Hello friends, I hope you all are doing great. Today, I am going to share the XIAO ESP32-S3 Library for Proteus. The XIAO ESP32S3 from Seeed Studio is one of the most popular small IoT boards you can buy: an ESP32-S3 dual-core chip, 8 MB of PSRAM, Wi-Fi and Bluetooth LE, USB-C and a battery charger on a board the size of a thumbnail - 21 x 17.8 mm. With this library it runs your ESP32-S3 Arduino sketch in Proteus 8.5 and joins our virtual Wi-Fi network.
XIAO ESP32-S3 Library for Proteus
Latest version: V1.0 (November 2026, this tutorial)
Other ESP32 boards and modules: ESP32 DevKit V1 · ESP32-DevKitC V4 · ESP32-S3 DevKitC-1 · ESP32-C3 SuperMini · ESP32-C6 DevKitC-1 · TTGO T-Display · T-Display S3 · XIAO ESP32-C3 · ESP32 Feather V2 · QT Py ESP32-S3 · ESP32-C5 DevKitC-1 · Olimex ESP32-POE · FireBeetle 2 ESP32-E · T-Call SIM800L · T-SIM7600 · T-Beam Supreme · M5StickC PLUS2 · ESP32-2432S028 CYD · M5Stack AtomS3 · M5Stack Core2 · LilyGO T-Deck · LOLIN S2 Mini · Heltec WiFi LoRa 32 V3 · LilyGO T-Beam · ESP32-CAM · ESP32-WROOM-32 · AirLift WiFi Shield · AirLift ESP32 Breakout · WT32-ETH01
Infrared sensors: IR Obstacle FC-51 · IR Proximity · IR Tracker · Sharp IR · IR Remote
Other displays: OLED · Nokia 5110 · LCD 128x64 · ST7735 · ST7789 · ILI9341 · TFT Shield 2.4 inch · TFT Shield 3.5 inch · E-Paper
Helping Tools
- Laptop WiFi Monitor: a laptop on the Wi-Fi of your design: a browser, a TCP / UDP terminal and ping
- Mobile WiFi Monitor: a smartphone that opens the pages of your board and sends it commands
- Serial Monitor Advance: a serial terminal window for the UART of your board
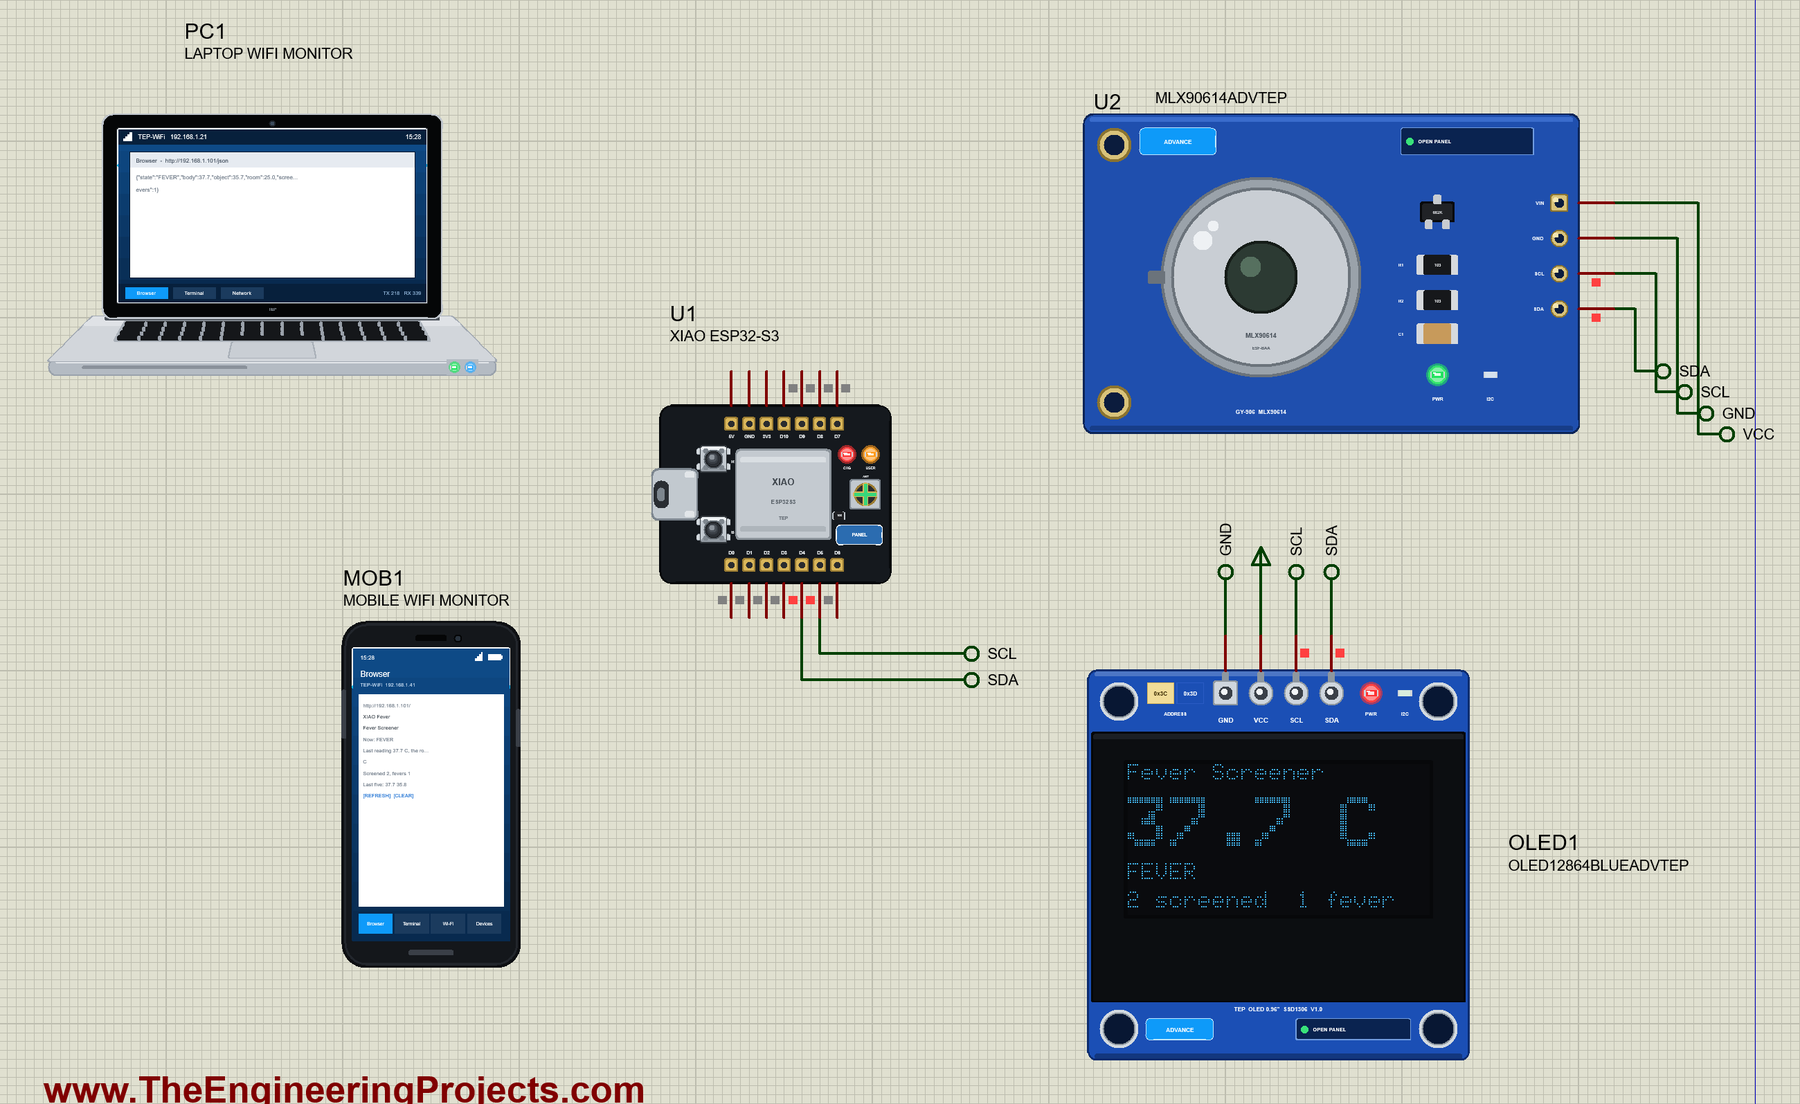
For the demo we built something every airport and hospital door has needed: a non-contact fever screener. An MLX90614 infra-red thermometer reads the forehead without touching it, an OLED shows the result, the board's own orange LED warns of a fever, and a phone and a laptop follow the count of people screened on the board's web page.
NOTICE: Proteus has no ESP32-S3 model, so our team has put a lot of effort into building this board ourselves: the XIAO's pins, LEDs, buttons and Wi-Fi are all our own model, and your sketch compiles with our free TEP Boards for Proteus add-on. Your feedback is the fuel that keeps us going, so please tell us what you think in the comments below or in the XIAO ESP32-S3 board of our forum. And if our free libraries help you, you can buy us a coffee. So, let's get started with the XIAO ESP32-S3 Library for Proteus:
What is the XIAO ESP32-S3?
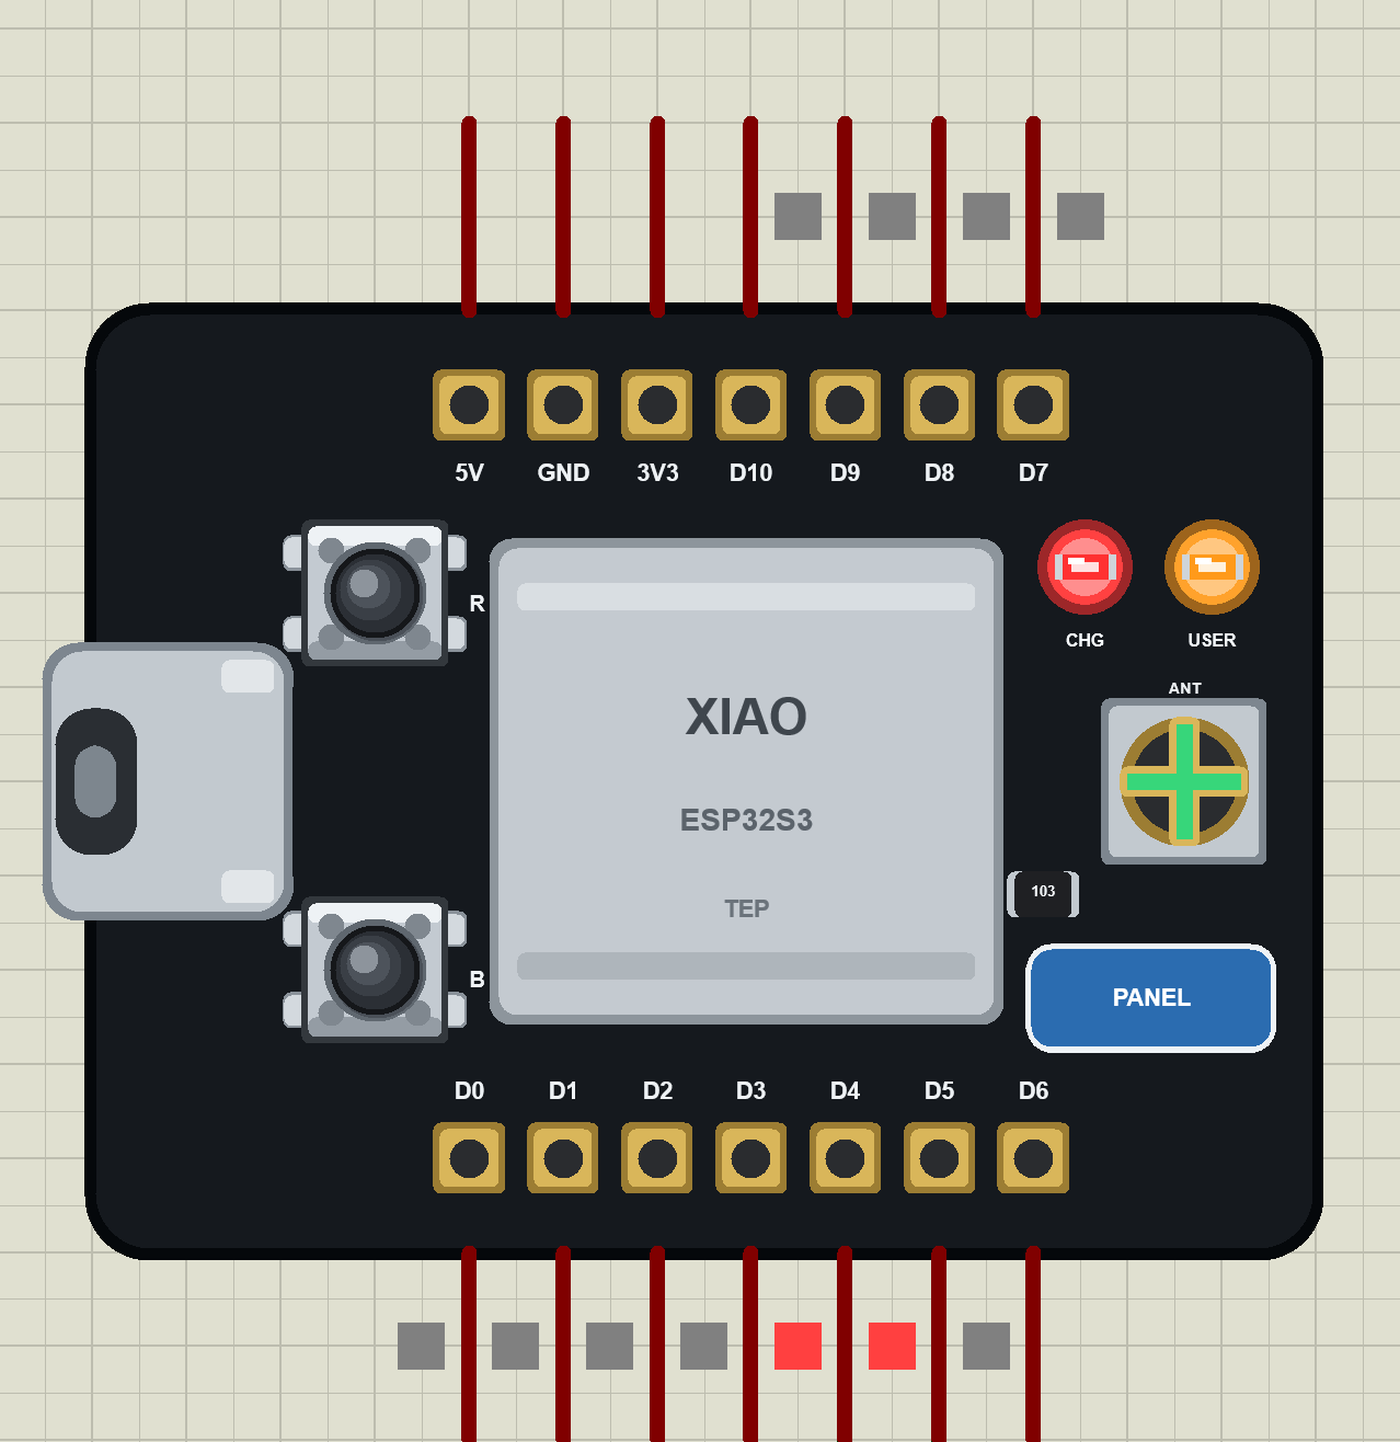
XIAO is Seeed Studio's family of tiny boards, all with the same 21 x 17.8 mm footprint and the same 14 pins, each with a different chip. The XIAO ESP32S3 carries Espressif's ESP32-S3: two Xtensa LX7 cores at 240 MHz with vector instructions for machine learning, 8 MB of PSRAM, 8 MB of flash, Wi-Fi 4 and Bluetooth 5 LE. The chip sits under a metal shield, the antenna is an external one on a U.FL connector, and the board has a LiPo charger with pads on the back, USB-C, two tiny buttons - B (BOOT) and R (RESET) - a red charge LED and an orange user LED. The 14 pins are castellated, so the board can be soldered flat onto another PCB.
| XIAO ESP32-S3 | XIAO ESP32-C3 | |
|---|---|---|
| Chip | ESP32-S3, two Xtensa cores at 240 MHz | ESP32-C3, one RISC-V core at 160 MHz |
| Memory | 8 MB PSRAM, 8 MB flash | 400 KB RAM, 4 MB flash |
| Size | 21 x 17.8 mm | 21 x 17.8 mm |
| Pins | 2 x 7 (11 GPIOs), castellated | 2 x 7 (11 GPIOs), castellated |
| Analog pins | A0 to A5, A8 to A10 | A0 to A3 |
| LEDs | charge LED and a user LED | charge LED only |
| USB | native USB: Serial on the USB-C port | native USB as well |
Our XIAO ESP32-C3 Library for Proteus is the smaller brother of this board; the pins are in the same places and have the same names, so a sketch moves from one to the other with almost no change.
Why the XIAO ESP32-S3?
Pick the XIAO ESP32-S3 when you need real computing power in a tiny space. The PSRAM and the vector instructions make it a favourite for TinyML, voice commands and small camera projects (the Sense version adds a camera and a microphone on a clip-on board), while the LiPo charger, the external antenna and the castellated pins make it just as good as the brain of a battery-powered sensor tag. Because Seeed's D0 to D10 names stay the same across the whole family, you can start a design with a cheap XIAO and move up when the sketch outgrows it.
Features of the XIAO ESP32-S3 Library for Proteus
- The board as it looks: the black XIAO with its castellated pins, USB-C, B and R, the shield, the CHG and USER LEDs and the U.FL connector, drawn at its real proportions.
- Your sketch: a .hex for "XIAO ESP32-S3 (TEP Proteus)" with Seeed's names - D0 to D10, A0 to A5, A8 to A10 - analogRead 0 to 4095, analogWrite and ledc PWM, attachInterrupt, Serial, Serial1 on D6 / D7, Wire on D4 / D5, SPI on D8 to D10.
- Wi-Fi: WiFi.begin, WebServer, HTTPClient, mDNS and NTP on our virtual router TEP-WiFi; the board is 192.168.1.101 in the demo.
- The LEDs and buttons work: LED_BUILTIN on GPIO21 lights the orange LED when LOW, the B button pulls GPIO0 LOW, R resets the board.
- The panel and the serial monitor: the board's panel (Wi-Fi, Pins, Test) and the built-in serial monitor with Monitor, Plotter and Board tabs - our TEP header, no Windows title bar.
- A complete package: about 3.7 MB with the board, the add-on, the MLX90614, OLED and monitor libraries and the demo, without the source code of the models.
The XIAO ESP32-S3 in Proteus
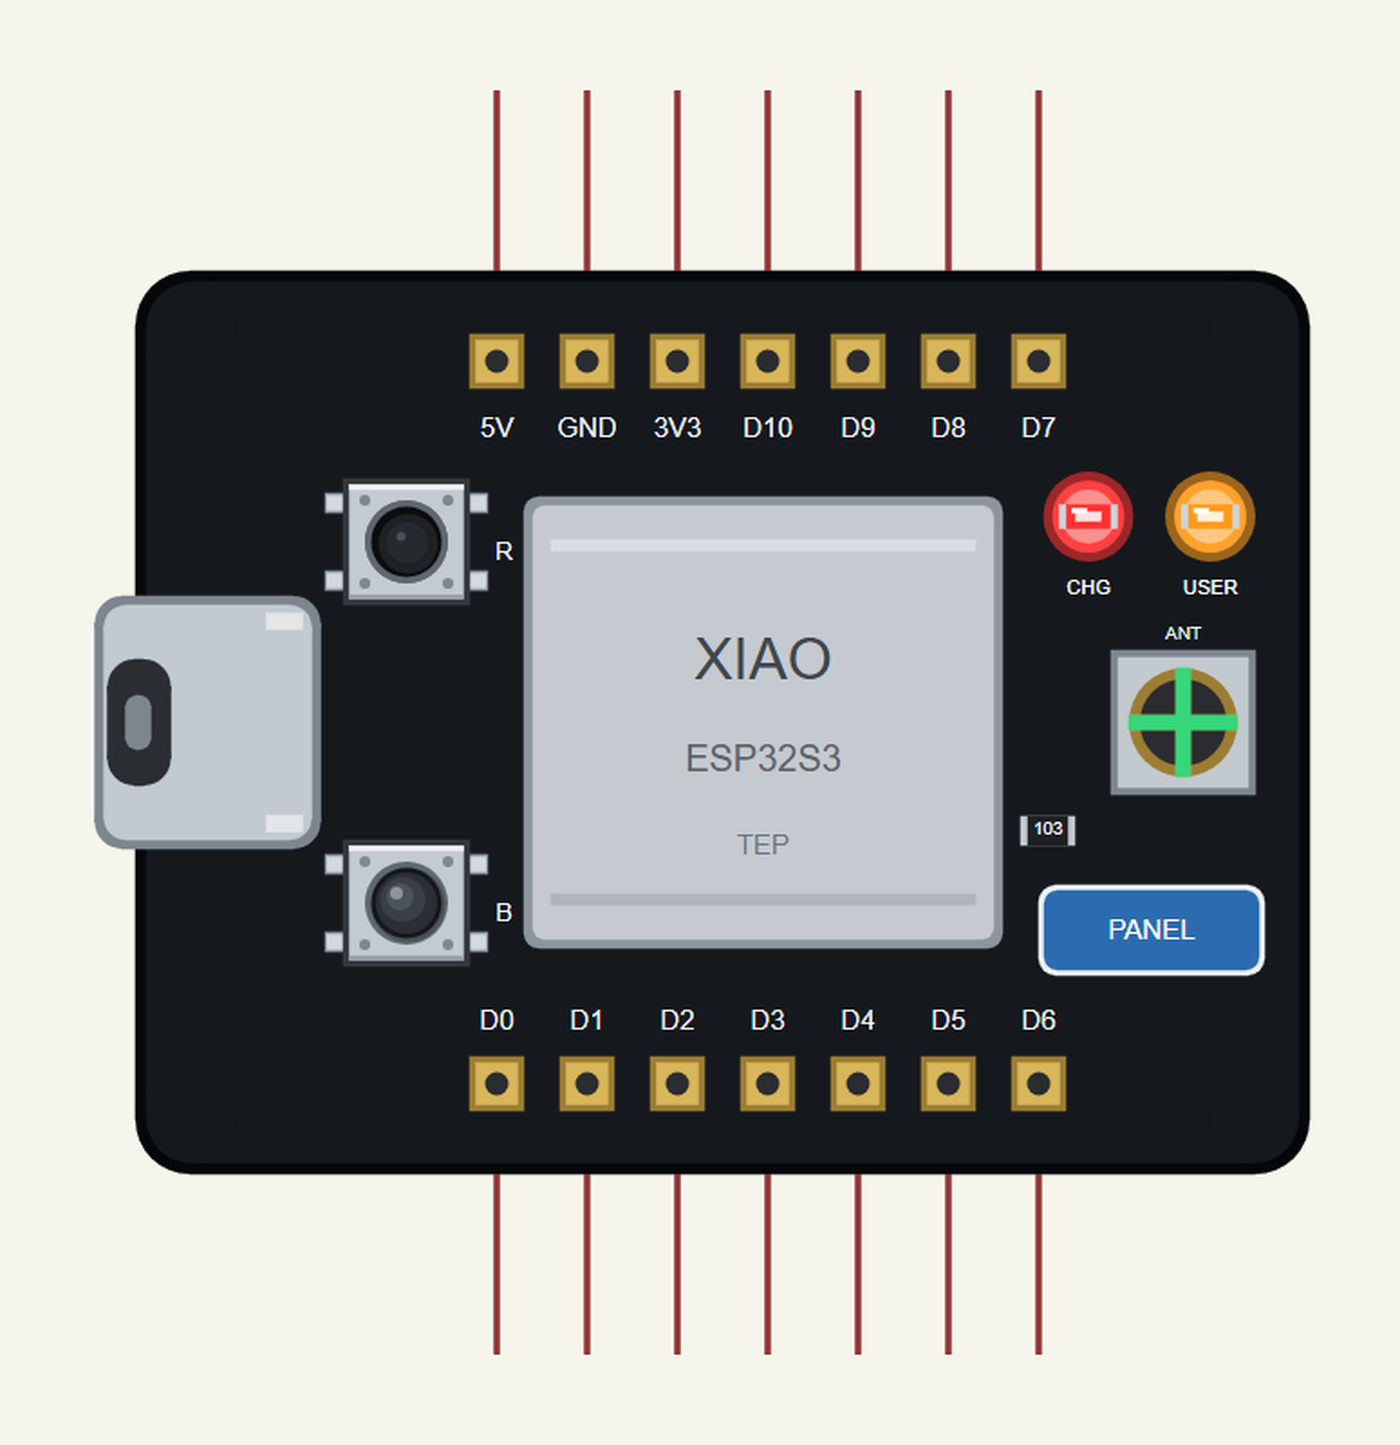
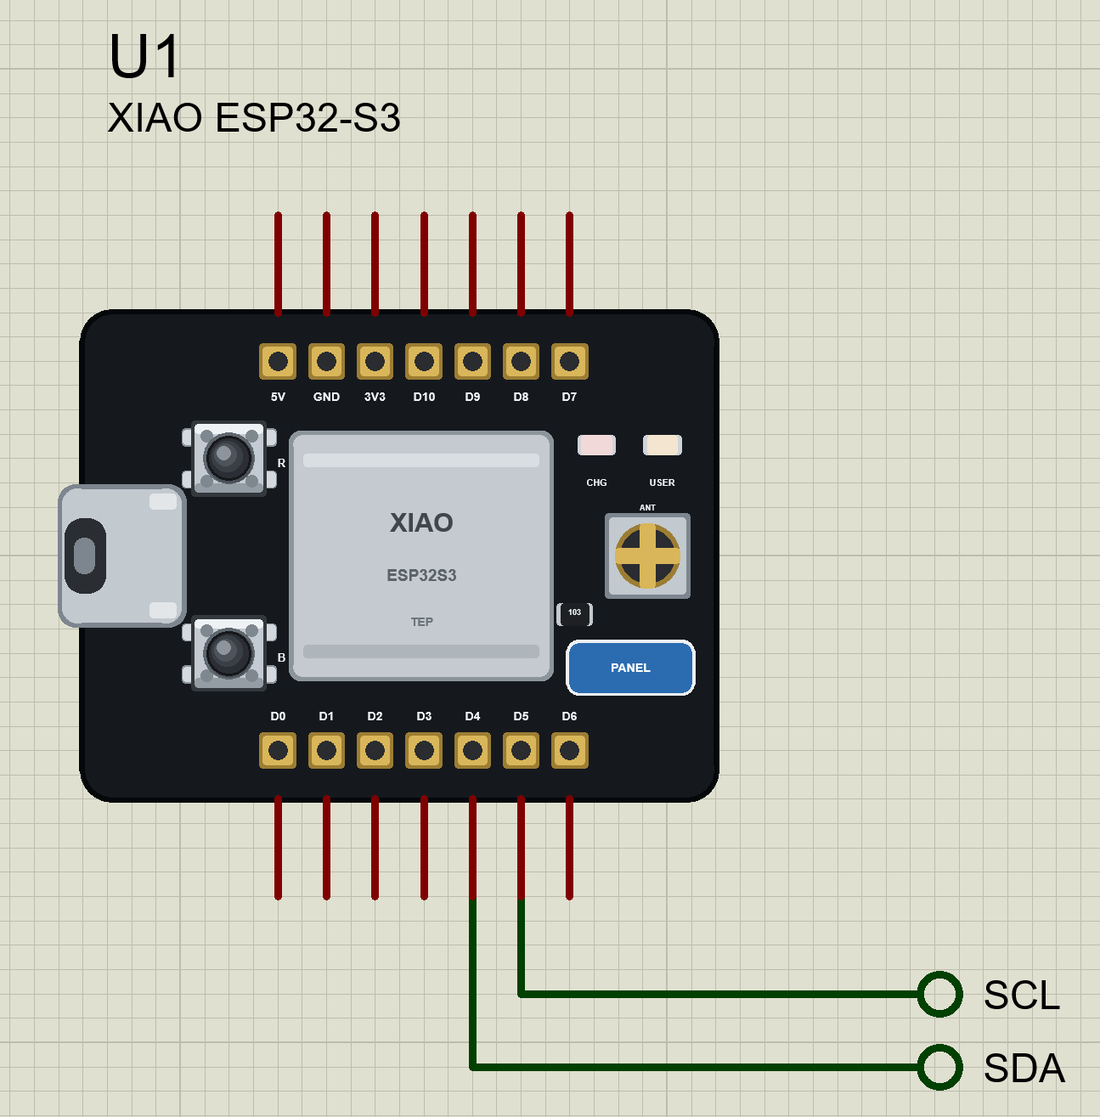
Search XIAO in Pick Devices; the device XIAO ESP32-S3 is in TEPXIAOS3.LIB (Microprocessor ICs, ESP32 Boards), with the prefix U. The board lies with the USB-C port on the left. Click the USB-C port to open the serial monitor and the PANEL pad (or the shield) to open the board's panel. One XIAO ESP32-S3 can be placed in a design.
The Pins
| Pins | GPIO | What the library does with them |
|---|---|---|
| D0 to D3 | 1 to 4 | GPIO, analogRead (A0 to A3), PWM, interrupt |
| D4 / D5 | 5 / 6 | Wire SDA / SCL, also A4 / A5 |
| D6 / D7 | 43 / 44 | Serial1 TX / RX |
| D8 / D9 / D10 | 7 / 8 / 9 | SPI SCK / MISO / MOSI, also A8 to A10 |
| 3V3, 5V, GND | - | 3.3 V, 5 V, ground |
| On the board | 0 and 21 | the B button (LOW when pressed), the USER LED (lit when LOW) |
As on the real board, Serial is the USB port, which in Proteus means the built-in serial monitor, and the D6 / D7 pins stay free for a GPS, a GSM module or anything else that speaks UART.
Download XIAO ESP32-S3 Library for Proteus
Click the button below to download XIAO-ESP32-S3-Library-for-Proteus-v1.0.zip (about 3.7 MB, without the source code of the models):
XIAO ESP32-S3 Library for Proteus V1.0- README.txt: installation, the demo, the pins, the properties, troubleshooting and the limits.
- Proteus Library Files:
TEPXIAOS3.LIBand the demo's parts:TEPMLX90614.LIB,TEPOLED12864.LIB,TEPLAPTOP.LIBandTEPMOBILE.LIB. - Proteus Model Files:
TEPNET.DLL(the board, the laptop, the phone and the network),TEPMLX90614.DLLandTEPOLED.DLL. - Arduino Code: the demo sketch and the TEP Boards for Proteus add-on 1.39.0.
- Proteus Simulation: the demo project, its HEX file and copies of the DLLs.
No Proteus yet? Read How to Download and Install Proteus 7 and 8. New to libraries? Follow How to Install a New Library in Proteus.
How to Install XIAO ESP32-S3 Library for Proteus
- Close Proteus and extract the whole zip file, for example to your Desktop.
- Copy the files from Proteus Library Files into the LIBRARY folder of Proteus.
- Copy the DLLs from Proteus Model Files into the MODELS folder, replacing an older TEPNET.DLL.
- Delete
TEPXIAOS3.IDXfrom the LIBRARY folder if it is there. - For your own sketches, copy Arduino Code\TEP Boards for Proteus\hardware into your Arduino sketchbook (Documents\Arduino) and restart the Arduino IDE; the board is XIAO ESP32-S3 (TEP Proteus). Install Adafruit MLX90614, Adafruit SSD1306, Adafruit GFX and Adafruit BusIO from the Library Manager.
- Start Proteus, press P and search for XIAO.
Demo: a Non-Contact Fever Screener
Fever is the first sign of many infections, and at a door the check has to be quick, hands-free and safe for the person doing it. A non-contact screener measures a forehead in a second without touching it, shows the result to the person, and keeps a count for the staff. It needs an infra-red sensor, a small display, a processor and a radio, which is exactly what a XIAO with two I2C modules gives you. This is a demo of the idea and not a medical device; real screening equipment is calibrated and certified.
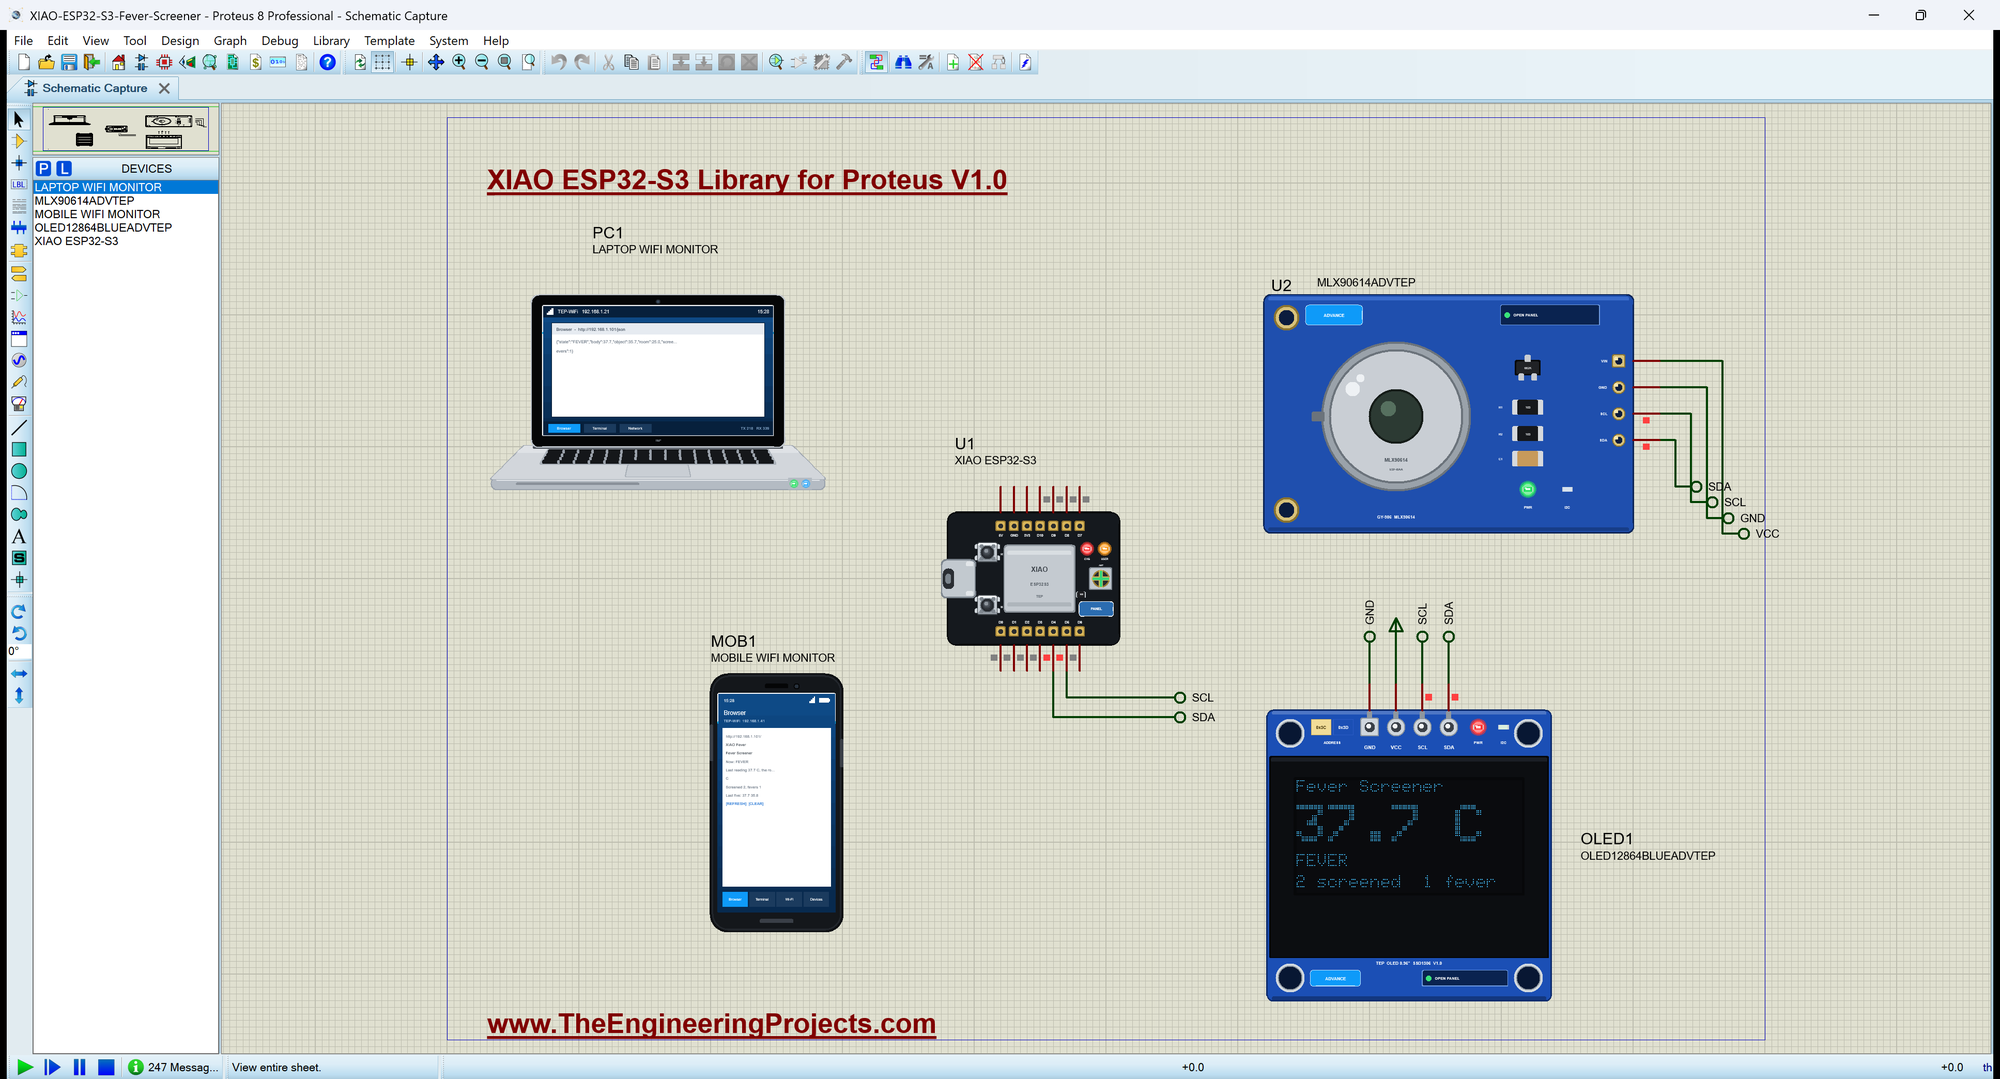
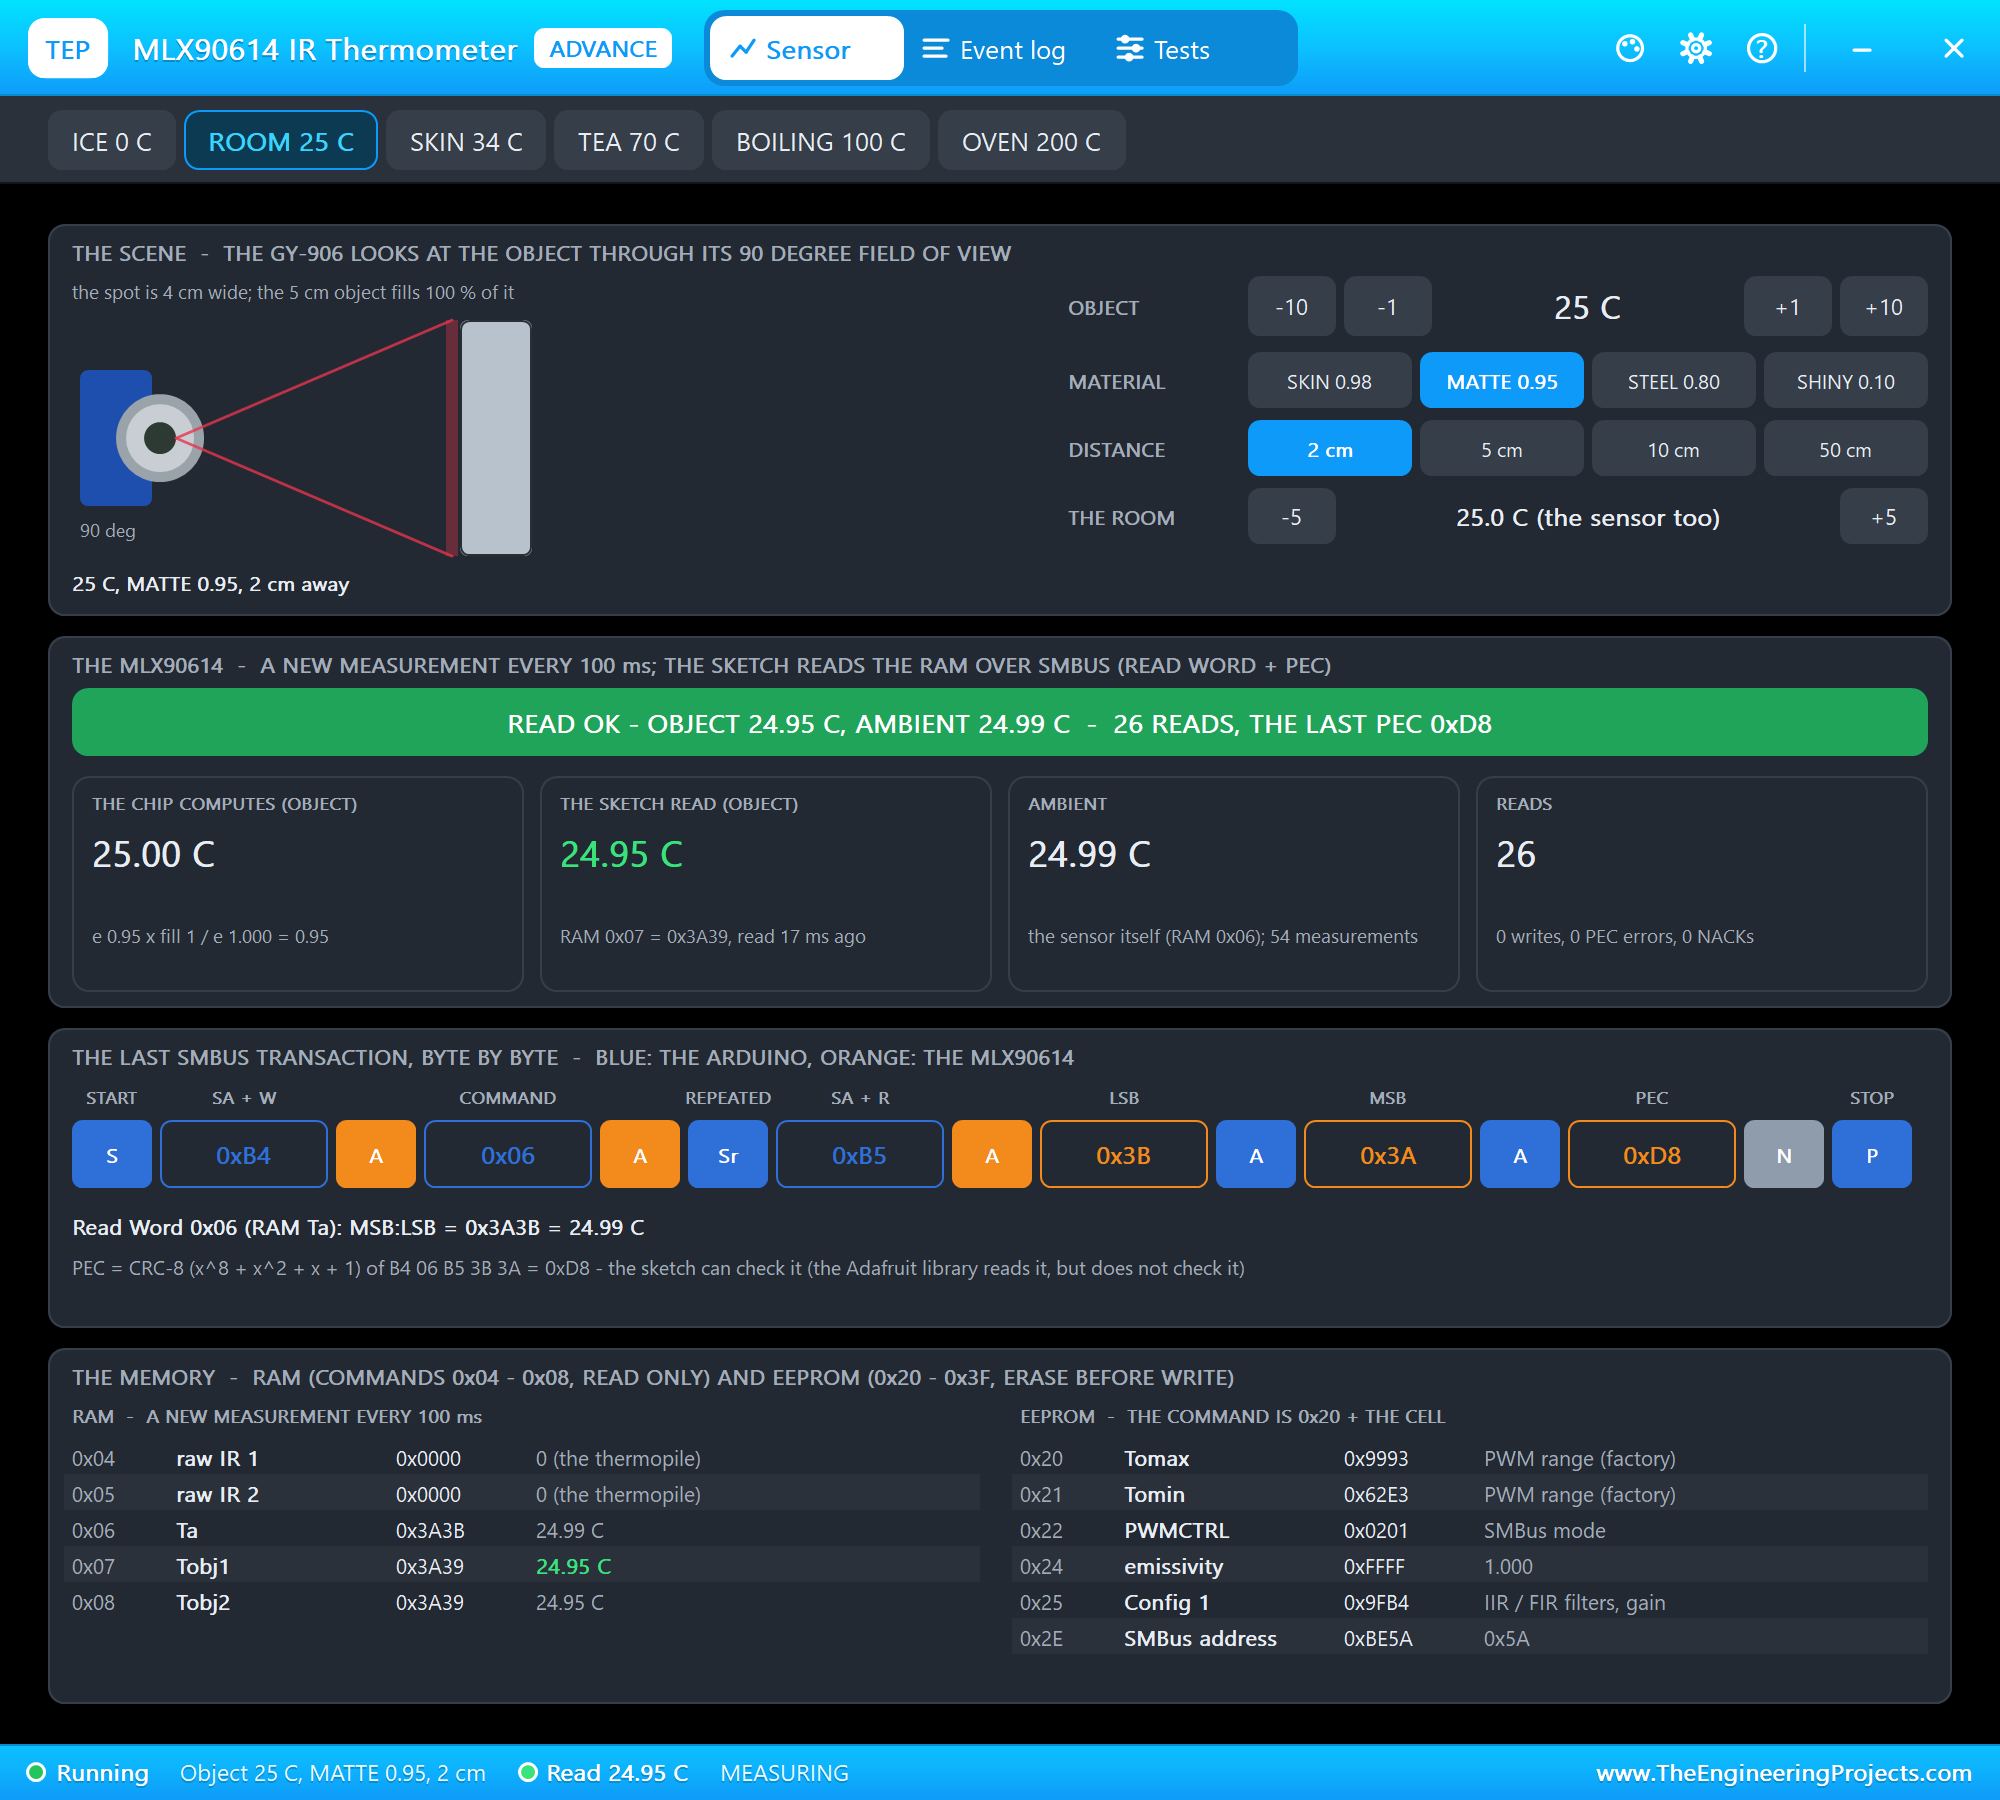
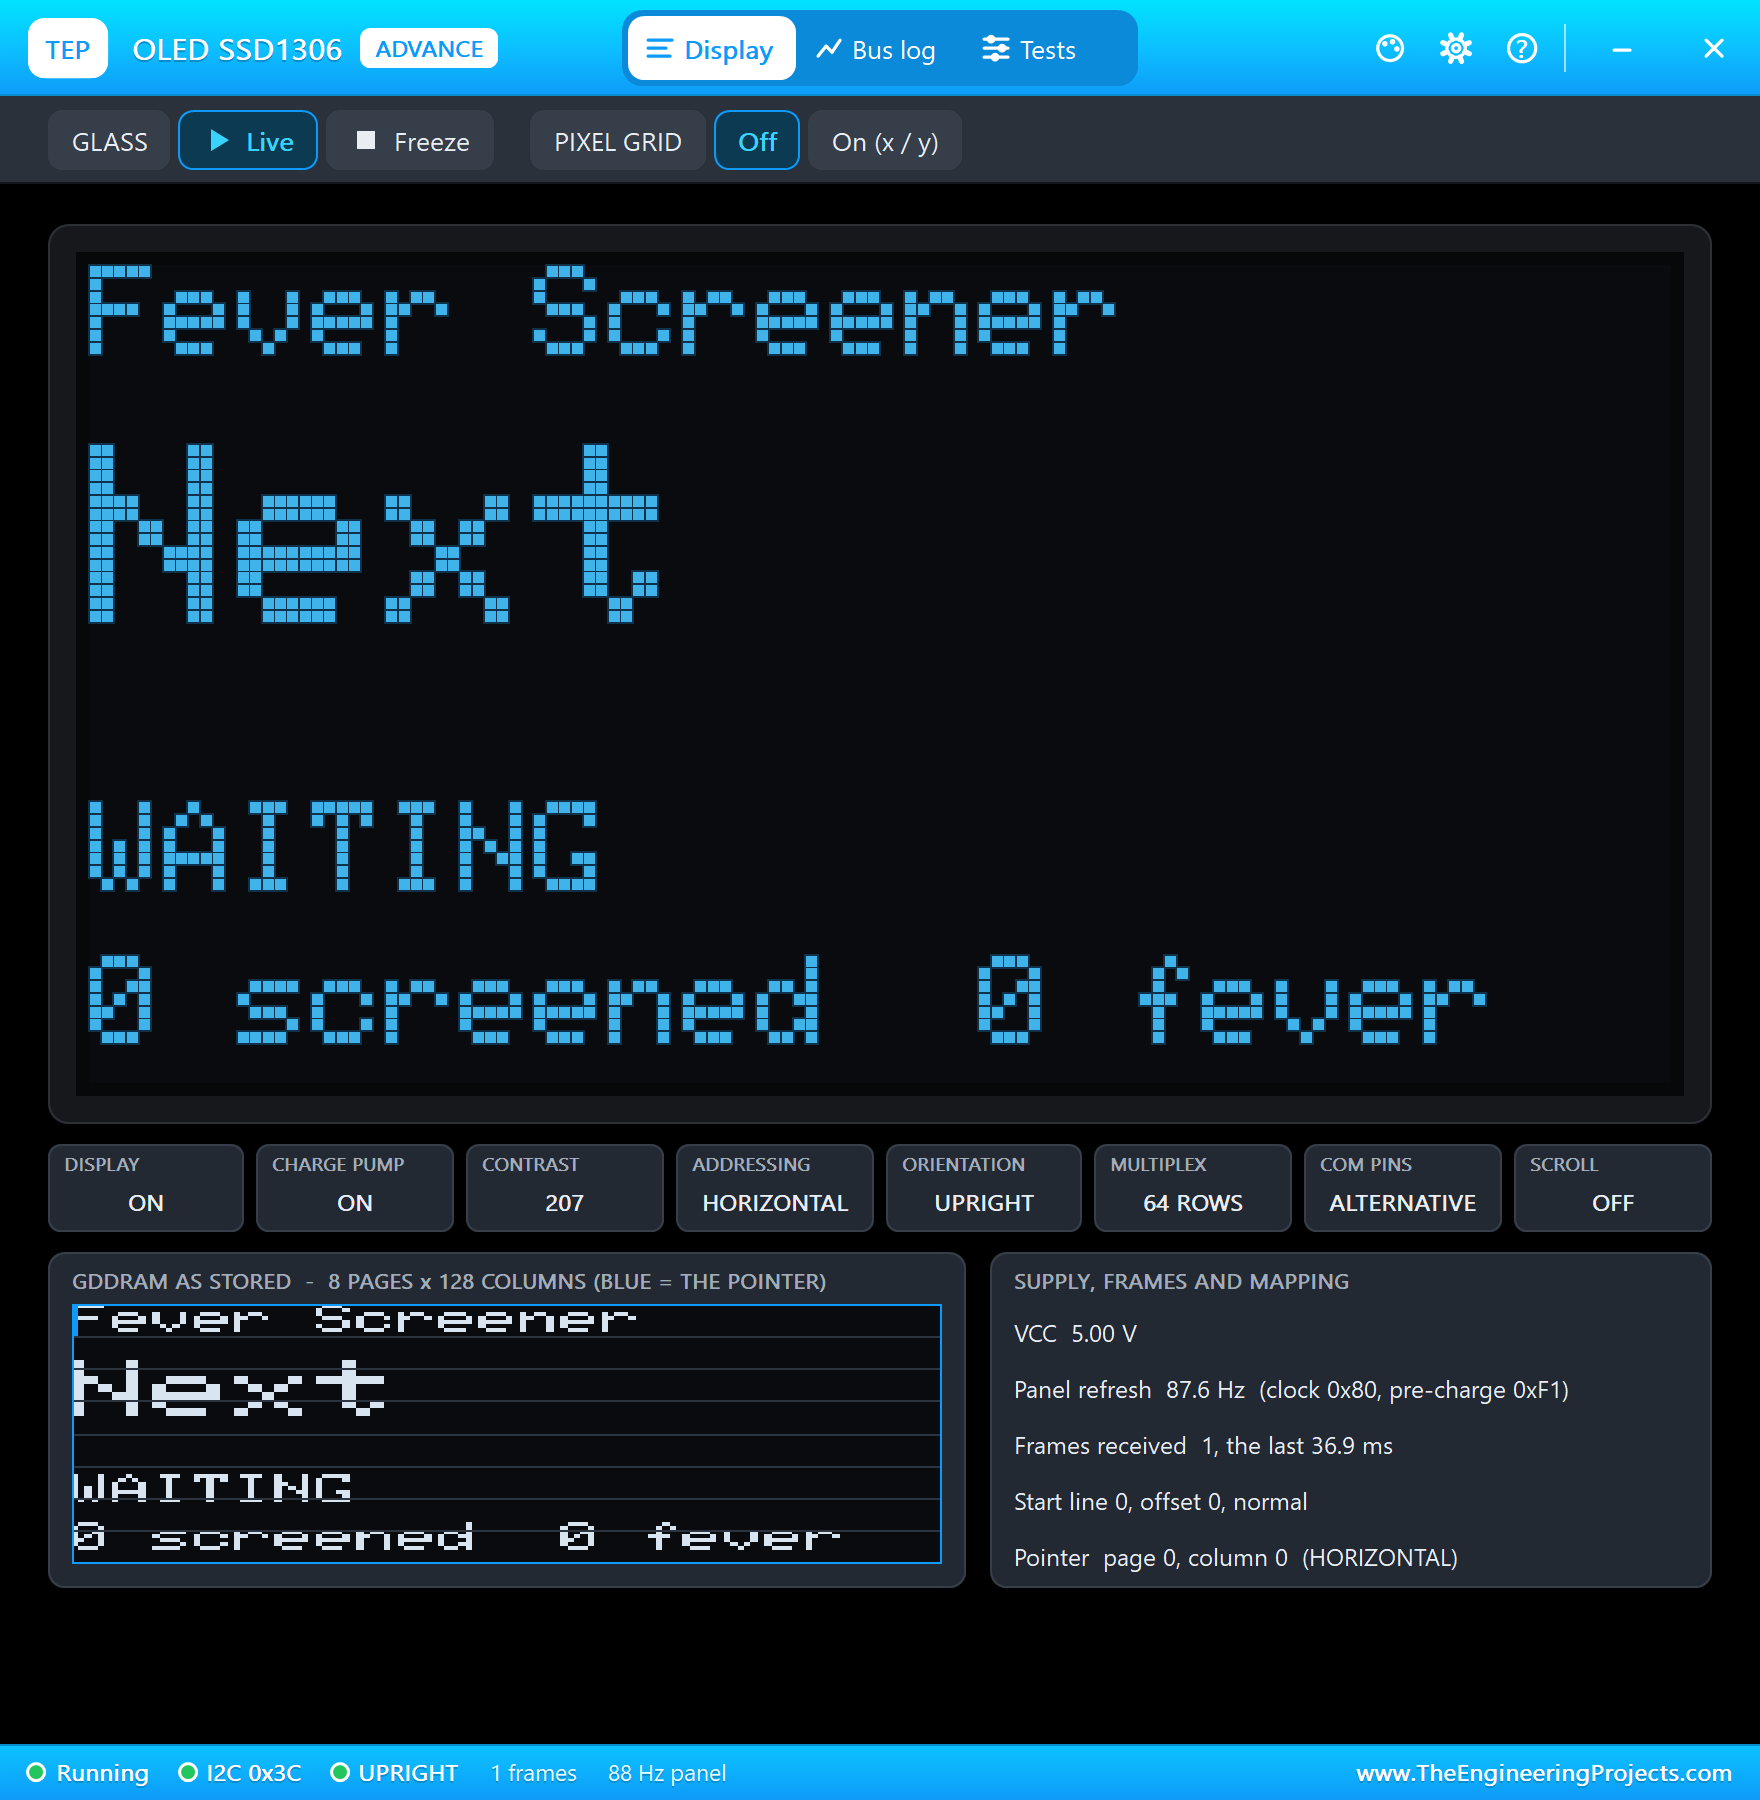
Open XIAO-ESP32-S3-Fever-Screener.pdsprj. U1 runs XIAOS3_Fever_Screener.hex. U2 is the GY-906 MLX90614 from our MLX90614 IR Thermometer Library for Proteus and OLED1 the 0.96 inch display from our OLED SSD1306 Library for Proteus - both in the Advance version: they open their pop-up windows at Run, with the object's temperature to set and the display's glass to read. PC1 is the Laptop WiFi Monitor and MOB1 the Mobile WiFi Monitor.
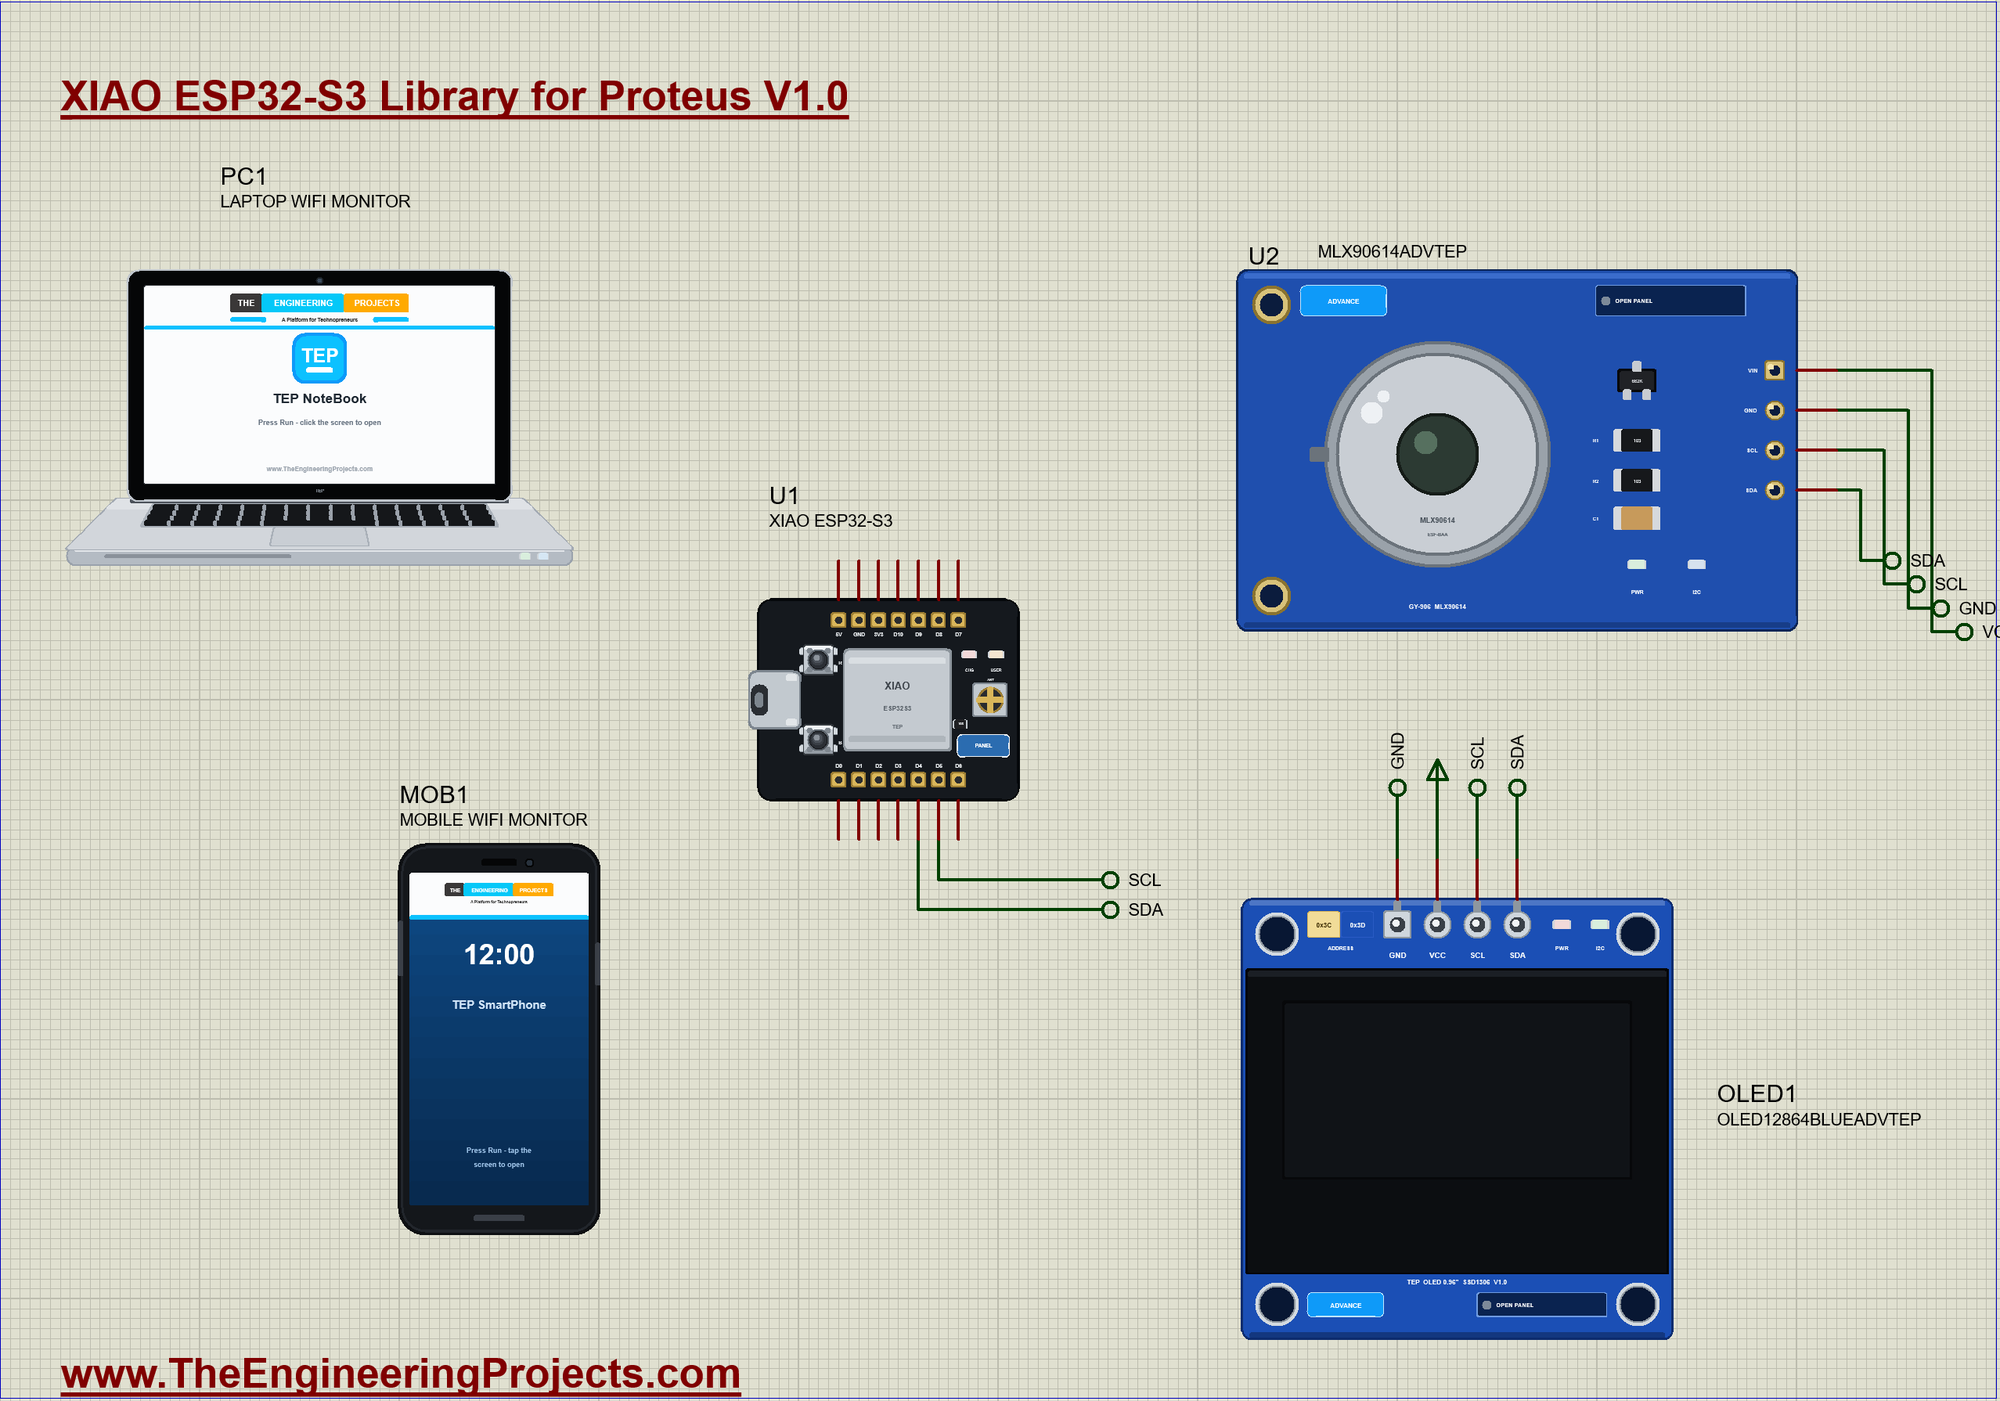
| Module pin | Net label | XIAO pin | What it does |
|---|---|---|---|
| MLX90614 SDA, SCL | SDA, SCL | D4, D5 | I2C, the address 0x5A |
| OLED SDA, SCL | SDA, SCL | D4, D5 | I2C, the address 0x3C |
| VIN, VCC | VCC | 3V3 | the supply |
| GND | GND | GND | ground |
Two devices share one bus: I2C needs only the two wires, and each module answers to its own address. That is why the tiny XIAO has pins to spare, even with a sensor and a display attached.
How an Infra-Red Thermometer Works
Everything warmer than absolute zero gives off infra-red light, and the warmer it is the more it gives off. The MLX90614 has a thermopile behind its filter window: a tiny stack of junctions that warms up by a few thousandths of a degree from the light falling on it. Its own chip compares that with the temperature of the sensor itself and computes the object's temperature, and your sketch simply reads the result over I2C. Two numbers matter when you use one. The emissivity tells how well a surface radiates: human skin is 0.98, a matte object about 0.95, and shiny metal far less. The field of view of the GY-906 is 90 degrees, so the sensor sees a spot about as wide as twice its distance from the target - it has to sit close to the forehead, or it averages the forehead with the wall behind it.
Reading Steady Values
A person walking up to a sensor is not a steady target. So the sketch reads the object and the room four times a second, and treats anything warmer than 30 C as a forehead. It then waits for four readings in a row that agree within 0.3 C. A bigger jump means the person is still moving, so it throws the readings away and starts again:
void readSensor() {
  if (millis() < nextRead) return;
  nextRead = millis() + 250;
  objectC = mlx.readObjectTempC();
  ambientC = mlx.readAmbientTempC();
  bool present = objectC >= PRESENT_C;
  if (state == WAITING && present) { state = MEASURING; sum = 0; count = 0; verdict = "MEASURING"; redraw = true; }
  else if (state == MEASURING && !present) { state = WAITING; verdict = "WAITING"; redraw = true; }
  else if (state == RESULT && !present) { state = WAITING; verdict = "WAITING"; redraw = true; Serial.println(F("Next person please")); }
  if (state == MEASURING) {
    if (fabs(objectC - prevC) > STEADY_C) { sum = 0; count = 0; }
    sum += objectC;
    if (++count == SAMPLES) finishPerson();
  }
  prevC = objectC;
}
From Skin to Body Temperature
Your forehead is cooler than the inside of your body, by around two degrees in a room. Every forehead thermometer adds such an offset and this one is the constant OFFSET_C. After that the verdict is simple: 37.5 C and more is a fever, 39 C and more a high fever. The person is counted and the last five readings are kept for the web page:
void finishPerson() {
  bodyC = sum / SAMPLES + OFFSET_C;
  verdict = bodyC >= HIGH_FEVER_C ? "HIGH FEVER" : bodyC >= FEVER_C ? "FEVER" : "NORMAL";
  screened++;
  if (bodyC >= FEVER_C) fevers++;
  for (byte k = 4; k > 0; k--) last[k] = last[k - 1];
  last[0] = bodyC;
  state = RESULT;
  Serial.print(F(">> Person ")); Serial.print(screened); Serial.print(F(": ")); Serial.print(bodyC, 1);
  Serial.print(F(" C - ")); Serial.println(verdict);
  redraw = true;
}
Notice the state machine around it. WAITING, MEASURING and RESULT make sure one person is counted once: the sketch stays in RESULT until the sensor sees the room again, however long the person stands there.
The User LED and the B Button
The orange LED of the XIAO is wired between 3.3 V and GPIO21, so it lights when the pin is LOW - the opposite of what you might expect. The sketch keeps it on for a fever and blinks it for a high fever, without ever using delay(), because the web server must keep answering:
void driveLed() {                                           // the user LED is lit when LOW
  bool fever = state == RESULT && bodyC >= FEVER_C, high = state == RESULT && bodyC >= HIGH_FEVER_C;
  if (high && millis() >= nextBlink) { nextBlink = millis() + 250; blinkOn = !blinkOn; }
  digitalWrite(LED_BUILTIN, (high ? blinkOn : fever) ? LOW : HIGH);
}
The B button sits on GPIO0, the boot pin. After the board has started it is a normal input, so the sketch uses it to clear the counts at the end of a shift. GPIO0 has a pull-up, so a press reads LOW.
The OLED
The display shows only what the person in front of it needs: the temperature in big digits, the verdict and the two counts. Printing to a whole 128 x 64 screen takes a while over I2C, so the sketch redraws only when something has changed:
void showOled() {
  oled.clearDisplay();
  oled.setTextColor(SSD1306_WHITE);
  oled.setTextSize(1);
  oled.setCursor(0, 0);
  oled.print(F("Fever Screener"));
  oled.setCursor(0, 54);
  oled.print(screened); oled.print(F(" screened  ")); oled.print(fevers); oled.print(F(" fever"));
  oled.setCursor(0, 14);
  oled.setTextSize(state == RESULT ? 3 : 2);
  if (state == RESULT) { oled.print(bodyC, 1); oled.print(F(" C")); }
  else oled.print(state == MEASURING ? F("Hold...") : F("Next"));
  oled.setTextSize(1);
  oled.setCursor(0, 42);
  oled.print(verdict);
  oled.display();
  redraw = false;
}
The Web Page
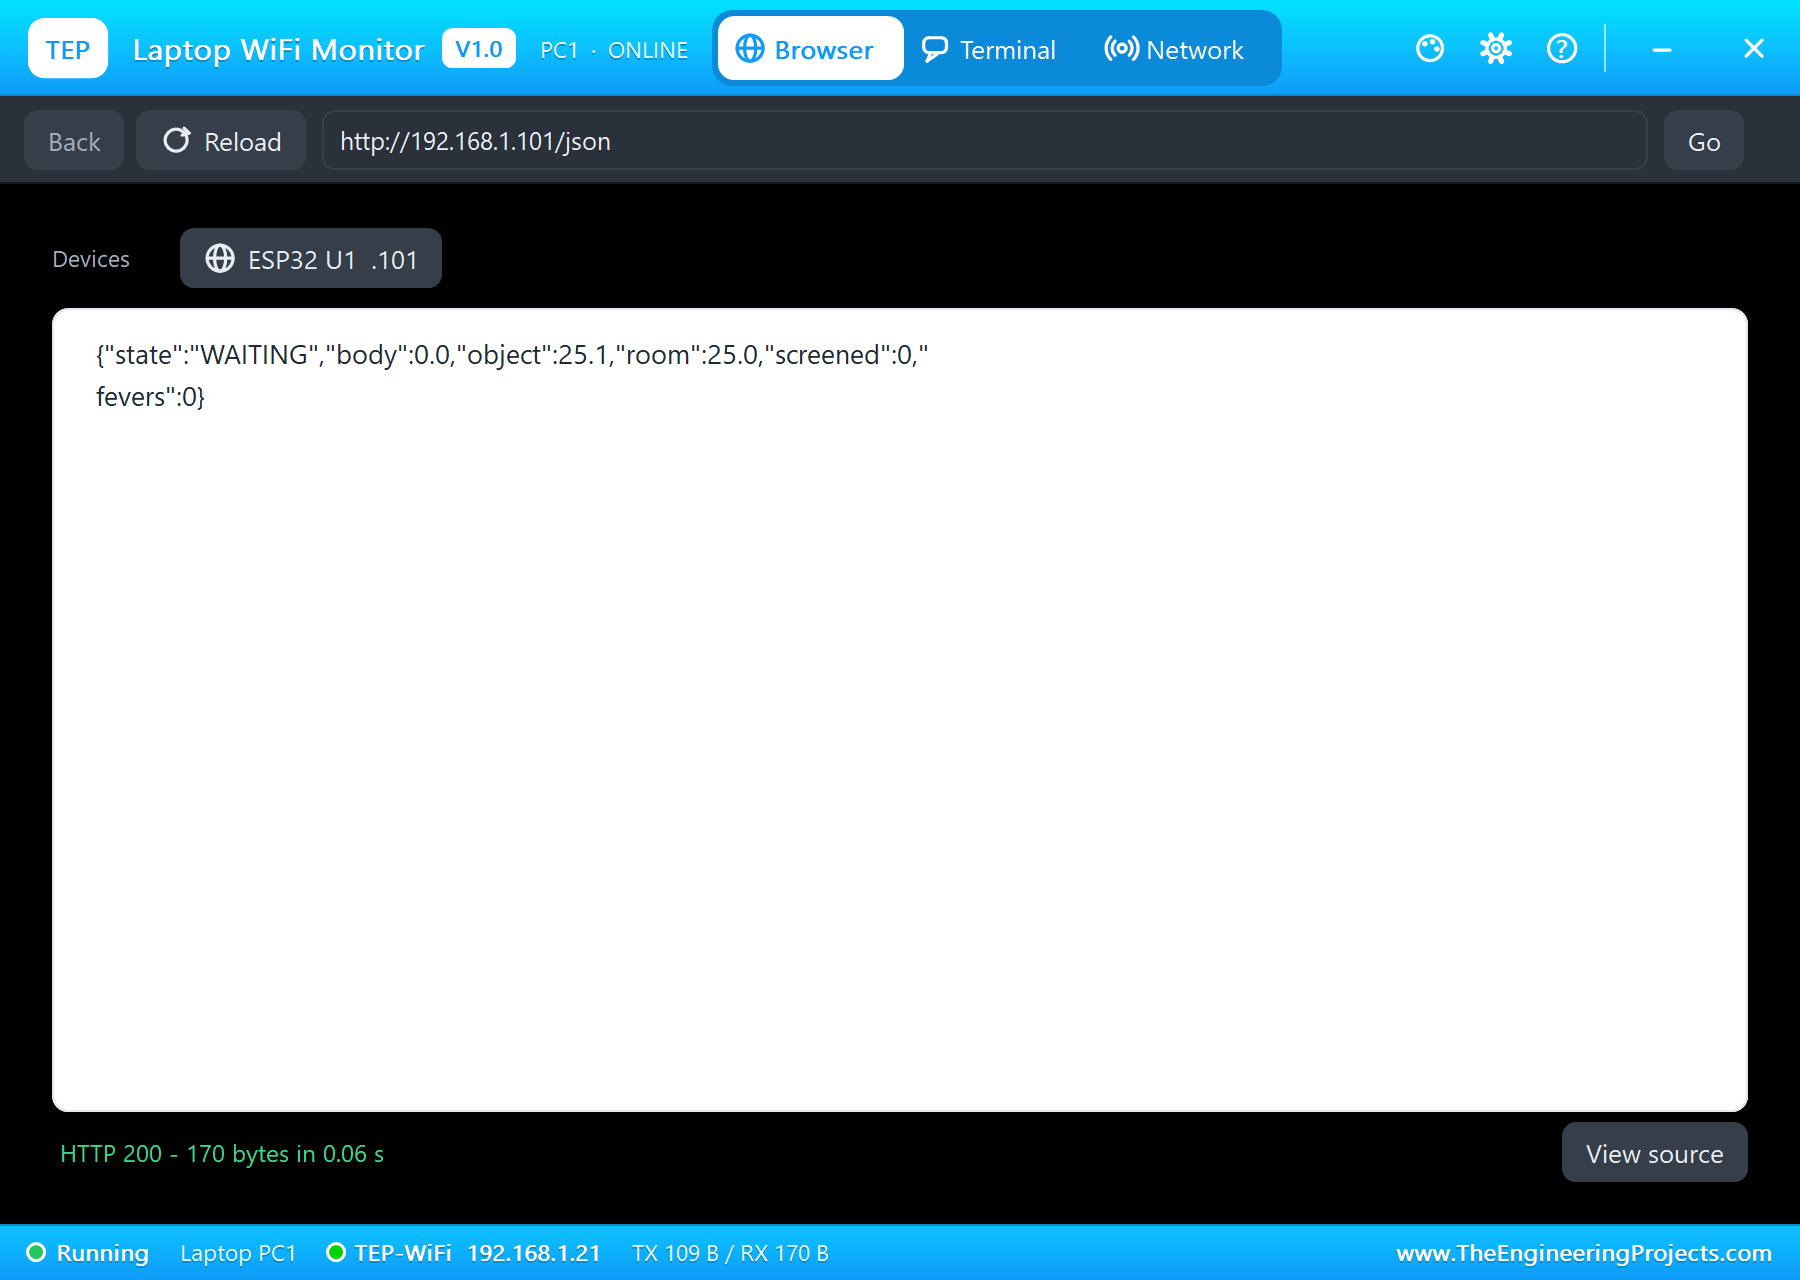
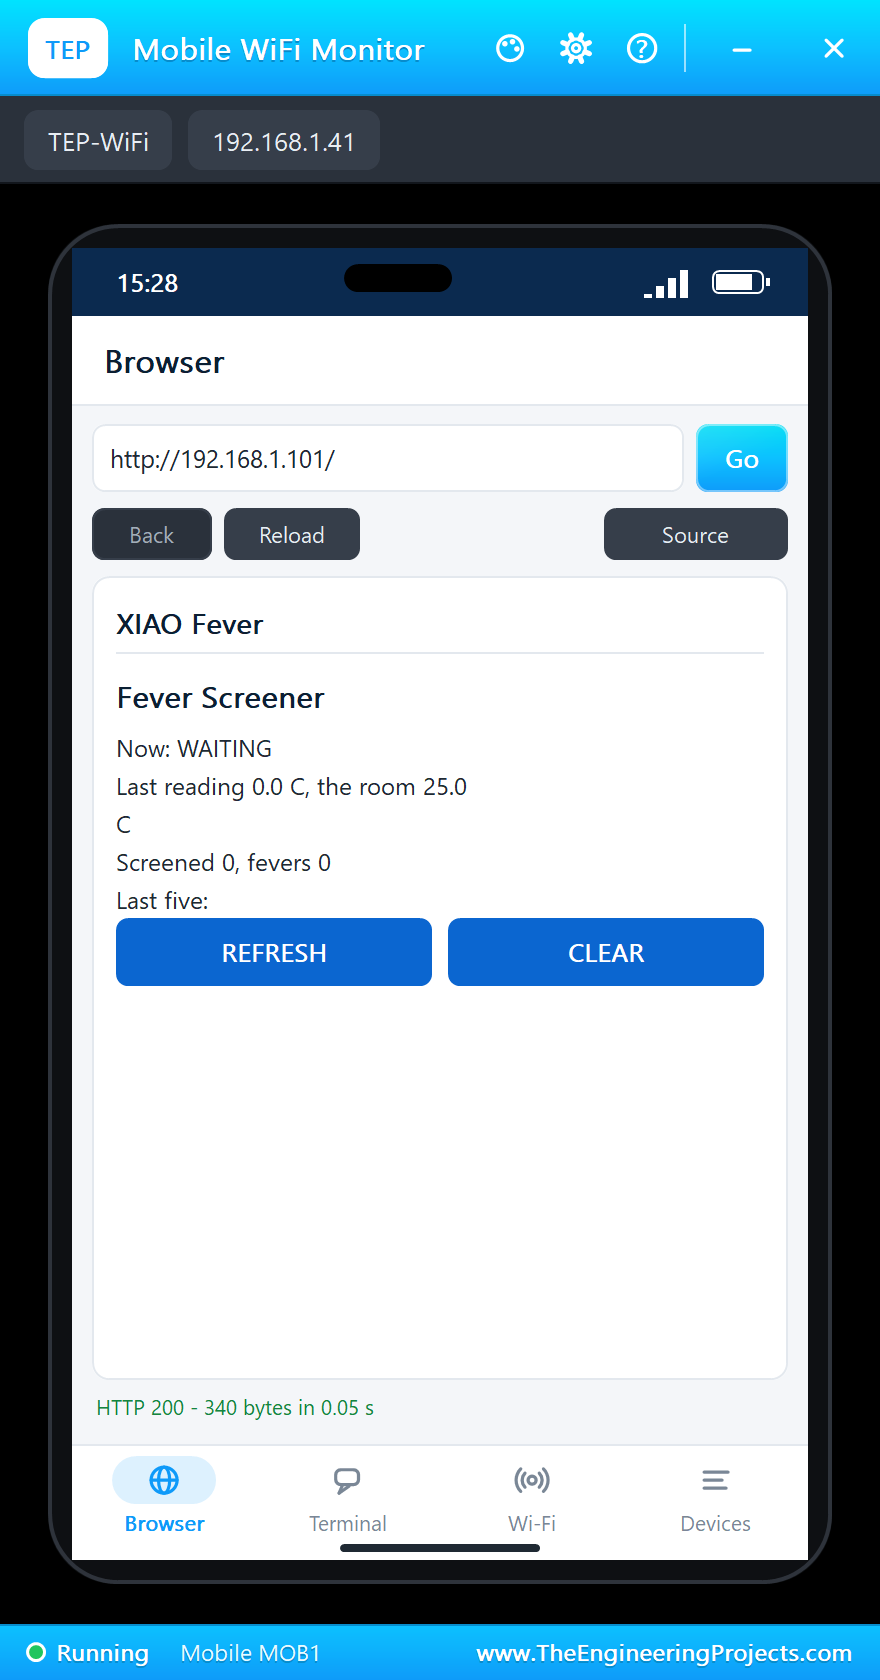
The page at the board's address gives the staff the same facts from anywhere on the network, with REFRESH and CLEAR buttons, and /json gives a computer the numbers without the HTML, so that a dashboard can collect the readings of several doors:
void handleJson() {
  String j = "{\"state\":\"" + String(verdict) + "\",\"body\":" + String(bodyC, 1) + ",\"object\":" + String(objectC, 1);
  j += ",\"room\":" + String(ambientC, 1) + ",\"screened\":" + String(screened) + ",\"fevers\":" + String(fevers) + "}";
  server.send(200, "application/json", j);
}
Run the Demo
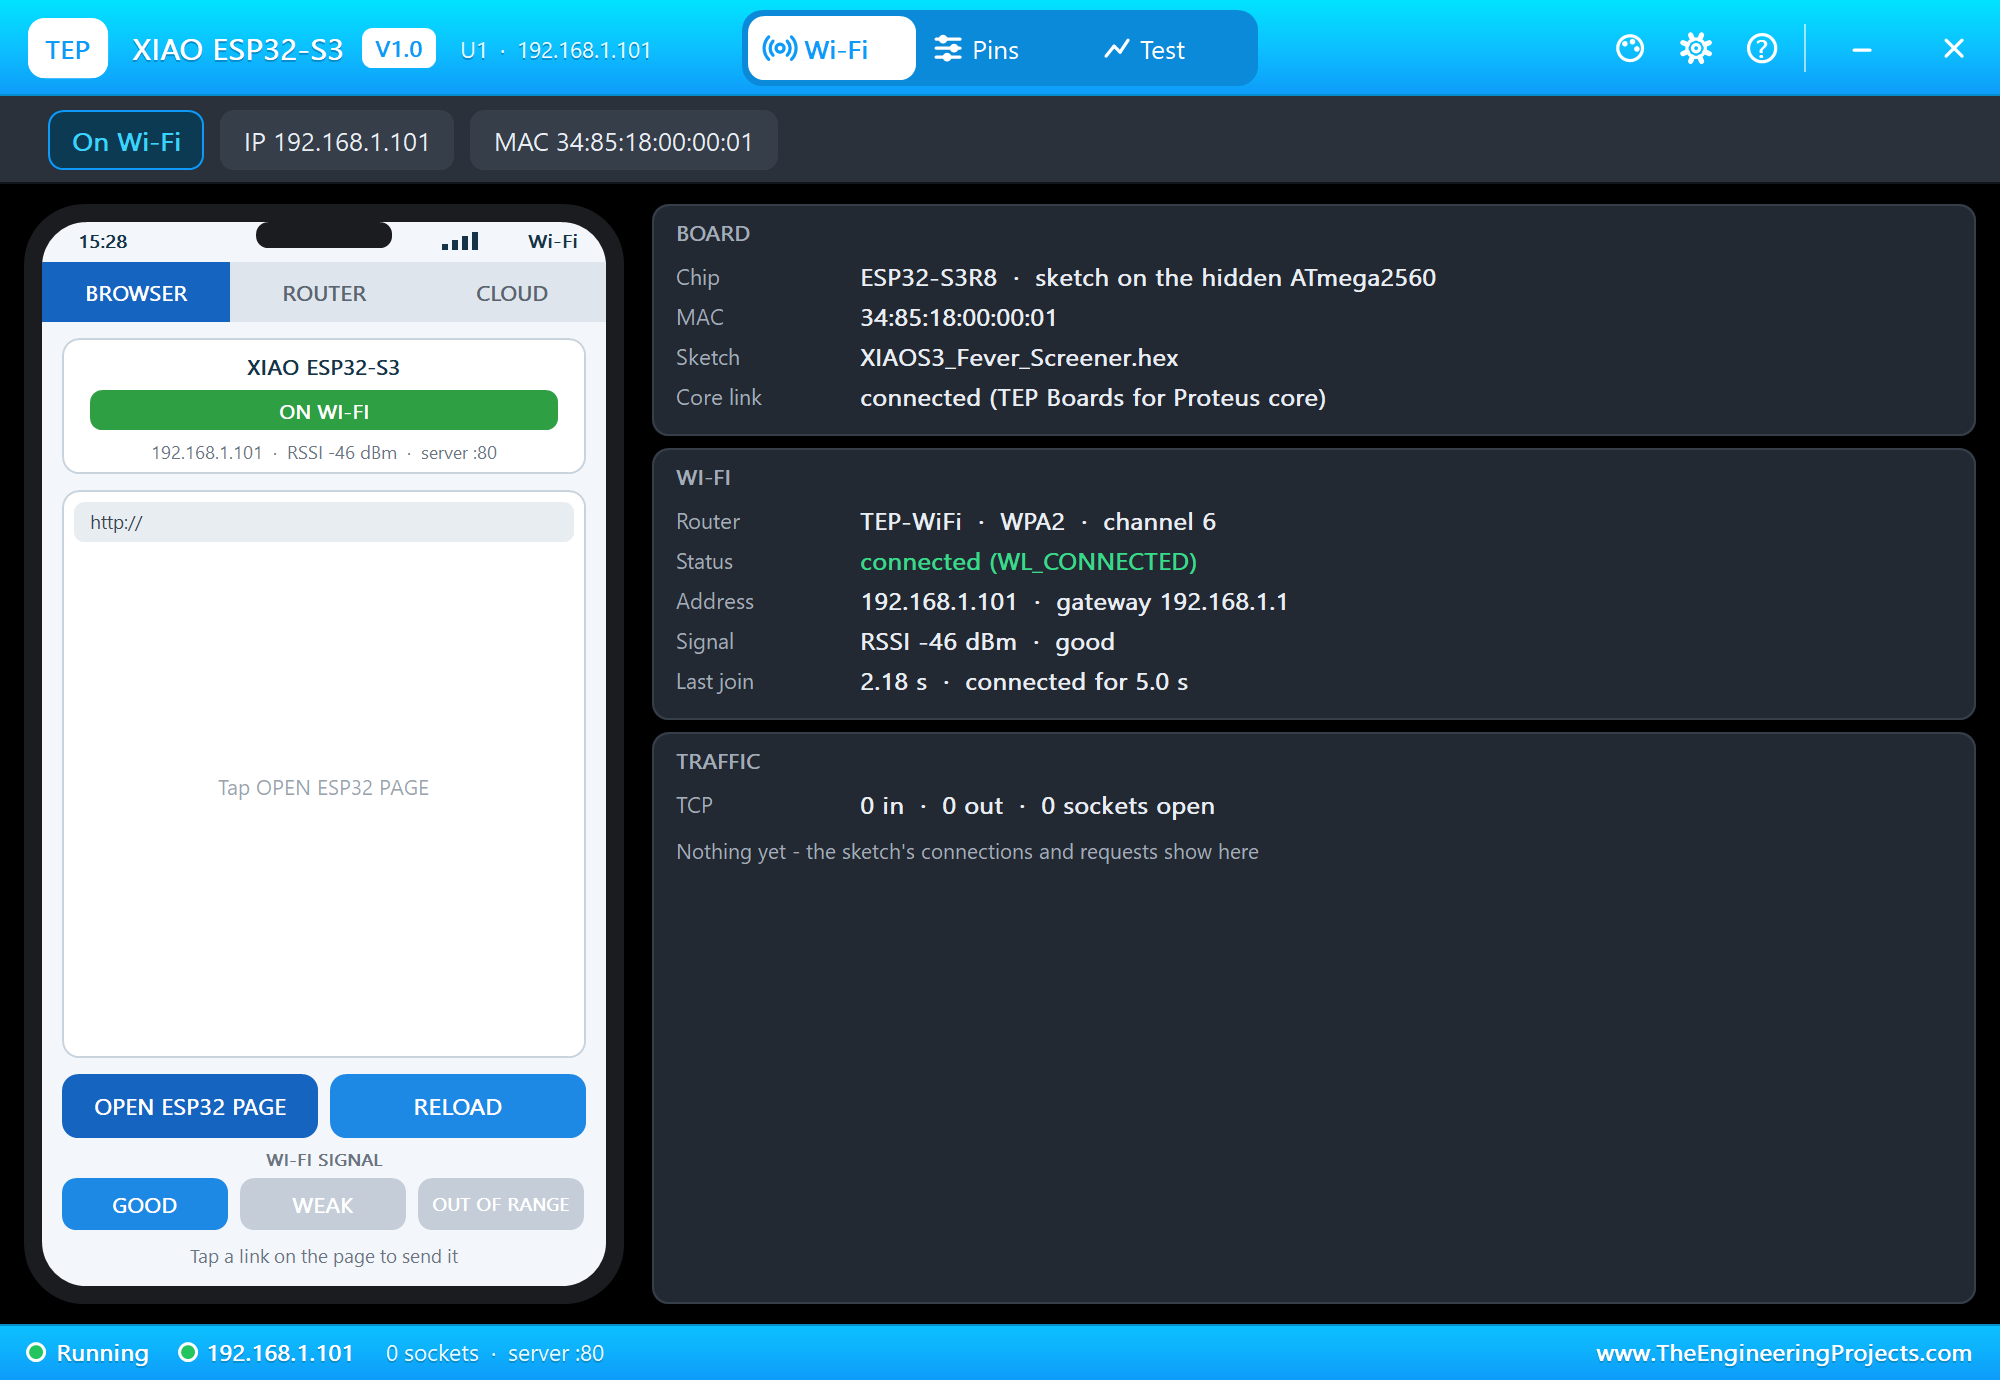
Press Run. The serial monitor opens, both modules answer and the board joins TEP-WiFi:
XIAO ESP32-S3 Fever Screener - The Engineering Projects
MLX90614 ready
OLED ready
Connecting to TEP-WiFi
Screener page: http://192.168.1.101/
Object 25.0 C  room 25.0 C  WAITING  screened 0  fevers 0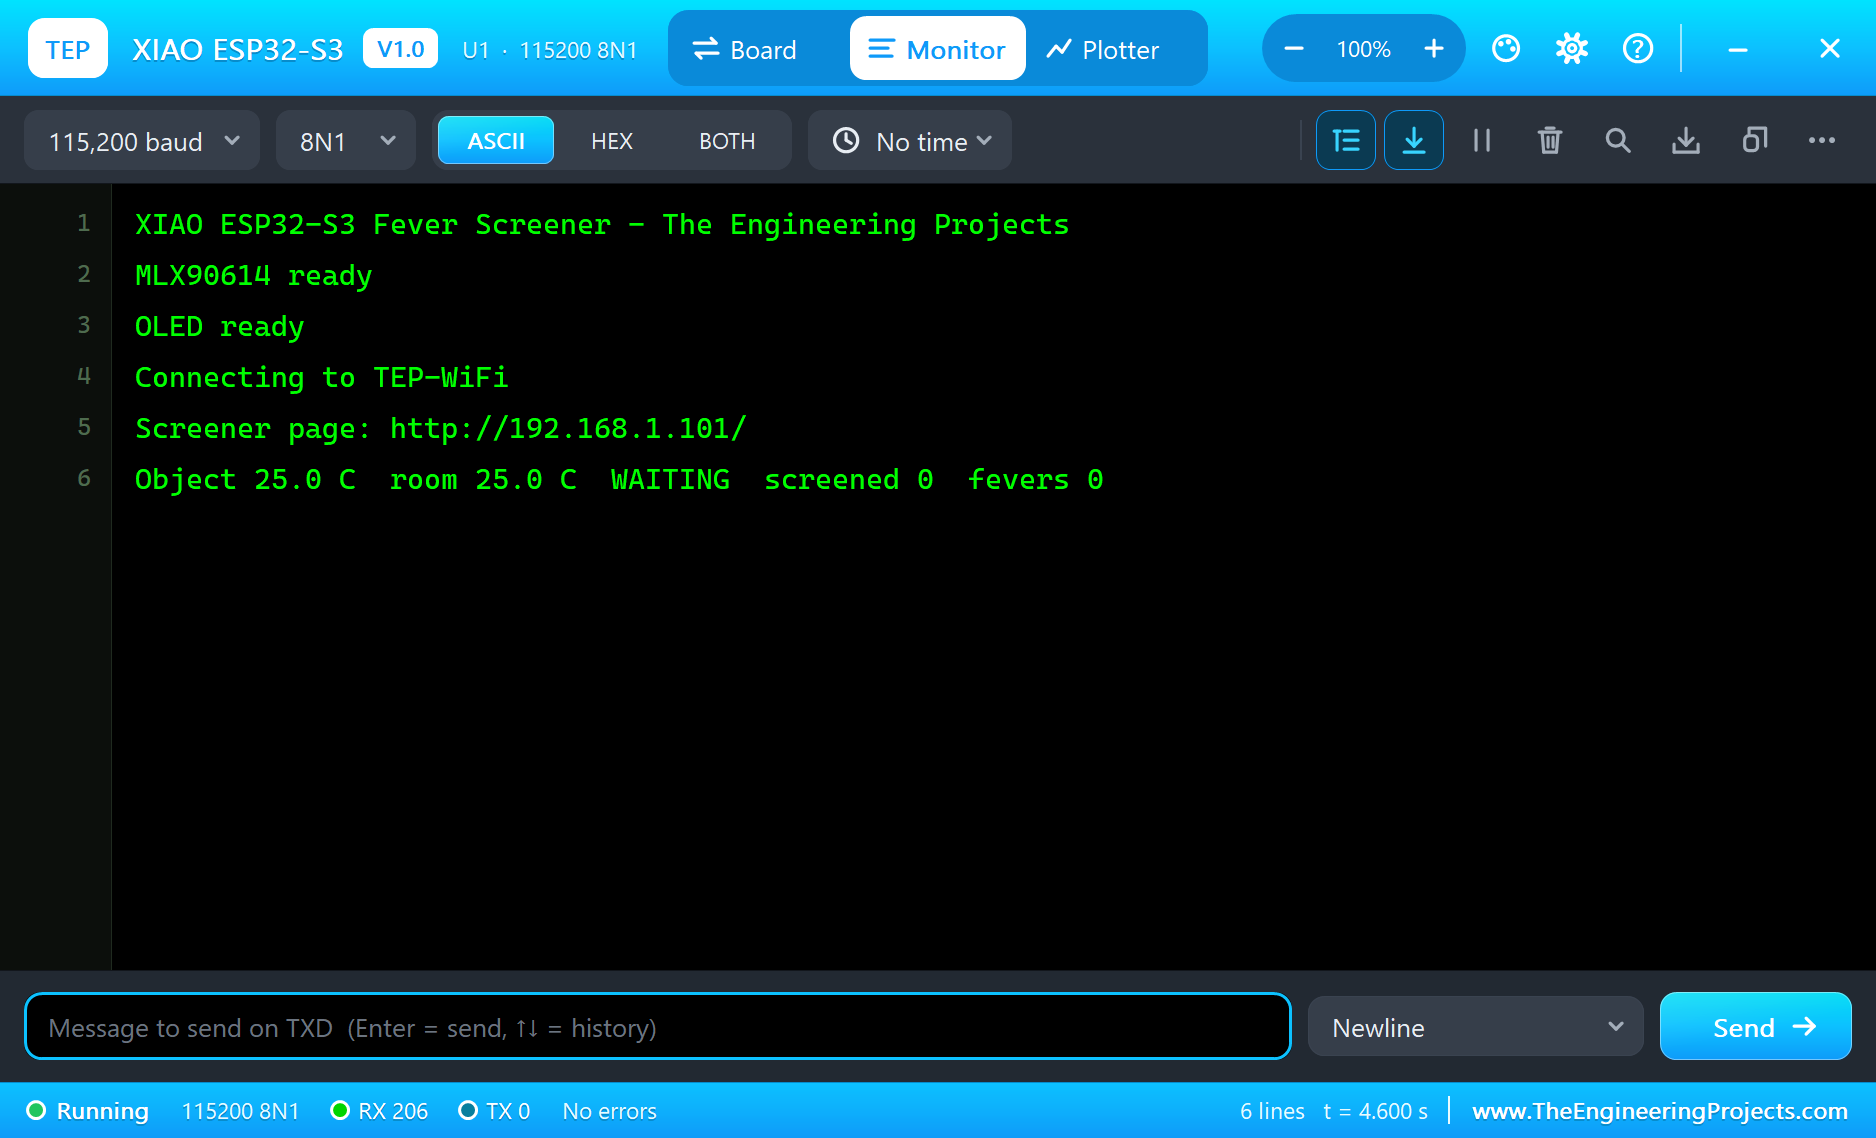
Open the Page
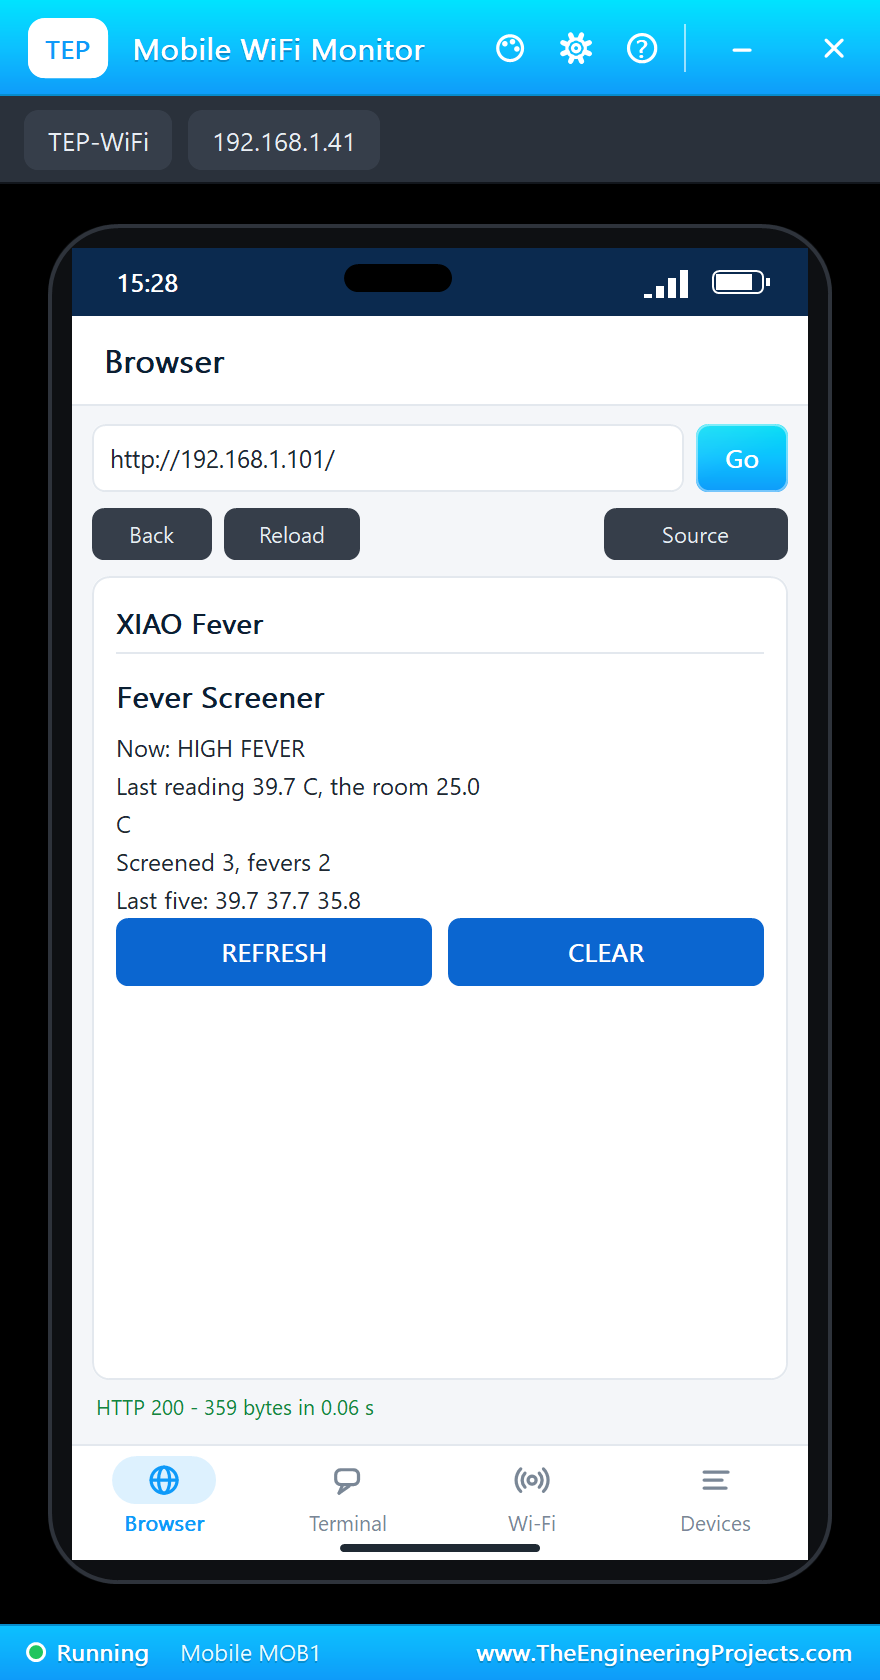
On the laptop click Browser and Go (the home page is http://192.168.1.101/json); on the phone the same with http://192.168.1.101/:
Person 1: Normal
On the MLX90614's pop-up click the material SKIN 0.98, then the object SKIN 34 C: someone has stepped up to the sensor. After four steady readings the monitor prints >> Person 1: 35.8 C - NORMAL.
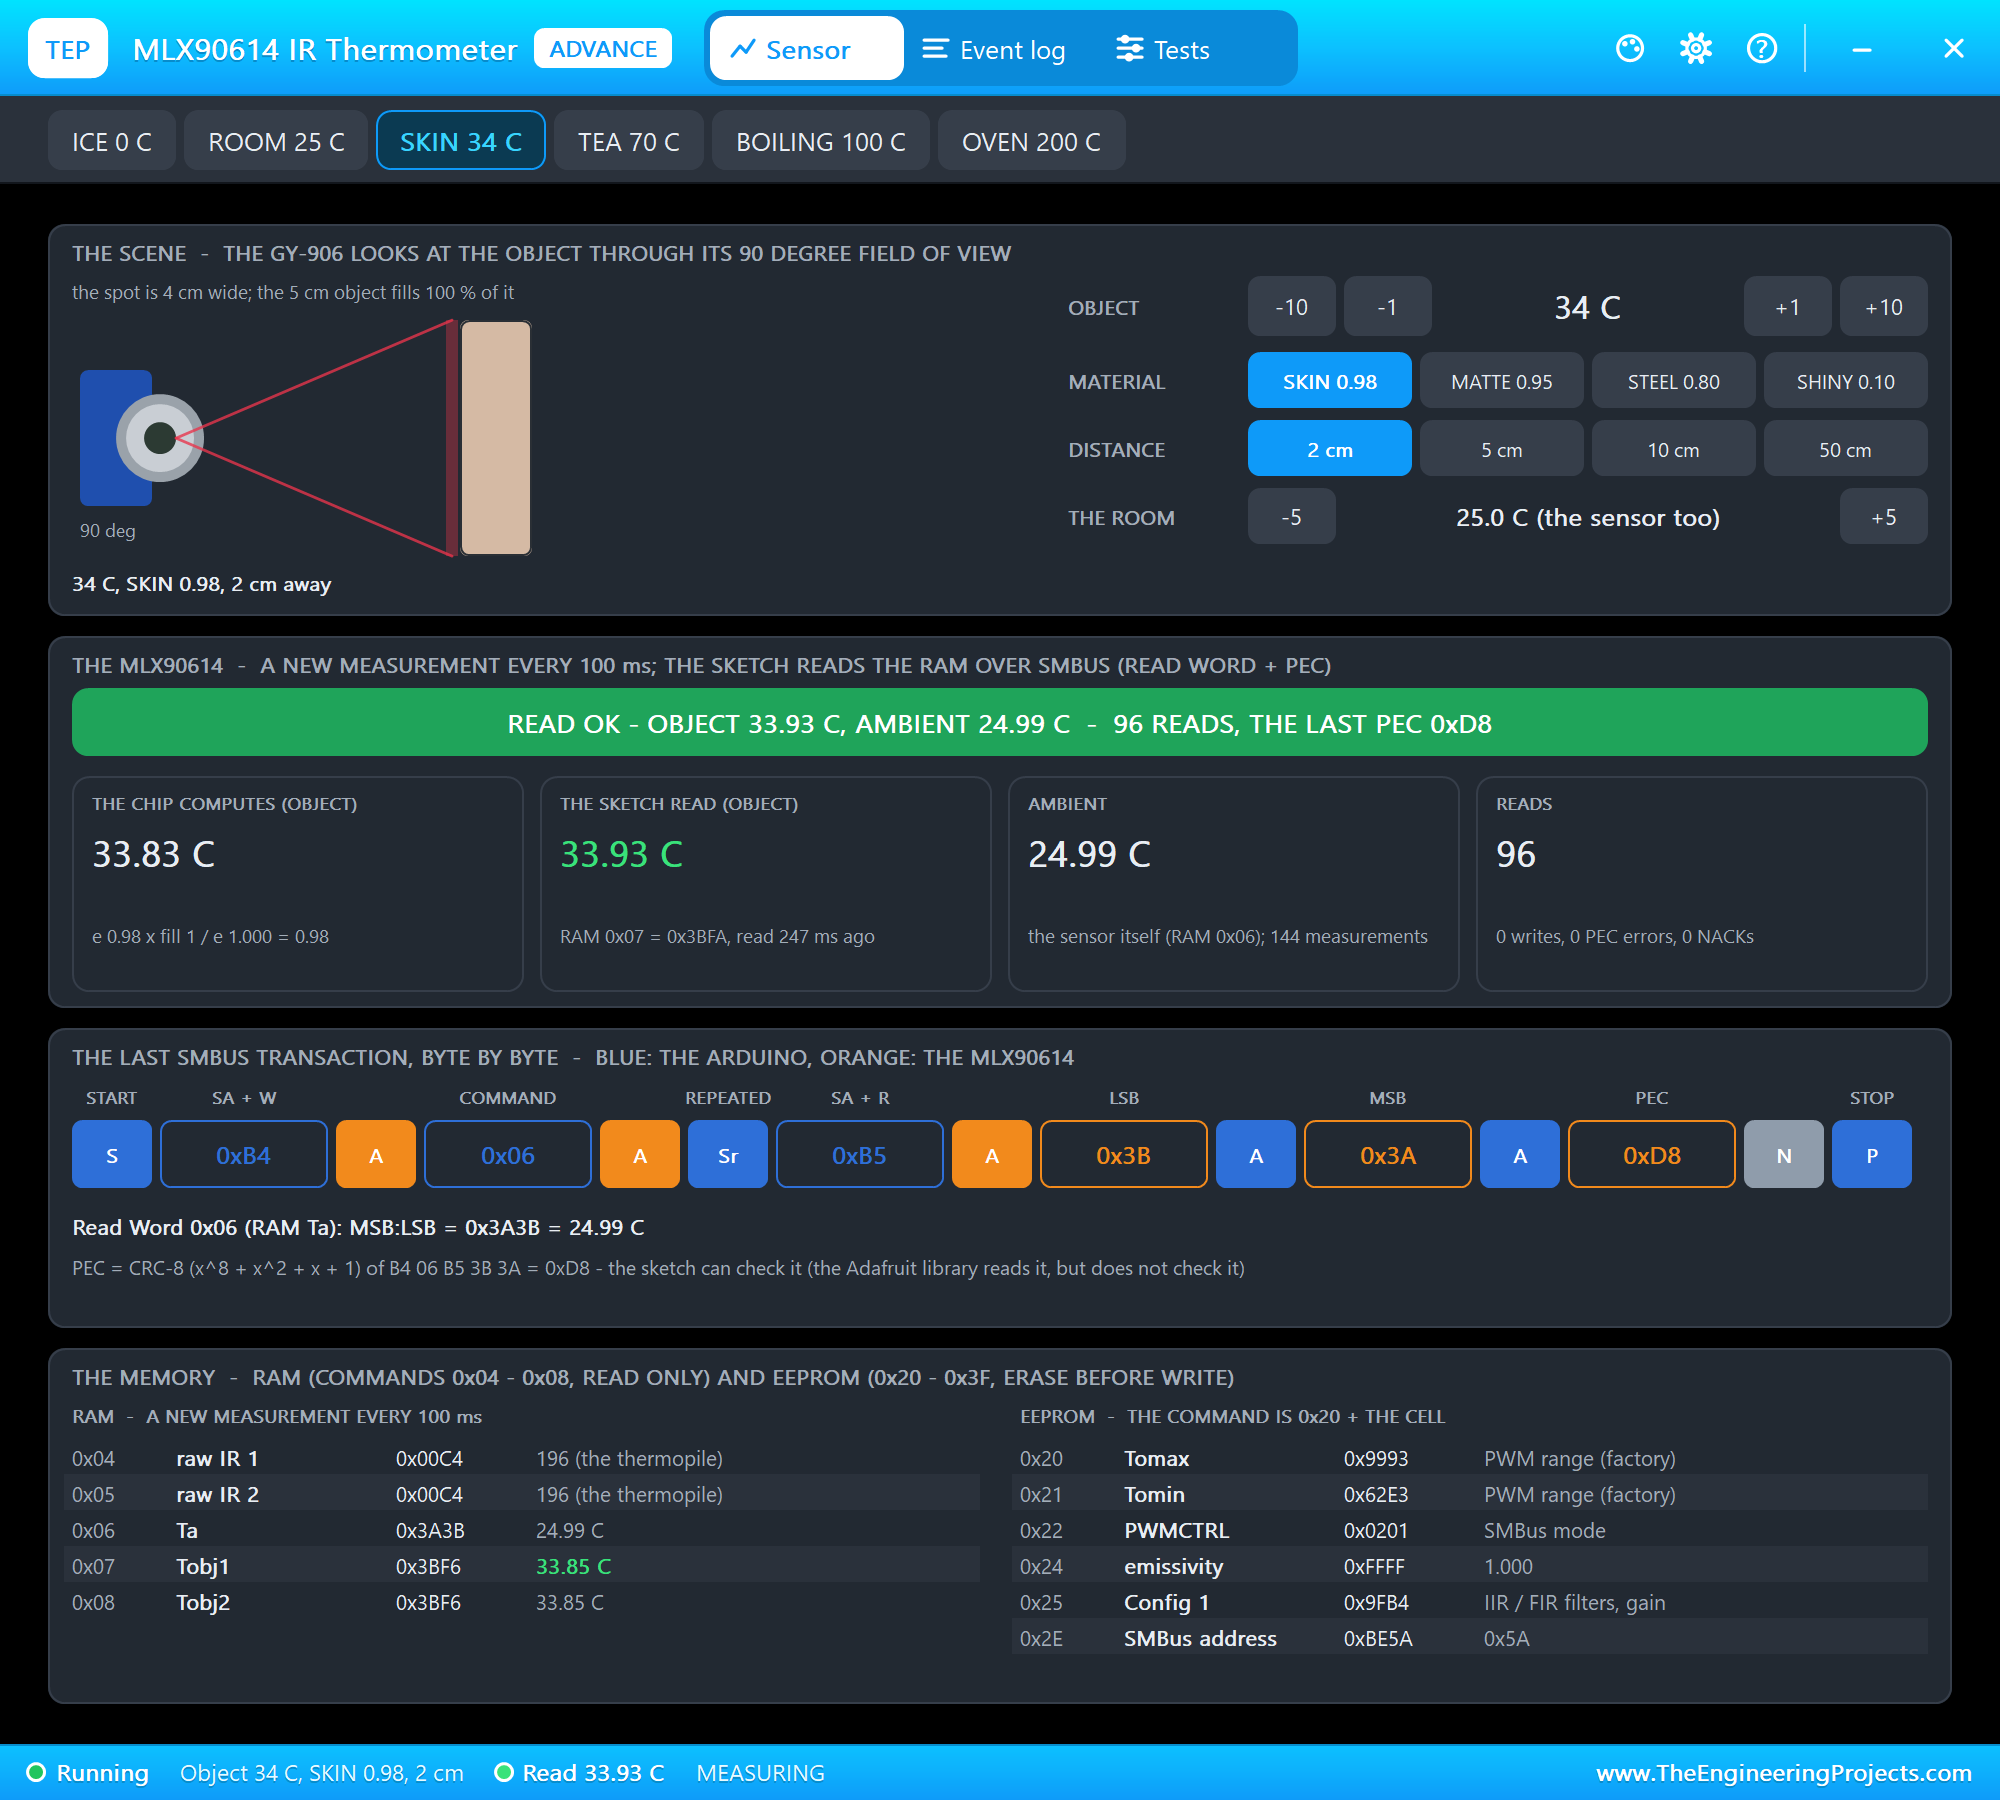
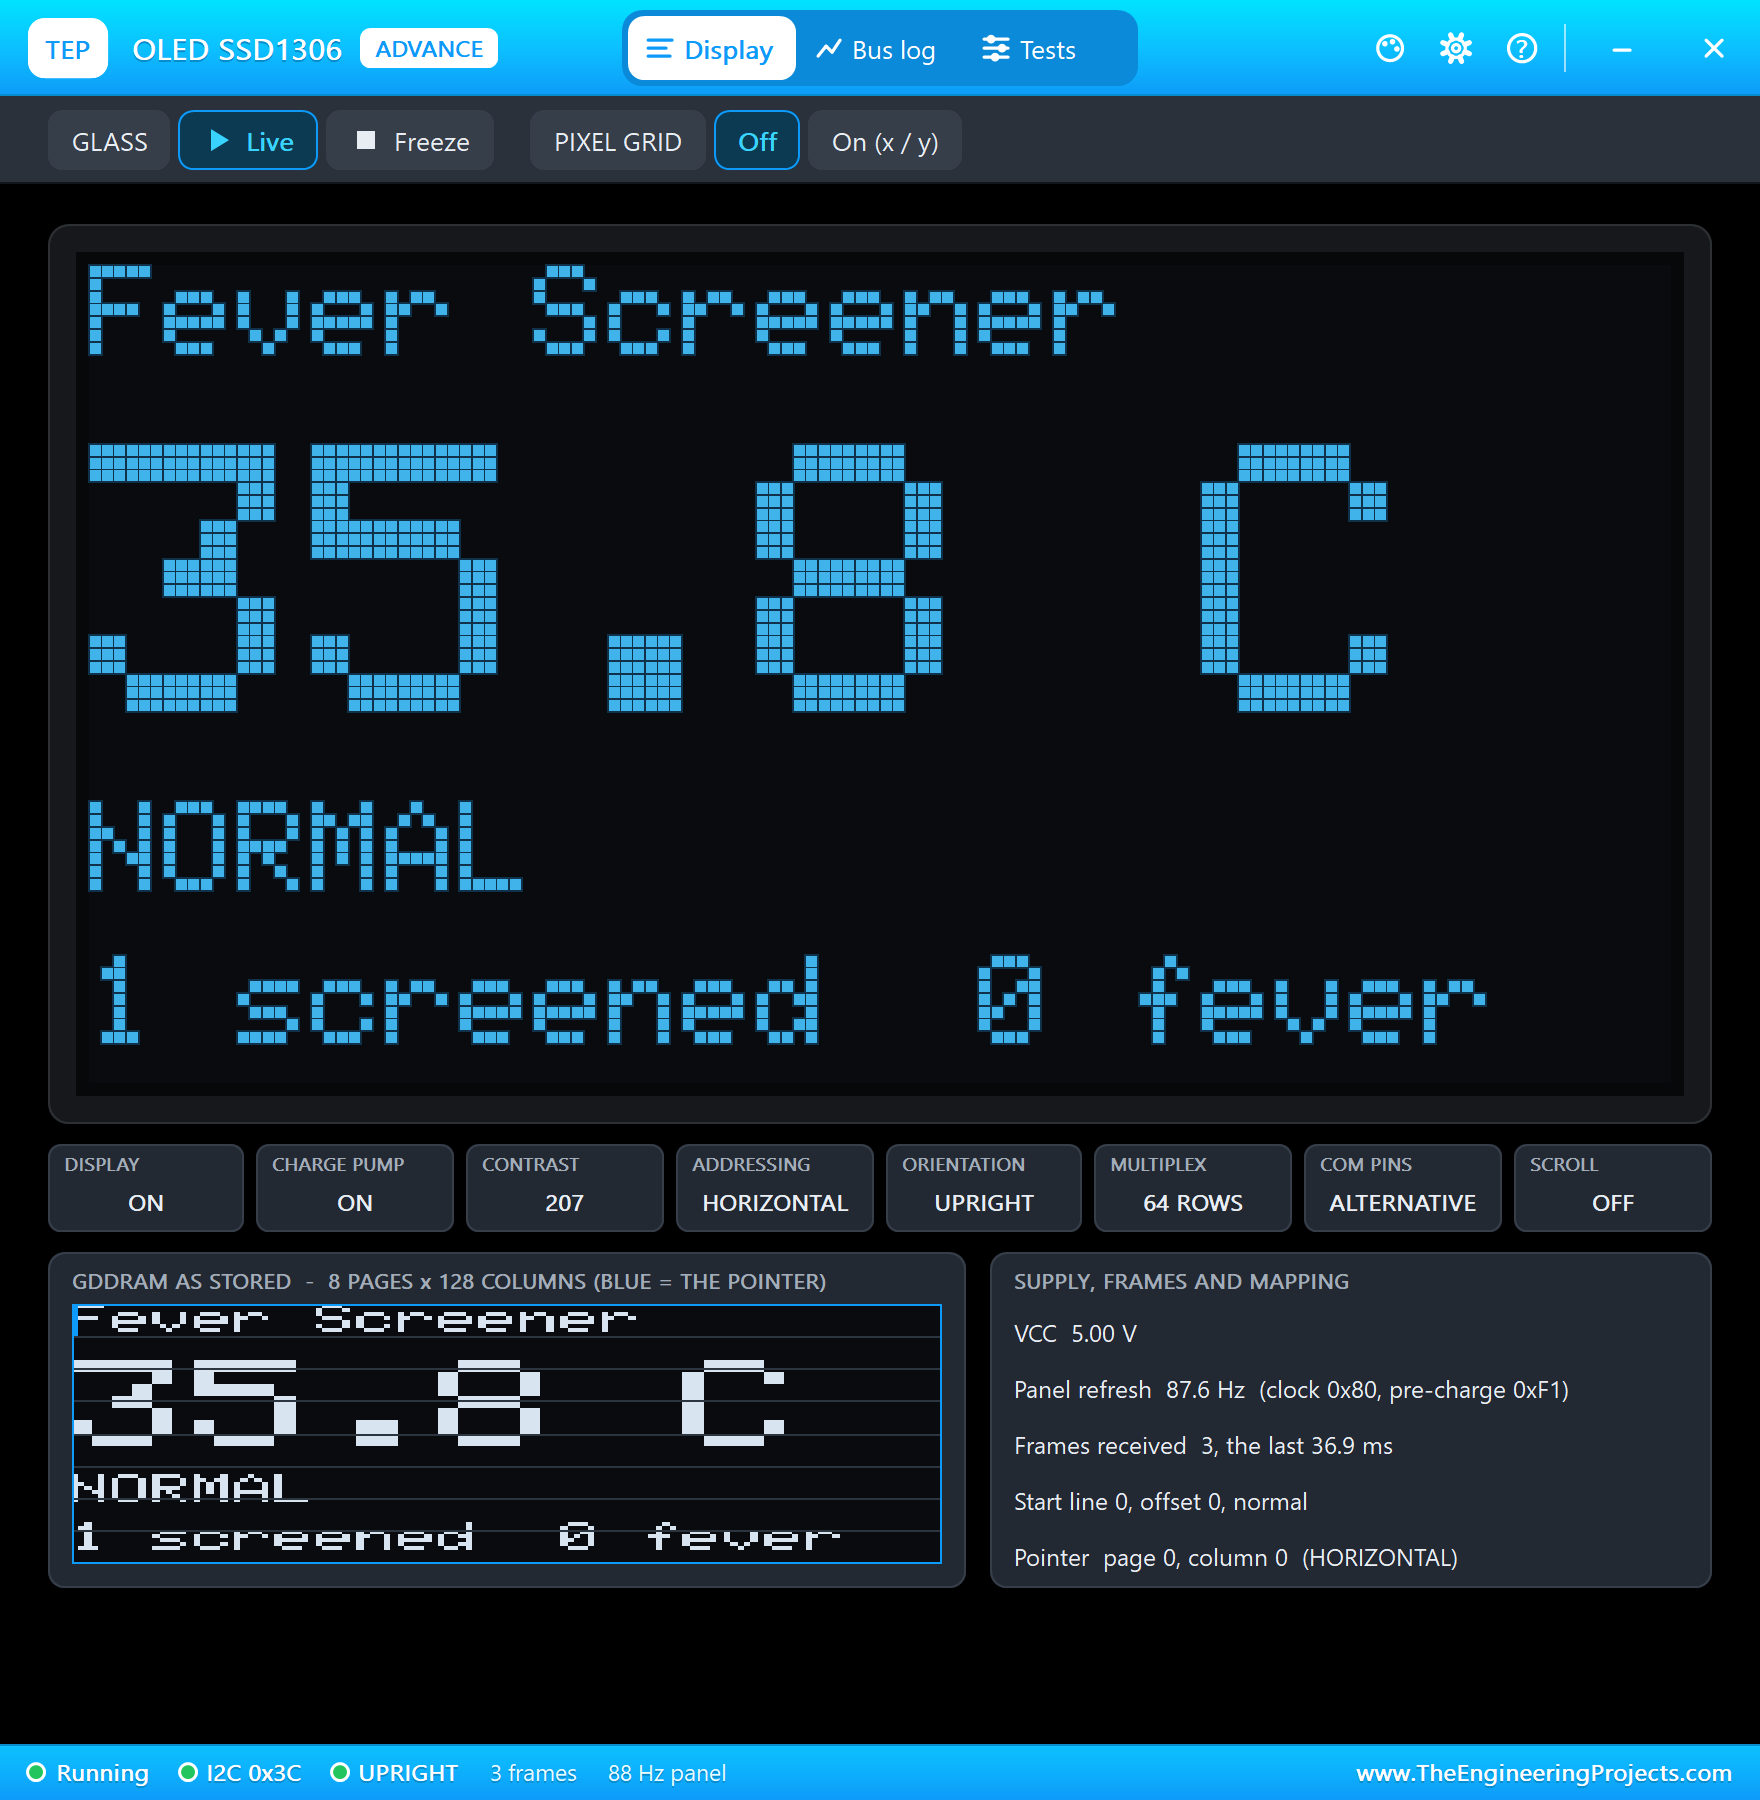
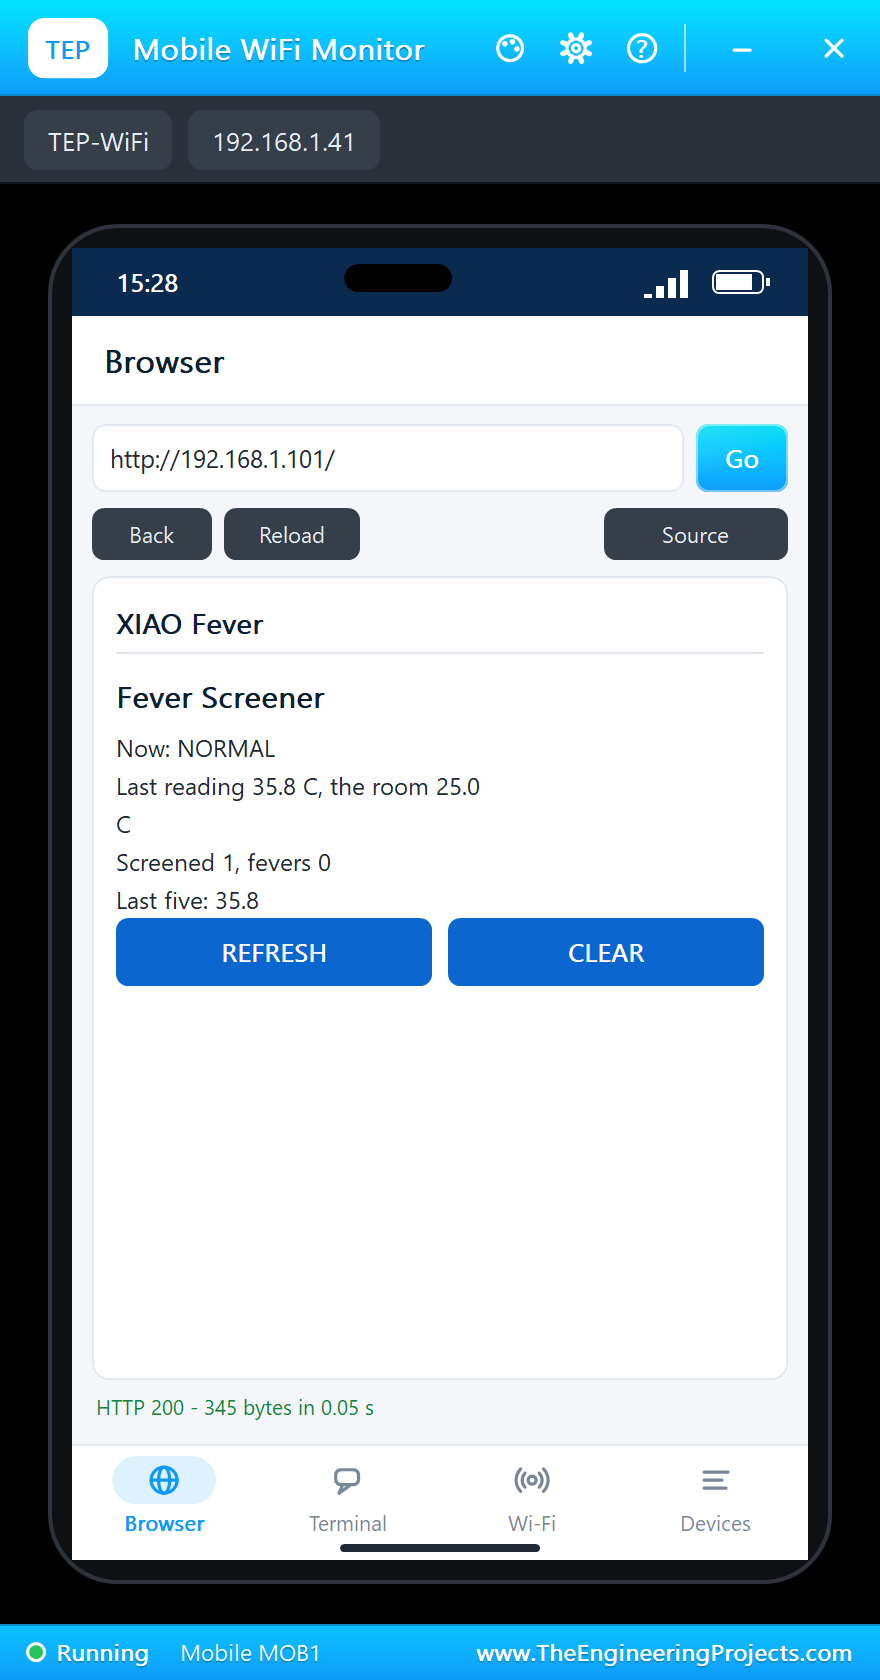
Click ROOM 25 C: the person has left, the monitor says "Next person please" and the screener is ready again.
Person 2: a Fever
Click SKIN 34 C and then +1 twice, for a warmer forehead. The result is 37.7 C, FEVER, and the orange USER LED lights on the board:
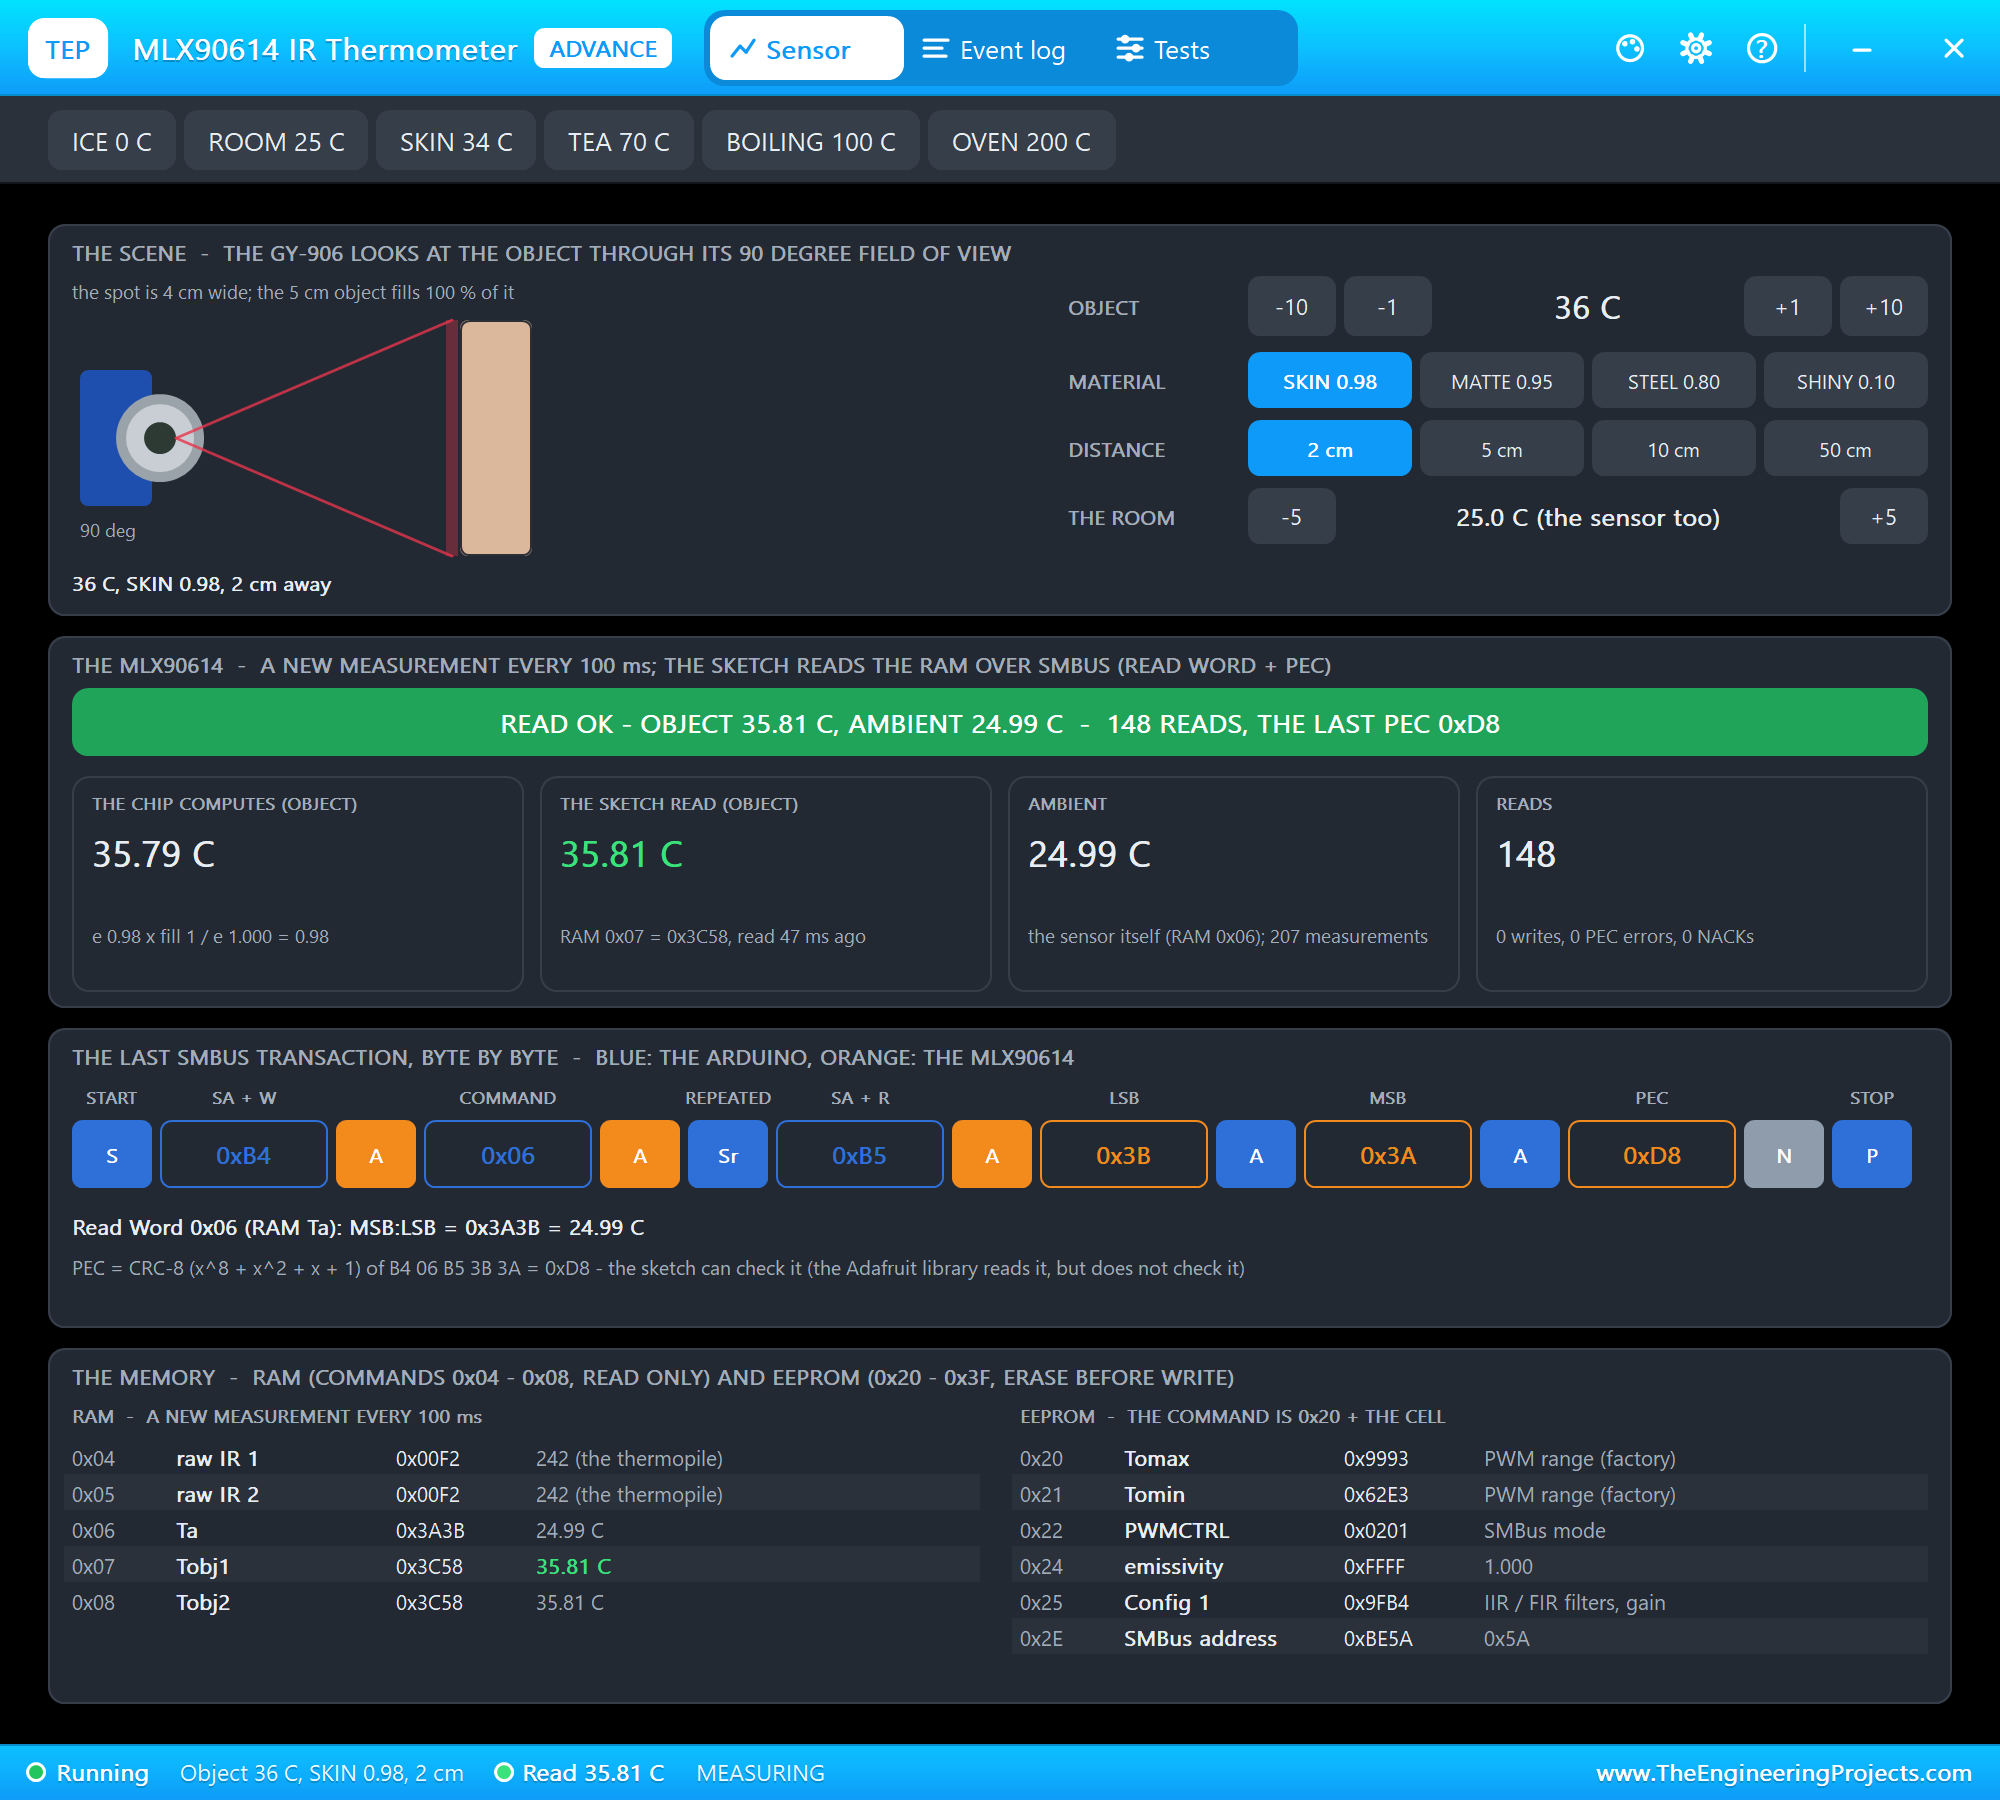
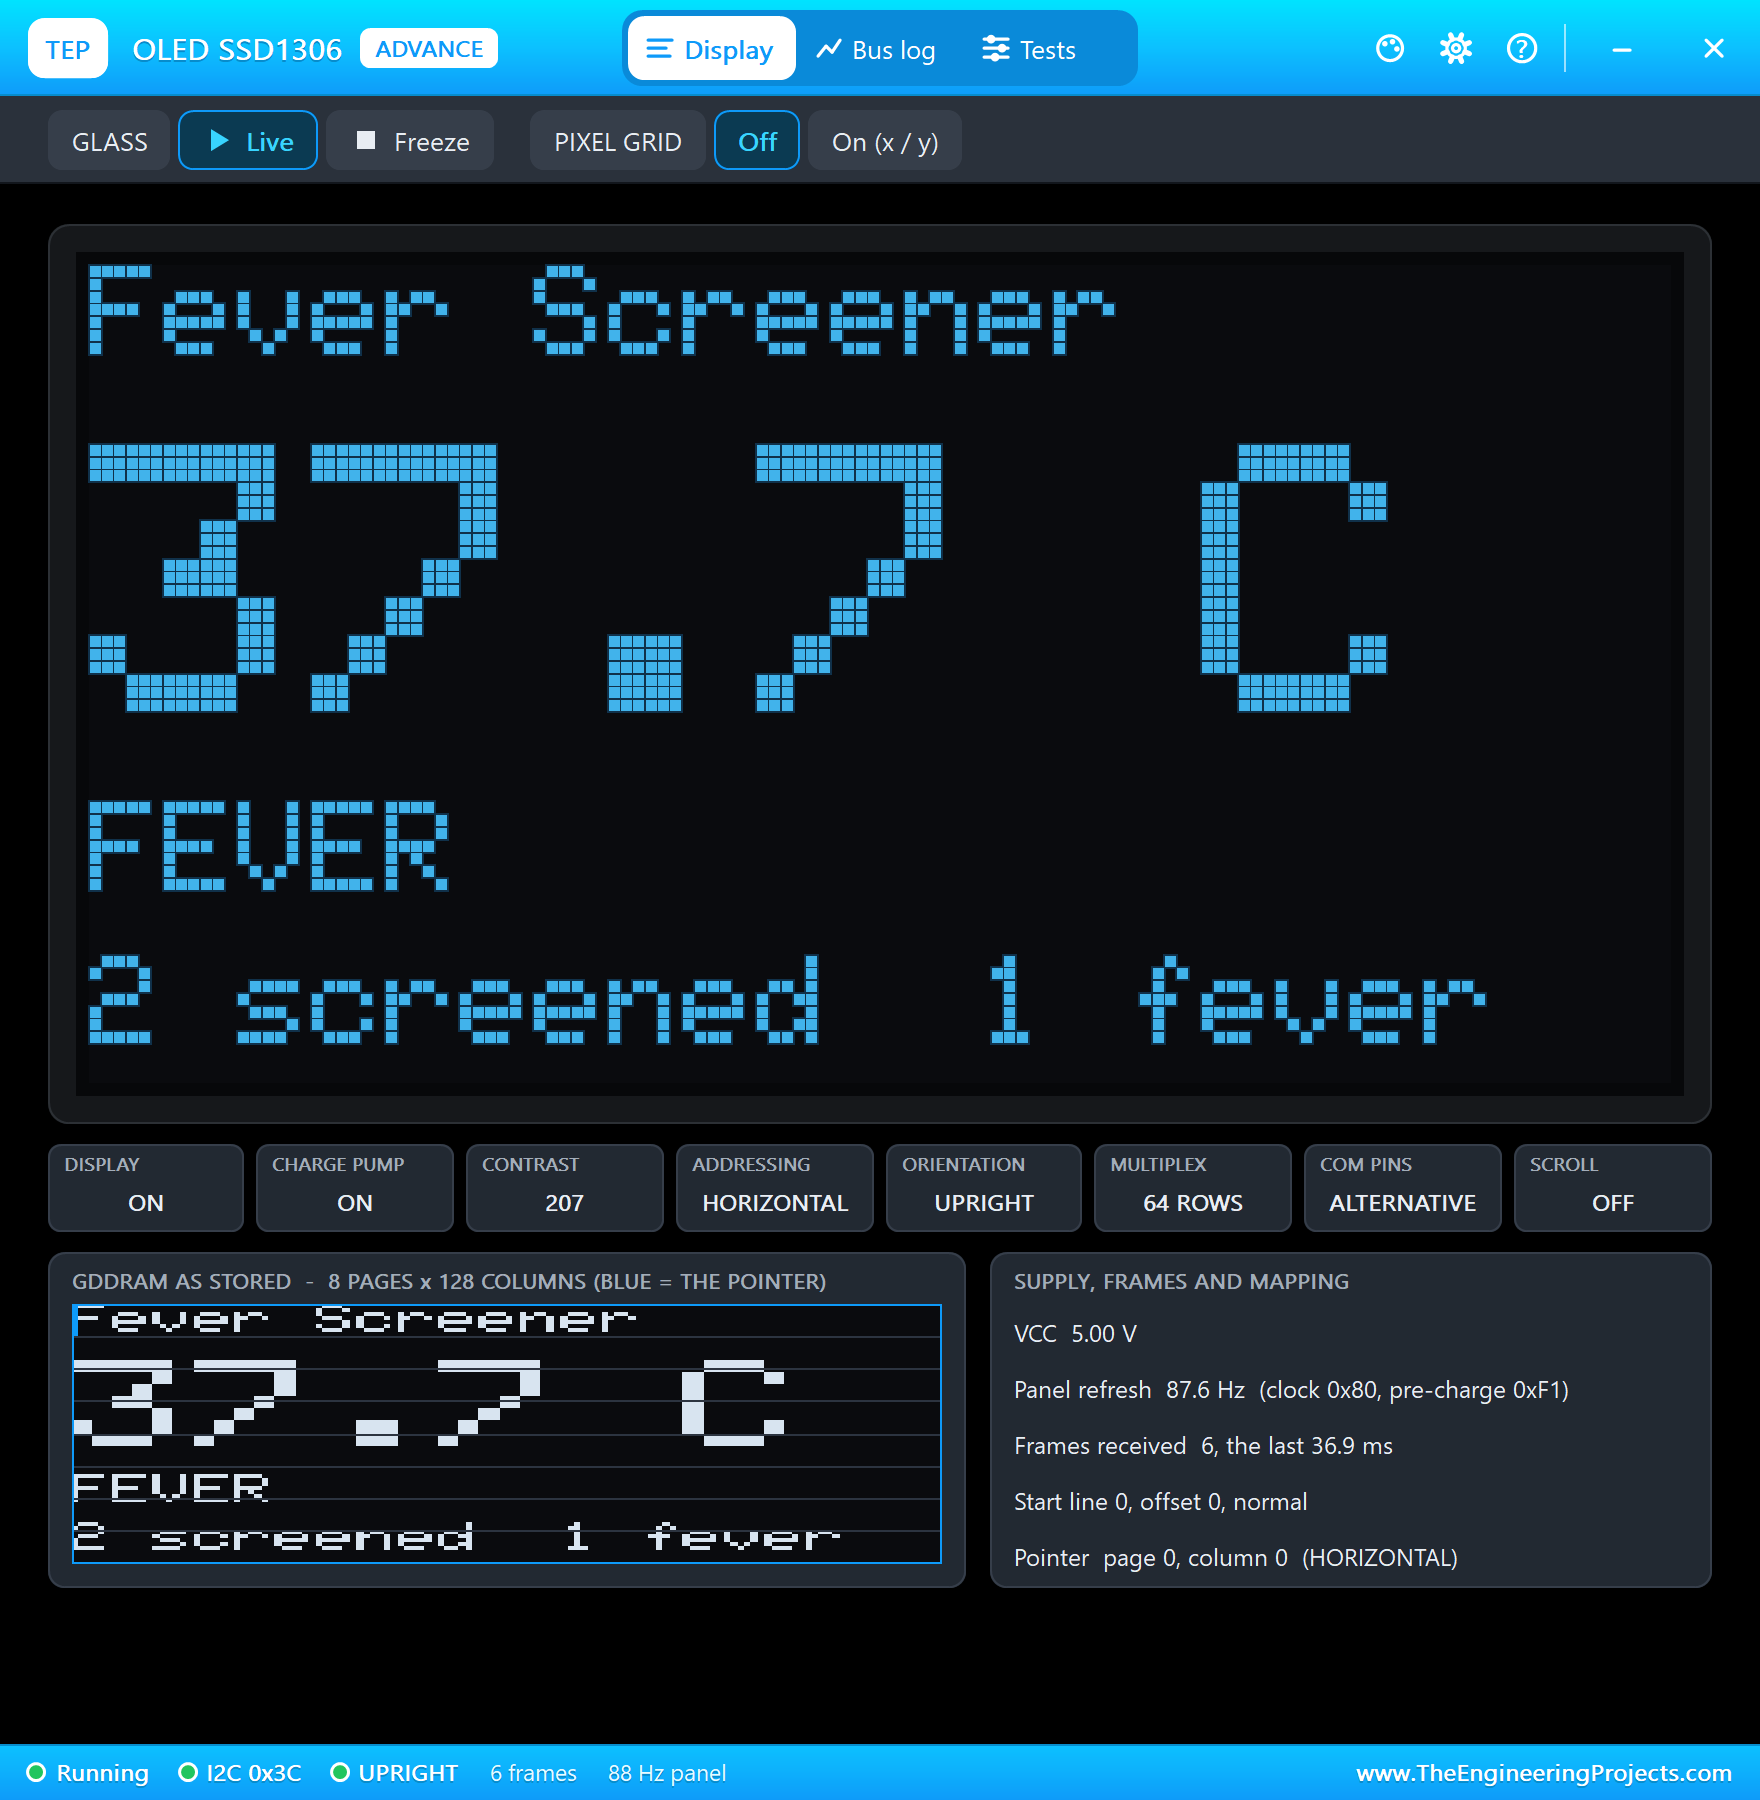
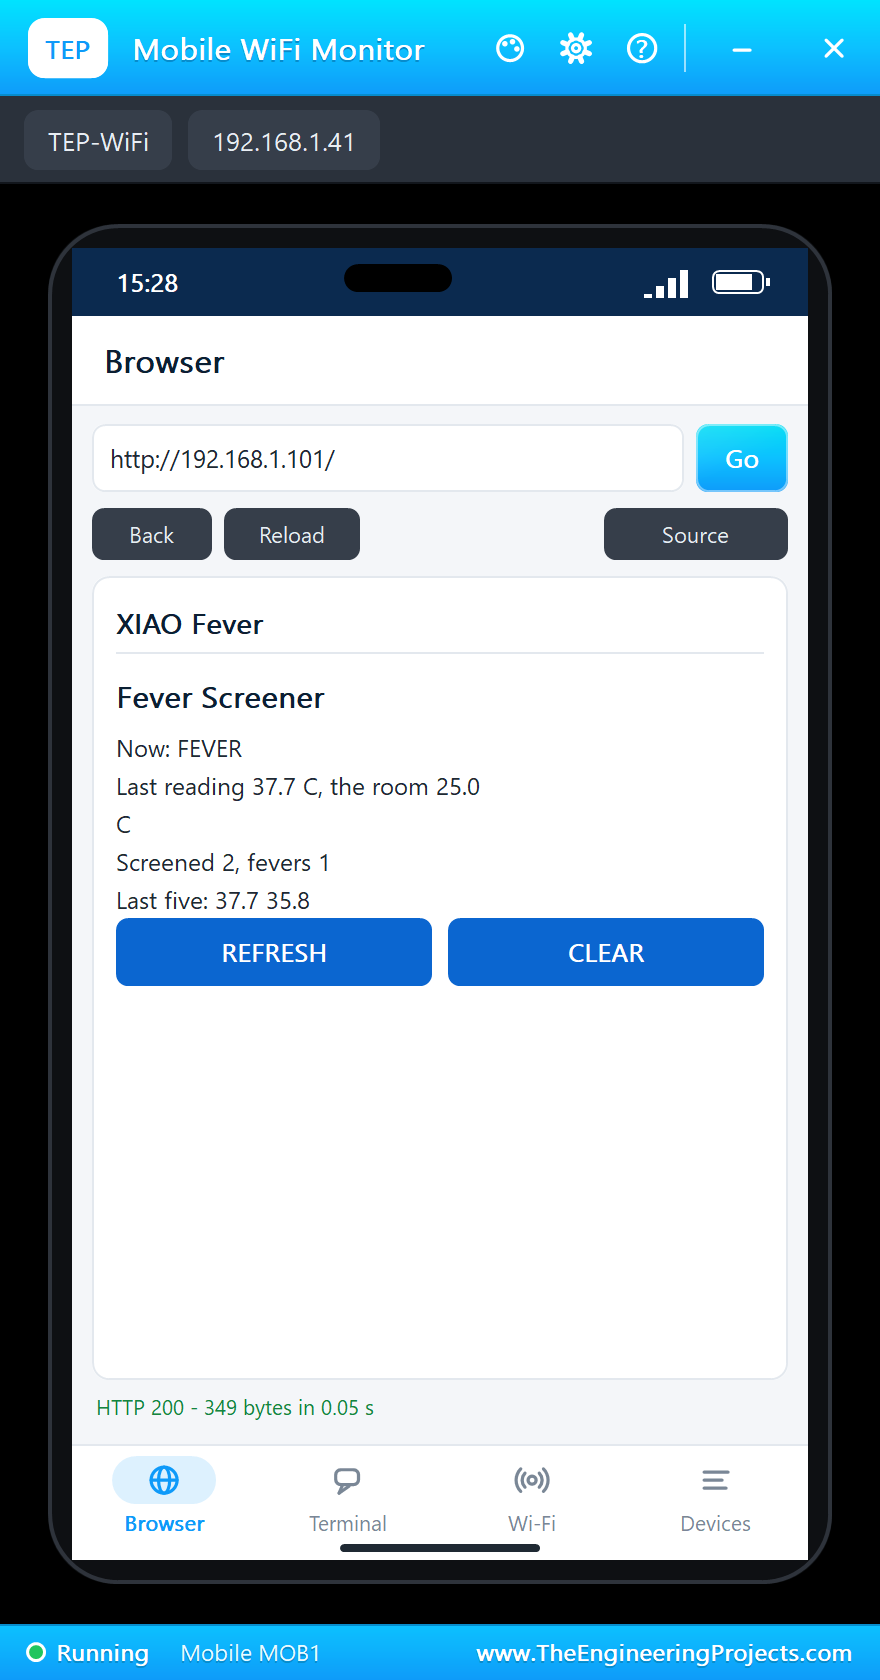
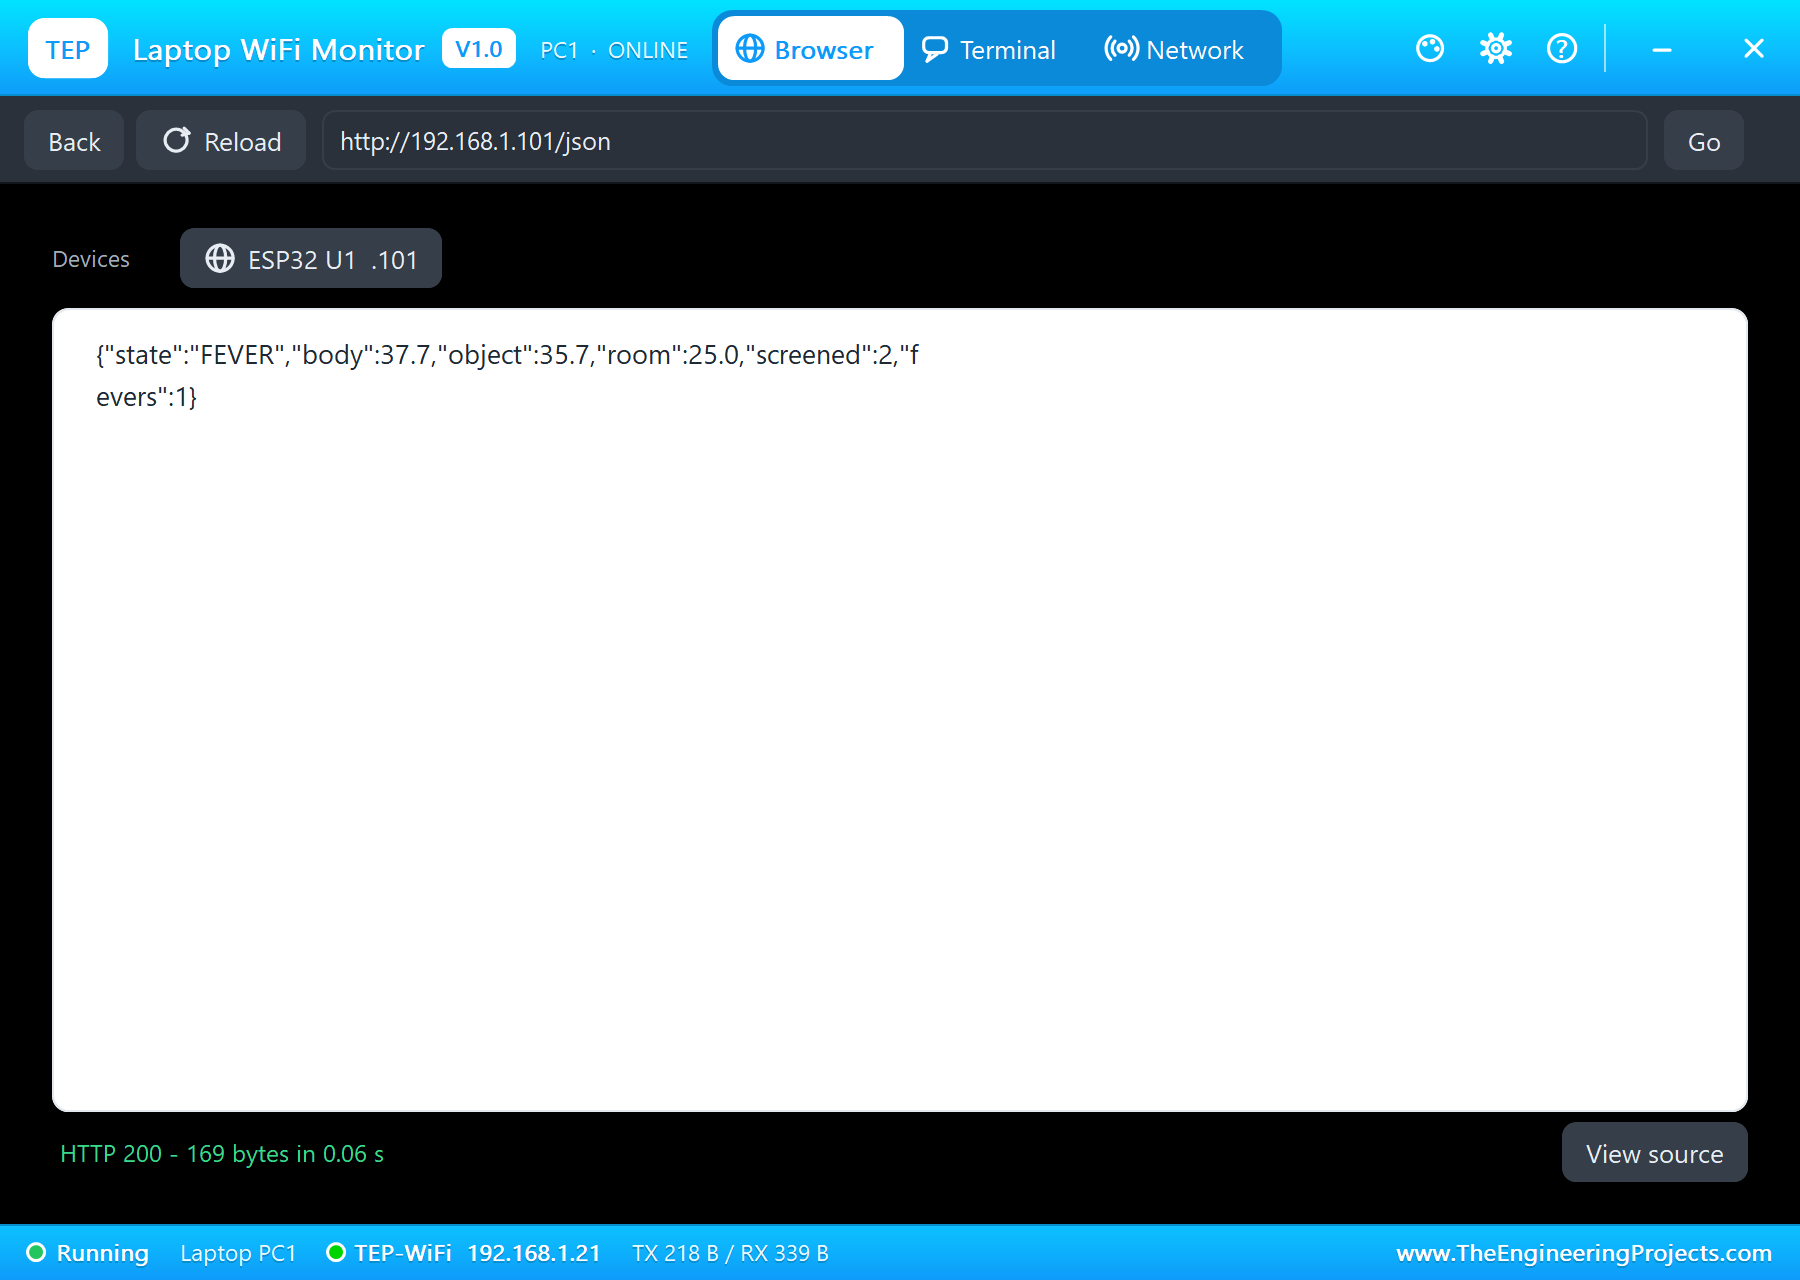
Person 3: a High Fever
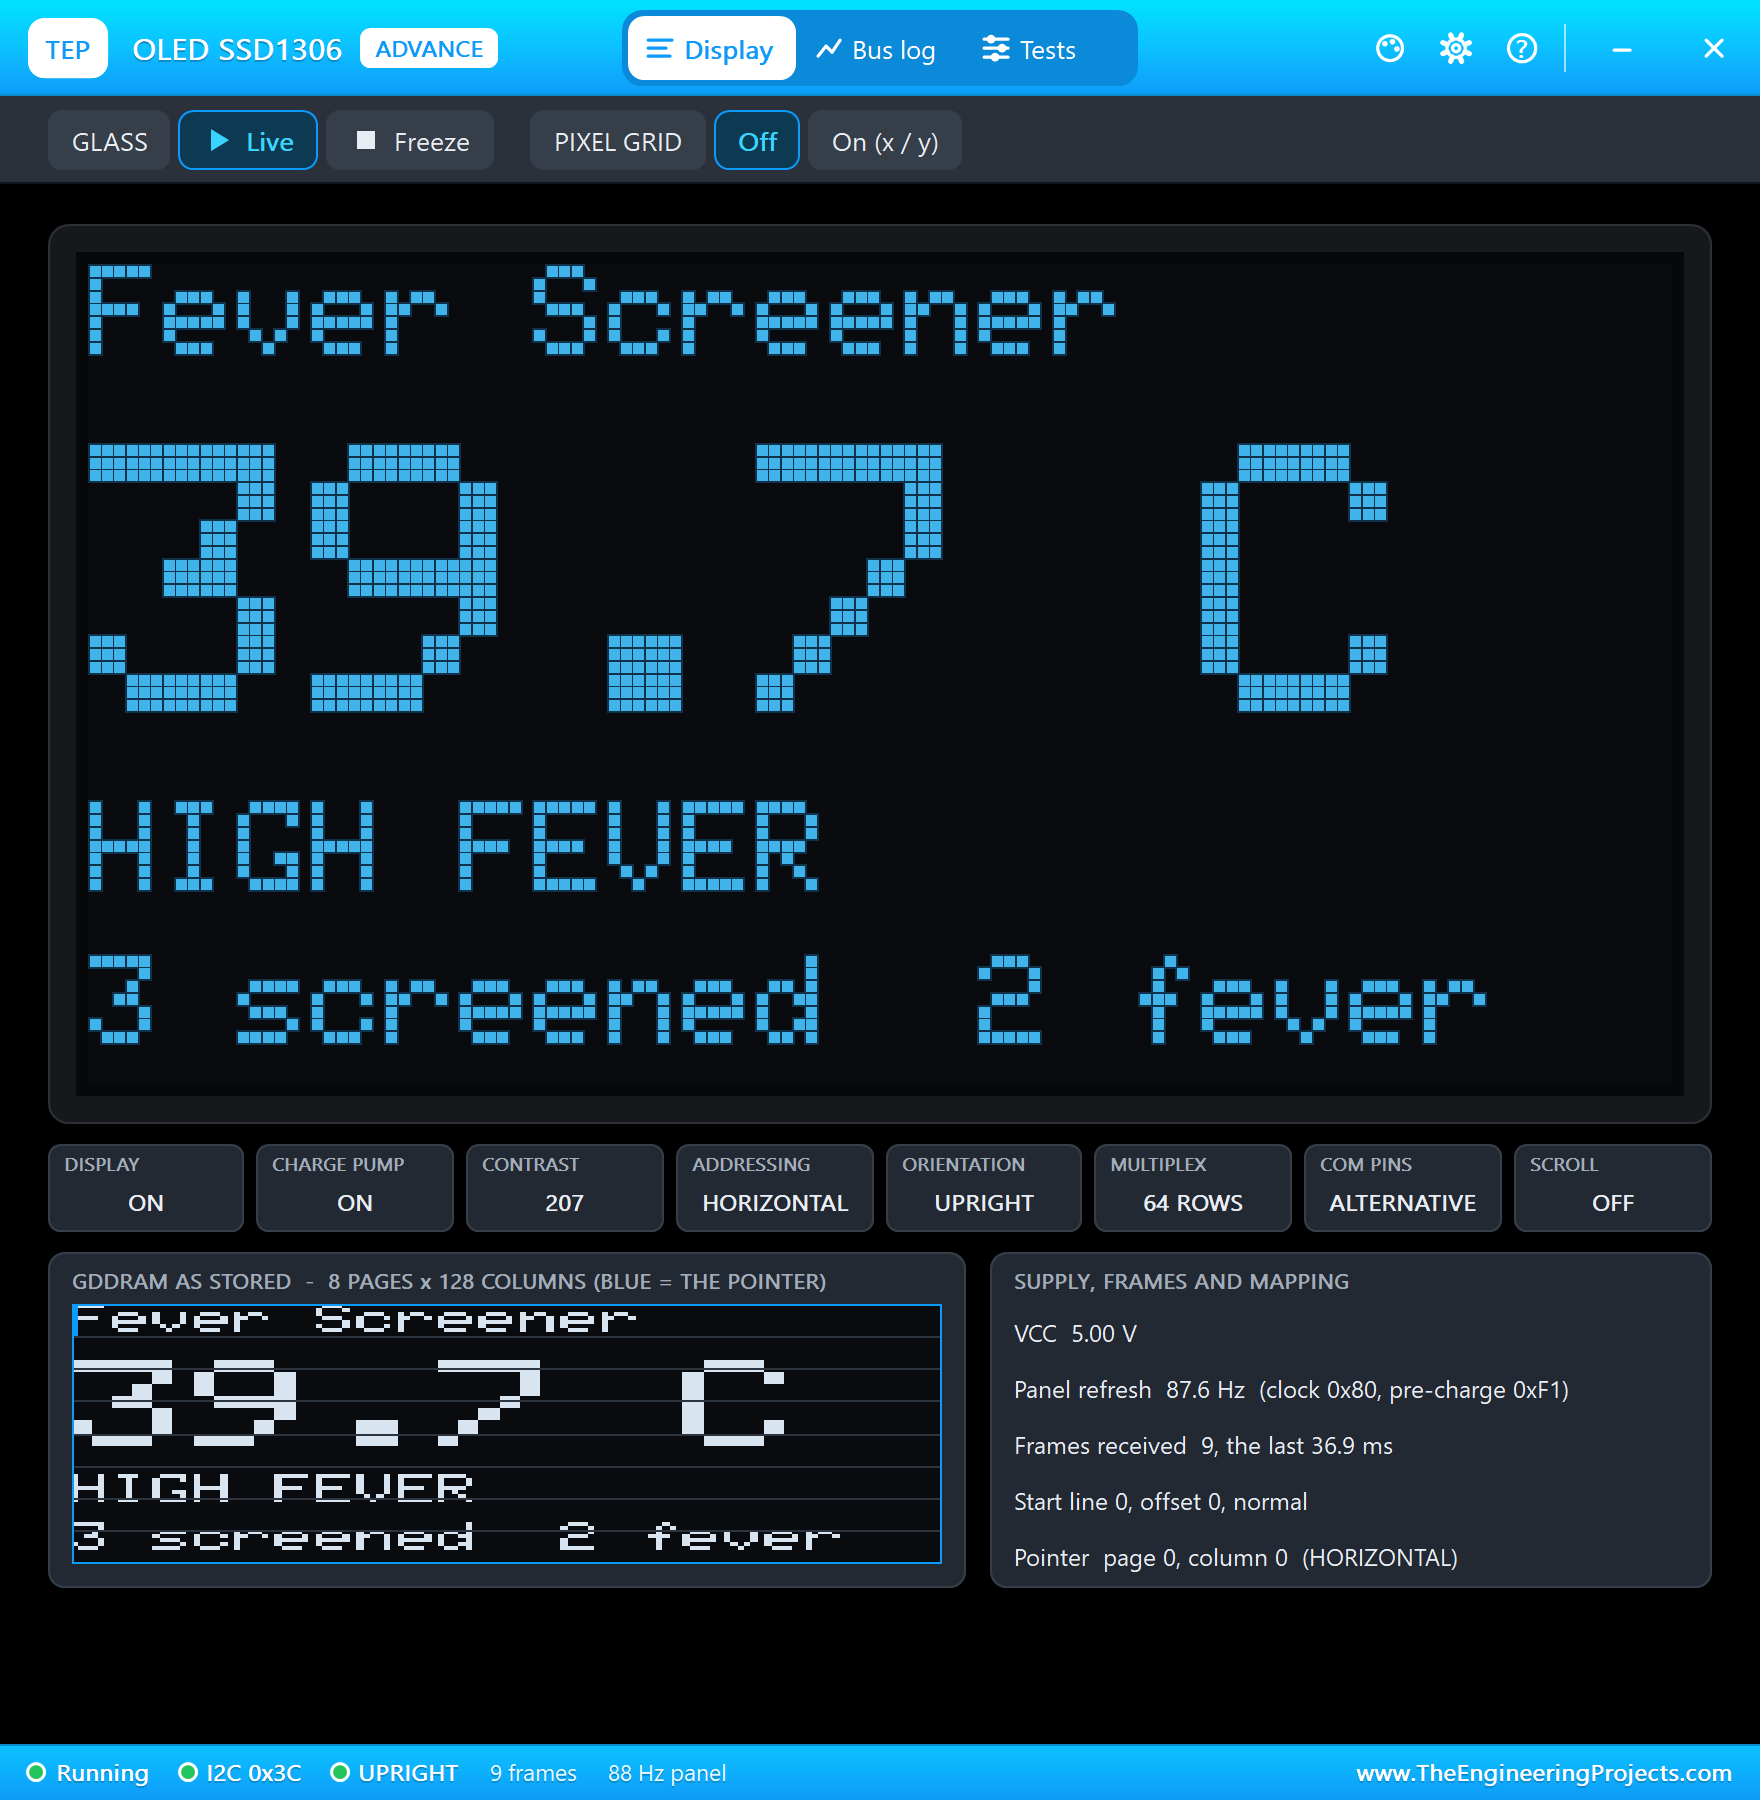
Back to the room, then SKIN 34 C and +1 four times: 39.7 C, HIGH FEVER, and the LED blinks. The monitor has followed everything so far:
Object 33.8 C  room 25.0 C  MEASURING  screened 0  fevers 0
>> Person 1: 35.8 C - NORMAL
Object 33.8 C  room 25.0 C  NORMAL  screened 1  fevers 0
Next person please
>> Person 2: 37.7 C - FEVER
Object 35.9 C  room 25.0 C  FEVER  screened 2  fevers 1
Object 35.8 C  room 25.0 C  FEVER  screened 2  fevers 1
Next person please
>> Person 3: 39.7 C - HIGH FEVER
Object 37.7 C  room 25.0 C  HIGH FEVER  screened 3  fevers 2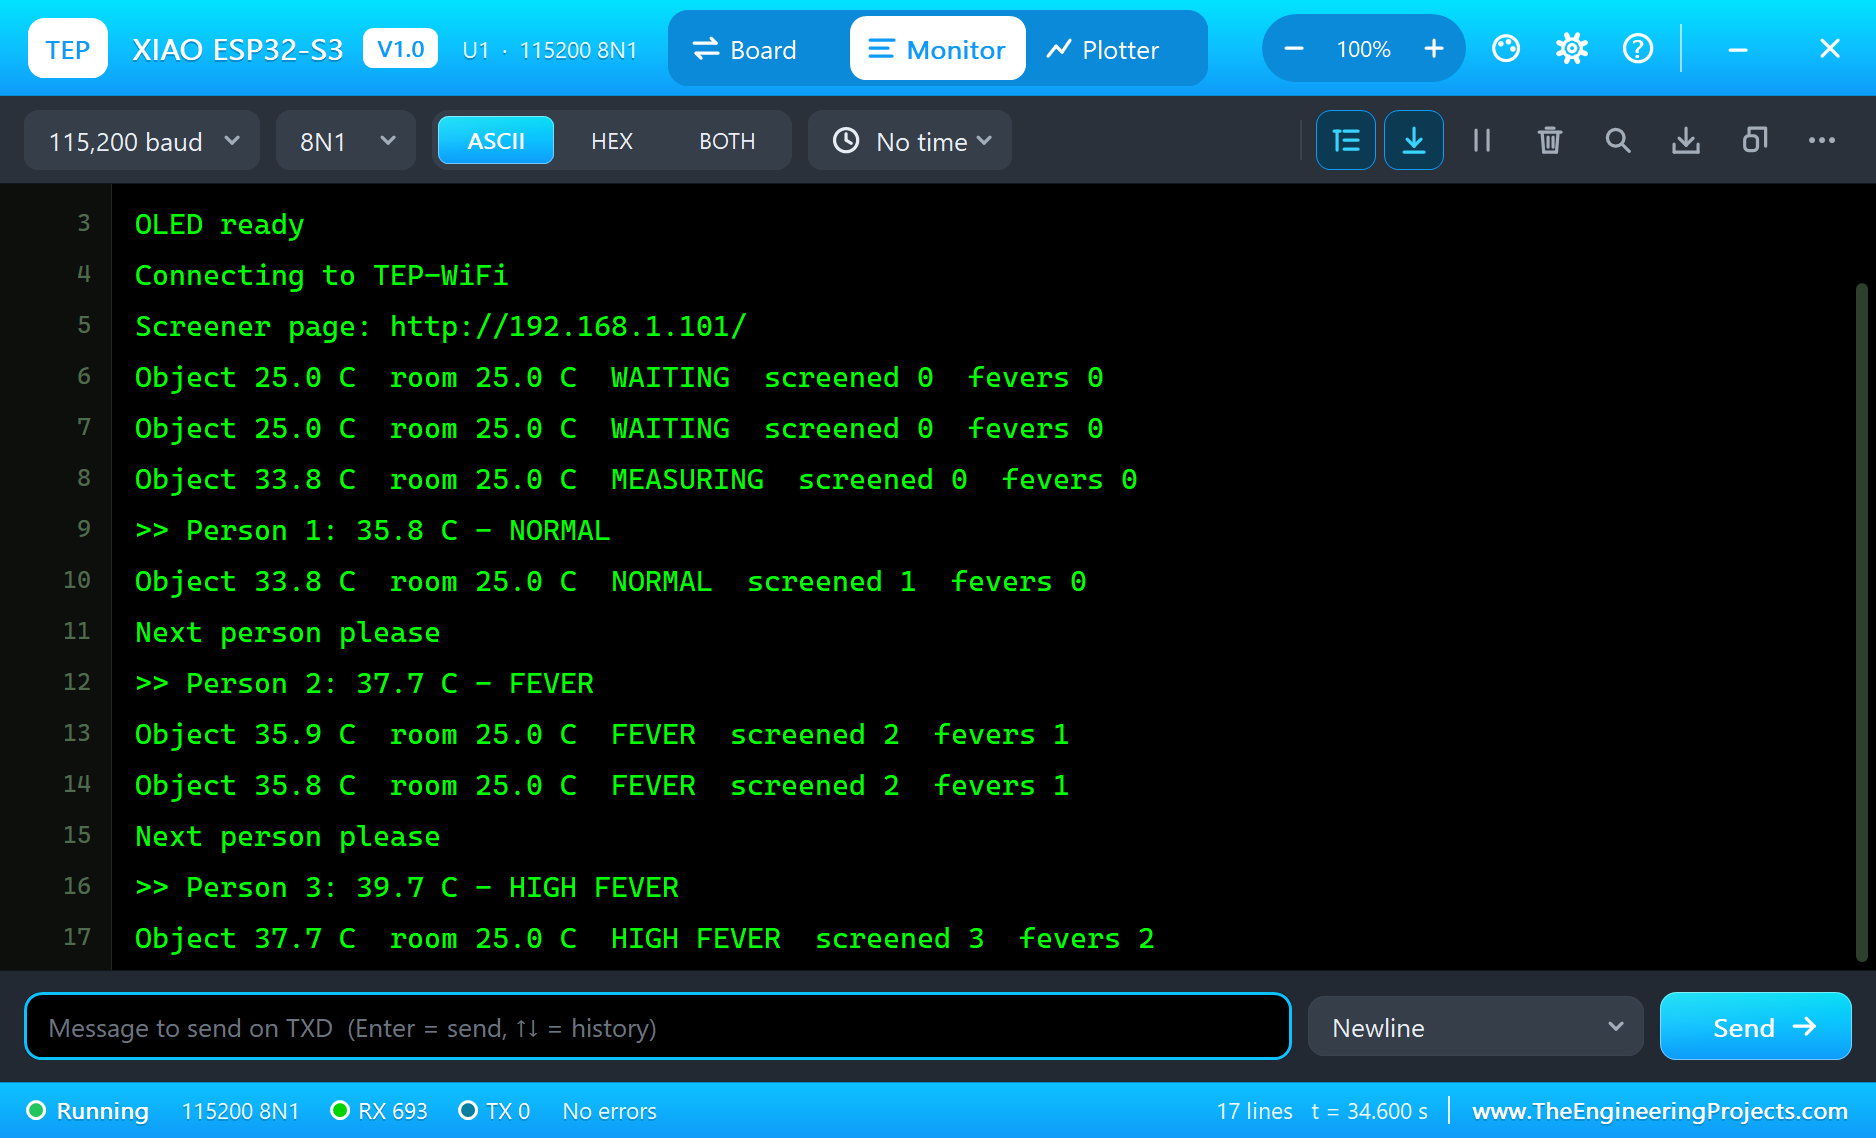
Clear the Counts
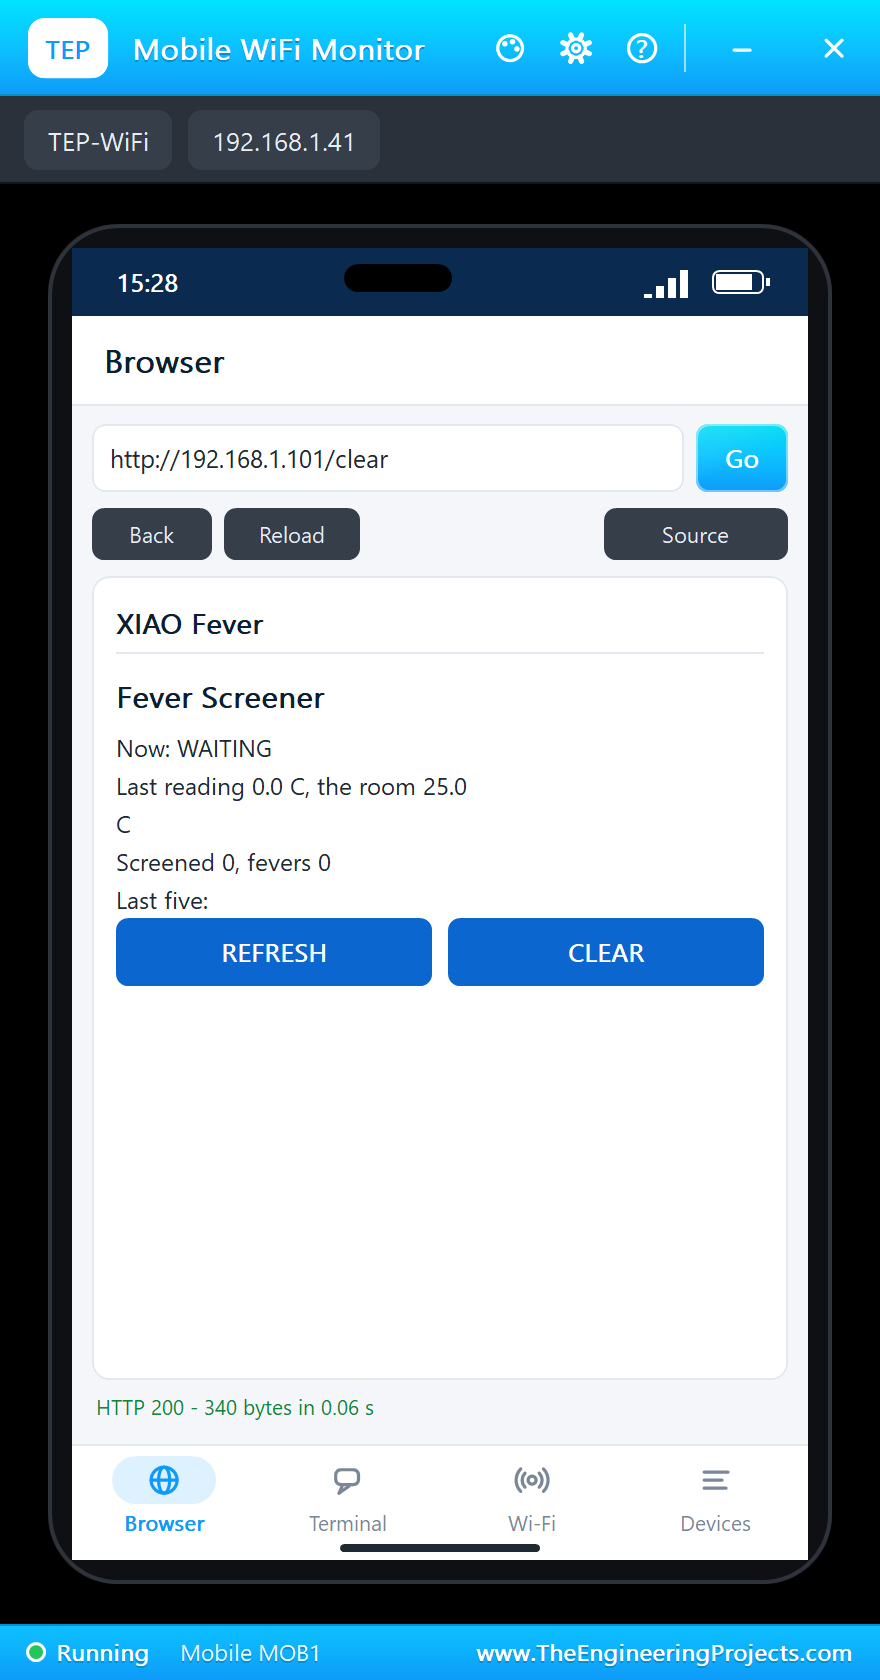
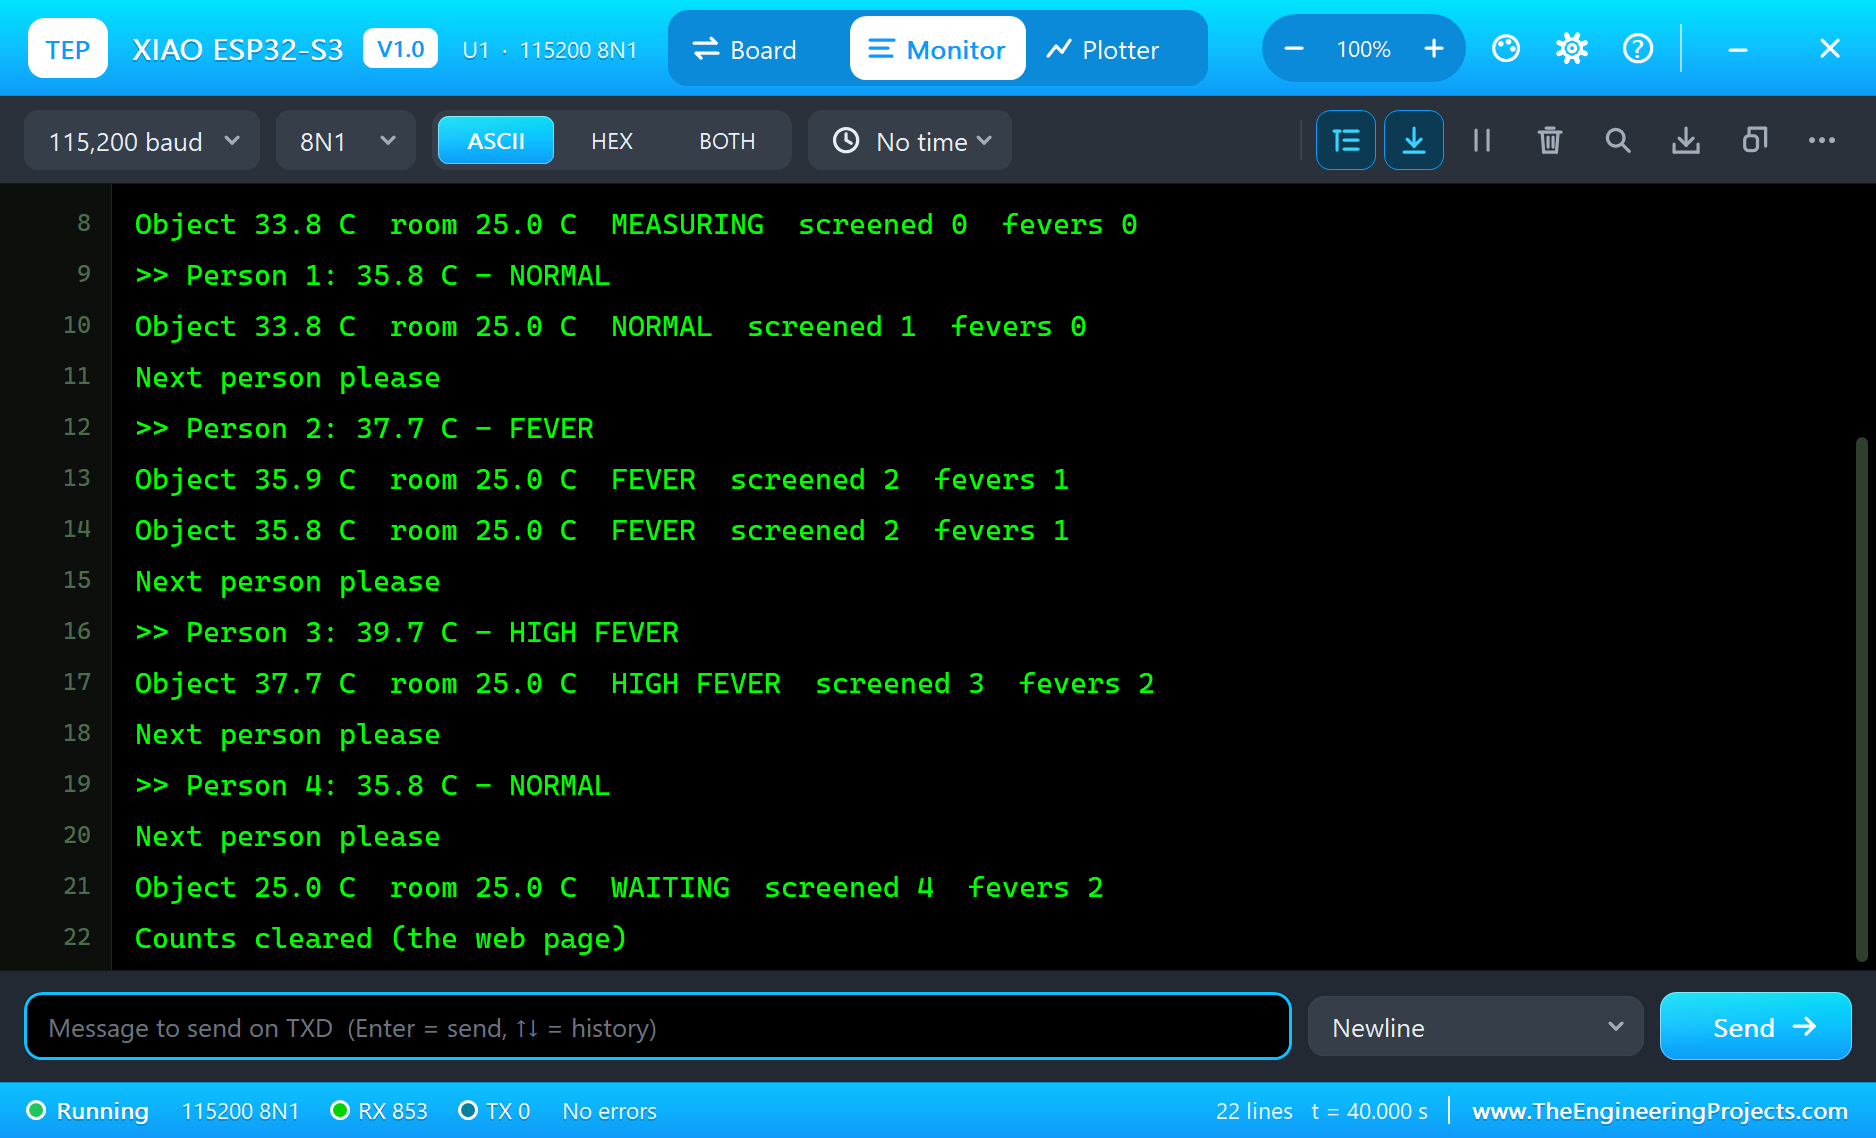
At the end of the day, CLEAR on the phone starts a new count. The monitor confirms with Counts cleared (the web page). The B button and the word CLEAR typed in the monitor do the same.
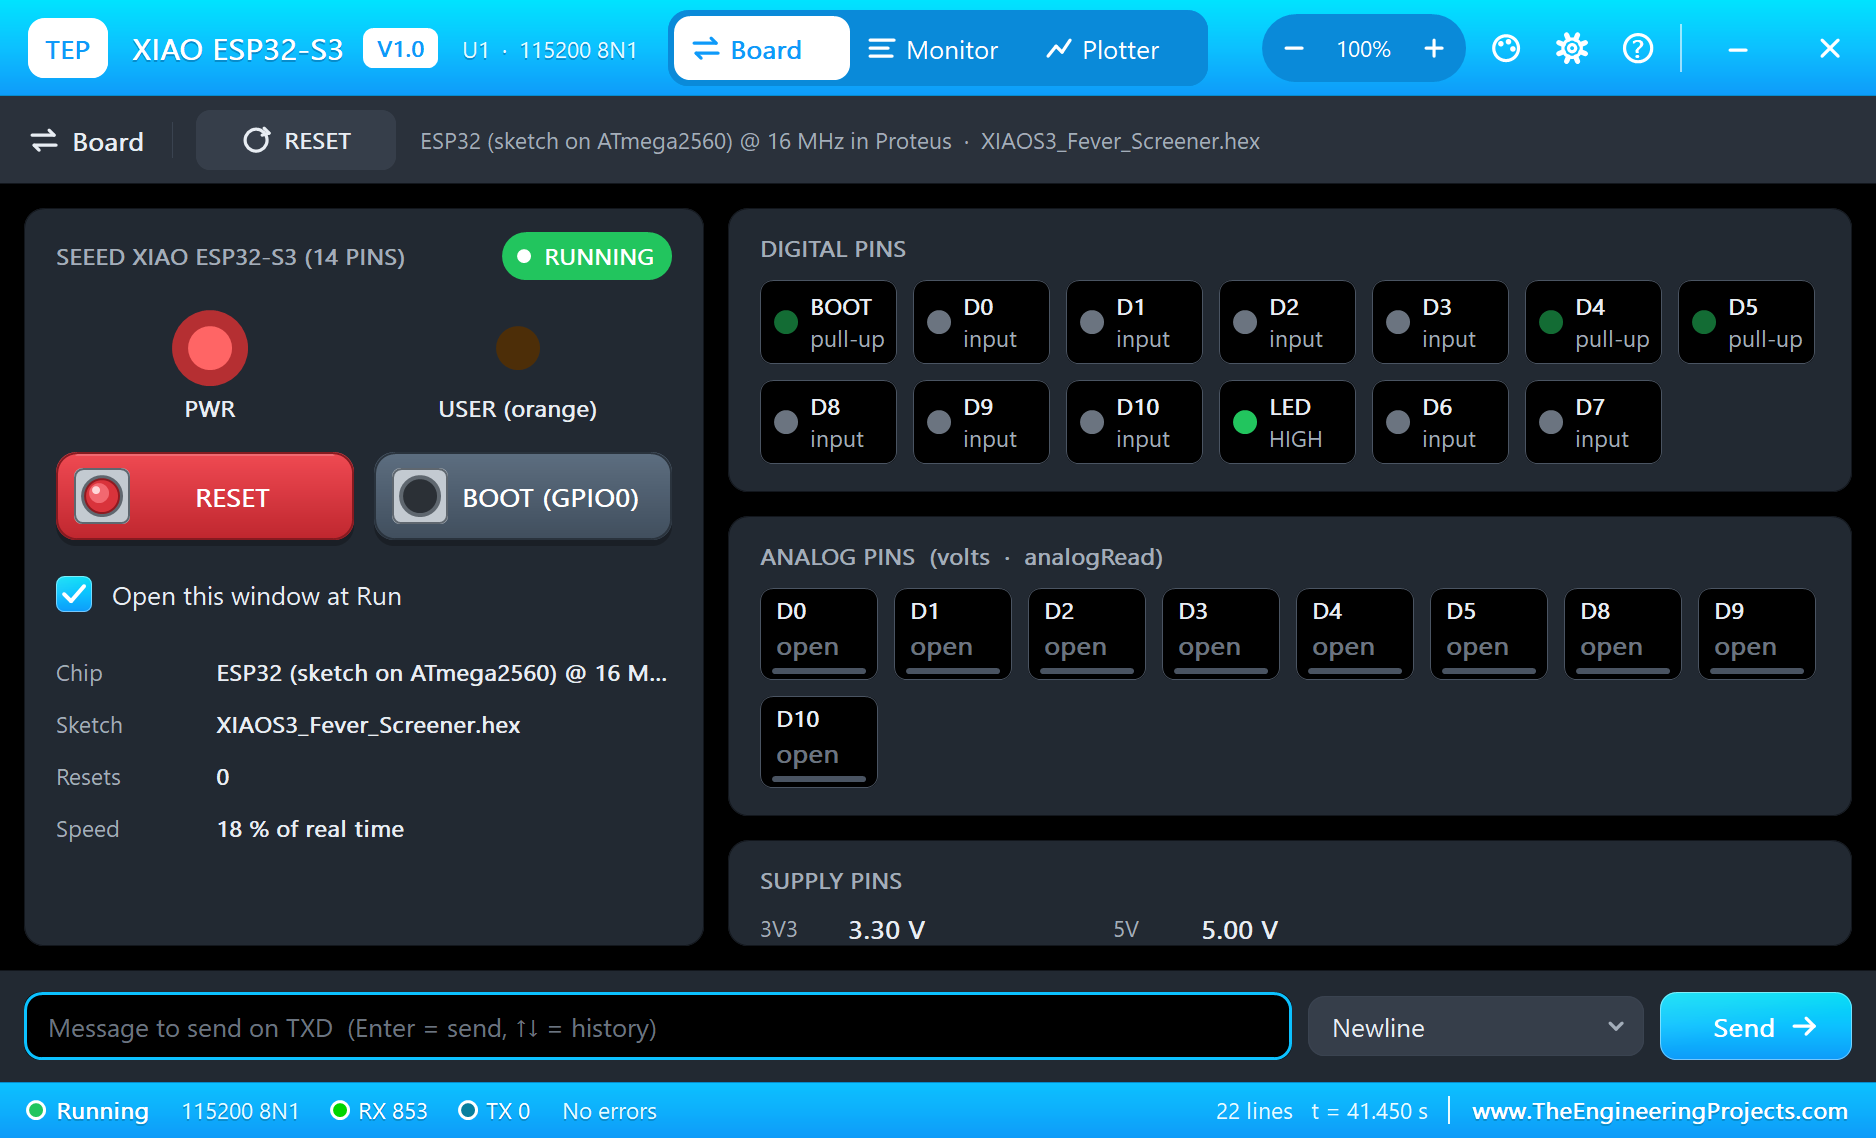
The built-in serial monitor, in the look of our TEP Serial Monitor Advance for Proteus, keeps the whole log, and its Board tab shows every pin live:
Try It Yourself
- Set the distance on the MLX90614's pop-up to 50 cm with a forehead: the spot is far wider than the target, the sensor mixes it with the room, and the reading falls.
- Set the material to SHINY 0.10: the reading goes wrong, which is why a shiny object cannot be measured this way.
- Change
FEVER_Cto suit your own rules and rebuild. - Type
STATUSorCLEARin the monitor.
Ideas to Extend the Fever Screener
- Send every fever to a phone with HTTPClient and a messaging service.
- Add a relay that opens the door only for a normal reading.
- Log each reading with the time from NTP to a Micro SD card.
- Add a buzzer so a fever cannot be missed.
Your Own Sketches
Write the sketch in the Arduino IDE with the board XIAO ESP32-S3 (TEP Proteus), use Sketch > Export Compiled Binary and set the board's PROGRAM property to the .hex. For a real XIAO ESP32S3 select "XIAO_ESP32S3" in Espressif's "esp32" package and upload - the same sketch, with the same D names.
Things to Know Before Using a Real XIAO ESP32-S3
- Fit the antenna: without the external antenna on the U.FL connector the Wi-Fi range is a few metres.
- The USER LED is inverted: LOW turns it on, so write HIGH in setup() if you want it off.
- USB CDC: Serial goes over the chip's own USB; enable "USB CDC On Boot" in the IDE to see it.
- GPIO0 is BOOT: holding B at reset starts download mode, the way out of a sketch that crashes USB.
- The board gets warm: Wi-Fi at full power heats the small board; keep it away from a temperature sensor.
- The battery: solder a 3.7 V LiPo to the pads on the back; the board charges it from USB.
Properties of the XIAO ESP32-S3
| Property | What it does |
|---|---|
| PROGRAM | the sketch: a .hex from TEP Boards for Proteus (board "XIAO ESP32-S3") |
| WIFISSID, WIFIPASS | the router in range (TEP-WiFi, 12345678) |
| MONITOR, BAUD, AUTOOPEN | the built-in serial monitor: on, its baud rate (115200), open at Run |
| TIME | the clock for NTP: PC or a fixed UTC time |
Troubleshooting
- "MLX90614 NOT FOUND" or "OLED NOT FOUND": SDA on D4, SCL on D5; the sensor is 0x5A, the OLED 0x3C.
- Nobody is measured: the object must be warmer than 30 C.
- The reading is low: pick the material SKIN 0.98 and a distance of 2 cm.
- The board stays off the network: the sketch's SSID and password must match WIFISSID and WIFIPASS.
- A number goes wrong above 32767: int is 16 bits in the simulation - use long.
- The page shows old values: use REFRESH; the monitors do not reload by themselves.
Limitations of the Simulation
- Your sketch gets 8 KB of RAM in the simulation, not the real board's 8 MB of PSRAM, and there are no FreeRTOS tasks, no second core and no vector instructions, so TinyML sketches will not fit.
- Bluetooth LE, the native USB, the camera of the Sense version, the battery charger and the external antenna's range are not modelled.
- The router, the addresses and the windows are TEP additions.
- XIAO is a name of Seeed Studio and ESP32-S3 of Espressif Systems; this library is not made or endorsed by them or by Labcenter.
- Tested in Proteus 8.5 in October 2026 (the demo as shipped, about 32 s of simulation). Proteus 7 is not supported.
So, that was all about the XIAO ESP32-S3 Library for Proteus. I hope it helps you build and test your XIAO projects before you touch the hardware - the sensor, the display, the Wi-Fi and the web page in one simulation. If you have any questions, ask in the comments and I will help you out. Till the next tutorial, take care and have fun!