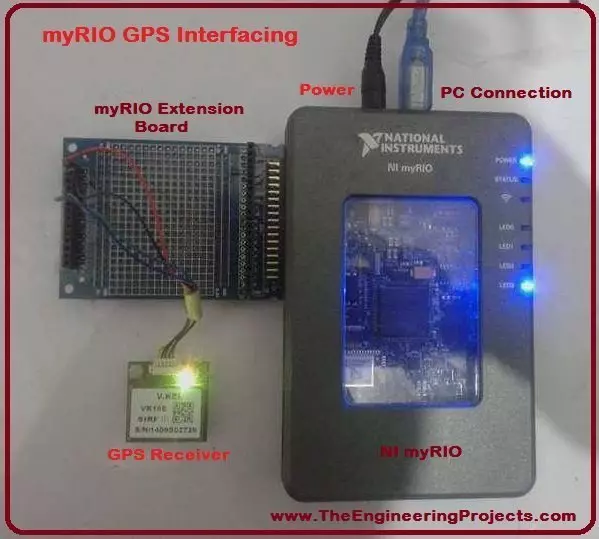
Today, I would like to provide a complete discussion on myRIO GPS Interfacing. First of all I would like to tell you about GPS, from what it is abbrevi...
Hello everyone! I hope you all will be absolutely fine and having fun. Today, I would like to provide a complete discussion on introduction to GPS and myRIO as well as myRIO GPS Interfacing as the most related part. First of all I would like to tell you about GPS, from what it is abbreviated, at which principle it works and how it plays its role in our daily life. GPS is basically derived from the word Global Positioning System. GPS is a complete network of satellites which are continuously rotating in their orbits and send information to earth about their accurate position in space. GPS receivers are used to receive the signals, and the received signals help us to estimate the precise time, position and speed of anything moving around. I have share GPS Library for Proteus in my previous tutorials, which is quite helpful for the engineering students.
GPS plays a vital role in our daily life. It provides a complete map, i.e. it helps us to easily go through the places which we have never seen before. GPS first system was developed by Americans in 1960's. They introduced it to locate their ships in the ocean. This system has five (5) satellites which are used to locate their ships once in every hour. GPS has three basics parts named as satellites, control stations and receivers. All of these will be explained later. This entire system is able to provide us the information about altitude, precise position, speed etc. But there are also some errors while estimating all these things. The major cause of its error is the inaccurate time of the receivers clock. Due to this fact, we get same GPS coordinates for the different points and it becomes impossible to locate anything accurately. For example, in a small garden we want to locate a robotic lawn mower. But due to the error problem we get the same GPS coordinates, for the initial as well as the final position of the lawn mower. This system has a lot of real life applications e.g. mapping forests, military applications, intelligence applications, locating ship, navigating vehicles and aircraft, guide hikers etc.The further detail about the GPS and myRIO GPS interfacing will be provided later in this section.
Introduction to GPS Receiver Module
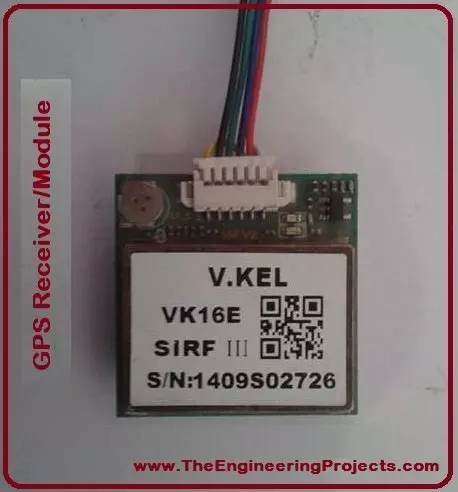
GPS stands for Global Positioning System. It is the network of satellites which are orbiting in their orbits and send information to the earth, about the precise position. This system plays a vital role in daily life. It was first introduced by Americans to navigate their ships. It is now enhanced to a great level and is able to provide information about forest mapping, guide hikers, locating air crafts, navigating vehicles and a lot more. If we want to go at newer places which we have never visited before, we can easily go there taking help from the GPS system by using GPS receiver. The GPS receiver or a GPS module is shown in the figure given below.
You can see from the above figure, I have cut white and yellow wire because I am not using it.
I have used the other four remaining wires for the communication between GPS module and myRIO.
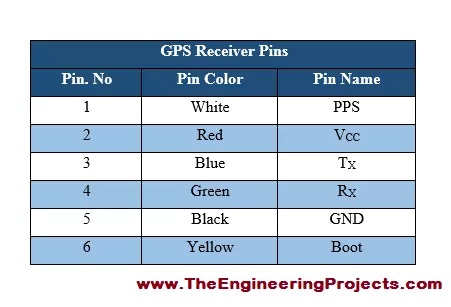
GPS has total six (6) pins, but we will use only four (4) of them.
Each of the pins has different functions to perform.
GPS module/receiver pins are provided in the table shown in the figure given below.
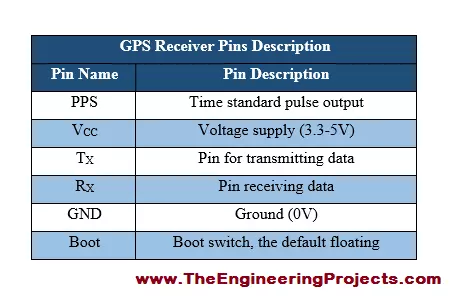
2. GPS Pins Description
Since each pin is assigned with a different task, so must know about functions associated with each pin.
GPS pin description are listed in the table given in the figure shown below.
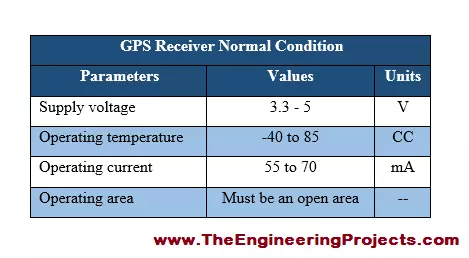
3. GPS Receiver Operating Conditions
Like all other devices, GPS receiver also works on certain conditions, which must be fulfill to get better performance.
Normal operating conditions for this particular GPS receiver are listed in the table given in the figure shown below.
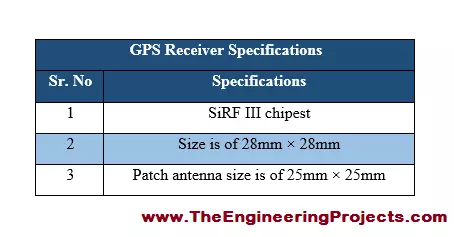
4. GPS Receiver Specifications
The specifications are such parameters which show the efficiency of that device.
GPS receiver specifications are provided in the table shown in the figure given below.
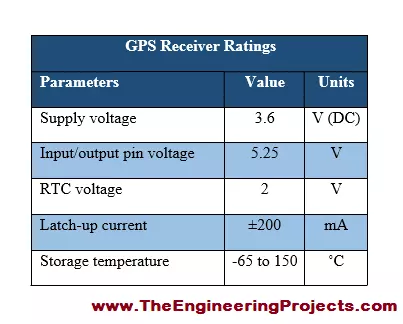
5. GPS Receiver Ratings
Ratings tell us about the power, current and voltage requirement of any electronic device.
GPS receiver absolute maximum ratings are listed in the table shown in the figure given below.
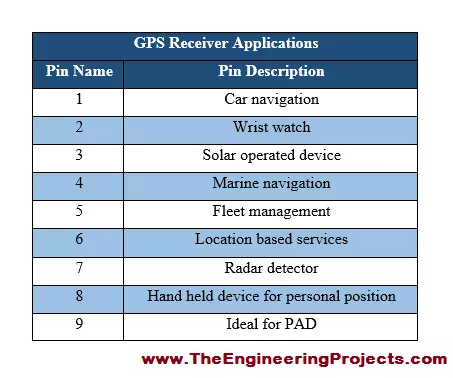
6. GPS Receiver Applications
Most of the electronic devices are known on the basis of their applications.
GPS receiver applications are listed in the table given in the figure shown below.
myRIO GPS Interfacing
In the previous section we have discussed i detail about the basics parameters of the GP receiver module and the different properties and applications associated with that particular module. Now, in this section of the tutorial myRIO GPS interfacing, I am going to tell the step by step procedure to be followed in order to interface a GPS receiver module with NI myRIO. So, the major focus of the section will be the only discussion on the interfacing of GPS receiver module using NI myRIO and NI LabVIEW. All the step are explained in detail below. So, do follow all the steps in the same way as I did.
GPS receiver module interfaced with myRIO is given in the figure shown below.
2. NI LabVIEW Final VI for sReceiving GPS Data
The Virtual Instrument (VI) is huge in size, so I have added it into three different parts.
Each part of the entire VI is given in the separate figure.
Below, I am going to share each part of the VI and will explain a bit about it later.
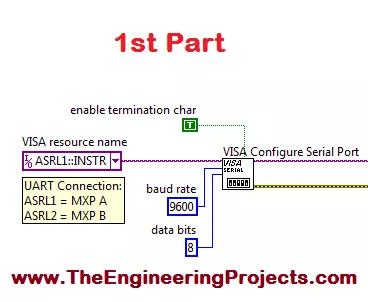
The first part of the VI for receiving GPS data is given in the figure shown below.
In the first part of the VI as shown above, I have used VISA Serial Port for the communication between GPS receiver and myRIO.
VISA Resource Name is basically the MXP of myRIO as described in Introduction to myRIO.
ASRL1 shows the GPS receiver is attached with the MXP A of myRIO.
If you want to attach your GPS receiver with MXP B, then you have to select ASRL2.
9600 is the baud rate, shows the rate at which GPS is communicating with myRIO or vice versa.
So, that was the discussion about the first part of VI for getting GPS data.
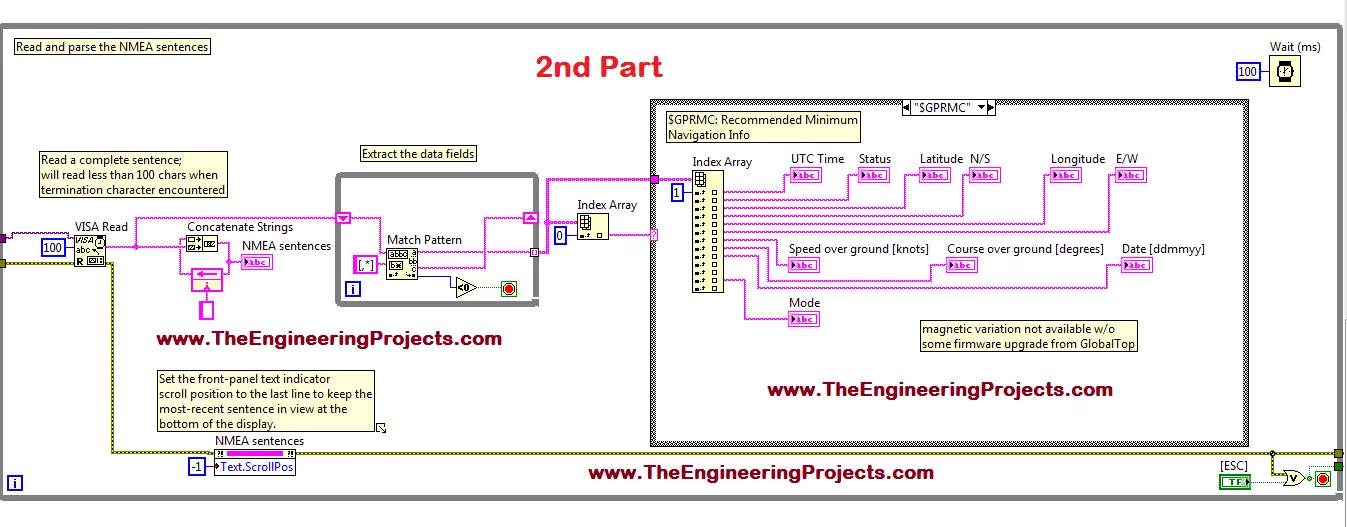
The second part of the VI is given in the figure shown below.
At the extreme left of the above figure, I have used a VISARead block, which is reading continuously 100 characters when termination character encountered.
Then I used a block Concatenate String which takes input from VISA Read and produces NMEA sentences, which are back to its input as feedback.
Moving to the right the next small While Loop is for extracting the data fields.
The next comparatively large loop is for getting latitude, longitude, UC time, speed etc.
And at the top right corner of the above figure I have added a delay of 100 milli seconds.
So, that was the detailed description of the second part of the VI for getting GPS data usig NI myRIO.
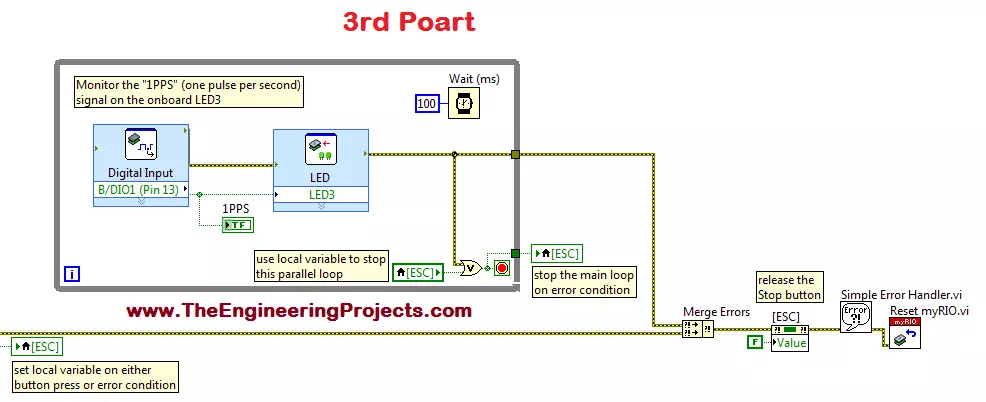
The 3rd part of the VI for getting GPS data is shown in the figure given below.
In the above figure, inside the While Loop, I have used Digital Input whose output is connected to and LED.
The above step describes the monitoring of one pulse per second signal (1PPS) on the on-board LED 3.
Then I have used Merge Error block to produce a single final output.
Then, I used a Simple Error block in order to visualize the error, if it occurs.
At the end, I have used a Reset myIRO block, which resets the FPGA (Field Programmable Gate Array) target and all the input/output channels on myRIO.
So, that was the detailed description of the third part of the block diagram window VI for receiving GPS data using NI myRIO.
You can easily receive the data from GPS receiver by following all of the above steps carefully.
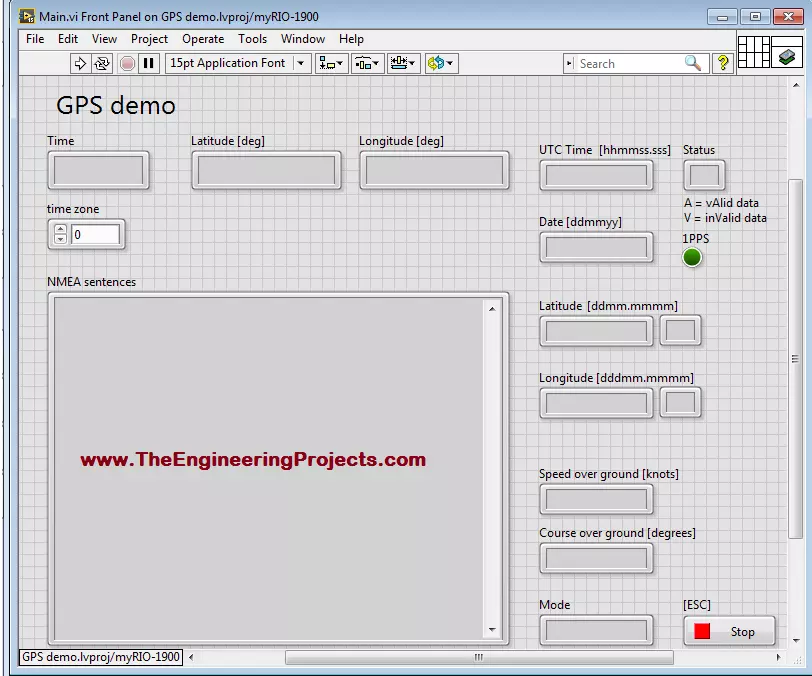
3. NI LabVIEW Final GUI for Receiving GPS Data
I have made a complete VI in LabVIEW to receive GPS data.
The arrangements of the blocks e.g.time, latitude, longitude and speed are made to provide a better look to the GUI.
An LED on the right side shows the one pulse per second (1-PPS).
On the bottom left of the above GUI, I have made a region to obtain all the data from the GPS receiver module.
The final form of GUI (Graphical User Interface) is given in the figure shown in the figure below.
In the above figure, at the bottom right you can see a button with a red colored small square inside it.
Using this button, you can terminate your program when it is in running condition, this function can also be performed using Esc button from either your personal computer or from your laptop.
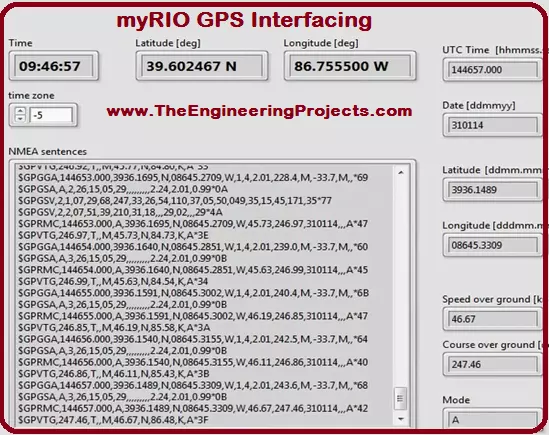
4. Received GPS Data
The data obtained from the GPS receiver is displayed on the GUI.
The GUI is given in the figure shown below.
From the above figure, you can see that the longitude, longitude are properly obtained.
At the top left corner of the above GUI, I have shown the exact time inside a Numeric Indicator.
Date has also been displayed in the middle of the right side of the GUI.
I have displayed longitude, latitude, time, date etc as shown in the figure above.
So, that was the brief discussion on the results obtained from GPS receiver module.
You can download the complete NI LabVIEW VI (Virtual Instrument) here by clicking on the button below.
That is all from the tutorial myRIO GPS Interfacing. I have covered almost all the necessary details about getting GPS data from the satellites using GPS receiver/module. I have also provided the detail about the GPS network and working of the whole network. I hope you have enjoyed this tutorial and hoping for your appreciation for this effort. I have shared the complete NI LabVIEW VI (Virtual Instrument) for myRIO GPS interfacing. Just by downloading it you will be able to get GPS data using any of the GPS receiver/module. I will further share interesting and informative topics in my later tutorials so, till then take care and bye :)
syedzainnasir
I am Syed Zain Nasir, the founder of The Engineering Projects (TEP). I am a
programmer since 2009 before that I just search things, make small projects and now I am sharing my
knowledge through this platform. I also work as a freelancer and did many projects related to
programming and electrical circuitry. My Google Profile+Follow
Get Connected