Hello friends, I hope you all are doing great. Today, I am going to share the new Mini Speaker Library for Proteus. A small 8 ohm speaker is the next step up from a buzzer: it covers a much wider range of frequencies, so melodies sound like music rather than beeps, and with an amplifier it can play speech and real audio. You find these little speakers in toys, doorbells, alarm clocks, handheld games and the talking parts of countless gadgets.
Mini Speaker Library for Proteus
Latest version: V1.0 (November 2026, this tutorial)
Other component libraries: C945 Transistor · PC817 Optocoupler · Relay Module · Resistor · 5 mm LED · Designer Colour LED · Push Button · Active Buzzer · Electrolytic Capacitor · Ceramic Capacitor · Tantalum Capacitor · Film Capacitor · 1N4007 Diode · Zener Diode · Schottky Diode · Supercapacitor · Photodiode · RGB LED · Bridge Rectifier · Flashing LED · Bi-Colour LED · SMD LED · Slide Switch · Toggle Switch · Rocker Switch · Micro Limit Switch · Emergency Stop Switch · SMD Resistor · Power Resistor · Resistor Network · Potentiometer · Trimmer Potentiometer · Slide Potentiometer · NTC Thermistor · DIP Switch · Fuse · Passive Buzzer · 7-Segment Display · LED Bar Graph · IR / UV LED · Small Transistors · TIP122 Darlington · N-MOSFET · P-MOSFET · PC817 Optocoupler · Filament Bulb · Power LED · Voltage Regulator · SCR and TRIAC · Inductor · Toroid Inductor · Crystal
Helping Tools
- Serial Monitor Advance: a serial terminal window for the UART of your board
- Serial Monitor Expert: the serial monitor with extra debugging tools
- LCD Library for Proteus V3.0: 16x2, 20x4 and I2C LCDs to show your readings
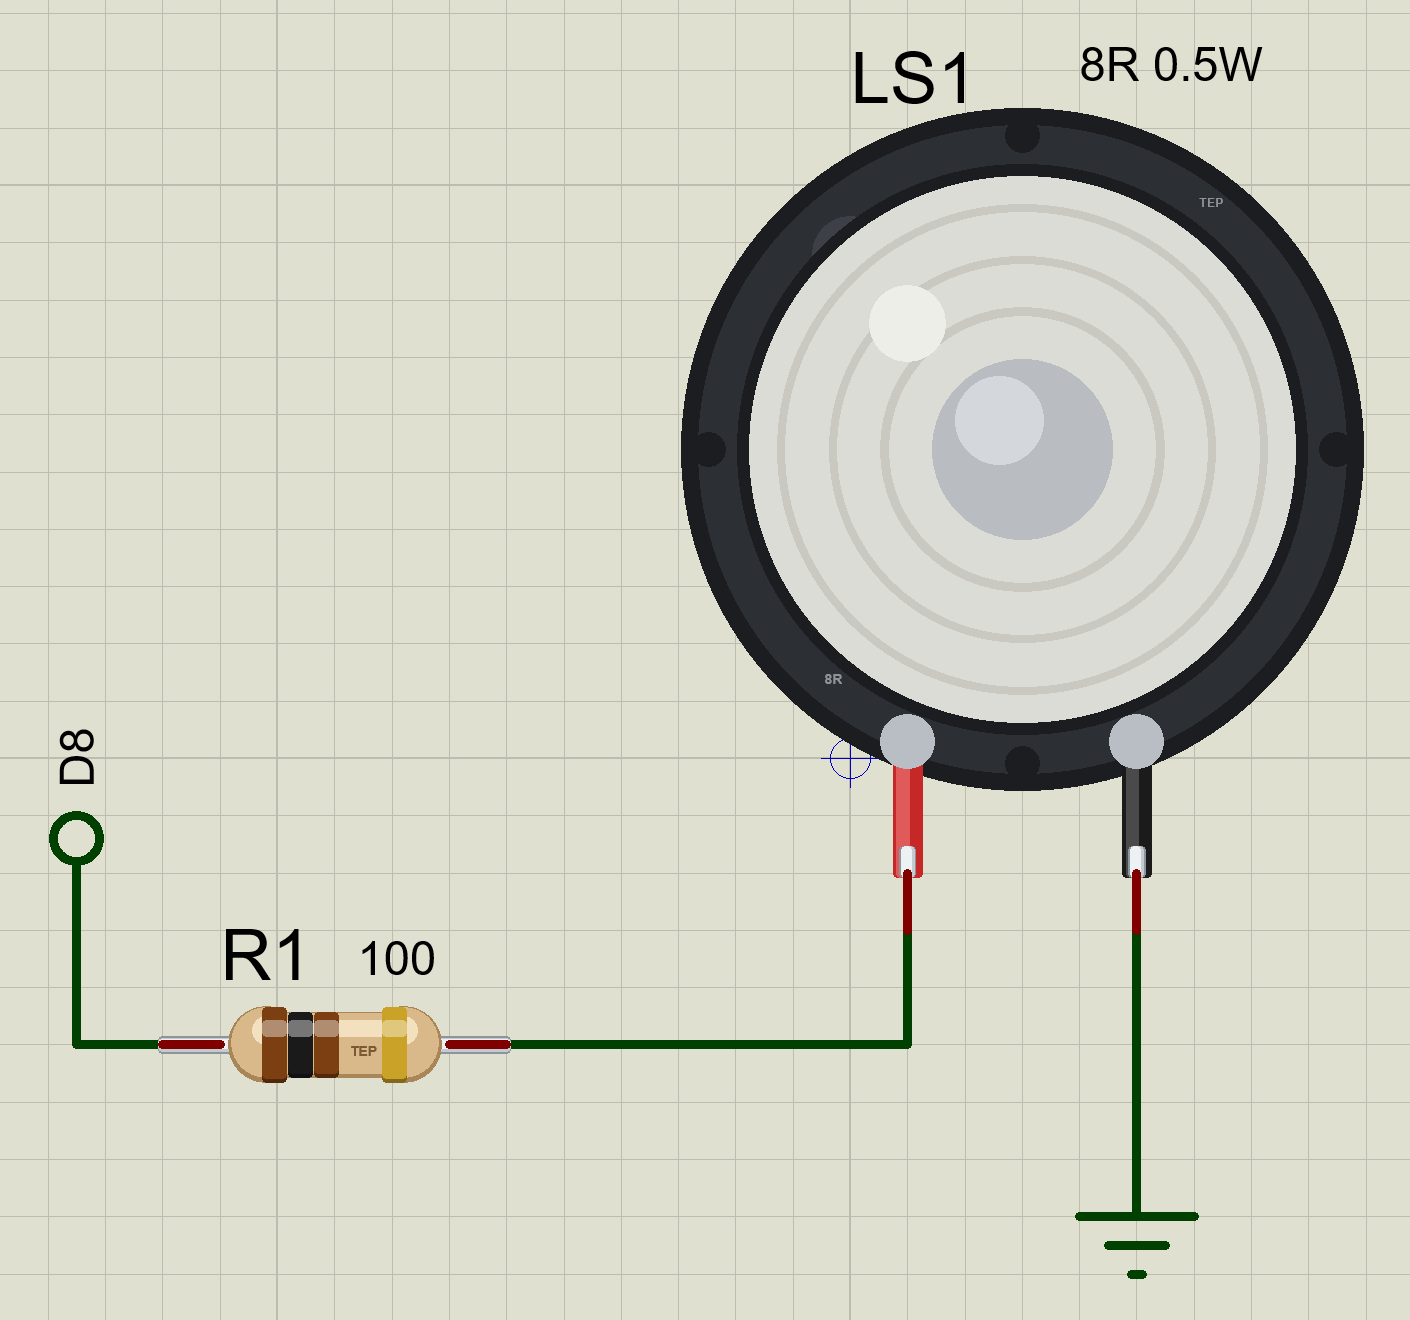
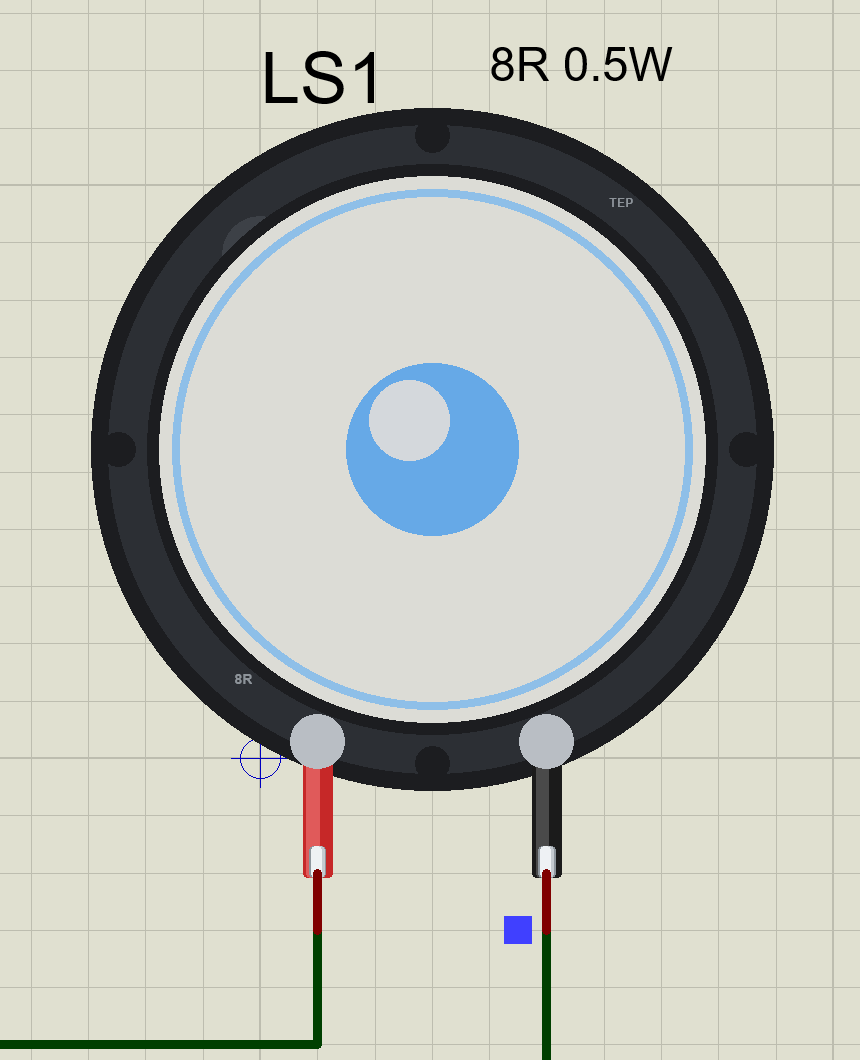
Our library has a 28 mm 8 ohm mini speaker at true scale, with its black frame, the mylar cone with its ridges, the dome in the middle and red and black leads. At Run, it plays the tone your Arduino drives it with, on your PC speaker too, as loud as the real speaker would be at that frequency. The pop-up names the note, draws the speaker's response against frequency with the tone on it, and shows the power in the coil, including the part a square wave wastes as heat. The demo plays a scale and one tone per octave, so you can hear exactly where a small speaker is strong and where it is weak.
NOTICE: Our team has put a lot of effort into these small parts: the bodies, the animation and the pop-ups are all our own design, and you get them free. Your feedback is the fuel that keeps us going, so please tell us what you think in the comments below or in the Mini Speaker board of our forum. And if our free libraries help you, you can buy us a coffee. So, let's get started with the Mini Speaker Library for Proteus:
What is a Speaker?
A speaker turns an electrical signal into sound. At its back sits a permanent magnet with a narrow round gap. In that gap hangs the voice coil, a coil of fine wire glued to the cone. Current through the coil makes it a small electromagnet, pushed one way or the other by the permanent magnet depending on the direction of the current. The coil moves the cone, the cone moves the air, and the air carries the sound to your ear. A soft surround at the edge and a spider at the back hold the cone centred and let it move.
Unlike a buzzer, which is built to ring loudly at one frequency, a speaker is built to follow the signal over a wide range. That is what lets it play music and speech. A mini speaker like ours covers roughly from its resonance at 600 Hz up to well above 10 kHz, which suits melodies, alerts and voice, but not deep bass.
| Feature | Our mini speaker |
|---|---|
| Size | 28 mm across, front view |
| Rated like | PUI Audio AS02808MR-2-R |
| Impedance | 8 ohm |
| Power | 0.5 W nominal, 1 W at the most |
| Resonance | 600 Hz |
| In the library | MINISPEAKER28TEP, prefix LS |
Impedance: 8 Ohm
A speaker's impedance is its resistance to the signal, given as a round number: 4, 8 or 16 ohm for most speakers. The coil's plain DC resistance is a little lower, and the coil's inductance makes the impedance rise at high frequencies. Our model uses the 8 ohm as a plain resistance, which is close enough for the tones an Arduino makes. The low value matters: 5 V across 8 ohm is over half an amp, far more than an Arduino pin can give.
Power and Loudness
The power rating says how much a speaker can take before its coil overheats: 0.5 W nominal for ours, and 1 W for short peaks. The loudness follows the power: double the power is 3 dB louder, ten times the power is 10 dB louder. A few milliwatts from a pin is quiet but clearly audible in a quiet room; half a watt from an amplifier fills a room.
Our pop-up gives the loudness as decibels below full power, which is the rated 0.5 W on the flat part of the response. It takes into account the power that goes into the tone itself, the fundamental of the square wave, and the speaker's response at that frequency.
Resonance and Response
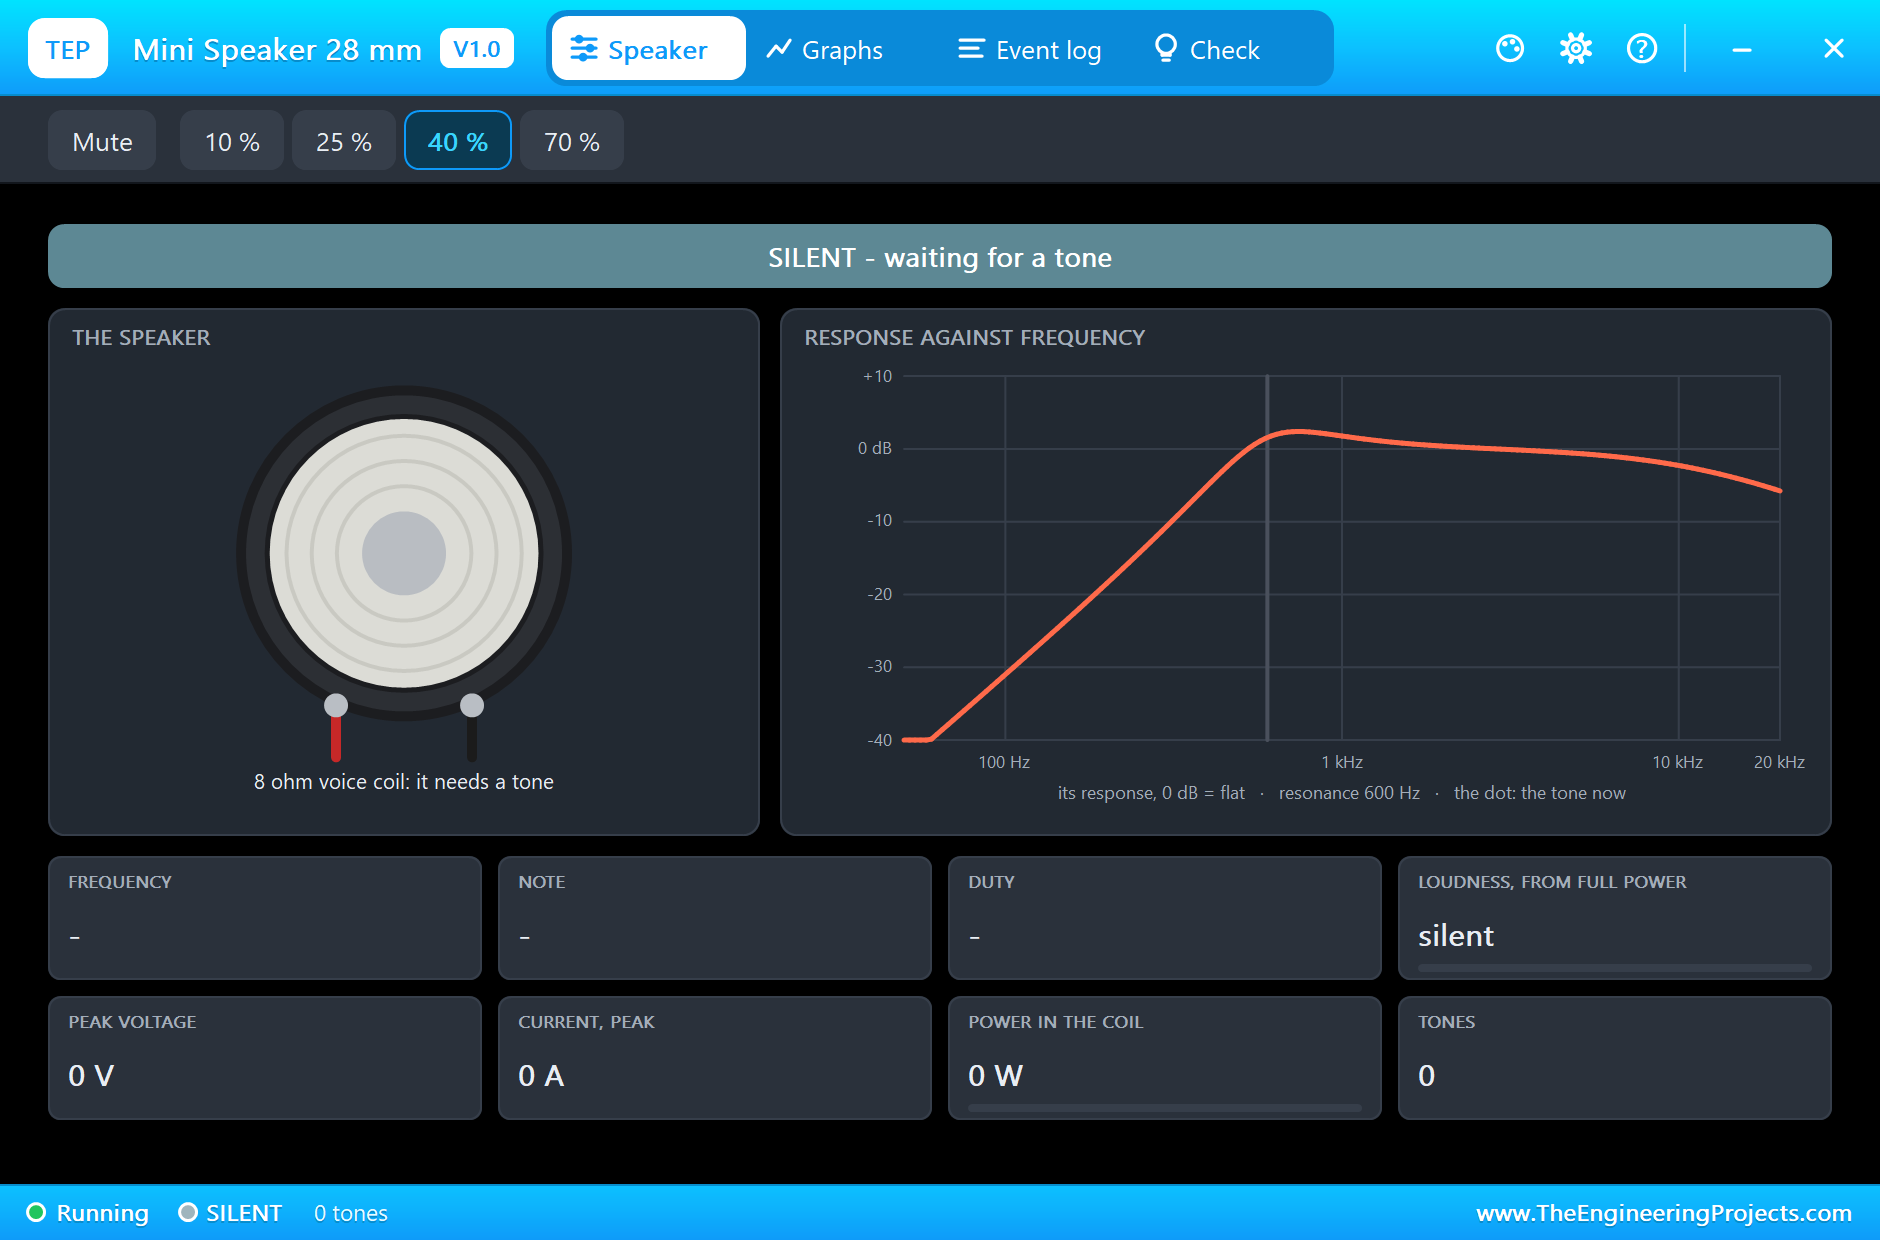
Every speaker has a resonance, the frequency where the cone, its suspension and the air move most easily. Below it, a small cone simply cannot push enough air, and the sound falls away fast: about 12 dB for every halving of the frequency. Above it, the response is fairly flat until the cone becomes too heavy to follow, far up in the treble. Our model draws exactly that: weak below 600 Hz, flat above it, and a gentle fall past 12 kHz.
That is why tiny speakers sound thin. A bass note at 100 Hz comes out about 31 dB weaker than a tone at 1 kHz from the same drive. Melodies for a small speaker sound best above about 600 Hz, which is the range of the fifth octave and up on a piano.
The Square Wave and Its DC Part
An Arduino makes tones with tone(pin, frequency): a square wave that swings between 0 V and 5 V. That wave carries more than the tone. Its average is not zero but half the peak, a steady DC part that pushes the cone to one side and holds it there, and only heats the coil. With a 50 % duty, the DC part is half of all the power in the coil. A capacitor in series with the speaker, 100 uF or so, blocks the DC and lets the tone through, which is what amplifier outputs do.
Driving It from a Pin
Straight on a pin, 8 ohm would try to draw over half an amp, which would damage the pin. The simple fix, the same as in Arduino's own tone examples, is a series resistor of about 100 ohm. In our demo that leaves 0.31 V on the speaker, 6.1 mW in its coil and 39.1 mA from the pin at the peak: inside the UNO's 40 mA absolute limit, but close to it, so the Check page marks it amber. A 150 ohm resistor leaves more margin, at the cost of a little volume. For real volume, use an amplifier module with a coupling capacitor.
Notes and Octaves
Each octave doubles the frequency, and divides into 12 semitones. The reference note is A4 at 440 Hz, so A5 is 880 Hz and C6 is about 1047 Hz. Our pop-up names the nearest note for every tone and shows how far off it is in cents, hundredths of a semitone. The demo's scale, C5 to C6, sits right on the flat part of the speaker's response.
| Note | Frequency | Note | Frequency |
|---|---|---|---|
| C5 | 523 Hz | G5 | 784 Hz |
| D5 | 587 Hz | A5 | 880 Hz |
| E5 | 659 Hz | B5 | 988 Hz |
| F5 | 698 Hz | C6 | 1047 Hz |
Where They Are Used
Mini speakers play the sounds of toys, doorbells, alarm clocks and kitchen appliances, the voice prompts of meters and chargers, and the audio of handheld games and small radios. In Arduino projects they play melodies with tone(), sound effects, and with a small amplifier and an audio player module, recorded speech and music. Next to the Passive Buzzer Library for Proteus, which rings loudest at one frequency, a speaker is the choice whenever a tune has to sound like a tune.
Features of the Mini Speaker Library for Proteus
- The real look, at true scale: a 28 mm speaker with its black frame, mylar cone, dome and red and black leads, and our small TEP signature.
- It plays the tone it is given: the model times the edges of the drive and finds the frequency, the note and the duty.
- Sound on your PC: at the right pitch and loudness; it pauses when the simulation pauses.
- A real response curve: weak below its 600 Hz resonance, flat above it.
- The power in the coil: all of it, the part in the tone and the DC part that only heats, with warnings over 0.5 W and 1 W.
- A real electrical load: 8 ohm, so the pin current is real, and the Check page judges it.
- A pop-up: the tone, the note, the power, the loudness on the response curve, mute and volume, graphs, an event log and a check page.
- A complete package: about 1.9 MB with the library, our Arduino UNO V4.0, our resistor and push buttons and the demo, without the source code of the model.
The Mini Speaker in Proteus
The device is MINISPEAKER28TEP in TEPSPEAKER.LIB, under Speakers and Sounders, with the prefix LS and the model TEPSPEAKER.DLL. Search SPEAKER in Pick Devices. Its two pins are + on the red lead and - on the black one.
The Properties
| Property | What it does |
|---|---|
| Label (VALUE) | 8R 0.5W |
| Sound on the PC, % | 40; 0 keeps it silent |
| Coil resistance, ohm | 8 |
Download Mini Speaker Library for Proteus
Click the button below to download Mini-Speaker-Library-for-Proteus-v1.0.zip (about 1.9 MB, without the source code of the models):
Mini Speaker Library for Proteus V1.0- README.txt: installation, the demo, the properties, troubleshooting and the limits.
- Proteus Library Files:
TEPSPEAKER.LIB,TEPRESISTOR.LIB,TEPBUTTON.LIBand ourArduinoV4TEP.LIB. - Proteus Model Files:
TEPSPEAKER.DLL,TEPRESISTOR.DLL,TEPBUTTON.DLLandTEPARDUINO.DLL. - Arduino Code: the demo sketch.
- Proteus Simulation: the demo project, its HEX file and copies of the DLLs.
No Proteus yet? Read How to Download and Install Proteus 7 and 8. New to libraries? Follow How to Install a New Library in Proteus.
How to Install Mini Speaker Library for Proteus
- Close Proteus and extract the whole zip file, for example to your Desktop.
- Copy the files from Proteus Library Files into the LIBRARY folder of Proteus.
- Copy the files from Proteus Model Files into the MODELS folder.
- Delete
TEPSPEAKER.IDXfrom the LIBRARY folder if it is there. - Start Proteus, press P and search for SPEAKER.
Demo: A Scale and the Octaves
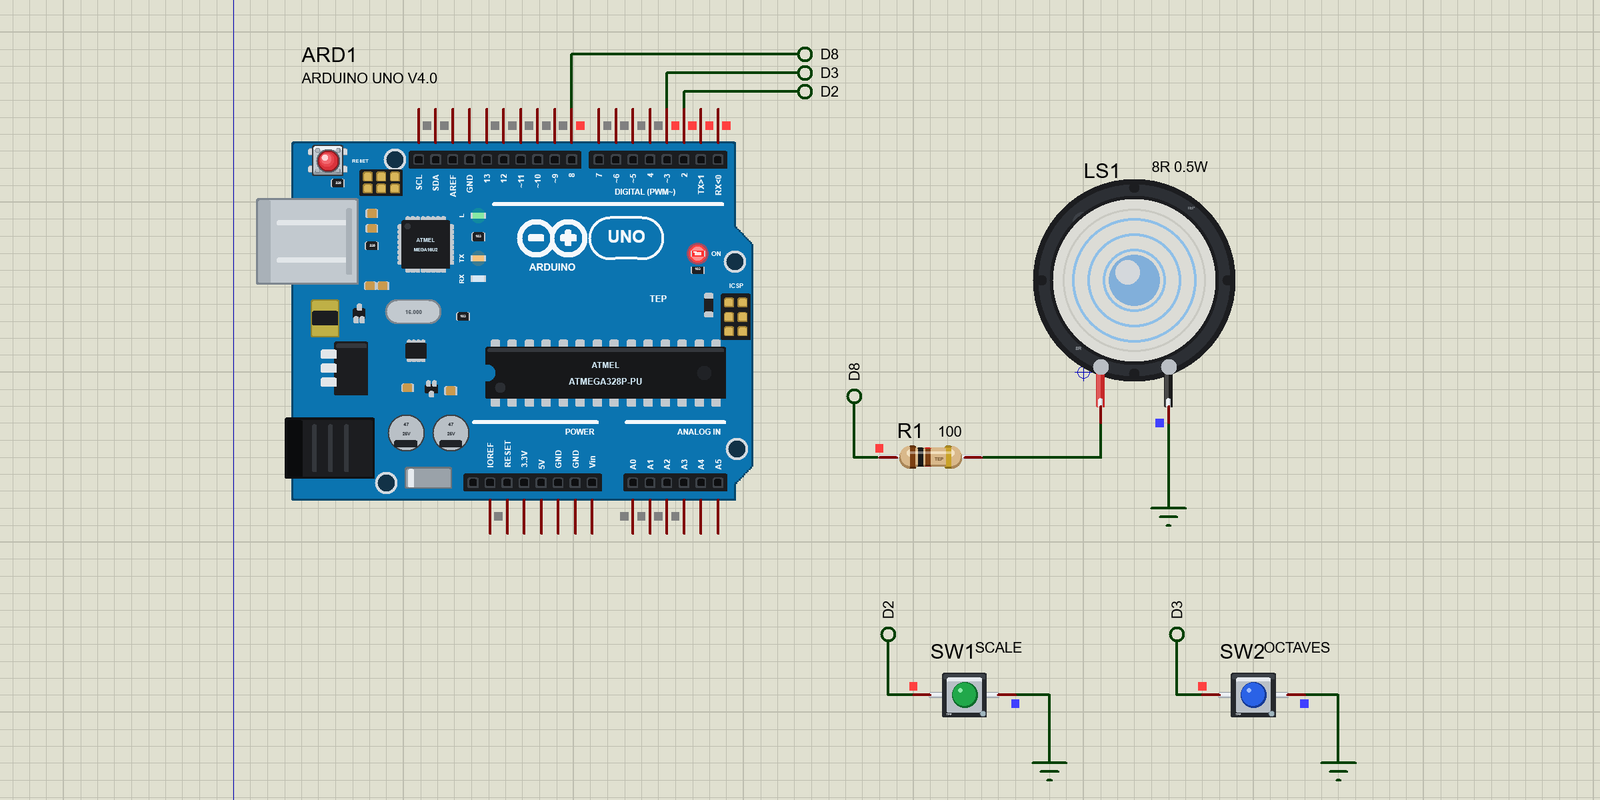
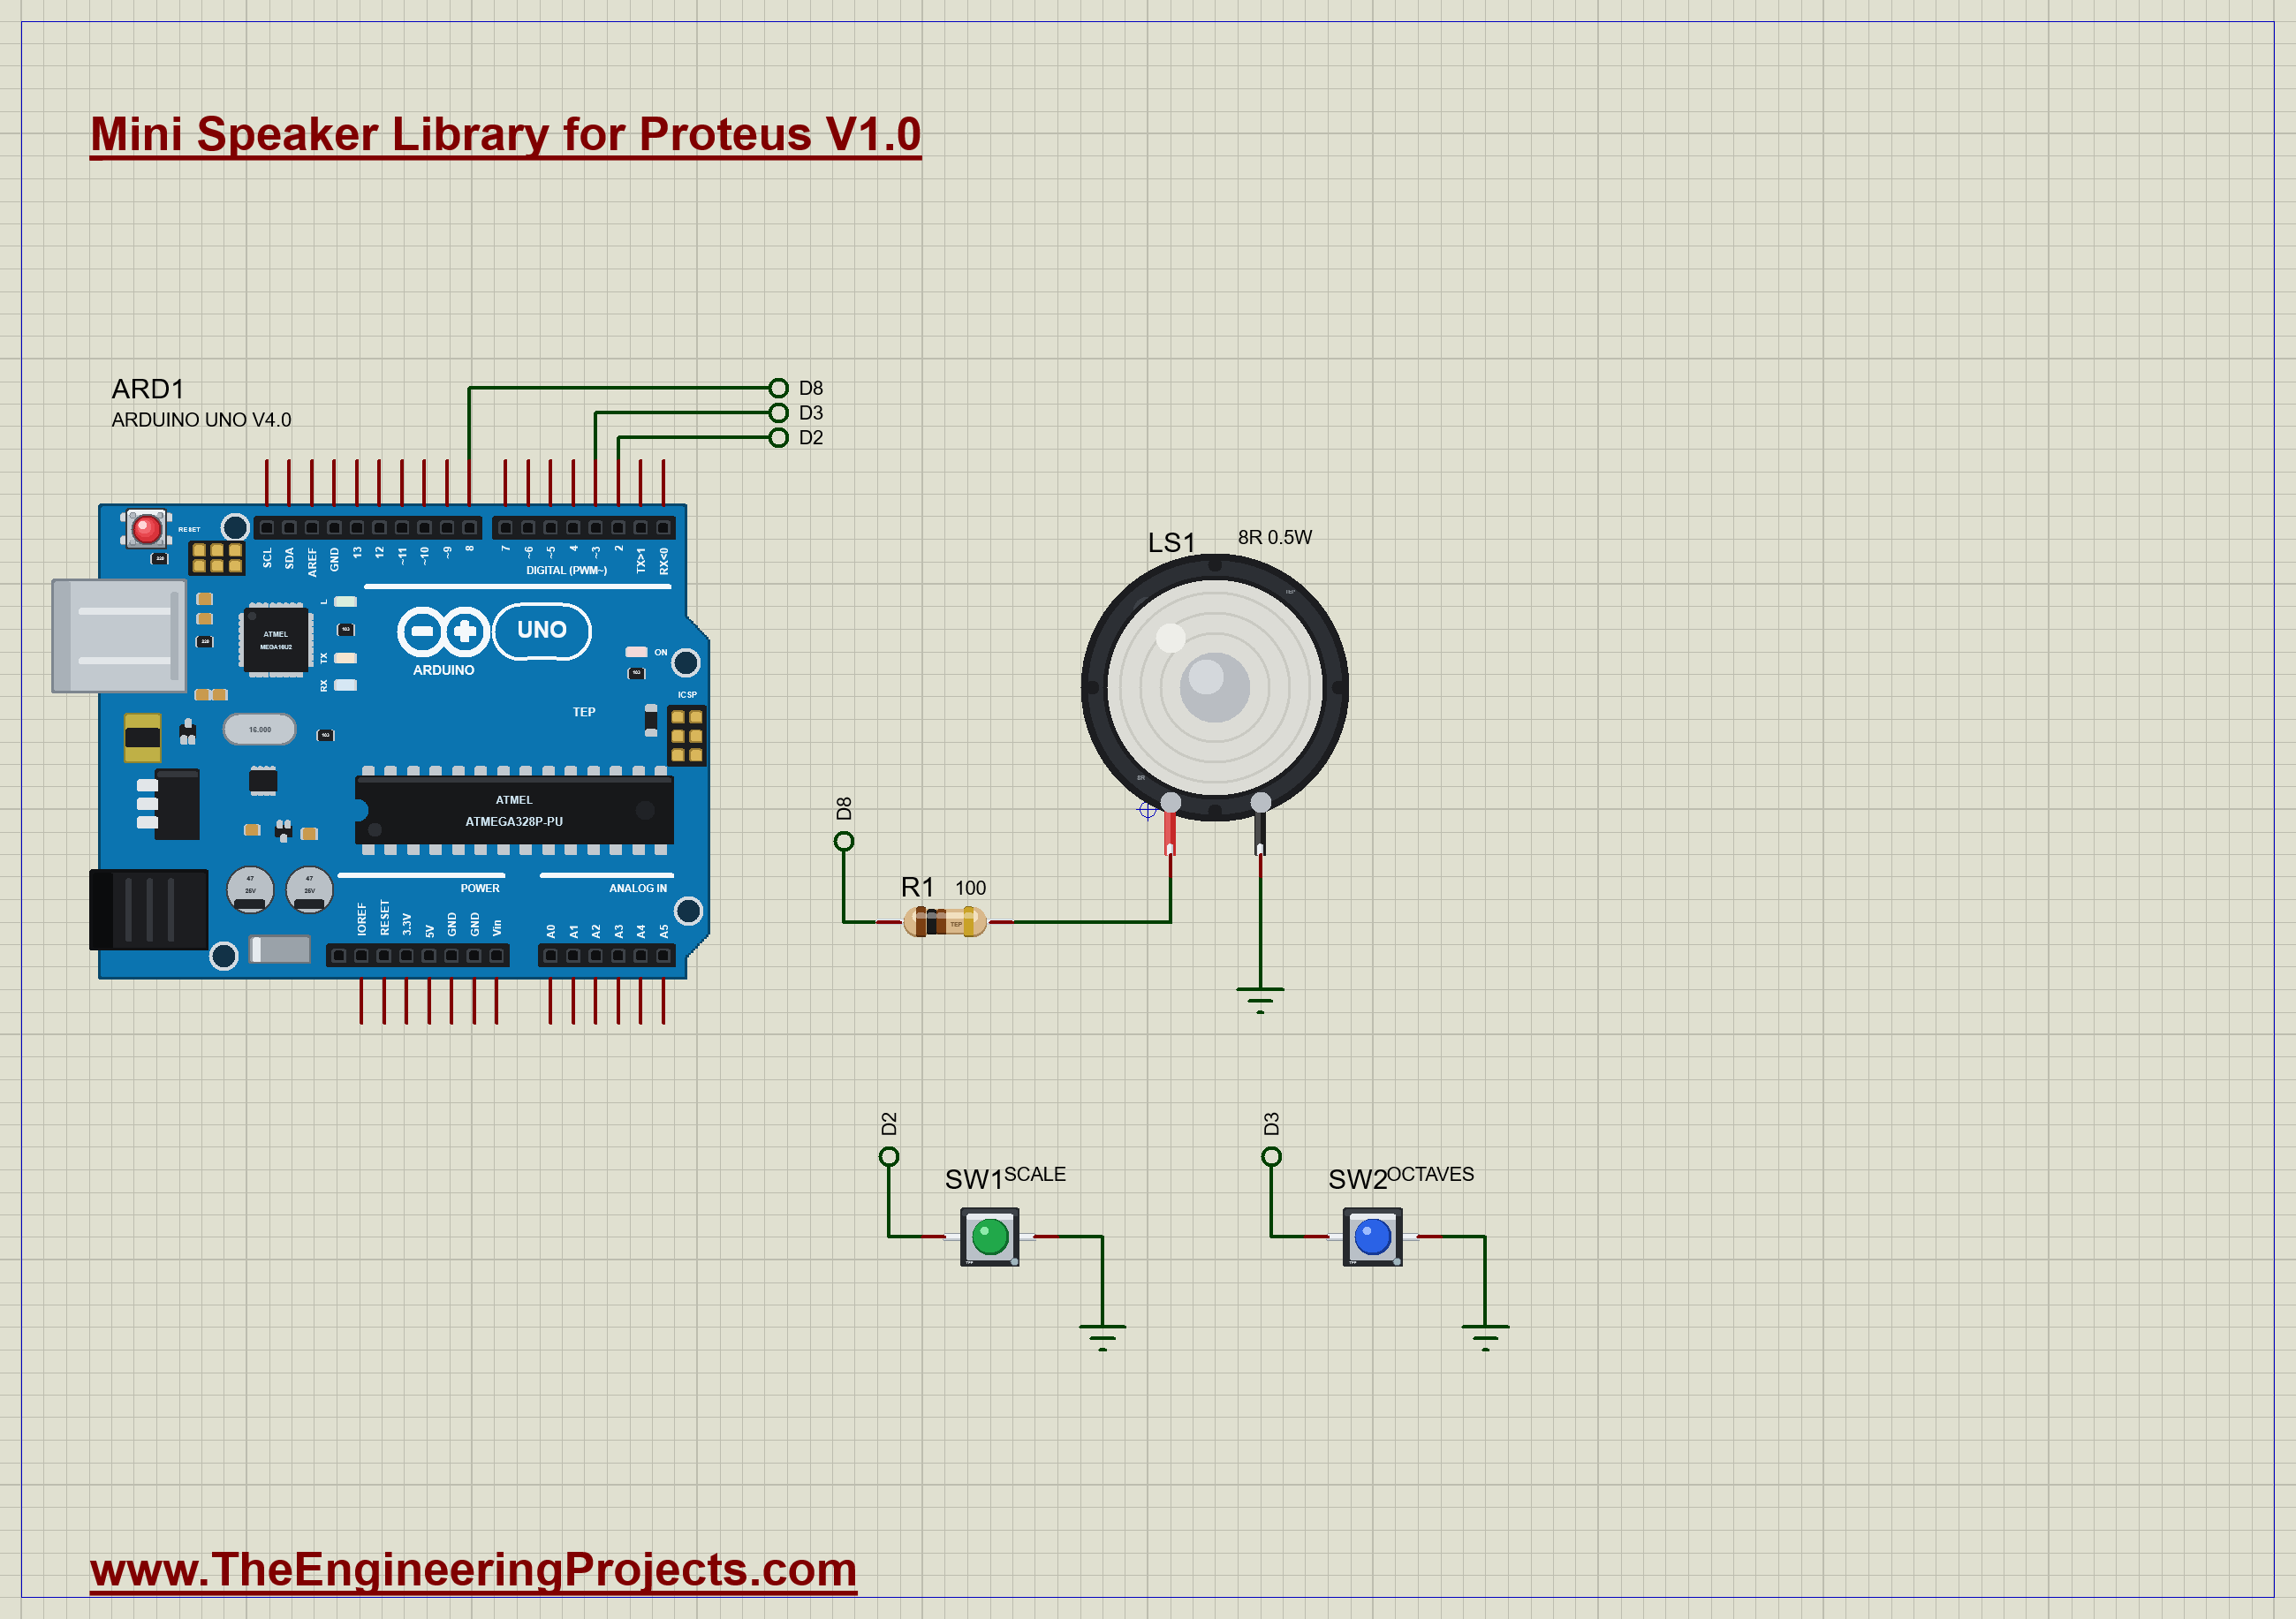
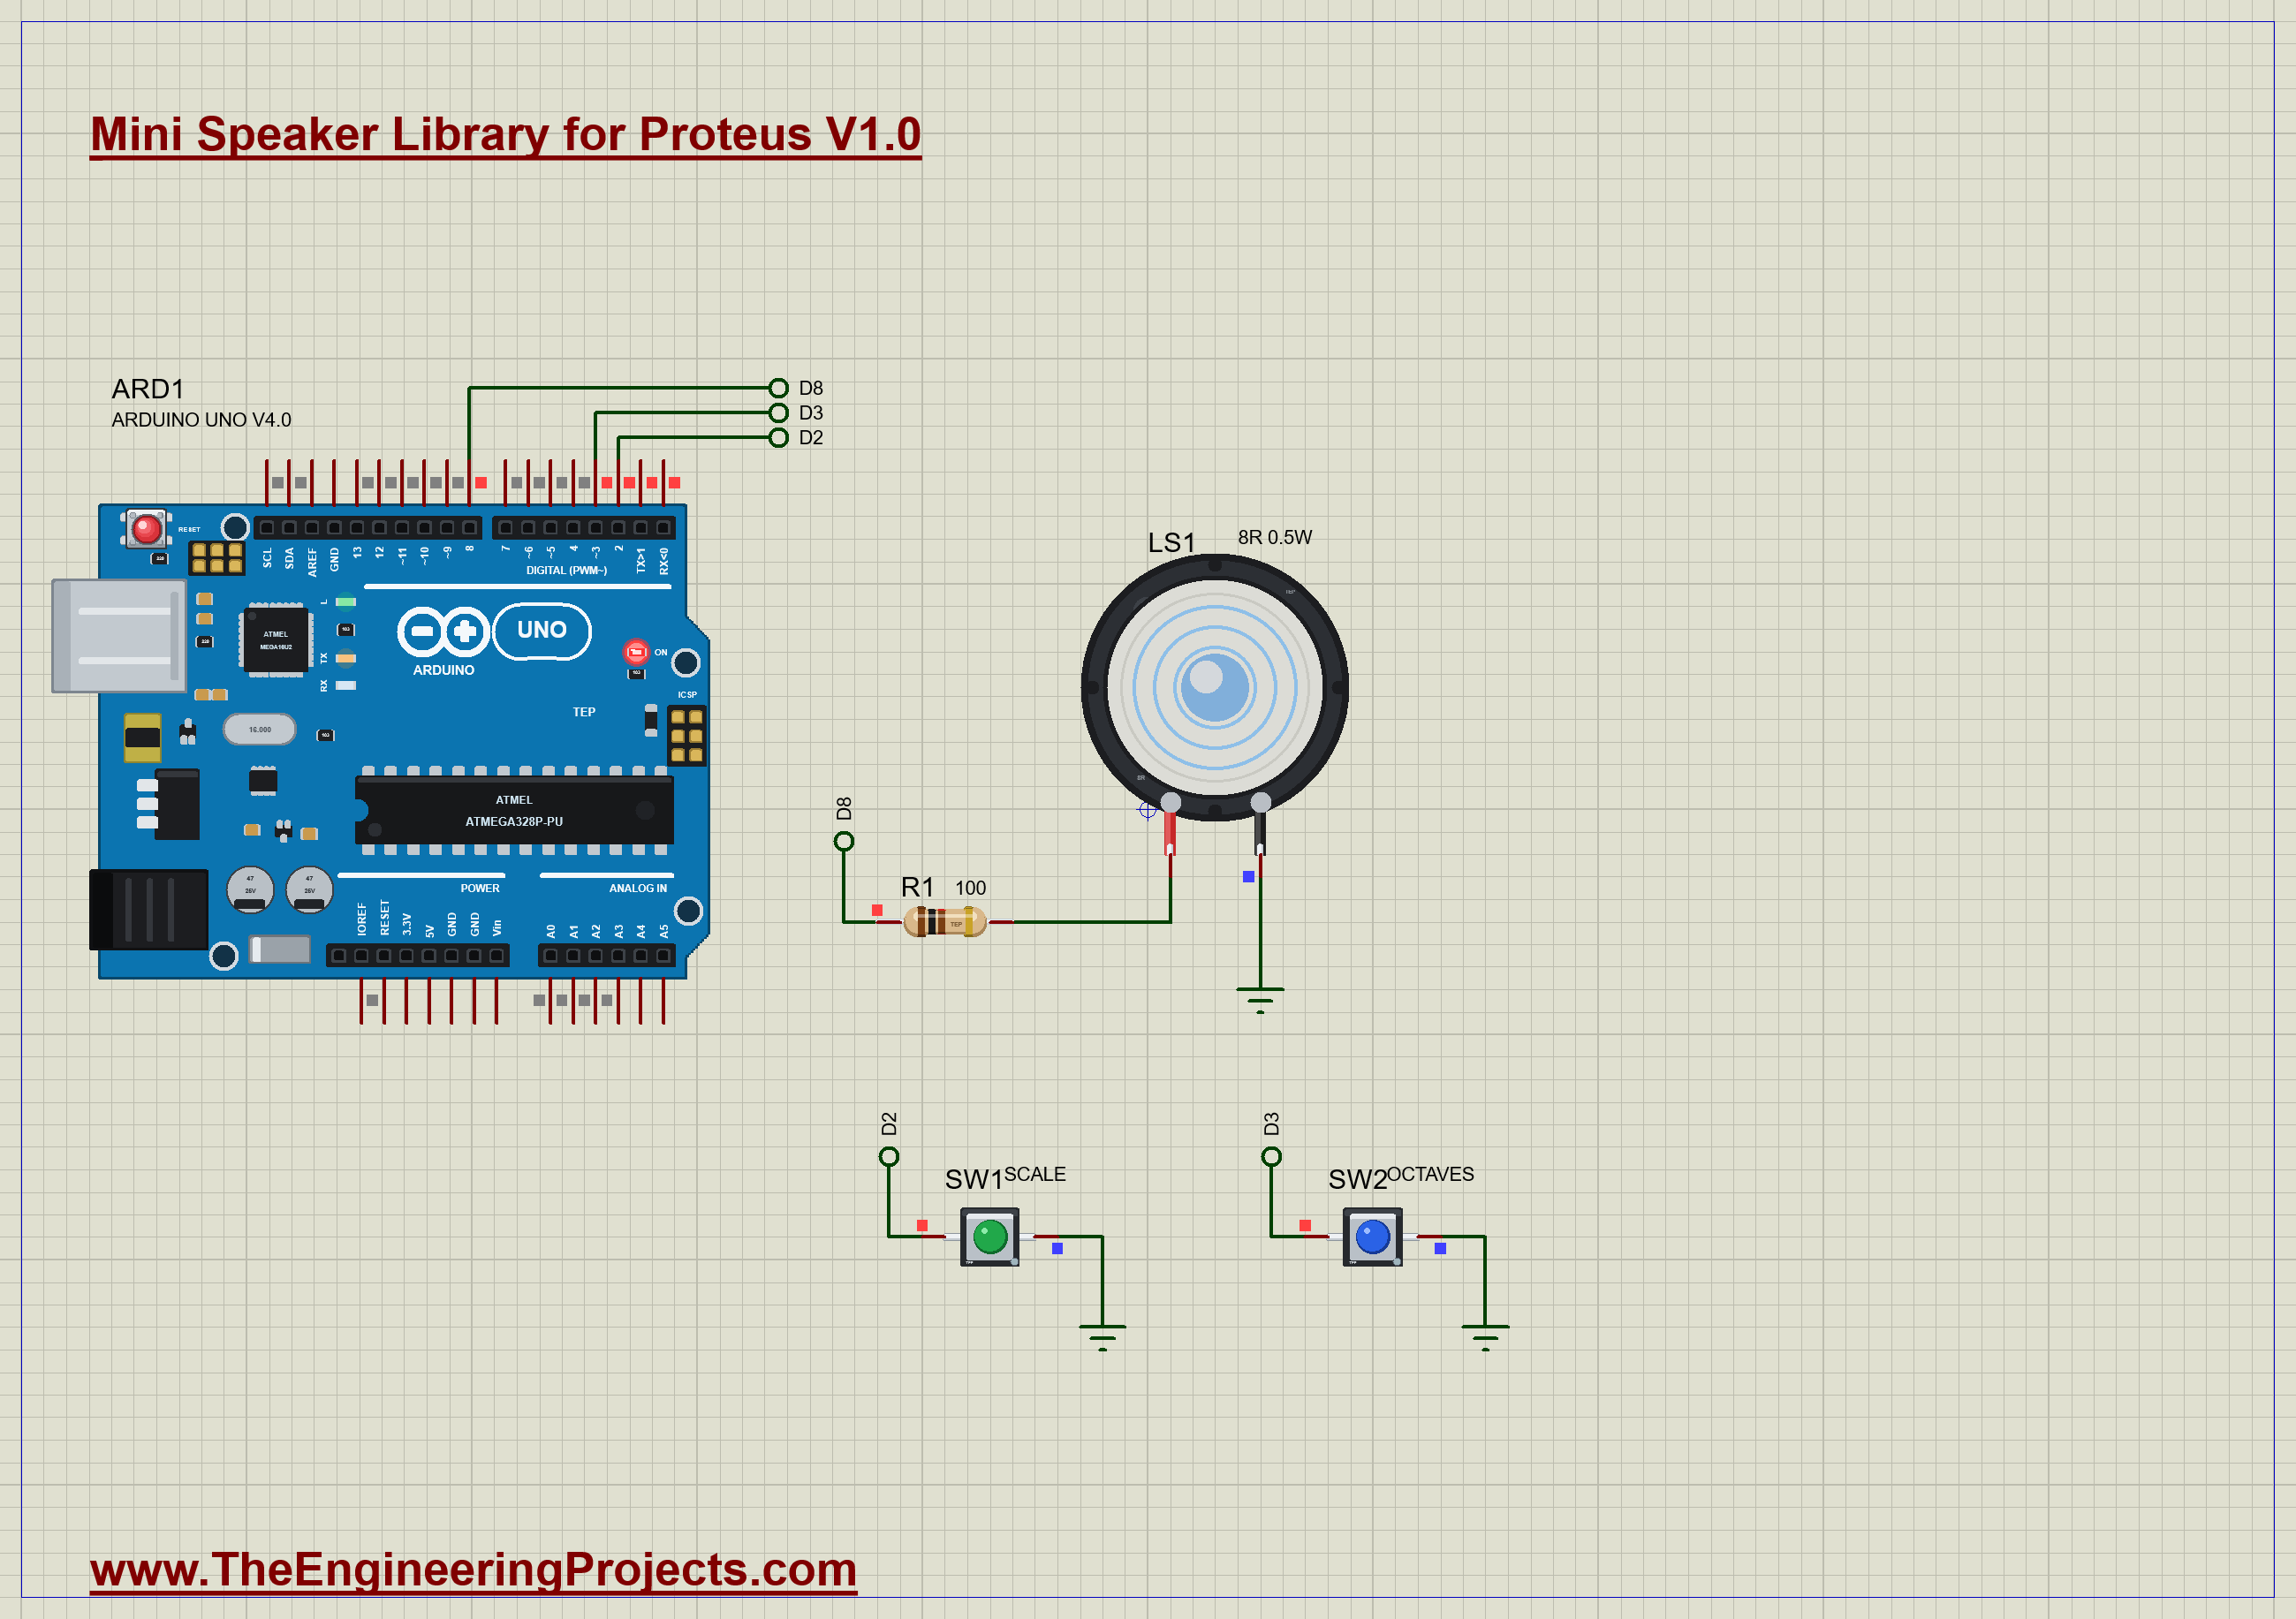
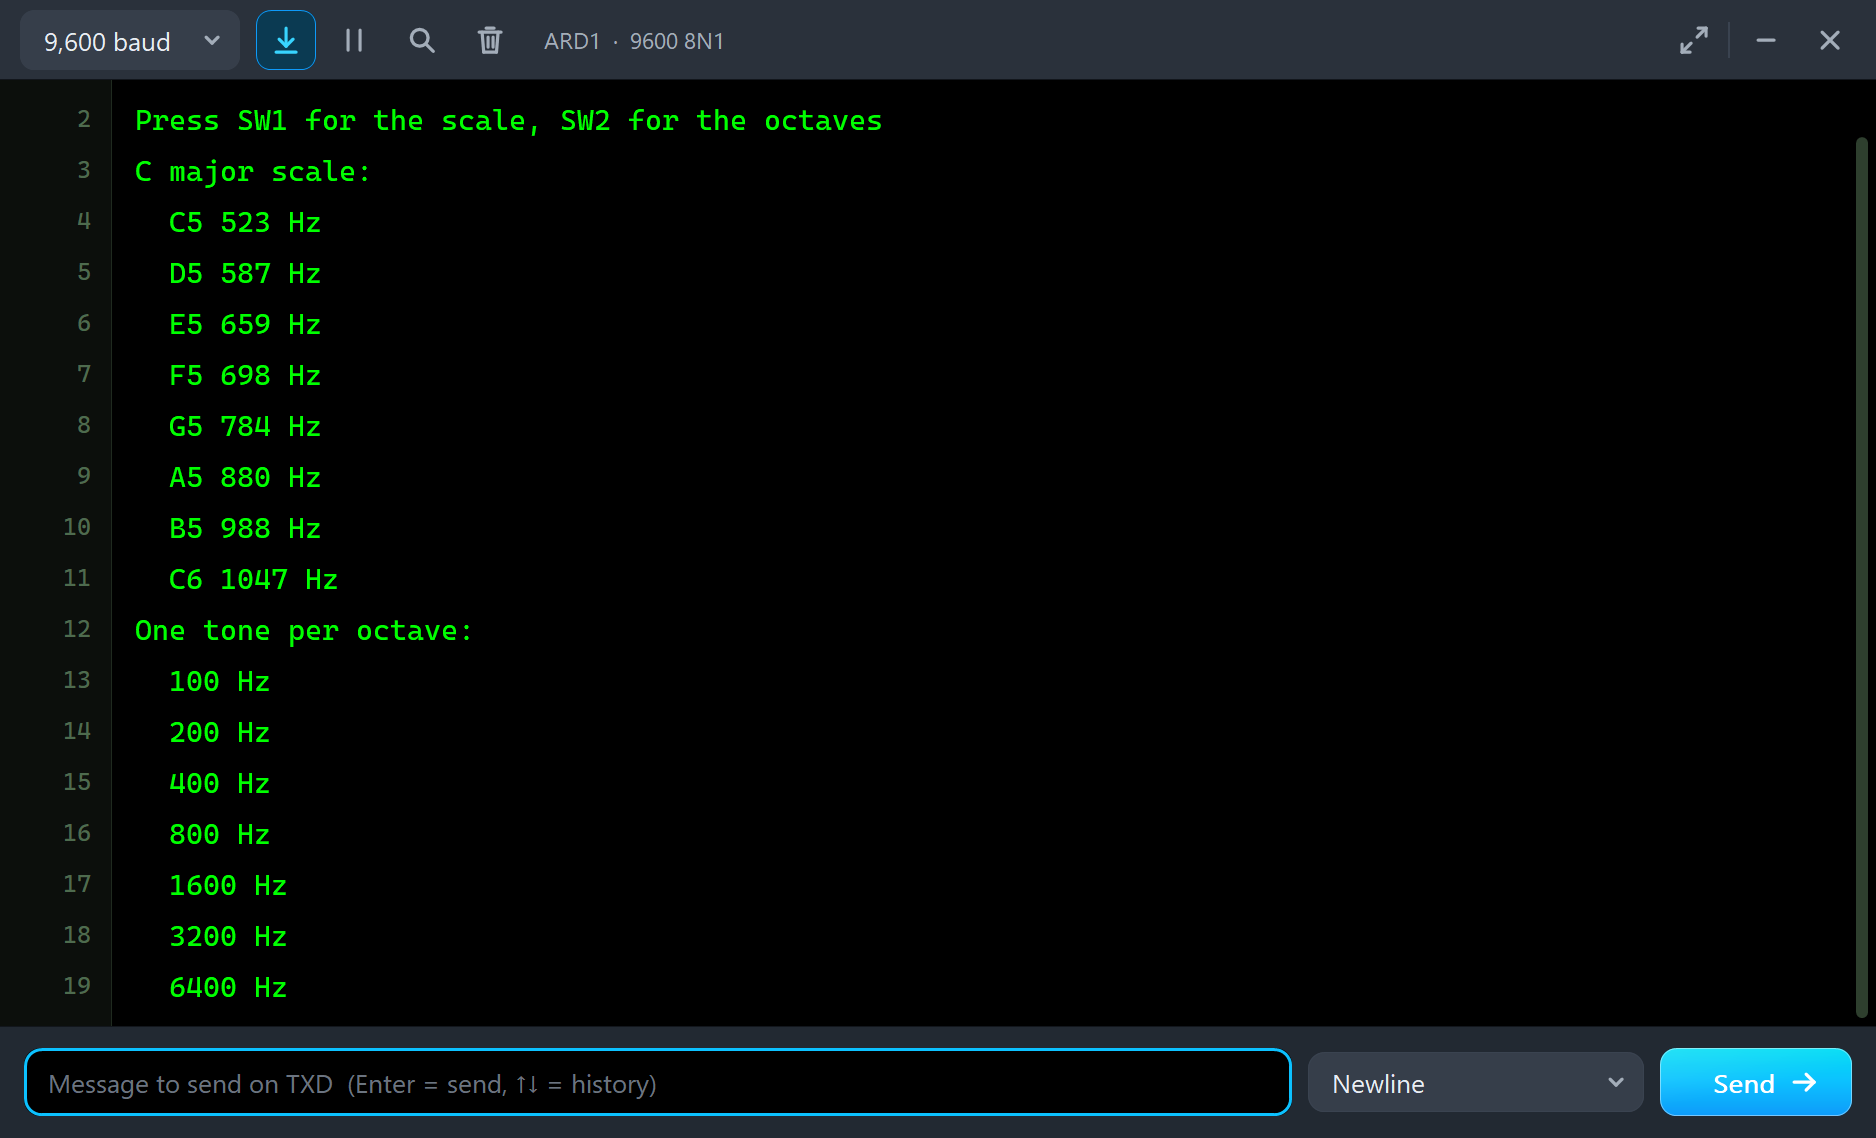
LS1, the mini speaker, sits on D8 behind R1, a 100 ohm resistor that keeps the pin current safe. Two push buttons from D2 and D3 to ground start the music: SW1 plays the C major scale, and SW2 plays one tone per octave from 100 Hz to 6400 Hz. Open Mini-Speaker-Scale-ArduinoUnoV4.pdsprj. It runs on our Arduino UNO Library for Proteus V4.0, with its built-in monitor, the same window as our TEP Serial Monitor Advance for Proteus. The resistor is from our Resistor Library for Proteus, the buttons from our Push Button Library for Proteus.
| Part | Connection | Job |
|---|---|---|
| LS1 (mini speaker) | D8 through R1, - to GND | plays the tones |
| R1 (100 ohm) | D8 to LS1 + | keeps the pin near 40 mA |
| SW1 (push button) | D2 to GND | plays the scale |
| SW2 (push button) | D3 to GND | plays the octaves |
The Sketch
The scale plays eight notes, C5 to C6, each for 250 ms with a short gap before the next:
    tone(SPEAKER, SCALE[k], 250);
    delay(300);
The octaves start at 100 Hz and double the frequency each time, up to 6400 Hz:
for (unsigned int hz = 100; hz <= 6400; hz *= 2) {Each of those tones lasts 400 ms, long enough to hear the difference:
    tone(SPEAKER, hz, 400);
    delay(450);
Both buttons use INPUT_PULLUP, so a press reads LOW, and the sketch waits for the release before it listens again.
Run the Demo
Press Run. The speaker stays SILENT, waiting for a tone, and its pop-up shows the response curve: the steep slope below 600 Hz and the flat top above it:
The Scale
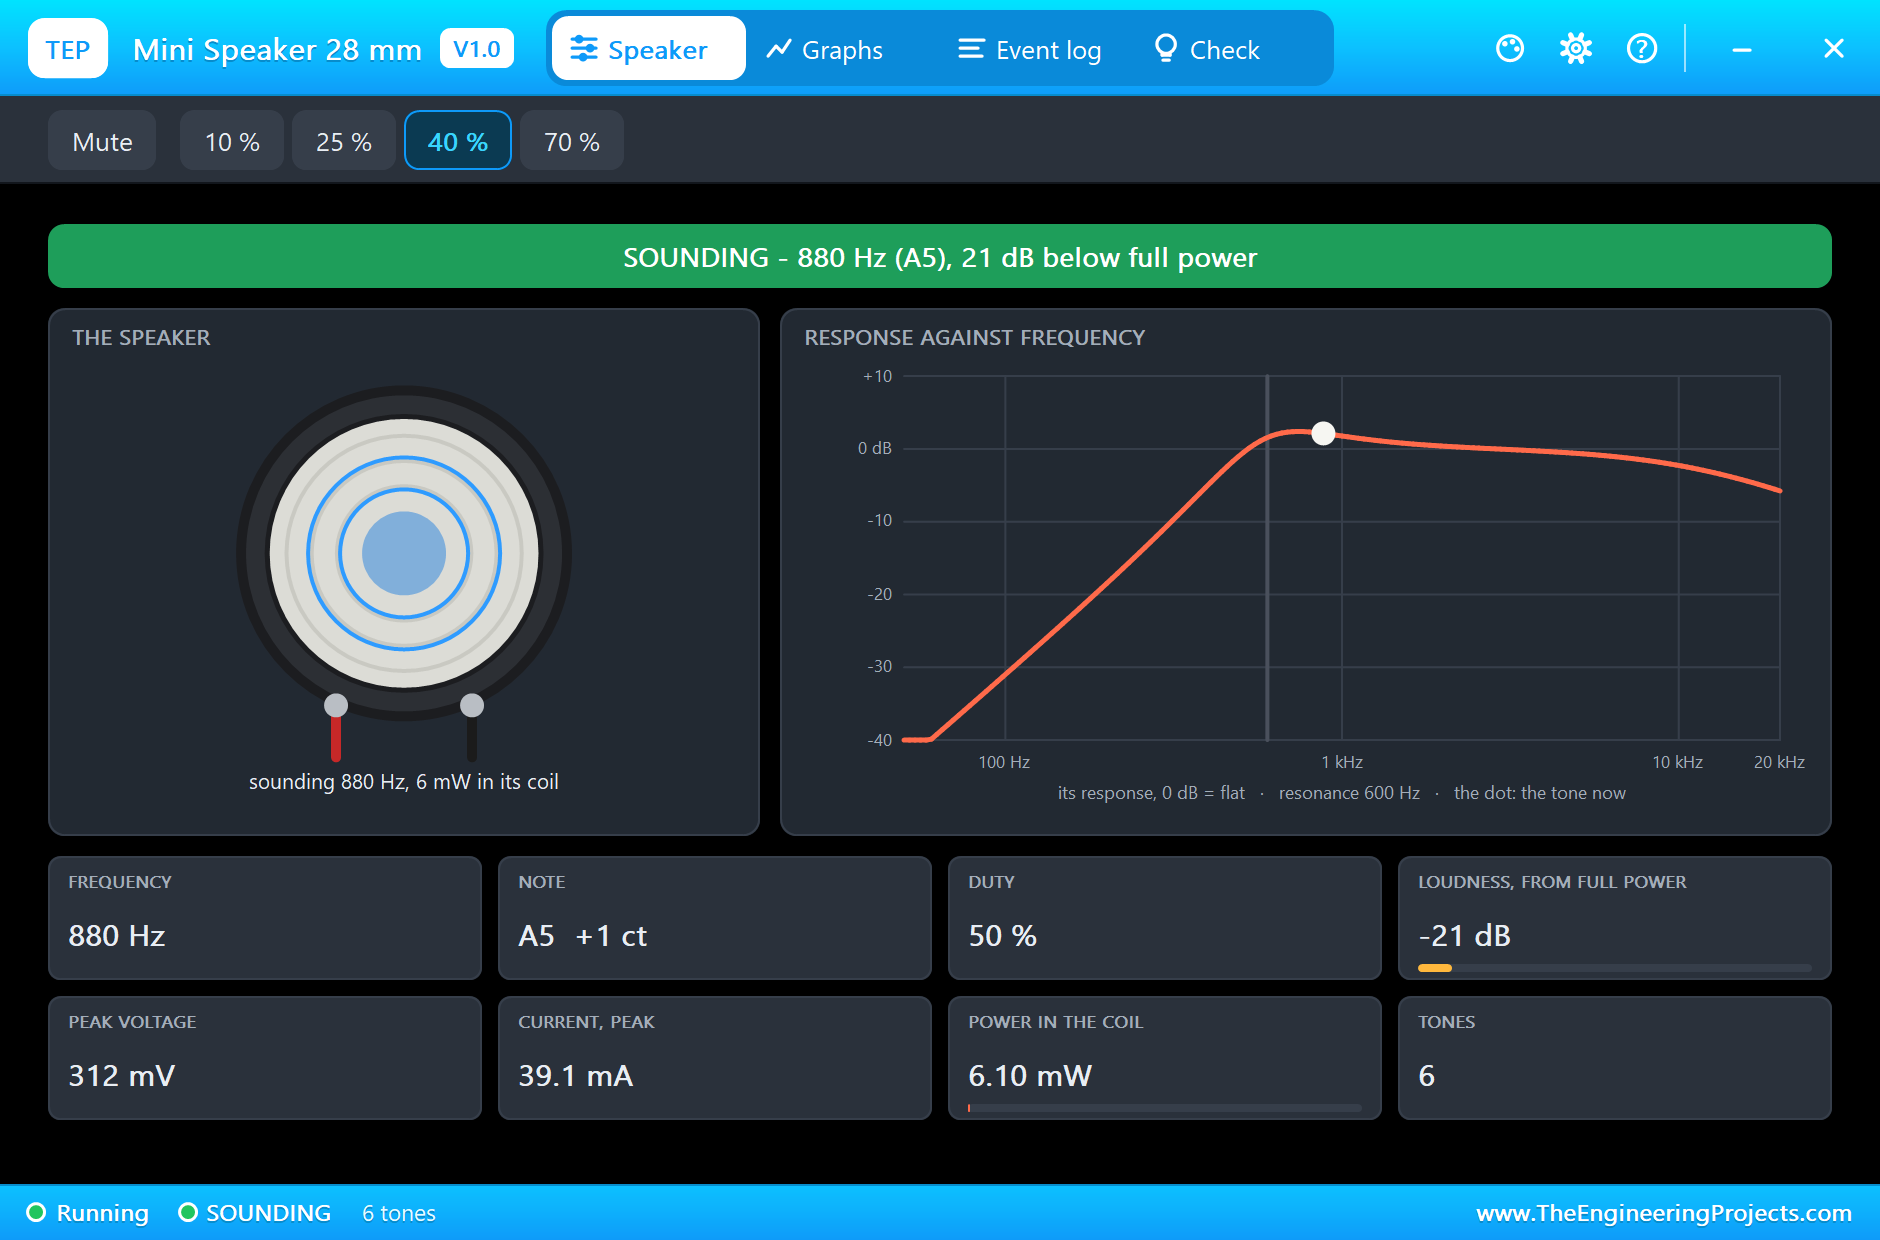
Now press SW1. The scale plays on your PC, and on the sheet, rings move out over the cone while it sounds. We paused on A5: 880 Hz, 1 cent sharp, 50 % duty. The dot sits on the flat part of the curve, 2 dB above the flat response, close to the resonance. The banner reads 21 dB below full power: the speaker gets only 0.31 V through the resistor, 6.1 mW in its coil, of which about 2.4 mW is in the tone itself:
Here is the complete circuit, truly running:
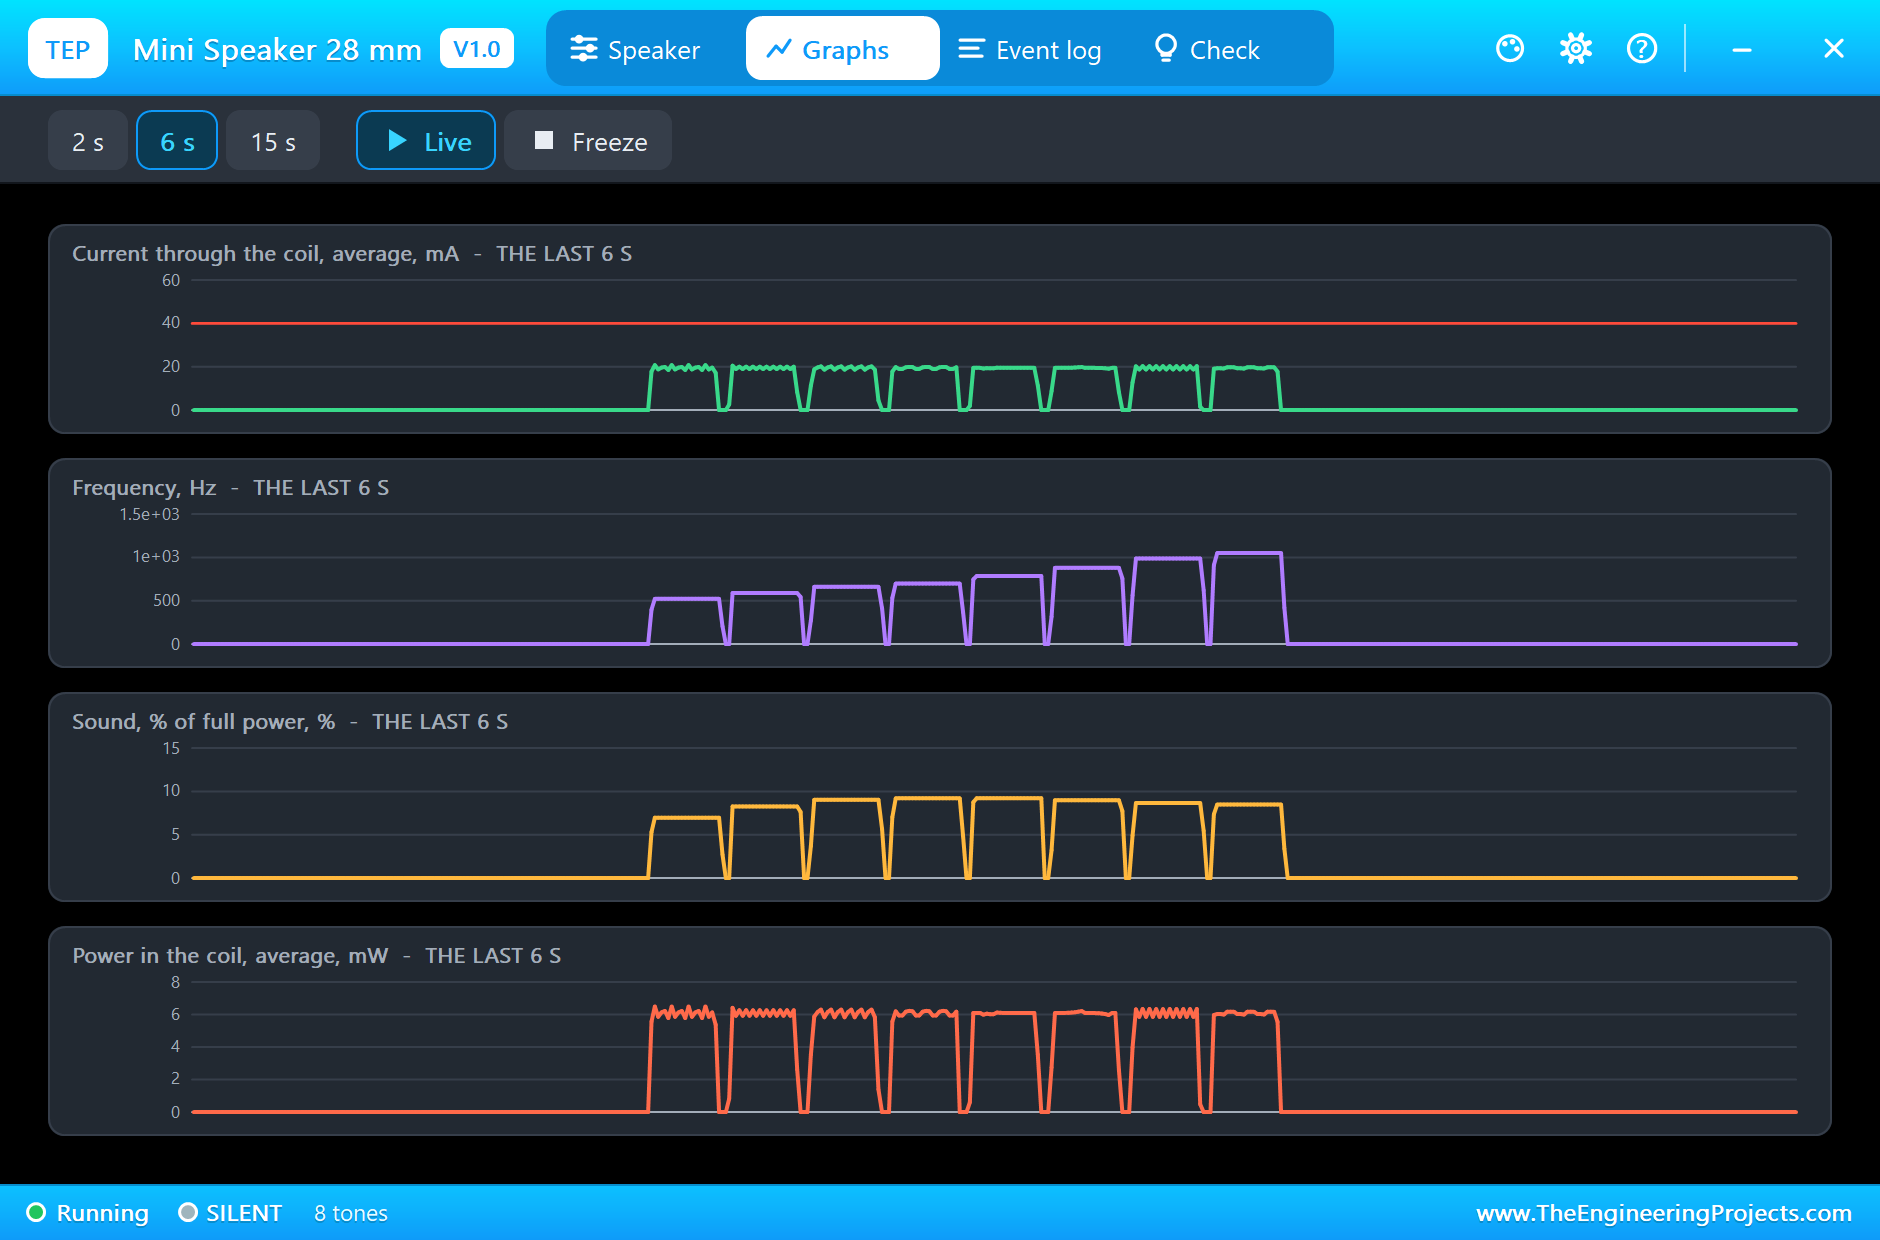
The Graphs page shows the eight notes as steps of frequency, with the current and the power in the coil steady through them all: the drive does not change from note to note, only the pitch:
The Octaves
Now press SW2, and listen. The first tones, 100 Hz and 200 Hz, are thin and quiet; from 400 Hz the sound fills out, and from 800 Hz it stays strong. We paused twice. At 200 Hz the dot sits low on the slope, 18 dB below the flat response, and the banner reads 41 dB below full power. At 3205 Hz it sits on the flat top, at 0 dB:
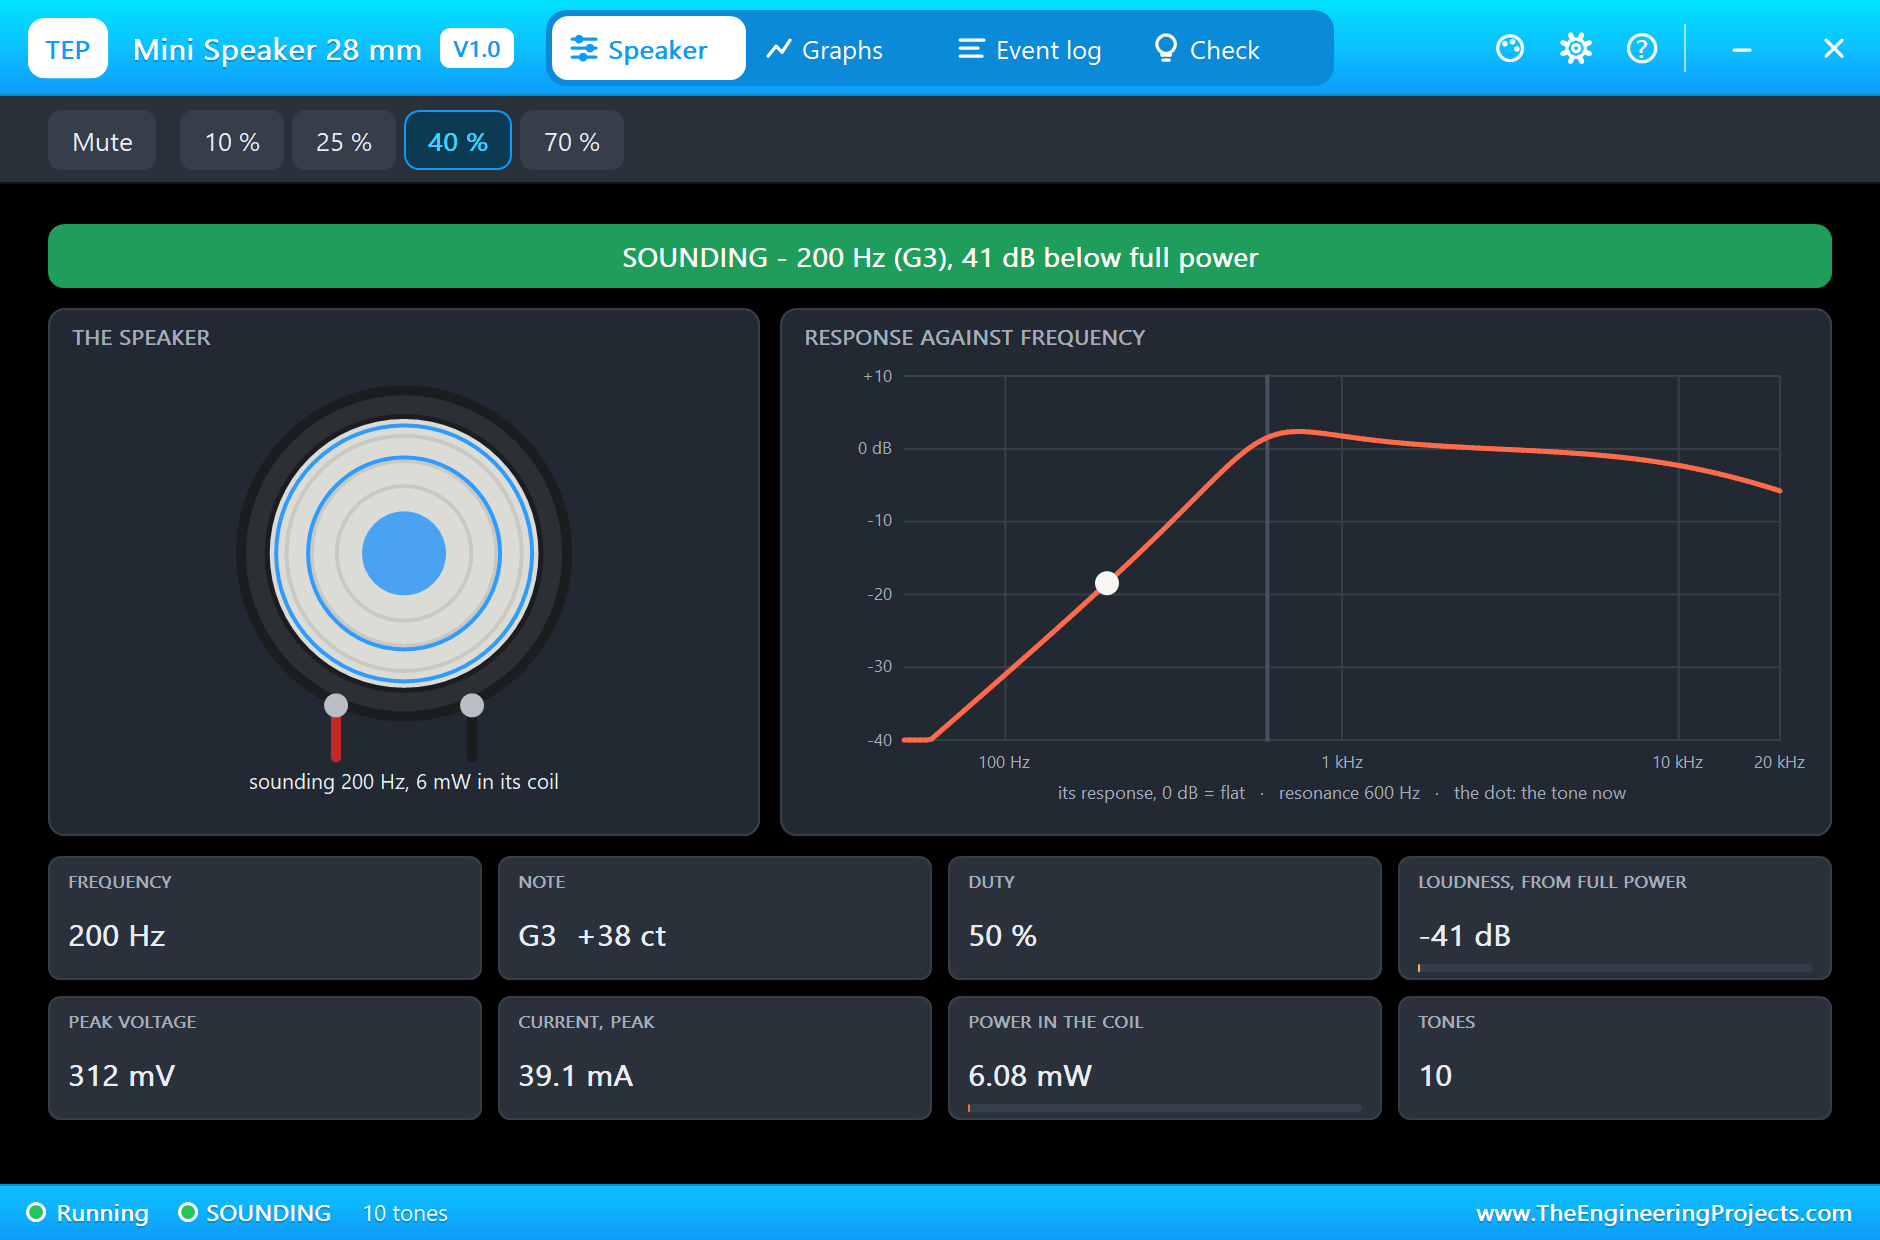
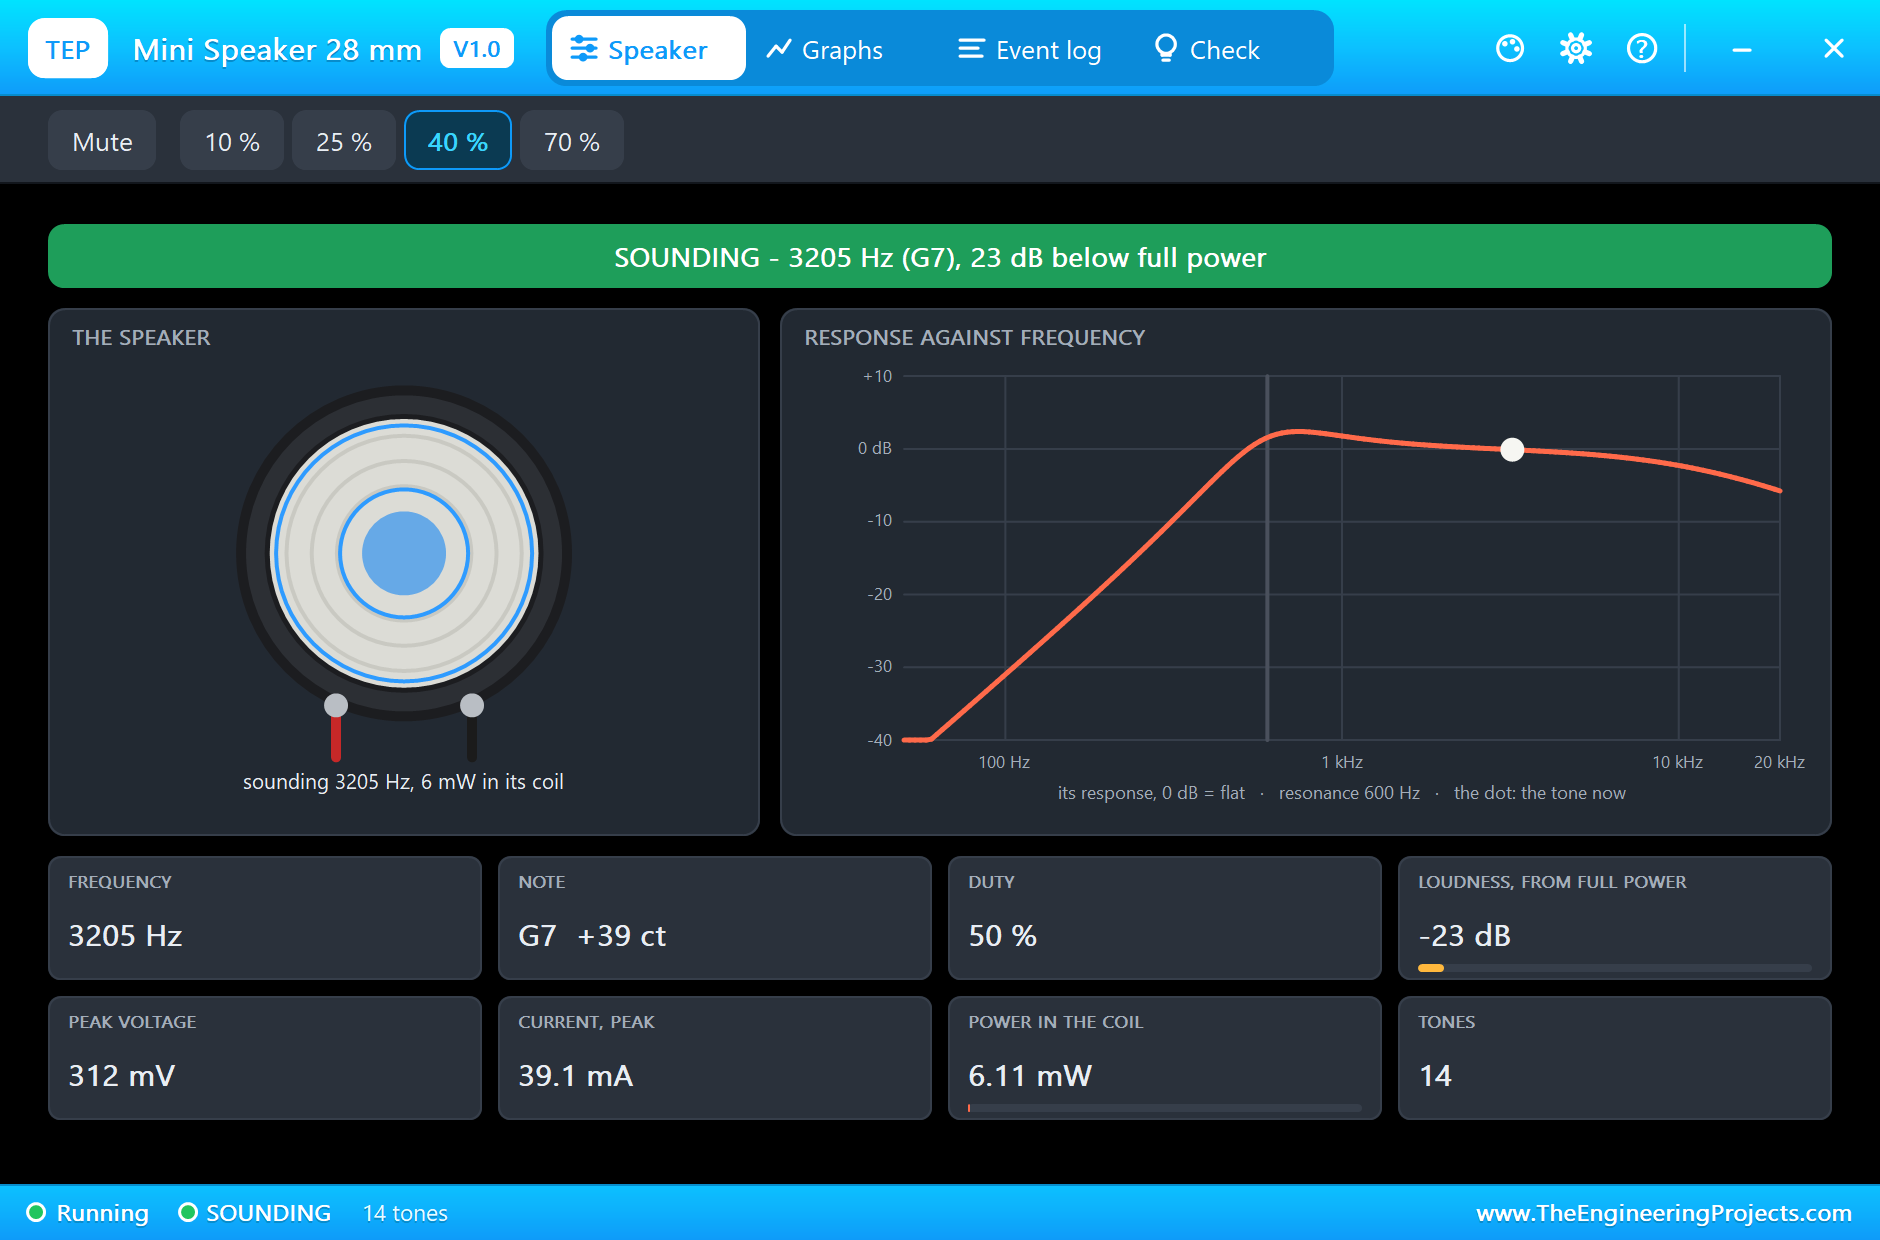
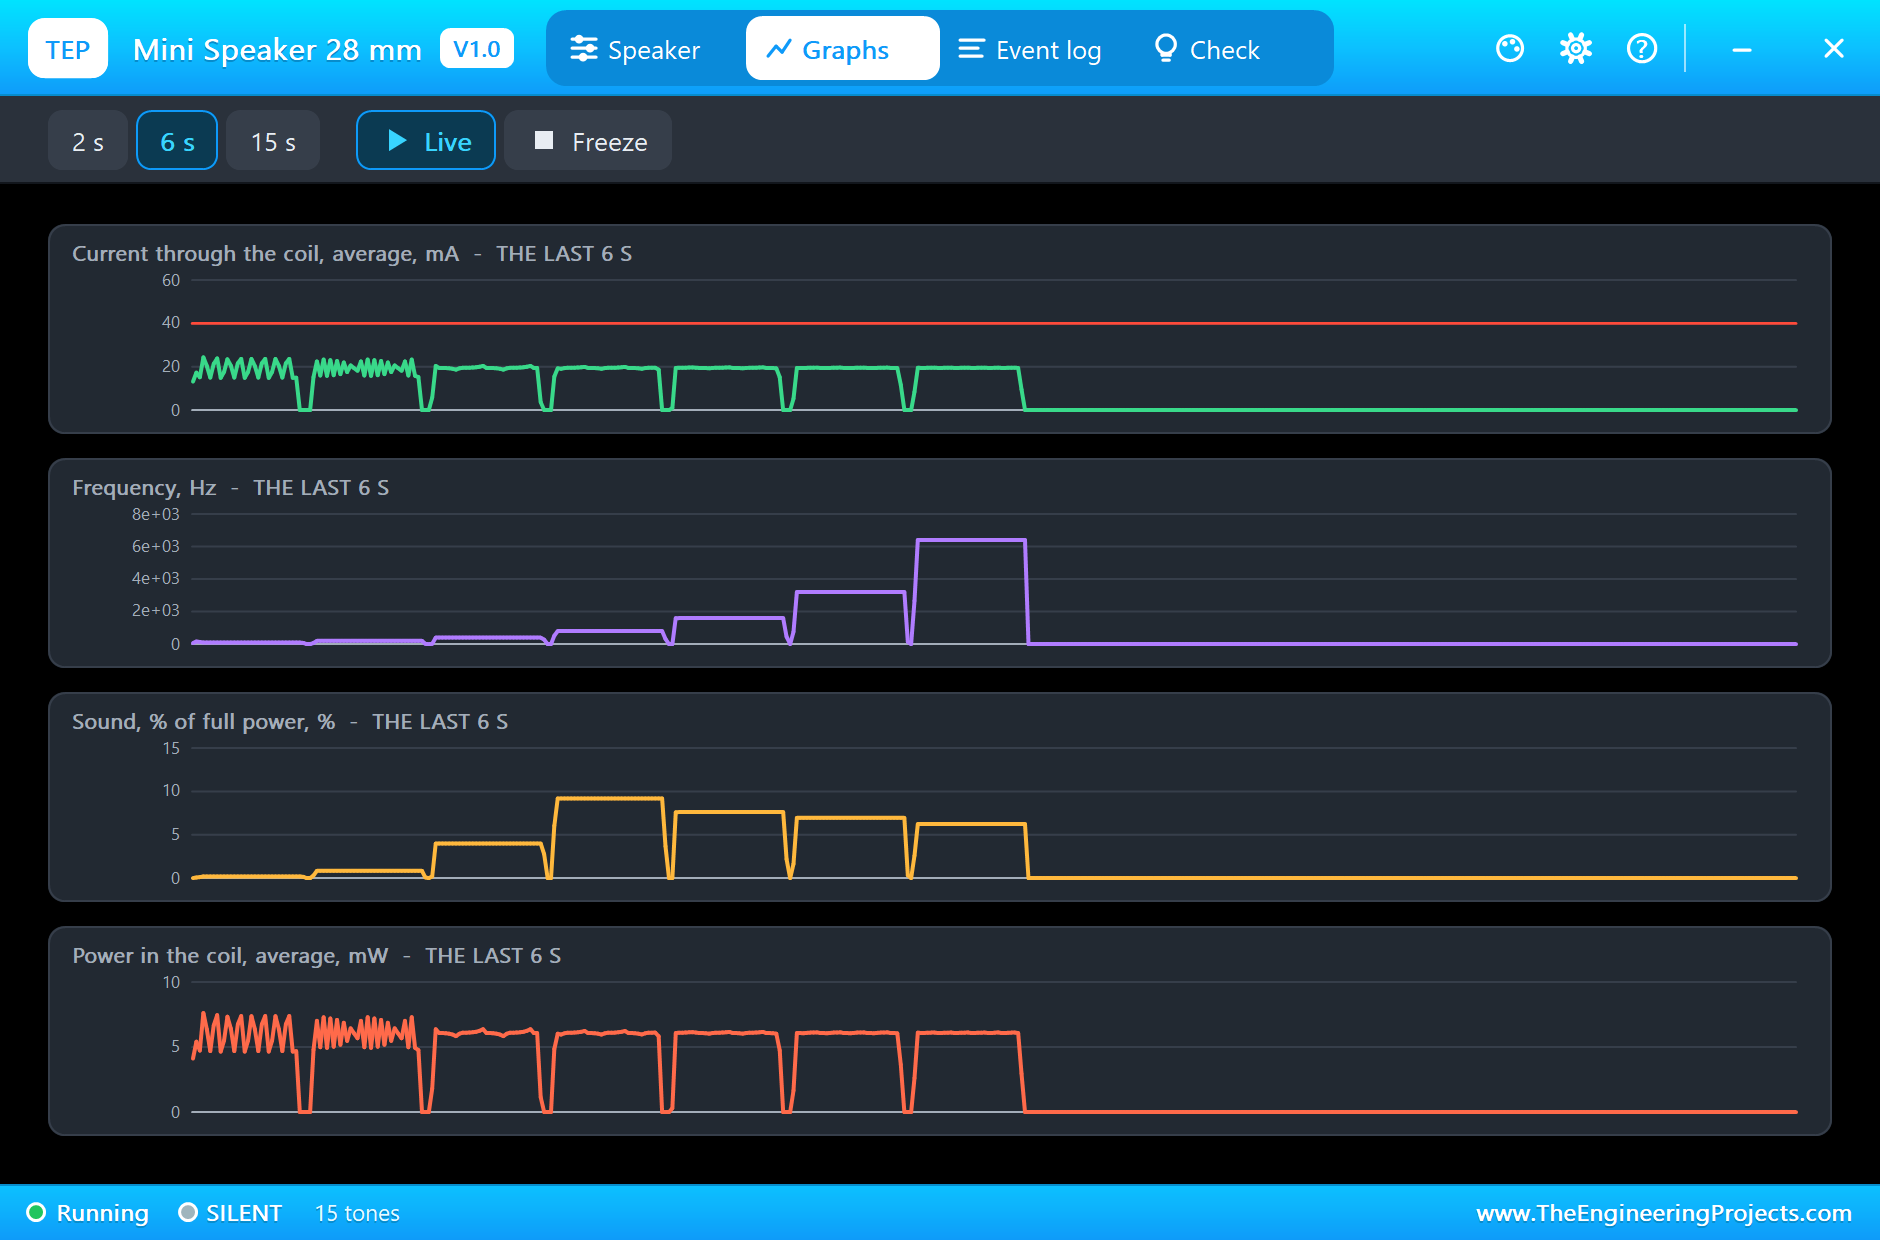
Across the seven octaves, the response the pop-up logged was -31 dB at 100 Hz, -18 dB at 200 Hz, -5 dB at 400 Hz, +2 dB at 800 Hz, +1 dB at 1.6 kHz, 0 dB at 3.2 kHz and -1 dB at 6.4 kHz. That is the whole story of a small speaker in seven numbers. On the Graphs page, the sound trace rises octave by octave while the power in the coil stays the same:
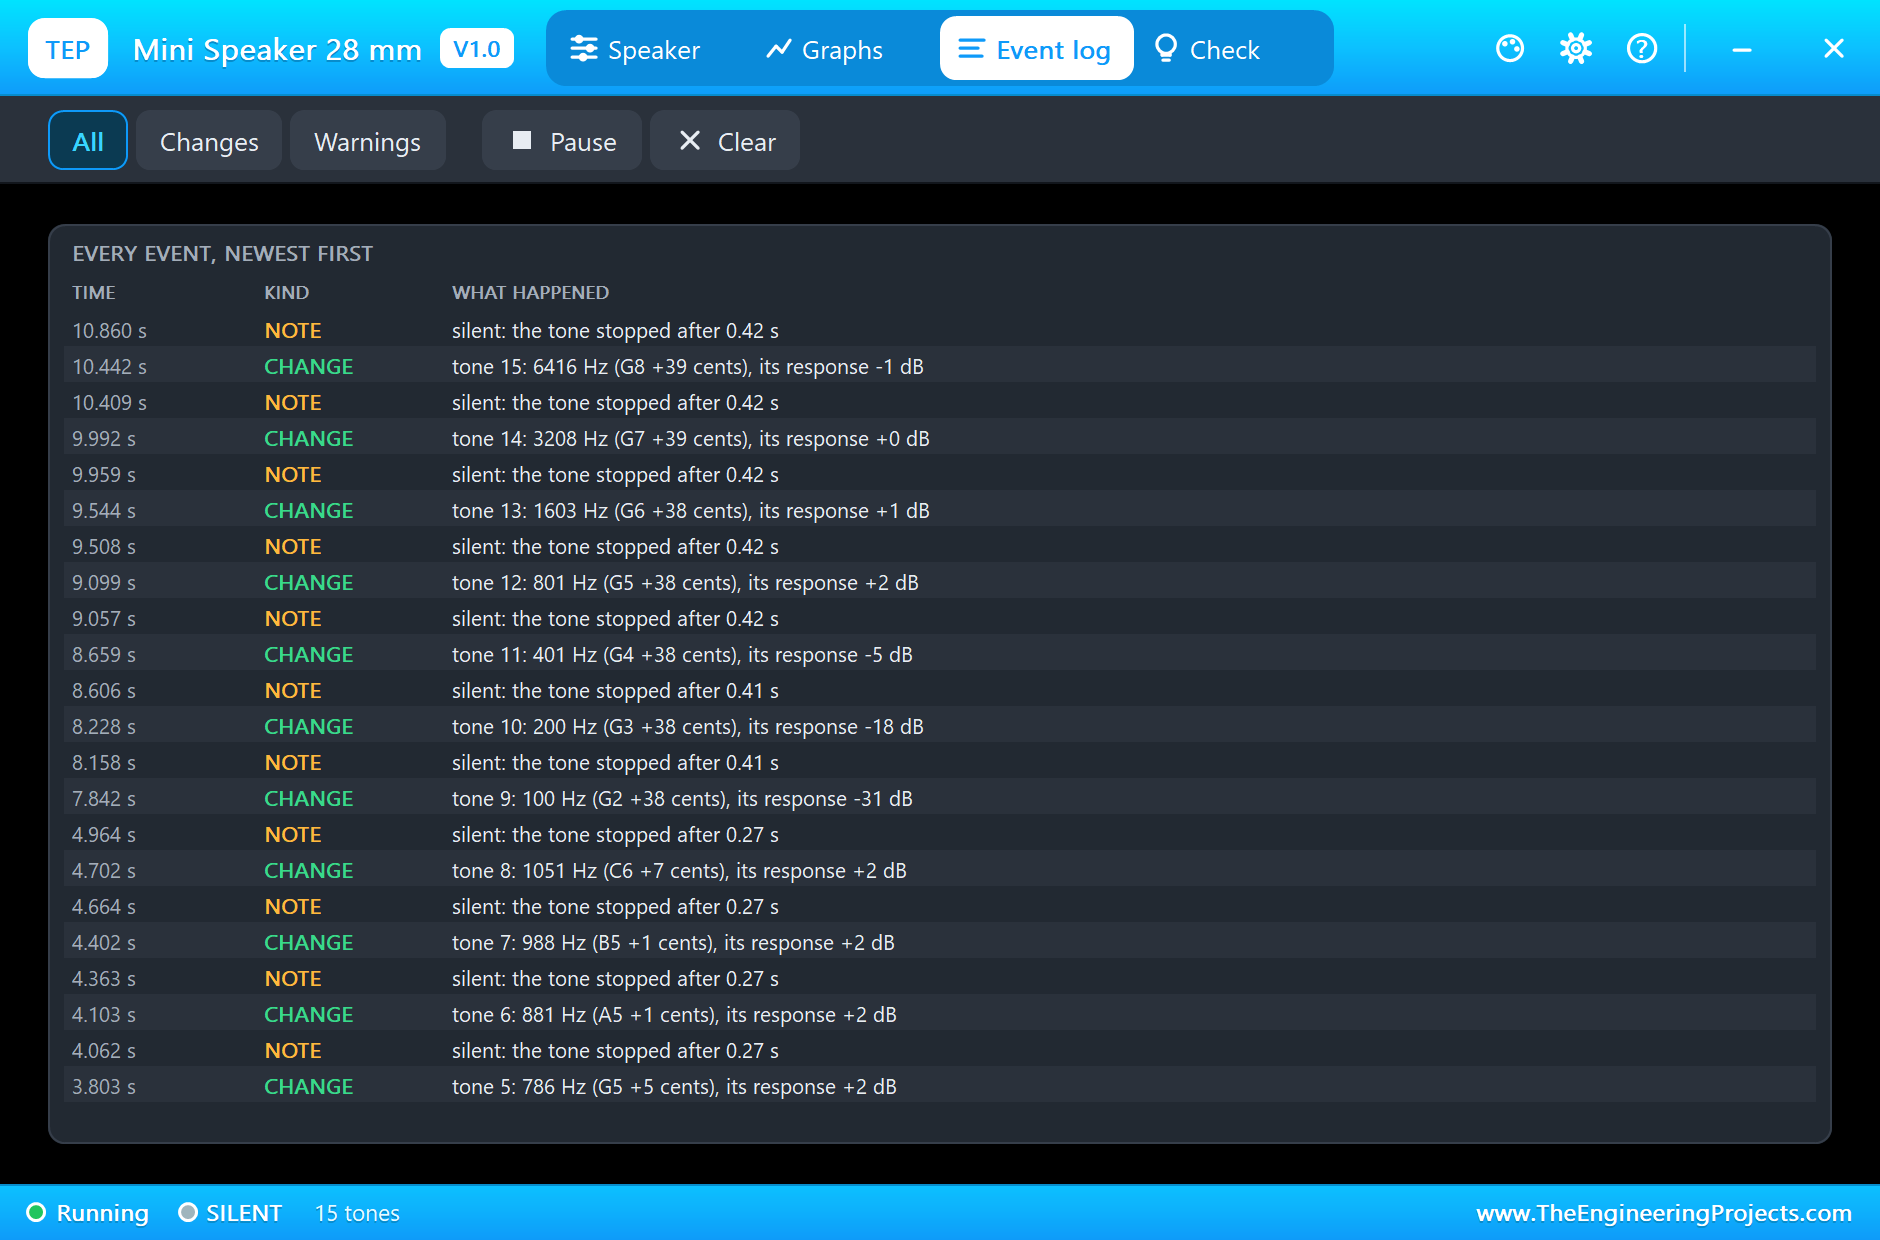
The Event log names every one of the 15 tones of the run, with its note, its cents and the speaker's response at that frequency:
The Check Page
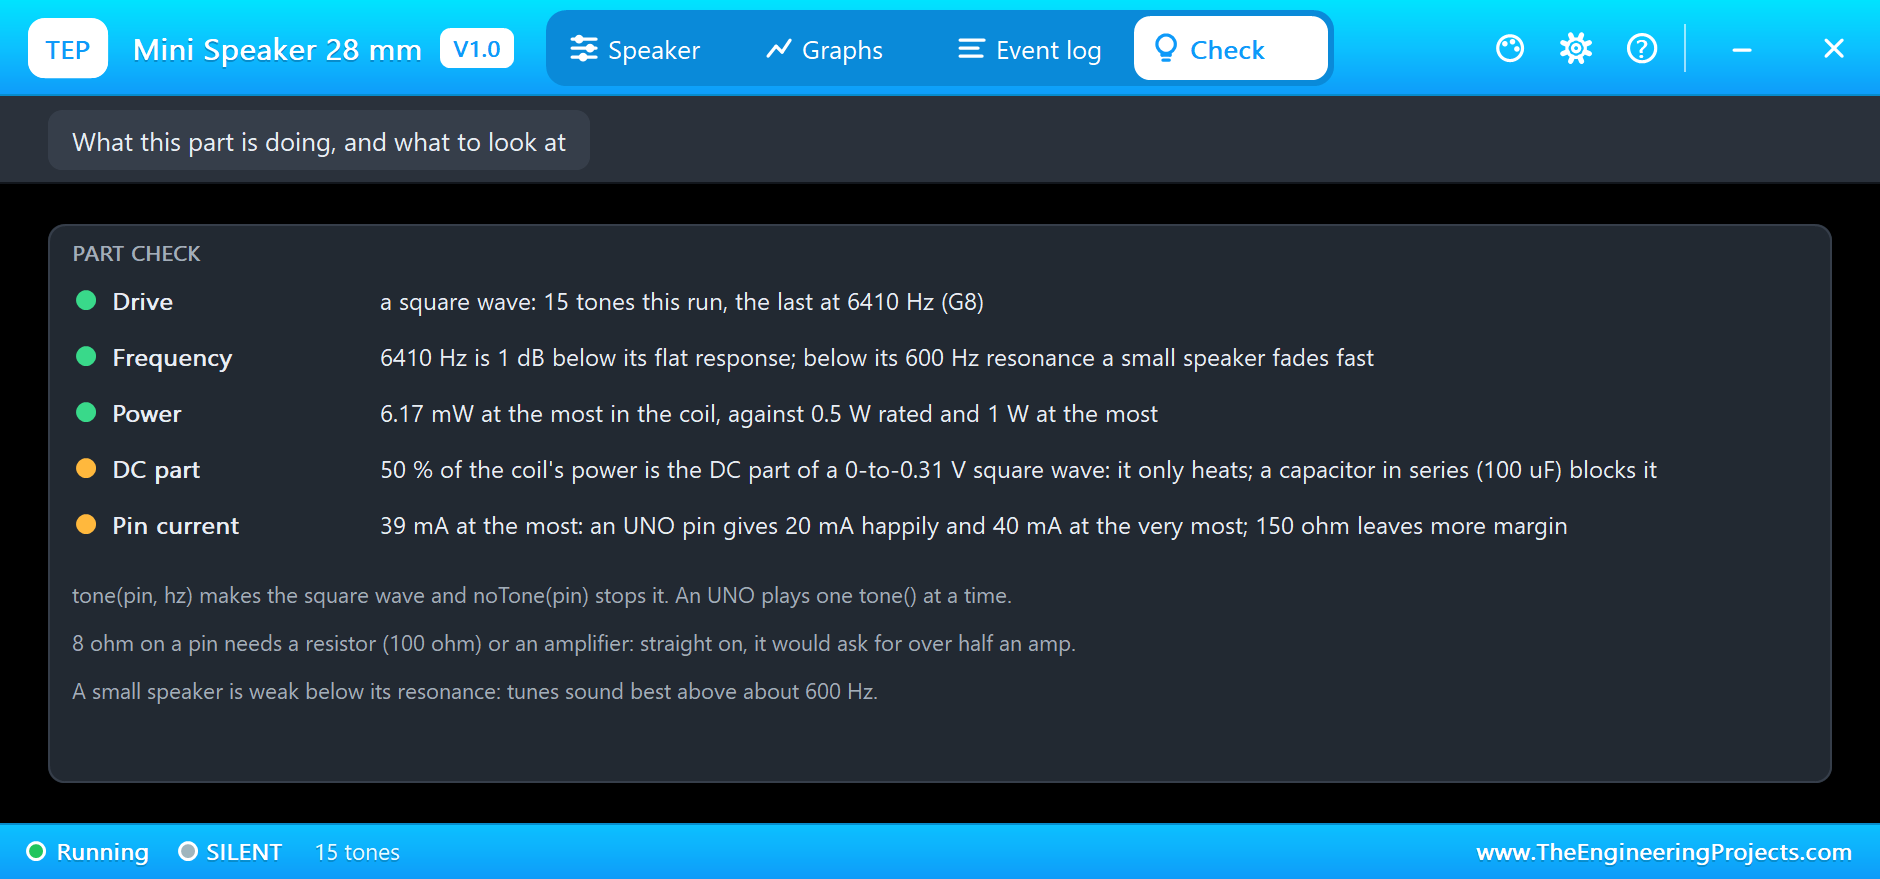
The Check page sums up the run. The drive and the frequency are fine, and 6.17 mW is far from the 0.5 W rating. Two amber rows teach the rest: half the coil's power is the DC part of the square wave, which a 100 uF capacitor in series would block; and 39 mA from the pin is inside its limit, but close to it, so 150 ohm would leave more margin:
Try It Yourself
- Play the scale an octave lower, C4 to C5, and hear it fade below the resonance.
- Raise R1 to 150 ohm, and watch the pin current turn green on the Check page.
- Play a tune of your own above 600 Hz, and read every note in the log.
- Use
analogWrite()on a PWM pin instead oftone(), and hear its fixed frequency. - Compare the same notes on the passive buzzer and on this speaker.
Ideas to Extend the Demo
- Add a potentiometer to set the pitch of a tone.
- Make a small piano with a row of push buttons.
- Play a different alert sound for each of several sensors.
- Drive the speaker from an amplifier module through a 100 uF capacitor.
Your Own Sketches
The demo sketch is in the zip file, and you can change it in the Arduino IDE. New to Arduino? Start with our Arduino Tutorial for Beginners. Export the compiled binary, and set the UNO's PROGRAM property to the new file. Our guide on How to get the HEX file from Arduino shows you where the file ends up.
Things to Know Before Using a Real Mini Speaker
- Never put 8 ohm straight on a pin: use a resistor of 100 ohm or more, or an amplifier.
- Block the DC part: a capacitor in series keeps the coil cool and the cone centred.
- Mind the power rating: 0.5 W nominal for this size; more burns the coil.
- Give it a box: a small enclosure makes a speaker much louder and fuller.
- Play above its resonance: tunes sound best above about 600 Hz.
Troubleshooting
- It only clicks: it gets DC. Use
tone(pin, hz). - It is quiet: the note is below its resonance, or the drive is small. Check the curve on the pop-up.
- No sound on the PC: the volume is 0, Mute is on, or the PC has no sound device. The simulation runs the same.
- OVER POWER: more than 1 W in the coil, from a supply or an amplifier without a resistor.
- The part is not simulated:
TEPSPEAKER.DLLis missing from MODELS and from the project folder.
Limitations of the Simulation
- The coil's inductance is left out: the speaker is its 8 ohm.
- The temperature of the coil is not followed, only the power.
- The PC plays a clean buzzy tone, not the exact sound of the speaker.
- Arduino is a name of Arduino; this library is not made or endorsed by Arduino or Labcenter.
- Tested in Proteus 8.5 in November 2026 (the demo as shipped). Proteus 7 is not supported.
So, that was all about the Mini Speaker Library for Proteus. I hope it helps you add music and sound to your projects, and hear how they will sound before you build them. If you have any questions, ask in the comments and I will help you out. Till the next tutorial, take care and have fun!