Hello friends, I hope you all are doing great. Today, I am going to share the new Split-Flap Display Library for Proteus V1.0. If you have ever waited under an old departure board and heard it clatter as every character flipped over to the next one, you have met the split-flap display. Each character on such a board is a little module of its own: a ring of flaps on a spool, a motor to turn it, and a sensor that tells the controller where the ring is. Makers love building them as clocks, word displays and message boards, and the usual recipe is a 28BYJ-48 stepper, a ULN2003 and a hall sensor.
Split-Flap Display Library for Proteus
Latest version: V1.0 (November 2026, this tutorial)
Other motors: SG90 Servo · TT Gear Motor · 28BYJ-48 Stepper · NEMA 17 Stepper · MG996R Servo · N20 Encoder Motor · JGA25-370 Encoder Motor · FS90R 360 Servo · 130 DC Motor · A2212 Brushless · X27.168 Gauge · Analog Panel Meter · DC Tachogenerator · LM393 Speed Sensor · MG90S Servo · DS3218 Servo · L12 Linear Servo · JGB37-520 Motor · RS-775 Motor · JGY-370 Worm Motor · 12V Linear Actuator · Coin Vibration Motor · Mini Submersible Water Pump · 12V Peristaltic Pump · 4-Pin PC Fan · 12V Push-Pull Solenoid · NEMA 23 Stepper Motor · Micro Linear Stepper · TYJ50 Synchronous Motor · Quartz Clock Movement · Air-Core Gauge · Electromechanical Counter · Electric Bell · Wind Turbine · 8520 Coreless Motor · Car Wiper Motor · Car Door Lock Actuator · 12V Solenoid Water Valve · 12V Holding Electromagnet
Motor drivers: L298 · L9110S · TB6612FNG · BTS7960 · A4988 / DRV8825 · 28BYJ-48 + ULN2003 · PCA9685 Servo · Relay Module · 30A Brushless ESC · TB6600 Stepper Driver
Helping Tools
- Serial Monitor Advance: a serial terminal window for the UART of your board
- Serial Monitor Expert: the serial monitor with extra debugging tools
- LCD Library for Proteus V3.0: 16x2, 20x4 and I2C LCDs to show your readings
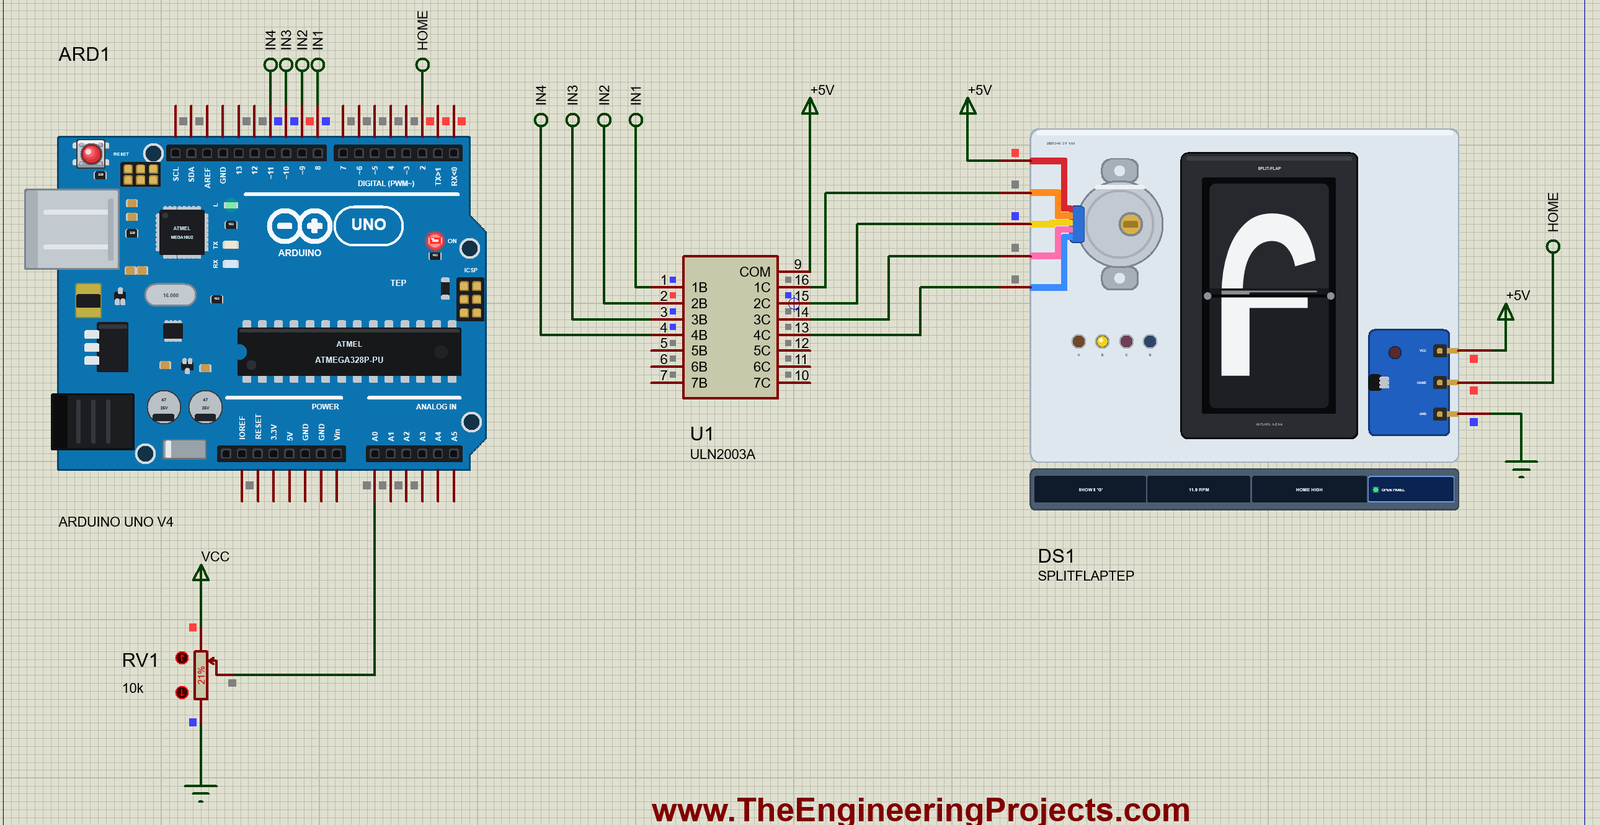
This library gives that module a part of its own in Proteus. Its stepper coils are in the circuit, the spool carries 40 flaps, the flaps fall as the spool turns, and a hall sensor pulls a HOME pin low once a turn. It behaves like the real thing in the ways that matter for your sketch: it only turns forward, it loses steps when you drive it too fast, and a sketch that counts the wrong number of steps a turn ends up a character off. A pop-up window shows the flap, the spool, the coils and the reason for every wrong character. The demo drives it from an Arduino UNO V4.0 through Proteus's own ULN2003A.
NOTICE: a split-flap module looks simple - a motor turns a ring of cards - but getting the right character every time takes a steady hand: the right number of steps, a gentle ramp, a home sensor and never a step backwards. Our team put a lot of effort into making this model fail the way the real one does, and say why. Your feedback is the fuel that keeps us going, so please tell us what you think in the comments below or in the Motor Driver board of our forum. And if our free libraries help you, you can buy us a coffee. So, let's get started with the Split-Flap Display Library for Proteus V1.0:
What is a Split-Flap Display?
A split-flap display shows a character on two halves of a card. Every flap carries the top half of one character on its front and the bottom half of the next character on its back. The flaps hang on a spool, and a small stop tab holds the top flap up. When the spool turns, the top flap is pushed past the tab and falls: its back now shows the bottom half of the next character, and the flap behind it shows that character's top half. Turn the spool further and the next flap falls. The display has no idea which character it shows - the controller has to count, and a sensor has to tell it where the start is.
| Split-flap module (the model) | |
|---|---|
| Flaps | 40 on one spool: blank, A - Z, 0 - 9, . - ? (9 deg each) |
| Motor | a 28BYJ-48 5 V stepper, 50 ohm coils from RED, 64 : 1 gearbox |
| A turn | 4075.8 half steps (64 x 63.68) - not 4096 |
| Home | a hall sensor: HOME LOW while the magnet passes, 1.5 - 5.5 deg into the blank flap |
| Direction | only forward - backwards the flaps catch on the stop tab (JAMMED) |
| Speed | up to about 17 RPM with the flaps and a ramp from 5 RPM |
How a Flap Falls
In the model, the spool angle decides everything. Flap number k falls at k x 9 degrees and shows until the next one falls at (k + 1) x 9 degrees, so the middle of flap k sits at k x 9 + 4.5 degrees. Over the second half of every 9 degrees, the motor pushes the next flap against the stop tab, which takes a little extra torque; the moment the flap falls, that load is gone. Add the spool's own friction and you get the load the stepper sees: a steady 3 mN.m and up to 8 mN.m more just before each flap drops.
Why a Home Sensor?
A stepper turns exactly as far as it is told - until it does not. One stall, one bump, one wrong number in the sketch, and the count no longer matches the spool. The home sensor fixes that once a turn: a small magnet on the spool passes a hall-effect sensor, its output goes LOW, and the sketch knows exactly where the spool is. A good split-flap sketch finds home at power-up and sets its position again every time HOME goes LOW, so no error can grow beyond one turn.
Why Only Forward?
The stop tab works in one direction. Turn the spool backwards and the fallen flaps are dragged up against the tab: they catch, the spool stops, and the motor slips. That is why every real split-flap goes forward to the next character - even when that means going all the way round. To go back one character, you go forward 39.
What's New in Split-Flap Display Library for Proteus V1.0
- A part of its own: a 40-flap split-flap module with its 28BYJ-48, its hall-sensor board and its window.
- The real stepper: the 28BYJ-48's coils, rotor, detents and 64 : 1 gearbox, driven by any ULN2003 or transistors on its four coil wires.
- The real flaps: a falling flap on the sheet, the flaps' load on the spool, the jam when it is driven backwards, lost steps when it is driven too fast.
- The real home sensor: an open-collector HOME output with its board's pull-up - LOW once a turn.
- A pop-up window with four pages - Display, Graphs, Event log and Check - with the 40 flaps drawn as a ring.
- An A4 demo on our Arduino UNO V4.0: homing, a knob, words, and every classic mistake on command.
The Split-Flap Display in Proteus
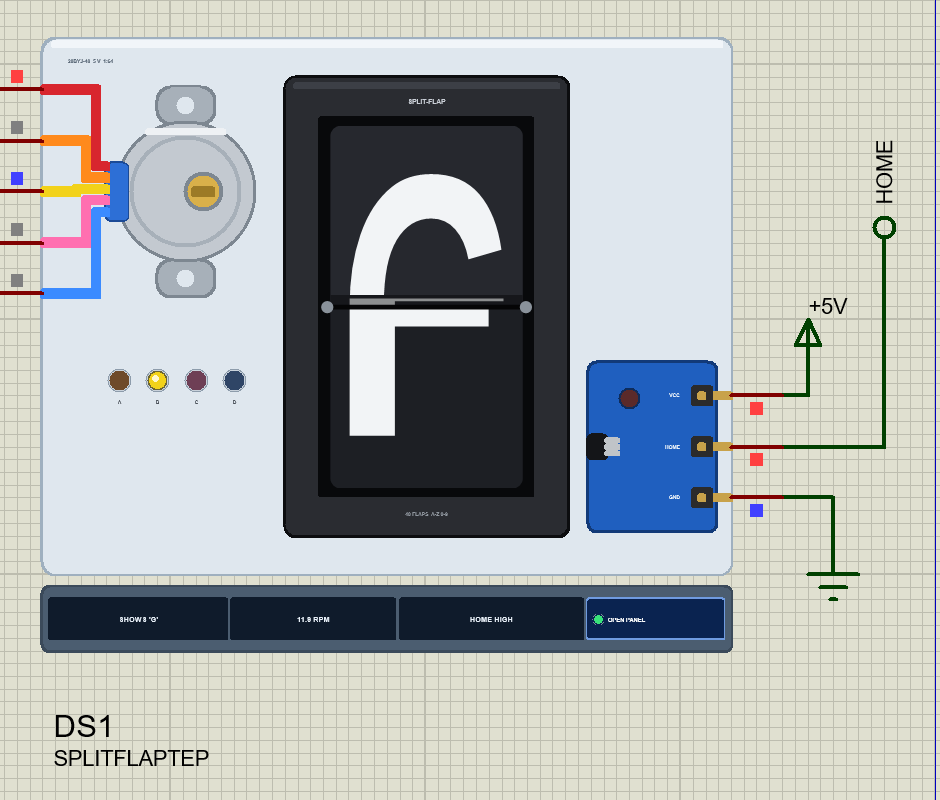
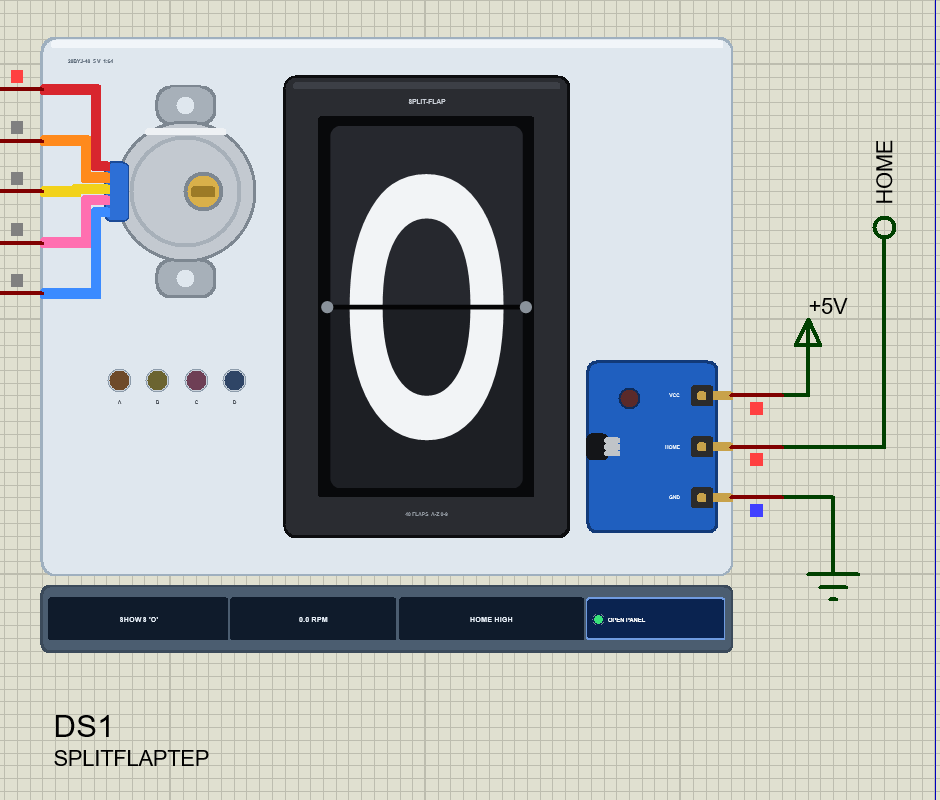
Search split-flap in Pick Devices; the device SPLITFLAPTEP is in TEPSPLITFLAP.LIB (category Electromechanical, Motors) and its model is TEPSPLITFLAP.DLL. It is drawn from the front: the dark housing with the window and its flap card, the 28BYJ-48 on the left with its two ears, its blue wire cap and the five wires to the pins, and the blue hall-sensor board on the right with its black sensor facing the spool and its own LED.
At Run the window shows the character on the spool, and you see each flap fall as it changes: first the old character's top half folds down onto the split, then the new character's bottom half unfolds below it. The sensor board's LED lights while the magnet is there. The coil LEDs A - D light in their wire colours while their coil is on, and the strip under the plate shows the character, the speed, the HOME output and the OPEN PANEL button. The plate, the coil LEDs and the strip are TEP additions; the real module has none of them.
The Pins and the Property
| Pin | What the model does with it |
|---|---|
| RED | the motor's common: +5 V |
| ORANGE, YELLOW, PINK, BLUE | coils A - D: a 50 ohm winding from RED each; a coil is on while its wire is pulled LOW |
| VCC, GND | the hall sensor's supply (3 V or more) |
| HOME | the sensor's output: LOW at the magnet, HIGH through the board's 10 kohm pull-up |
| Property | Default | What it does |
|---|---|---|
| START | 0 | the flap showing at power-up, 0 - 39 (0 = blank, 1 = A ... 26 = Z, 27 = 0 ... 36 = 9) |
Download Split-Flap Display Library for Proteus
Click the button below to download Split-Flap-Display-Library-for-Proteus-v1.0.zip (about 1.2 MB, without the source code of the models):
Split-Flap Display Library for Proteus V1.0- README.txt: installation, the demo, the wiring, the property, real hardware, troubleshooting and the limits.
- Proteus Library Files:
TEPSPLITFLAP.LIBandArduinoV4TEP.LIBfrom our Arduino Library for Proteus V4.0. - Proteus Model Files:
TEPSPLITFLAP.DLLandTEPARDUINO.DLL. - Proteus Simulation:
Split-Flap-Display-ULN2003A-ArduinoUnoV4.pdsprj,SplitFlap_Demo.hexand copies of the two DLLs. - Arduino Code:
SplitFlap_Demo.ino(no library needed).
Good to know: the demo's driver is Proteus's own ULN2003A, which comes with every Proteus 8, so there is nothing else to install.
No Proteus yet? Read How to Download and Install Proteus 7 and 8. New to libraries? Follow How to Install a New Library in Proteus.
How to Install Split-Flap Display Library for Proteus
- Close Proteus and extract the whole zip file, for example to your Desktop.
- Copy
TEPSPLITFLAP.LIBandArduinoV4TEP.LIBfrom Proteus Library Files into the LIBRARY folder of Proteus (usuallyC:\Program Files (x86)\Labcenter Electronics\Proteus 8 Professional\LIBRARY). - Copy
TEPSPLITFLAP.DLLandTEPARDUINO.DLLfrom Proteus Model Files into the MODELS folder. The two Arduino files are the ones of our Arduino Library V4.0; if you have it, they are the same. - Delete
TEPSPLITFLAP.IDXfrom the LIBRARY folder if it is there. - Start Proteus, press P and search for split-flap.
Tip: keep the Proteus Simulation folder together, because the project needs its .hex file and the DLLs beside it. The library is tested in Proteus 8.5; Proteus 7 is not supported.
The Demo Circuit
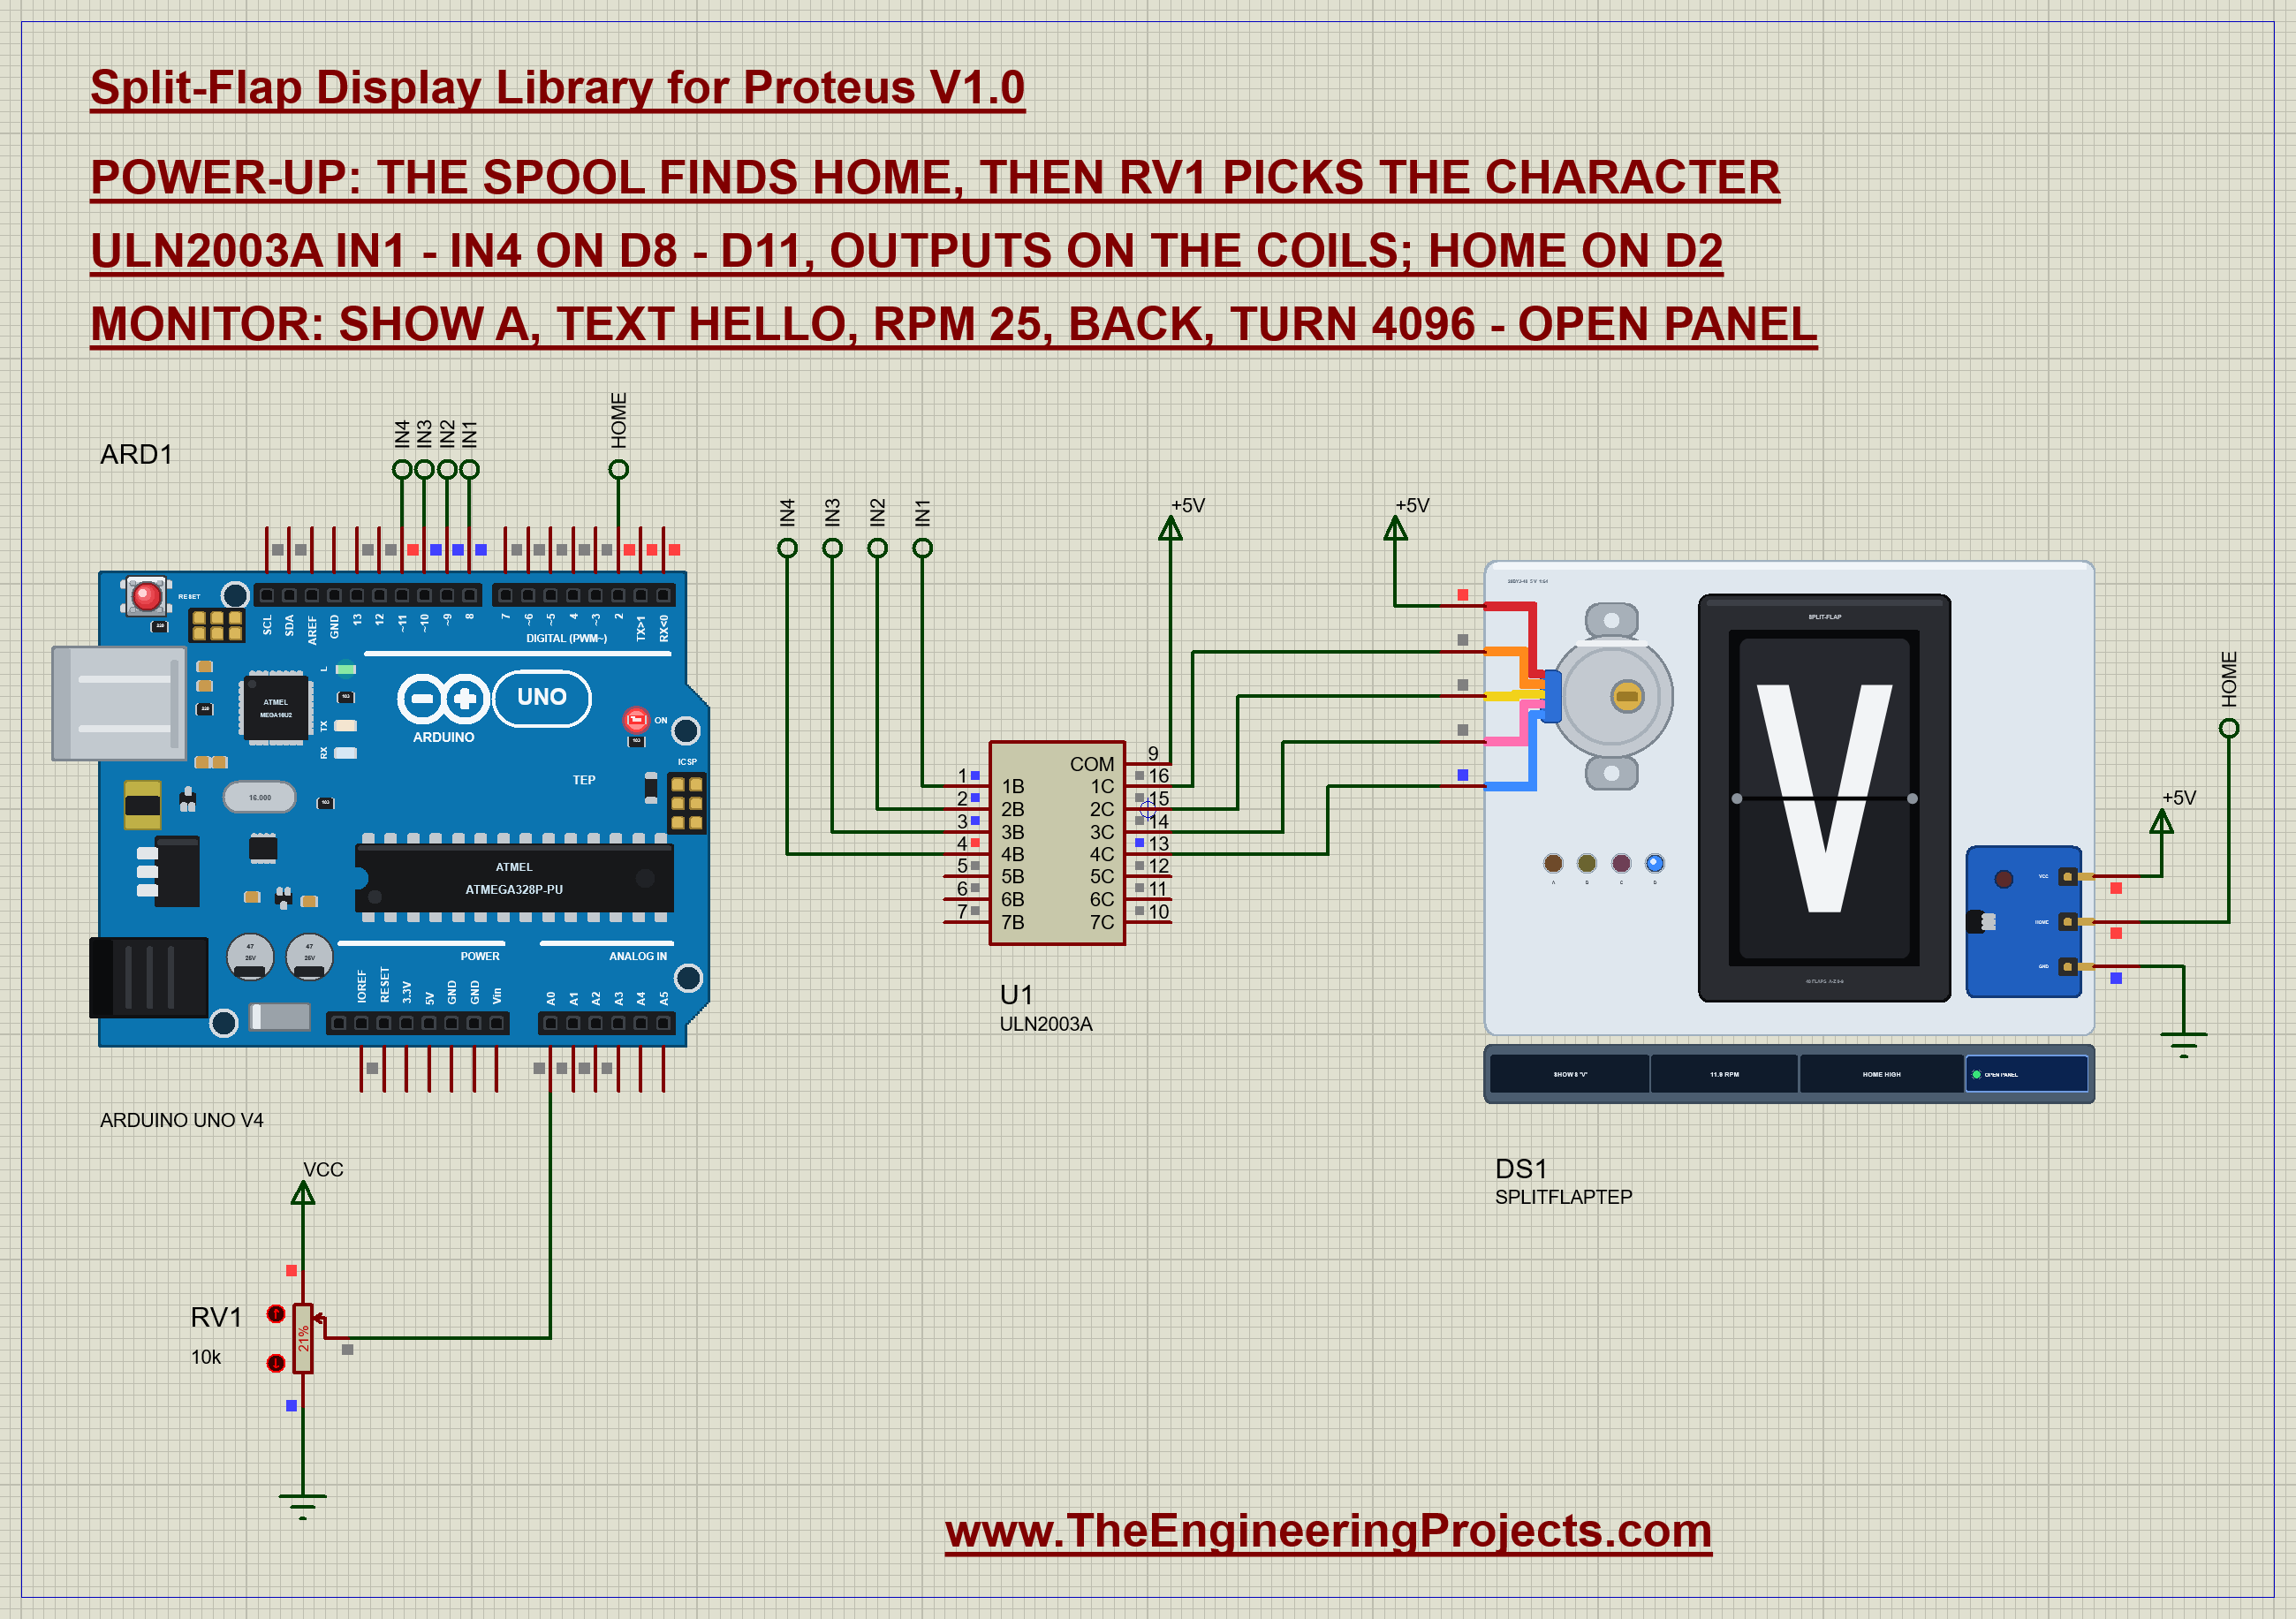
Open Split-Flap-Display-ULN2003A-ArduinoUnoV4.pdsprj. ARD1 is an Arduino UNO V4.0 from our Arduino UNO Library for Proteus V4.0, running SplitFlap_Demo.hex with its serial monitor built in. U1 is Proteus's ULN2003A Darlington array, DS1 the split-flap module and RV1 a 10k pot on A0 that picks the character in knob mode.
| Part | Pin | Goes to |
|---|---|---|
| ULN2003A | 1B - 4B | D8 - D11 (labels IN1 - IN4) |
| ULN2003A | 1C - 4C | the module's ORANGE, YELLOW, PINK, BLUE |
| ULN2003A | COM | +5V |
| Module | RED, VCC | +5V |
| Module | HOME | D2 (label HOME) |
| Module | GND | ground |
| RV1 | wiper | A0 |
Why a ULN2003?
A 28BYJ-48 coil takes about 90 mA at 5 V - far more than an Arduino pin should give - and the coils are inductors, which kick back when they switch off. The ULN2003A is seven Darlington switches with their clamp diodes built in: each output pulls one coil wire to ground, and the diodes to COM catch the kick. This model is the same 28BYJ-48 as our 28BYJ-48 Stepper Motor Library for Proteus, so if you know that demo, the wiring is the same - plus the HOME wire to D2.
The Arduino Code
The sketch needs no library: it writes the half-step sequence itself, which is the easiest way to keep exact count of every step. New to Arduino? Start with Arduino Tutorial for Beginners and Introduction to Arduino UNO. The pins and the flaps come first:
const byte IN1 = 8, IN2 = 9, IN3 = 10, IN4 = 11;      // ULN2003A IN1 - IN4: coils A - D (orange, yellow, pink, blue)
const byte HOME_PIN = 2;                              // the hall sensor: LOW while the magnet passes
const char FLAPS[] = " ABCDEFGHIJKLMNOPQRSTUVWXYZ0123456789.-?"; // the 40 flaps in spool orderThe half-step table drives the four coils in eight steps - one coil, then two, then one again - which gives the smoothest motion and the most steps per turn:
const byte SEQ[8] = {0b0001, 0b0011, 0b0010, 0b0110, 0b0100, 0b1100, 0b1000, 0b1001}; // half steps: A, AB, B, BC, C, CD, D, DAThe most important number in the sketch is the length of a turn. The 28BYJ-48's gearbox is not 64 : 1 but 63.68 : 1, so a turn is 4075.77 half steps - not the round 4096 many sketches use:
float halfPerTurn = 4075.77; // 64 x 63.68: the 28BYJ-48's half steps a turn (NOT 4096)From there, the middle of every flap is easy to work out:
long centreHalf(int k) { return lround((k * 9.0 + 4.5) * halfPerTurn / 360.0); } // the middle of flap kEvery forward step reads the home sensor. When HOME goes from HIGH to LOW, the spool is exactly 1.5 degrees into the blank flap, and the sketch sets its position to match:
  if (dir > 0 && h == LOW && lastHome == HIGH) {
    if (homing) { pos = homeHalf(); homing = false; homed = true; left = centreHalf(0) - pos; moveLen = left; Serial.println(F("Home found - the blank flap")); }
    else if (sync) pos = homeHalf();
  }
To show a character, the sketch only ever moves forward - if the target is behind, it goes round:
  float d = centreHalf(k) - p;
  while (d < 1) d += halfPerTurn;
The speed ramps up from 5 RPM over the first 120 half steps and down over the last 120, because a 28BYJ-48 cannot jump to full speed with a load on its shaft:
float v = min(rpm, min(5 + (rpm - 5) * (done + 1) / RAMP, 5 + (rpm - 5) * left / RAMP));And when the spool stops, the coils are switched off. The gearbox holds the spool on its own, and the motor stays cool:
if (!released && millis() - stopAt > 150) { coils(0); released = true; } // the gearbox holds the spool: the coils offThe HEX file is in the package. To change the sketch, open it in the Arduino IDE and export the compiled binary, as in How to get the HEX file from Arduino. It needs 10,478 bytes of flash (32 % of the UNO) and 420 bytes of RAM.
Running the Demo
Press Run. The UNO's serial monitor and the module's pop-up open over the schematic; move them aside. The spool turns until the magnet passes the sensor, stops on the blank flap and then turns on to the character RV1 picks:
Split-Flap Display demo - The Engineering Projects
ULN2003A on D8 - D11, HOME on D2. 40 flaps, 4076 half steps a turn, forward only.
Commands: show A | text HELLO | knob | rpm 12 | home | sync on | sync off | turn 4096 | spin 4 | back | help
Homing - turning to the magnet
Home found - the blank flap
Showing blank
Showing 'H'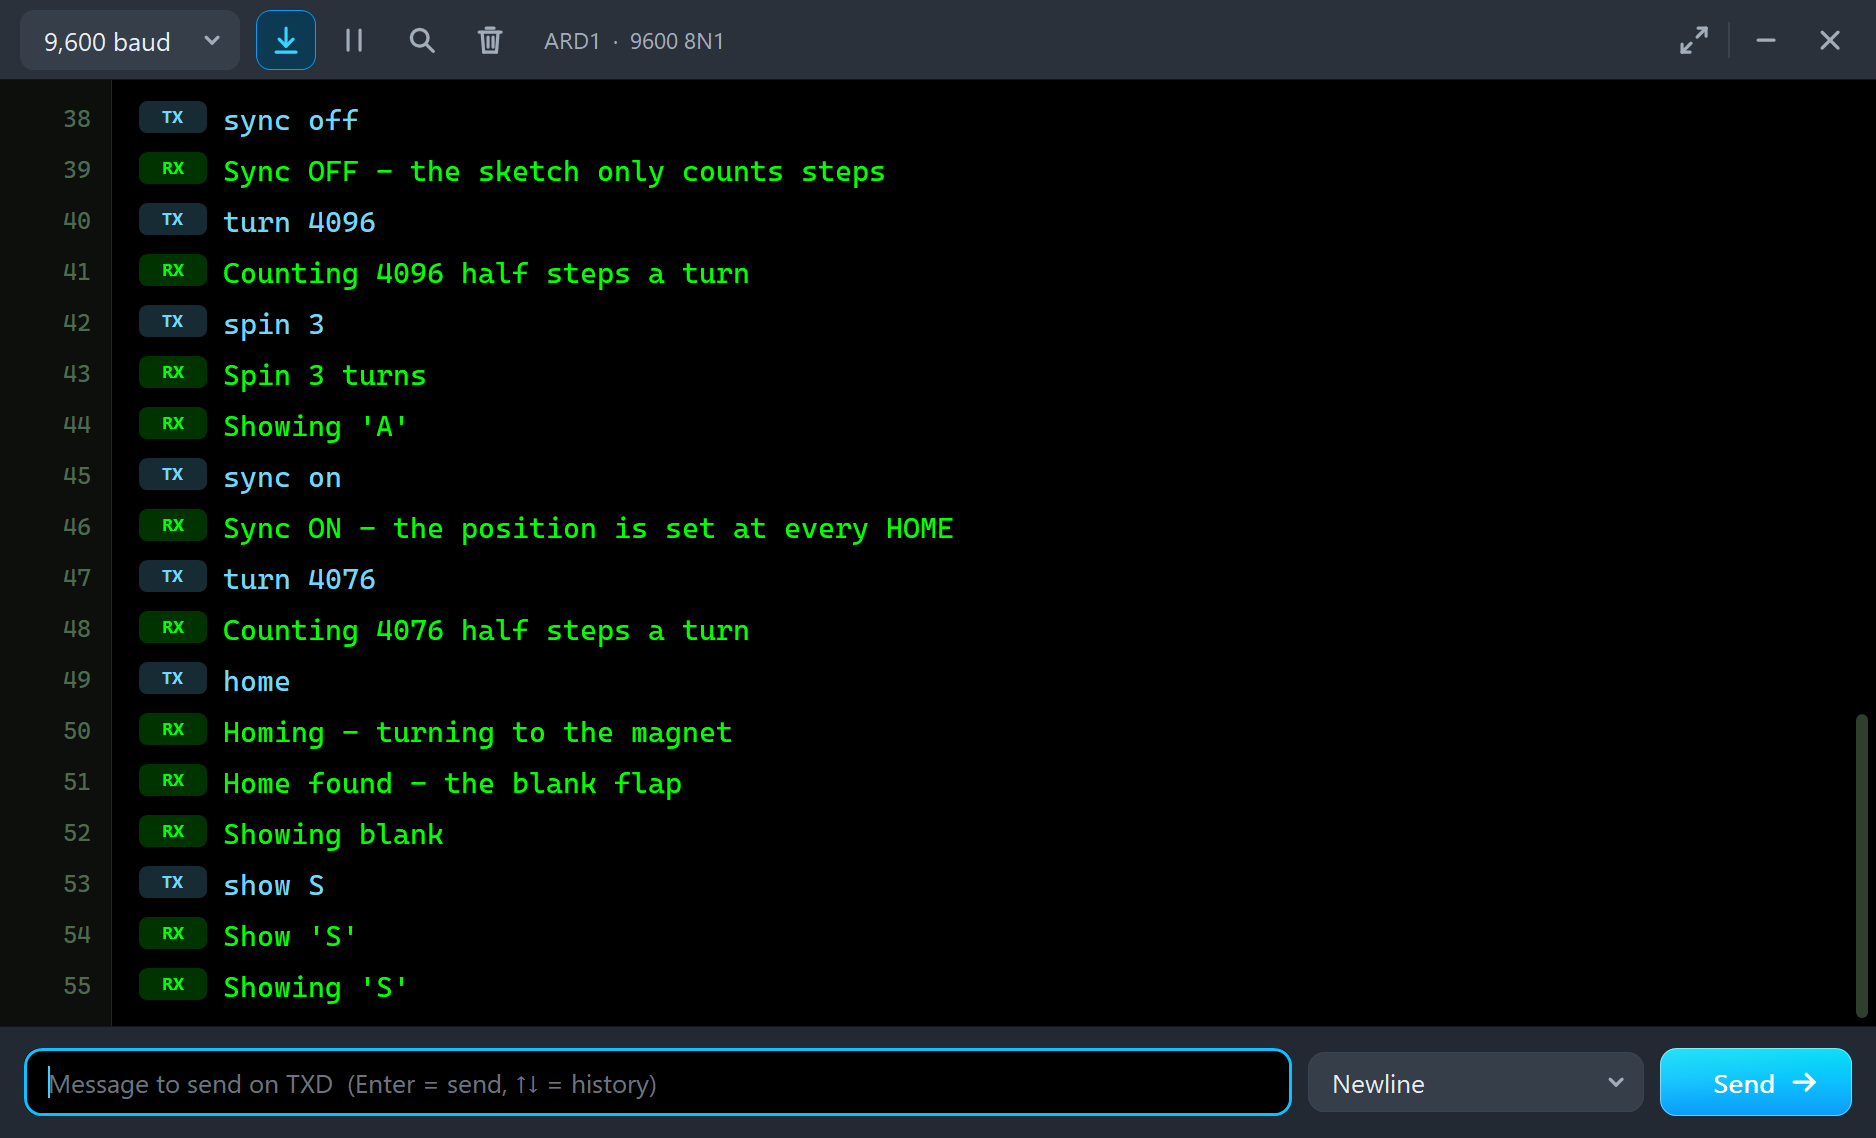
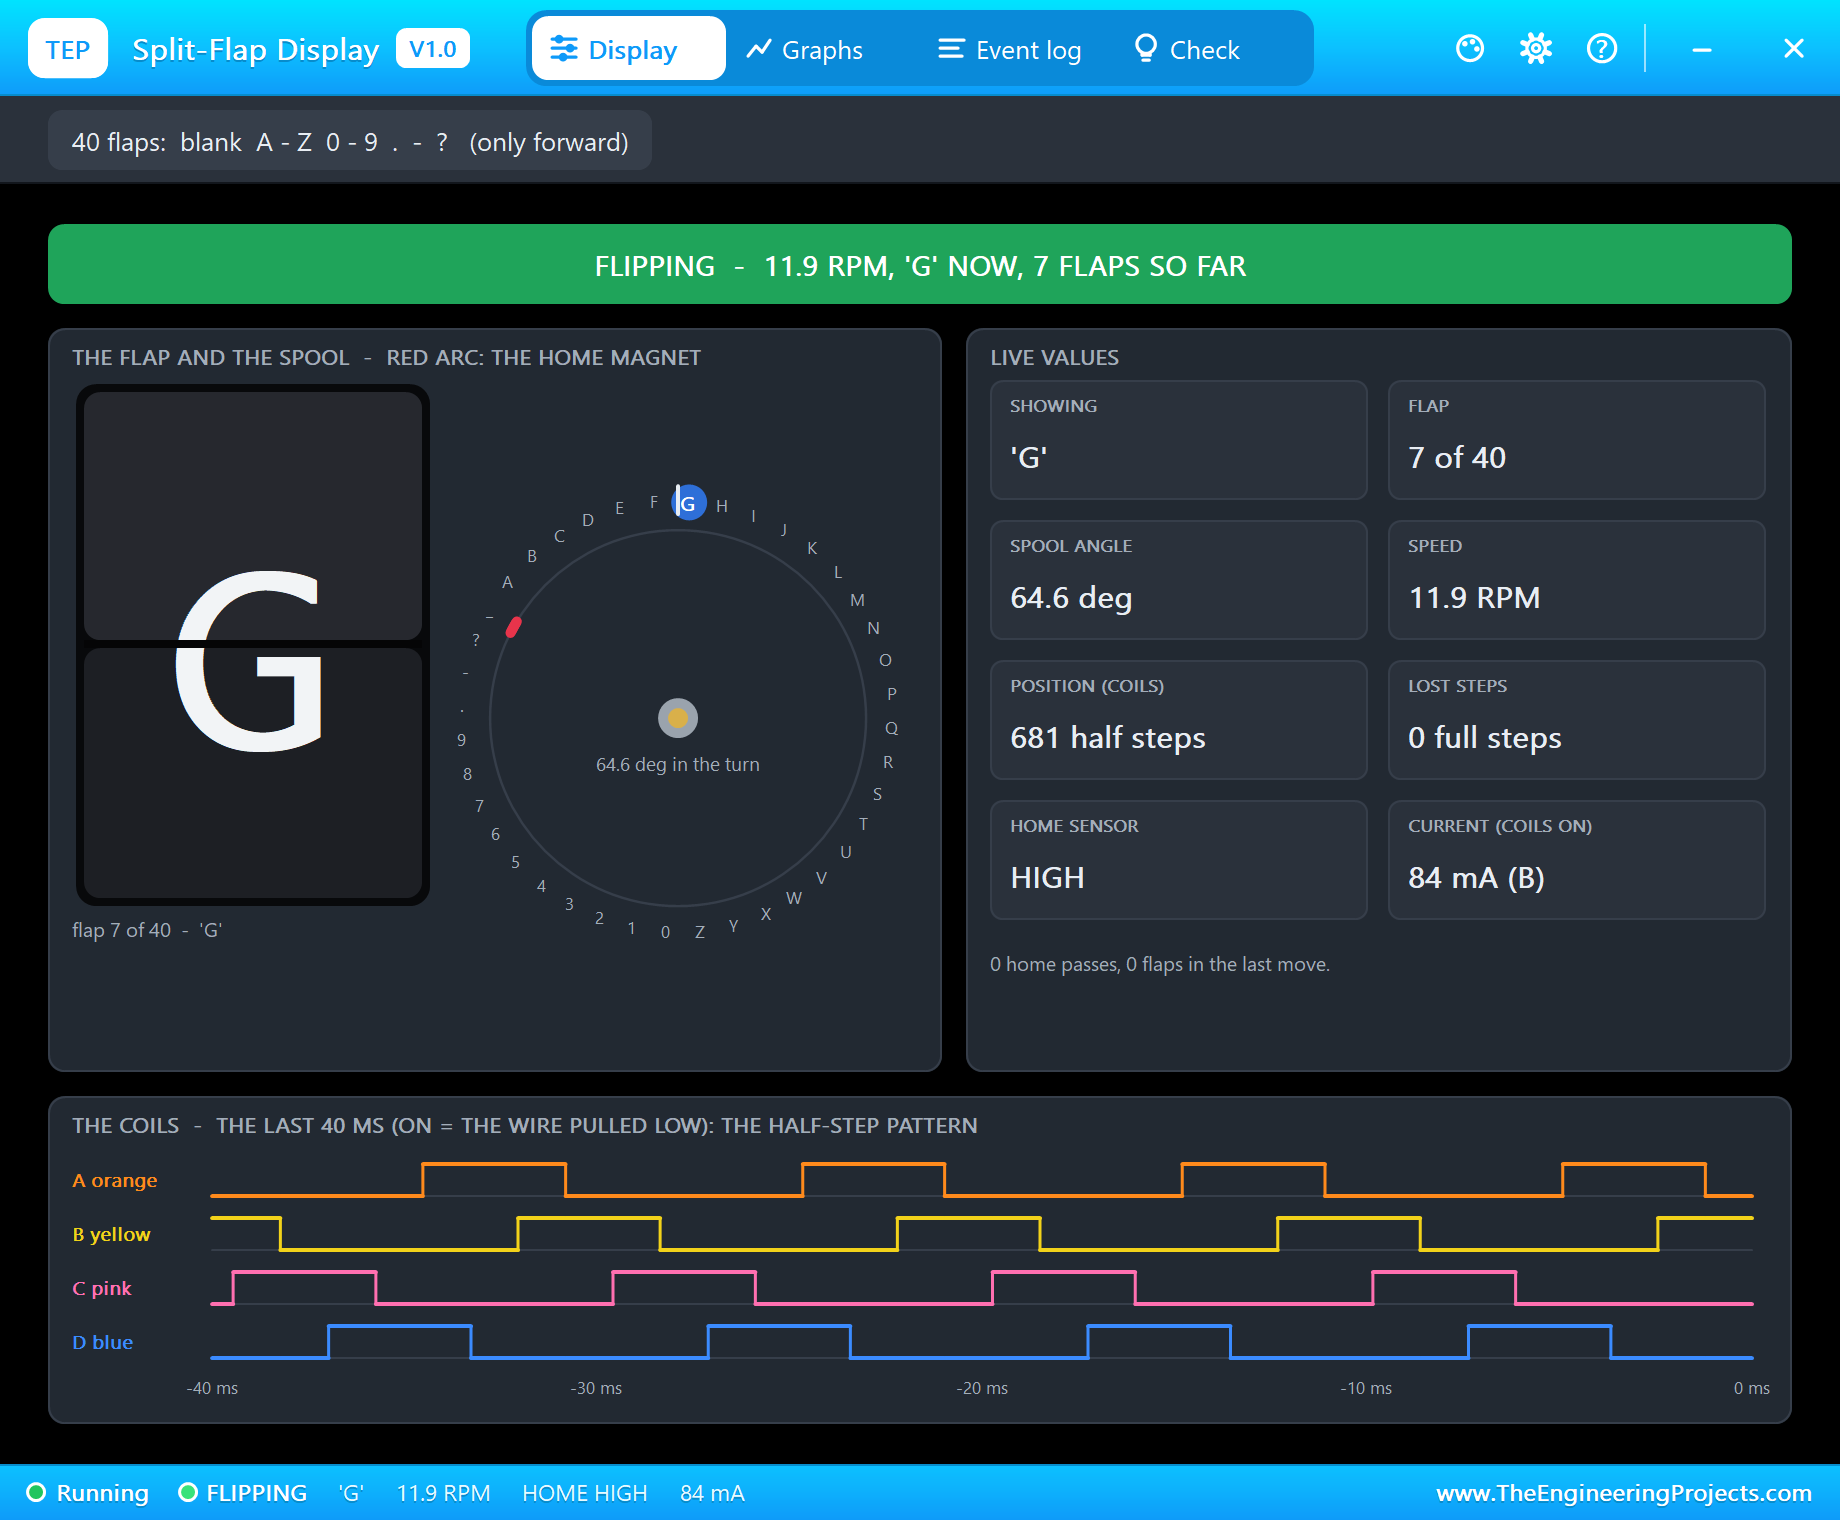
The pop-up has the look of our TEP Serial Monitor Advance for Proteus and four tabs: Display, Graphs, Event log and Check. The Display page shows the state in big letters - here "FLIPPING - 11.9 RPM, 'G' NOW, 7 FLAPS SO FAR" - then the flap itself and the spool's 40 flaps in a ring, turning with the spool, with the home magnet marked in red. Next to it are eight live values, and at the bottom the four coils over the last 40 ms: the half-step pattern you wrote in the sketch, drawn as a timing chart.
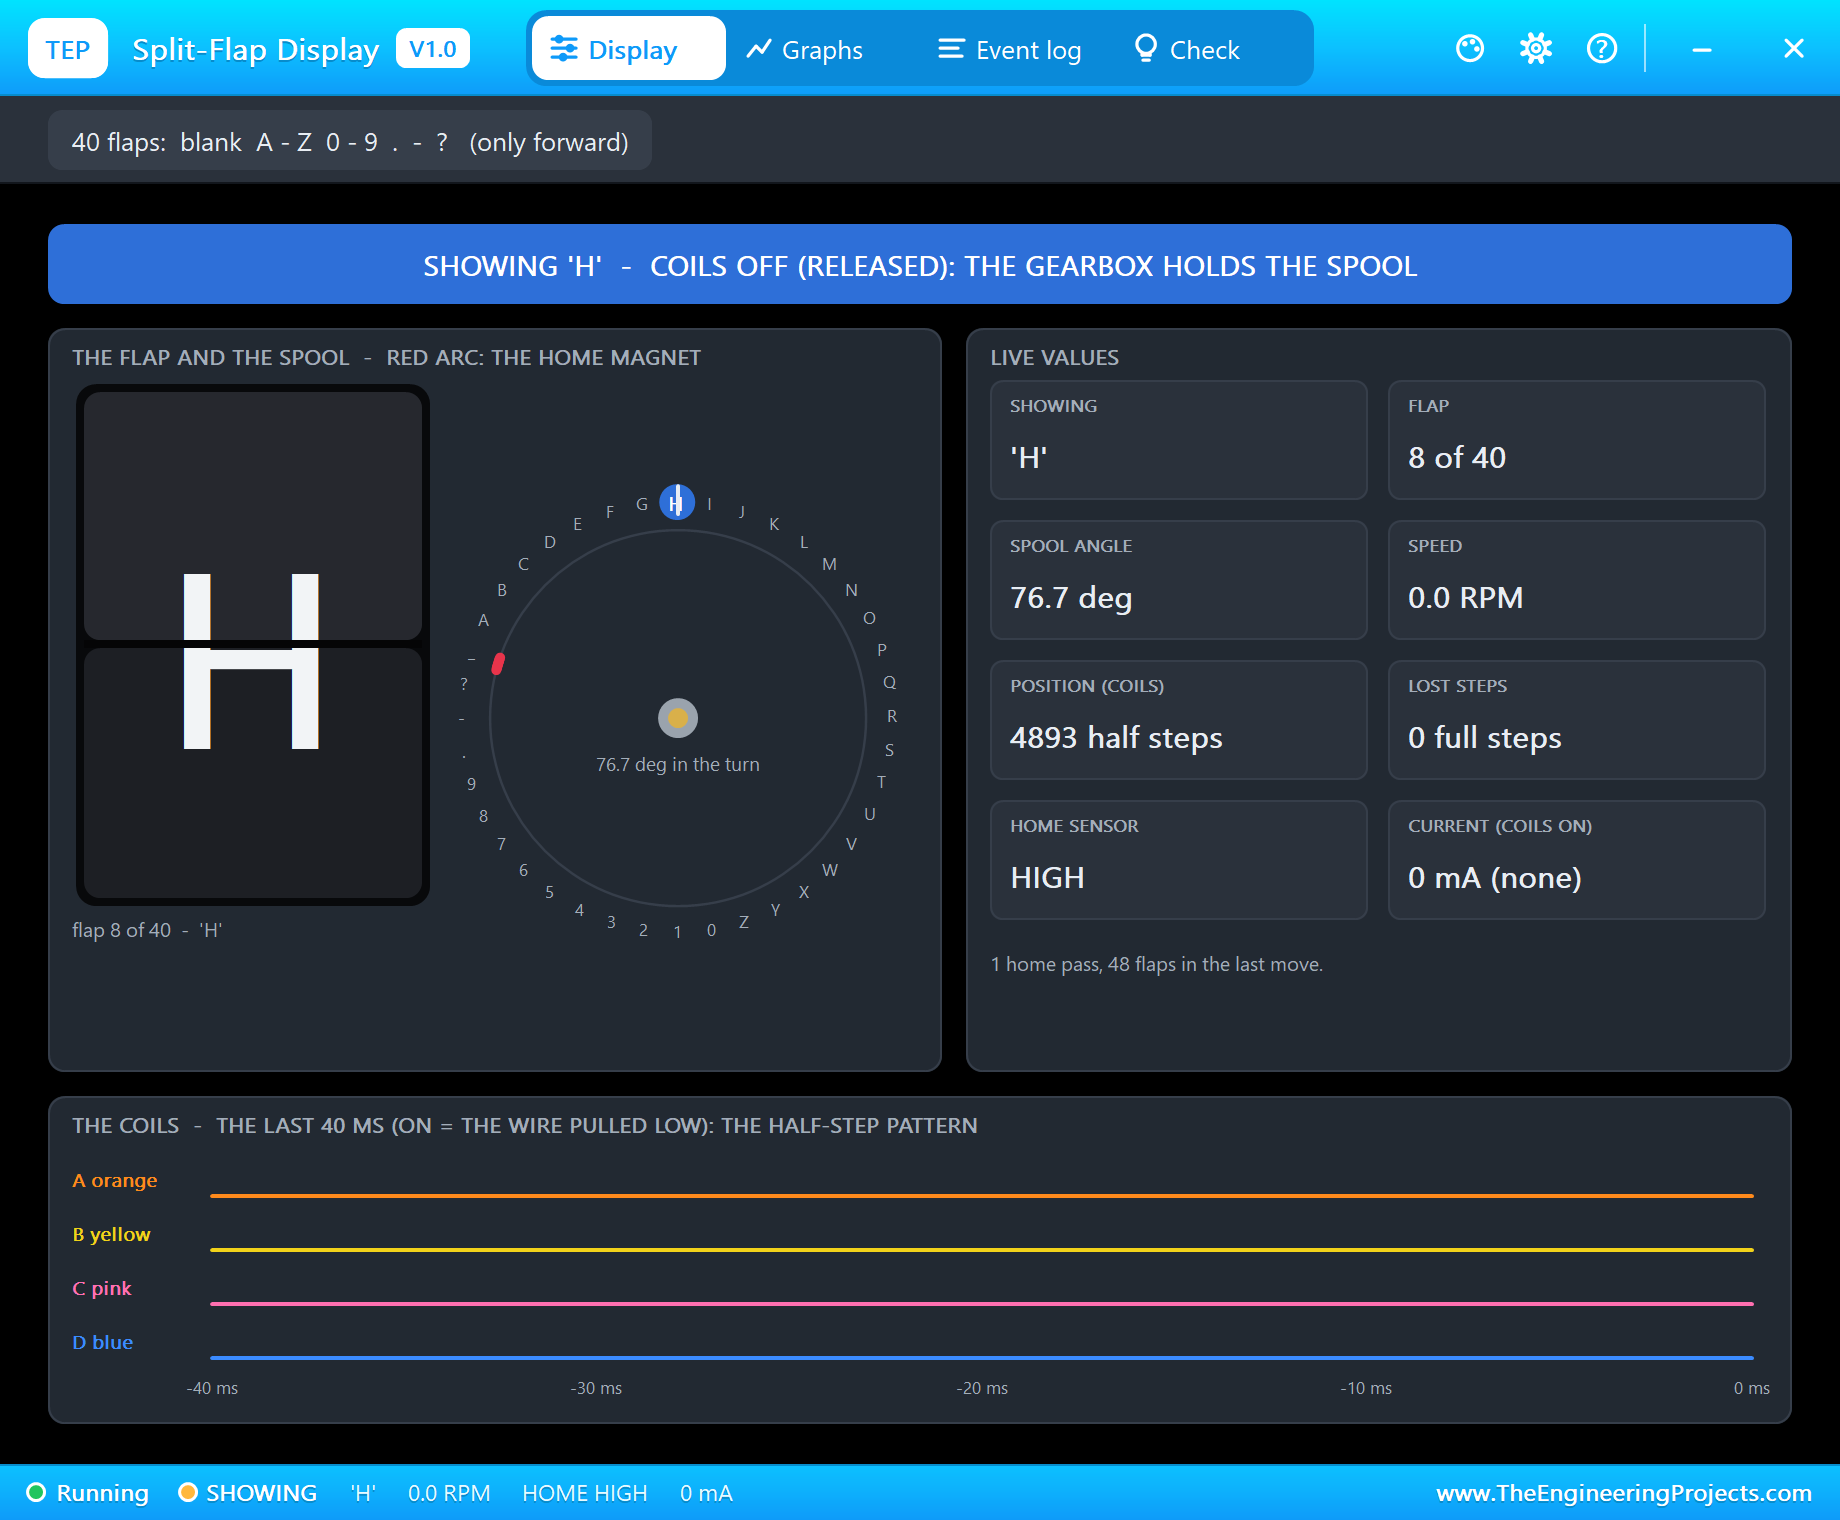
The Event log records the whole start: "HOME - the magnet passed the hall sensor (HOME LOW) at 1.5 deg, the blank flap", then, with RV1 at 21 %, "SHOWING 'H' - from blank in 6.28 s, 48 flaps" - a full turn to find home, the blank flap and 8 more.
A Word: HELLO
Type text HELLO. The sketch shows one character a second. 'H' is already there, so it starts with 'E':
text HELLO
Text - HELLO
Showing 'E'
Showing 'L'
Showing 'O'
Text done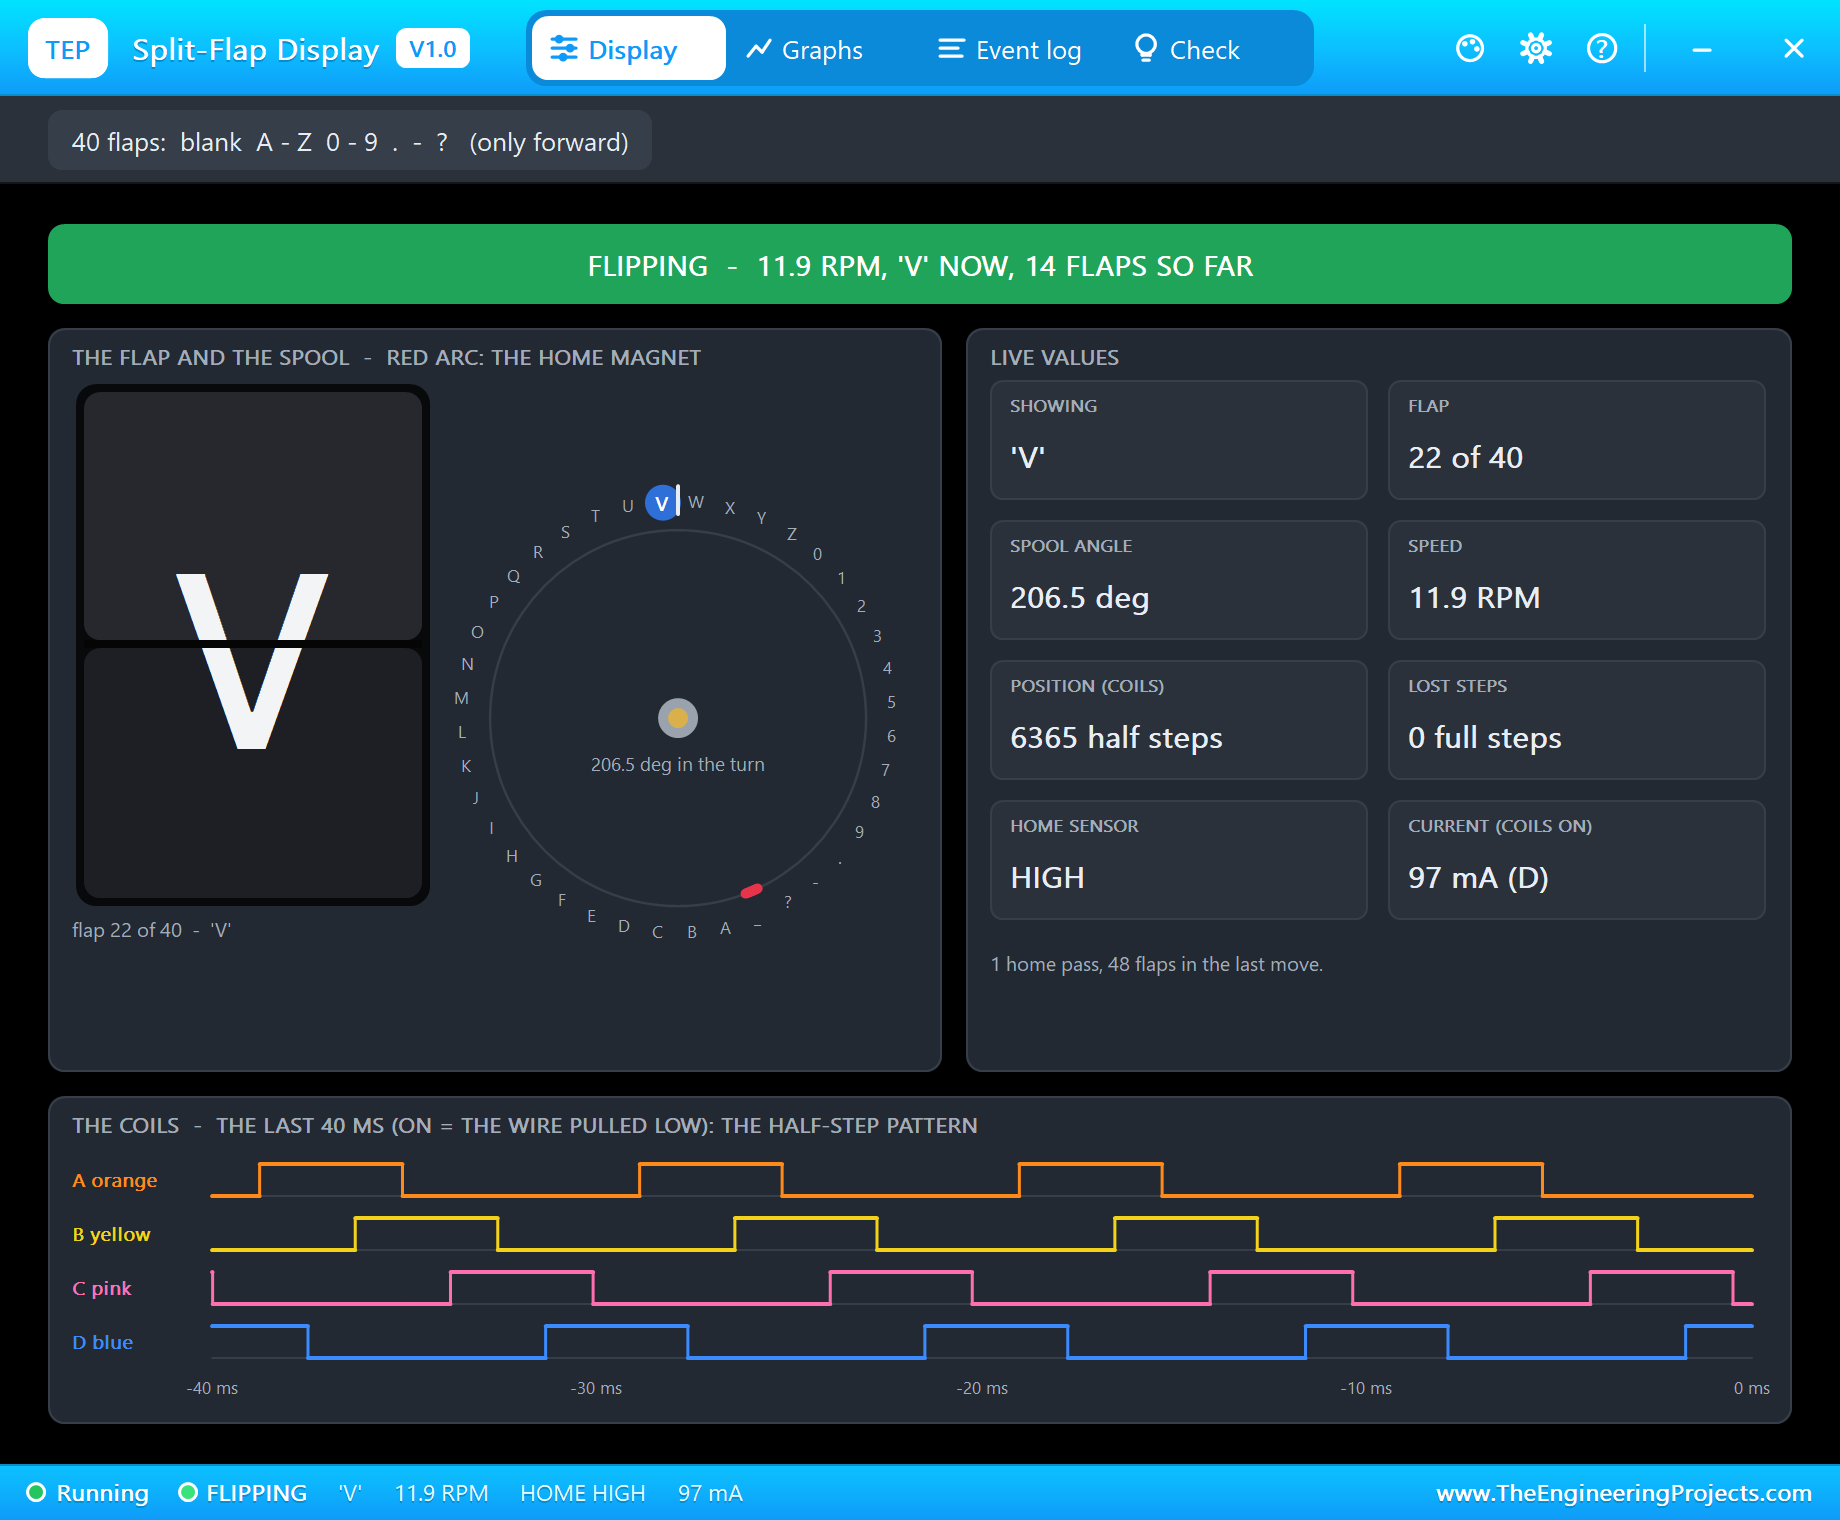
This is where a split-flap differs from any other display. 'E' comes before 'H' on the spool, so the module cannot go back three flaps - it goes forward 37: "SHOWING 'E' - from 'H' in 4.77 s, 37 flaps". Then 'L' takes 7 flaps in 1.01 s, the second 'L' needs no move at all, and 'O' is 3 flaps on. If your project shows words, order your characters to suit the spool, or accept the long trips round.
Too Fast: Lost Steps
Now the first classic mistake. Type rpm 25 and then show Z:
rpm 25
Top speed 25.0 RPM
show Z
Show 'Z'
Showing 'Z'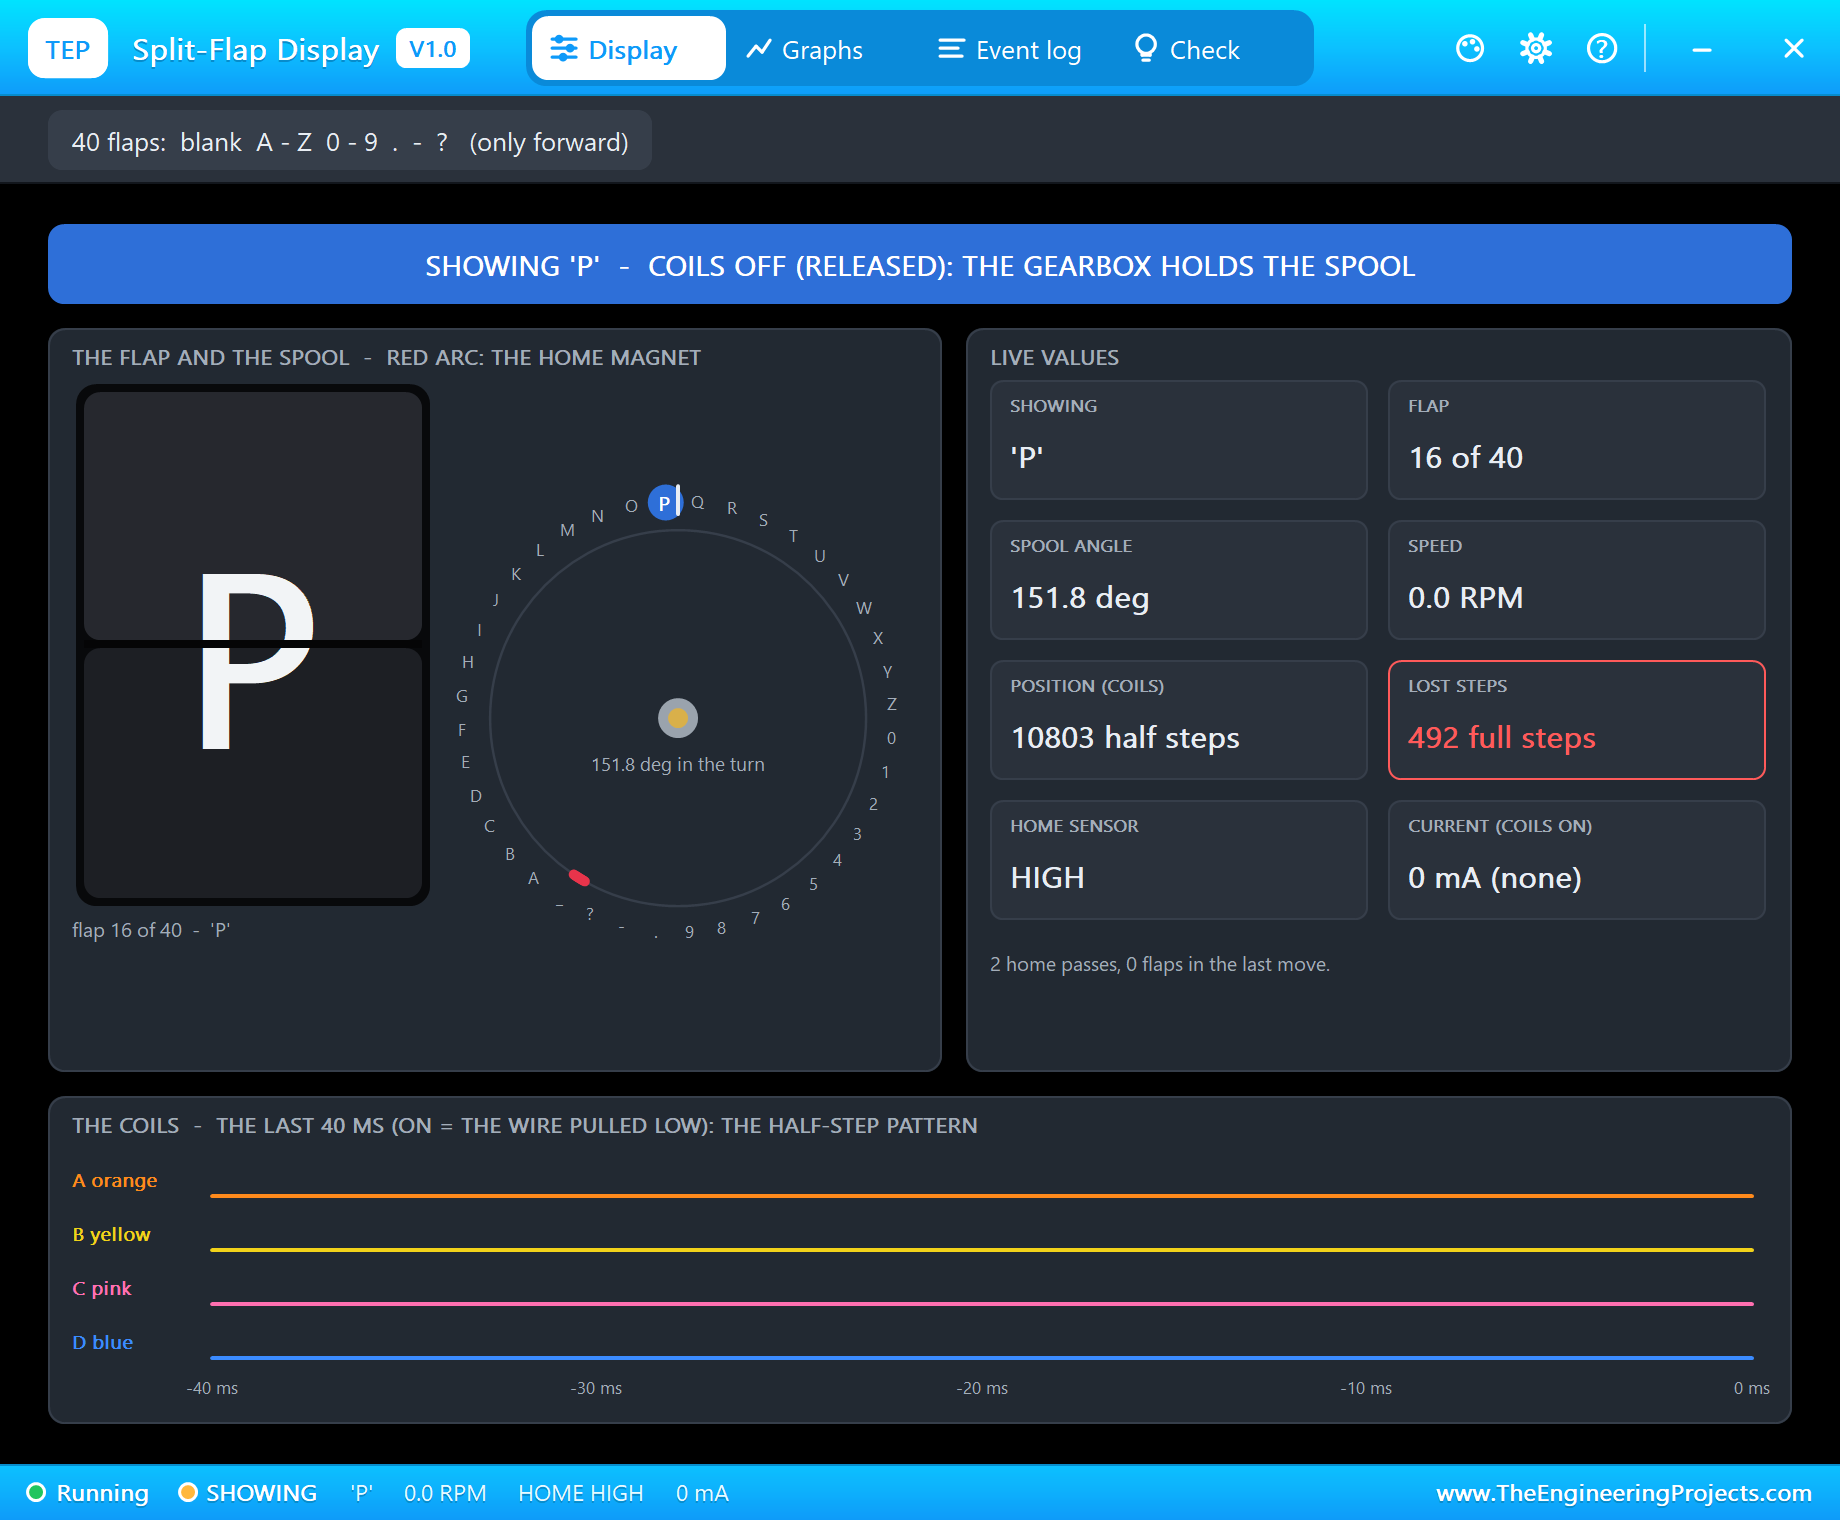
The sketch ramps up towards 25 RPM, but somewhere past 17 RPM the 28BYJ-48 cannot keep up with the coils any more. The rotor falls behind the field, slips, and from then on only buzzes in place. The log says "lost 408 full steps (412 in all) - too fast for the 28BYJ-48 and the flaps' load", the spool stops on 'P' - just one flap after 'O' - and the sketch, which only counts the steps it sent, cheerfully prints "Showing 'Z'". On a real board, this is the character you did not ask for.
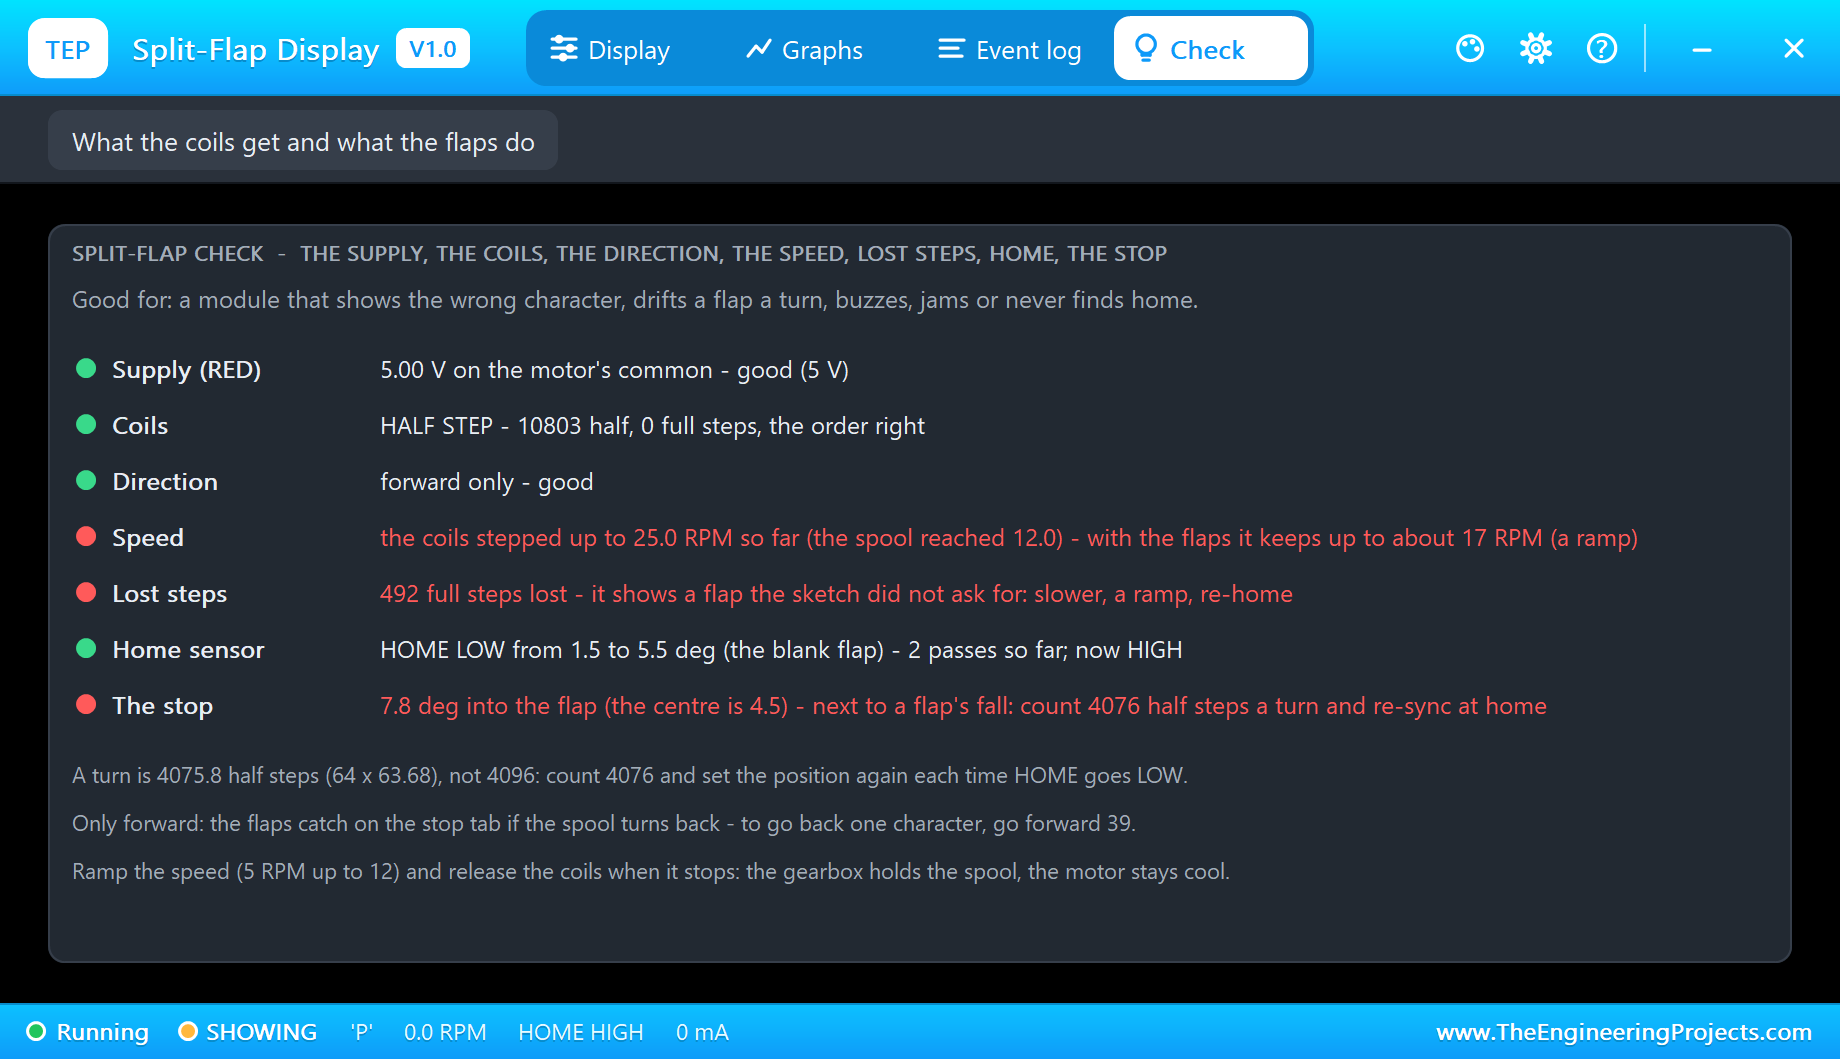
The Check page goes through the supply, the coils, the direction, the speed, lost steps, the home sensor and where the spool stopped. Here it compares the speed the coils were given with the speed the spool reached: "the coils stepped up to 25.0 RPM so far (the spool reached 12.0)". It also notices that the spool stopped 7.8 degrees into the flap, right next to the next one's fall. The cure is in the tips: a slower top speed, a ramp, and a new home.
Type rpm 12 and home. The spool turns until the magnet passes the sensor - "SHOWING blank - from 'P' in 3.07 s, 24 flaps" - and the sketch knows where it is again. show Z now takes 26 flaps in 3.39 s and lands exactly on 'Z'.
Backwards: the Jam
The second classic mistake: back asks the motor for one flap backwards.
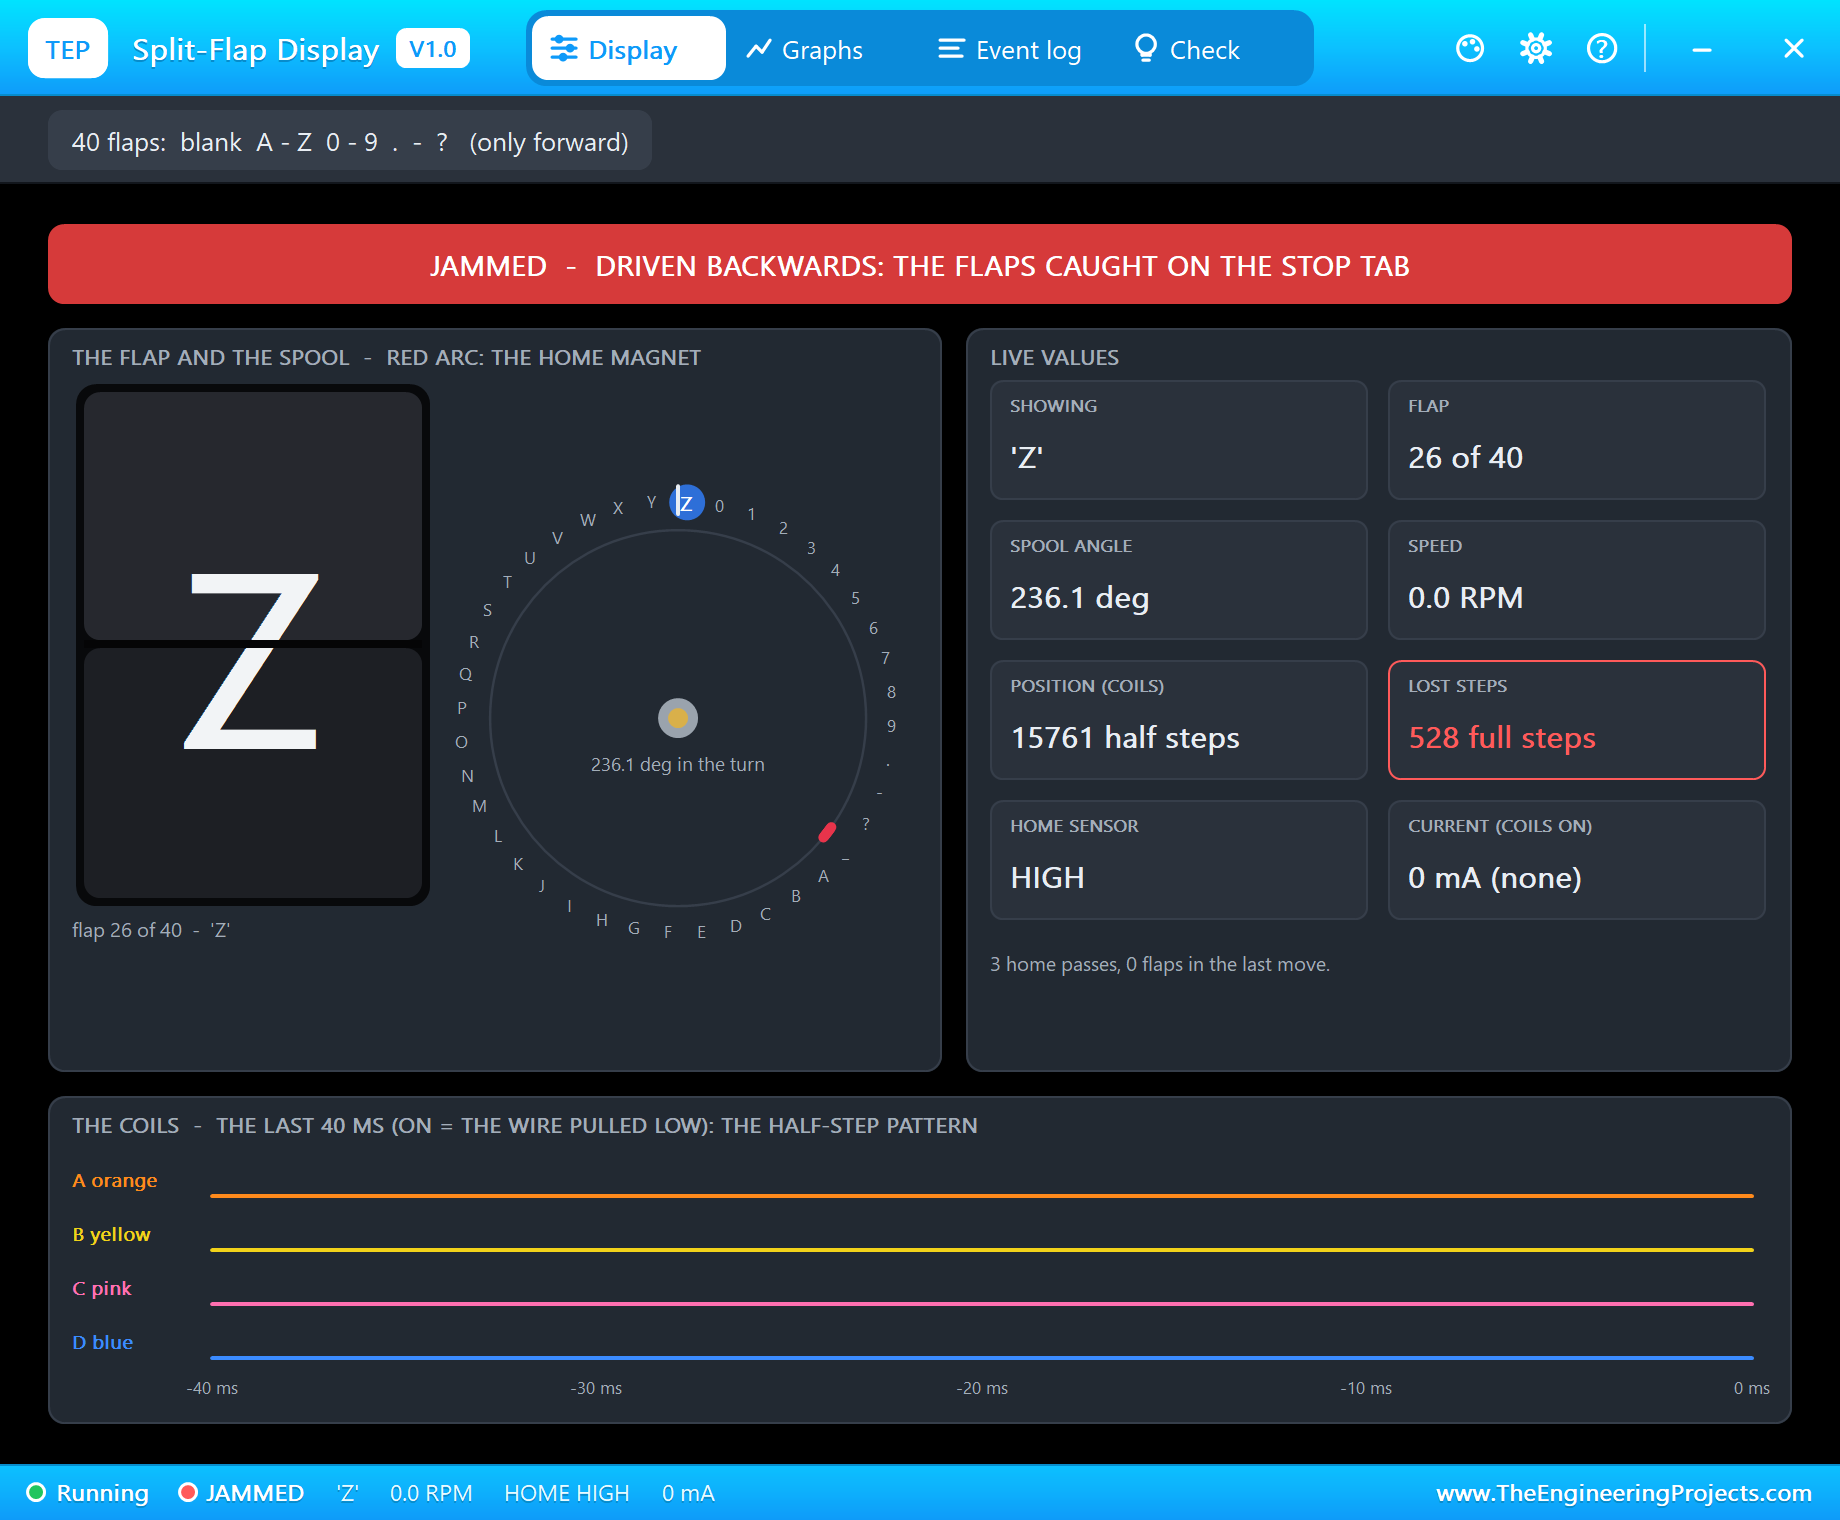
The spool turns back 2.7 degrees and stops dead: the fallen flaps have caught on the stop tab. The coils keep pulling, the rotor slips, and the log reads "JAMMED - the spool was driven backwards: the flaps caught on the stop tab (only forward)" and "lost 32 full steps (528 in all) - against the jam". The lost steps add up across both mistakes: 492 from the stall and 36 more against the jam. The sketch now believes it is one flap back, while the spool is still on 'Z'. A home puts it right again.
4096 Half Steps a Turn: the Drift
The third mistake is the quietest. Many 28BYJ-48 sketches assume 4096 half steps a turn. Let us try it: sync off stops the sketch from setting its position at HOME, turn 4096 makes it count 4096 half steps a turn, and spin 3 asks for three whole turns from 'A':
sync off
Sync OFF - the sketch only counts steps
turn 4096
Counting 4096 half steps a turn
spin 3
Spin 3 turns
Showing 'A'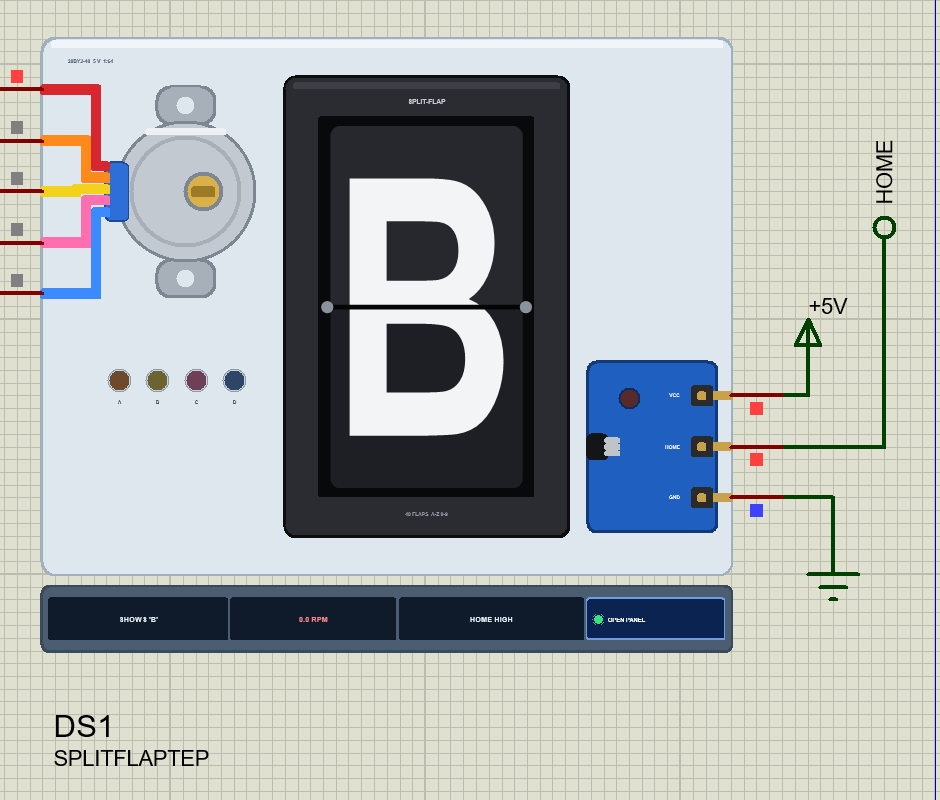
Each of those "turns" is 20 half steps too long - 1.8 degrees. After three of them the spool is 5.4 degrees further on than it should be, which is enough to drop the next flap: "SHOWING 'B' - from 'A' in 15.17 s, 121 flaps", while the sketch prints "Showing 'A'". Nothing stalled, nothing jammed and no step was lost - the sketch simply counted wrong.
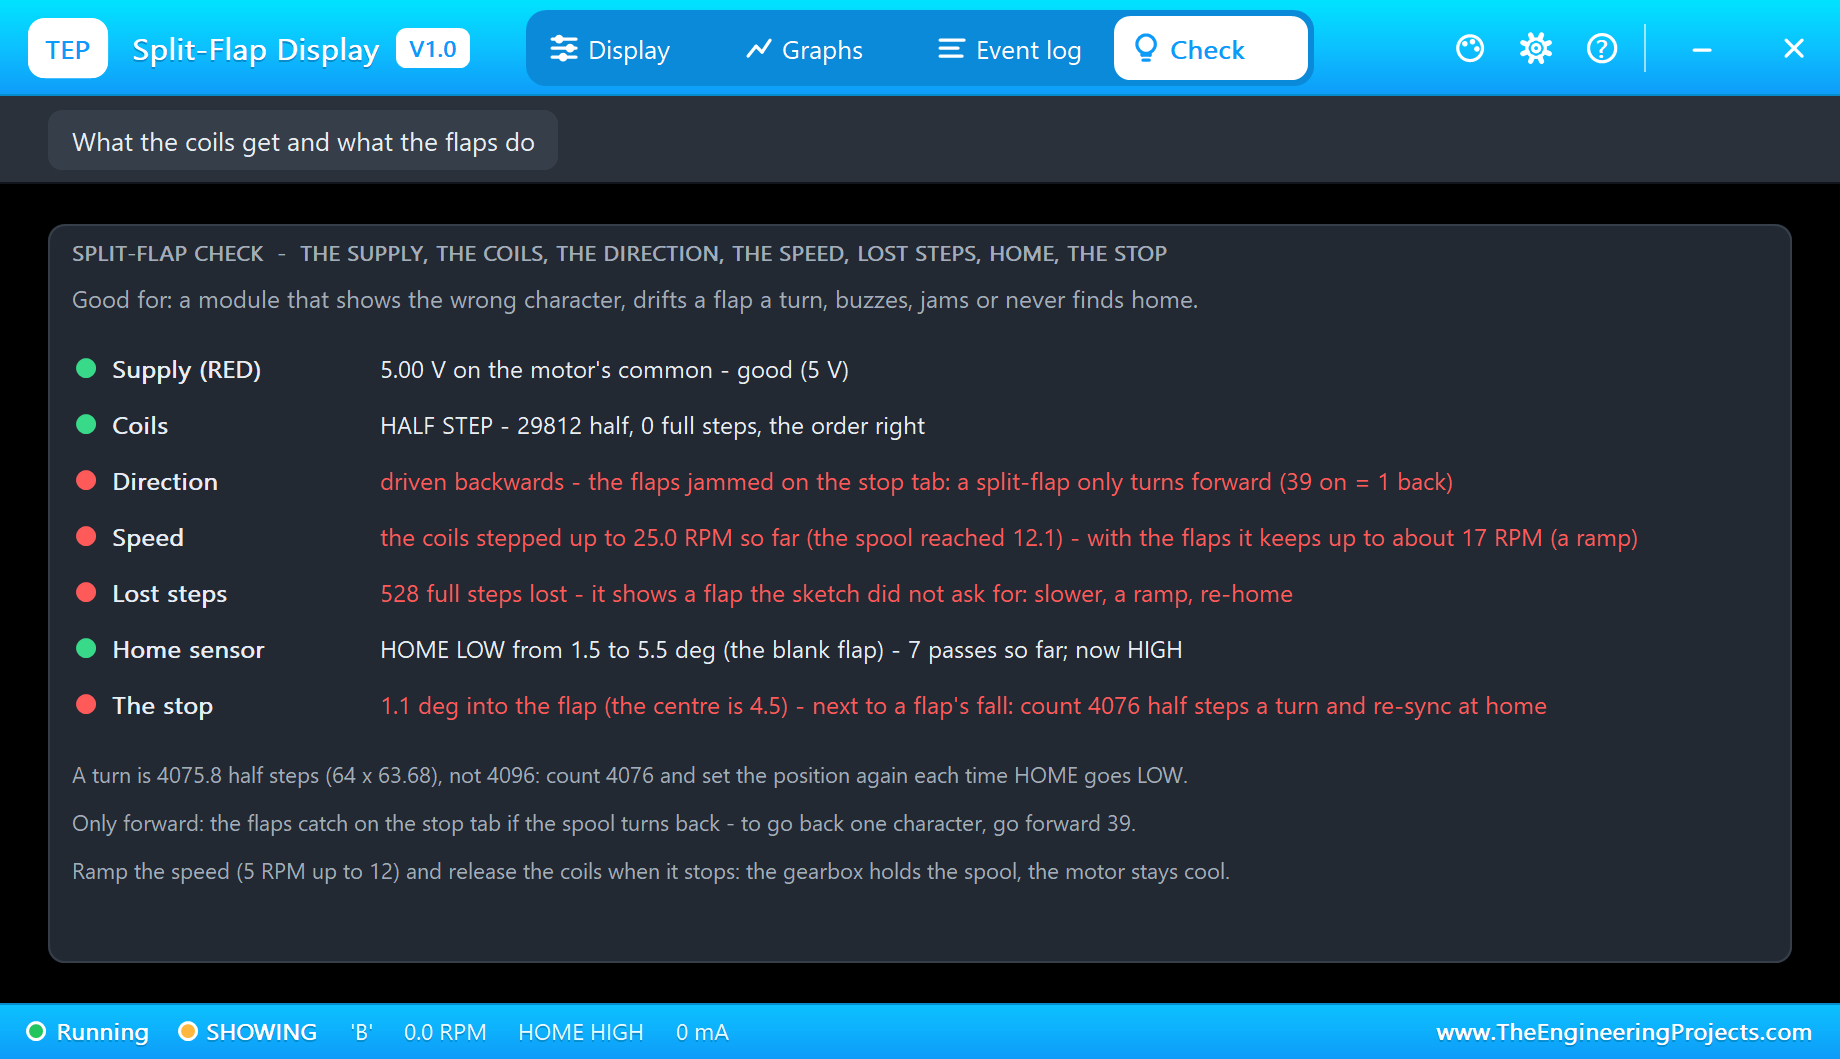
The Check page catches it by where the spool stopped: 1.1 degrees into the flap, instead of the 4.5 degrees of its centre. Its first tip is the whole fix: count 4076 half steps a turn and set the position again each time HOME goes LOW. Type sync on, turn 4076 and home, and show S lands on 'S' after 19 flaps in 2.51 s.
Graphs and the Log
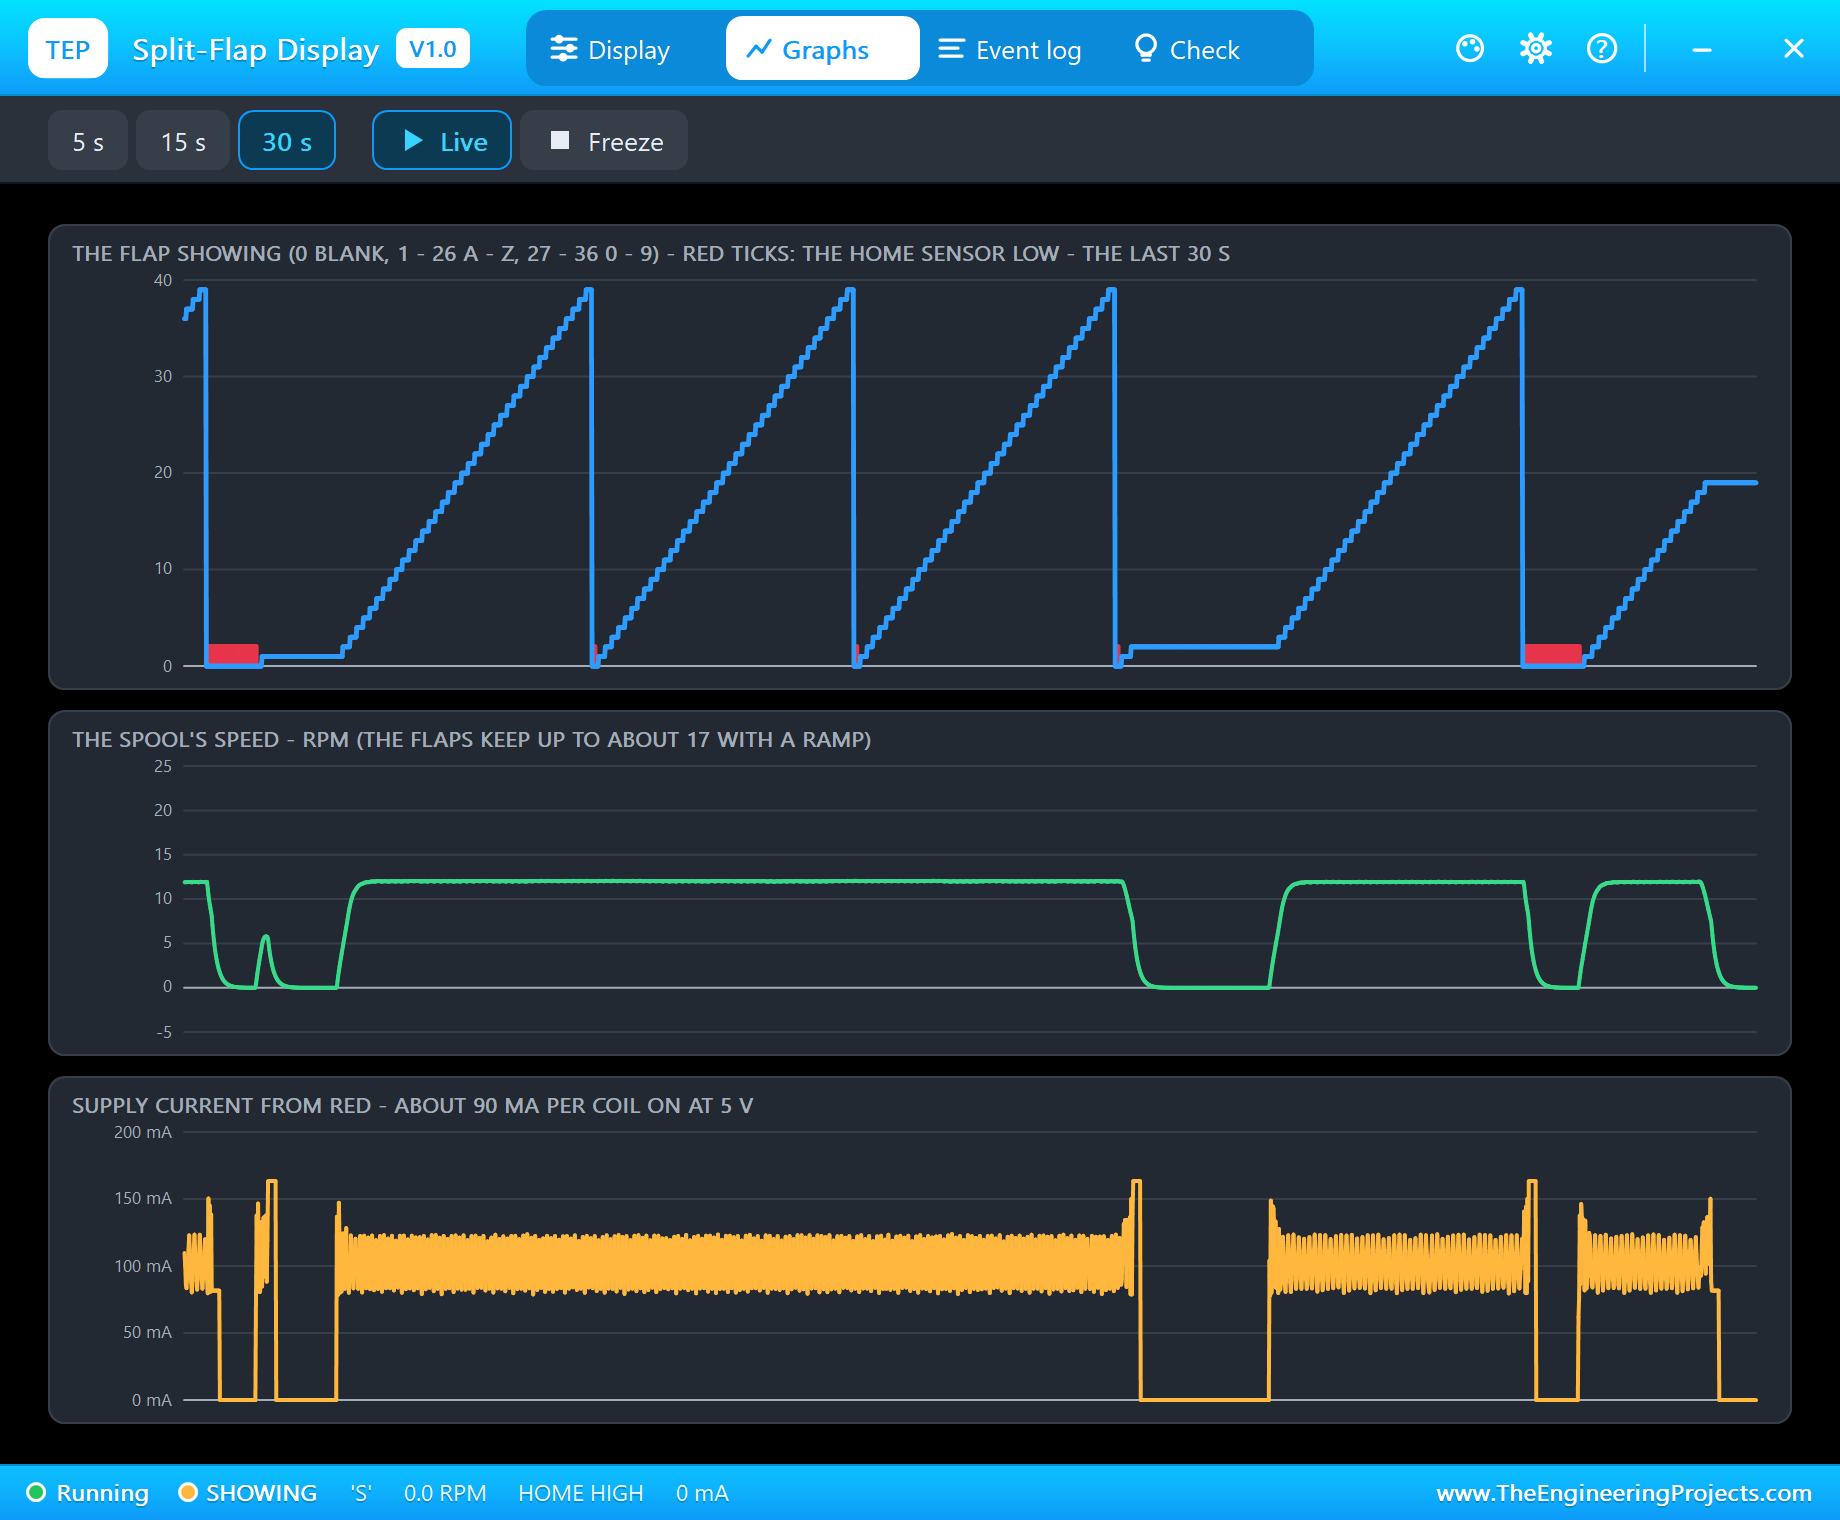
Graphs draws the flap showing, the spool's speed and the supply current over the last 5, 15 or 30 seconds. The flap graph is a staircase that climbs to 39 and drops back to 0 every turn, with red marks where the home sensor was LOW. You can read the three full turns of the drift test in it, and see the ramps at the start and end of every move in the speed graph.
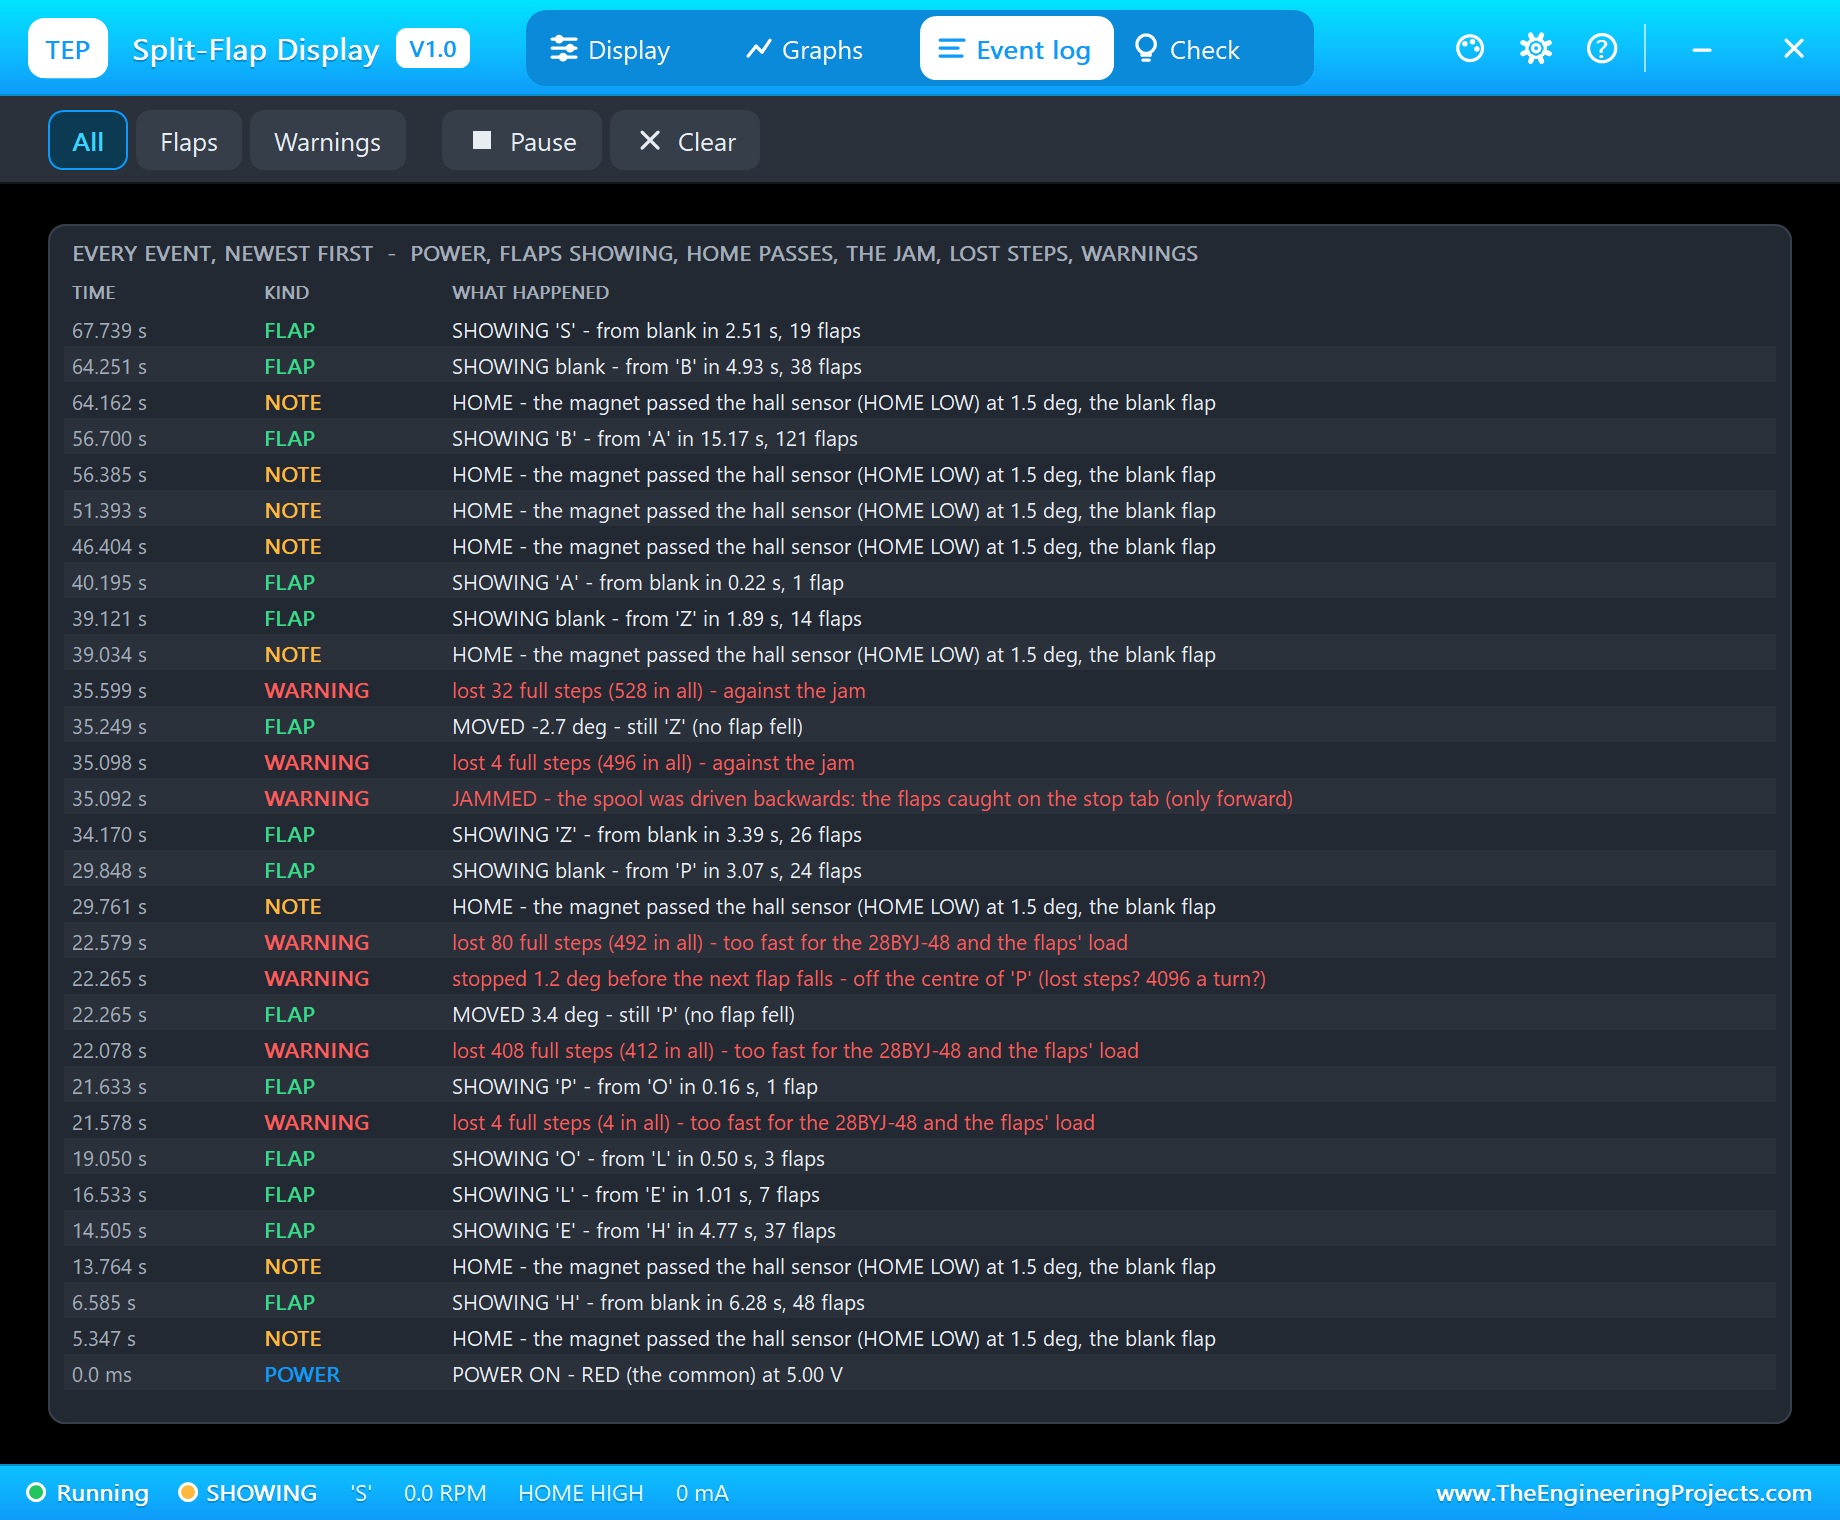
The Event log keeps every move with where it came from, how long it took and how many flaps fell, every HOME pass, and every warning with its reason. Filter it to Flaps or Warnings, pause it, or clear it.
How the Model Works
The coils are 50 ohm windings from RED to each coil wire, so any driver that pulls the wires LOW - a ULN2003, transistors - works. A coil counts as on while its wire sits more than half the supply below RED, and each change is time-stamped where the voltage crossed. Between two analog points, at most 1 ms apart, the rotor follows that history in 10 microsecond steps: the coil currents with the Darlington drop and the clamp diode, the back-EMF, the detents, the 63.68 : 1 gearbox and the spool's load. It is the 28BYJ-48 of our 28BYJ-48 Stepper Motor Library for Proteus, with the flaps added.
The spool adds three things: the friction and the flap pushed over the tab, the jam - the spool may go back at most 3 degrees from the furthest point it reached - and the 40 flaps themselves. The watch turns the motion into events: a move that ends is logged with its flaps and its time, lost steps are counted once per slip and add up, and a stop within 1.5 degrees of a flap's fall is flagged, because that is what a counting error looks like. HOME is an open-collector output: 100 ohm to GND while the magnet passes, the board's 10 kohm pull-up to VCC otherwise.
We checked the model on a PC with 21 automatic tests: 4076 half steps at 12 RPM give 360.0 degrees, 40 fallen flaps and one home pass; the fastest clean speed with the flaps and a ramp is 17 RPM; 25 RPM without a ramp stalls; 200 half steps back jam after 2.9 degrees; a stall and a jam add up; and 5 turns of 4096 half steps end 8.9 degrees too far - one flap off. The demo project is read back from disk with 87 checks.
Troubleshooting
- It does not turn (NO POWER): RED is not on +5 V, or the ULN2003A's inputs are not driven.
- It buzzes in place (WRONG ORDER): the coil wires are swapped - IN1 - IN4 = orange, yellow, pink, blue.
- It shows a character the sketch did not ask for: lost steps - too fast, no ramp, or driven backwards. Slow down and home again.
- JAMMED: the sketch drove the spool backwards. A split-flap only turns forward.
- It drifts a flap every few turns: the sketch counts 4096 half steps a turn, or does not set its position at HOME.
- It never finds home: HOME is not on the UNO's pin, or the sensor has no VCC - the Check page says which.
- No module, no UNO or no monitor:
TEPSPLITFLAP.DLLorTEPARDUINO.DLLis missing from MODELS and the project folder; a closed monitor opens again with a click on the UNO's USB port.
Things to Know Before Building a Real Split-Flap
- Use a driver: a 28BYJ-48 draws about 90 mA a coil at 5 V - run it through a ULN2003 board, never from the Arduino's pins, and release the coils when it stops.
- Count 4076, not 4096: a turn is 64 x 63.68 half steps. Set the position again at every home pulse, and no error can grow.
- Only forward: to go back one character, go forward 39.
- Ramp the speed: start at about 5 RPM. A 5 V 28BYJ-48 with flaps keeps up to about 15 - 17 RPM; the 12 V versions go faster.
- Check the magnet: hall modules (A3144, AH3364, KY-003) pull their output LOW at the magnet, but only for one pole - turn the magnet over if nothing happens.
Limitations of the Simulation
- Not modelled: the flaps' own flutter and sound, the magnet's pole, a 12 V motor, and more modules on one bus - put several modules side by side, each on its own driver.
- The plate, the coil LEDs and the strip are TEP additions.
- The model is our own, written from the typical data of the 28BYJ-48 stepper, maker split-flap modules and hall-effect switches; this library is not made or endorsed by any split-flap or motor maker, Arduino or Labcenter.
- Licences: the demo HEX contains the Arduino AVR core 1.8.6 (LGPL); the sketch is included and the README gives the source link. The ULN2003A is Proteus's own part.
- Tested in Proteus 8.5 in October 2026 with the demo as shipped: homing, the knob, HELLO, too fast, the jam, the 4096 drift, re-homing and all four pages of the pop-up. Proteus 7 is not supported.
So, that was all about the Split-Flap Display Library for Proteus V1.0. I hope it helps you build the board you have in mind - a clock, a word of the day, a departure board for your desk - and saves you from the flap that lands one character off. If you have any questions, ask in the comments and I will help you out. Till the next tutorial, take care and have fun!