74LS138 - 3 to 8 Line Decoder IC | Datasheet, Working and Simulation

Hello students! I hope you are doing great. Today, we are talking about the decoders in the proteus. We know that decoders are the building blocks of any digital electronic device. These electronic circuits are used for different purposes, such as memory addressing, signal demultiplexing, and control signal generation. These decoders have different types and we are discussing the 3 to 8 line decoders.

In this tutorial, we will start learning the basic concept of decoders. We’ll also understand what the 3-to-8line decoders are and how we connect this concept with the 74LS138 IC in proteus. We’ll discuss this IC in detail and use it in the project to present the detailed work. 

Where To Buy?
No.ComponentsDistributorLink To Buy
174LS138AmazonBuy Now

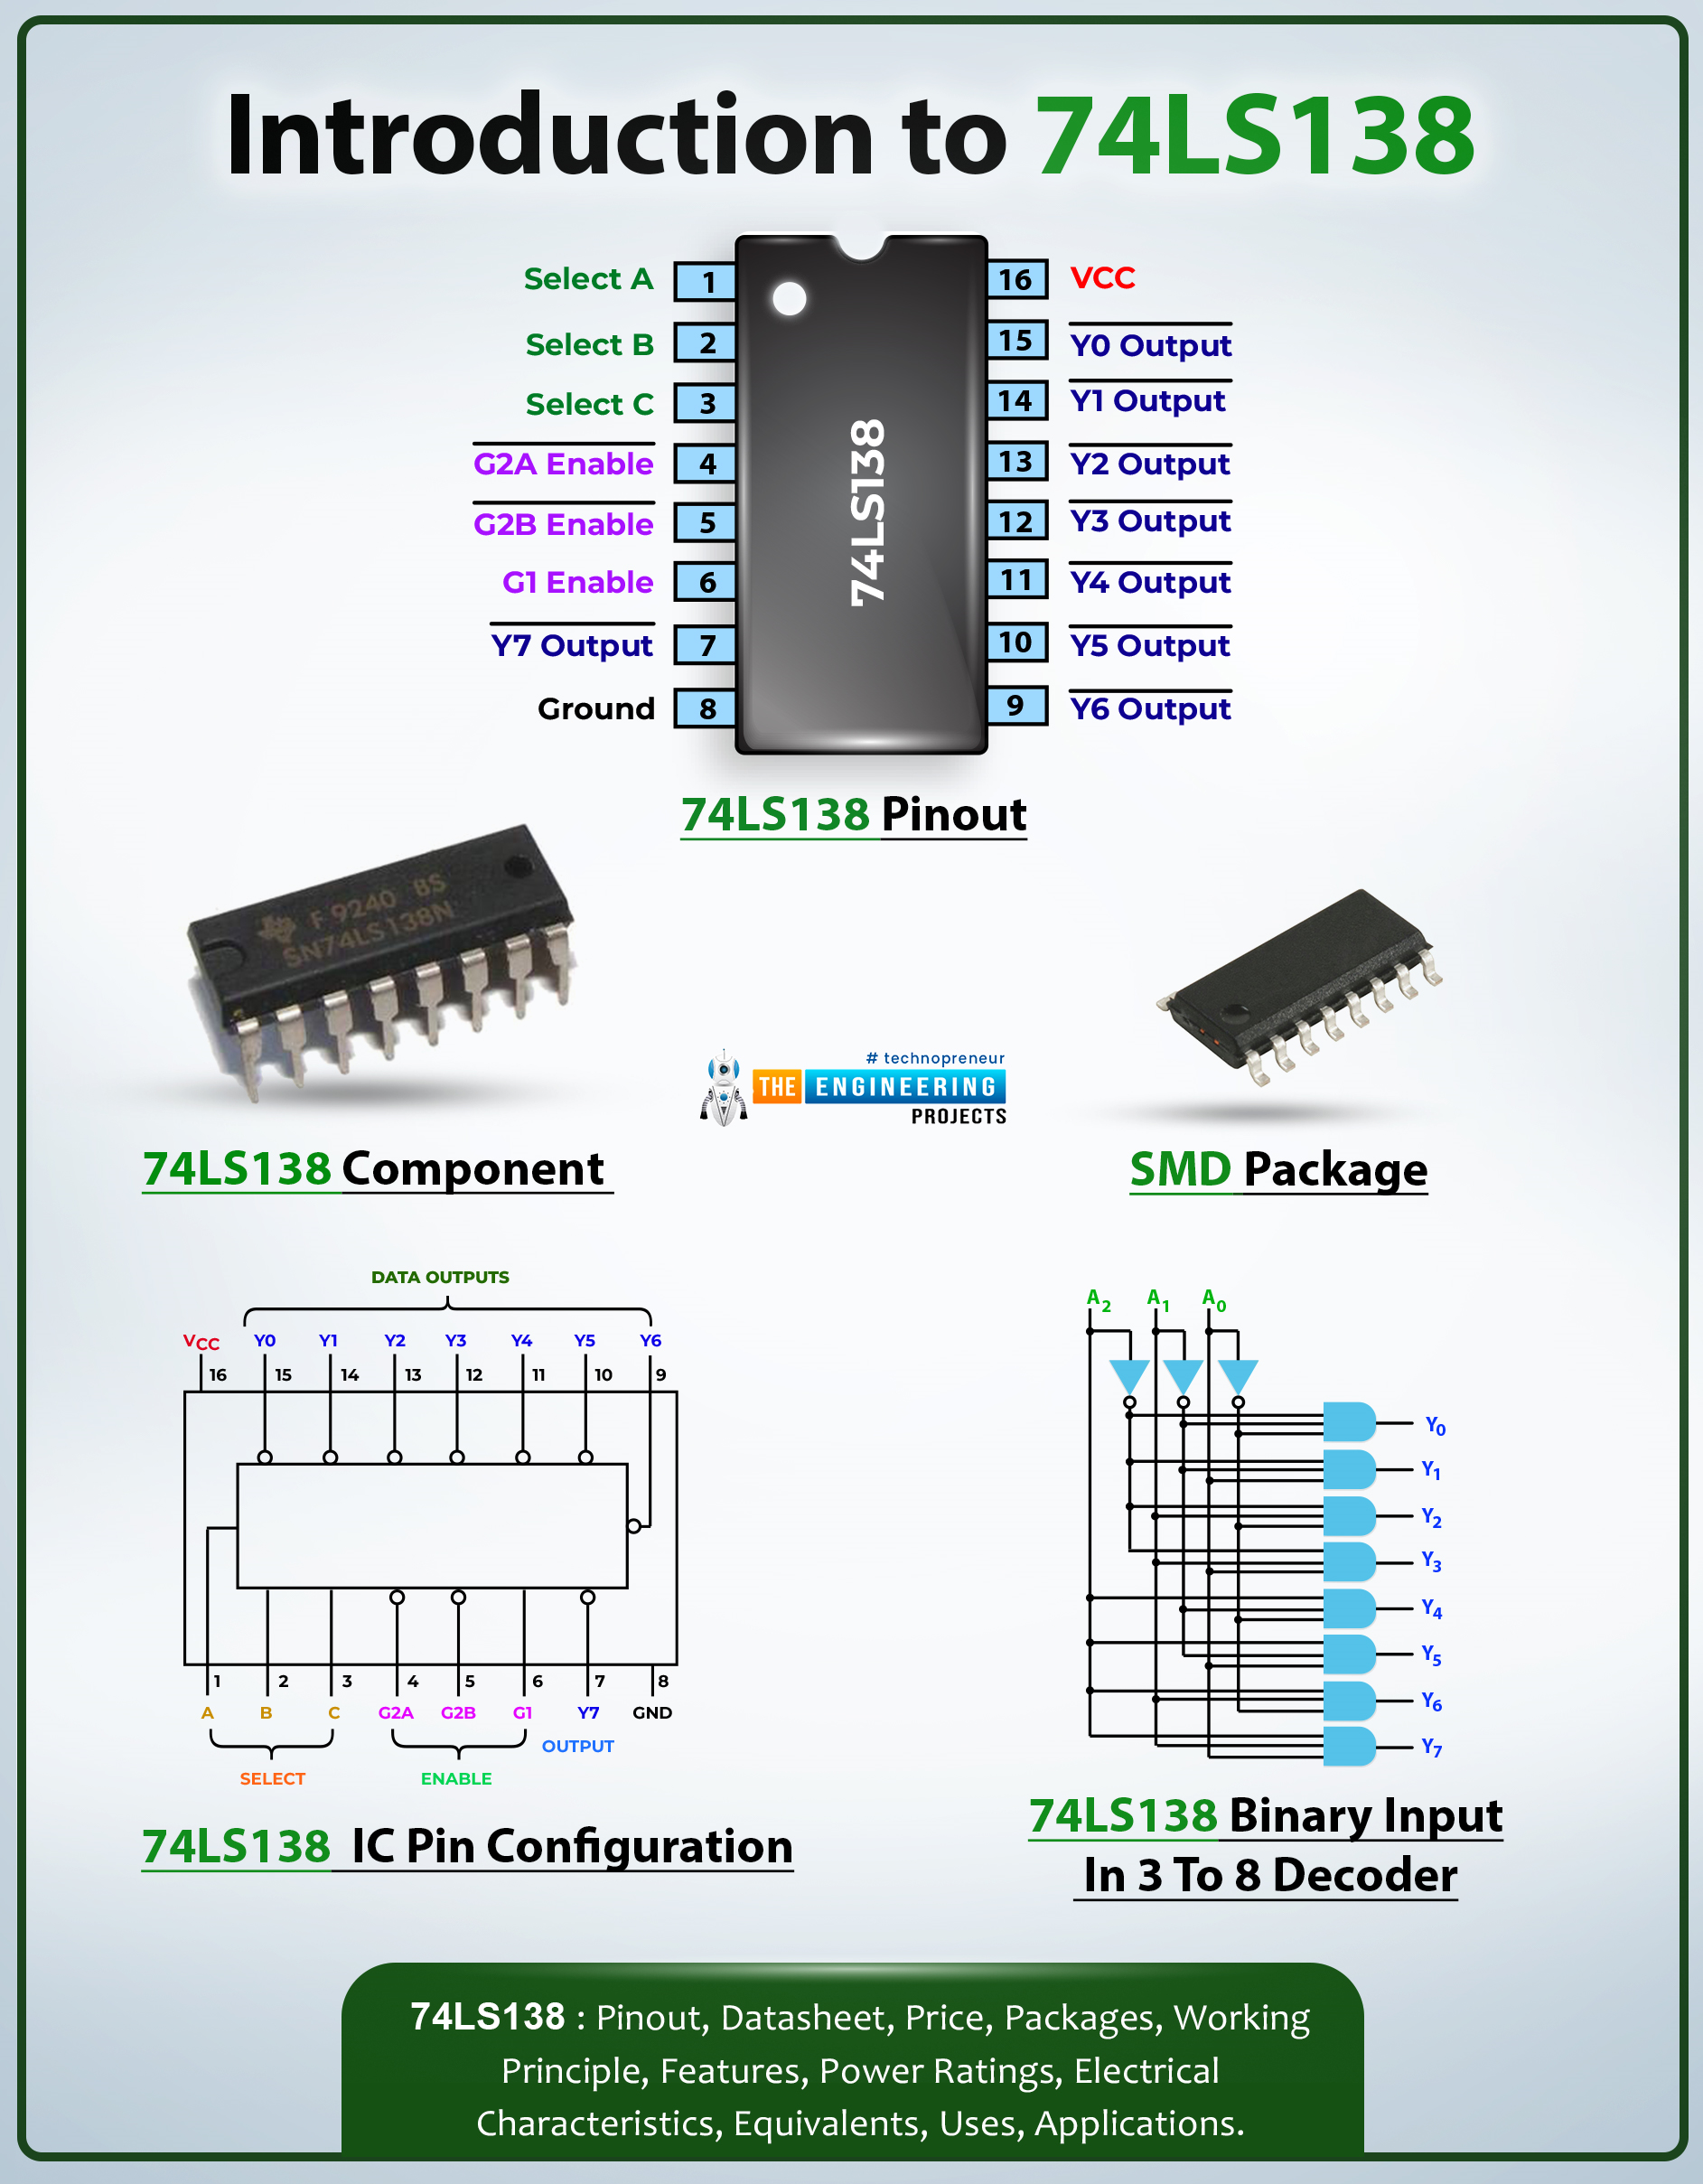
What is a 3 to 8 Line Decoder?

A three to eight line decoder is an electronic device that takes three inputs and based on their combination, provides one of its eight outputs. In simple words, the 3 to 8 line decoder gets three inputs and reads the binary combination of its input. As a result, the single output is obtained at the output of the decoder. Here are the basic concepts to understand its working:

Binary Input in 3 to 8 Decoder

A 3 to 8 line decoder has three input pins which are usually denoted as A, B and C. These correspond to the three bits of the binary code.  The term binary means these can only be 0 or 1 and no other digits are allowed. This can be the raw bits from the user or can be the output signal from the circuits’ device that becomes the input of the decoder.

Outputs of 3 to 8 Decoder

The 3 to 8 decoder has eight possible output pins. These are usually denoted as Y0, Y1, Y2,..., Y7  and the output is obtained only at one of these pins. The output depends on the binary combination of the input provided to it. In large circuits, its output is fed into any other component and the circuit works. 

Functionality of 3 to 8 Decoder

As mentioned before, the combination of the binary input decides the output. Only one of the eight output pins of the decoder gets high which means, only one output has the value of one and all others are zero. The high pin is considered active and all other pins are said to be inactive. 

Truth Table of 3 to 8 Decoder

The truth talbe of all the inputs and possible output of 3 to 8 decoders are given here:

Input MSB (A)

Input B

Input LSB (C)

Active Output

Y0

Y1

Y2

Y3

Y4

Y5

Y6

Y7

0

0

0

Y0

1

0

0

0

0

0

0

0

0

0

1

Y1

0

1

0

0

0

0

0

0

0

1

0

Y2

0

0

1

0

0

0

0

0

0

1

1

Y3

0

0

0

1

0

0

0

0

1

0

0

Y4

0

0

0

0

1

0

0

0

1

0

1

Y5

0

0

0

0

0

1

0

0

1

1

0

Y6

0

0

0

0

0

0

1

0

1

1

1

Y7

0

0

0

0

0

0

0

1

Here, 

MSB= Most significant bit

LSB= Least significant bit

I hope the above concepts are now clear with the help of this truth table. 

Introduction to 74LS138 Decoder 

The 74LS138 is a popular integrated circuit IC that is commonly used 3 to 8 line decoder. It is one of the members of 74LS therefore, it is named so. The 74LS is a group of transistor transistor logic (TTL) chips. The basic feature of this IC is to get three inputs and provide the signal on only one pin of the output automatically based on the binary inputs. In addition to the input, output, and functionality of the 74LS138, there are some additional features listed below:

Features of 74LS138

  • The 74LS138 has the cascading feature which means, two or more 74LS138 can be connected together to enhance the number of output lines. The circuit is arranged in such a way that the output of one 74LS138 IC becomes the input of the other and as a result, more than one ICs can work together. 

  • The structure of this IC is designed in such a way that it provides high-speed operation. It is done because the decoders are supposed to decode the input so quickly that its output may stimulate other functions of the circuits. 

  • The TTL compatibility of the 74LS138 makes it more accurate. The LS in its name indicate that these are part of low-power shotkey series therefore, these can be operated at the 5V power supply. This makes it ideal for multiple electronic circuits and these do not require any additional device to get accurate power. 

  • These ICs are versatile because they come in different packages and the users can have the right set of ICs depending on the circuit he is using. Two common packages of this IC are given next:

    • DIP (Dual Inline Package)

    • SOP (Small Outline Package)

  • It has multiple modes of operation therefore, it has versatile applications. 

74LS138 IC Pin Configuration

Before using any IC in the circuit, it is important to understand its pinouts. The 73LS138 has the 16 pins structure that which is shown here:

The detailed names and features of these pins can be matched with the table given below:

Pin Number

Pin Name

Pin Function

1

A

Address input pin

2

B

Address input pin

3

C

Address input pin

4

G2A

Active low enable pin

5

G2B

Active low enable pin

6

G1

Active high enable pin

7

Y7

Output pin

8

GND

Ground pin

9

Y6

Output pin 6

10

Y5

Output pin 5

11

Y4

Output pin 4

12

Y3

Output pin 3

13

Y2

Output pin 2

14

Y1

Output pin 1

15

Y0

Output pin 0

16

VCC

Power supply pin

74LS138 in Proteus

The structure and working of this IC can be understood by creating a project with it and for this, we have chosen the Porteus to show the detailed working. Here are the steps to create the project of a 3 to 8 line decoder in Proteus:

  • Open your Proteus software.

  • Create a new project. 

  • Go to the pick library by clicking the “P” button at the left side of the screen. It will show you a search box with details of the components. 

  • Here, type 74LS138 and you will see the following search:

  • Double click on the IC to collect it on your devices. 

  • Selecting this IC, click on the working sheet to place it there. 

You can see the pins and labels of this IC. 

Designing a 3 to 8 Line Decoder with 74LS138

The 74LS138 requires some additional components to be used as a decoder. Here is the project where we are using it as 3 to 8 line decoder:

Components Required

  • 74LS138 IC

  • 8 LEDs of different colors

  • Switch SPDT

  • Switch  SPST

  • Switch Mom

  • Switch (simple)

  • Connecting wires

Procedure

  • Go to the pick library and get all the components of the circuits one after the other. 

  • Set the 74LS138 IC in the working area.

  • On the left side of the IC, arrange the switches to be used as the input devices.

  • On the left side of the IC, arrange the LEDs that will indicate the output. 

  • Go toto the terminal mode from the left side of the screen and arrange the ground and power terminals with the required devices. 

  • The circuit at this point must look like the following image:

  • Connect all of these with the help of connecting wires. For convenience, I am using the labels to have better work:

  • Once you have connected all the components, the circuit is ready to use. In the left bottom corner, search for the play button and run the project. 

  • Change the input with the help of switches and check for the output LEDs. You will see the circuit works exactly according to the truth table. 

Working of 74LS138 IC in Proteus

  • The 74LS138 is designed to be used as a 3 to 8 line so there is no need to connect different ICs and components to design the working of this decoder.

  • The input and output pins are present with this IC therefore, the user simply connects the switches as an input device. A switch has only two possible states that are either on or off therefore, it is an ideal way to present the binary input. 

  • Usually, LEDs are used as the output devices so that when they get the signal, they are turned on and vice versa. 

  • The ground and power terminals are used to complete the circuit. 

  • Pins 4, 5, and 6 are called the enabled pins. These are labeled as E1, E2, and E3 pins. Out of these, E1 and E2 are considered as the active low pins which means, these are active only when they are pulled down. On the other hand, the E3 is considered an active high; hence it activates the output only when it is pulled high. 

  • Once the circuit is complete, the user can change the binary inputs through the switches and check for the output LEDs. 

  • The combination of inputs results in the required output hence the user can easily design the circuit without making any technical changes. 

Today, we have seen the details of 74LS138 decoder IC in Proteus. We started with the basic introduction of a decoder and saw what is the 3 to 8 line decoder isdecoder. After that, we saw the truth table and the features of a 3 to 8 line decoder. We saw how 74LS128 works and in the end, we designed the circuit of a 3 to 8 line decoder using 74LS138. The circuit was easy and we saw it working in detail. If you have any questions, you can ask in the comment section.

Exploring 15 Techniques for Custom CNC Machining in Engineering

Step into the world of precision engineering—where custom CNC machined parts transform raw materials into the sinews and bones of your next big project. Like a tailor crafting a bespoke suit, CNC machining offers an unparalleled fit for your specific requirements.

The prospect of holding your idea in your hands, not just on paper, is the realm where imagination meets implementation. But what options lie at your fingertips? Let's explore the paths to turning those digital blueprints into tangible assets.

Materializing Visions: The Alloy of Choice

Before the whirring of machines begins, your quest starts with choosing the right material—a decision as critical as selecting the foundation for a skyscraper. Each material whispers its own strengths and secrets, waiting to align with your project's demands.

Aluminum

For starters, aluminum stands out as a front-runner in popularity due to its lightweight yet robust nature —an ally for components in aerospace or portable devices. Imagine the sleek body of a drone or the frame of a prototype sports car; they likely share an aluminum heartbeat.

Stainless Steel

Stainless steel steps forward for projects where endurance and rust resistance are paramount. Think of medical devices that can withstand repetitive sterilization or marine parts whispering secrets to ocean waves without fear of corrosion.

Image Source: Pixabay

Titanium

Delving deeper into specialties, titanium emerges when the strength-to-weight ratio is not just a preference but a necessity—ideal for high-performance sectors such as motorsports or prosthetics.

Brass

Brass occupies a niche where electrical conductivity must dance elegantly with malleability—perhaps in custom electronic connectors or intricate musical instruments.

Each material imparts its essence to your project, shaping not just function but also future possibilities. Which one will be the bedrock for your engineering aspirations?

Carving Precision: The Toolpath Less Traveled

The next step on our journey approaches like the unveiling of a trail in dense fog—selecting the appropriate CNC machining process that will breathe life into your vision. Each method manifests its prowess through sparks and shavings, ready to tackle complexity with finesse.

Better yet, since there are a variety of machines from Revelation Machinery on offer, with second-hand units representing better value than new equivalents, you can pick one of the following without breaking the bank or limiting yourself in terms of functionality and features.

Milling

3-axis milling is like the steadfast hiker; it's reliable and perfect for parts with fairly simple geometries. If your project involves creating a prototype bracket or a basic gear, this could be your marching tune. But when contours call for more intricate choreography, 5-axis milling pirouettes onto the stage. It invites you to envision turbine blades sculpted with aerodynamic grace or an ergonomic joystick that fits into hands as naturally as pebbles on a beach.

Image Source: Pixabay

Turning

Turning—the spinning dance between material and tool—offers cylindrical mastery manifested in objects rotating around their own axis. This is where items such as shafts for motors or precision rollers for conveyor systems are born from rotation's embrace.

EDM Options

But what if your piece hides complex internal features, akin to secret passages within a castle? Enter EDM—Electrical Discharge Machining —a process where electrical sparks rather than physical cutting tools unlock hidden gems. Ideal perhaps for making intricate molds used in injection molding machines that will churn out hundreds of thousands of perfectly replicated plastic knights.

As if wielding a magic wand, wire EDM carves with finesse where traditional tools cannot tread, slicing through hardened steel as easily as a hot knife through butter. Consider the labyrinthine path of a lightweight gear or the delicate framework of an instrument sensor—wire EDM is your guide through these intricate landscapes.

Then there’s the level-headed sibling in this family, plunge/sinker EDM—an ace up your sleeve when three-dimensional complexity calls. It's perfect for forming punch and die combinations used in manufacturing presses that shape sheet metal into automotive body panels or appliance housings with clockwork precision.

Decision Time

The truth nestled within these processes promises tailored solutions to even the most enigmatic engineering puzzles. Your custom CNC machined part will emerge from its fiery birthright not just created, but crafted with intent. In this emporium of efficiency and accuracy, which CNC sorcery will you enlist to transform your concept into creation?

Finishing Touches: The Symphony of Surfaces

Now that the form has been forged, it's time for the maestro—finishing—to step up and conduct a symphony of surfaces. This is where rough edges soften and exteriors gleam, ready for their grand debut.

Anodizing

Anodizing tiptoes onto stage left, offering its protective embrace to aluminum parts. It’s a finish that doesn't just add a splash of color but also bolsters resistance to wear and corrosion. Picture an aerospace fitting beaming with radiant blue or a fire engine red bicycle frame standing resilient against scratches and weathering.

Powder Coating

Powder coating strides in with its own brand of rugged beauty—a finish that cloaks objects in a uniform, durable skin impervious to the elements. Outdoor machinery basks in its shielding layer, flaunting colors that withstand sun, rain, and the passage of seasons.

Image Source: Pixabay

Precision Grinding

For components that need to glide together as smoothly as ballroom dancers, you’ll want to consider precision grinding. Imagine automotive pistons or mechanical bearing races—their surfaces milled down to microscopic levels for tolerances tighter than a drum skin.

Bead Blasting

Perhaps your masterpiece calls for an understated elegance; then bead blasting might brush across the scene. It leaves behind a matte texture that diffuses light and speaks to sophistication. Its application speaks volumes on products where glare is the enemy and understated aesthetics are paramount—like the dashboard of a luxury car or the casing of high-end audio equipment, where touch and sight merge into user experience.

Electroplating

Let's not forget electroplating—the alchemist's choice that transmutes base metals into gold, well, in appearance at least. Here we witness components such as plumbing fixtures or electronic connectors being vested in extra layers for improved conductivity and aesthetic appeal, shimmering with purpose and resilience.

Passivation

If subtlety is your aim, then passivation is your unassuming guardian. Stainless steel medical instruments or food processing parts bask in this chemical bath, emerging more stoic against rust and degradation—an invisible shield for an unspoken duty.

Etching

As the encore approaches with laser etching taking center stage, customization reaches another level. It allows you to adorn surfaces with serial numbers, logos, or intricate patterns—turning each part into a storyteller of its own journey from concept to finality.

The Last Word

All this info should set you up to make smart decisions ahead of creating custom CNC machined parts for any engineering project you have in the pipeline. And it’s worth restating that as well as choosing carefully, buying used machinery is another way to get great results that will make your budget manageable.

Syed Zain Nasir

I am Syed Zain Nasir, the founder of <a href=https://www.TheEngineeringProjects.com/>The Engineering Projects</a> (TEP). I am a programmer since 2009 before that I just search things, make small projects and now I am sharing my knowledge through this platform.I also work as a freelancer and did many projects related to programming and electrical circuitry. <a href=https://plus.google.com/+SyedZainNasir/>My Google Profile+</a>

Share
Published by
Syed Zain Nasir