Hello friends! How are you today? Today we're going to discuss a project that is interesting and also useful in our everyday life. You see QR codes almost everywhere, right? They are printed on almost every product's package, leaflets, newspapers, and brochures.
Perhaps, you often use QR code scanners on your mobile device. What about making such a program by yourself? Yes! That is exactly what we are going to do today. We will make a QR code scanner using the ESP32-CAM. For image processing, we will use the OpenCV library.
If you’ve ever wanted to create a real-time QR code scanner using a low-cost, wireless camera module, you’re in the right place. In this tutorial, we’ll walk through setting up an ESP32-CAM to stream video and using OpenCV to detect and decode QR codes in real time.
Introduction to the ESP32-CAM
The ESP32-CAM is a powerful yet affordable development board that combines the ESP32 microcontroller with an integrated camera module, making it an excellent choice for IoT and vision-based applications. Whether you're building a wireless security camera, a QR code scanner, or an AI-powered image recognition system, the ESP32-CAM provides a compact and cost-effective solution.
One of its standout features is built-in WiFi and Bluetooth connectivity, allowing it to stream video or capture images remotely. Despite its small size, it packs a punch with a dual-core processor, support for microSD card storage, and compatibility with various camera sensors (such as the OV2640). However, since it lacks built-in USB-to-serial functionality, flashing firmware requires an external FTDI adapter.
System Architecture of ESP32-CAM QR Code Scanner
This project consists of two main components:
ESP32-CAM as an Image Server
Python Script for QR Code Detection and Processing
Each component interacts with different subsystems to achieve the overall functionality.
1. High-Level Overview
The architecture consists of:
ESP32-CAM: Captures images and hosts them on a web server.
WiFi Network: Enables communication between ESP32-CAM and the computer running the Python script.
Python Script on a Computer: Continuously fetches images from ESP32-CAM, processes them, and extracts QR code data.
User Interface: Displays the live feed and detected QR codes.
2. Detailed Breakdown of Components
A. ESP32-CAM (Image Server)
Hardware: ESP32-CAM module with OV2640 camera.
Software: ESP32-CAM uses the esp32cam library to initialize the camera and serve images via an HTTP web server.
Functionality:
Captures an image when accessed via http://
/cam-hi.jpg. Returns the image in JPEG format to the requesting client.
Workflow:
ESP32-CAM initializes camera settings (resolution: 800x600, JPEG quality: 80).
It connects to a WiFi network.
A web server starts on port 80.
When a client (Python script) accesses /cam-hi.jpg, ESP32-CAM captures an image and sends it.
B. Python QR Code Detection Script (Client)
Hardware: A computer (Windows/Linux/Mac).
Software: Python, OpenCV, NumPy, urllib.
Functionality:
Fetches images from ESP32-CAM at regular intervals.
Converts them to grayscale for better QR detection.
If normal detection fails, applies adaptive thresholding.
Detects and decodes QR codes using OpenCV.
Displays the live video feed with detected QR code data.
Workflow:
The script continuously requests images from http://
/cam-hi.jpg. It decodes the image using OpenCV.
Converts the image to grayscale.
Attempts to detect a QR code.
If detection fails, applies image preprocessing (blurring and thresholding).
If a QR code is found, it prints the decoded text and overlays a bounding box.
The processed frame is displayed in a window.
3. Communication & Data Flow
Data Flow Between Components
ESP32-CAM Captures Image
Uses esp32cam::capture() to take a snapshot.
Hosts the image on an HTTP endpoint (/cam-hi.jpg).
Python Script Requests Image
Sends an HTTP GET request using urllib.request.urlopen().
Receives the image data in JPEG format.
Image Processing & QR Code Detection
OpenCV converts the image to grayscale.
Tries decoding the QR code using cv2.QRCodeDetector().detectAndDecode().
If unsuccessful, applies adaptive thresholding and retries.
Output Display & User Interaction
If a QR code is detected, its content is displayed.
Bounding boxes are drawn around detected QR codes.
Live video feed is displayed in an OpenCV window.
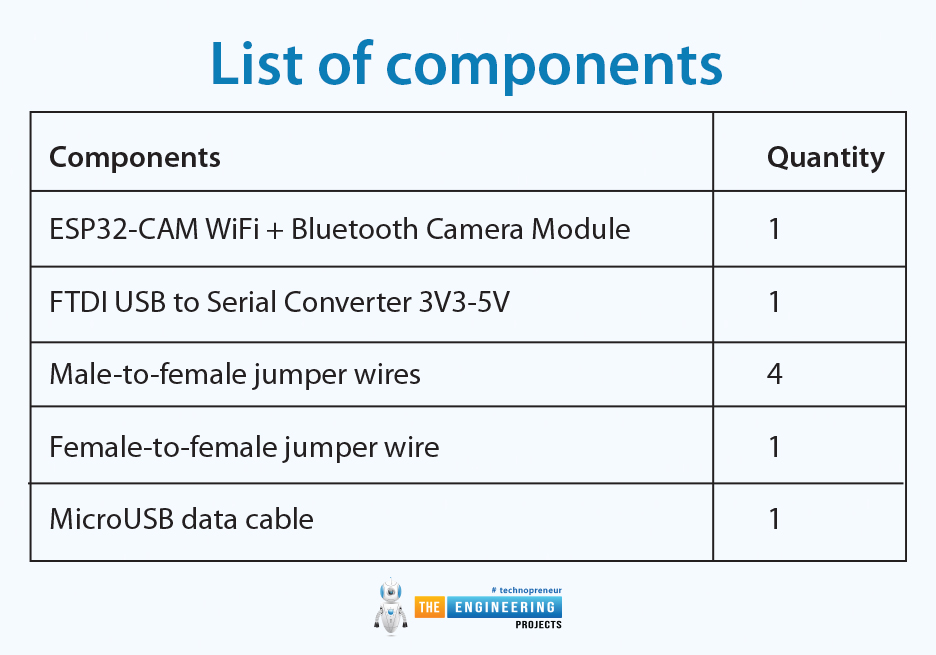
List of components

Components |
Quantity |
ESP32-CAM WiFi + Bluetooth Camera Module |
1 |
FTDI USB to Serial Converter 3V3-5V |
1 |
Male-to-female jumper wires |
4 |
Female-to-female jumper wire |
1 |
MicroUSB data cable |
1 |
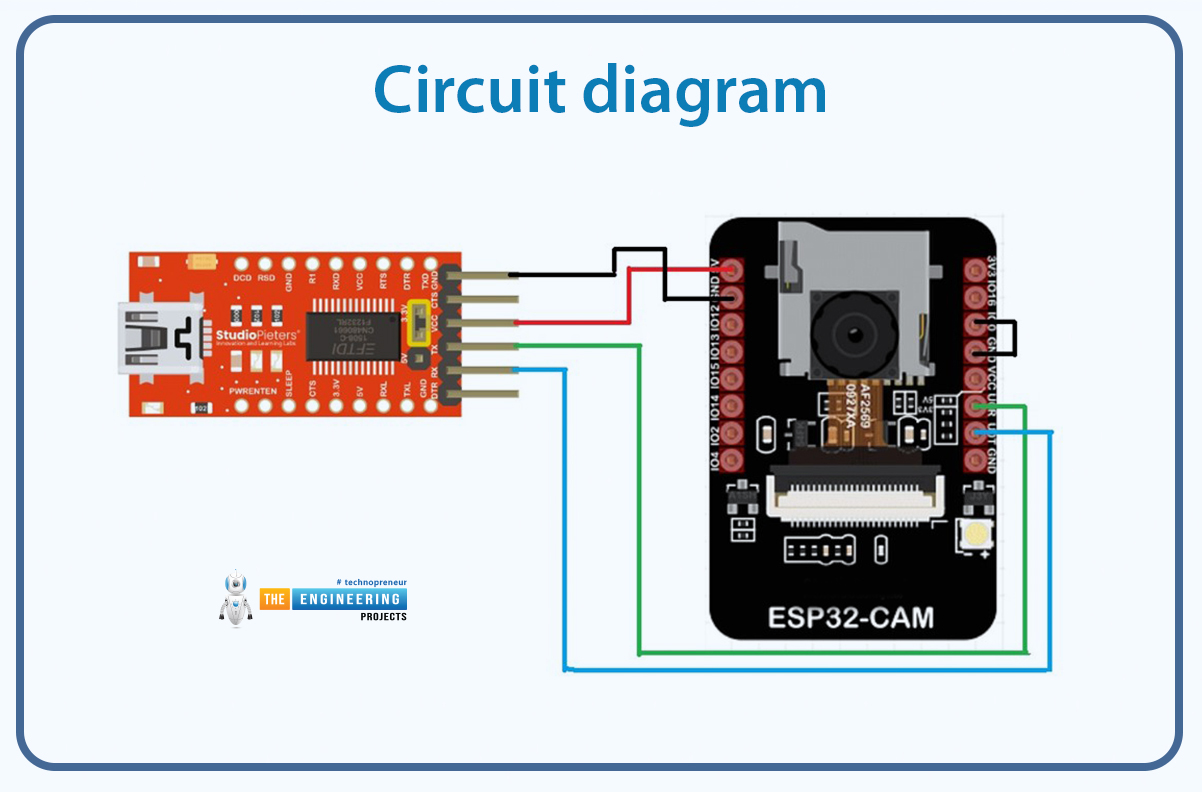
Circuit diagram
Following is the circuit diagram of this project.

Fig: Circuit diagram

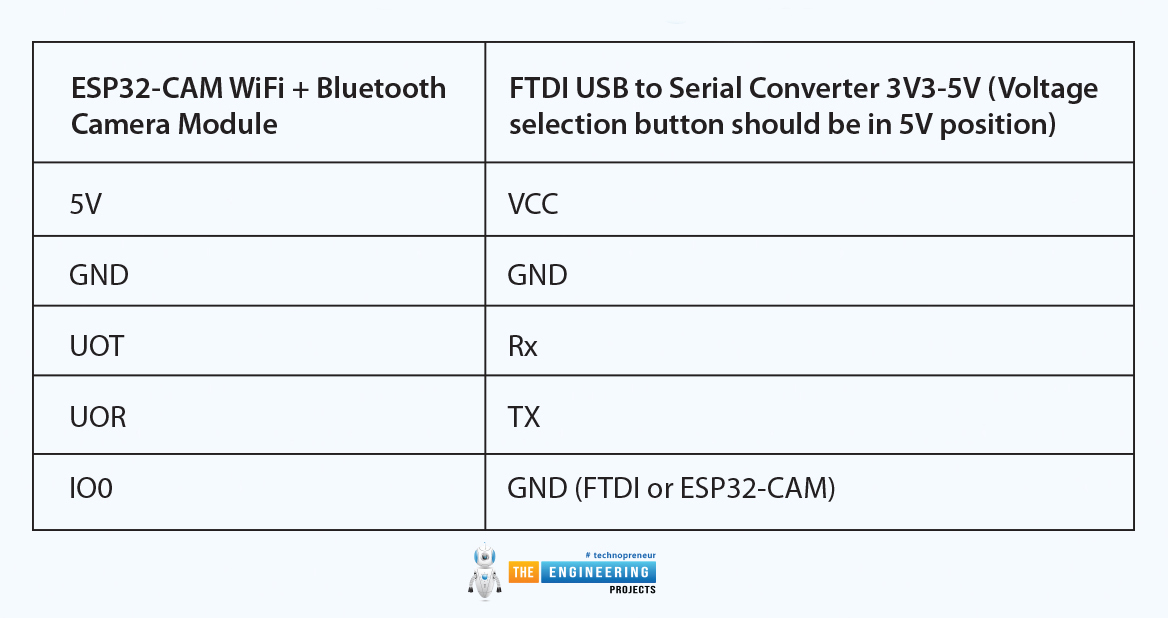
ESP32-CAM WiFi + Bluetooth Camera Module |
FTDI USB to Serial Converter 3V3-5V (Voltage selection button should be in 5V position) |
|---|---|
5V |
VCC |
GND |
GND |
UOT |
Rx |
UOR |
TX |
IO0 |
GND (FTDI or ESP32-CAM) |
Programming
If this is your first project with an ESP32 board, you need to do board installation. You will also need to download and install the ESP32-CAM library. To make the camera functional, the cp210x usb driver and the FTDI driver, must be properly installed in your computer. Here is a detailed tutorial that shows how to get started with the ESP32-CAM.
ESP32-CAM code
#include
#include
#include
const char* WIFI_SSID = "SSID";
const char* WIFI_PASS = "password";
WebServer server(80);
static auto hiRes = esp32cam::Resolution::find(800, 600);
void serveJpg()
{
auto frame = esp32cam::capture();
if (frame == nullptr) {
Serial.println("CAPTURE FAIL");
server.send(503, "", "");
return;
}
Serial.printf("CAPTURE OK %dx%d %db\n", frame->getWidth(), frame->getHeight(),
static_cast
server.setContentLength(frame->size());
server.send(200, "image/jpeg");
WiFiClient client = server.client();
frame->writeTo(client);
}
void handleJpgHi()
{
if (!esp32cam::Camera.changeResolution(hiRes)) {
Serial.println("SET-HI-RES FAIL");
}
serveJpg();
}
void setup(){
Serial.begin(115200);
Serial.println();
{
using namespace esp32cam;
Config cfg;
cfg.setPins(pins::AiThinker);
cfg.setResolution(hiRes);
cfg.setBufferCount(2);
cfg.setJpeg(80);
bool ok = Camera.begin(cfg);
Serial.println(ok ? "CAMERA OK" : "CAMERA FAIL");
}
WiFi.persistent(false);
WiFi.mode(WIFI_STA);
WiFi.begin(WIFI_SSID, WIFI_PASS);
while (WiFi.status() != WL_CONNECTED) {
delay(500);
}
Serial.print("http://");
Serial.println(WiFi.localIP());
Serial.println(" /cam-hi.jpg");
server.on("/cam-hi.jpg", handleJpgHi);
server.begin();
}
void loop()
{
server.handleClient();
}
After uploading the code, disconnect the IO0 pin of the camera from GND. Then press the RST pin. The following messages will appear.

Fig: Code successfully uploaded to ESP32-CAM
You have to copy the IP address and paste it into the following part of your Python code.

Fig: Copy-pasting the URL to the Python script
Code breakdown
#include
#include
#include
#include
: Adds support for creating a lightweight HTTP server. #include
: Allows the ESP32 to connect to Wi-Fi networks. #include
: Provides functions to control the ESP32-CAM module, including camera initialization and capturing images.
const char* WIFI_SSID = "SSID";
const char* WIFI_PASS = "password";
WIFI_SSID and WIFI_PASS: Define the SSID and password of the Wi-Fi network that the ESP32 will connect to.
WebServer server(80);
WebServer server(80): Creates an HTTP server instance that listens on port 80 (default HTTP port).
static auto hiRes = esp32cam::Resolution::find(800, 600);
esp32cam::Resolution::find: Defines camera resolutions:
hiRes: High resolution (800x600).
void serveJpg()
{
auto frame = esp32cam::capture();
if (frame == nullptr) {
Serial.println("CAPTURE FAIL");
server.send(503, "", "");
return;
}
Serial.printf("CAPTURE OK %dx%d %db\n", frame->getWidth(), frame->getHeight(),
static_cast
server.setContentLength(frame->size());
server.send(200, "image/jpeg");
WiFiClient client = server.client();
frame->writeTo(client);
}
esp32cam::capture: Captures a frame from the camera.
Failure Handling: If no frame is captured, it logs a failure and sends a 503 error response.
Logging Success: Prints the resolution and size of the captured image.
Serving the Image:
Sets the content length and MIME type as image/jpeg.
Writes the image data directly to the client.
void handleJpgHi()
{
if (!esp32cam::Camera.changeResolution(hiRes)) {
Serial.println("SET-HI-RES FAIL");
}
serveJpg();
}
handleJpgHi: Switches the camera to high resolution using esp32cam::Camera.changeResolution(hiRes) and calls serveJpg.
Error Logging: If the resolution change fails, it logs a failure message to the Serial Monitor.
void setup(){
Serial.begin(115200);
Serial.println();
{
using namespace esp32cam;
Config cfg;
cfg.setPins(pins::AiThinker);
cfg.setResolution(hiRes);
cfg.setBufferCount(2);
cfg.setJpeg(80);
bool ok = Camera.begin(cfg);
Serial.println(ok ? "CAMERA OK" : "CAMERA FAIL");
}
WiFi.persistent(false);
WiFi.mode(WIFI_STA);
WiFi.begin(WIFI_SSID, WIFI_PASS);
while (WiFi.status() != WL_CONNECTED) {
delay(500);
}
Serial.print("http://");
Serial.println(WiFi.localIP());
Serial.println(" /cam-hi.jpg");
server.on("/cam-hi.jpg", handleJpgHi);
server.begin();
}
Serial Initialization:
Initializes the serial port for debugging.
Sets baud rate to 115200.
Camera Configuration:
Sets pins for the AI Thinker ESP32-CAM module.
Configures the default resolution, buffer count, and JPEG quality (80%).
Attempts to initialize the camera and log the status.
Wi-Fi Setup:
Connects to the specified Wi-Fi network in station mode.
Waits for the connection and logs the device's IP address.
Web Server Routes:
Maps URL endpoint ( /cam-hi.jpg).
Server Start:
Starts the web server.
void loop()
{
server.handleClient();
}
server.handleClient(): Continuously listens for incoming HTTP requests and serves responses based on the defined endpoints.
Summary of Workflow
The ESP32-CAM connects to Wi-Fi and starts a web server.
URL endpoint /cam-hi.jpg) lets the user request images at high resolution.
The camera captures an image and serves it to the client as a JPEG.
The system continuously handles new client requests.
Python code
import cv2
import urllib.request
import numpy as np
import time
url = 'http://192.168.1.101/cam-hi.jpg'
detector = cv2.QRCodeDetector()
scanned_text = None
while True:
# Fetch frame from the IP camera URL
img_resp = urllib.request.urlopen(url)
img_arr = np.array(bytearray(img_resp.read()), dtype=np.uint8)
frame = cv2.imdecode(img_arr, -1)
if frame is None:
continue
# QR Code detection
gray = cv2.cvtColor(frame, cv2.COLOR_BGR2GRAY)
decoded_text, points, _ = detector.detectAndDecode(gray)
if not decoded_text:
# If normal detection fails, try preprocessing
enhanced = cv2.GaussianBlur(gray, (5, 5), 0)
enhanced = cv2.adaptiveThreshold(enhanced, 255, cv2.ADAPTIVE_THRESH_GAUSSIAN_C,
cv2.THRESH_BINARY, 11, 2)
decoded_text, points, _ = detector.detectAndDecode(enhanced)
if points is not None and decoded_text:
if decoded_text != scanned_text:
print(f"Decoded: {decoded_text}")
scanned_text = decoded_text
# Convert points to integer values and draw the bounding box
points = points.astype(int) # Convert float points to integer
cv2.polylines(frame, [points], isClosed=True, color=(0, 255, 0), thickness=3)
# Display the frame with QR code detection
cv2.imshow("QR Scanner", frame)
# Wait for 'q' key to exit the loop
if cv2.waitKey(1) & 0xFF == ord('q'):
break
cv2.destroyAllWindows()
Code breakdown
Import Required Libraries
import cv2
import urllib.request
import numpy as np
import time
cv2 → OpenCV library for image processing.
urllib.request → Fetches the image frame from the ESP32-CAM URL.
numpy → Handles image data in arrays.
time → (Unused here but often used for timing/debugging).
Define Camera Stream URL
url = 'http://192.168.1.101/cam-hi.jpg'
The ESP32-CAM provides a JPEG stream over this local IP address.
Ensure that your ESP32-CAM is connected to the same Wi-Fi network.
Initialize the QR Code Detector
detector = cv2.QRCodeDetector()
cv2.QRCodeDetector() creates an instance of OpenCV's built-in QR code detector.
Variable to Store Previously Scanned Text
scanned_text = None
This stores the last detected QR code text.
Used to prevent duplicate prints of the same QR code.
Start the Main Loop
while True:
Runs indefinitely to keep fetching frames and detecting QR codes.
Fetch Frame from ESP32-CAM
img_resp = urllib.request.urlopen(url)
img_arr = np.array(bytearray(img_resp.read()), dtype=np.uint8)
frame = cv2.imdecode(img_arr, -1)
urllib.request.urlopen(url): Fetches the image as bytes.
bytearray(img_resp.read()): Converts the byte stream into an array.
np.array(..., dtype=np.uint8): Converts the byte array into a NumPy array (for image processing).
cv2.imdecode(img_arr, -1): Decodes the array into an OpenCV image (frame).
Skip Frame If Invalid
if frame is None:
continue
Ensures the loop does not crash if the frame is not properly retrieved.
Convert to Grayscale
gray = cv2.cvtColor(frame, cv2.COLOR_BGR2GRAY)
Converts the frame to grayscale for better QR code detection.
QR code detection works better on grayscale images.
Detect QR Code
decoded_text, points, _ = detector.detectAndDecode(gray)
detectAndDecode(gray):
Detects QR code in the image.
Returns:
decoded_text → The text inside the QR code.
points → The four corner points of the QR code.
_ → A binary mask (not used here).
If Detection Fails, Try Preprocessing
if not decoded_text:
enhanced = cv2.GaussianBlur(gray, (5, 5), 0)
enhanced = cv2.adaptiveThreshold(enhanced, 255, cv2.ADAPTIVE_THRESH_GAUSSIAN_C,
cv2.THRESH_BINARY, 11, 2)
decoded_text, points, _ = detector.detectAndDecode(enhanced)
If the first detection attempt fails, the script applies:
Gaussian Blur → Reduces noise.
Adaptive Thresholding → Enhances contrast.
Then, it retries QR code detection on the enhanced image.
Handle Successful QR Code Detection
if points is not None and decoded_text:
If a QR code is successfully detected, process it.
Prevent Repeated Decoding
if decoded_text != scanned_text:
print(f"Decoded: {decoded_text}")
scanned_text = decoded_text
Ensures the script does not print the same QR code multiple times.
Draw Bounding Box Around QR Code
points = points.astype(int) # Convert float points to integer
cv2.polylines(frame, [points], isClosed=True, color=(0, 255, 0), thickness=3)
Converts points to integer values.
Uses cv2.polylines() to draw a green bounding box around the detected QR code.
Display the Frame
cv2.imshow("QR Scanner", frame)
Opens a live OpenCV window displaying the video stream with QR detection.
Quit on 'q' Key Press
if cv2.waitKey(1) & 0xFF == ord('q'):
break
Waits 1 millisecond for a key press.
If the user presses 'q', the loop exits.
Cleanup
cv2.destroyAllWindows()
Closes all OpenCV windows and frees resources.
Let’s test the setup!
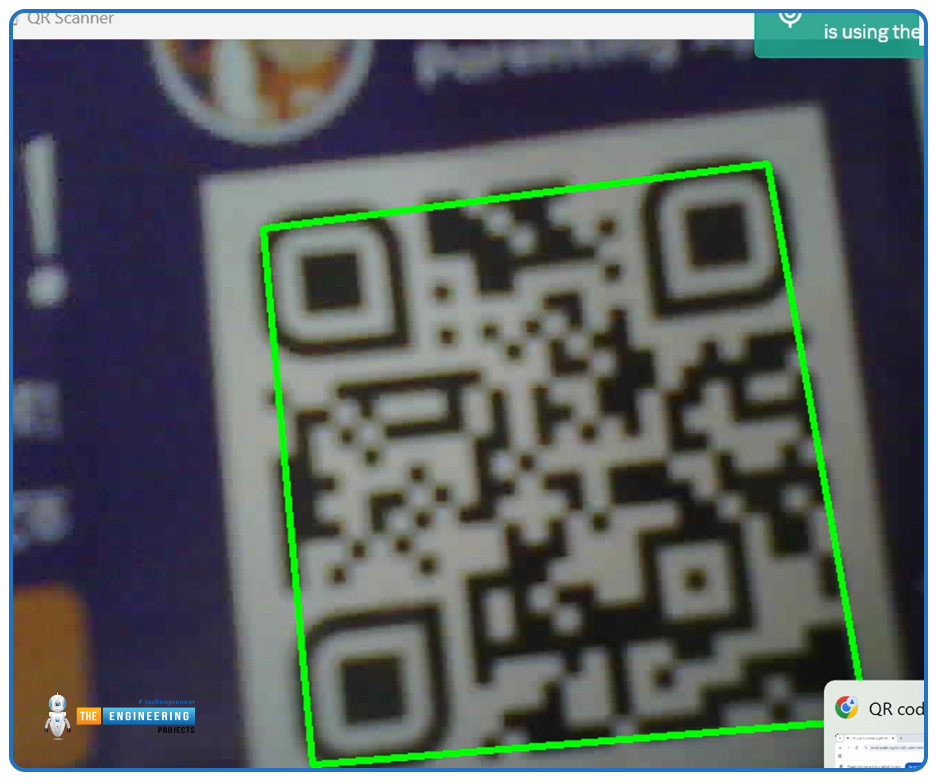
Run the Python code and place your camera in front of a QR code. The QR code will be detected inside a green bounding box.

Fig: QR code detected
You will see the decoded QR code in the output window.
Wrapping It Up
And there you have it! We successfully built a real-time QR code scanner using an ESP32-CAM and OpenCV. The script continuously grabs frames from the ESP32-CAM’s live feed, detects QR codes, and even draws a bounding box around them. If the initial detection doesn’t work, it smartly enhances the image to improve accuracy.
This setup can be super handy for things like automated check-ins, inventory tracking, or even smart home projects. But this is just the beginning! You can take it even further by Storing scanned QR codes in a database, triggering automated actions based on the scanned data
and expanding it to multiple cameras for larger applications
With the power of computer vision and the flexibility of the ESP32-CAM, the possibilities are endless. So go ahead, experiment, tweak, and see where you can take it!


 ESP32 Projects
 xeohacker
 0 Comments


