Hello friends, I hope you all are doing great. Today, I am going to share the new 12V Solenoid Water Valve Library for Proteus V1.0. If you have ever built an automatic plant watering system, a water dispenser, an aquarium top-up or a coffee machine with an Arduino, you have met this part: the little 12 V solenoid water valve with a white or grey plastic body, two threaded ports and a black coil on top. Power the coil and the water flows; cut the power and it stops.
12V Solenoid Water Valve Library for Proteus
Latest version: V1.0 (November 2026, this tutorial)
Other motors: SG90 Servo · TT Gear Motor · 28BYJ-48 Stepper · NEMA 17 Stepper · MG996R Servo · N20 Encoder Motor · JGA25-370 Encoder Motor · FS90R 360 Servo · 130 DC Motor · A2212 Brushless · X27.168 Gauge · Analog Panel Meter · DC Tachogenerator · LM393 Speed Sensor · MG90S Servo · DS3218 Servo · L12 Linear Servo · JGB37-520 Motor · RS-775 Motor · JGY-370 Worm Motor · 12V Linear Actuator · Coin Vibration Motor · Mini Submersible Water Pump · 12V Peristaltic Pump · 4-Pin PC Fan · 12V Push-Pull Solenoid · NEMA 23 Stepper Motor · Micro Linear Stepper · TYJ50 Synchronous Motor · Quartz Clock Movement · Air-Core Gauge · Electromechanical Counter · Split-Flap Display · Electric Bell · Wind Turbine · 8520 Coreless Motor · Car Wiper Motor · Car Door Lock Actuator · 12V Holding Electromagnet
Motor drivers: L298 · L9110S · TB6612FNG · BTS7960 · A4988 / DRV8825 · 28BYJ-48 + ULN2003 · PCA9685 Servo · Relay Module · 30A Brushless ESC · TB6600 Stepper Driver
Helping Tools
- Serial Monitor Advance: a serial terminal window for the UART of your board
- Serial Monitor Expert: the serial monitor with extra debugging tools
- LCD Library for Proteus V3.0: 16x2, 20x4 and I2C LCDs to show your readings
This library puts that valve into Proteus as a part of its own. Its coil is in the circuit, its pilot plunger lifts, its rubber diaphragm opens with the water pressure, and the water flows - in litres per minute, adding up to litres. It also does the things that catch people out with real valves: it will not open without enough pressure, it will not open against too much, and a hold PWM that is too low lets it drop shut. The demo drives it from an Arduino UNO V4.0 through our L9110S driver, with the "kick and hold" trick that keeps the coil cool.
NOTICE: a solenoid valve looks like a switch for water - power on, water on. Our team put a lot of effort into building one that behaves like the real thing: the coil and its inductance, the pilot plunger, the diaphragm that needs pressure, the flow and the heat. Your feedback is the fuel that keeps us going, so please tell us what you think in the comments below or in the Motor Driver board of our forum. And if our free libraries help you, you can buy us a coffee. So, let's get started with the 12V Solenoid Water Valve Library for Proteus V1.0:
What is a 12V Solenoid Water Valve?
A solenoid valve is a valve opened by an electromagnet. The common 1/2" 12 V water valve is normally closed: with no power, a spring holds it shut, so a power cut or a crashed controller never floods anything. When the coil is powered, it pulls a steel plunger up, and the valve opens.
| 12 V solenoid water valve (the model) | |
|---|---|
| Coil | 26.7 ohm: 0.45 A and 5.4 W at 12 V, either polarity |
| Type | normally closed, pilot-operated |
| Pressure | 0.2 to 8 bar |
| Flow | Kv 0.6: about 14 L/min at 2 bar |
| Opening, closing | fully open about half a second after the coil; closed about a second after it is switched off |
| Properties | VOLTAGE 12 or 24, PRESSURE (bar) |
How a Pilot-Operated Valve Opens
A small coil cannot lift a big valve against water pressure, so most cheap 1/2" valves cheat: they are pilot-operated. The coil only lifts a small plunger off a tiny pilot hole, about 2 mm across, in the middle of a rubber diaphragm. Water above the diaphragm escapes through that hole faster than a small bleed hole can refill it, so the pressure above drops, and the water pressure underneath lifts the diaphragm off the main seat. The water itself does the heavy work. When the coil lets go, the plunger closes the pilot hole, the chamber refills through the bleed hole, and the diaphragm settles back - which is why the valve closes softly, in about a second.
Why It Needs Pressure - and Fails at Too Much
The trick has two catches. With too little pressure, the water cannot lift the diaphragm: the plunger moves, but nothing flows. That is why these valves do not work from a bucket or a rain-barrel tank - they need about 0.2 bar or more. And with too much pressure, the water pushes the plunger onto the pilot hole harder than the coil can pull: the coil buzzes, the valve stays shut. Our model has both.
What's New in 12V Solenoid Water Valve Library for Proteus V1.0
- A part of its own: the valve from the front - the grey body with its IN and OUT ports and the flow arrow, the black coil on top, the pipes and a spout.
- A real coil in the circuit: 26.7 ohm and an inductance that grows from 170 mH to 350 mH as the plunger lifts.
- A real pilot valve: the plunger against its spring and the water, the diaphragm that needs 0.2 bar, the flow that follows the pressure.
- A cut-away on the sheet: the pilot lifting, the diaphragm opening and the water running, with water falling from the spout.
- A pop-up window with four pages - Valve, Graphs, Event log and Check - with pressure chips from no water to 10 bar.
- An A3 demo on our Arduino UNO V4.0 with our L9110S on 12 V: kick and hold, a timed watering, and the hold PWM on a knob.
The 12V Solenoid Water Valve in Proteus
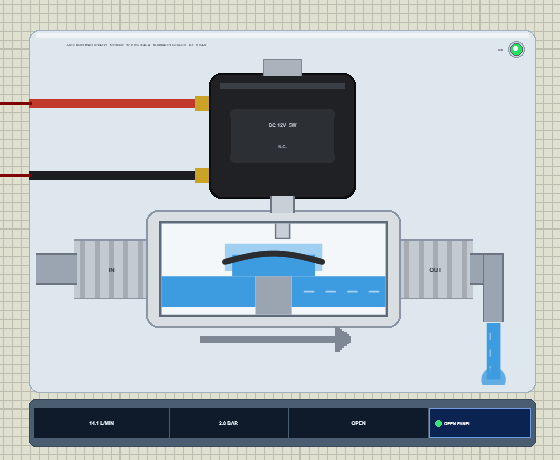
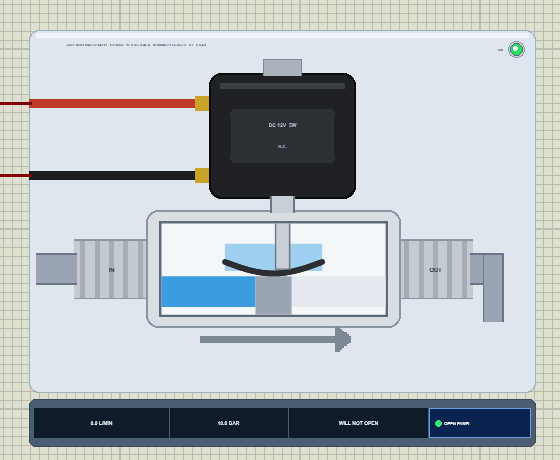
Search valve in Pick Devices; the device WATERVALVETEP is in TEPVALVE.LIB (category Electromechanical, Motors) and its model is TEPVALVE.DLL. It is drawn from the front: the grey plastic body with its threaded IN and OUT ports, the flow arrow moulded under it, the black epoxy coil with its nut and two brass spade terminals - a red wire to + and a black one to - - and a piece of pipe on each side, the outlet turning down to a spout.
At Run, a cut-away window in the body shows what happens inside: the water on the inlet side, the main seat, the rubber diaphragm sitting on it or lifted, and the pilot plunger. When the valve opens, the outlet side fills, streaks run through it and water falls from the spout. The ON LED lights green while current flows, and the strip under the plate shows the flow, the pressure, the state and the OPEN PANEL button. The plate, the LED, the cut-away, the falling water, the rating line and the strip are TEP additions; the real valve has none of them.
The Pins and the Properties
| Pin | What the model does with it |
|---|---|
| + | the coil's first terminal (the red wire) |
| - | the coil's second terminal - either polarity opens the valve |
| Property | Default | What it does |
|---|---|---|
| VOLTAGE | 12 | the coil: 12, or 24 for a 24 V valve |
| PRESSURE | 2 | the water pressure at the inlet, in bar (0 to 12) |
Download 12V Solenoid Water Valve Library for Proteus
Click the button below to download 12V-Solenoid-Water-Valve-Library-for-Proteus-v1.0.zip (about 1.2 MB, without the source code of the models):
12V Solenoid Water Valve Library for Proteus V1.0- README.txt: installation, the demo, the wiring, the properties, real hardware, troubleshooting and the limits.
- Proteus Library Files:
TEPVALVE.LIBandArduinoV4TEP.LIBfrom our Arduino Library for Proteus V4.0. - Proteus Model Files:
TEPVALVE.DLLandTEPARDUINO.DLL. - Proteus Simulation:
12V-Solenoid-Water-Valve-L9110S-ArduinoUnoV4.pdsprj,Valve_Demo.hexand copies of the DLLs. - Arduino Code:
Valve_Demo.ino(no library needed).
Good to know: the demo's driver is our L9110S Motor Driver, a separate library that is not in this zip. Download it from its own article, the L9110S Motor Driver Library for Proteus, and install TEPL9110S.LIB and TEPL9110S.DLL the same way.
No Proteus yet? Read How to Download and Install Proteus 7 and 8. New to libraries? Follow How to Install a New Library in Proteus.
How to Install 12V Solenoid Water Valve Library for Proteus
- Close Proteus and extract the whole zip file, for example to your Desktop.
- Copy
TEPVALVE.LIBandArduinoV4TEP.LIBfrom Proteus Library Files into the LIBRARY folder of Proteus (usuallyC:\Program Files (x86)\Labcenter Electronics\Proteus 8 Professional\LIBRARY). - Copy
TEPVALVE.DLLandTEPARDUINO.DLLfrom Proteus Model Files into the MODELS folder. The two Arduino files are the ones of our Arduino Library V4.0; if you have it, they are the same. - Install the L9110S Motor Driver library the same way if you do not have it yet.
- Delete
TEPVALVE.IDXfrom the LIBRARY folder if it is there. - Start Proteus, press P and search for valve.
Tip: keep the Proteus Simulation folder together, because the project needs its .hex file and the DLLs beside it. The library is tested in Proteus 8.5; Proteus 7 is not supported.
The Demo Circuit
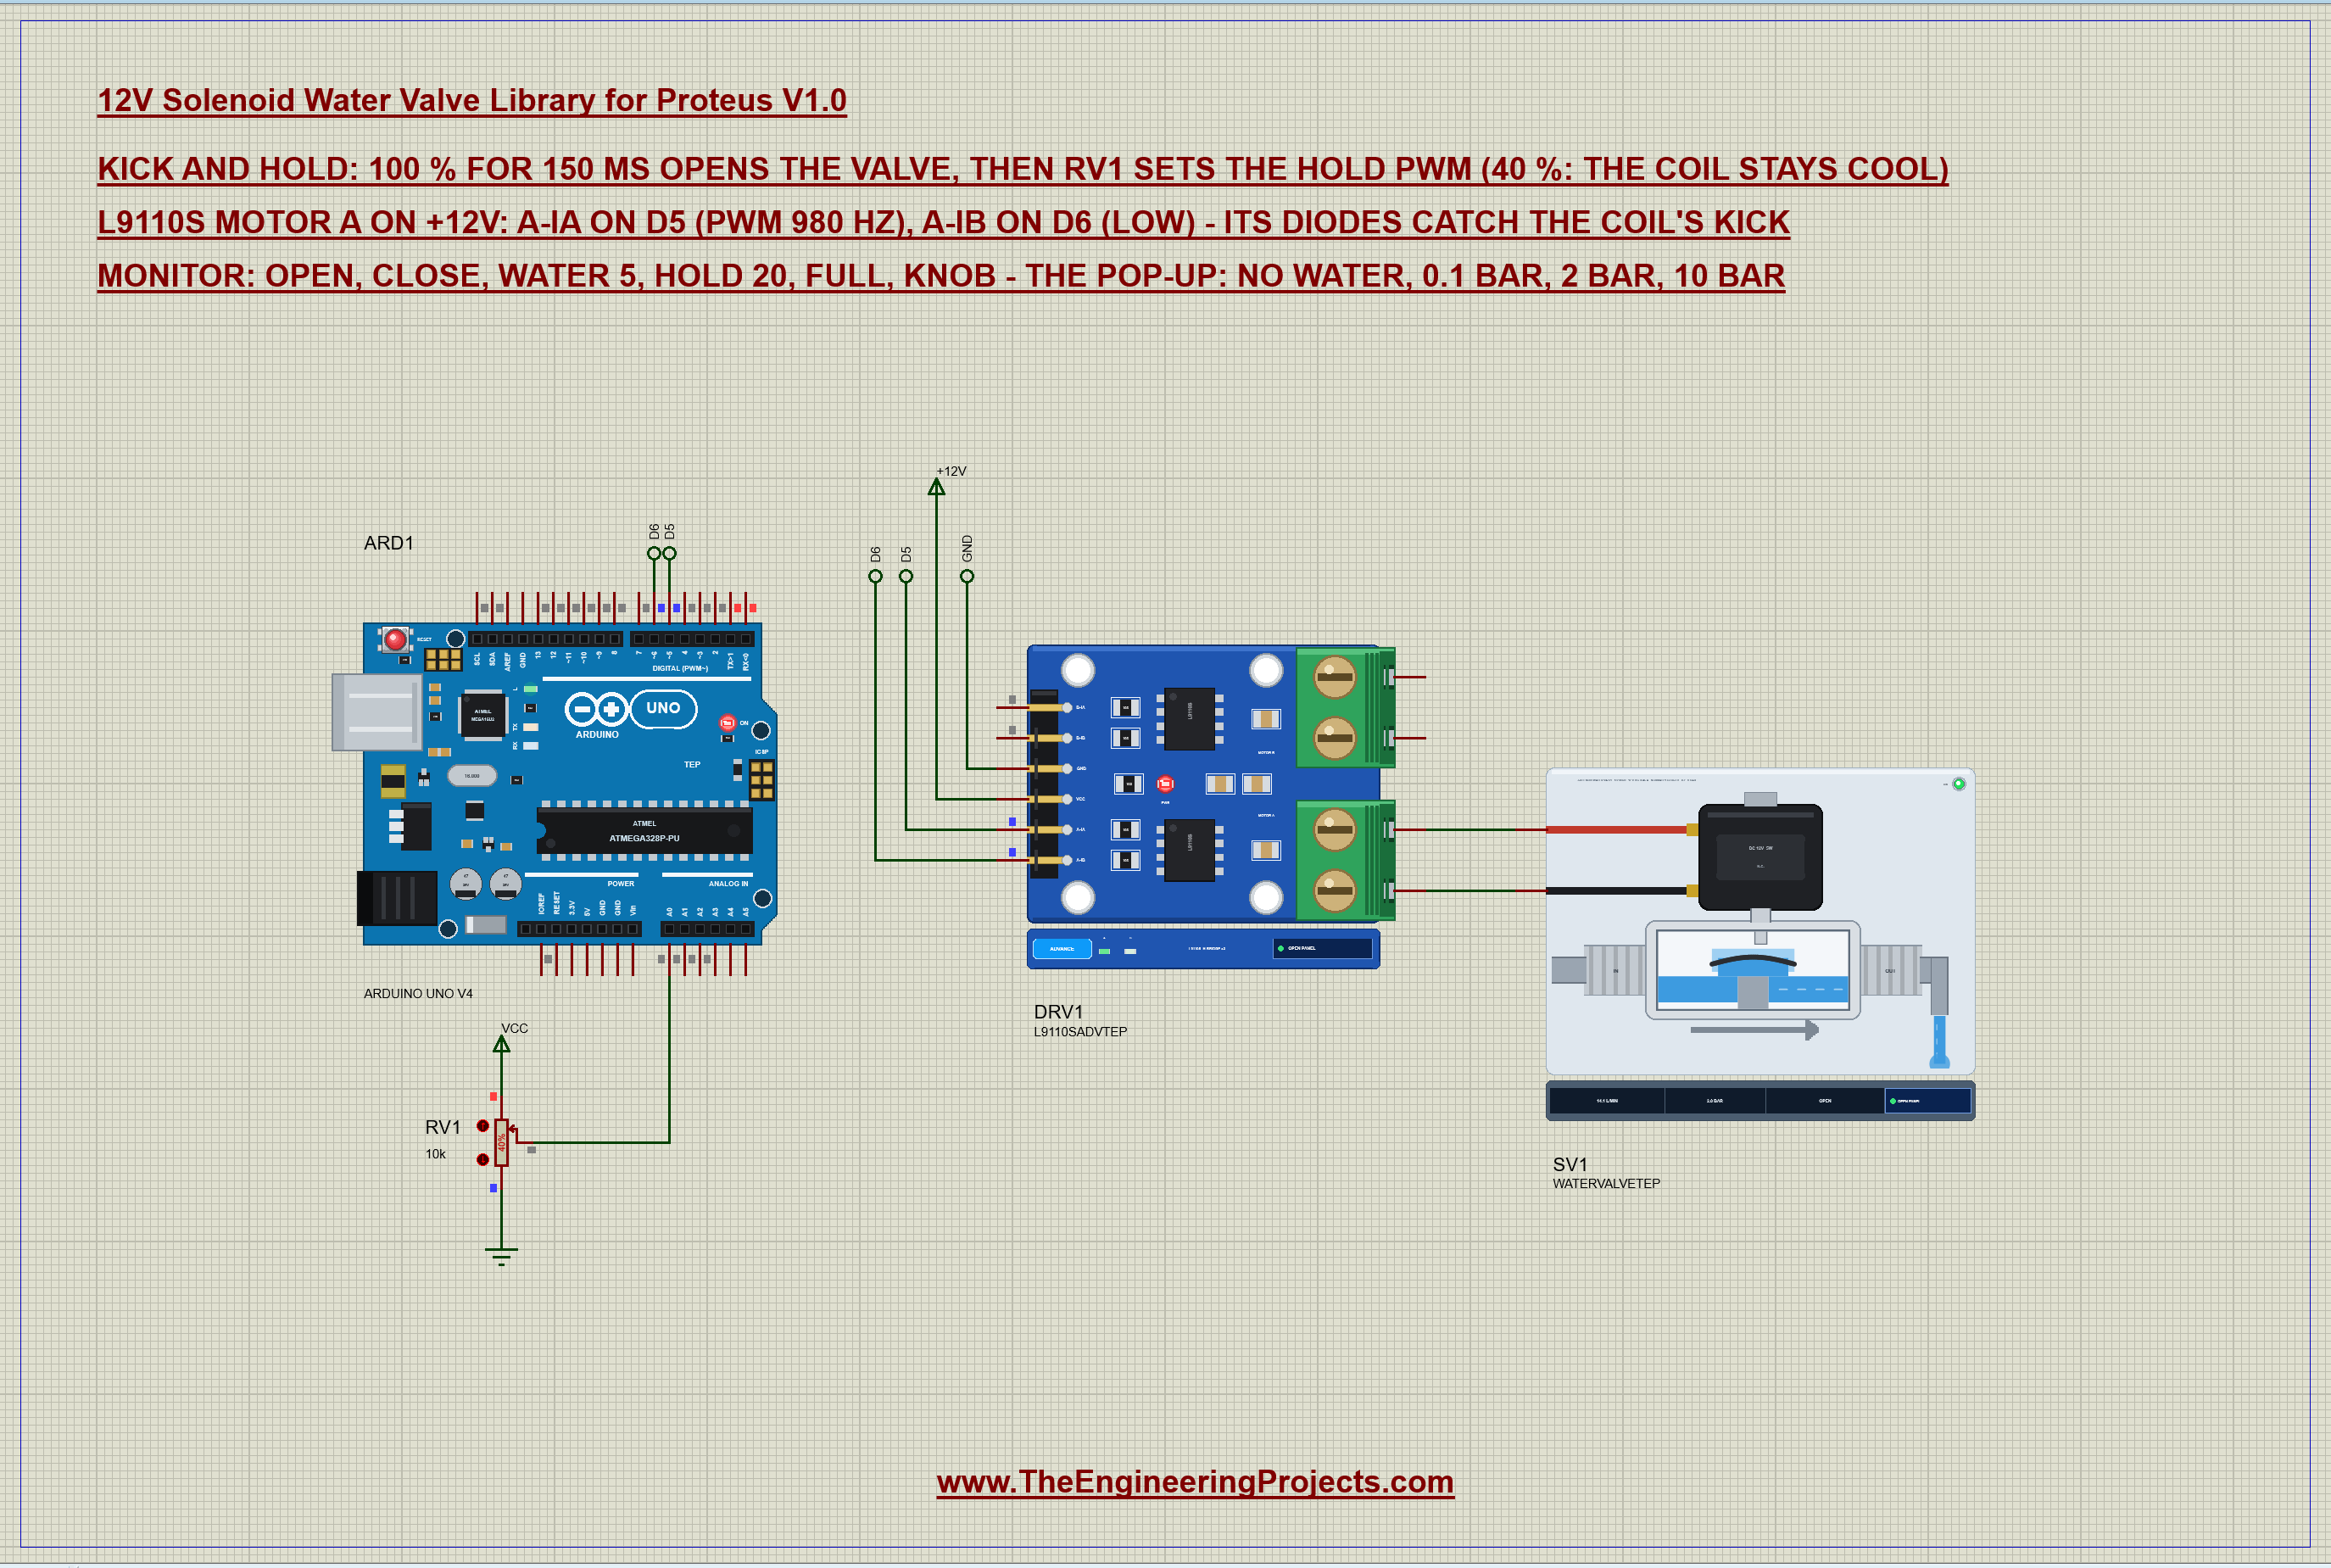
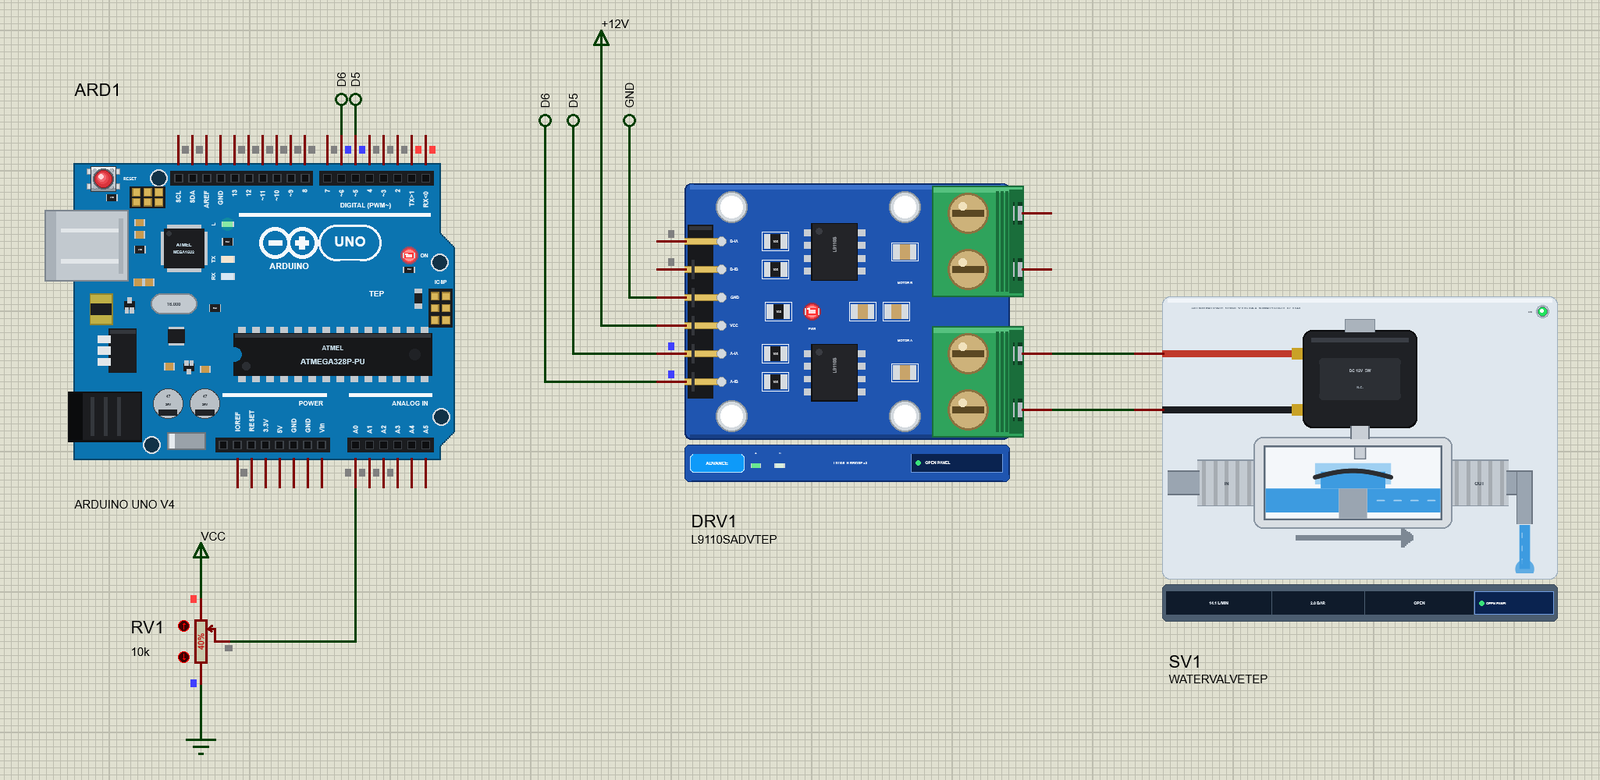
Open 12V-Solenoid-Water-Valve-L9110S-ArduinoUnoV4.pdsprj. ARD1 is an Arduino UNO V4.0 from our Arduino UNO Library for Proteus V4.0, running Valve_Demo.hex with its serial monitor built in. DRV1 is our L9110S driver in its pop-up version, on a +12V supply. SV1 is the valve on the driver's motor A outputs, with 2 bar at its inlet, and RV1 is a 10k pot on A0 that sets the hold PWM.
| Part | Pin | Goes to |
|---|---|---|
| L9110S | A-IA, A-IB | D5 (PWM), D6 (LOW) - by net labels |
| L9110S | VCC, GND | +12V, ground |
| L9110S | A-OA, A-OB | the valve's + and - (straight wires) |
| RV1 | wiper | A0 |
Why an L9110S?
A valve coil draws about 0.45 A at 12 V - far more than an Arduino pin can give - and, being a coil, it kicks back when it is switched off. The L9110S handles both: it switches up to about 0.8 A per channel, it takes a PWM input, and its output stage already has the diodes that catch the coil's kick. With a relay or a single MOSFET you would add a 1N4007 diode across the coil yourself. The PWM input matters too, as you will see: it lets the sketch hold the valve open with a fraction of the power.
The Arduino Code
The sketch needs no library. New to Arduino? Start with Arduino Tutorial for Beginners and Introduction to Arduino UNO. The pins and the length of the kick come first:
const byte IA = 5, IB = 6, KNOB = A0;
const unsigned int KICK_MS = 150;              // full voltage to open (the pilot lifts in about 10 ms)
One function drives the coil: a PWM on A-IA with A-IB held LOW. At 0 % both inputs are LOW and the coil's current dies away through the driver:
void drive(int pct) {                          // A-IA PWM, A-IB LOW; 0 = both LOW
  pct = constrain(pct, 0, 100);
  digitalWrite(IB, LOW);
  analogWrite(IA, (int)(pct * 255L / 100));
  drivePct = pct;
}
Kick and Hold
The heart of the sketch. A solenoid needs much more current to pull its plunger in than to hold it there, because the magnet is far stronger once the gap is closed. So the sketch opens the valve with full voltage, then drops to a hold PWM:
void open() {                                  // kick and hold
  drive(100); delay(KICK_MS);
  drive(holdPct);
The hold comes from RV1, read all the time and reported when it moves; a command can fix it instead:
    const int k = (int)((long)analogRead(KNOB) * 100 / 1023);
    if (abs(k - lastKnob) >= 2) {
holdPct = constrain(atoi(s + 5), 0, 100); fixedHold = true;Closing is simply both inputs LOW:
if (!strcmp(s, "close")) { waterEnd = 0; drive(0); Serial.println(F("Close - IA LOW, IB LOW: the valve closes")); return; }A Timed Watering
water 5 opens the valve and notes when to close it; the loop does the closing, so the sketch never blocks:
    open();
    waterEnd = millis() + sec * 1000UL;
if (waterEnd && (long)(millis() - waterEnd) >= 0) { waterEnd = 0; drive(0); Serial.println(F("Watering done - the valve closes")); }The HEX file is in the package. To change the sketch, open it in the Arduino IDE and export the compiled binary, as in How to get the HEX file from Arduino. It needs 7,050 bytes of flash (22 % of the UNO) and 295 bytes of RAM.
Running the Demo
Press Run. The UNO's serial monitor, the valve's pop-up and the L9110S's pop-up open over the schematic; move them aside. The valve is closed, and the sketch reports the knob:
12V Solenoid Water Valve demo - The Engineering Projects
L9110S on 12 V: A-IA on D5 (PWM), A-IB on D6 (LOW). RV1 on A0: the hold PWM.
Commands: open | full | close | water 5 | hold 40 | knob | status | help
Hold PWM from RV1: 40 %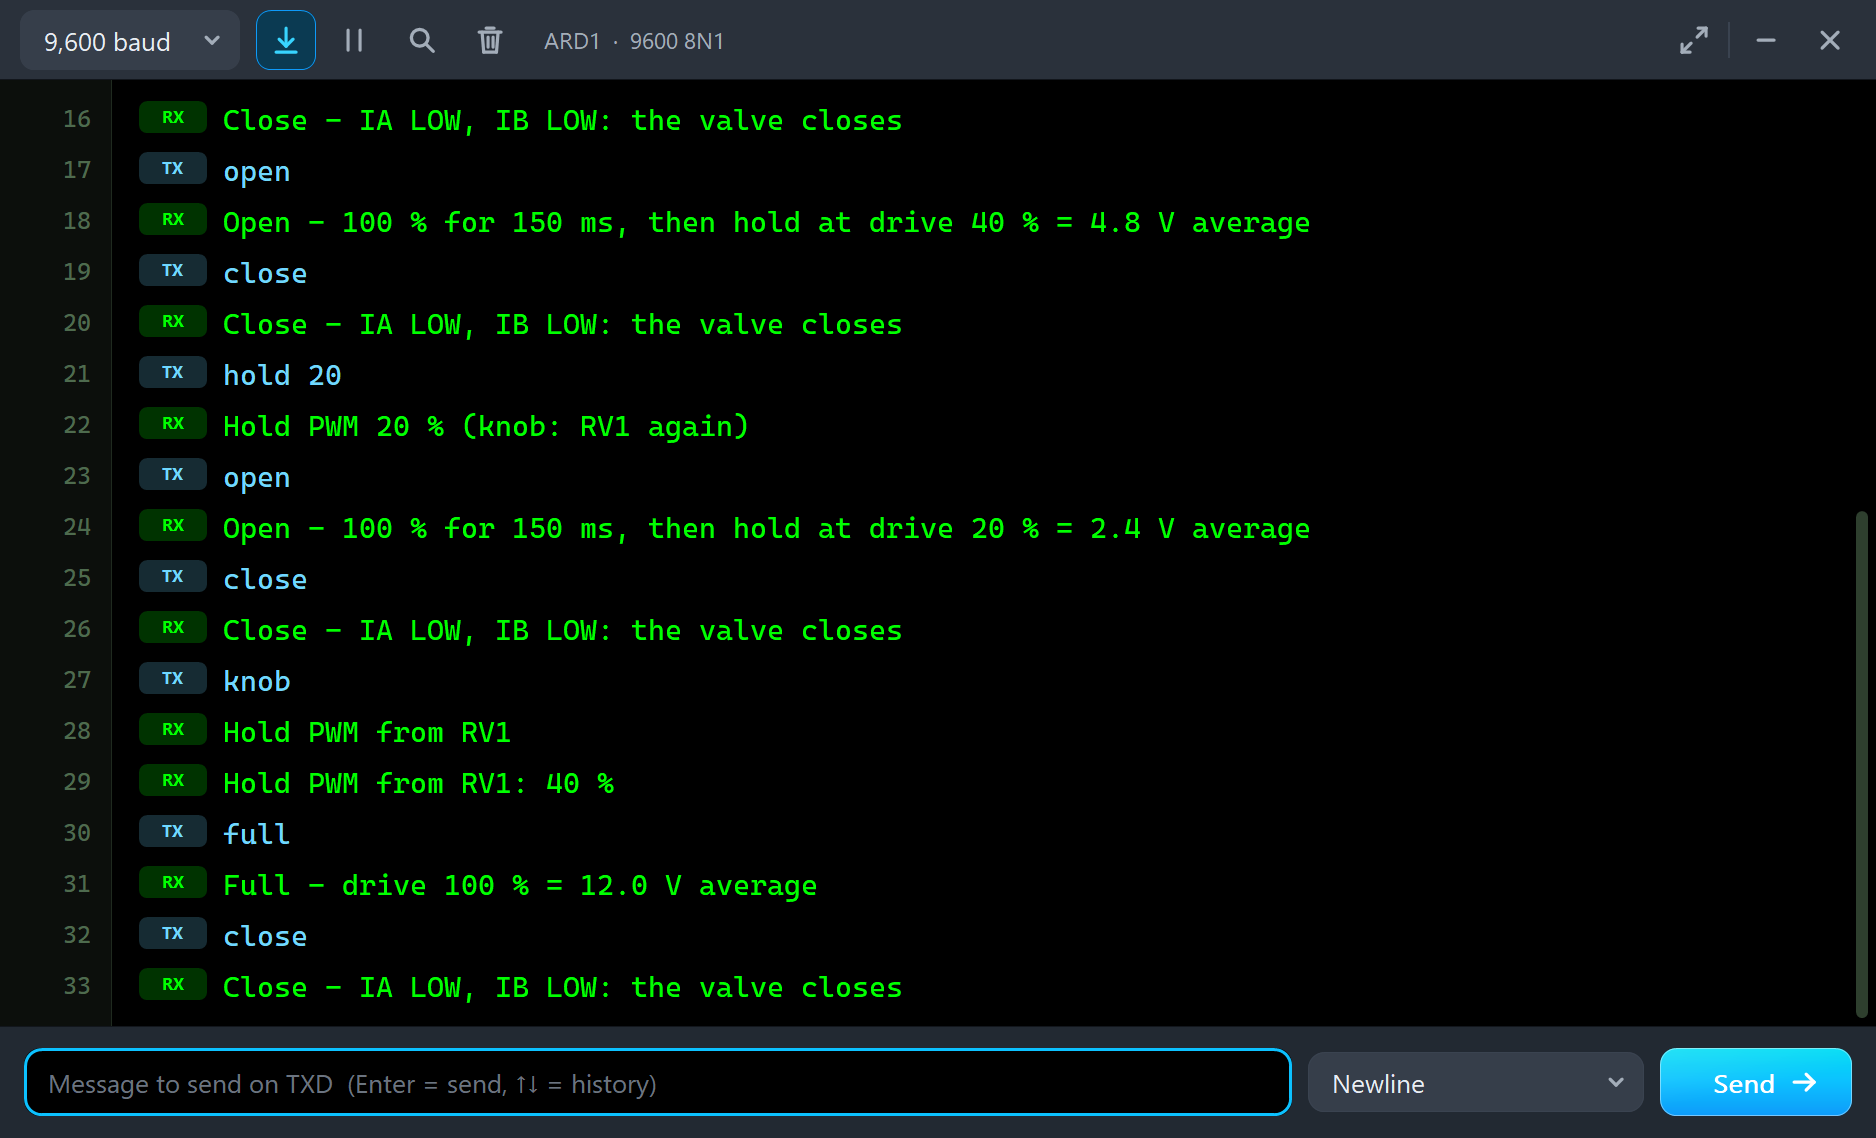
Opening With Kick and Hold
Type open:
open
Open - 100 % for 150 ms, then hold at drive 40 % = 4.8 V average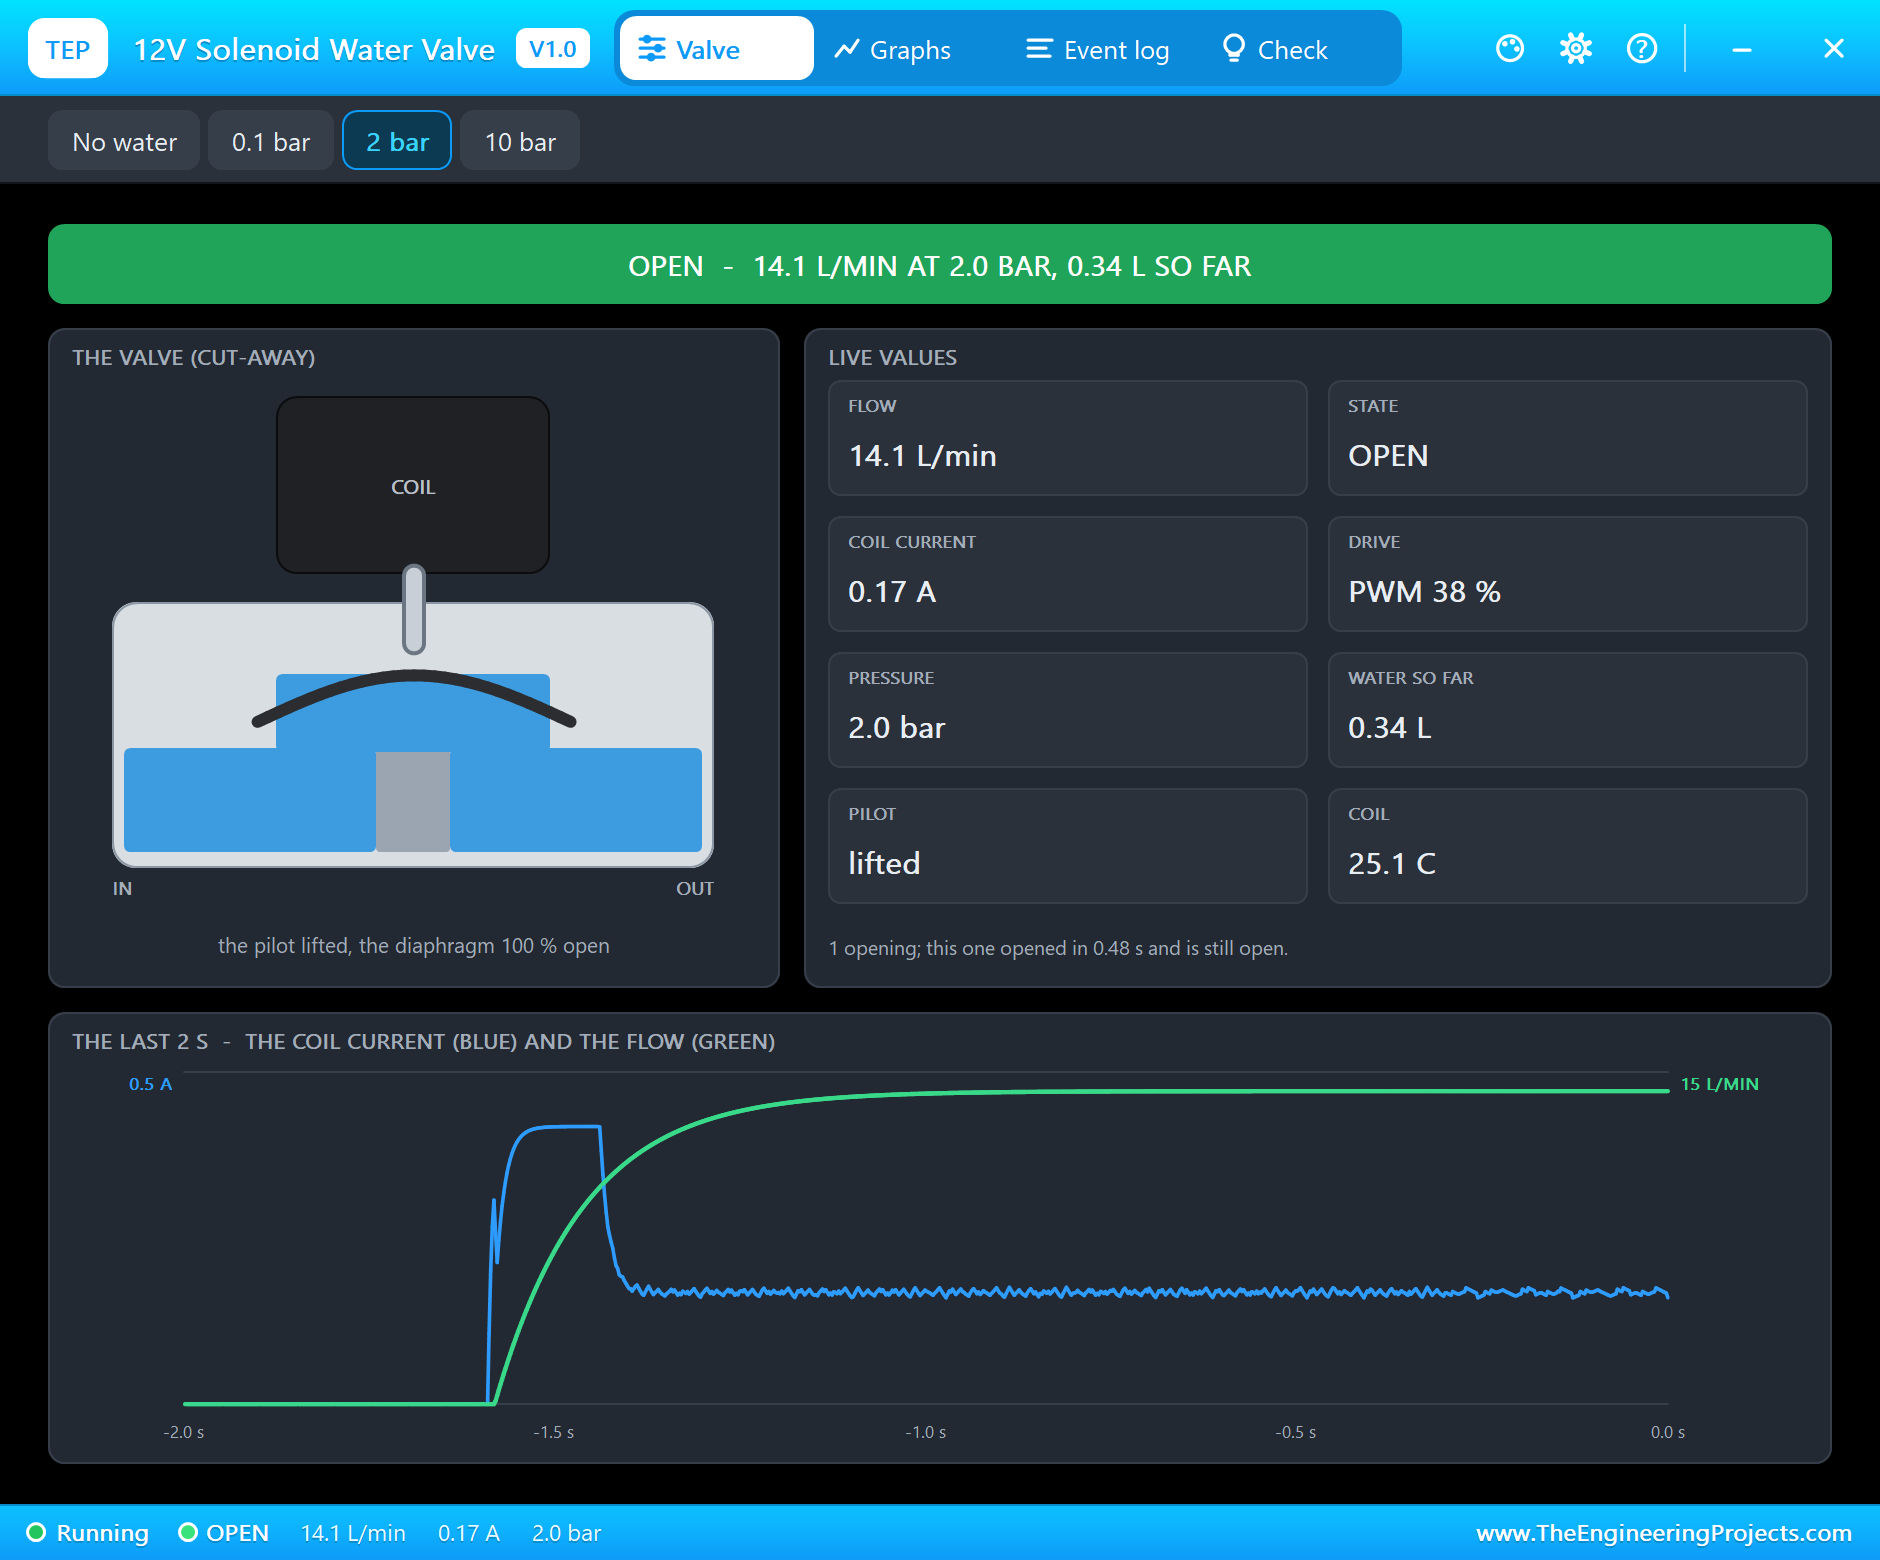
The log tells the story: "OPEN - 14.1 L/min at 2.0 bar, fully open 0.48 s after the coil (the pilot lifted in 8 ms)". The pilot plunger jumps in a few milliseconds, but the diaphragm takes about half a second to lift - that is the water doing its work. The pop-up has the look of our TEP Serial Monitor Advance for Proteus and four tabs: Valve, Graphs, Event log and Check. The Valve page shows the state in big letters, a cut-away of the valve and eight live values: the flow, the state, the coil current, the drive, the pressure, the water so far, the pilot and the coil's temperature.
The trace at the bottom shows the last 2 seconds: the coil current in blue jumps to over 0.4 A for the 150 ms kick and then drops to a ripple around 0.17 A - the hold. The flow in green climbs smoothly to 14 L/min. The log has the hold too: "PWM 976 Hz, 39 % duty = 4.53 V average, 0.169 A (0.76 W) - open". The coil now takes 0.76 W instead of about 5 W.
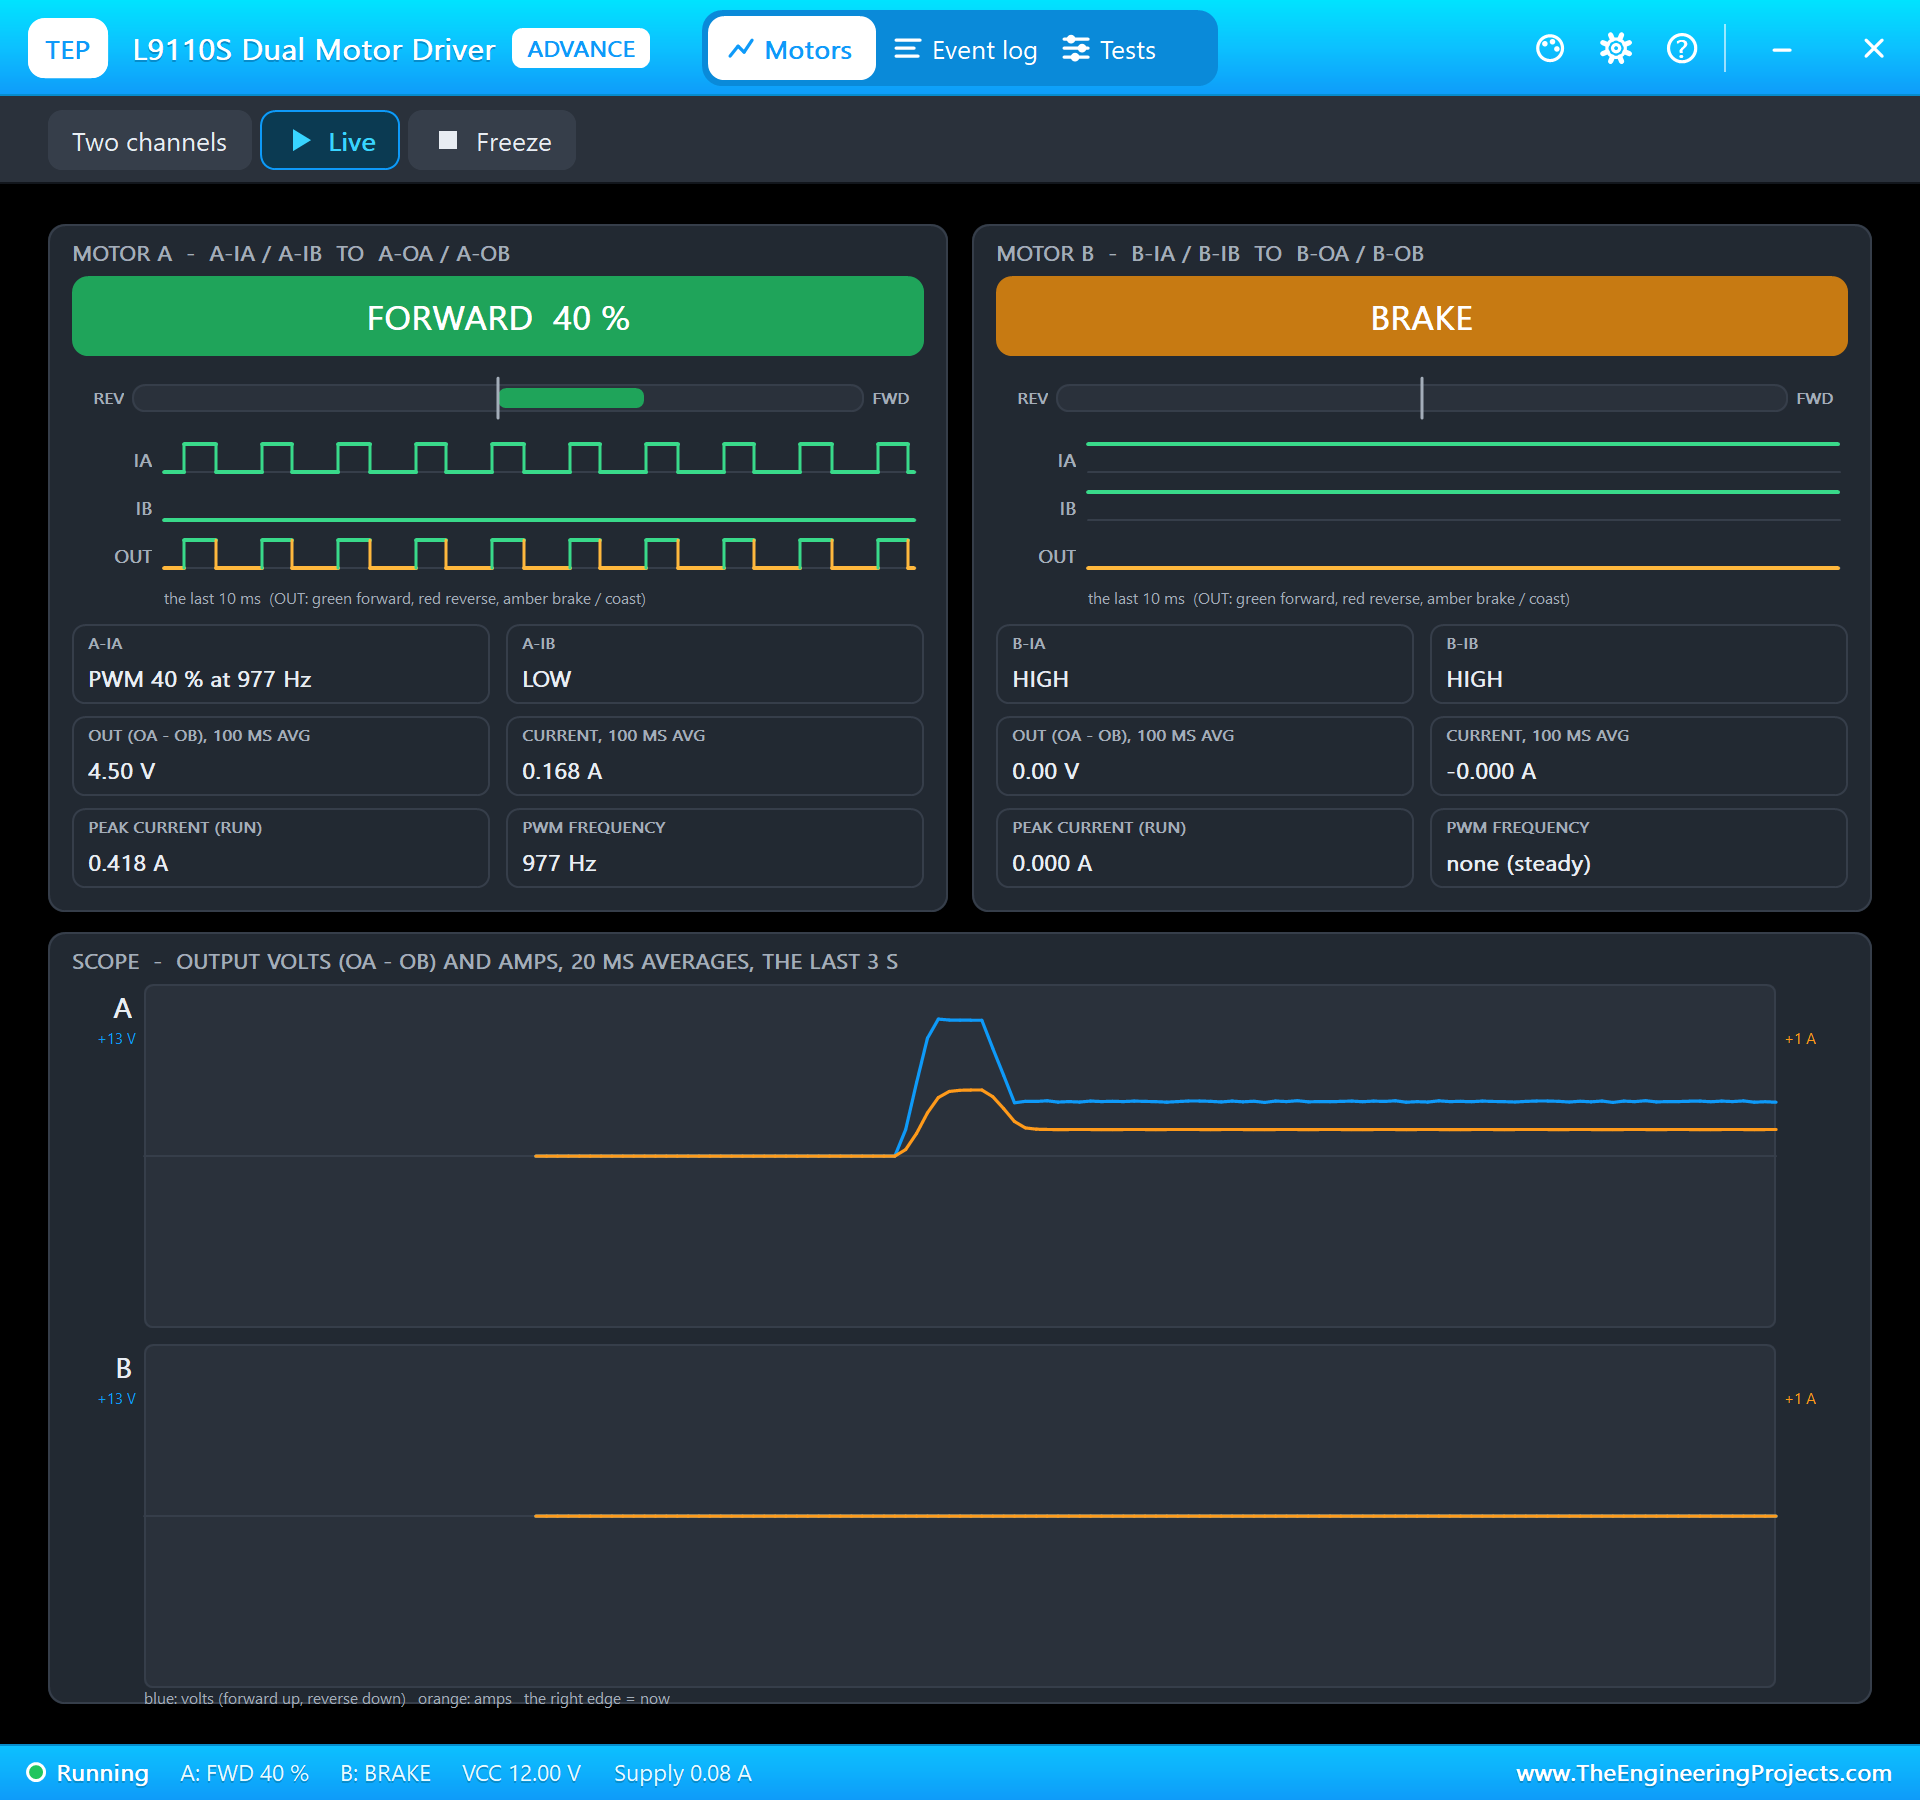
The L9110S's pop-up sees the same from the driver's side: "FORWARD 40 %", A-IA "PWM 40 % at 977 Hz", 4.50 V and 0.168 A on its output, and a peak of 0.418 A - the kick. Motor B shows BRAKE: its inputs are not wired, and the board's pull-ups hold them HIGH.
Closing
close
Close - IA LOW, IB LOW: the valve closes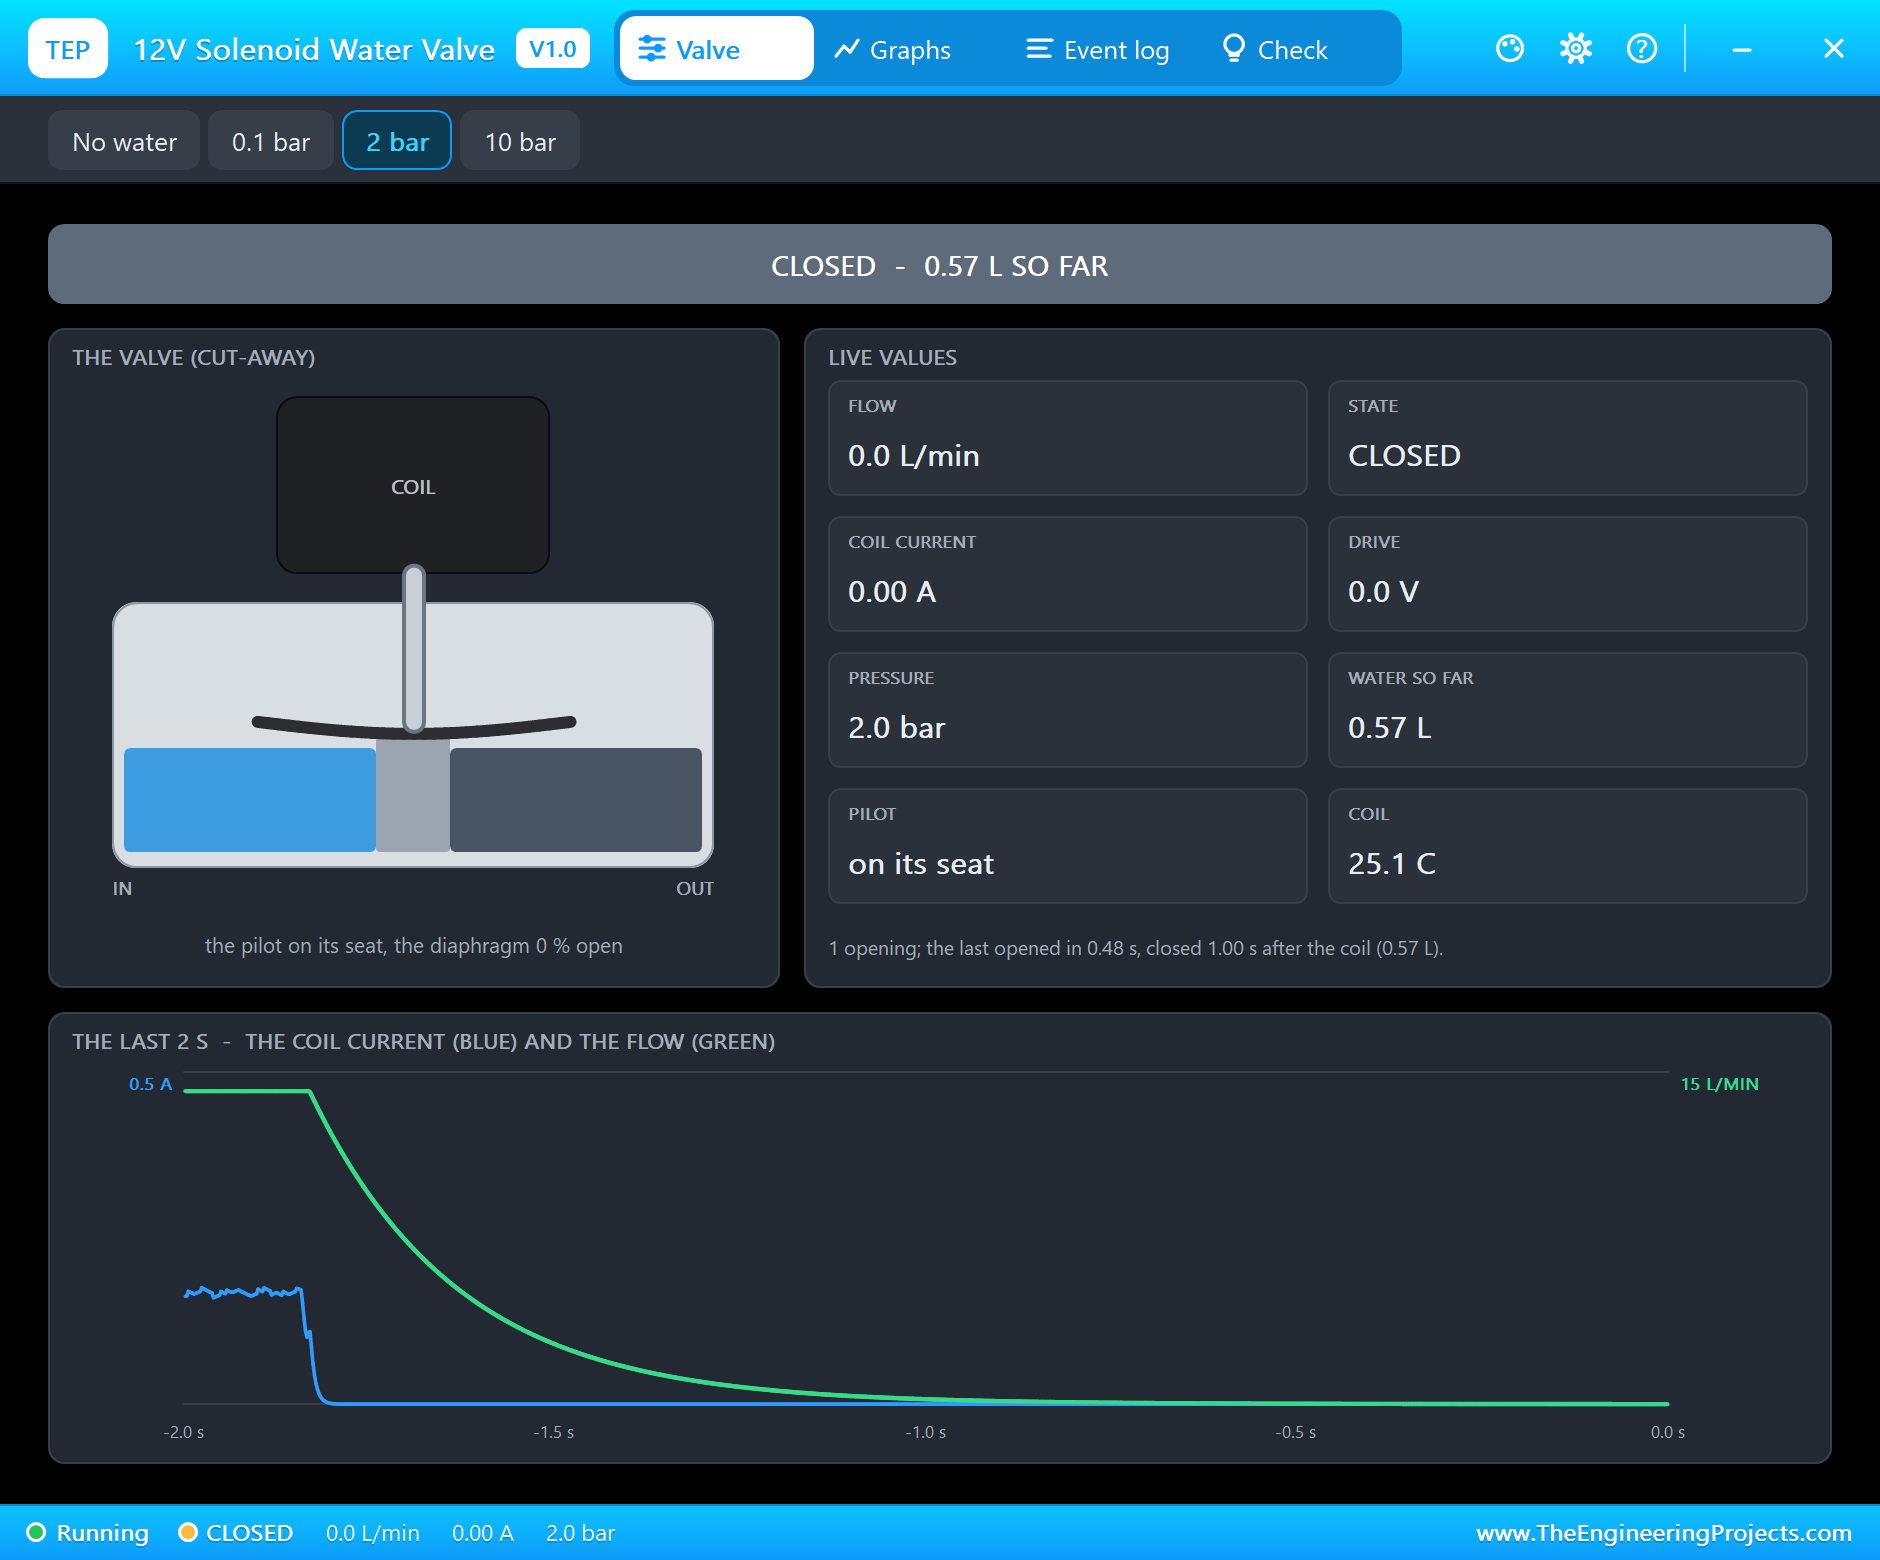
The coil current drops to zero at once, but the flow fades out: the diaphragm needs its chamber refilled before it settles. The log: "CLOSED - the flow stopped 1.00 s after the coil went off; 0.57 L this time, 0.57 L in all". If your project measures out water by time, that second counts.
A Timed Watering
water 3
Open - 100 % for 150 ms, then hold at drive 40 % = 4.8 V average
Watering for 3 s
Watering done - the valve closes
The valve opens with the same kick and hold, runs for 3 seconds and closes by itself: "CLOSED - the flow stopped 1.00 s after the coil went off; 0.76 L this time, 1.33 L in all". Three seconds of coil gave 0.76 L, because the water flows a little while the valve opens and closes.
Not Enough Pressure
Now click 0.1 bar on the valve's pop-up - a tank on a shelf, say - and type open:
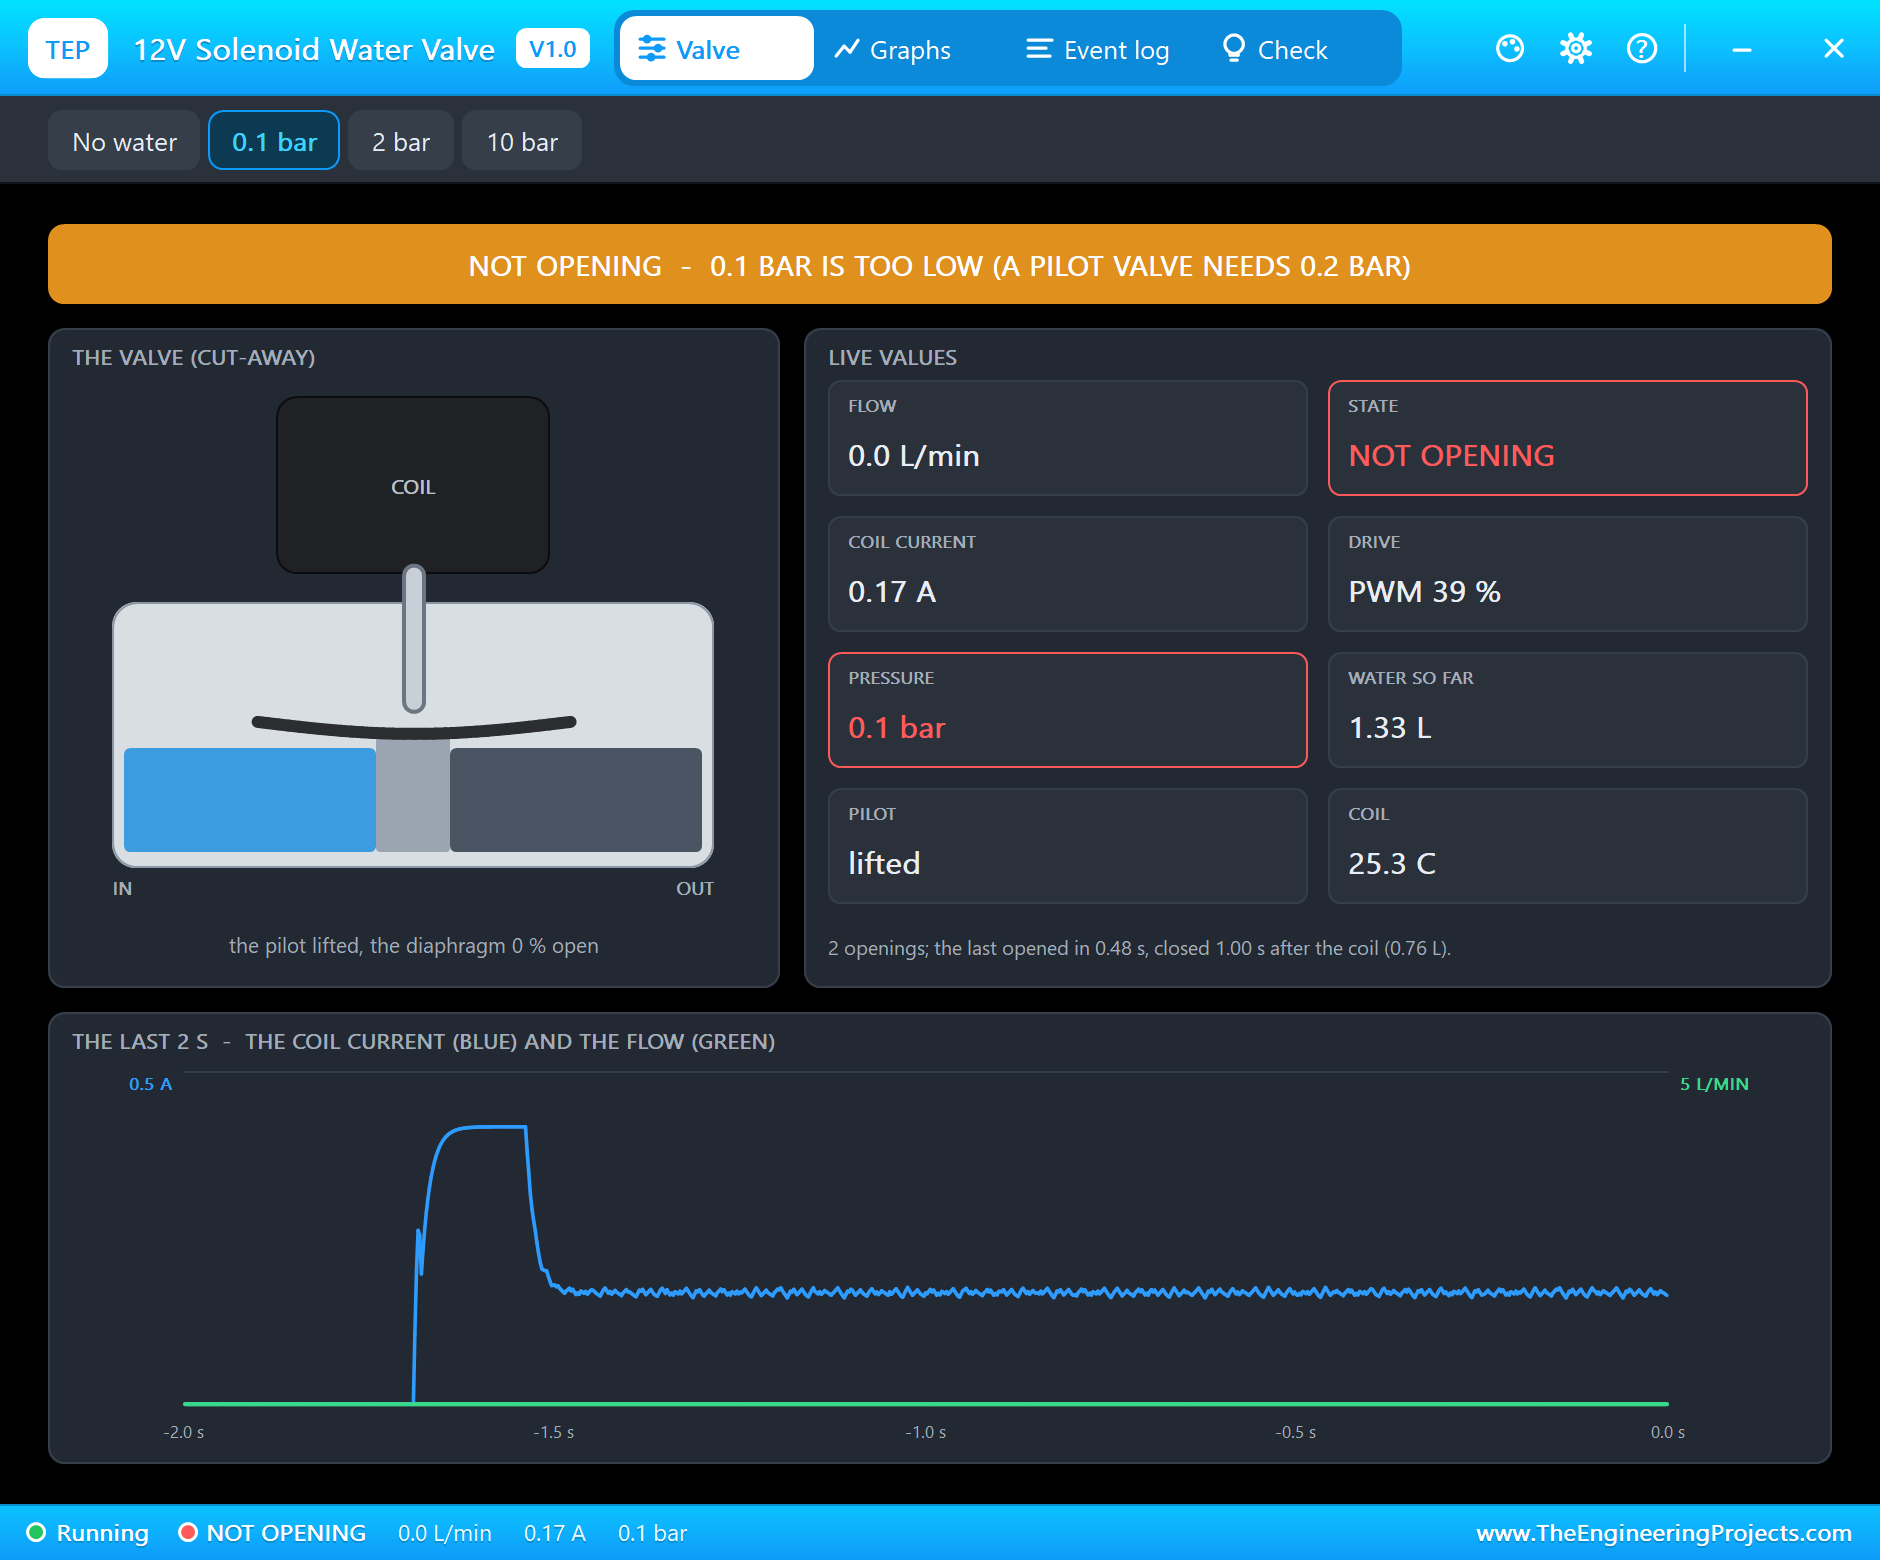
The coil does its job - the pilot is lifted - but nothing flows. The log explains: "NOT OPENING - the pilot is lifted, but 0.1 bar cannot lift the diaphragm: it needs 0.2 bar or more". This is the most common surprise with these valves: a pilot-operated valve is not for gravity-fed water. For a tank or a bucket, buy a "direct-acting" or "zero pressure" valve, whose coil lifts the main seal itself.
Too Much Pressure
Click 10 bar - over the valve's 8 bar rating - and type open again:
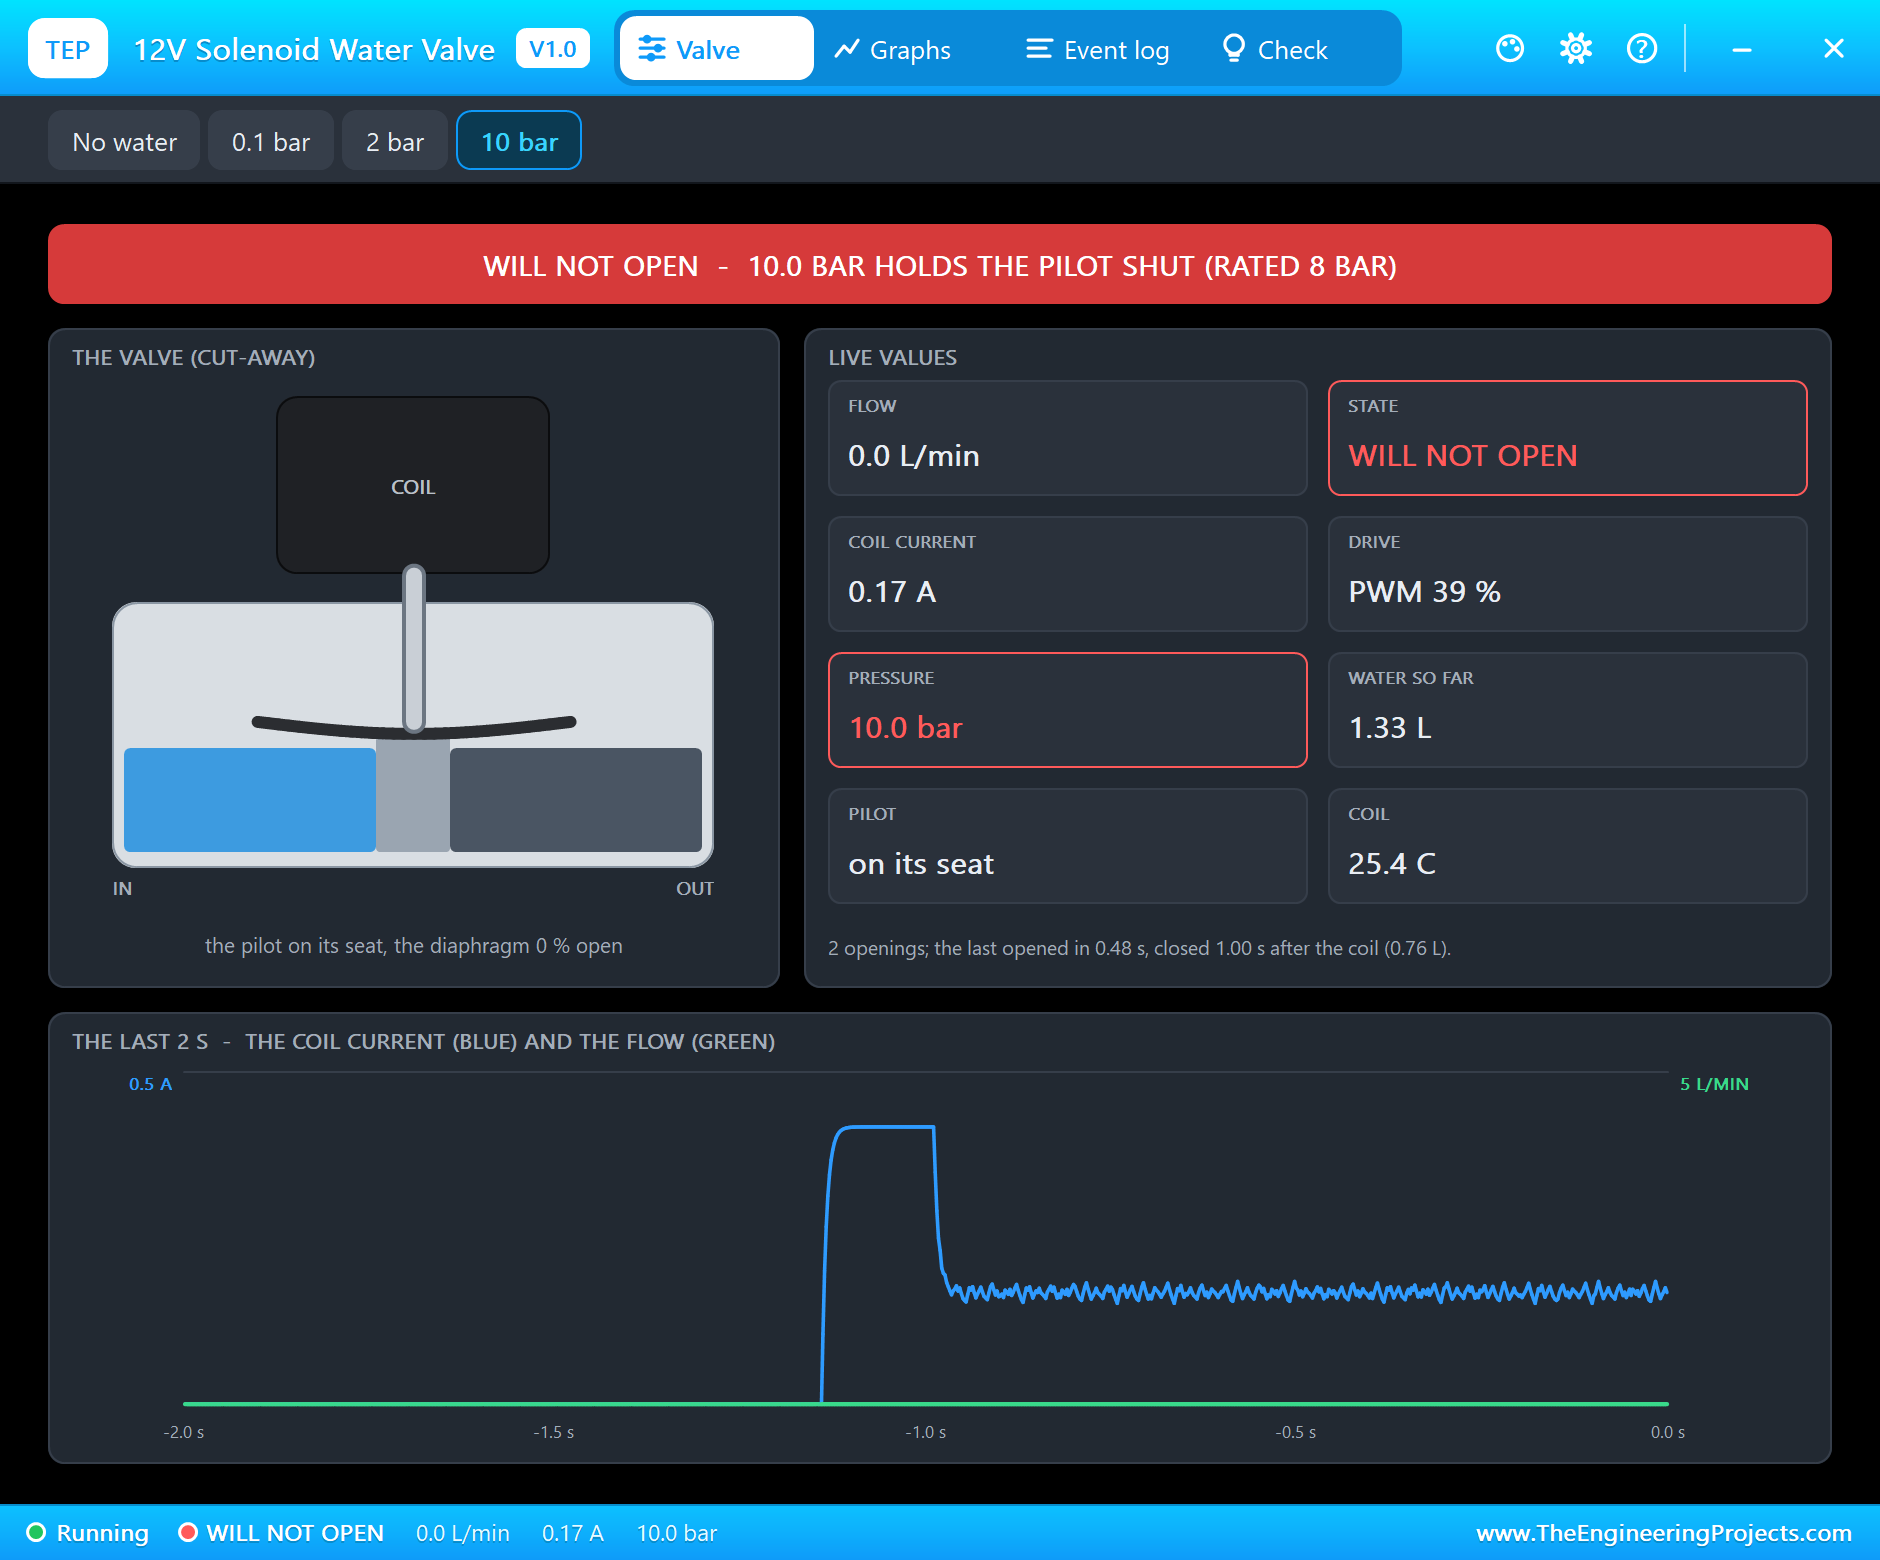
This time the plunger does not even move. The water pressing on the pilot hole adds to the spring, and the coil cannot beat them: "WILL NOT OPEN - the coil pulls 4.2 N at most, the spring and 10.0 bar push 4.9 N (rated 8 bar)". The 4.2 N is the best the coil managed during the full-voltage kick.
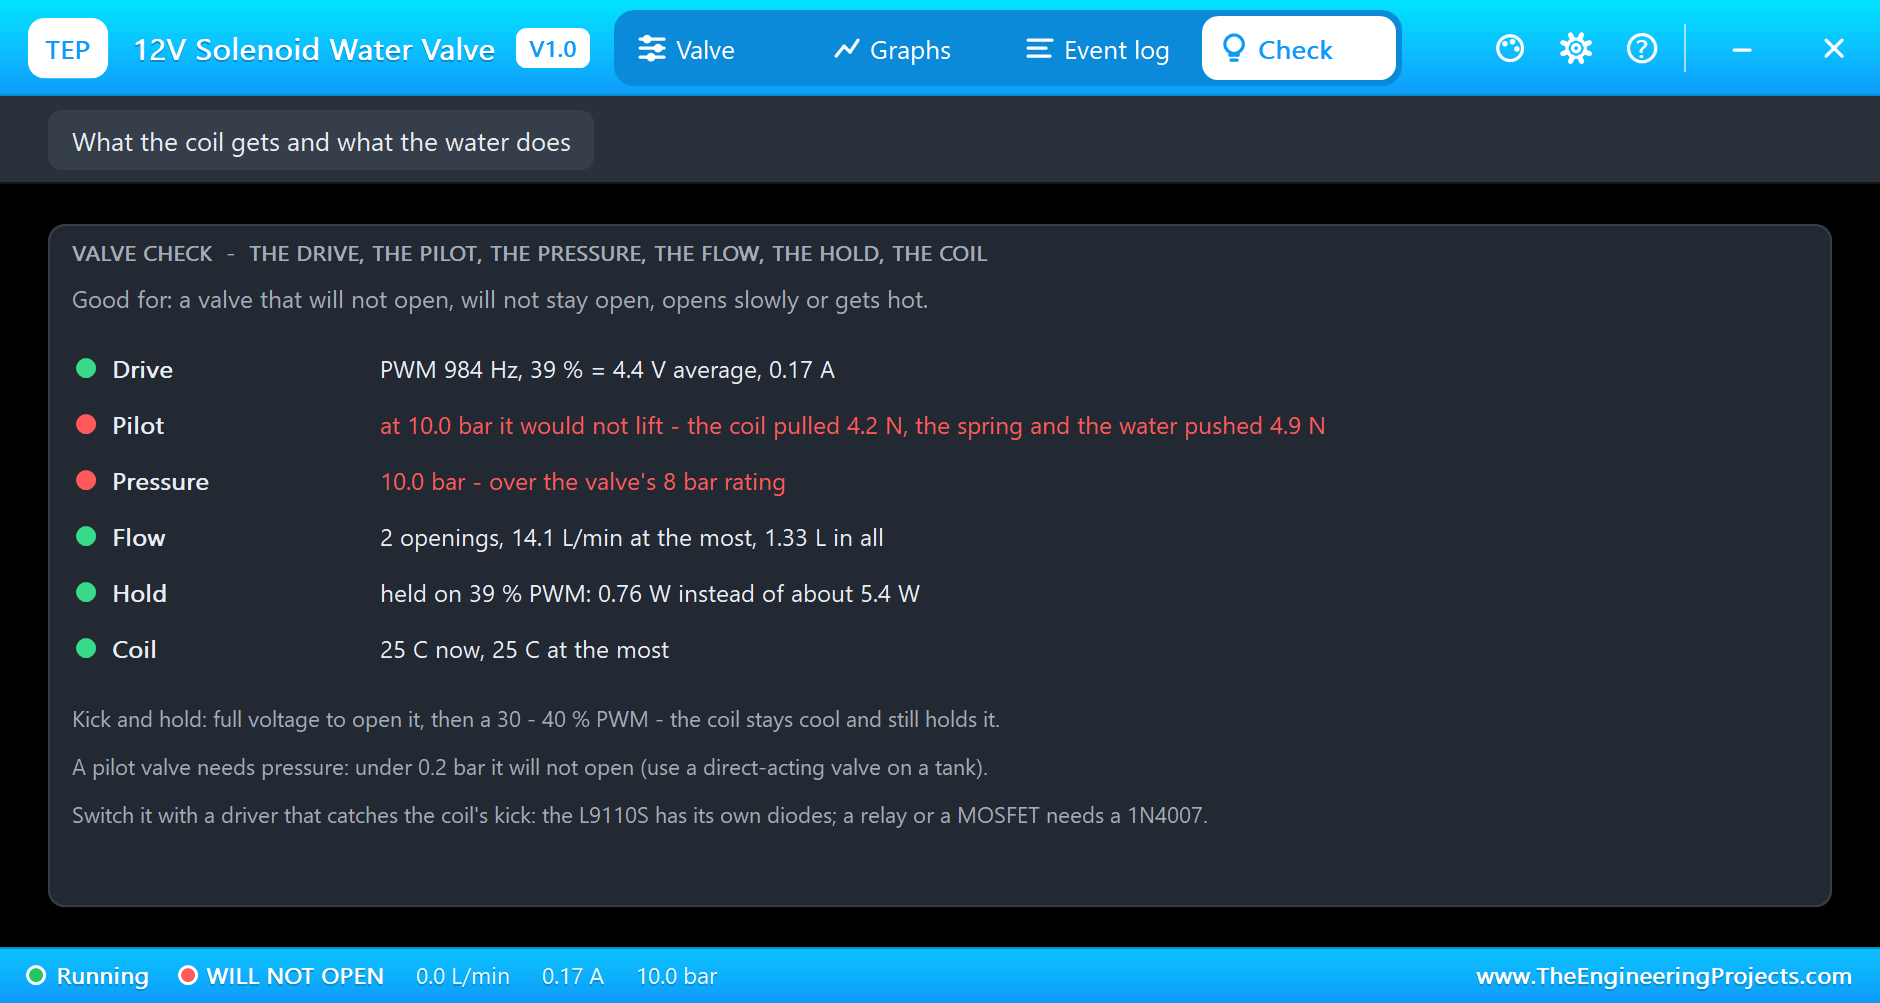
The Check page goes through the drive, the pilot, the pressure, the flow, the hold and the coil, each with a coloured dot. Here the Pilot row says "at 10.0 bar it would not lift - the coil pulled 4.2 N, the spring and the water pushed 4.9 N", the Pressure row says "10.0 bar - over the valve's 8 bar rating", and the Hold row shows what the PWM saves: "held on 39 % PWM: 0.76 W instead of about 5.4 W". The model's limit depends on the voltage the coil really gets: a weaker supply or a long thin cable lowers the pressure it can open against.
A Hold PWM That Is Too Low
Back to 2 bar. How low can the hold go? Try 20 %:
hold 20
Hold PWM 20 % (knob: RV1 again)
open
Open - 100 % for 150 ms, then hold at drive 20 % = 2.4 V average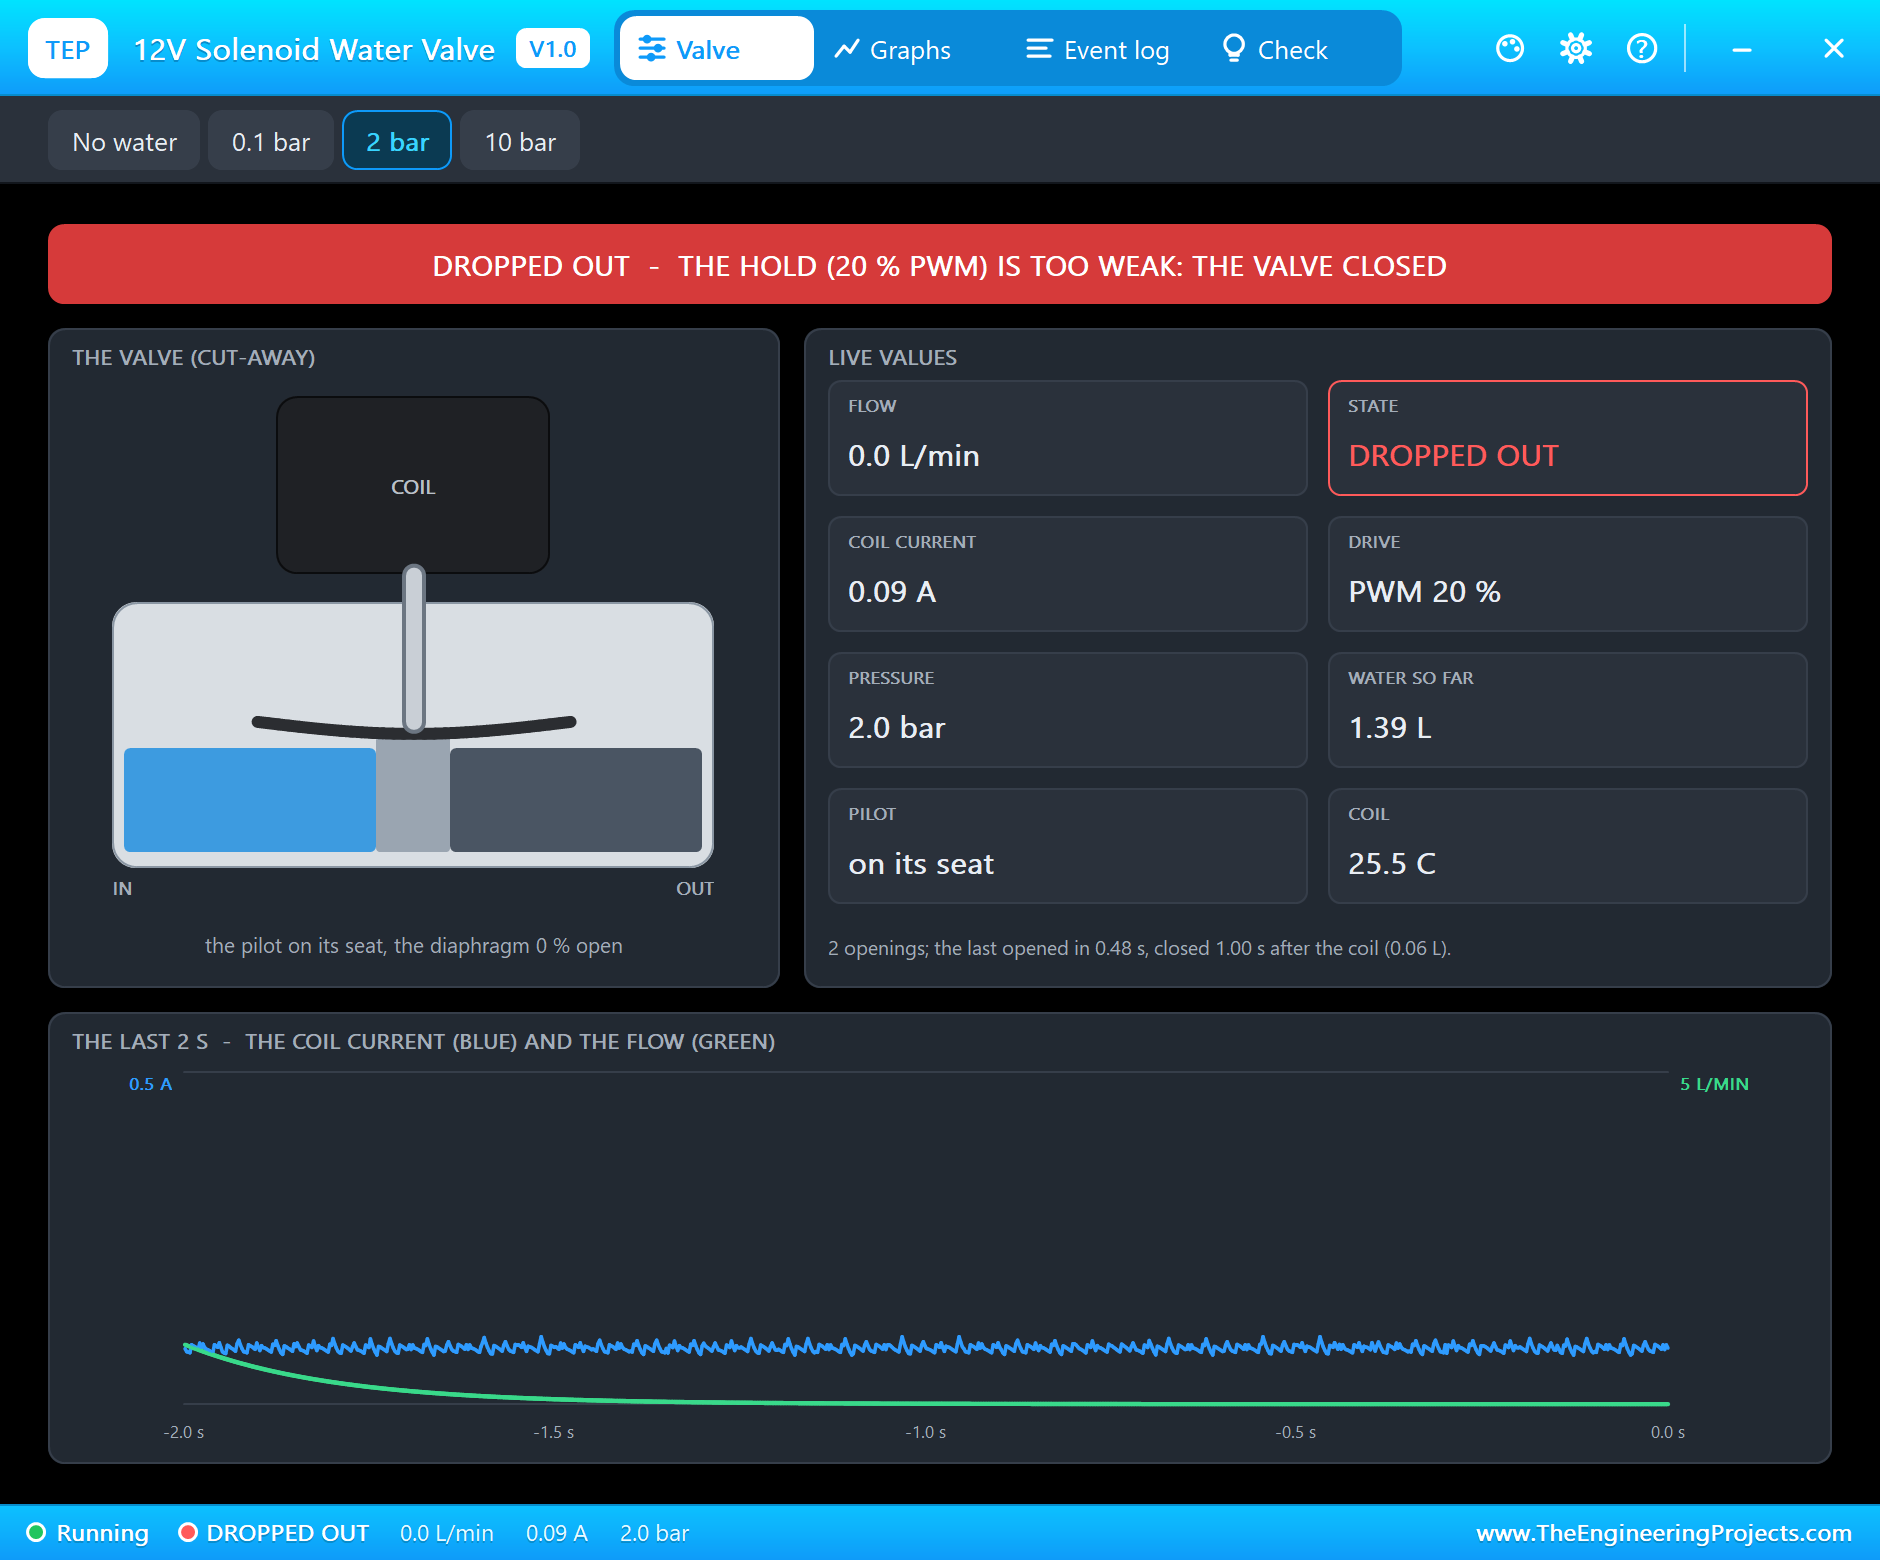
The kick opens the pilot as before, but 20 % cannot hold it (the PWM measured 19 %): "DROPPED OUT - the hold (19 % PWM, 0.085 A) is too weak: the pilot fell; it needs about 25 %". The diaphragm had only just started to lift, so very little water came through: "CLOSED with the coil still on - 0.06 L this time". In a real project this is a nasty fault - the coil is powered, the valve is shut - and it gets more likely as the coil warms, because a hot coil has more resistance and draws less current. Leave a margin: 30 to 40 %.
Full Voltage Instead
knob
Hold PWM from RV1
Hold PWM from RV1: 40 %
full
Full - drive 100 % = 12.0 V average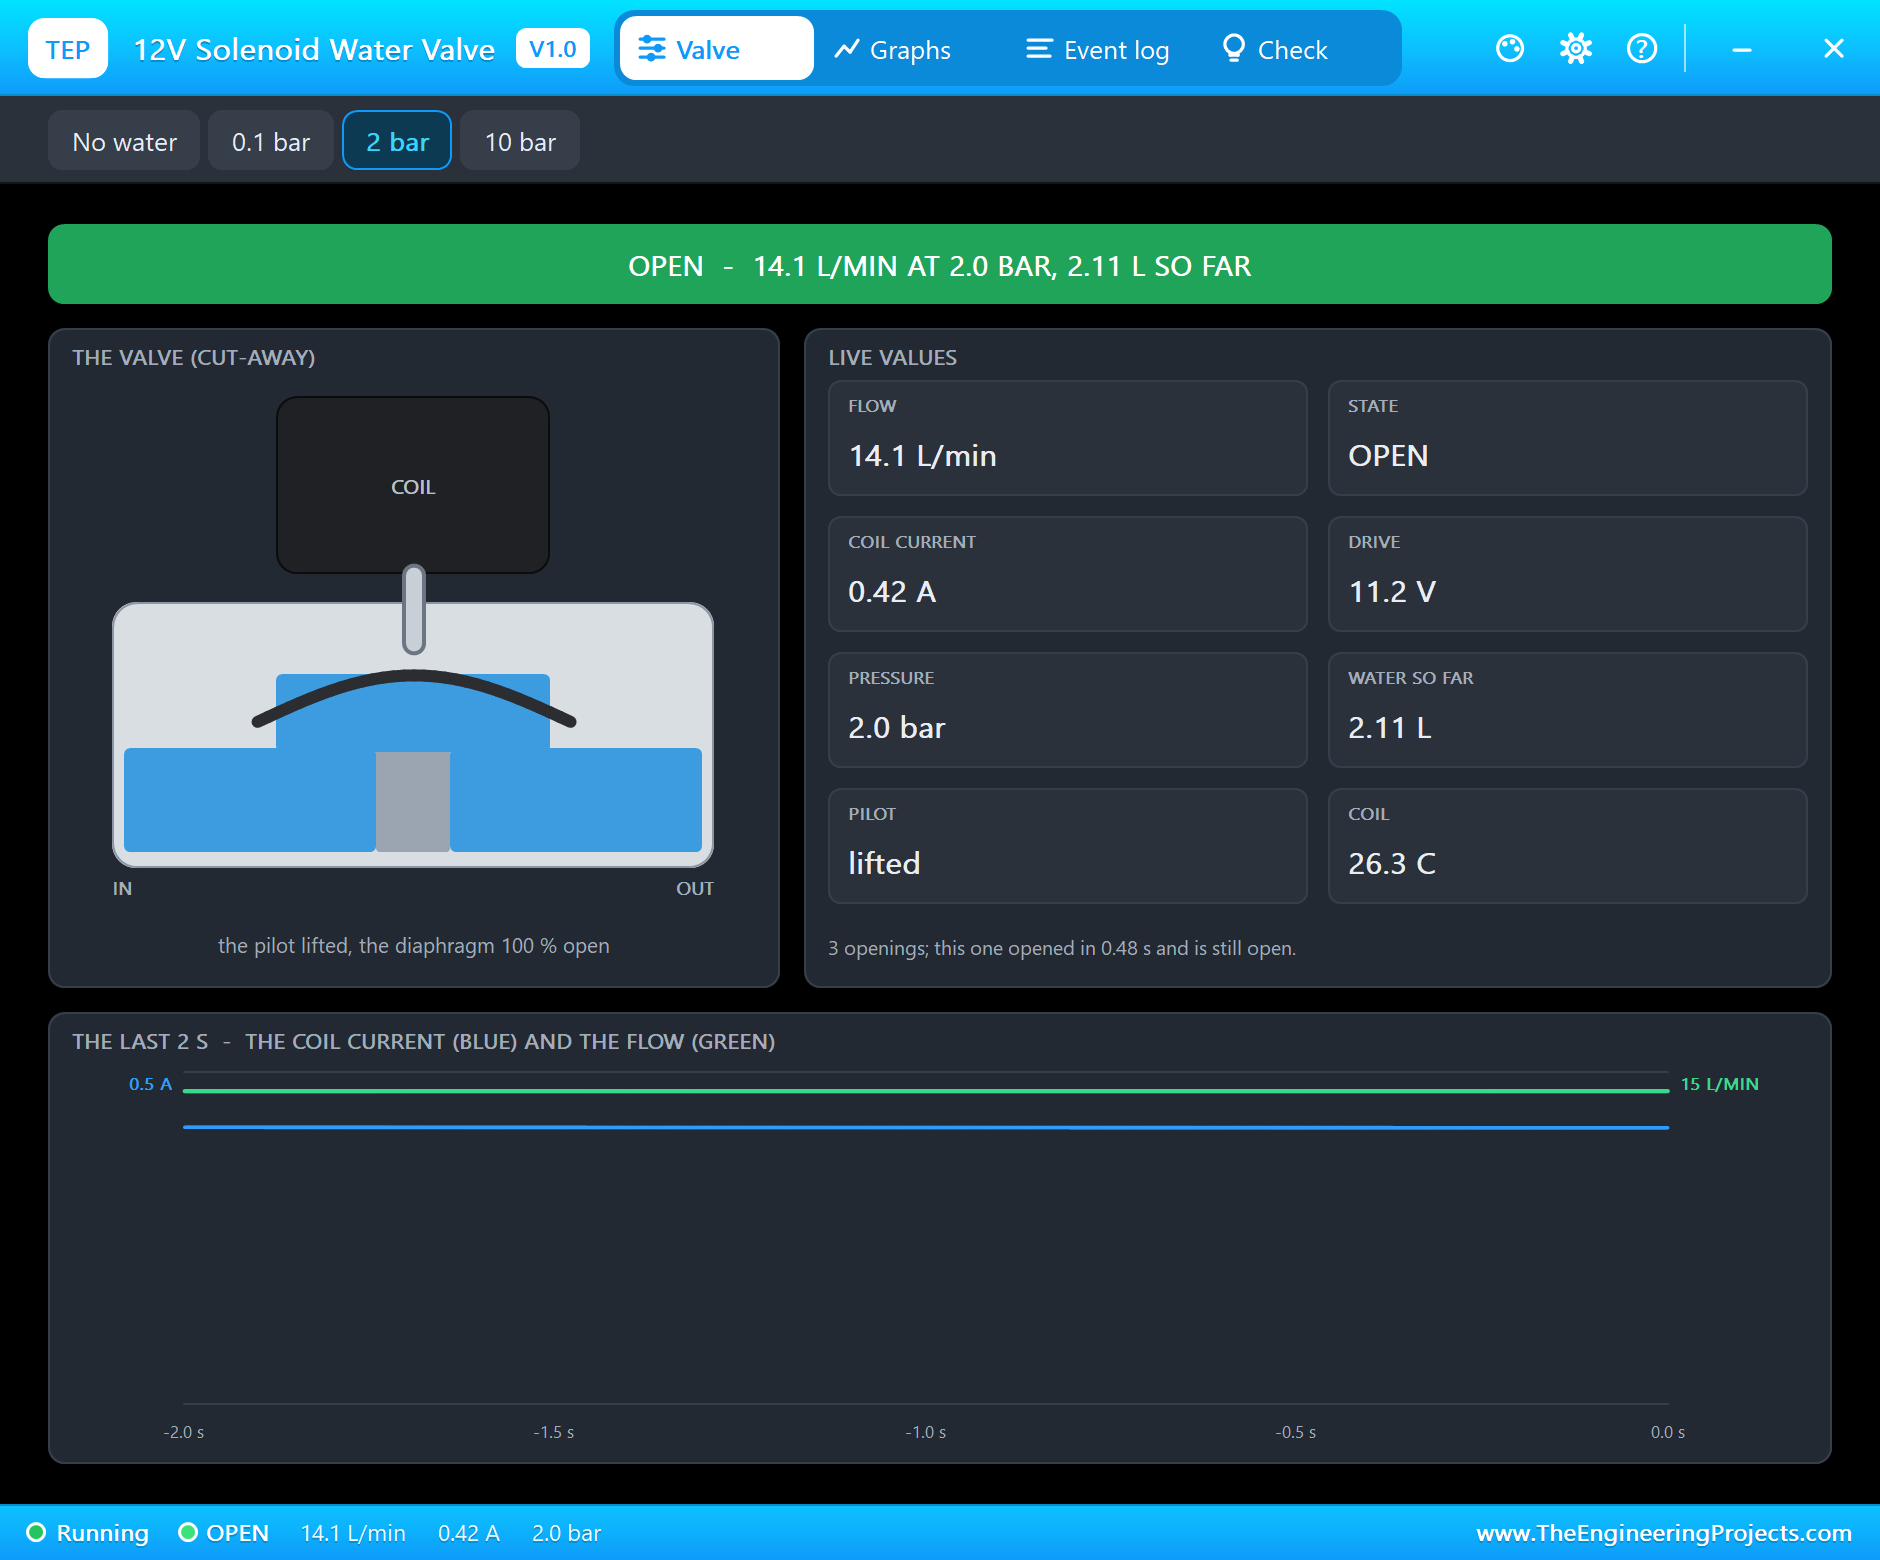
full keeps 100 % on the coil. The valve opens just the same, but the log shows the price: "steady drive: 11.15 V, 0.416 A (4.65 W) - the pilot lifted" - six times the power of the 40 % hold. For a few seconds that does not matter; for an hour of watering the coil gets hot. Our model heats it like the real thing: in the PC tests, ten minutes on 12 V took the coil to 73 C, while the 40 % hold kept it at 34 C.
Graphs and the Log
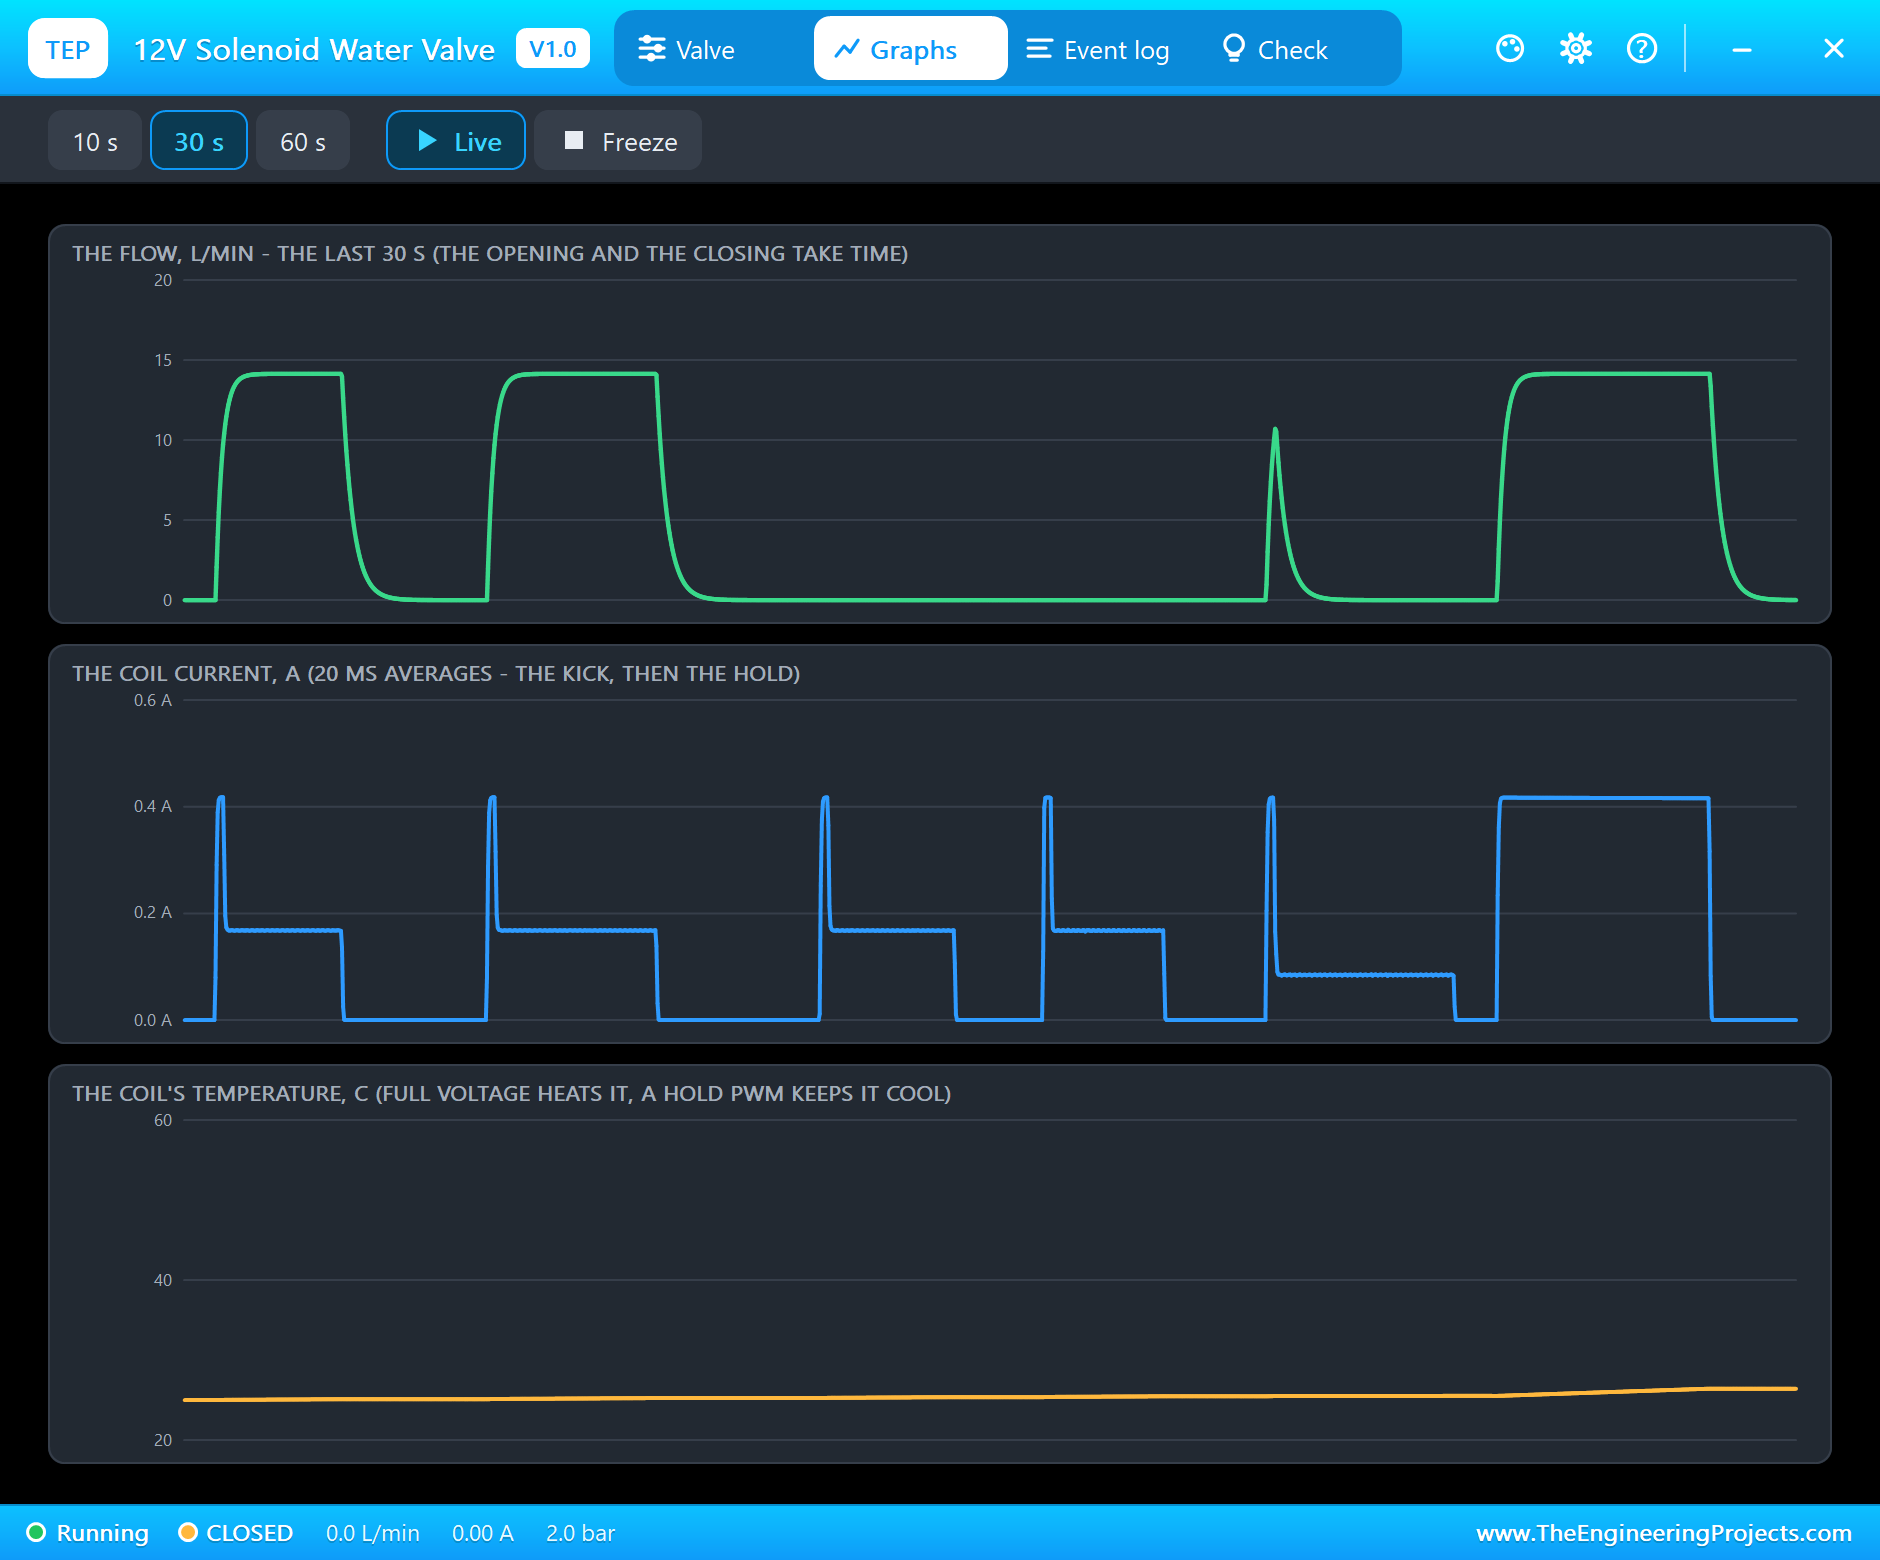
Graphs draws the flow, the coil current and the coil's temperature over the last 10, 30 or 60 seconds. The 30 s view shows the whole second half of the demo: a block of flow for every opening, each with its soft start and its slow fade; the current's short kicks to over 0.4 A and the long holds at 0.17 A, the 20 % hold at 0.08 A, and the last opening on a steady 0.42 A.
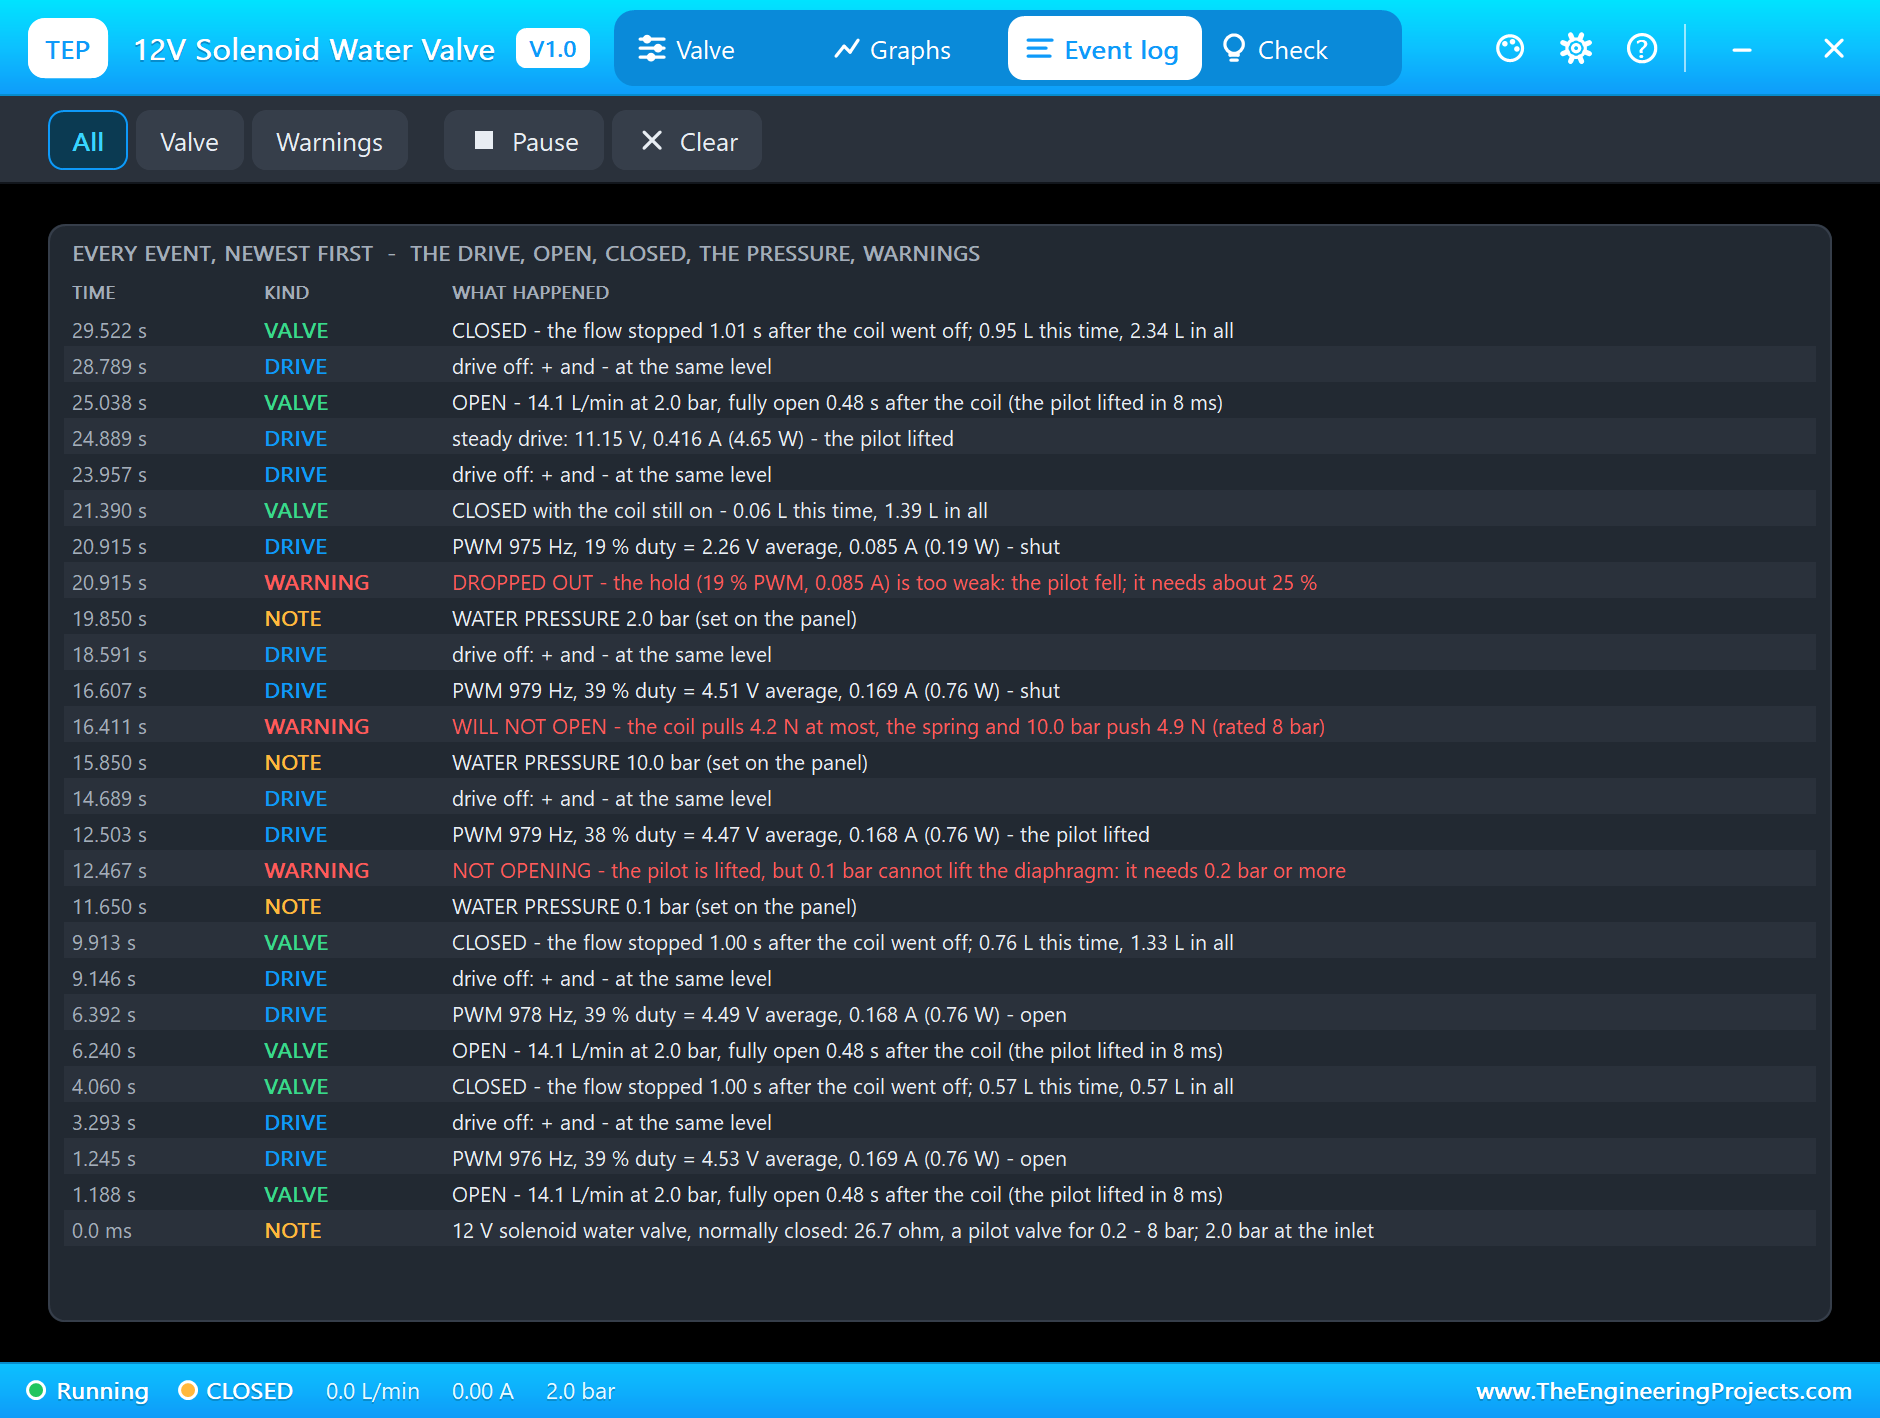
The Event log keeps every opening with its flow and timing, every closing with its litres, every drive change with its PWM frequency, duty and power, the pressure changes and the warnings. Filter it to Valve or Warnings, pause it, or clear it. Two more warnings you may meet: HOT when the coil passes 100 C, and OVER-VOLTAGE when it gets more than its rating.
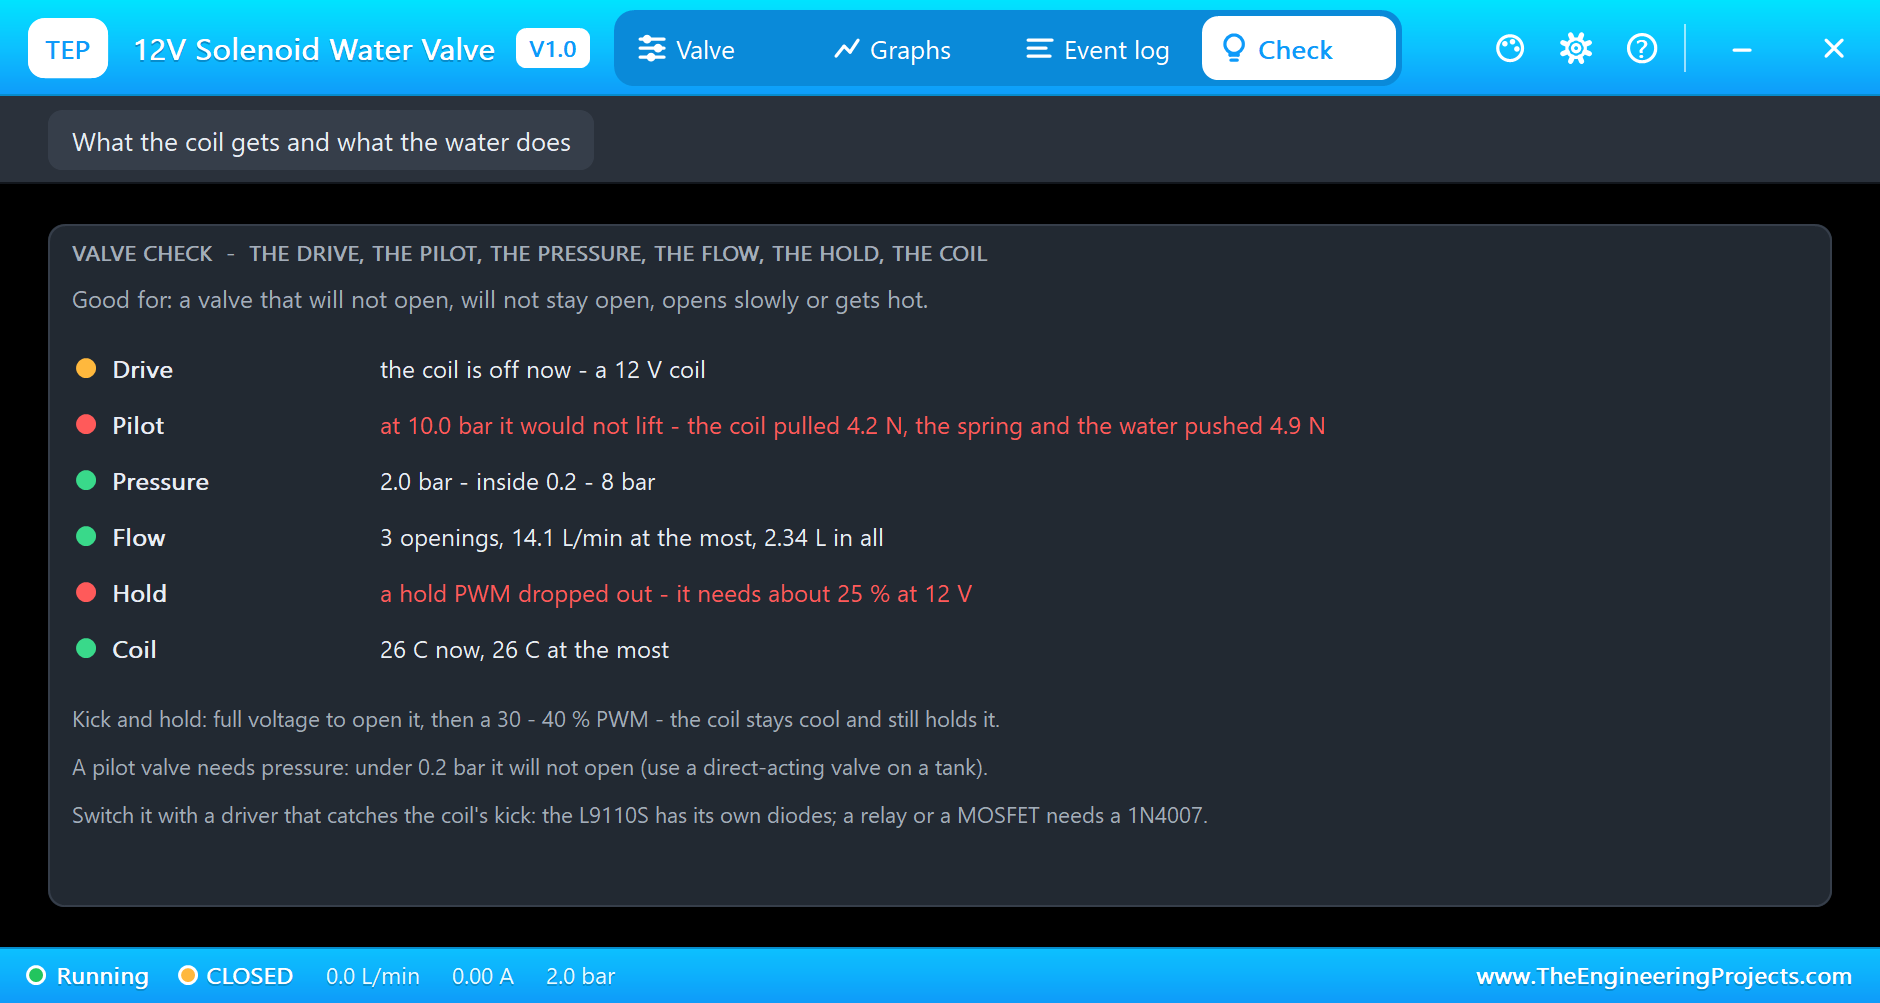
At the end of the run the Check page sums it up: 3 openings, 14.1 L/min at the most and 2.34 L in all; the Pilot row remembers the 10 bar attempt, the Hold row the drop-out, and the coil is at 26 C.
How the Model Works
The coil sits between + and - as 26.7 ohm with an inductance that depends on the plunger's gap: 170 mH with the plunger down on the pilot hole, 350 mH pulled in. At every analog step the model puts a conductance and a current source into the circuit for it, worked out from the coil's magnetic flux, so the driver and the coil are solved together and the current really dips and grows as the plunger moves. The step is held to 0.2 ms while current flows or the valve moves, and 2 ms at rest.
Between the analog points the mechanics run in sub-steps of at most 20 us. The plunger feels the coil's pull, its spring and the water on the 2.2 mm pilot hole. The diaphragm opens only with the pilot lifted and 0.2 bar or more - faster with more pressure - and closes as its chamber refills. The flow follows the opening and the square root of the pressure, Kv 0.6, and the coil warms with the current and cools to the air.
We checked the model on a PC with 10 automatic tests: kick and a 40 % hold at 2 bar gives 14.14 L/min, fully open 0.478 s after the coil, held at 0.80 W; it closes 1.002 s after the coil; no water and 0.1 bar give no flow; 10 bar holds the pilot shut, 8 bar opens; a 20 % hold drops out; ten minutes at 12 V reach 73 C against 34 C on the hold; and a 24 V valve on 24 V flows the same. The demo project is read back from disk with 69 checks.
Troubleshooting
- Nothing happens and nothing is logged: no voltage across + and -, or the driver has no +12V.
- NOT OPENING or NO WATER: the pressure is under 0.2 bar - a pilot valve needs pressure.
- WILL NOT OPEN: the pressure is over the rating, or the drive is too weak to lift the pilot - kick it with full voltage.
- DROPPED OUT: the hold PWM is too low - about 25 % is the least at 12 V.
- HOT: full voltage for a long time - use kick and hold.
- The valve is not simulated:
TEPVALVE.DLLis missing from MODELS and from the project folder. - No driver: install our L9110S library (
TEPL9110S.LIBandTEPL9110S.DLL). - No UNO or no monitor:
TEPARDUINO.DLLis missing; a closed monitor opens again with a click on the UNO's USB port. - No pop-up: click OPEN PANEL on the valve's strip, or turn "Open the panel at Run" on in its Settings.
Things to Know Before Wiring a Real Solenoid Valve
- Use a driver: a 1/2" 12 V valve draws about 0.4 to 0.5 A - an L9110S, an L298N, a MOSFET module or a relay, never an Arduino pin.
- Catch the kick: with a relay or a single MOSFET, fit a 1N4007 across the coil, its cathode on +. The L9110S has its own diodes.
- Check the type: a pilot-operated valve needs about 0.2 bar; for a tank or a bucket use a direct-acting valve.
- Mind the arrow: the flow arrow on the body shows the way the water must go - fitted backwards, the valve leaks.
- Kick and hold: for long openings, open with full voltage and hold with a 30 to 40 % PWM - the coil runs much cooler and lasts longer.
Limitations of the Simulation
- Not modelled: water hammer, the pipes' own pressure drop, a dirty or blocked valve, a direct-acting valve and the manual bleed screw.
- The plate, the ON LED, the cut-away window, the falling water, the rating line and the strip are TEP additions.
- The model is our own, written from the typical data of 12 V 1/2" solenoid water valves; this library is not made or endorsed by any valve maker, Arduino or Labcenter.
- Licences: the demo HEX contains the Arduino AVR core 1.8.6 (LGPL); the sketch is included and the README gives the source link. The L9110S driver of the demo is our separate library.
- Tested in Proteus 8.5 in October 2026 with the demo as shipped: kick and hold, close, a timed watering, 0.1 bar, 10 bar, a 20 % hold, full voltage, and all four pages of the pop-up. Proteus 7 is not supported.
So, that was all about the 12V Solenoid Water Valve Library for Proteus V1.0. I hope it helps you with your watering system, your dispenser or your aquarium - and that kick and hold keeps your coils cool. If you have any questions, ask in the comments and I will help you out. Till the next tutorial, take care and have fun!