Hello friends, I hope you all are doing great. Today, I am going to share the Arduino MKR WAN 1310 Library for Proteus. The MKR WAN 1310 is Arduino's small long-range board: a SAMD21 processor and a Murata LoRa module on a slim 25 mm wide board, made for sensors far away from any Wi-Fi. With this library it runs your Arduino sketch in Proteus 8.5, and its radio really talks to our other LoRa boards in the same design.
Arduino MKR WAN 1310 Library for Proteus
Latest version: V1.0 (November 2026, this tutorial)
Other new Arduino boards: UNO R4 WiFi · Nano ESP32 · UNO WiFi Rev2 · Nano 33 IoT · UNO Q · UNO R4 Minima · Nano Every · MKR WiFi 1010 · Nano RP2040 Connect · STM32 Black Pill · Nucleo-F401RE · STM32 Blue Pill · Teensy 4.1 · Arduino Due · Arduino Leonardo · Arduino Micro · BBC micro:bit V2 · GIGA R1 WiFi · Nano 33 BLE Sense · XIAO nRF52840 Sense · RAK4631 WisBlock · Nano Matter
LoRa modules: SX1278 Ra-02 · RFM95W · SX1262
RF modules: nRF24L01 · nRF24L01 PA LNA · CC1101 · RFM69HCW · HC-12 · 433MHz RF · XBee
Distance and motion sensors: Ultrasonic HC-SR04 · JSN-SR04T · Sharp IR · TF-Luna LiDAR · VL53L0X · PIR HC-SR501 · RCWL-0516 · IR Obstacle FC-51
Helping Tools
- Laptop WiFi Monitor: a laptop on the Wi-Fi of your design: a browser, a TCP / UDP terminal and ping
- Mobile WiFi Monitor: a smartphone that opens the pages of your board and sends it commands
- Serial Monitor Advance: a serial terminal window for the UART of your board
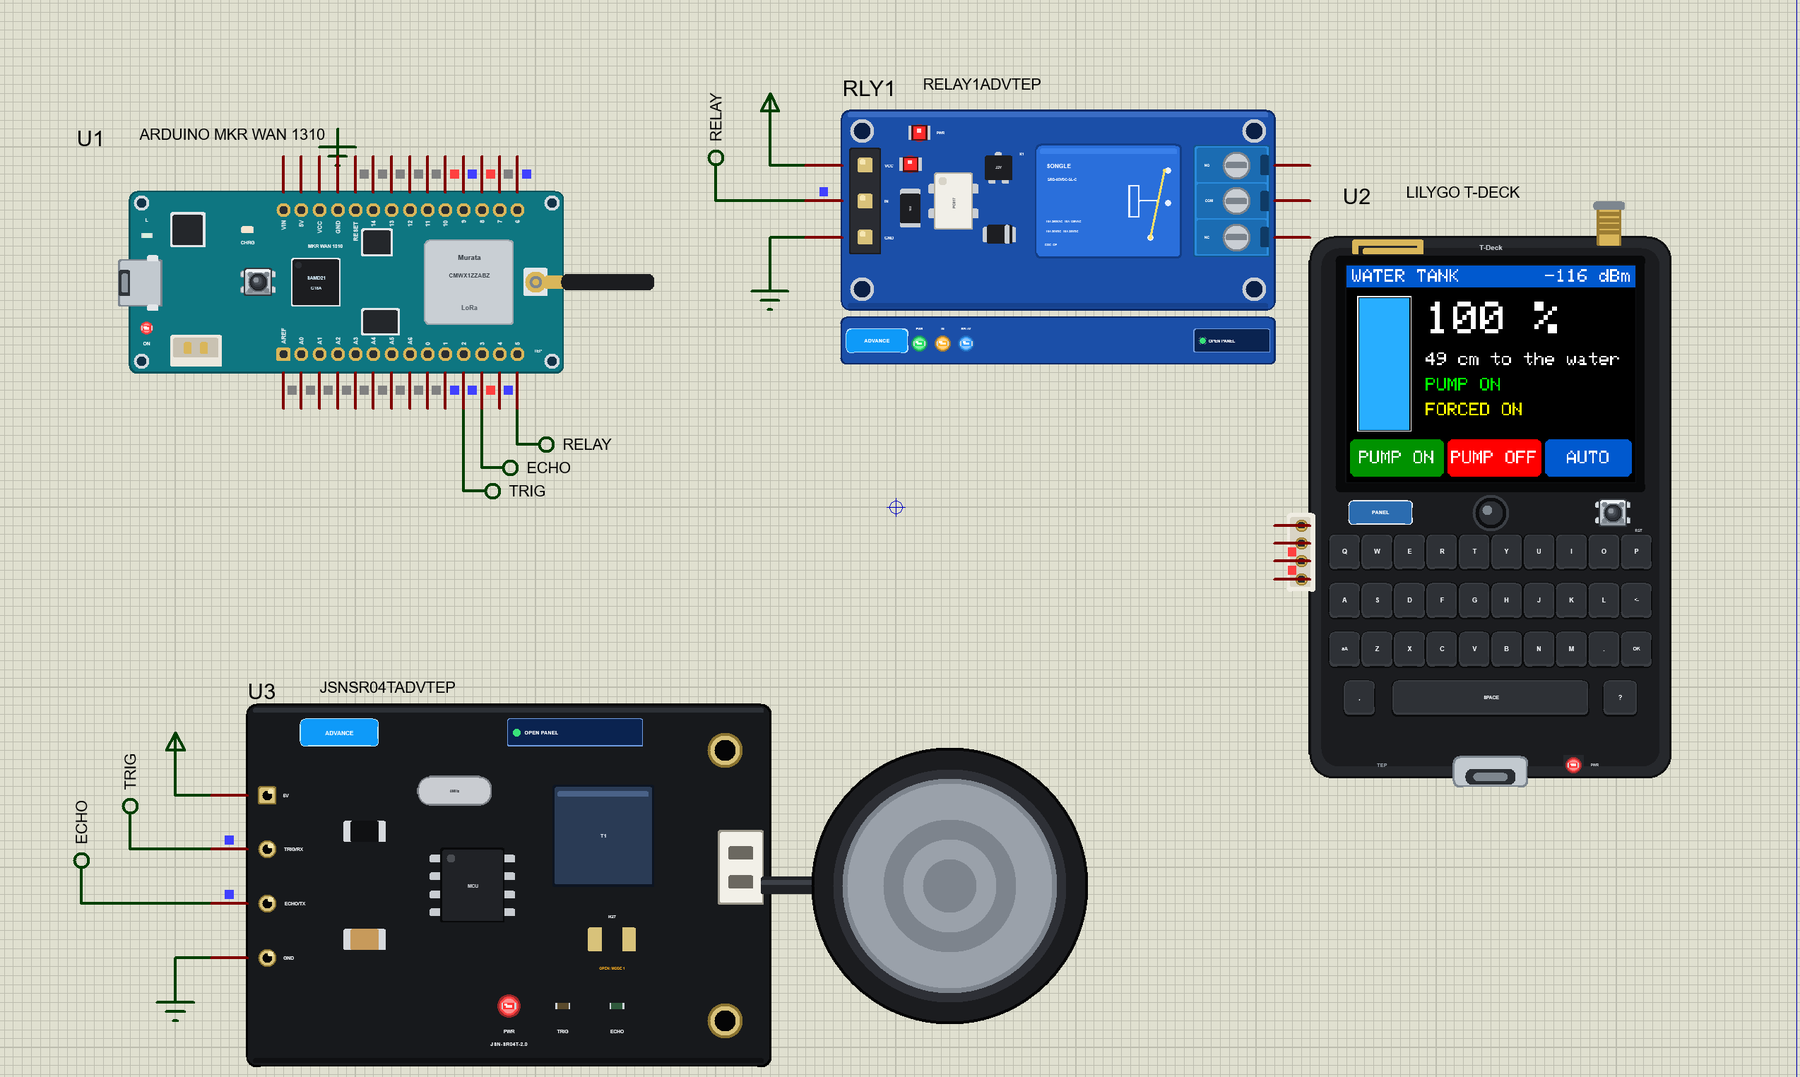
For the demo we built a LoRa water tank monitor. The MKR WAN 1310 stands at a tank at the far end of a field, with a waterproof JSN-SR04T ultrasonic sensor in the lid and a relay for the pump. Our LilyGO T-Deck Library for Proteus is the handheld, 2 km away. It shows the level on its screen, and a tap on the glass switches the pump. There is not a single wire between the two.
NOTICE: Proteus has no SAMD21 model, so our team has put a lot of effort into building this board ourselves: the MKR's pins, its LoRa radio and its serial monitor are all our own model, and your sketch compiles with our free TEP Boards for Proteus add-on. Your feedback is the fuel that keeps us going, so please tell us what you think in the comments below or in the Arduino MKR WAN 1310 board of our forum. And if our free libraries help you, you can buy us a coffee. So, let's get started with the Arduino MKR WAN 1310 Library for Proteus:
What is the Arduino MKR WAN 1310?
The MKR WAN 1310 belongs to Arduino's MKR family of slim boards. Its main processor is a SAMD21G18A, an Arm Cortex-M0+ at up to 48 MHz, with 256 KB of flash and 32 KB of SRAM. The radio is a Murata CMWX1ZZABZ module, a metal can with its own STM32L0 processor and a Semtech SX1276 radio inside, and it transmits at up to +20 dBm. The board also carries an ATECC508 crypto chip, a 2 MB W25Q16 SPI flash and a battery charger. The antenna is a separate dipole on a small u.FL socket.
| MKR WAN 1310 | MKR WiFi 1010 | T-Deck | |
|---|---|---|---|
| Processor | SAMD21 | SAMD21 | ESP32-S3 |
| Radio | LoRa | Wi-Fi | LoRa, Wi-Fi |
| Screen and keys | none | none | colour screen, keyboard |
| I/O voltage | 3.3 V | 3.3 V | 3.3 V |
| Best for | far-away sensors | sensors near a router | handhelds |
LoRa or LoRaWAN?
These two words are easy to mix up. LoRa is the radio itself: the way the bits travel through the air. Two boards with the same settings can talk to each other directly, and nobody else is involved. LoRaWAN is a network built on top of that radio, with gateways, a server and registered devices, such as The Things Network. Arduino's page for this board shows both paths: the MKRWAN library for public networks, and the Arduino LoRa library for board-to-board links.
This library is for the second path. A LoRaWAN join needs a network server, and there is none inside a simulation, so the MKRWAN library is not modelled. The add-on brings a LoRa library with the same calls and the same defaults as the Arduino LoRa library, so a board-to-board sketch moves to the real product without changes.
Why LoRa Suits a Water Tank
A tank in a field is a hard job for most radios. Wi-Fi does not reach it, a SIM card costs money every month, and there may be no mains socket. A level only changes slowly, so the tank has very little to say: a few bytes every so often. LoRa is made for exactly this. It gives up speed to reach kilometres, on licence-free frequencies. For the same reason it is a poor choice for pictures or sound, but a perfect one for a number that changes a few times an hour.
Features of the Arduino MKR WAN 1310 Library for Proteus
- The MKR WAN 1310 as it looks: the teal board, the two rows of pads with their labels, the SAMD21, the Murata can, the u.FL socket and the antenna, with our small TEP signature.
- Your sketch: a .hex for "Arduino MKR WAN 1310 (TEP Proteus)" with the MKR's pin numbers D0 to D14 and A0 to A6.
- LoRa by air: the add-on's LoRa library, with no wires between the boards.
- One air for all: it hears our T-Deck, T-Beam Supreme and Heltec V3 when the settings agree.
- A real link budget: the LORADIST property sets the distance, and the RSSI and SNR follow from it.
- Serial Monitor: click the USB port, with Monitor, Plotter and Board tabs.
- A complete package: about 4.0 MB with the part, the add-on, the T-Deck, the JSN-SR04T and relay libraries and the demo, without the source code of the models.
The Arduino MKR WAN 1310 in Proteus
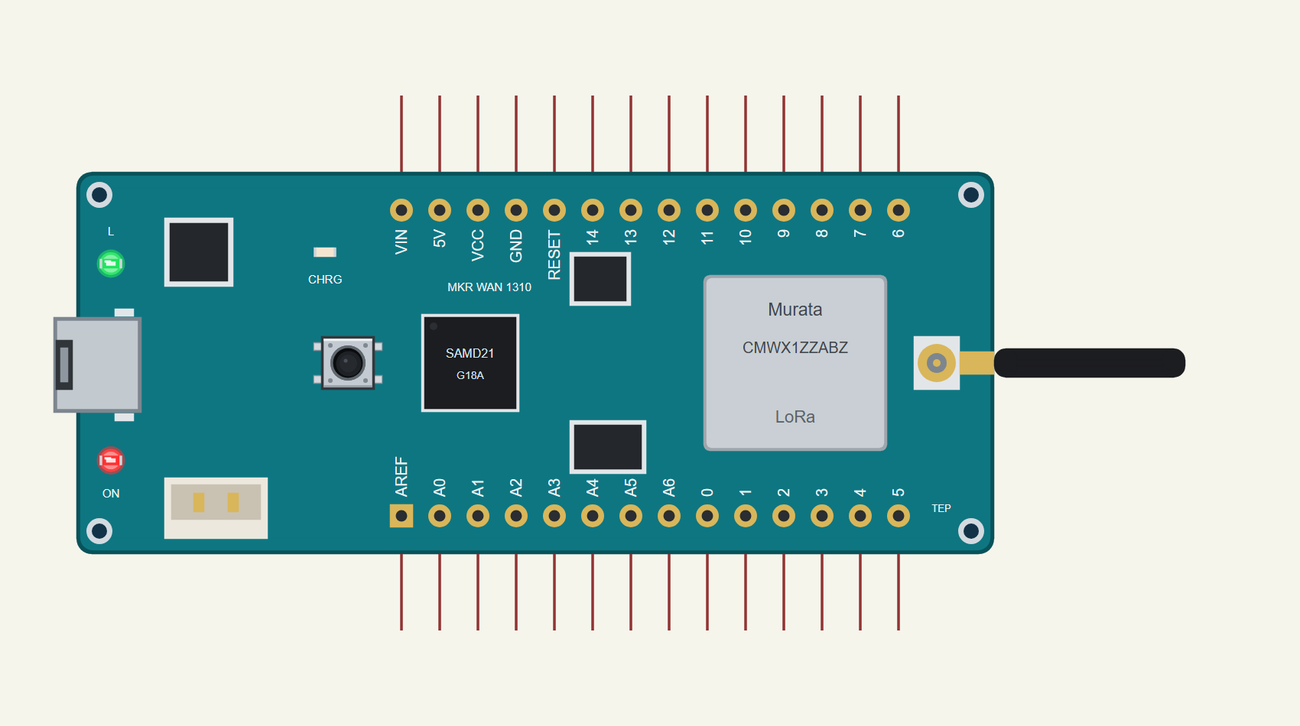
Search MKR WAN in Pick Devices; the device is in TEPMKRWAN.LIB (Microprocessor ICs, Arduino LoRa Boards), with the prefix U. Click the USB port for the serial monitor. The board has no Wi-Fi, so unlike our Arduino MKR WiFi 1010 Library for Proteus it has no PANEL pad.
The Pins
| Pins | What the library does with them |
|---|---|
| D0 to D7 | GPIO, PWM, interrupt |
| D8, D9, D10 | SPI MOSI, SCK and MISO, or GPIO |
| D11, D12 | Wire SDA and SCL, or GPIO |
| D13, D14 | Serial1 RX and TX, or GPIO |
| A0 to A6 | analogRead 0 to 1023 for 0 to 3.3 V, or GPIO |
| VCC, 5V, GND | 3.3 V, 5 V and ground |
| RESET | the board's reset |
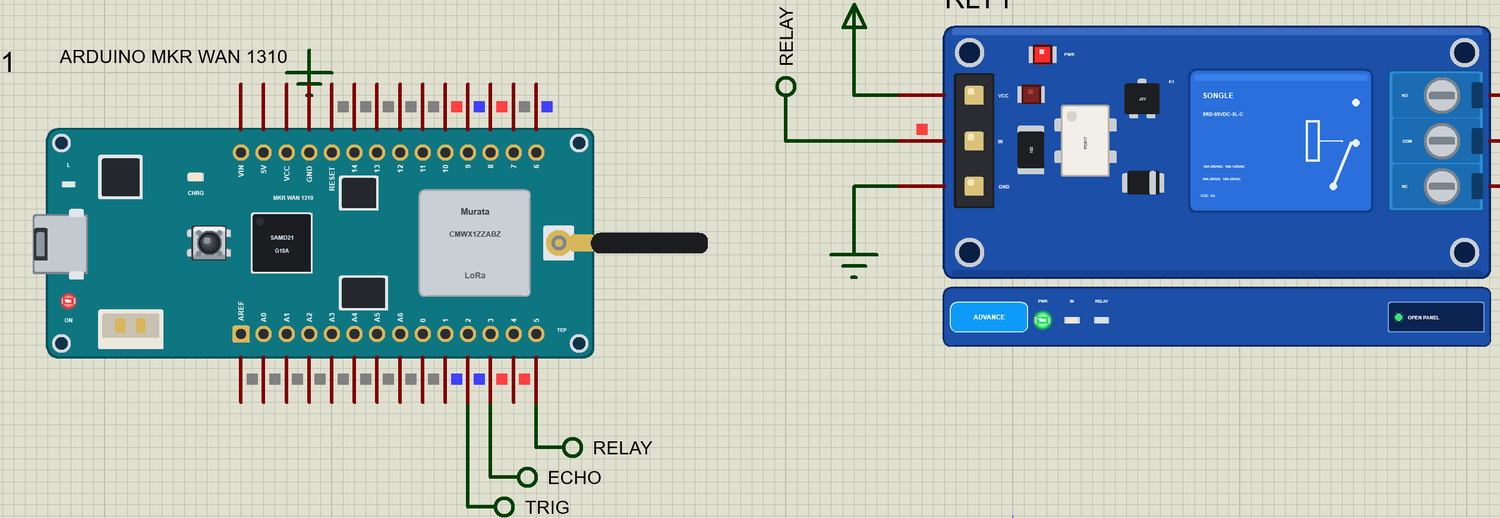
The L LED is on D6, which the sketch calls LED_BUILTIN. Serial is the USB port, and it goes straight to the built-in monitor. The crypto chip, the SPI flash, the charger and the battery are not modelled.
Download Arduino MKR WAN 1310 Library for Proteus
Click the button below to download Arduino-MKR-WAN-1310-Library-for-Proteus-v1.0.zip (about 4.0 MB, without the source code of the models):
Arduino MKR WAN 1310 Library for Proteus V1.0- README.txt: installation, the demo, the pins, the properties, troubleshooting and the limits.
- Proteus Library Files:
TEPMKRWAN.LIBand the demo's parts:TEPTDECK.LIB,TEPJSNSR04T.LIBandTEPRELAY.LIB. - Proteus Model Files:
TEPNET.DLL,TEPJSNSR04T.DLLandTEPRELAY.DLL. - Arduino Code: the two demo sketches and the TEP Boards for Proteus add-on 1.54.0, with its LoRa library.
- Proteus Simulation: the demo project, its two HEX files and copies of the DLLs.
No Proteus yet? Read How to Download and Install Proteus 7 and 8. New to libraries? Follow How to Install a New Library in Proteus.
How to Install Arduino MKR WAN 1310 Library for Proteus
- Close Proteus and extract the whole zip file, for example to your Desktop.
- Copy the files from Proteus Library Files into the LIBRARY folder of Proteus.
- Copy the DLLs from Proteus Model Files into the MODELS folder, replacing an older TEPNET.DLL.
- Delete
TEPMKRWAN.IDXfrom the LIBRARY folder if it is there. - For your own sketches, copy Arduino Code\TEP Boards for Proteus\hardware into your Arduino sketchbook (Documents\Arduino) and restart the Arduino IDE; the board is Arduino MKR WAN 1310 (TEP Proteus). The LoRa library comes with the add-on. The T-Deck's sketch also needs RadioLib, Adafruit ST7735 and ST7789, Adafruit GFX and Adafruit BusIO from the Library Manager.
- Start Proteus, press P and search for MKR WAN.
Demo: a LoRa Water Tank Monitor
Anyone who looks after a farm, a village water supply or a large garden knows the walk out to the tank. Is it full? Is the pump still running? An empty tank means thirsty animals, and a forgotten pump means wasted water and a burnt motor. A small board that measures the level, runs the pump by itself and reports to your pocket saves that walk, and it needs no network at all.
Open MKR-WAN-1310-Tank-Monitor.pdsprj. U1 runs MKRWAN_Tank_Node.hex. U3 is the sensor from our JSN-SR04T Waterproof Ultrasonic Sensor Library and RLY1 comes from our Relay Module Library, both in the Advance version. U2 is the T-Deck, running TDeck_Tank_Reader.hex. The LORADIST property of both boards is 2 km. The monitors are the same window as our TEP Serial Monitor Advance for Proteus.
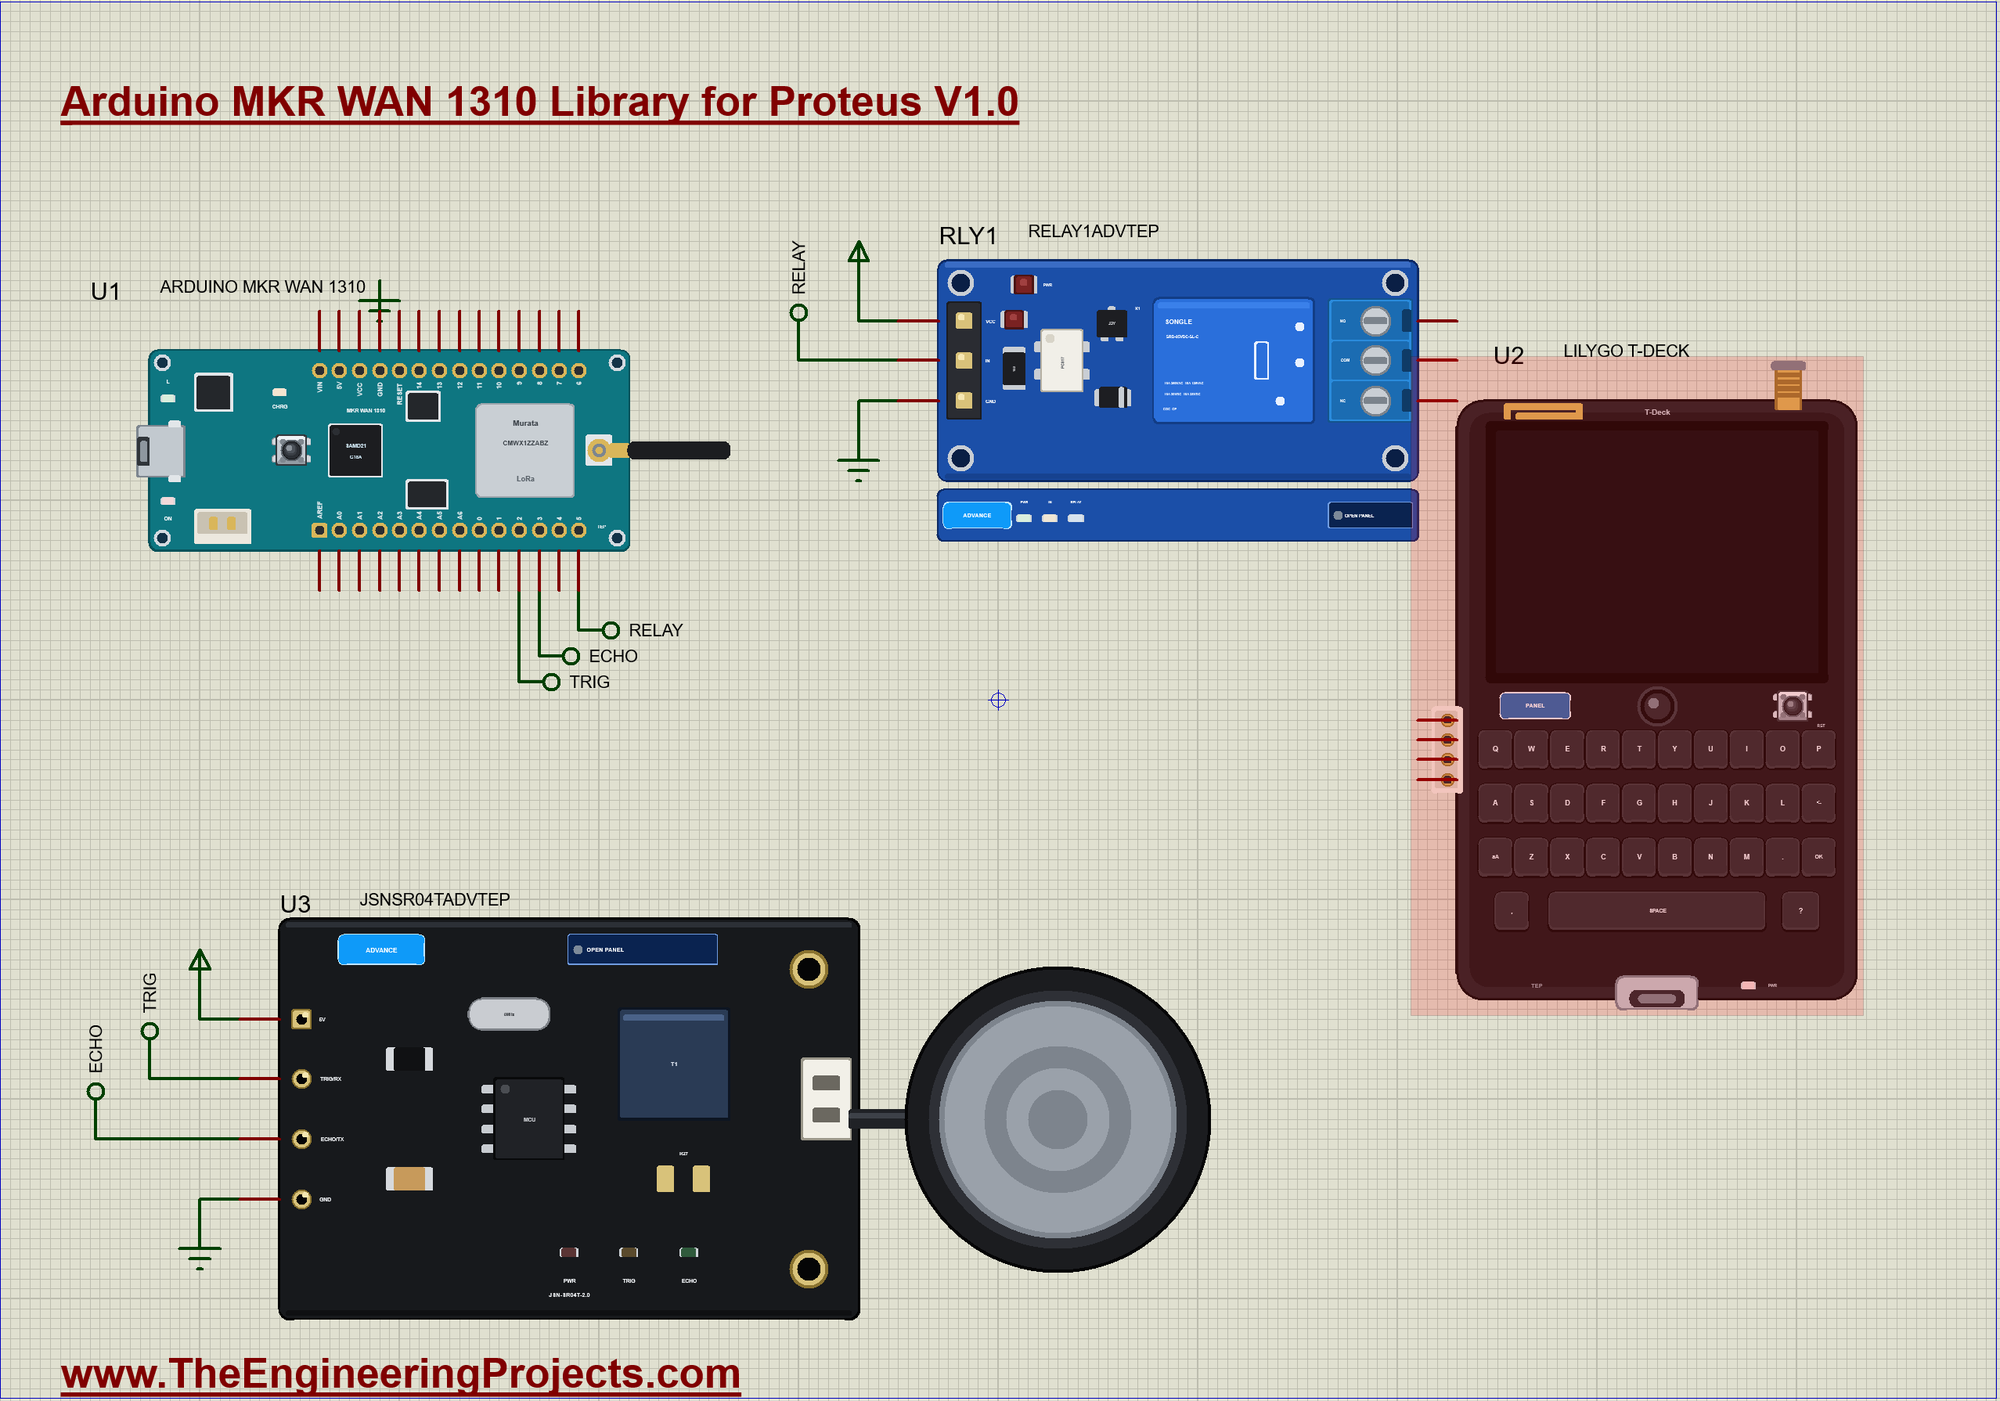
| Part | Pin | MKR WAN 1310 pin | What it does |
|---|---|---|---|
| JSN-SR04T | TRIG | D2 | starts a measurement |
| JSN-SR04T | ECHO | D3 | HIGH for the sound's round trip |
| Relay module | IN | D5 | LOW switches the pump on |
Measuring Water with Sound
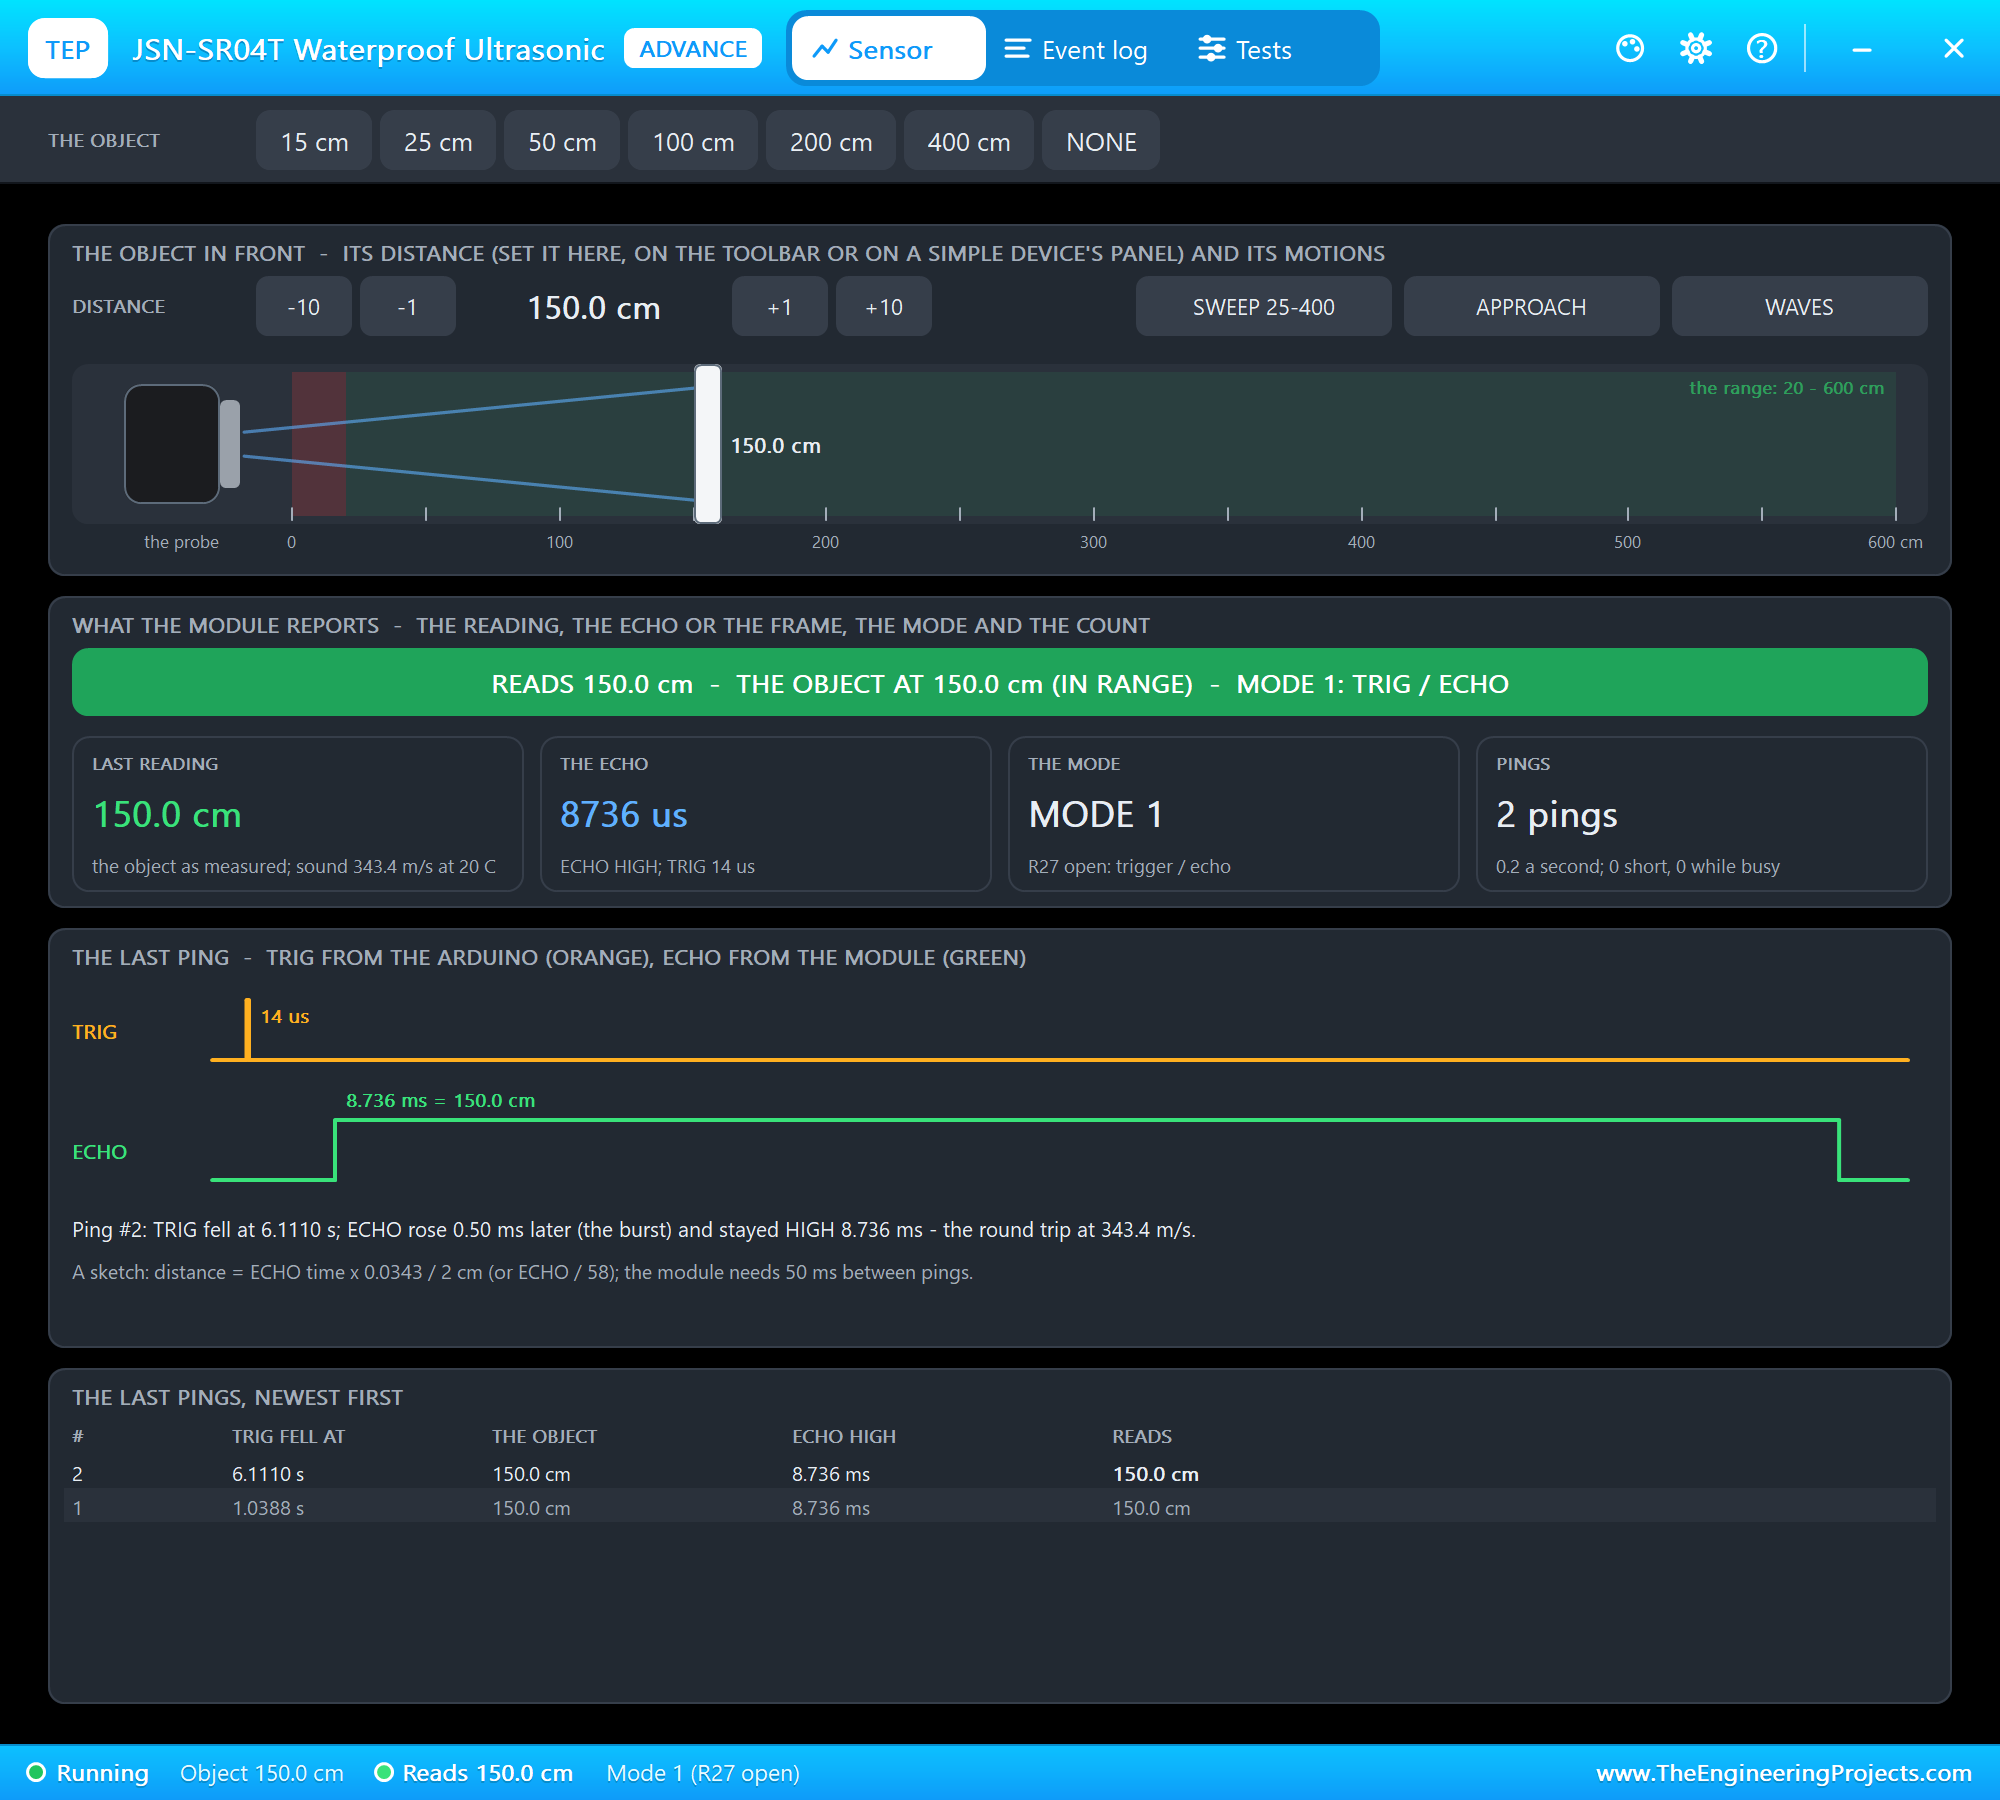
The JSN-SR04T is the waterproof cousin of the popular HC-SR04. Its sealed probe sits in the tank lid, and its small driver board stays in a dry box. A short pulse on TRIG makes the probe send a burst of ultrasound. The sound bounces off the water, and ECHO stays HIGH for the whole round trip. Sound travels at about 343 m/s, so each centimetre of distance takes about 58 microseconds there and back. The sketch turns that time into centimetres. If nothing comes back, this module holds ECHO HIGH for 36 ms, and the sketch treats that as a fault rather than a very long distance:
long readDistanceCm() {
  digitalWrite(TRIG_PIN, LOW);
  delayMicroseconds(4);
  digitalWrite(TRIG_PIN, HIGH);
  delayMicroseconds(10);
  digitalWrite(TRIG_PIN, LOW);
  const unsigned long echo = pulseIn(ECHO_PIN, HIGH, 40000UL);
  if (!echo || echo > 35000UL) return -1;                   // nothing heard: this module holds ECHO HIGH for 36 ms
  return echo * 343UL / 20000UL;
}
From Distance to Percent
The sensor looks down from the lid, so a larger distance means less water. Two numbers describe the tank: 300 cm from the lid when it is empty, and 50 cm when it is full. constrain() keeps the answer between 0 and 100, so a reading past either mark can never give a strange percentage:
int levelPercent(long cm) {
  return constrain((EMPTY_CM - cm) * 100L / (EMPTY_CM - FULL_CM), 0L, 100L);
}
Two Limits for the Pump
Why two limits? With a single limit of, say, 50 %, the pump would start at 49 % and stop at 50 %, over and over, and a little ripple on the water could switch it every few seconds. That would soon burn out the motor and the relay. So the pump starts at 25 % and stops at 90 %, and between those two it keeps doing whatever it was doing. This is called hysteresis, and every thermostat and water pump controller uses it:
void runPump(int percent) {
  if (mode == MODE_ON) setPump(true, percent);
  else if (mode == MODE_OFF) setPump(false, percent);
  else if (percent <= LOW_PERCENT) setPump(true, percent);
  else if (percent >= HIGH_PERCENT) setPump(false, percent);
}
Sending a Report
Every 5 seconds the node measures the water, checks the pump and sends a report. The LoRa library is pleasantly simple: beginPacket(), then print(), just as with Serial, and endPacket(), which waits until the packet has gone. The report is plain text with commas, such as T,3,148,60,0,0, which keeps it short and easy to read in the monitor:
void report() {
  const long cm = readDistanceCm();
  const int percent = cm < 0 ? 0 : levelPercent(cm);
  if (cm < 0) Serial.println(F(">> No echo from the sensor"));
  else runPump(percent);
  seqNow++;
  digitalWrite(LED_BUILTIN, HIGH);
  LoRa.beginPacket();
  LoRa.print(F("T,"));
  LoRa.print(seqNow);
  LoRa.print(',');
  LoRa.print(cm < 0 ? 0 : cm);
  LoRa.print(',');
  LoRa.print(percent);
  LoRa.print(',');
  LoRa.print(pumpOn ? 1 : 0);
  LoRa.print(',');
  LoRa.print(mode);
  LoRa.endPacket();
  digitalWrite(LED_BUILTIN, LOW);
  Serial.print(F("Tank "));
  Serial.print(cm);
  Serial.print(F(" cm  "));
  Serial.print(percent);
  Serial.print(F(" %  pump "));
  Serial.print(pumpOn ? F("ON  ") : F("OFF  "));
  Serial.println(MODE_NAME[mode]);
  nextReport = millis() + REPORT_MS;
}| Field | Example | Meaning |
|---|---|---|
| T | T | this is a tank report |
| seq | 3 | the report's number |
| cm | 148 | the distance, 0 = no echo |
| percent | 60 | the level |
| pump | 0 | 1 = running |
| mode | 0 | 0 AUTO, 1 FORCED ON, 2 FORCED OFF |
Listening for Commands
parsePacket() returns the size of a new packet, or 0. It is called on every pass through loop(), and it also starts the receiver again after a send. Then the bytes are read one by one, just like a serial port. The node answers every command with a fresh report, so the handheld knows at once that it worked. The delay(40) is there because a LoRa radio cannot listen while it talks, and the T-Deck needs a moment to go back to receiving:
void readCommand() {
  if (!LoRa.parsePacket()) return;
  String text;
  while (LoRa.available()) text += (char)LoRa.read();
  Serial.print(F(">> Command "));
  Serial.print(text);
  Serial.print(F("  ("));
  Serial.print(LoRa.packetRssi());
  Serial.print(F(" dBm, SNR "));
  Serial.print(LoRa.packetSnr(), 1);
  Serial.println(F(" dB)"));
  if (text == "C,ON") mode = MODE_ON;
  else if (text == "C,OFF") mode = MODE_OFF;
  else if (text == "C,AUTO") mode = MODE_AUTO;
  else if (text != "C,NOW") return;
  delay(40);                                                // the handheld needs a moment to go back to receiving
  report();
}
Starting Up
The relay's IN pin is set HIGH before it becomes an output. The other order would pull the pin LOW for a moment and click the pump on at every power-up. LoRa.begin(868E6) starts the radio on 868 MHz with the library's defaults: spreading factor 7, 125 kHz of bandwidth and coding rate 4/5. Then setTxPower(14) sets 14 dBm, the same as the T-Deck:
void setup() {
  pinMode(LED_BUILTIN, OUTPUT);
  pinMode(TRIG_PIN, OUTPUT);
  pinMode(ECHO_PIN, INPUT);
  digitalWrite(RELAY_PIN, HIGH);                            // HIGH first: the relay stays off
  pinMode(RELAY_PIN, OUTPUT);
  Serial.begin(115200);
  Serial.println(F("MKR WAN 1310 Tank Node - The Engineering Projects"));
  if (!LoRa.begin(868E6)) {
    Serial.println(F("LoRa failed"));
    while (true) delay(10);
  }
  LoRa.setTxPower(14);
  Serial.println(F("LoRa ready on 868 MHz"));
  delay(1000);                                              // the handheld is starting too
}
The Handheld
The T-Deck runs a different radio library, RadioLib, and a different radio chip, the SX1262. That does not matter, because LoRa is a standard way of sending bits: with the same frequency, spreading factor, bandwidth and sync word, the two understand each other. sscanf() splits the report, and the sketch checks that all six fields arrived before it trusts them. A broken packet is simply ignored:
void readRadio() {
  if (!radioEvent) return;
  radioEvent = false;
  String packet;
  const int state = radio.readData(packet);
  if (state != RADIOLIB_ERR_NONE) { radio.startReceive(); return; }
  char kind = 0;
  unsigned seq = 0, cm = 0, level = 0, pump = 0, mode = 0;
  const int fields = sscanf(packet.c_str(), "%c,%u,%u,%u,%u,%u", &kind, &seq, &cm, &level, &pump, &mode);
  if (fields == 6 && kind == 'T') {
    lastRssi = radio.getRSSI();
    const float snr = radio.getSNR();
    haveData = true;
    distanceCm = cm;
    percent = level;
    pumpOn = pump;
    tankMode = mode;
    drawReading();
    Serial.print(F(">> Tank "));
    Serial.print(percent);
    Serial.print(F(" %  "));
    Serial.print(distanceCm);
    Serial.print(F(" cm  pump "));
    Serial.print(pumpOn ? F("ON  ") : F("OFF  "));
    Serial.print(MODE_NAME[tankMode]);
    Serial.print(F("  ("));
    Serial.print(lastRssi);
    Serial.print(F(" dBm, SNR "));
    Serial.print(snr, 1);
    Serial.println(F(" dB)"));
  }
  radio.startReceive();
}
The three buttons along the bottom of the screen are only coloured rectangles. The sketch compares the X of the touch with their positions, and sends the matching command. There is one more detail in sendCommand(): the radio's DIO1 line also rises when a transmission ends, so the sketch clears its flag, or it would read its own packet back:
void sendCommand(const char *text) {
  const int state = radio.transmit(text);
  if (state != RADIOLIB_ERR_NONE) { Serial.print(F("transmit failed, code ")); Serial.println(state); }
  radioEvent = false;                                       // DIO1 also rises when a transmission ends: that is not a packet
  radio.startReceive();
  Serial.print(F(">> Sent "));
  Serial.println(text);
}
Run the Demo
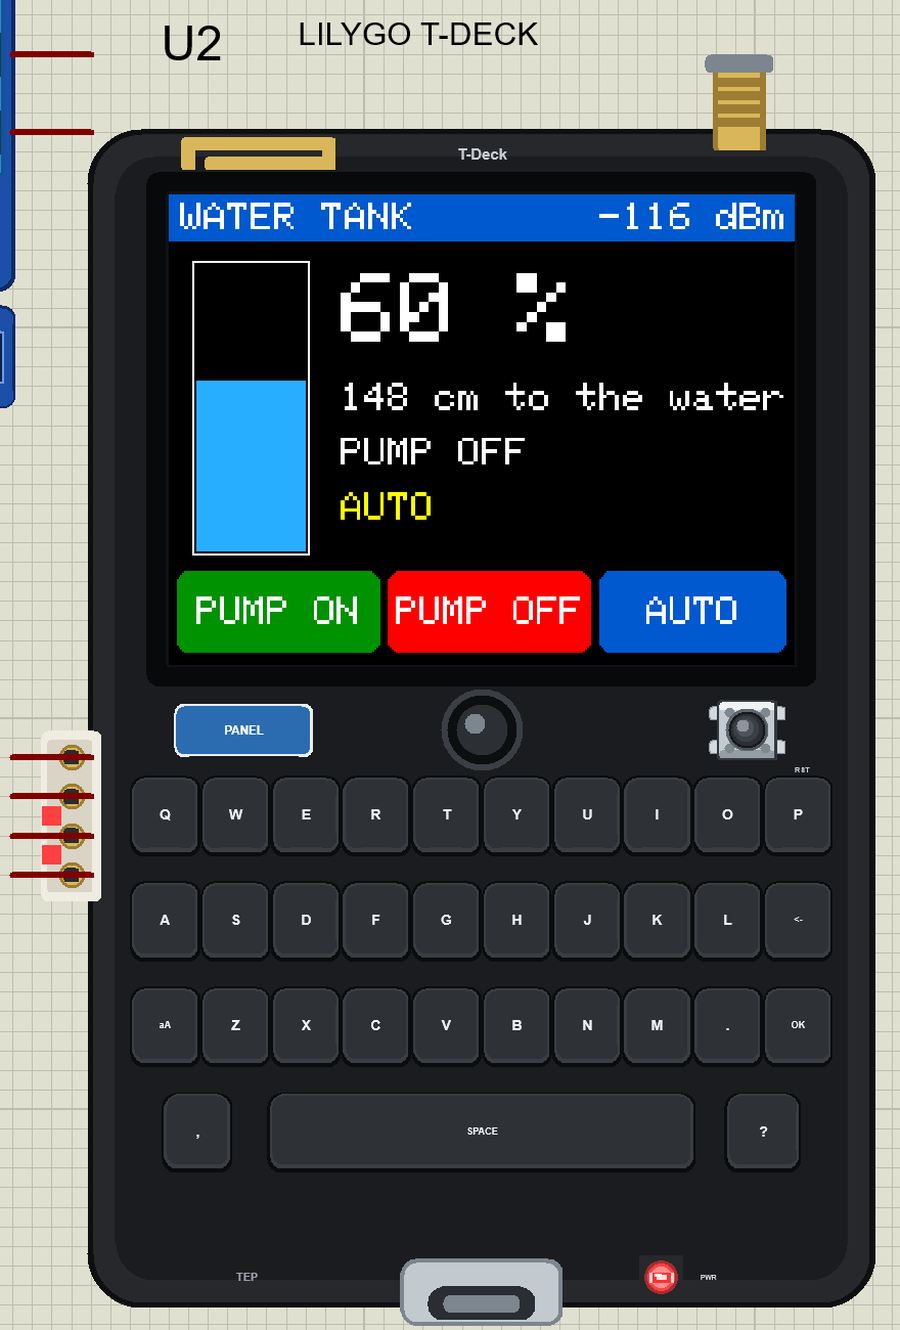
Press Run. The T-Deck says WAITING FOR THE TANK, and after a moment the first report arrives. The tank is 60 % full, the pump is off, and the mode is AUTO. The sensor reads 148 cm with the water at 150 cm, which is the kind of small error that a real sensor shows too. U1's monitor starts like this:
MKR WAN 1310 Tank Node - The Engineering Projects
LoRa ready on 868 MHz
Tank 148 cm  60 %  pump OFF  AUTO
Tank 148 cm  60 %  pump OFF  AUTO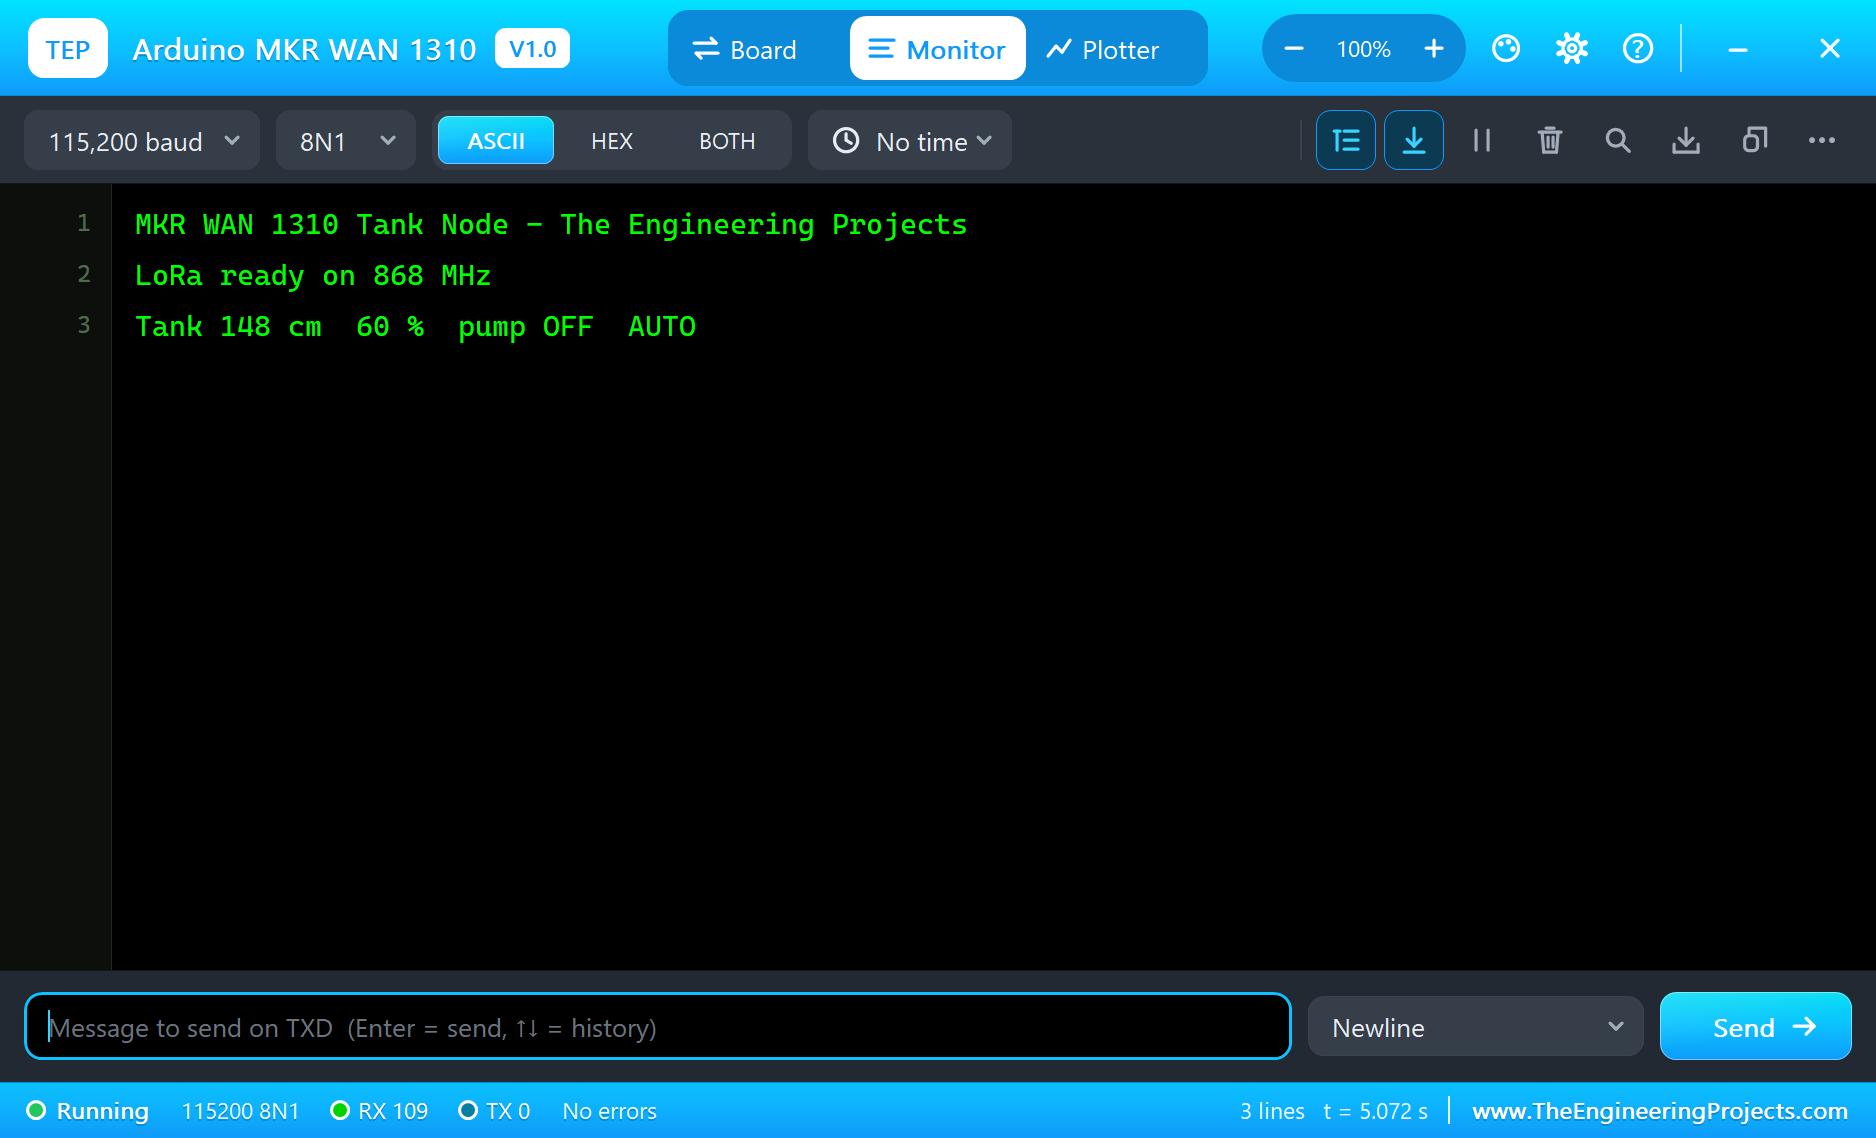
The Tank Runs Low
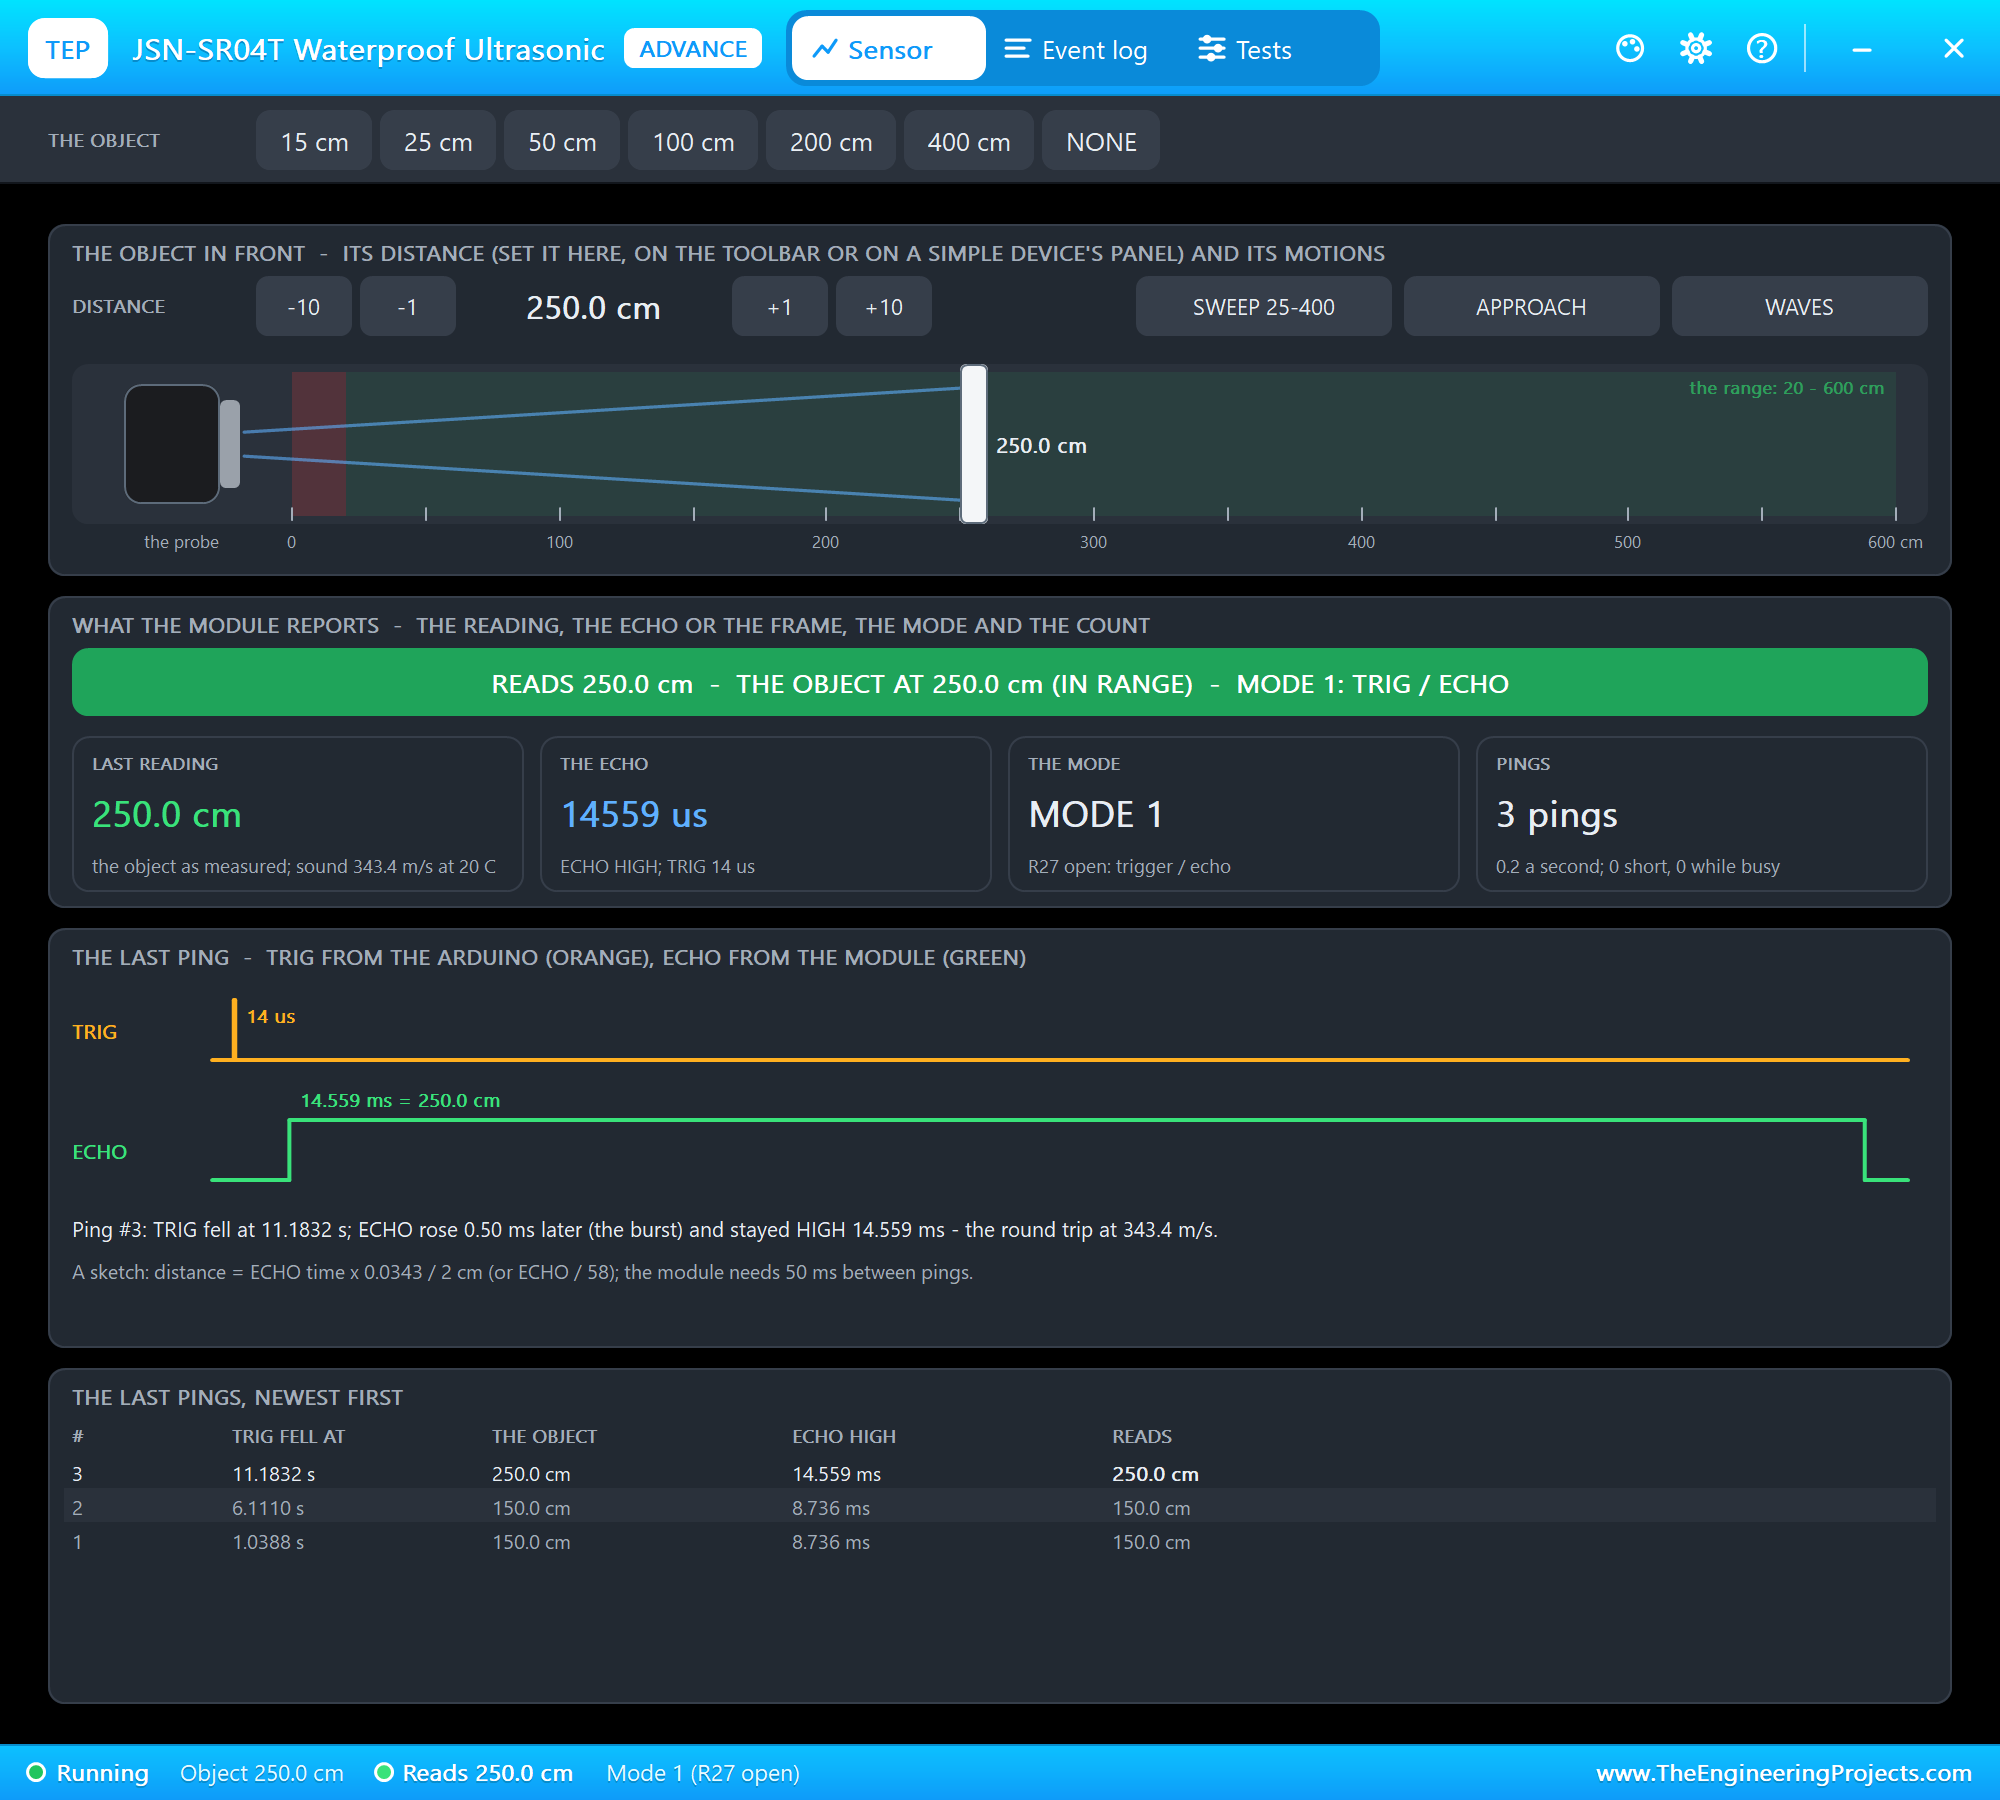
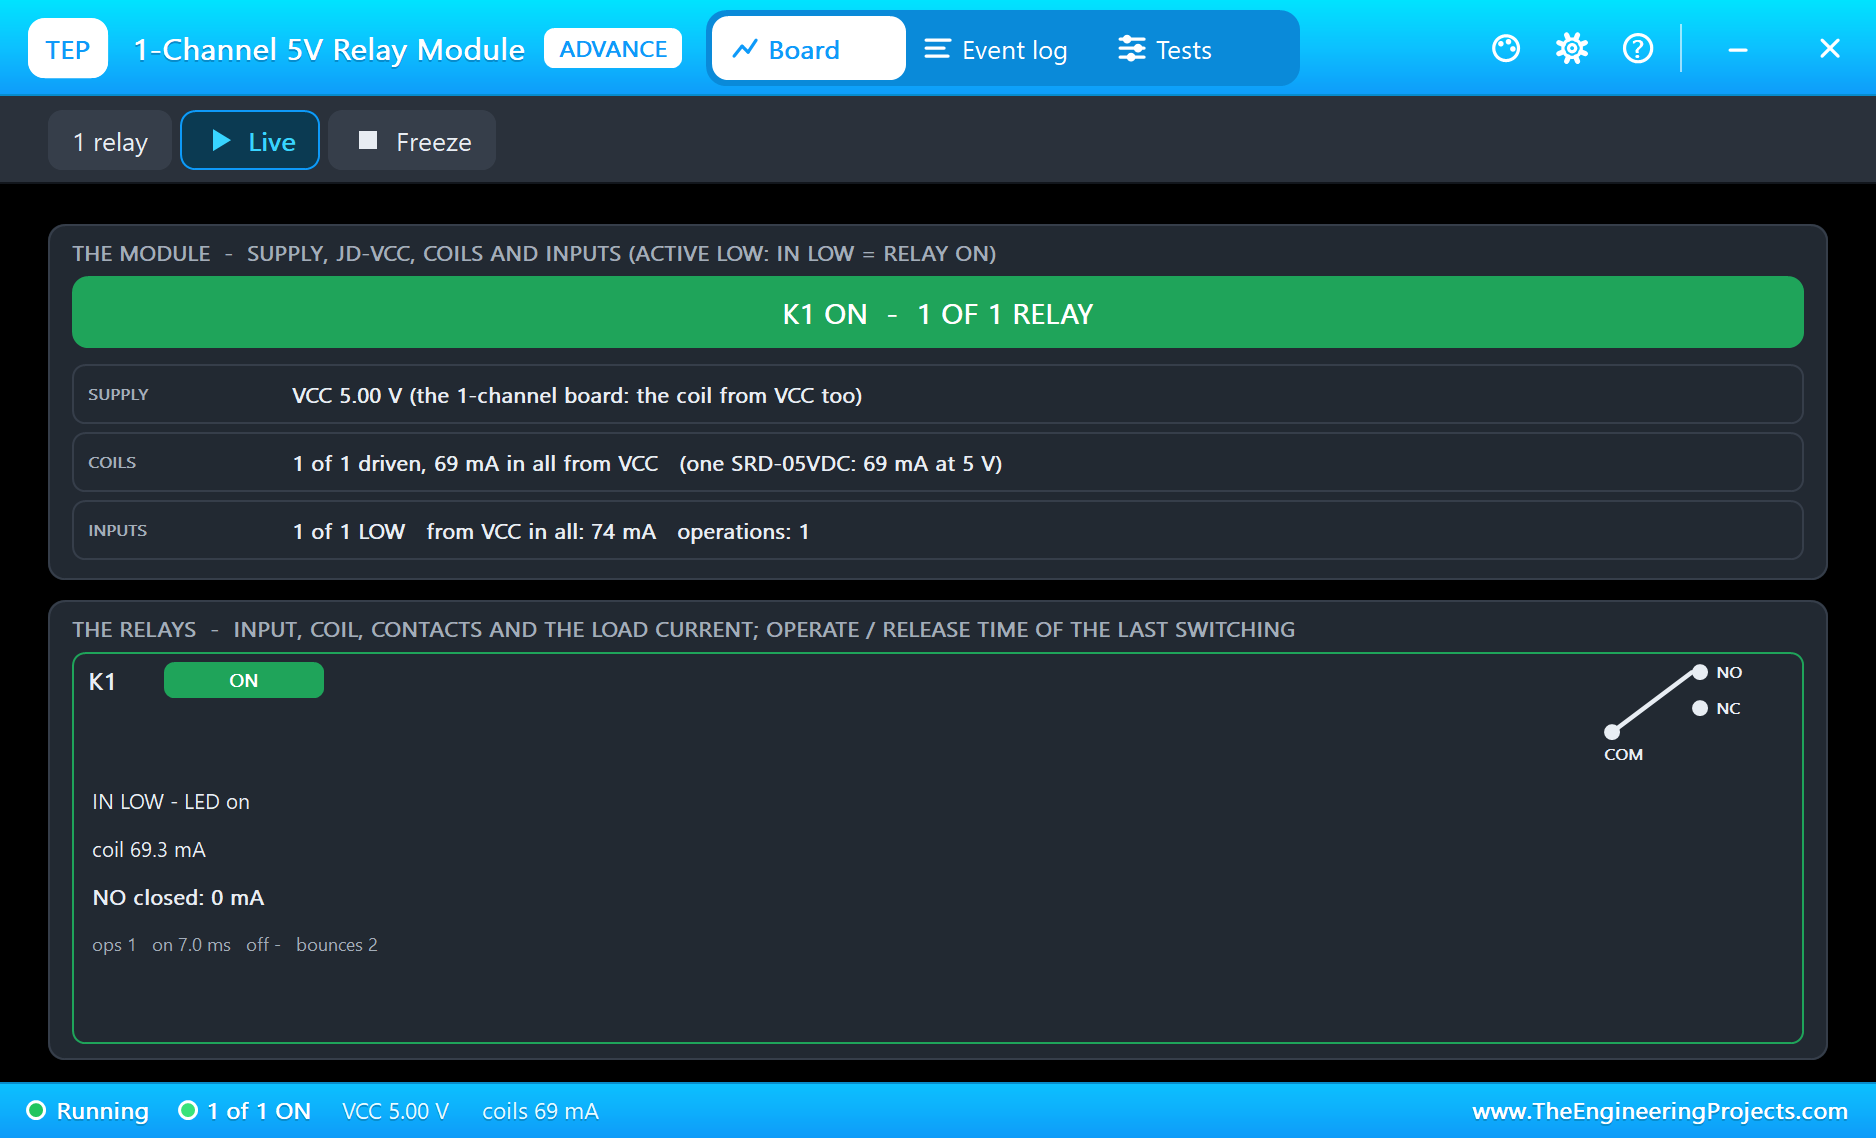
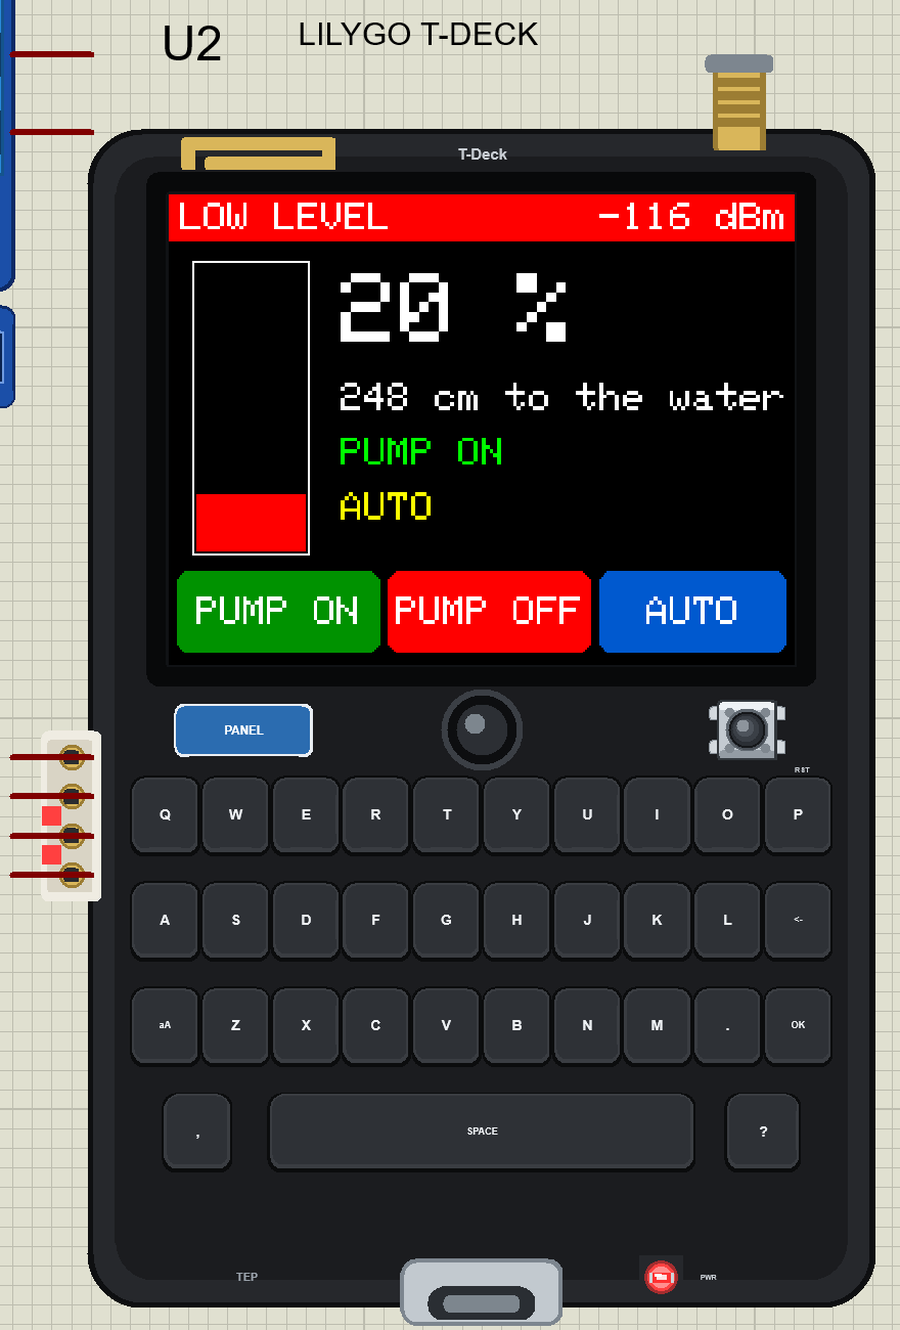
On the sensor's window click 200 cm, then +10 five times. The water is now 250 cm below the lid, which is 20 %. At the next report the node starts the pump, the relay pulls in, and the T-Deck's band turns red with LOW LEVEL:
The Tank Fills Up
Click 50 cm: the tank is full. The node stops the pump at the next report, by itself, and the band goes back to blue.
Take Control from Your Pocket
Now tap PUMP ON on the T-Deck's glass. The command crosses the 2 km, the node answers at once, and the screen says FORCED ON. The pump runs even though the tank is full, which is just what you would want while cleaning a pipe. The complete circuit looks like this while it runs:
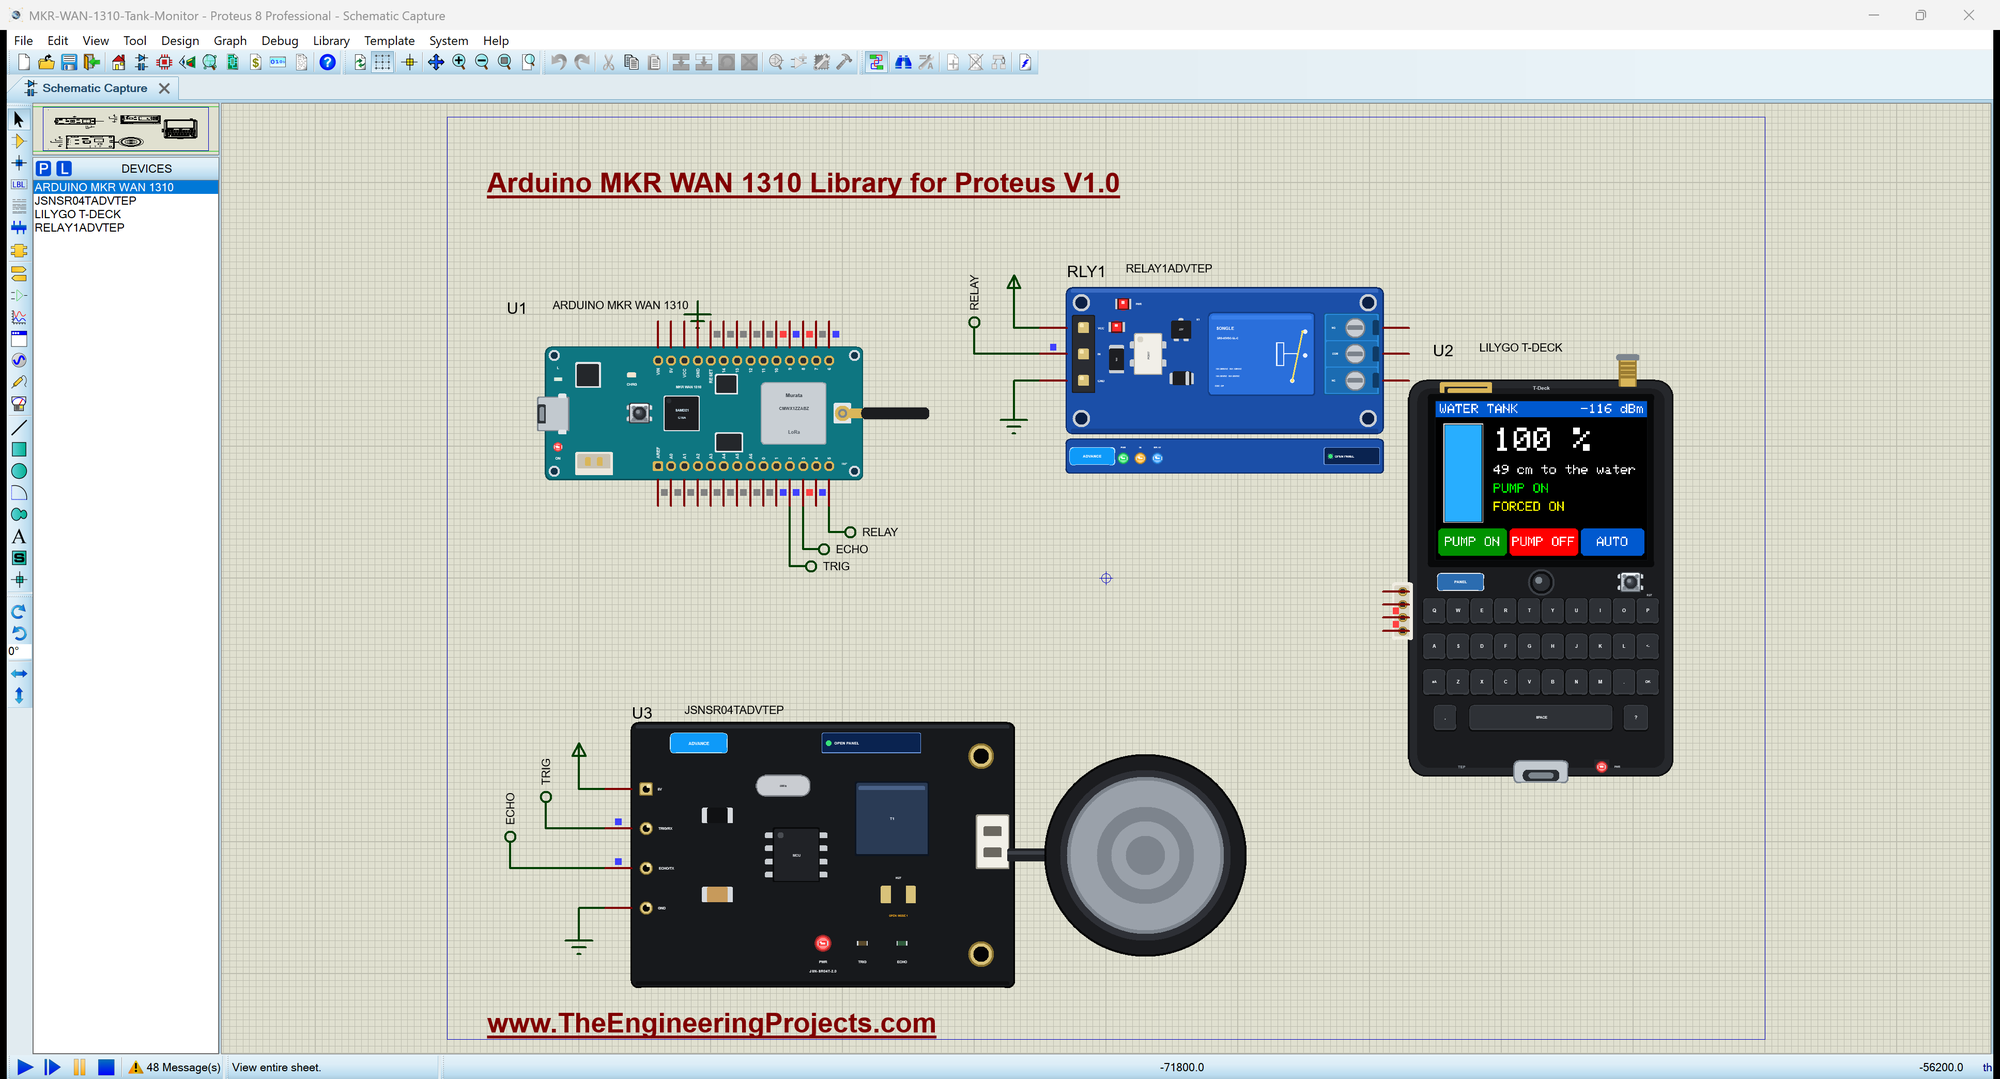
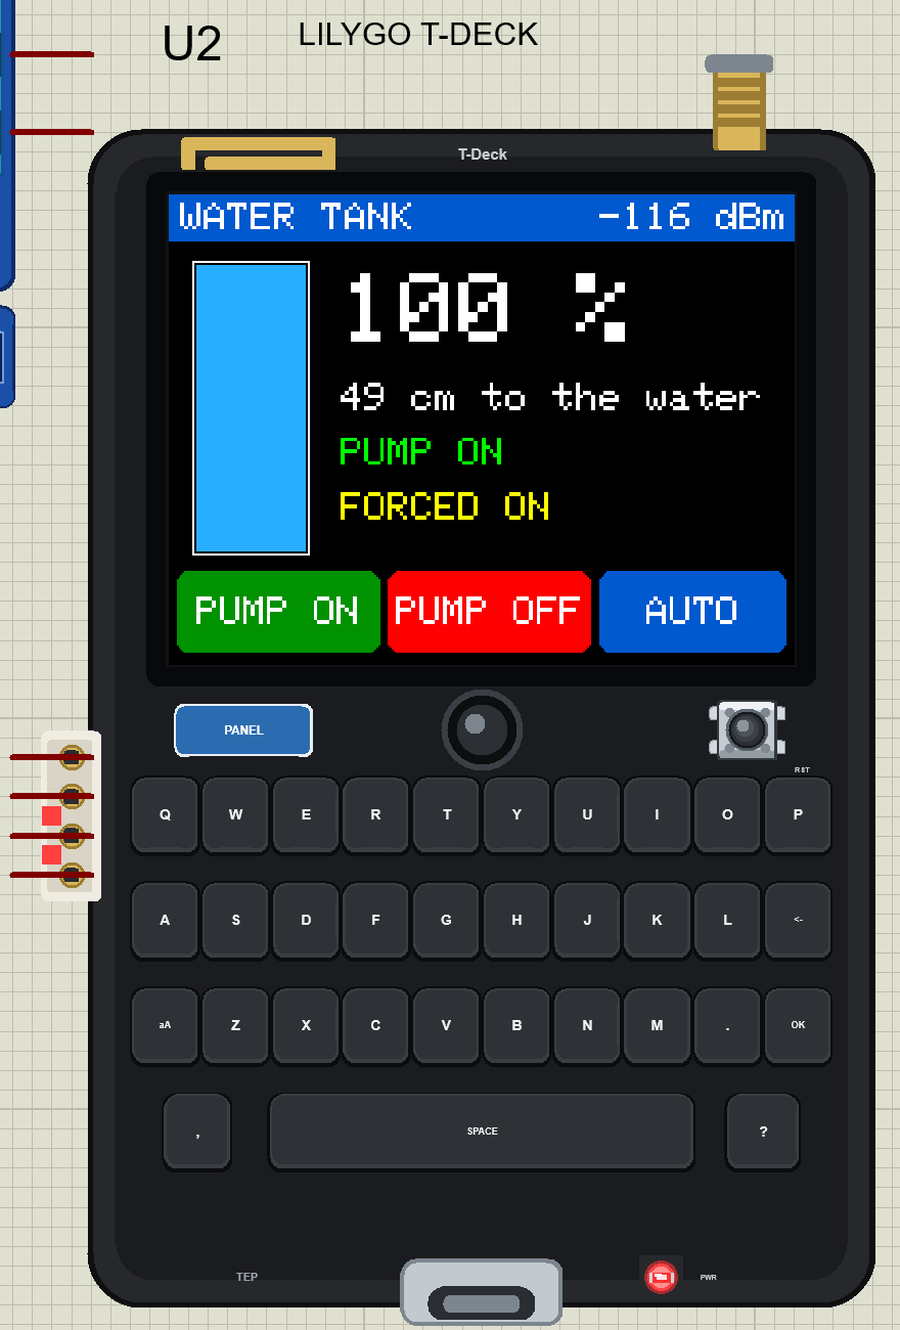
Tap AUTO and the node takes over again. The tank is full, so the pump stops. Click the trackball and the T-Deck asks for a report now, without waiting for the next one.
When the Sensor Fails
Click NONE on the sensor's window. Nothing comes back, so the node reports no echo, and it leaves the pump as it was. It would be dangerous to run a pump on a reading that cannot be trusted. The T-Deck's band turns red with NO ECHO:
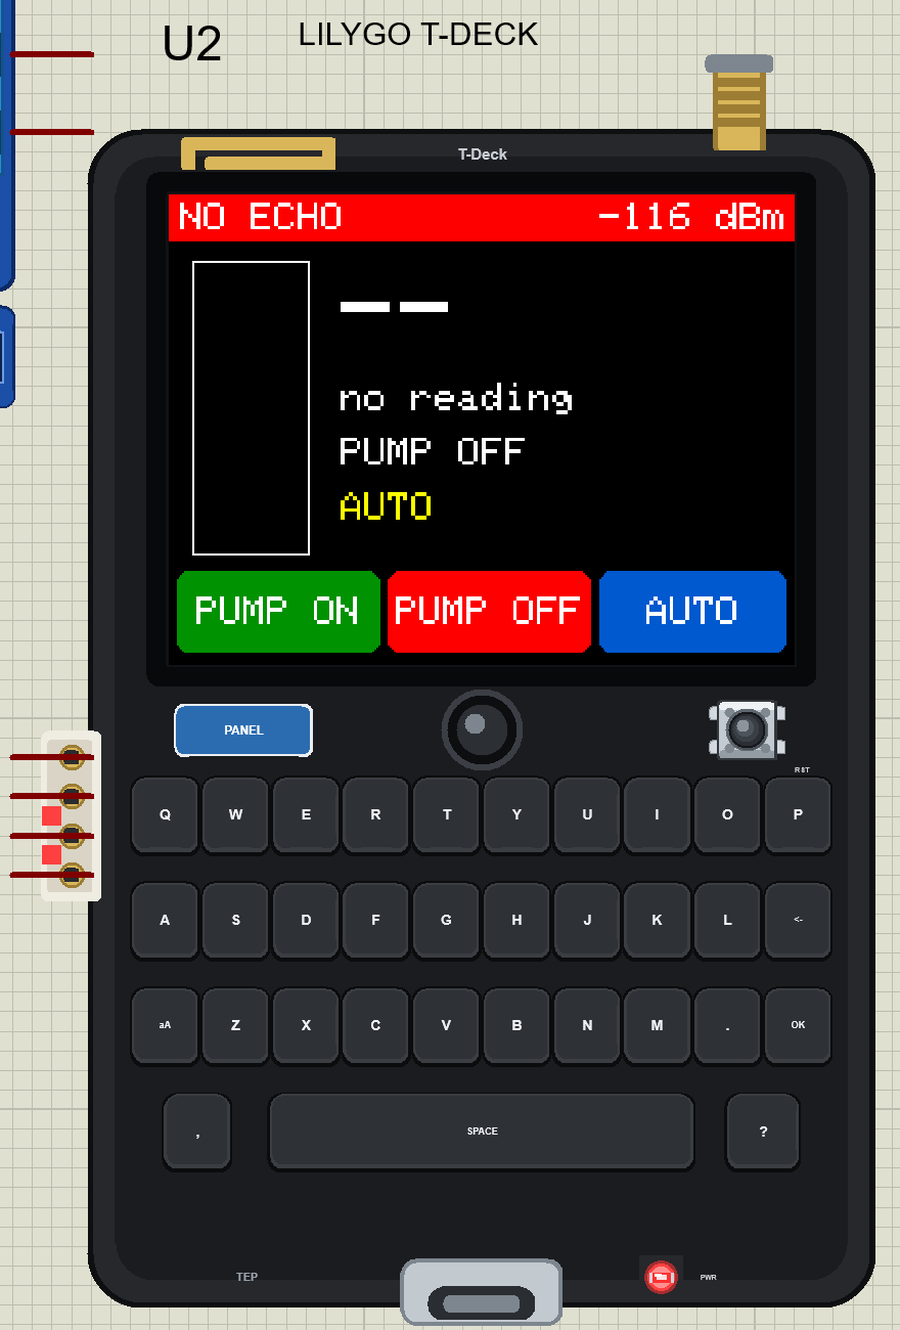
The monitor of the tank node has followed everything:
>> Pump ON at 20 %
Tank 248 cm  20 %  pump ON  AUTO
>> Pump OFF at 100 %
Tank 49 cm  100 %  pump OFF  AUTO
>> Command C,ON  (-116 dBm, SNR 0.8 dB)
>> Pump ON at 100 %
Tank 49 cm  100 %  pump ON  FORCED ON
>> Command C,AUTO  (-116 dBm, SNR 0.8 dB)
>> Pump OFF at 100 %
Tank 49 cm  100 %  pump OFF  AUTO
>> Command C,NOW  (-116 dBm, SNR 0.8 dB)
Tank 49 cm  100 %  pump OFF  AUTO
>> No echo from the sensor
Tank -1 cm  0 %  pump OFF  AUTO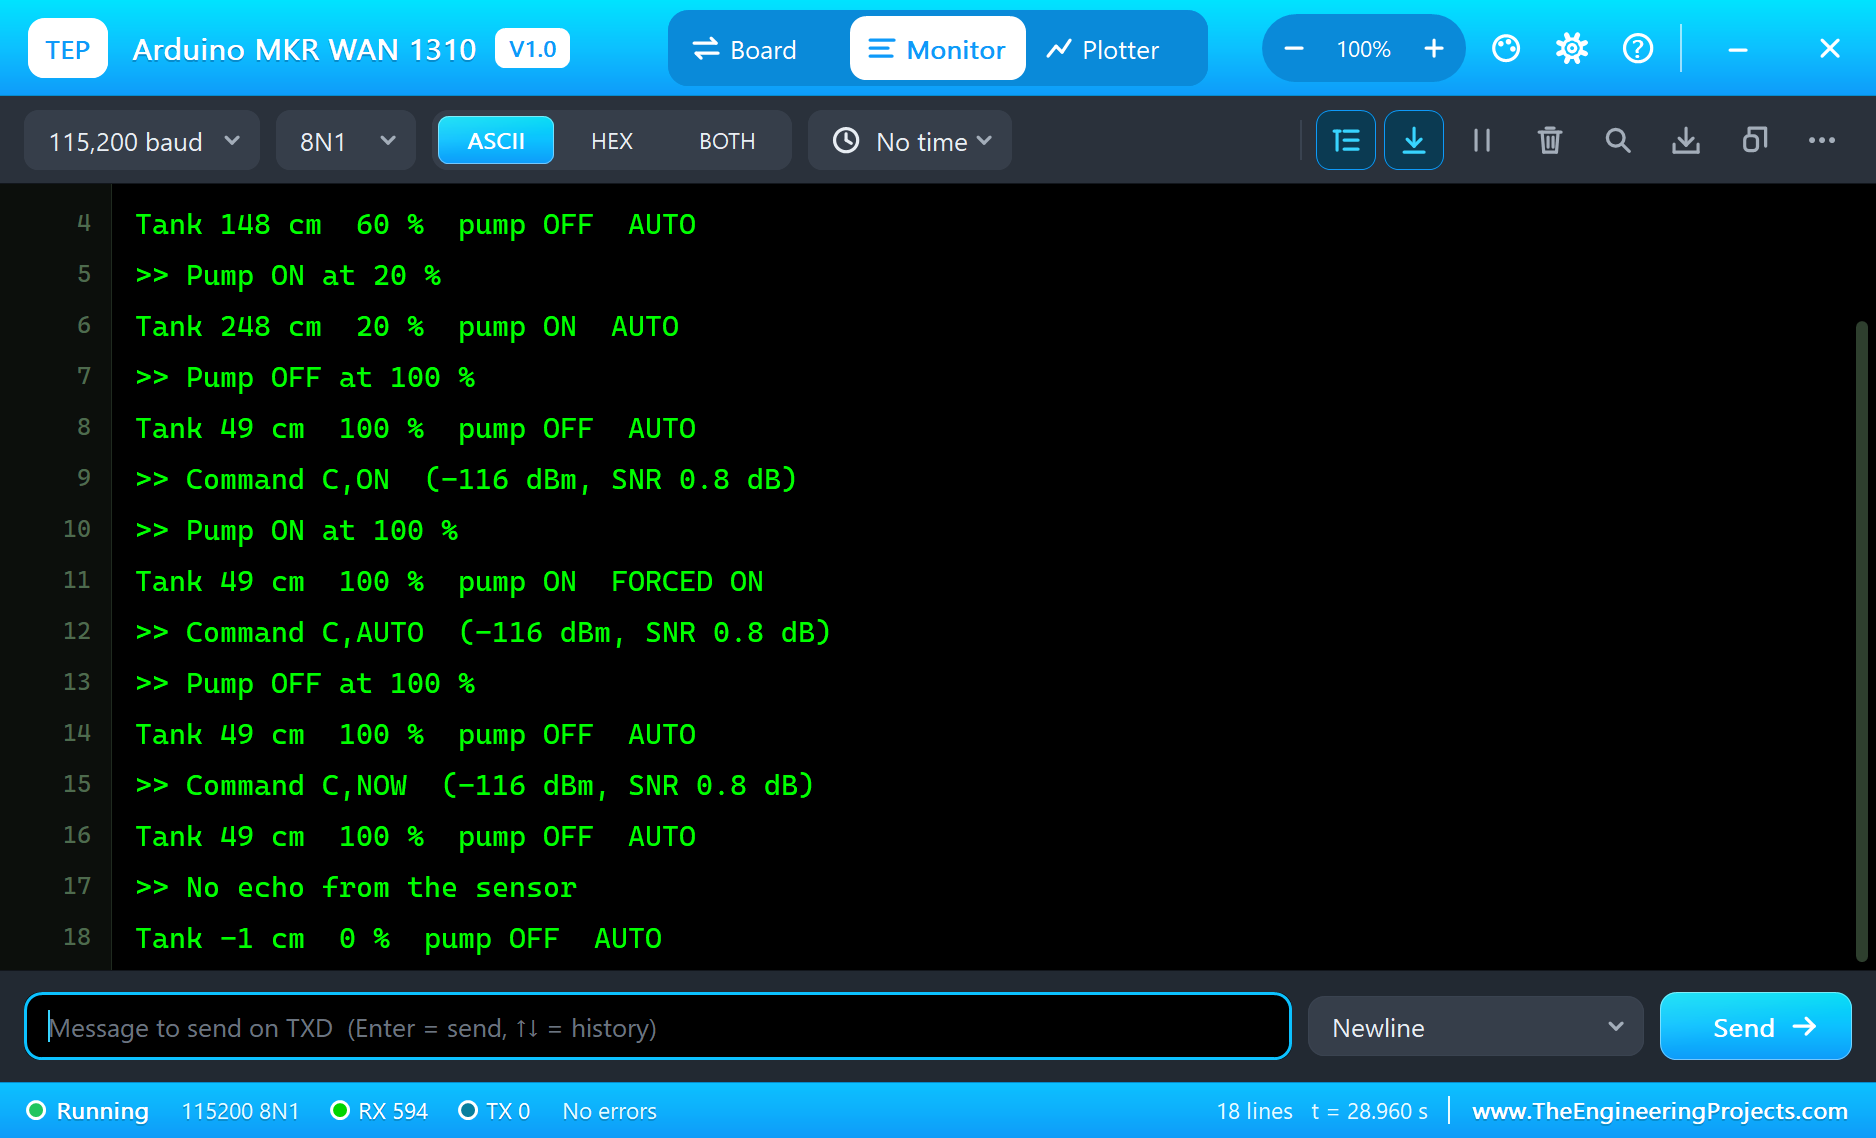
And here is the same story from the handheld. The RSSI of -116 dBm is weak, and the SNR of 0.8 dB shows that the signal is only just above the noise. At spreading factor 7 that is still a working link at 2 km, with room to spare:
>> Tank 60 %  148 cm  pump OFF  AUTO  (-116 dBm, SNR 0.8 dB)
>> Tank 20 %  248 cm  pump ON  AUTO  (-116 dBm, SNR 0.8 dB)
>> Tank 100 %  49 cm  pump OFF  AUTO  (-116 dBm, SNR 0.8 dB)
Touch at 56, 212
>> Sent C,ON
>> Tank 100 %  49 cm  pump ON  FORCED ON  (-116 dBm, SNR 0.8 dB)
Touch at 268, 212
>> Sent C,AUTO
>> Tank 100 %  49 cm  pump OFF  AUTO  (-116 dBm, SNR 0.8 dB)
>> Sent C,NOW
>> Tank 100 %  49 cm  pump OFF  AUTO  (-116 dBm, SNR 0.8 dB)
>> Tank 0 %  0 cm  pump OFF  AUTO  (-116 dBm, SNR 0.8 dB)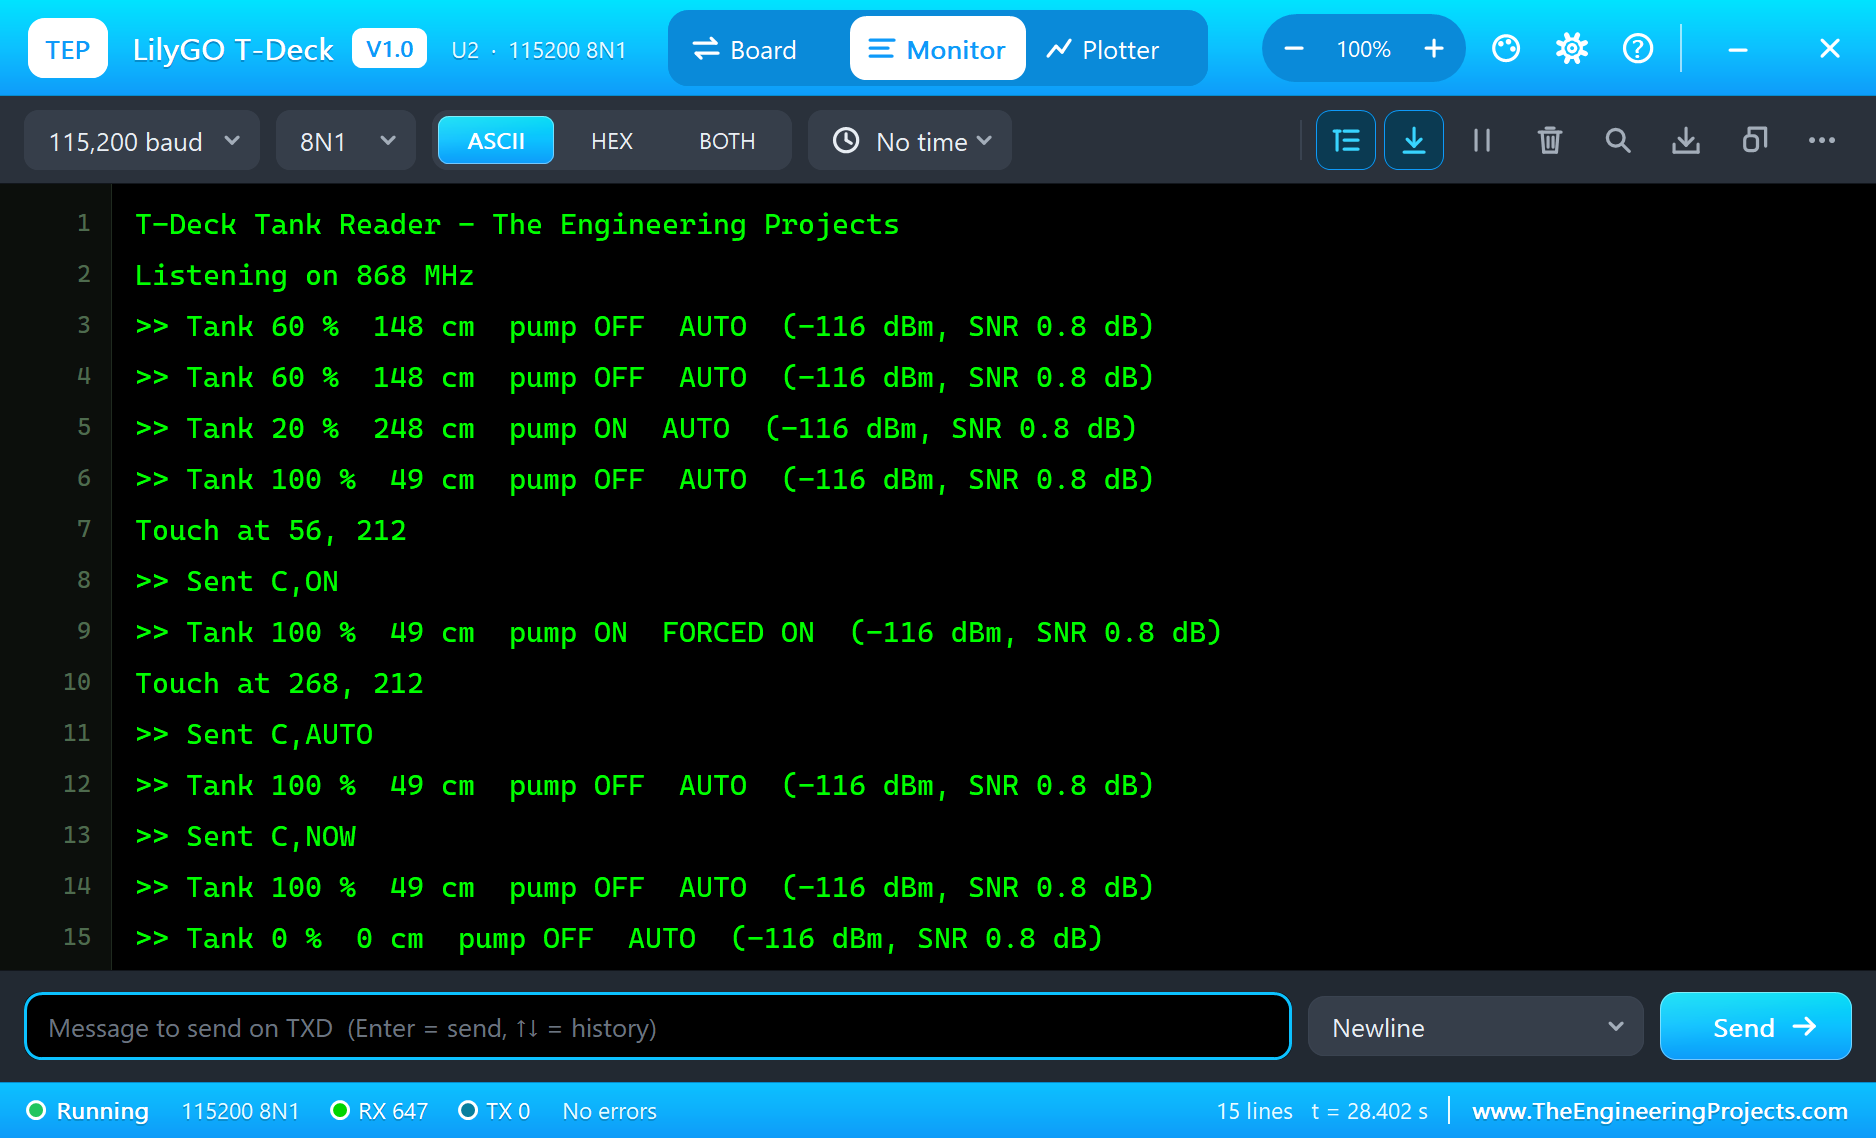
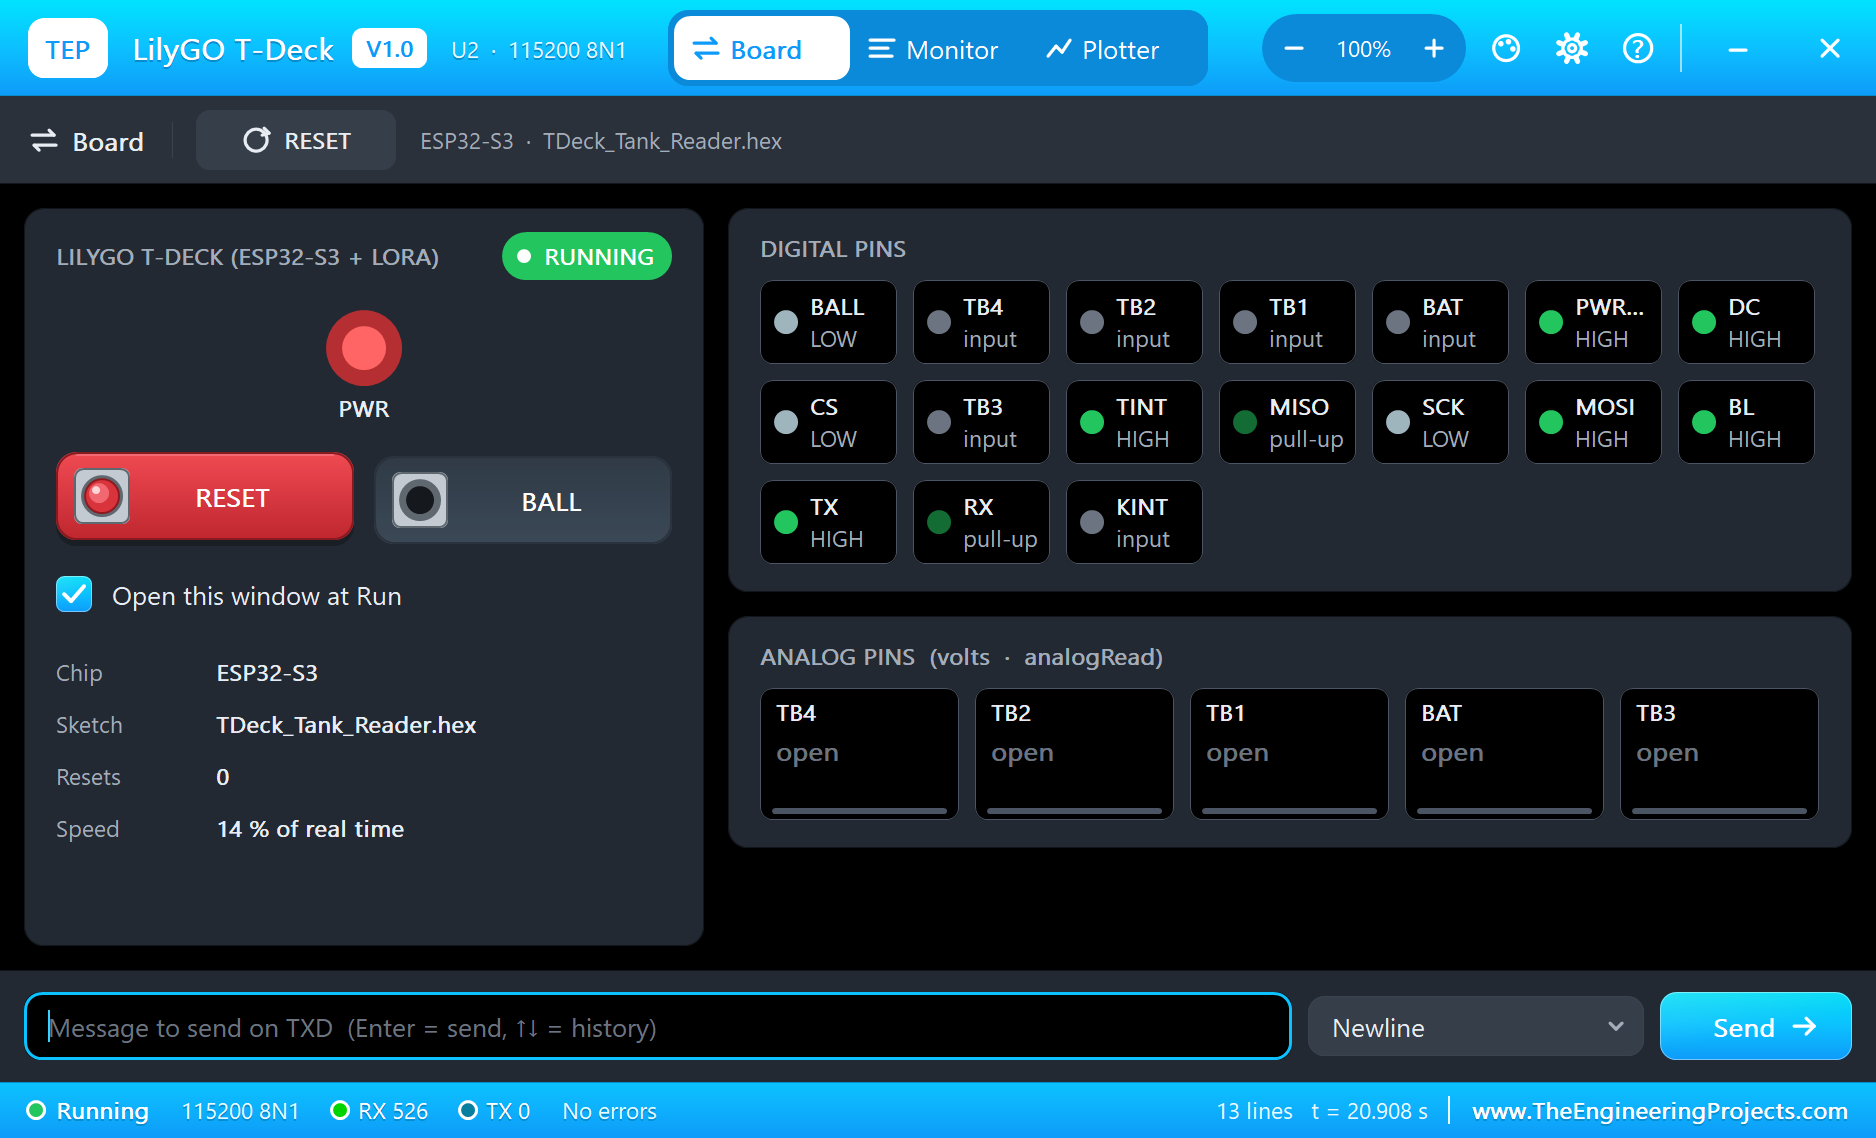
Try It Yourself
- Change LORADIST on both boards and watch the RSSI on the T-Deck's band.
- Press WAVES on the sensor's window, and see why a real tank needs a few readings averaged.
- Change
LOW_PERCENTandHIGH_PERCENT, and rebuild the sketch. - Try
LoRa.setSpreadingFactor(9), with the same setting in the T-Deck'sradio.begin().
Ideas to Extend the Tank Monitor
- Add a
sequencecheck, so that the T-Deck notices a lost report. - Warn when no report has arrived for a minute.
- Stop the pump if the level does not rise within a set time: a dry well or a broken pipe.
- Add a second node for a second tank, with its own number in the packet.
Your Own Sketches
Write the sketch in the Arduino IDE with the board Arduino MKR WAN 1310 (TEP Proteus), use Sketch > Export Compiled Binary and set the part's PROGRAM property to the .hex. For the real board select the MKR WAN 1310 in Arduino's SAMD package and install the Arduino LoRa library: the same sketch compiles there.
Things to Know Before Using a Real MKR WAN 1310
- The pins are 3.3 V only: they are not 5 V tolerant, so the 5 V ECHO of a real JSN-SR04T needs a voltage divider.
- Check the relay: many 5 V relay modules do not switch cleanly from a 3.3 V pin, so pick one made for 3.3 V logic, or add a transistor.
- Fit the antenna first: the radio needs its dipole on the u.FL socket before it transmits.
- Pick the right band: the licence-free LoRa frequencies differ from country to country.
- Respect the air time: many regions limit how long a device may transmit, so a real node should report far less often than every 5 seconds.
- Messages are not private: this demo sends plain text, so anyone nearby with the same settings could switch your pump. A real system needs a secret key.
Properties of the Arduino MKR WAN 1310
| Property | What it does |
|---|---|
| PROGRAM | the sketch: a .hex from TEP Boards for Proteus (board "Arduino MKR WAN 1310") |
| LORADIST | the distance to the other LoRa boards, from 10 m to 20 km |
| MONITOR, BAUD, AUTOOPEN | the built-in serial monitor: on, its baud rate (115200), open at Run |
Troubleshooting
- LoRa.begin() returns 0: the board in Tools must be Arduino MKR WAN 1310 (TEP Proteus).
- No packets arrive: both boards need the same frequency, bandwidth, spreading factor and sync word.
- parsePacket() always returns 0: call it in
loop(), and do not block for long. - The distance reads 613 cm: nothing is in front of the JSN-SR04T.
- The relay does not switch: its IN pin is active LOW.
- A number goes wrong above 32767: int is 16 bits in the simulation - use long.
Limitations of the Simulation
- This library is LoRa from board to board. The MKRWAN library and LoRaWAN, such as a join to The Things Network, are not modelled.
- In the LoRa library, onReceive, receive() and channel activity detection are not in this version: use parsePacket() in
loop(). - Your sketch gets 8 KB of RAM in the simulation, and int is 16 bits there.
- The crypto chip, the SPI flash, the charger and the battery are not modelled.
- Arduino and MKR are names of Arduino, Murata of Murata Manufacturing, LilyGO of LilyGO and LoRa of Semtech; this library is not made or endorsed by them or by Labcenter.
- Tested in Proteus 8.5 in October 2026 (the demo as shipped, about 30 s of simulation). Proteus 7 is not supported.
So, that was all about the Arduino MKR WAN 1310 Library for Proteus. I hope it helps you try your long-range ideas before you buy the boards - the LoRa link, the sensor, the relay and the handheld in one simulation. If you have any questions, ask in the comments and I will help you out. Till the next tutorial, take care and have fun!