Hey Learners, welcome to another exciting tutorial about electronics. We are talking about an audio amplifier using LM386. This is a very simple IC that we are going to used for the amplification of the audio signals. We shall go through the core postulation about the topic and then work on the practical implementation of the experiment. Just have a look at the topics of discussion:
Introduction to LM386 Audio Amplifier.
Components of LM386 Audio amplifier.
LM3386 Audio Amplifier Working.
Simulation of the LM386 Audio Amplifier Circuit in Proteus.
In addition, you will find interesting information in the DID YOU KNOW sections.
Introduction to LM386 Audio Amplifier
Audio signals play important role in many devices. These signals are used ...
Hello friends, today I am going to post the next lecture of Proteus Tutorial. I am receiving quite a positive response about this Proteus tutorial. In the previous post, we have seen How to use Virtual Terminal in Proteus and today I am going to explain How to use Oscilloscope in Proteus ISIS. This oscilloscope is just the same which you have seen in your electronic or electrical labs. Oscilloscope is basically used to monitor signals or waveforms. Particularly when you are not much aware of the circuit and you need a little debugging then you use oscilloscope.
In oscilloscopes, we can visualize the electrical properties of waveforms, like we can check whats the frequency of electrical signal, what's its voltage or current. Digital oscillosco ...
Hello everyone, I hope you all are doing great. In today's tutorial, we will have a look at How to use Virtual Terminal in Proteus ISIS. It's our 5th tutorial in Proteus Series. I will first explain what is virtual terminal and then we will have a look at its uses and performance in Proteus ISIS.
Virtual Terminal is an important tool available in Proteus and it comes quite in handy while working on serial modules i.e. GSM, GPS, XBee etc. So, let's get started with Virtual Terminal in Proteus.
What is Virtual Terminal ?
Virtual Terminal is a tool in Proteus, which is used to view data coming from Serial Port (DB9) and also used to send the data to Serial Port. In windows XP, there's a built in tool named Hy ...
Hello friends, hope you all are fine and having fun with your lives. Today, I am going to share all the LabView Projects, posted on our blog. These LabView projects are entirely designed by the TEP team and I hope they will help you in some way. Rite now the list is quite small but I am gonna post more tutorials and projects related to LabView soon. So, keep visiting or subscribe us via email so that you get these exciting tutorials straight to your inbox.
Moreover, LabView is really a difficult software and it really took us a lot of time in designing these projects so other blogger are more than welcome to share our projects on their blog but do mention the respective link from where you copied as a favor. I am gonna share the complete list here ...
Hello friends hope you all are healthy and enjoying good health. In today's tutorial, I am going to share How to Protect Simulink Design in MATLAB and in order to do so I have used S Function method. In my previous post I have explained How to Protect your m-file Codes in MATLAB by converting it to p-file so that no one can reach to your code and now I am gonna explain how to protect your simulations in MATLAB which you create in Simulink so that your intellectual work wont go waste.There are many methods to protect the Simulink simulations and the easiest of them is using S-function. Now follow these simple steps and it won't be much difficult.
Protect Simulink Design in MATLAB
Open the simulation which you want to protect. Make sure you are ...
Hello Friends, hope you all are fine and having fun. In today tutorial i am going to elaborate How to Automatically Connect with Wifi SSID using Arduino YUN. If you recall one of my previous tutorials named Getting started with Arduino YUN , in which i gave a brief introduction about Arduino YUN, its working and features. In that tutorial, I have explained How to connect Arduino YUN with Wifi manually. A little problem encounters while connecting Arduino manually to available wifi networks that if wifi connection drops then, then Arduino will also disconnect automatically and if wifi connection is energized again, it will still remain disconnected unless you reconnect it by yourself. This thing has very serious drawbacks in industrial projects, wh ...
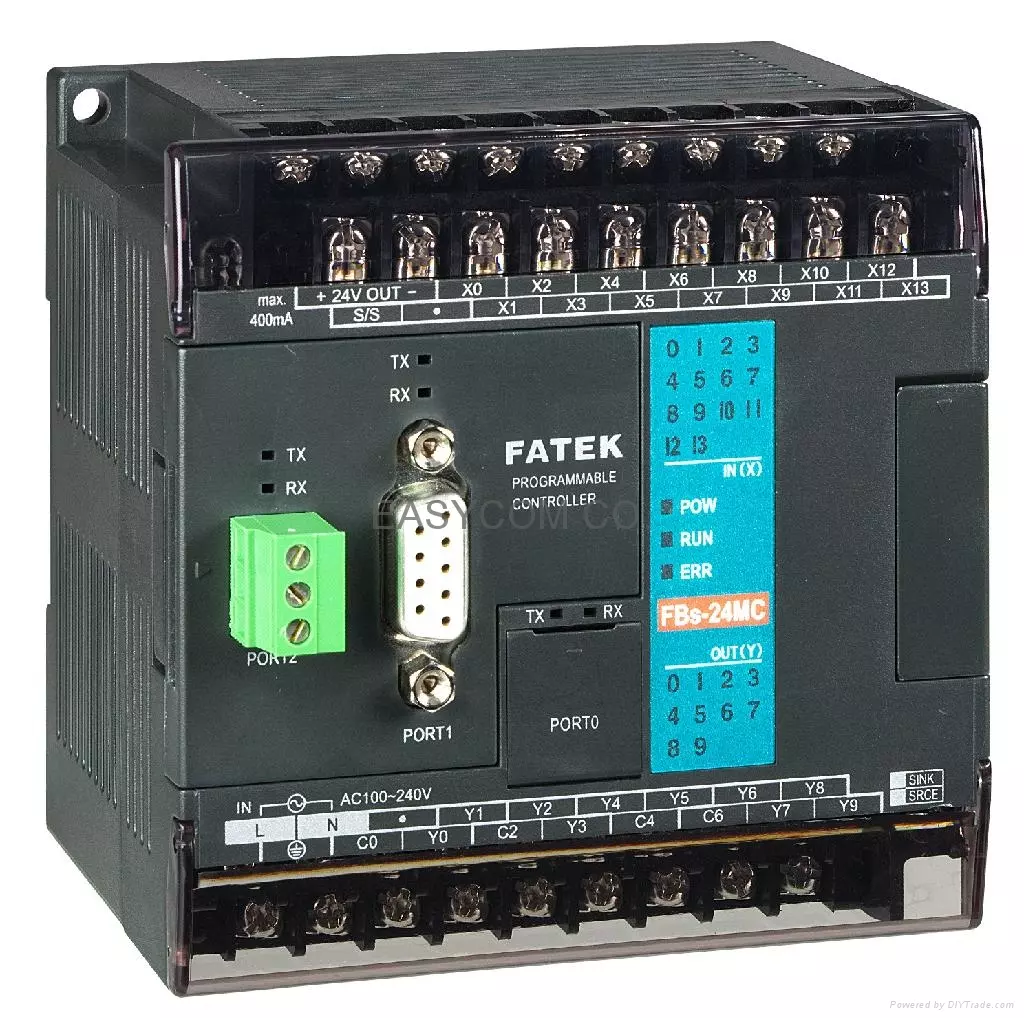
Hello friends, I hope you all are fine and enjoying good health. Today's tutorial, as the name shows, is on Introduction to PLC. PLC is an abbreviation of Programmable Logic Controller. Recently I worked on a project in which I have to design a Automated coffee Mixing Machine Using PLC. It worked quite good and I had a great time while working on it. After completing that project, it occurred to me that I haven't posted any tutorial on PLC. So I thought of starting this tutorial. This tutorial is not gonna cover in single post so my plan is to divide it in parts.
Today. I am gonna give an overview about PLC. We will have a look on basics i.e. what is PLC? Why we use PLC instead of microcontroller like Arduino or PIC Microcontroller? What's its adv ...
Hello friends! I hope you will be absolutely fine and having fun. Today, I am going to share that how to make a program for Stepper Motor Direction Control using Matlab. I am going to share this tutorial on demand. I have also make different programs for DC Motor Direction Control using Arduino, DC Motor Direction Control in Matlab, DC Motor Direction Control using LabVIEW, DC Motor Speed Control using Arduino, DC Motor Speed Control using Matlab and Stepper Motor Direction using Arduino in my previous tutorials. So before going into the detail of this tutorial you must have to go through these tutorial because I will use the same hardware and a bit changed Arduino source code. In this tutorial I will make an algorithm to send different commands ...
Hello friends, I hope you all are doing great. In today's tutorial, we will have a look at How to use Voltmeter & Ammeter in Proteus ISIS. It's our 4th tutorial in Proteus series. While designing an electronics project, voltage & current measurements are essential debugging features, as they help in understanding circuit behavior.
Proteus has builtin instruments for voltage & current measurement. We have have their probes and today we will discuss them in detail. First have a look at Voltmeter in Proteus ISIS:
How to use Voltmeter in Proteus ISIS
DC Voltmeter is used to measure the voltage difference across any DC component.
In order to use DC Voltmeter, we need to click on Virtual Instrum ...
Hello friends, I hope you all are doing great. In today's tutorial, I am going to show you How to Convert m File into p File in MATLAB. Now the question arises that why we need to do that? & the answer is if you want to protect your code and don't want anyone to access it then you need to your Convert m File into p File. P File is like an encrypted file which performs the same functionality as your original m file but no one can get the code out of it.
Like me explain it with an example, suppose you are some sort of developer and you have created some code for a company and now you want to protect your code and just send the company some sort of software. MATLAB has a function in which you convert your m-file into p-file and no one can open ...