Hello guys, in the last post I have explained the Basics of Inverters along with its types and also the inverters topology in other words working of inverters, then we discussed the Major Components of Inverters. Now in this post I am gonna explain the pure sine wave inverter and how to create it. I have used AVR microcontroller int his project. The reason I am using random microcontrollers is that so you guys get a taste of each one. Before starting on sine wave inverter read this article again and again as I have also mentioned the problem i got while making it. You should also read the Modified Sine Wave Design with Code.
I have divided this tutorial into four parts which are shown below. This is a step by step guide to design and build an in ...
Printed circuit boards are the most important and basic component of the electronic industry. These boards have made it possible to create and run circuits on every level and have served as the backbone of any electronic device. With the growing demand for technology, PCBs have gone through multiple evolutions. The transformation of PCBs has made it possible to create innovative and better electronic circuits.
Today, we are talking about the emerging trends in PCB that are reshaping electronic circuits and the components used in innovative designs. But before this, it is important to understand the importance of using the emerging trends for the circuits.
Importance of Using Trending Technologies in PCBs
PCBs are versatile components, and not all PCBs are ideal for a particular type ...
Hello everyone, hope you all are fine and having fun with your lives. Today, I am going to share a new project named as Interfacing of Multiple Temperature sensors DS18B20 arduino. I have already shared a tutorial on Interfacing of Temperature Senor 18B20 with Arduino but in that tutorial, we have seen how to connect one temperature sensor DS18B20 arduino. But today, I am gonna interface multiple temperature sensors DS18B20 Arduino. For this project I have used two sensors but you can use more if you want.
Temperature sensor DS18B20 is a one wire temperature sensor means we can get its data through a single wire and we can connect as many as we want temperature sensors with this single wire and can call them through their addressing. Each temperat ...
Hello everyone! I hope you all will be absolutely fine and having fun. Today I am going to given elaboration on Introduction to L293D. L 293D is basically a high current dual motor driver/controller Integrated Circuit (IC). It is able to drive load having current up to 1A at the voltage ranging from 4.5V to 36V. Motor driver usually act as current amplifier because they receive a low current signal as an input and provides high current signal at the output.
Motors usually operates on this higher current. L-293D has to builtin H-Bridge driver circuits and is able to control two DC motors at a time in both clockwise and counter clockwise direction. It has two enable pins and they should be kept high in order to control the motor. By changing the p ...
Hello friends! Hope you all will be absolutely fine. Today I am going to share my knowledge with you about how to create an algorithm for Water Level Detector in LabVIEW 2015. LabVIEW is an excellent software for simulation purpose as well as for the hardware interfacing (interfacing with the external devices). I support the "Graphical Language" which is usually known as "Field Programmable Gate Array (FPGA) " based language. In other software we have to create logic first and then we need to write a complete syntax for the created logic. This software is very easy to use and is quite helpful. Because, we don't have to write the complete complex syntax, instead we have to just create our logic and implement this logic using FPGA blocks. In this t ...
Hello everyone! I hope you all will be absolutely fine and having fun. Today, I am going to share my knowledge about how to make a simple Virtual Instrument (VI) for Stepper Motor Direction Control in LabVIEW. In my previous tutorial, I have worked on Stepper Motor Direction Control using Arduino, in which I have controlled Stepper Motor Direction Control using Arduino and I am gonna use the same setup but this time I am gonna do the Stepper Motor Direction Control in LabVIEW. Moreover, you should also have a look at Stepper Motor Direction Control using Matlab.
In this tutorial, I going to work on the program for Stepper Motor Direction Control in LabVIEW. So, before going into the details of this tutorial, you must go through my previous tutor ...
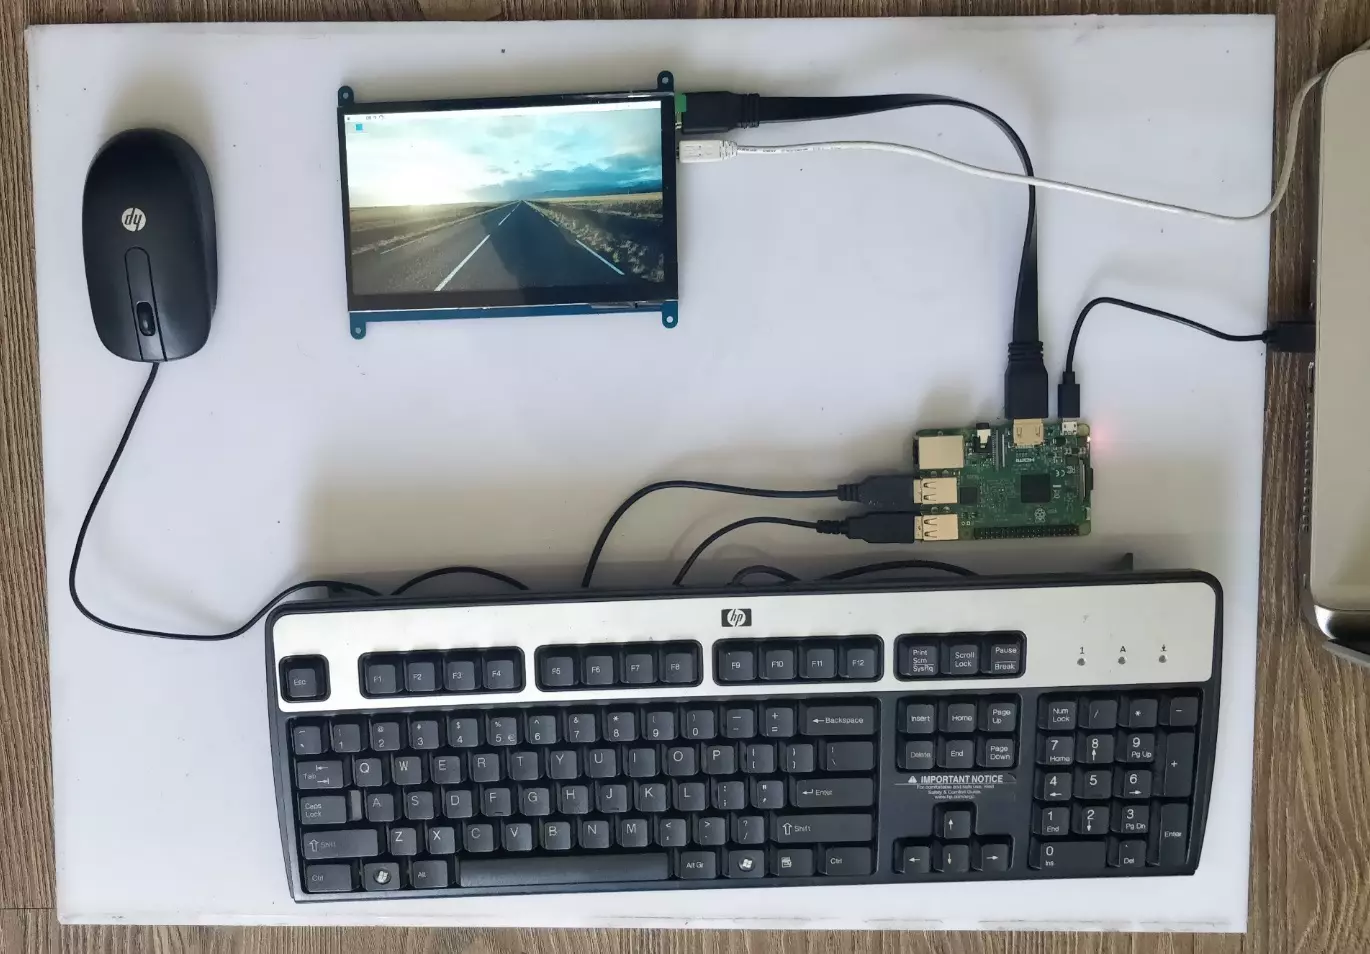
Hello friends, I hope you all are doing great. In today's tutorial, we are gonna have a look at How to Setup 7 inch HDMI LCD with Raspberry Pi 3. It's our second tutorial in Raspberry Pi 3 series. In our previous tutorials, first we have seen the basic Introduction to Raspberry Pi 3 and after that in our first tutorial, we have had a look at How to Install Raspbian on SD Card for Raspberry Pi 3.
Now we are ready to Setup 7 inch HDMI LCD with Raspberry Pi3 and then will start our raspbian for the first time on Raspberry Pi 3. We will also connect keyboard and mouse. In simple words, we are developing our own simple computer. So, let's get started with How to Setup 7 inch HDMI LCD with Raspberry Pi3:
How to Setup 7 inch HDMI LCD with Raspberry Pi3 ? ...
Hello everyone! I hope you all will be absolutely fine and having fun. Today, I am going to give you an elaboration on Introduction to LM2575. LM2575 is specially designed to simply the design of switching power supplies. It can be done by providing all the necessary active functions required in Integrated Circuit (IC) for step down regulators. LM-2575 can deliver load current of around 1A along with the good line regulation as well as load regulation. LM 2575 has different builtin functions e.g. frequency compensation, cycle by cycle current limiting, oscillator with the fixed frequency and a lot more.
LM-2575 has many amazing features i.e. it can reduce the heat sink size due to its higher efficiency parameter. In some cases even heat sink is ...
Hi Friends! Hope you’re well. I welcome you on board. In this post today, I’ll discuss What is VPN & How Does it Work?
A VPN stands for Virtual Private Network. It is used to hide your online activities from your ISP (internet service provider) and other third parties. This means you can surf online, share your credentials and send and receive data online with confidence. No one can sneak into your personal data and browsing history. Plus, it gives access to prohibited websites that you cannot see with your regular internet connection. A VPN hides your IP address and replaces it with another string of numbers from another location, which means no one can identify your actual location and IP address. Most companies and individuals use VPN to keep their personal data from the eyes of potent ...
Hello friends, I hope you all are doing well. Today, I am going to share the 8th tutorial of Section-III in our Raspberry Pi Programming Series. In the previous tutorial, we interfaced the temperature sensor DS18B20 with Raspberry Pi 4. In today's guide, we'll discover another temperature sensor BMP180 and will interface it with Raspberry Pi 4.So, let's get started:
Project DescriptionIn today's tutorial, we will interface the BMP180 sensor with Raspberry Pi 4 and will display the values of temperature, barometric pressure and altitude in the Raspberry Pi Console Window.
Components Required
We will use the following components in today's project:Raspberry pi 4BMP180 sensorFemale-Female Jumper wiresBreadboard
BMP180 Air Pressure Sensor
BMP180 i ...