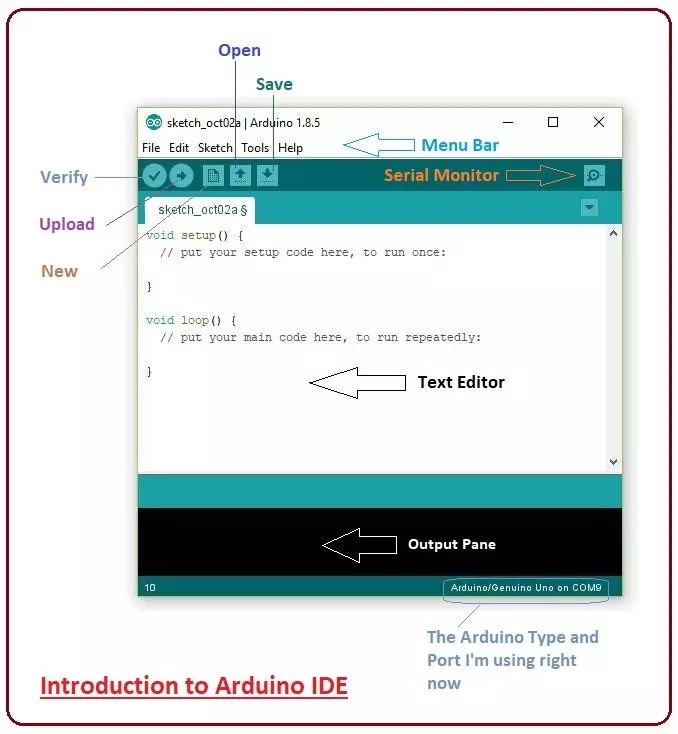
Hey Guys! Hope you are doing well. Today, I'll discuss the detailed Introduction to Arduino IDE, where IDE stands for Integrated Development Environment - An official software introduced by Arduino.cc , that is mainly used for writing, compiling and uploading the code in almost all Arduino modules/boards. Arduino IDE is open-source software and is easily available to download & install from Arduino's Official Site . In this post, I'll take you through the brief Introduction of the Software, how you can install it, and make it ready for your required Arduino module. Let's dive in and get down to the nitty-gritty of this Software. Introduction to Arduino IDE Arduino IDE is an open-source software, designed by Arduino.cc and mainly used for writing, compiling & uploading code to almost all Ar ...
Hey Guys! Hope you are getting along with life pretty well. Welcome you onboard. Today, I'll unlock the details on the Introduction to Arduino Micro . It is a Micro board, based on the ATmega32U4 microcontroller and comes with built-in USB, making it easily compatible with the computer. Arduino Micro, as the name suggests, is the smallest board in the Arduino Community. It is comparable to its counterparts like Arduino Nano and Arduino Promini. In this tutorial, I'll discuss each and everything related to Micro board including its main features, pinout, pin description, the software used and applications. Let's dive in and explore everything you need to know about this tiny board. Introduction to Arduino Micro Arduino Micro is the smallest board in the Arduino Community and is mainly based ...
Hi Friends! Hope you are doing well. Today, I'll give you a detailed Introduction to Arduino LilyPad . It is an Arduino Microcontroller Board, based on ATmega168 / ATmega328 and is introduced by Leah Buechley and SparkFun Electronics . This board is mainly developed for e-textiles and wearables projects. As per the designed purpose, it can be attached to fabric, sensors, power supplies, and actuators. You may need a conductive thread for joining this board with the required object. In this post, I'll try to cover each and everything related to Arduino LilyPad, what is this about and how it is used for the development of desired projects. Let's jump right in and get down to the nitty-gritty of this board. Introduction to Arduino LilyPad Arduino LilyPad is an Arduino Main Board that is mainl ...
Hey Friends! Hope you are doing well. Today, I'll discuss the details on How to use digitalWrite Arduino Command. The digitalWrite command in Arduino is used for writing the status of the digital Pin. The Pin assigned to this command must be an OUTPUT pin so that it can transfer data to other components like LEDs, motors, and actuators and use them as per your needs and requirements. Arduino boards have always been a great choice for both experts and newbies, as they come with built-in peripheral functions, and no need of external components is required to drive automation and develop some basic functions on the relevant project. Basic Arduino Software is used as a compiler and no separate burner is required to burn the required code into the board. You can simply plug the board with the c ...
Hi Friends! Hope you are doing well. In this post, I'll uncover the details on How to use pinMode Arduino Command . The pinMode defines the Arduino Pins, if they are used as an input or output. The INPUT_PULLUP is another option achieved by pinMode, that is mainly used to place a virtual pull-up resistor to the input pins. We have started Arduino Tutorials for Beginners quite a while now for the newbies, who are really interested to get a hands-on experience with Arduino. Generally, Arduino is known as a Microcontroller, but it is a step ahead of it. The PIC microcontrollers require some basic circuit to start with but Arduino brings revolution in the automation industry by removing the need of developing any basic circuit. Although Atmega328 is the Microcontroller used in Arduino UNO. Als ...
Hello everyone, I hope you all are fine and having fun with your lives. In today's tutorial, I am gonna show you How to Enqueue Scripts Files in WordPress Plugin. It's the third tutorial in this series of WordPress Plugin Creation. In our previous tutorial, we have seen How to Add Basic Functions in WordPress Plugin , so now the next thing we need to add is our scripts .js files and style .css files. As I told you in my previous tutorial that we can add these codes in a single file as well but it will make the file too heavy and complex. But if we divide our code in separate files then it will be quite easily to handle and debug in future. So, let's have a look at How to Enqueue Scripts Files in WordPress Plugin: Enqueue Scripts Files in WordPress Plugin Let's first create a sample .js and ...
Hello friends, I hope you all are doing great. In today's tutorial, I am going to show you How to Add Basic Function in WordPress Plugin. In the previous tutorial, we have seen How to Create a Simple WordPress Plugin , and today we are gonna add some basic functions in it, which are kind of compulsory. You may not find them useful right now but they will come in handy when we will work on complex plugins. It's the second tutorial in WordPress plugin creation series. If you got into any trouble then ask in comments and I will try my best to resolve them all. So, let's get started with these basic functions and add then in our newly created WordPress plugin: Add Basic Functions in WordPress Plugin As we have already created the class for our wordpress plugin so now its time to add some funct ...
Hello friends, I hope you all are doing great. In today's tutorial, I am gonna show you How to Create a Simple WordPress Plugin . I am starting this new series on WordPress Plugins and we will cover everything from basics to pro. This WordPress Plugin series is gonna be a long one. As today's our first post, so we are just gonna create a plugin and in later tutorials, we will add different features in it. I will try to cover all the basics but if you got into any trouble then ask in comments and I will try to resolve them out. I have been working a lot these days on WordPress and have learnt many new things so I thought to share them on my blog. It will be helpful for computer software engineers, as if you have created your own site with WordPress then you must have thought about creating ...
Hi Fellas! I am back to give you a daily dose of valuable information. Today, I'll give you a detailed Introduction to IRF3205 . It is an N-Channel HEXFET Power MOSFET that comes in a TO-220AB package and operates on 55V and 110A. It is mainly used for dynamic dv/dt rating and consumer full bridge applications. Additionally, it falls under the category of ultra LOW on-resistance devices based on Advanced Process Technology, making it a building block of the electronic applications where fast switching is a major concern. In this post, I'll cover each and everything related to this transistor, its main features, working, pinout, and applications. Let's get down to the nitty-gritty of this tiny component. Introduction to IRF3205 IRF3205 is an N-Channel HEXFET Power MOSFET that is mainly base ...
Hey Guys! Welcome you onboard. Today, I'll discuss the details on the Introduction to IRF4905. It is a P-Channel HEXFET Power MOSFET available in a TO-220AB package and is based on Advanced Process Technology. It is mainly used for fast switching purpose, capable of providing ultra-low on-resistance. This tiny device comes with three terminals called gate, drain and source where the gate terminal is used to control the current on remaining two terminals. The area between source and drain is known as a channel that is widely dependent on the voltage applied to the gate terminal. In this post, I'll cover each and everything related to this P channel MOSFET, its main features, working, pinout and applications. Let's jump right in and explore everything you need to know. Introduction to IRF490 ...