


Project Files of RFM95W LoRa Library for Proteus V1.1 (868/915 MHz + Arduino)
 Libraries
 Code
 Projects
 Simulation
rfm95w-tep-v1-1-64d326c026df4678896db703ecdb936a.zip
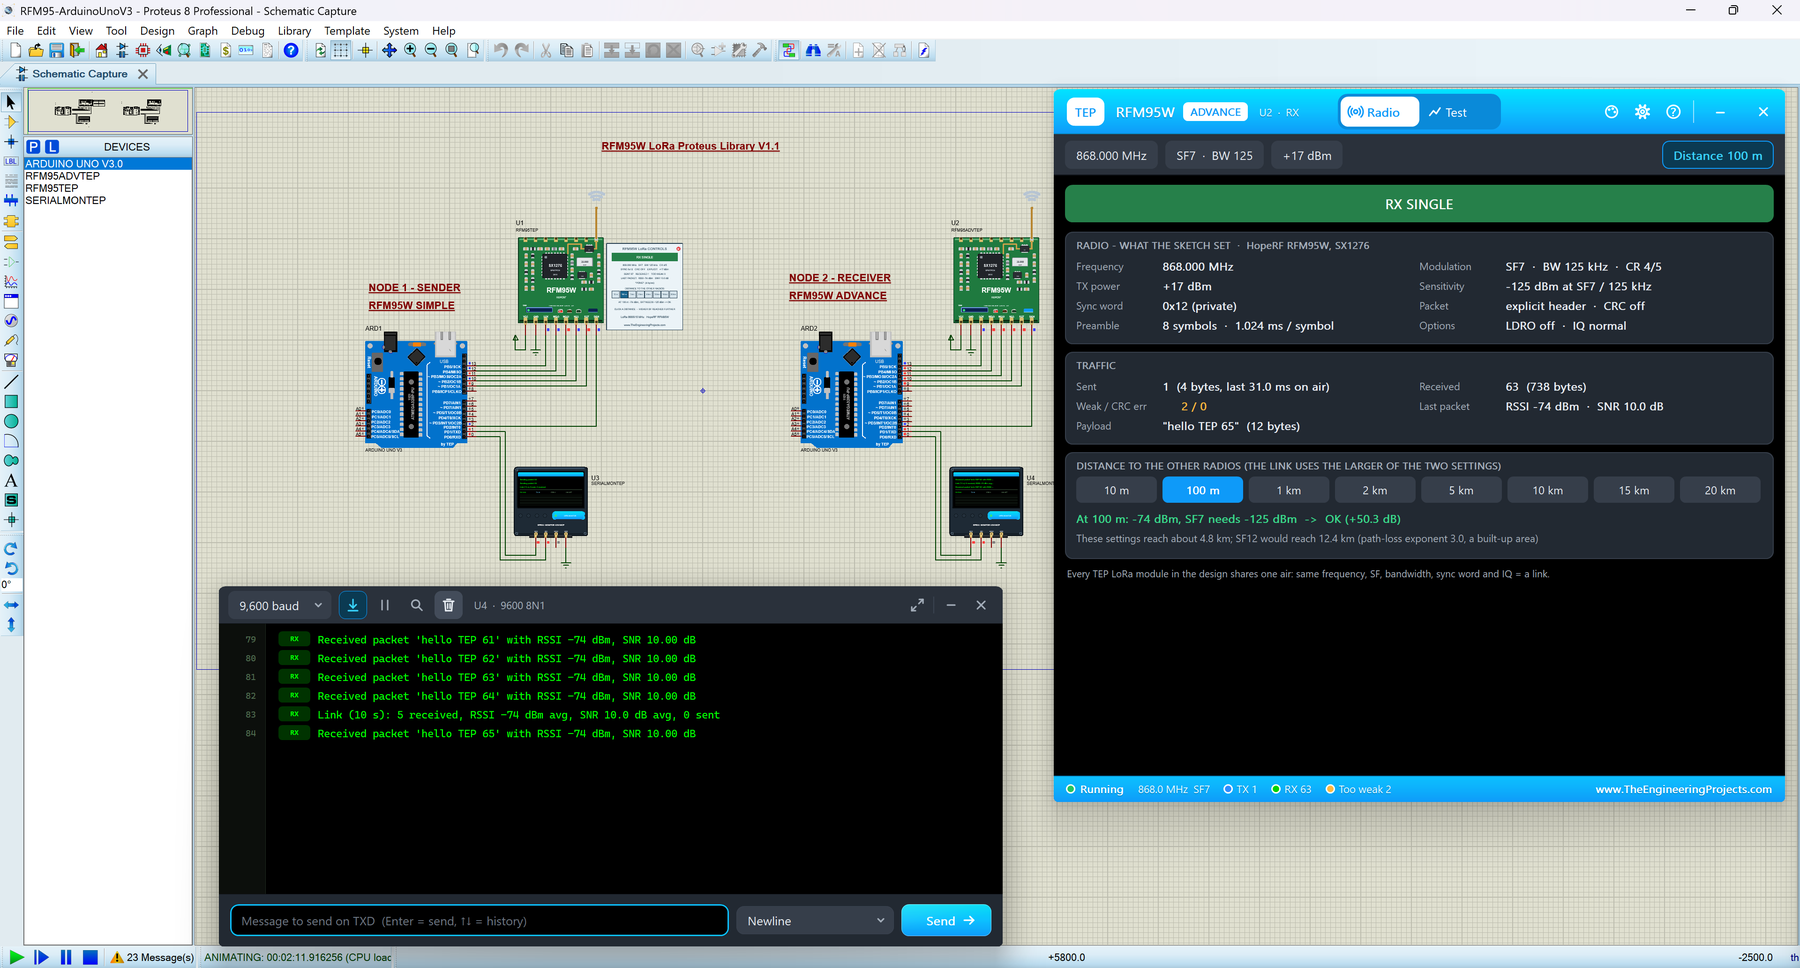
RFM95W LoRa Library for Proteus V1.1
RFM95W LoRa Library for Proteus V1.1 comes as a ZIP archive of 33 files (1.4 MB, 3.1 MB unpacked) holding Proteus library files, simulation model DLLs, a Proteus simulation, an Arduino sketch, an Arduino library and compiled HEX firmware.
- LIBProteus library
- IDXProteus library index
- DLLProteus model
- DSNProteus simulation
- INOArduino sketch
- LIBArduino library
- HEXHEX firmware
Description
Looking for the files of RFM95W LoRa Library for Proteus V1.1 (868/915 MHz + Arduino)? RFM95W LoRa Library for Proteus V1.1 is the ZIP package (1.4 MB) you need. It holds the Proteus library files (LIB and IDX), the simulation model (DLL), a ready Proteus simulation, an Arduino sketch, an Arduino library and the compiled HEX firmware. Below are the file structure, the README and the installation steps, so you can go from download to a working Proteus simulation in a few minutes.
What this library is
RFM95-LoRa-Library-for-Proteus-v1.1.zip with RFM95W Simple and Advance (TEPRFM95.LIB and TEPSX1278.DLL), the TEP Serial Monitor and Arduino libraries for Proteus, the two-UNO 868 MHz LoRa simulation with its HEX files, the sender and receiver sketches with the Arduino LoRa library and a README.
This is version 1.1; older or newer releases, when they exist, are listed in the Development tab.
What is inside the ZIP file
- ArduinoV3TEP.LIB – Proteus library, 95.6 KB
- TEPRFM95.LIB – Proteus library, 116.8 KB
- TEPSERIALMON.LIB – Proteus library, 11.1 KB
- ArduinoV3TEP.IDX – Library index, 830 B
- TEPSERIALMON.DLL – Simulation model, 978 KB
- TEPSX1278.DLL – Simulation model, 374 KB
- and 27 more, all listed in the File Structure tab
The archive unpacks to 3.1 MB and carries its own README (README.txt), shown in the README tab above.
How to download
Use the download panel at the top of this page: after the counter (30 seconds for guests, 10 for members) the black button unlocks and the ZIP file comes straight from our content network. If the browser opens it instead of saving, use Save as; extract the whole archive before using anything inside it.
How to install
- Step 1: Extract the ZIP file with Windows (Extract All), 7-Zip or WinRAR, keeping its folders.
- Step 2: Close Proteus and copy ArduinoV3TEP.LIB, TEPRFM95.LIB and TEPSERIALMON.LIB and ArduinoV3TEP.IDX into its LIBRARY folder (Proteus 8: C:\Program Files (x86)\Labcenter Electronics\Proteus 8 Professional\LIBRARY).
- Step 3: Copy TEPSERIALMON.DLL and TEPSX1278.DLL into the MODELS folder next to it, so the part simulates.
- Step 4: Start Proteus, press P and search for "ArduinoV3TEP"; place and wire it as in the tutorial.
- Step 5: In the Arduino IDE use Sketch → Include Library → Add .ZIP Library, then restart the IDE.
- Step 6: Open RFM95_Receiver.ino, RFM95_Sender.ino and LoRaDumpRegisters.ino and 11 more in the Arduino IDE, pick board and port and Verify (Export Compiled Binary gives the HEX).
- Step 7: In Proteus set the controller's Program File to RFM95_Receiver.hex and RFM95_Sender.hex; on hardware, flash the same file.
- Step 8: Open RFM95-ArduinoUnoV3.pdsprj in Proteus and press Play.
Read the detailed guide
This page is for the files. The full tutorial, RFM95W LoRa Library for Proteus V1.1 (868/915 MHz + Arduino), explains the circuit and the code step by step and shows the working results and the simulation; read it before you build. Questions about the download or the installation go in the comments below; more Proteus downloads are listed further down this page.

File Structure
 File Structure
698 B3.7 KB4.1 KB590 B973 B456 B681 B945 B2.9 KB2.7 KB3 KB3 KB16.2 KB3.1 KB8.6 KB1.2 KB374 B1 KB4.8 KB8.2 KB9.1 KB830 B95.6 KB116.8 KB11.1 KB978 KB374 KB18 KB37 KB38.4 KB978 KB374 KB27.6 KBGallery12 images from the tutorialOpen the tutorial
 Gallery12 images from the tutorial
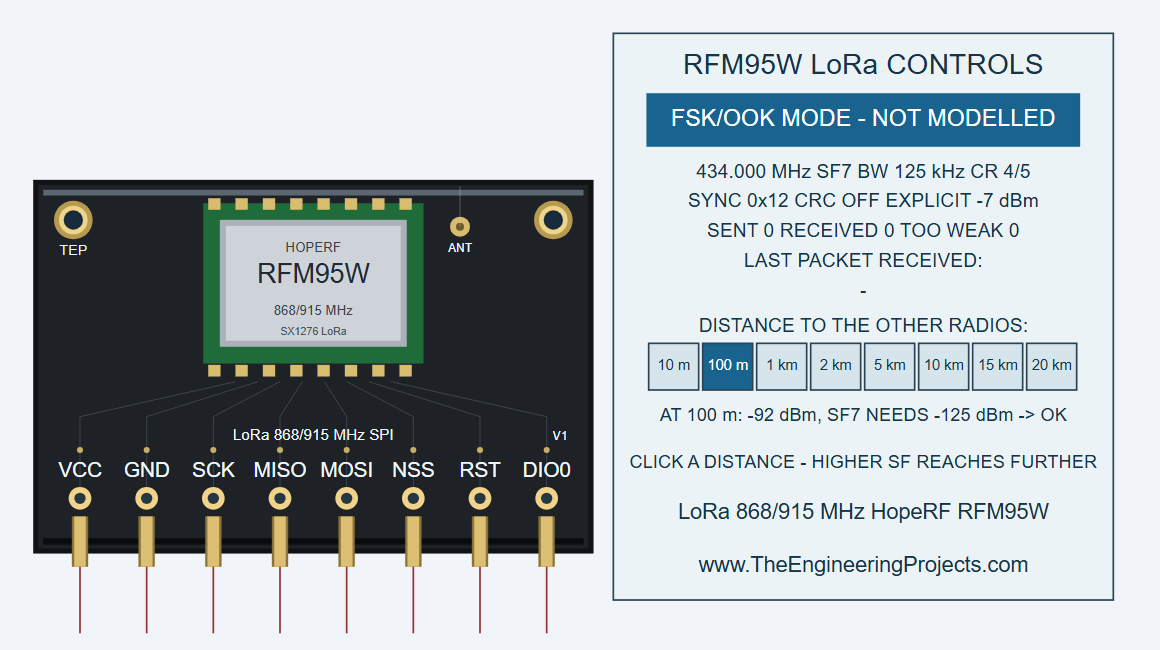
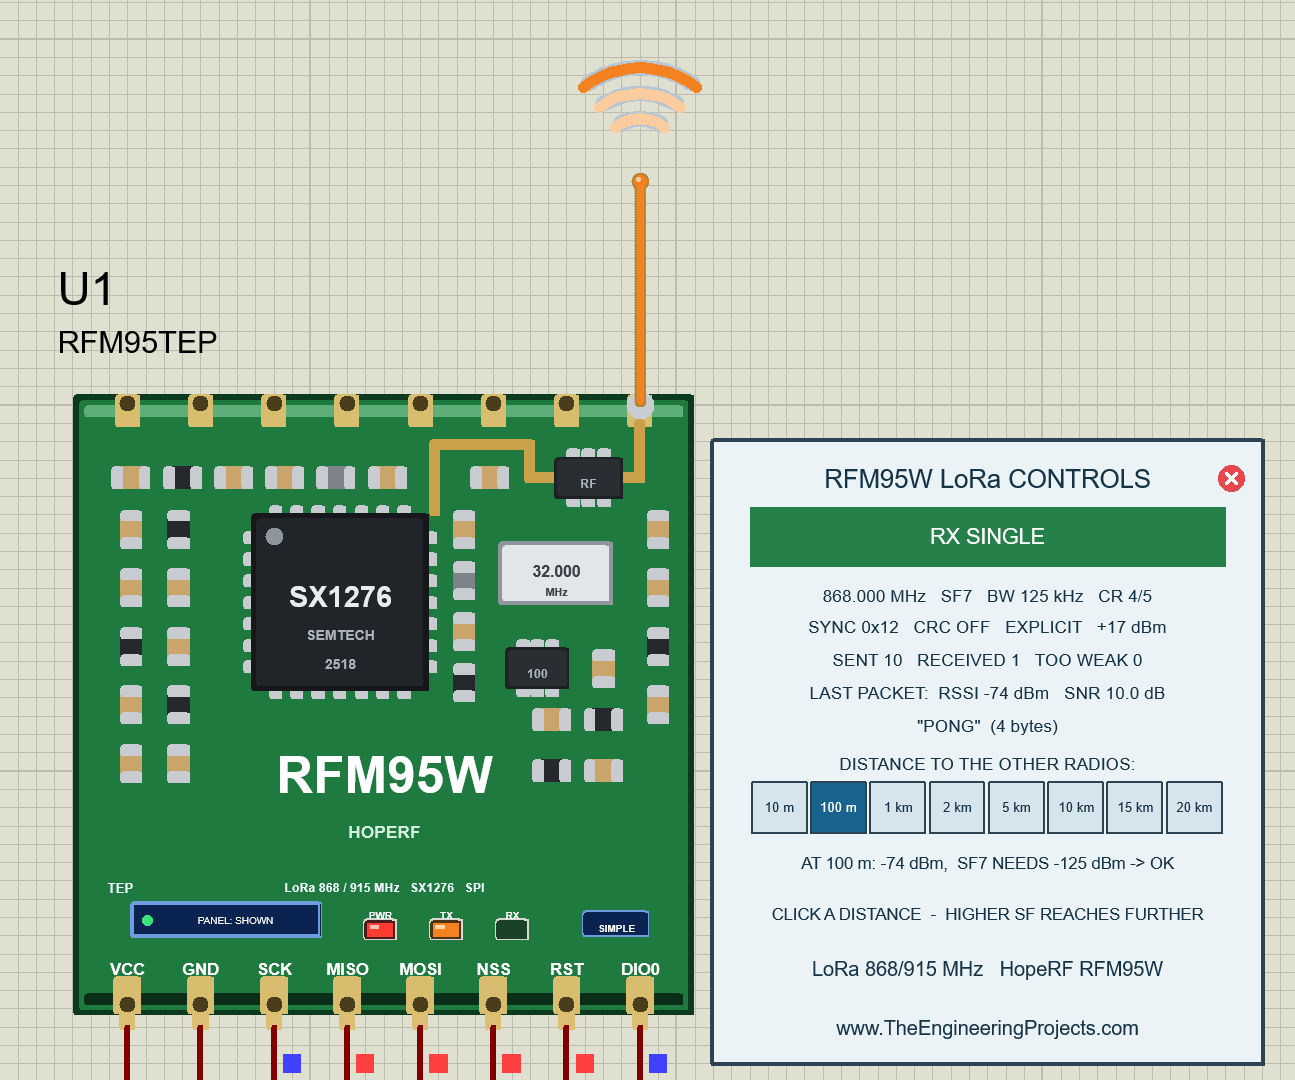
The circuit, the board and the results as they appear in RFM95W LoRa Library for Proteus V1.1 (868/915 MHz + Arduino). Open an image for its full size.
README
 README
RFM95W LoRa MODULE (HopeRF, Semtech SX1276, 868 / 915 MHz) LIBRARY FOR PROTEUS - V1.1
Designed by The Engineering Projects
www.TheEngineeringProjects.com

IMPORTANT LINKS
Article (read it first - pictures, step by step, every feature explained):
  https://www.theengineeringprojects.com/2026/09/rfm95w-lora-proteus-library.html
Report a bug or suggest a feature (our forum):
  https://www.theengineeringprojects.com/forum/category/rfm95w-proteus-library
The demo uses our TEP Serial Monitor Advance (included) instead of Proteus's
Virtual Terminal - its own article:
  https://www.theengineeringprojects.com/2026/10/serial-monitor-advance-proteus-library.html
Support us (the libraries are free):
  https://www.theengineeringprojects.com/donate

FILE STRUCTURE
RFM95-TEP-v1.1/
|-- Proteus Library Files/
|   |-- ArduinoV3TEP.IDX                              0.8 KB   its index -> LIBRARY folder
|   |-- ArduinoV3TEP.LIB                             95.6 KB   TEP Arduino UNO (demo) -> LIBRARY folder
|   |-- TEPRFM95.LIB                                116.8 KB   RFM95W Simple + Advance (2 devices) -> LIBRARY
|   |-- TEPSERIALMON.LIB                             11.1 KB   TEP Serial Monitor Advance -> LIBRARY folder
|-- Proteus Model Files/
|   |-- TEPSERIALMON.DLL                            978.0 KB   Serial Monitor model -> MODELS folder
|   |-- TEPSX1278.DLL                               374.0 KB   LoRa family model (all TEP LoRa libraries) -> MODELS
|-- Proteus Simulation/
|   |-- RFM95_Receiver.hex                           37.0 KB   UNO 2 (receiver v1.1)
|   |-- RFM95_Sender.hex                             38.4 KB   UNO 1 (sender v1.1)
|   |-- RFM95-ArduinoUnoV3.pdsprj                    18.0 KB   demo: UNO 1 + RFM95W Simple, UNO 2 + Advance
|   |-- TEPSERIALMON.DLL                            978.0 KB   copy of the monitor model
|   |-- TEPSX1278.DLL                               374.0 KB   copy of the model so the demo runs as is
|-- Arduino Code/
|   |-- RFM95_Receiver/RFM95_Receiver.ino             8.2 KB   sketch (source of the .hex)
|   |-- RFM95_Sender/RFM95_Sender.ino                 9.1 KB   sketch (source of the .hex)
|   |-- libraries/LoRa/                              59.0 KB   arduino-LoRa 0.8.0 (MIT, LICENSE), 19 files
|-- README.txt                                      ~28.5 KB   this file
Total: 3.05 MB (unzipped). The C++ source code of the model is not included.

WHAT IS IT?
A simulation model of the HopeRF RFM95W LoRa module (Semtech SX1276, 868 / 915
MHz, +20 dBm) for Proteus 8. Your Arduino talks to it over SPI exactly like to
the real chip: the LoRa register map, the 256-byte FIFO, sleep / standby / TX /
RX continuous / RX single / CAD, the IRQ flags and DIO0, packet RSSI / SNR,
explicit and implicit header, CRC, sync word, IQ inversion, PA_BOOST and PA_DAC
output power and the real LoRa time on air. It runs the UNMODIFIED arduino-LoRa
library (Sandeep Mistry). Every TEP LoRa module in a design (RFM95W, Ra-02,
SX1262) shares one simulated air: radios on the same frequency, spreading
factor, bandwidth, sync word and IQ setting talk to each other when the link
budget allows - you choose the DISTANCE between the radios (10 m ... 20 km) and
the model works out the received level and SNR (868 MHz loses 6 dB more than
433 MHz).
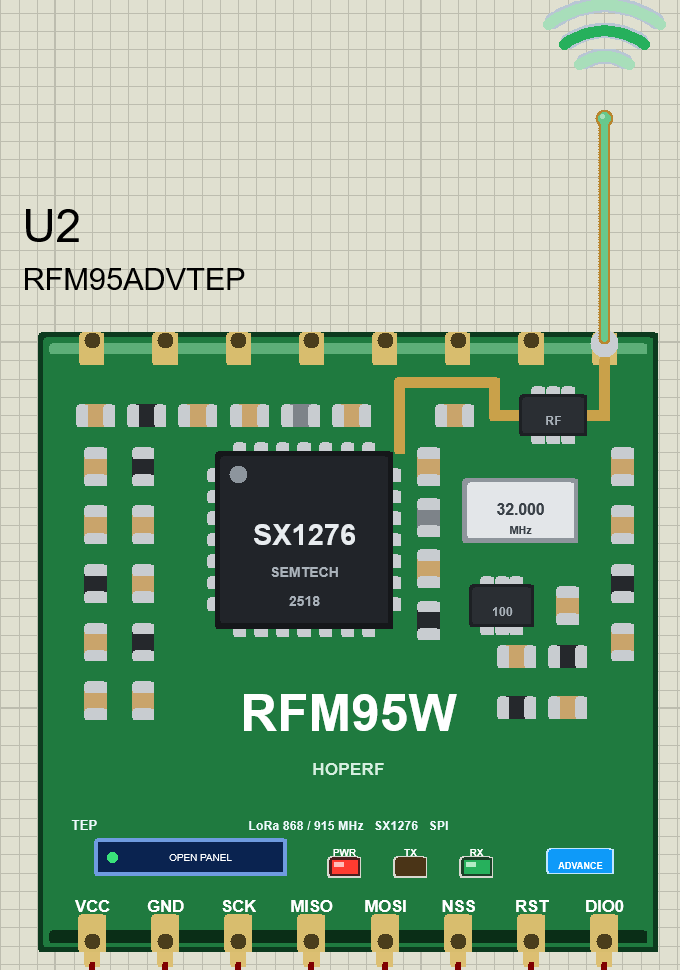
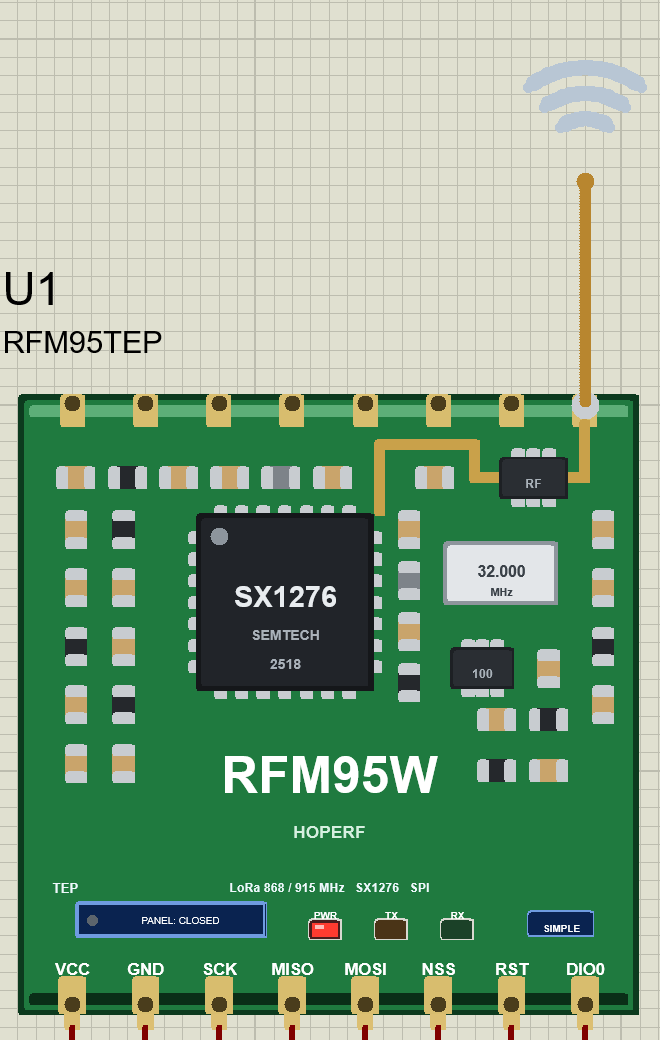
The part looks like the real module as HopeRF shows it, drawn clean and bold:
the small square GREEN board with the SX1276 chip, the 32.000 MHz crystal, the
RF switch and its small parts, the gold castellated pads and the ANT pad with a
quarter-wave wire antenna soldered to it. While the simulation runs the wire
glows orange while the module transmits and green while it receives, radio
waves above it ripple out (sending) or in (receiving), and three LEDs show what
happens: PWR (red, lit while VCC and GND are connected), TX (orange, blinks for
every packet sent) and RX (green, blinks for every packet received). The PWR /
TX / RX LEDs are a TEP addition - the real RFM95W has no LEDs.

TWO DEVICES IN ONE LIBRARY (search "RFM95" or "LoRa" in Pick Devices):
  RFM95W Simple    device RFM95TEP     "RFM95W LoRa Module (868/915 MHz) - Simple"
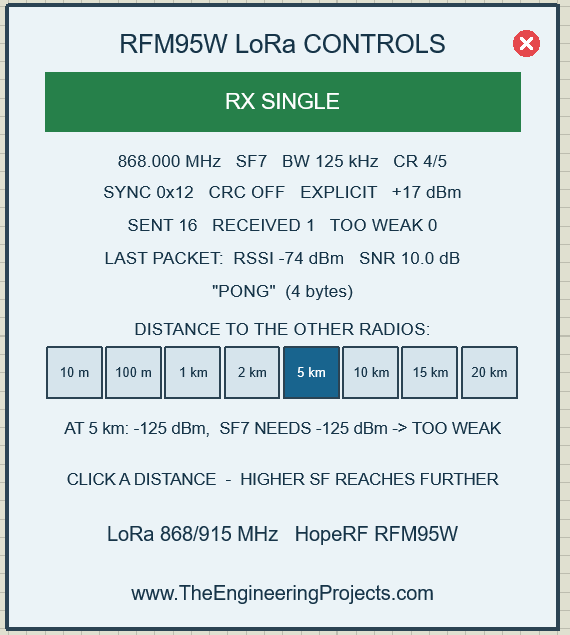
                   On-Sheet Panel: the control panel is drawn on the schematic
                   next to the module (the v1.0 panel): mode, frequency, SF,
                   bandwidth, coding rate, sync word, CRC, header, TX power,
                   SENT / RECEIVED / TOO WEAK, the last packet with RSSI / SNR,
                   the DISTANCE buttons and the predicted link budget. The red X
                   in the panel header closes it, the PANEL button on the board
                   opens it again. Your v1.0 designs keep working with this
                   device.
  RFM95W Advance   device RFM95ADVTEP  "RFM95W LoRa Module (868/915 MHz) - Advance"
                   Pop-Up Panel: only the module board on the schematic; at Run
                   a TEP pop-up window opens - the same look as the TEP Serial
                   Monitor (move it by its header, resize it, minimise it). The
                   header shows the state (SLEEP, STANDBY, RX, TX, CAD); the tabs
                   Radio and Test sit in the header; the gear and ? icons open
                   Settings and Help; the palette icon switches the theme:
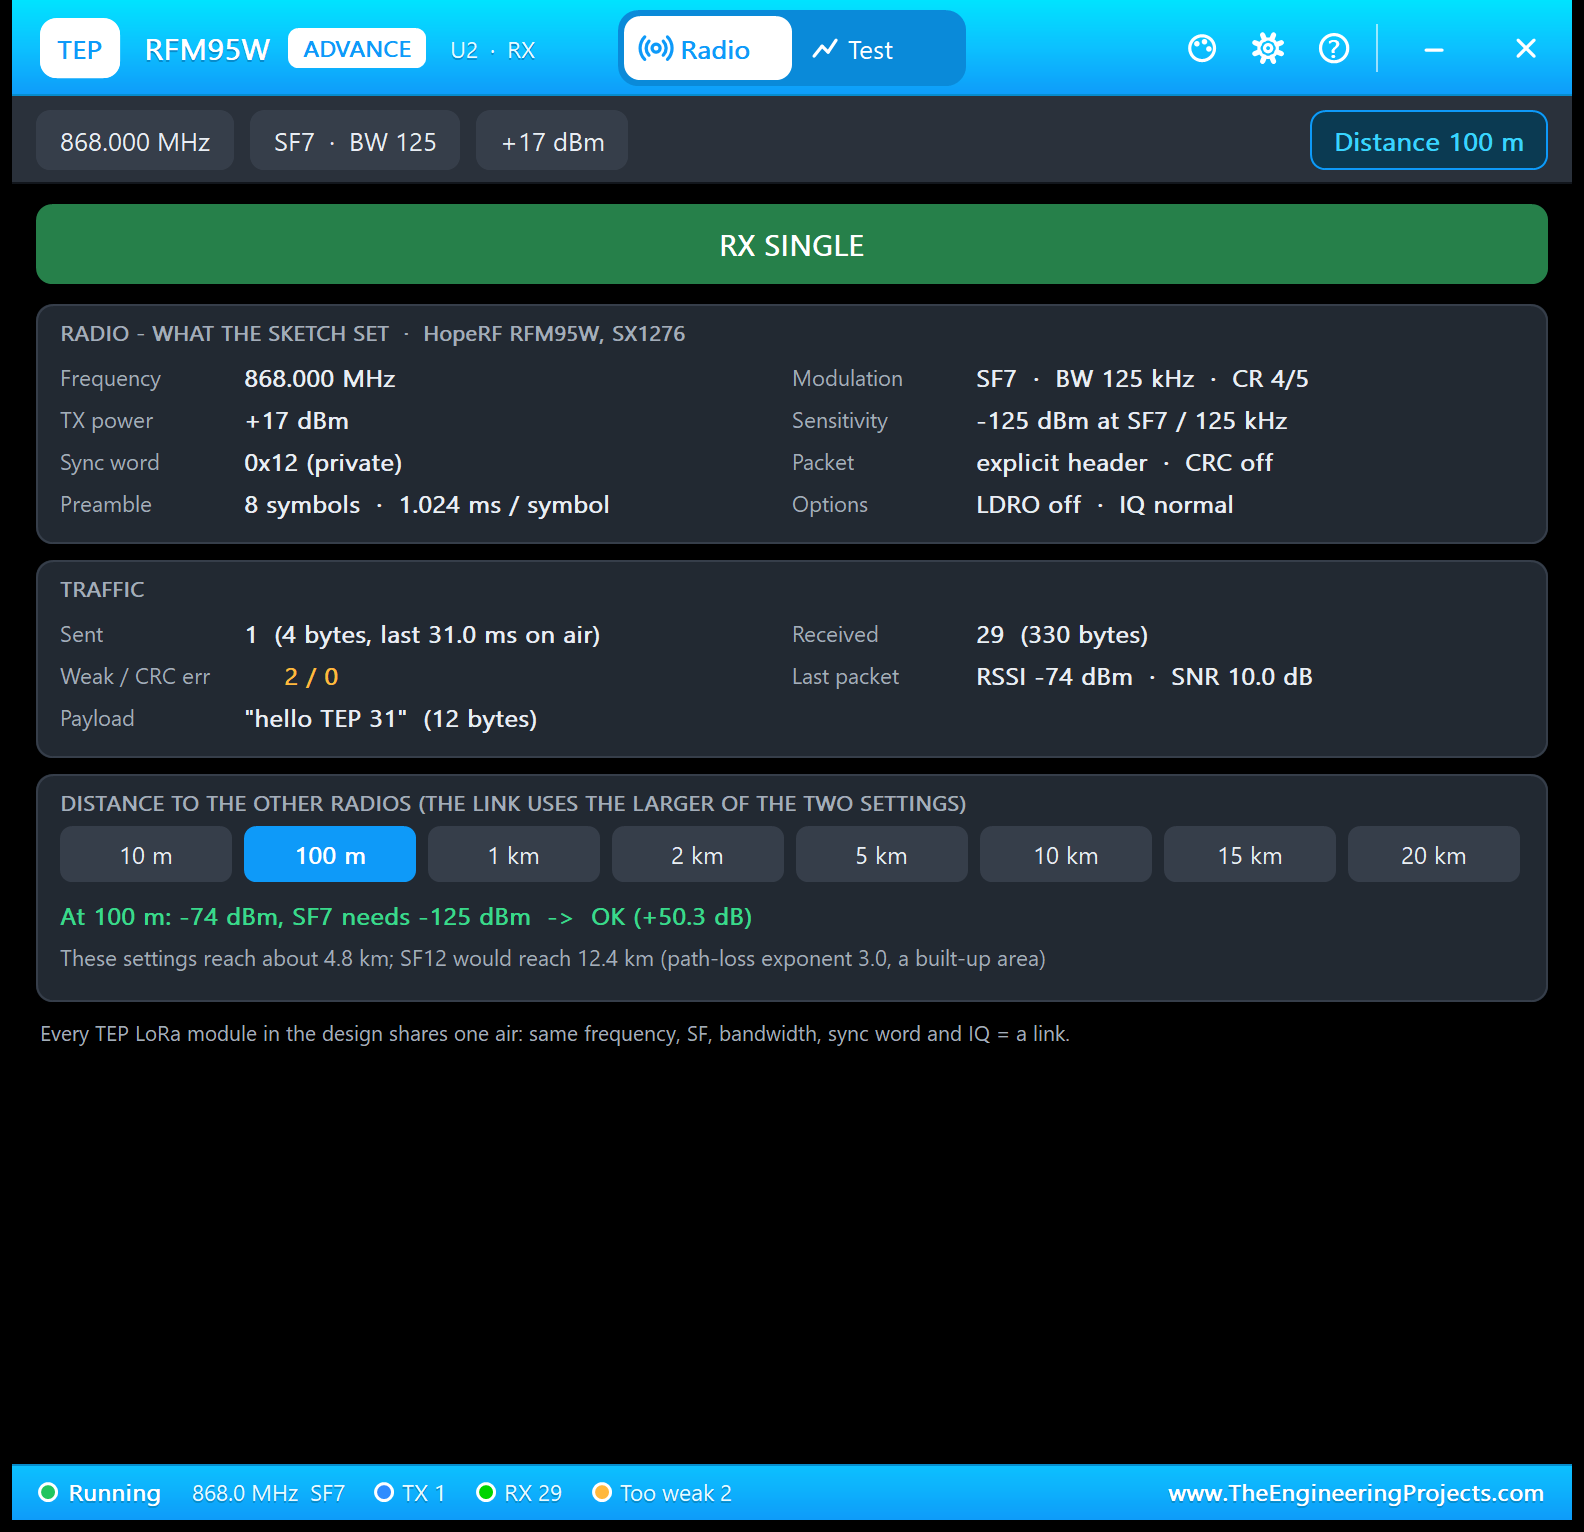
                     Radio     the state banner, RADIO - WHAT THE SKETCH SET
                               (frequency, TX power, sync word, preamble, SF /
                               bandwidth / coding rate, sensitivity, header, CRC,
                               LDRO, IQ), TRAFFIC (sent, received, too weak / CRC
                               errors, the last packet and its RSSI / SNR) and
                               DISTANCE (the eight buttons, the level at that
                               distance and how far these settings reach)
                     Test      four test tools, all measured on the model: Link
                               test, Time on air, Range, Register check (see THE
                               TEST TOOLS below)
                     Settings  theme (TEP Dark / Light), text size, open at Run,
                               window size - remembered for your Windows user
                     Help      Help & Support like the TEP Serial Monitor: report
                               a bug, suggest a feature, article, user guide,
                               updates, donate, website, forum; Copy diagnostics
                               (radio, registers, traffic, test results, the
                               other radios) for a bug report
                   The OPEN PANEL button on the board opens the window again
                   after you close it.
Both devices use the same model, TEPSX1278.DLL - the TEP LoRa family model (the
name comes from the first TEP LoRa library), also the model of our SX1278
(Ra-02) and SX1262 libraries (identical TEPSX1278.DLL in all three packages, so
installing them all is safe; RFM95W, Ra-02 and SX1262 modules in one design talk
to each other).

SIMPLE OR ADVANCE?
Simple when you want everything visible on the schematic (screenshots, a quick
look at the counters, the v1.0 behaviour). Advance when you want a clean
schematic and the tools: the link test, time on air with the duty-cycle rule,
the range per spreading factor and the register / SPI check. Both simulate the
same chip; you can mix them in one design (the demo does).

NEW IN V1.1
* Two devices: RFM95W Simple (the panel on the sheet, close / open) and RFM95W
  Advance (pop-up window with the radio page, four test tools, settings and
  help) - see above.
* Board: redrawn after HopeRF's RFM95W - GREEN and square (v1.0: a black
  carrier), the SX1276, the crystal, the RF switch, gold castellated pads and the
  wire antenna on the ANT pad. The 8 Proteus pins stay where v1.0 had them, so
  the wiring of a v1.0 design fits. The wire glows orange while sending and
  green while receiving, radio waves above it; new LEDs PWR / TX / RX (a TEP
  addition - the real module has none): PWR lights with VCC, TX blinks for every
  packet sent, RX for every packet received (each blink held 0.3 / 0.4 s so you
  see it); a PANEL / OPEN PANEL button and a SIMPLE / ADVANCE badge.
* Model: every radio keeps a record of each packet it sent or heard (decoded,
  CRC error, too weak, nobody heard it) with level, SNR and time on air, and of
  the Arduino's SPI accesses - what the test tools show. The air, the link
  budget, the DISTANCE buttons and everything of v1.0 are unchanged (100 m:
  RSSI -74 dBm, SNR 10 dB at 868 MHz).
* The demo uses the TEP Serial Monitor Advance instead of Virtual Terminals - one
  monitor per Arduino (U3 = UNO 1, U4 = UNO 2) with quick buttons - and shows both
  styles: UNO 1 with RFM95W Simple, UNO 2 with RFM95W Advance.
* The demo sketches (v1.1) keep every v1.0 output line and add Serial Monitor
  commands (SEND, PING, STATUS, SF, BW, PWR, AUTO, HELP) and a link line every
  10 s; the sender now listens between its packets, so the receiver can send to
  it too (and answer PING with PONG).
* Version 1.1 everywhere; the C++ source code of the model is no longer included.

TEST STATUS
v1.1 was tested in Proteus 8.5 SP0 (6 Oct 2026) with this demo: U3 / U4 and U2's
pop-up open at Run, the receiver prints every "hello TEP n" with RSSI -74 dBm /
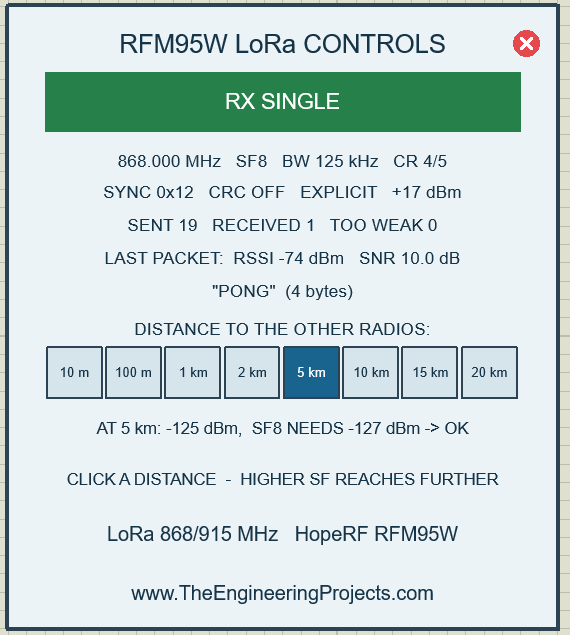
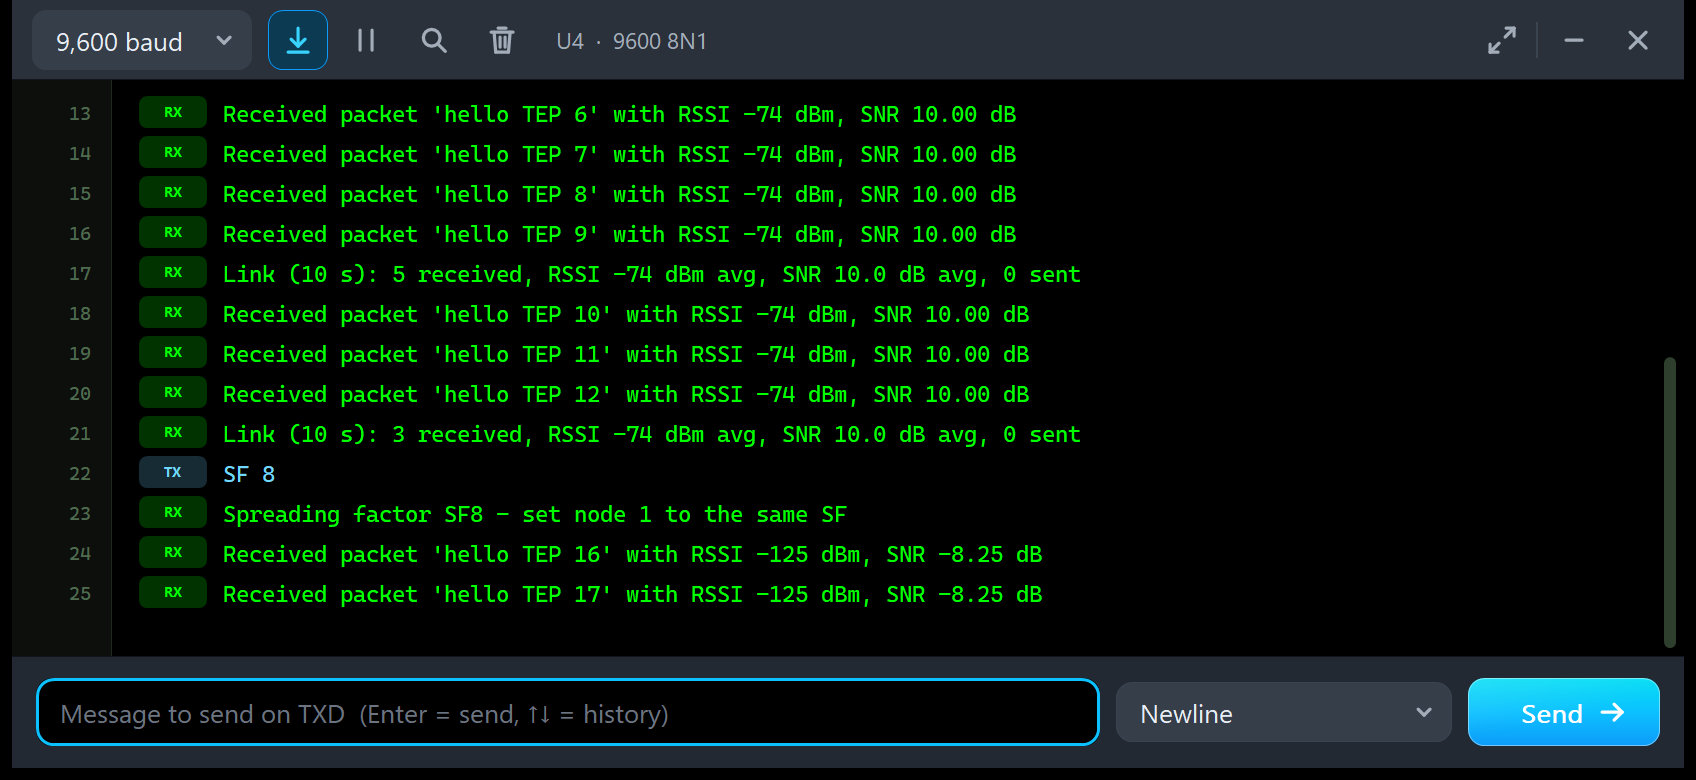
SNR 10.00 dB, PING -> PONG after 63.6 ms, 5 km -> TOO WEAK (-125 dBm, -0.7 dB)
and SF 8 on both monitors brings it back (-125 dBm, SNR -8.25 dB), the Link test
5 / 5 at -74 dBm, 41.2 ms. The pop-up tools, red X / PANEL and Settings / Help are
the same code as the SX1278 library (same DLL), verified there the same day.
v1.0 was tested in Proteus 8.5 SP0 (29 Sep 2026) with the v1.0 demo at 868 MHz:
the receiver printed every "hello TEP n" with RSSI -74 dBm / SNR 10.0 dB at
100 m; 5 km on the receiver panel made the SF7 packets TOO WEAK, 100 m restored
the link at once.
PC tests of v1.1 (1293 automatic checks of the SX127x side - this library and
the SX1278 library share them -, all passed): 48 with the UNMODIFIED
arduino-LoRa 0.8.0 driving two chip models bit by bit over SPI (the v1.0 tests,
unchanged, including an RFM95W at 868 MHz and one talking to a Ra-02 at 433
MHz); 33 on the v1.1 chip features (the packet records, the SPI log, the
private-air bench, the regional duty-cycle rules, the link budget); 134 on the
complete Proteus model (the 27 of v1.0 unchanged + both RFM95W devices and both
SX1278 devices, the red X and PANEL, OPEN PANEL, a v1.0 design, the antenna
glow, the PWR / TX / RX LEDs, the pop-up window, its pages, the four tools with
measured numbers); 56 with the REAL v1.1 demo sketches (RFM95_Sender /
RFM95_Receiver and the SX1278 pair) running on two simulated UNOs at once (every
v1.0 line, the commands, PING both ways, the link line); 1022 on the rendered
pop-up windows and boards (every page fits in TEP Dark and Light, at Large text
and 150 % DPI; every tool's hint lines fit; the LEDs lit / dark as they should).

INSTALLATION (about 2 minutes)
1. Close Proteus. Extract the WHOLE ZIP to a normal folder (e.g. Desktop).
2. Copy everything in "Proteus Library Files" (TEPRFM95.LIB with both devices,
   TEPSERIALMON.LIB and the TEP Arduino V3 library ArduinoV3TEP.LIB / .IDX used
   by the demo) to the LIBRARY folder of Proteus, for example:
     C:\Program Files (x86)\Labcenter Electronics\Proteus 8 Professional\LIBRARY
   (on some PCs: C:\ProgramData\Labcenter Electronics\Proteus 8 Professional\
   LIBRARY - use the folder that already holds Proteus's own .LIB files).
3. Copy TEPSX1278.DLL and TEPSERIALMON.DLL from "Proteus Model Files" to the
   MODELS folder (...\Proteus 8 Professional\MODELS).
4. Updating from v1.0: replace TEPRFM95.LIB (delete any TEPRFM95.IDX) and
   TEPSX1278.DLL. A v1.0 design keeps its v1.0 symbol: it runs with the new
   model (the v1.0 panel and its DISTANCE buttons, without the v1.1 board parts
   and the red X) - re-pick the part to get the v1.1 symbol. If you also use our
   SX1278 or SX1262 library, their TEPSX1278.DLL is the same file.
5. Start Proteus. In Pick Devices (P) search "RFM95": you get the Simple and the
   Advance device (category Peripherals > Wireless).

RUN THE DEMO
"Proteus Simulation\RFM95-ArduinoUnoV3.pdsprj" - keep the two .hex files and the
two DLLs beside the project.
  UNO 1 (ARD1): RFM95_Sender.hex, RFM95W Simple (U1) and Serial Monitor U3.
  UNO 2 (ARD2): RFM95_Receiver.hex, RFM95W Advance (U2) and Serial Monitor U4.
  1. Press Run. Both monitor windows open (9600 baud) and so does U2's pop-up.
     U3 shows "Sending packet: 0", 1, 2 ... every 2 s, U4 "Received packet
     'hello TEP 0' with RSSI -74 dBm, SNR 10.00 dB"; U1's panel counts SENT, U2's
     pop-up RECEIVED; the wire antennas flash orange (U1 sending) and green (U2
     receiving), U1's TX LED and U2's RX LED blink.
  2. U3 / U4 quick buttons: PING (the other node answers PONG - the round trip,
     about 63 ms - the 4-byte PING and PONG take 31 ms on air each at SF7),
     STATUS, SEND Hello from node 1 / 2 (the other monitor prints it), HELP. Type
     your own: SEND <text>, SF 9 (then on the other monitor too), BW 250 (both),
     PWR 20, AUTO OFF / ON (UNO 1).
  3. Click 5 km on U1's panel (or on U2's Radio page): the SF7 packets arrive TOO
     WEAK (-125 dBm at 868 MHz) and nothing is printed. Type SF 8 on both monitors
     and they arrive again. Back to 100 m and SF 7. Close U1's panel with its red
     X, open it with PANEL.
  4. U2 (Advance): open the Test tab:
       Link test: 10 packets, Run test - U1's next 10 packets with their level;
         click 5 km during the test and watch the bars turn red.
       Time on air: 12 / 32 / 64 / 255 bytes, Run test - every SF and bandwidth,
         and the 1 % duty cycle of the EU 868 MHz band.
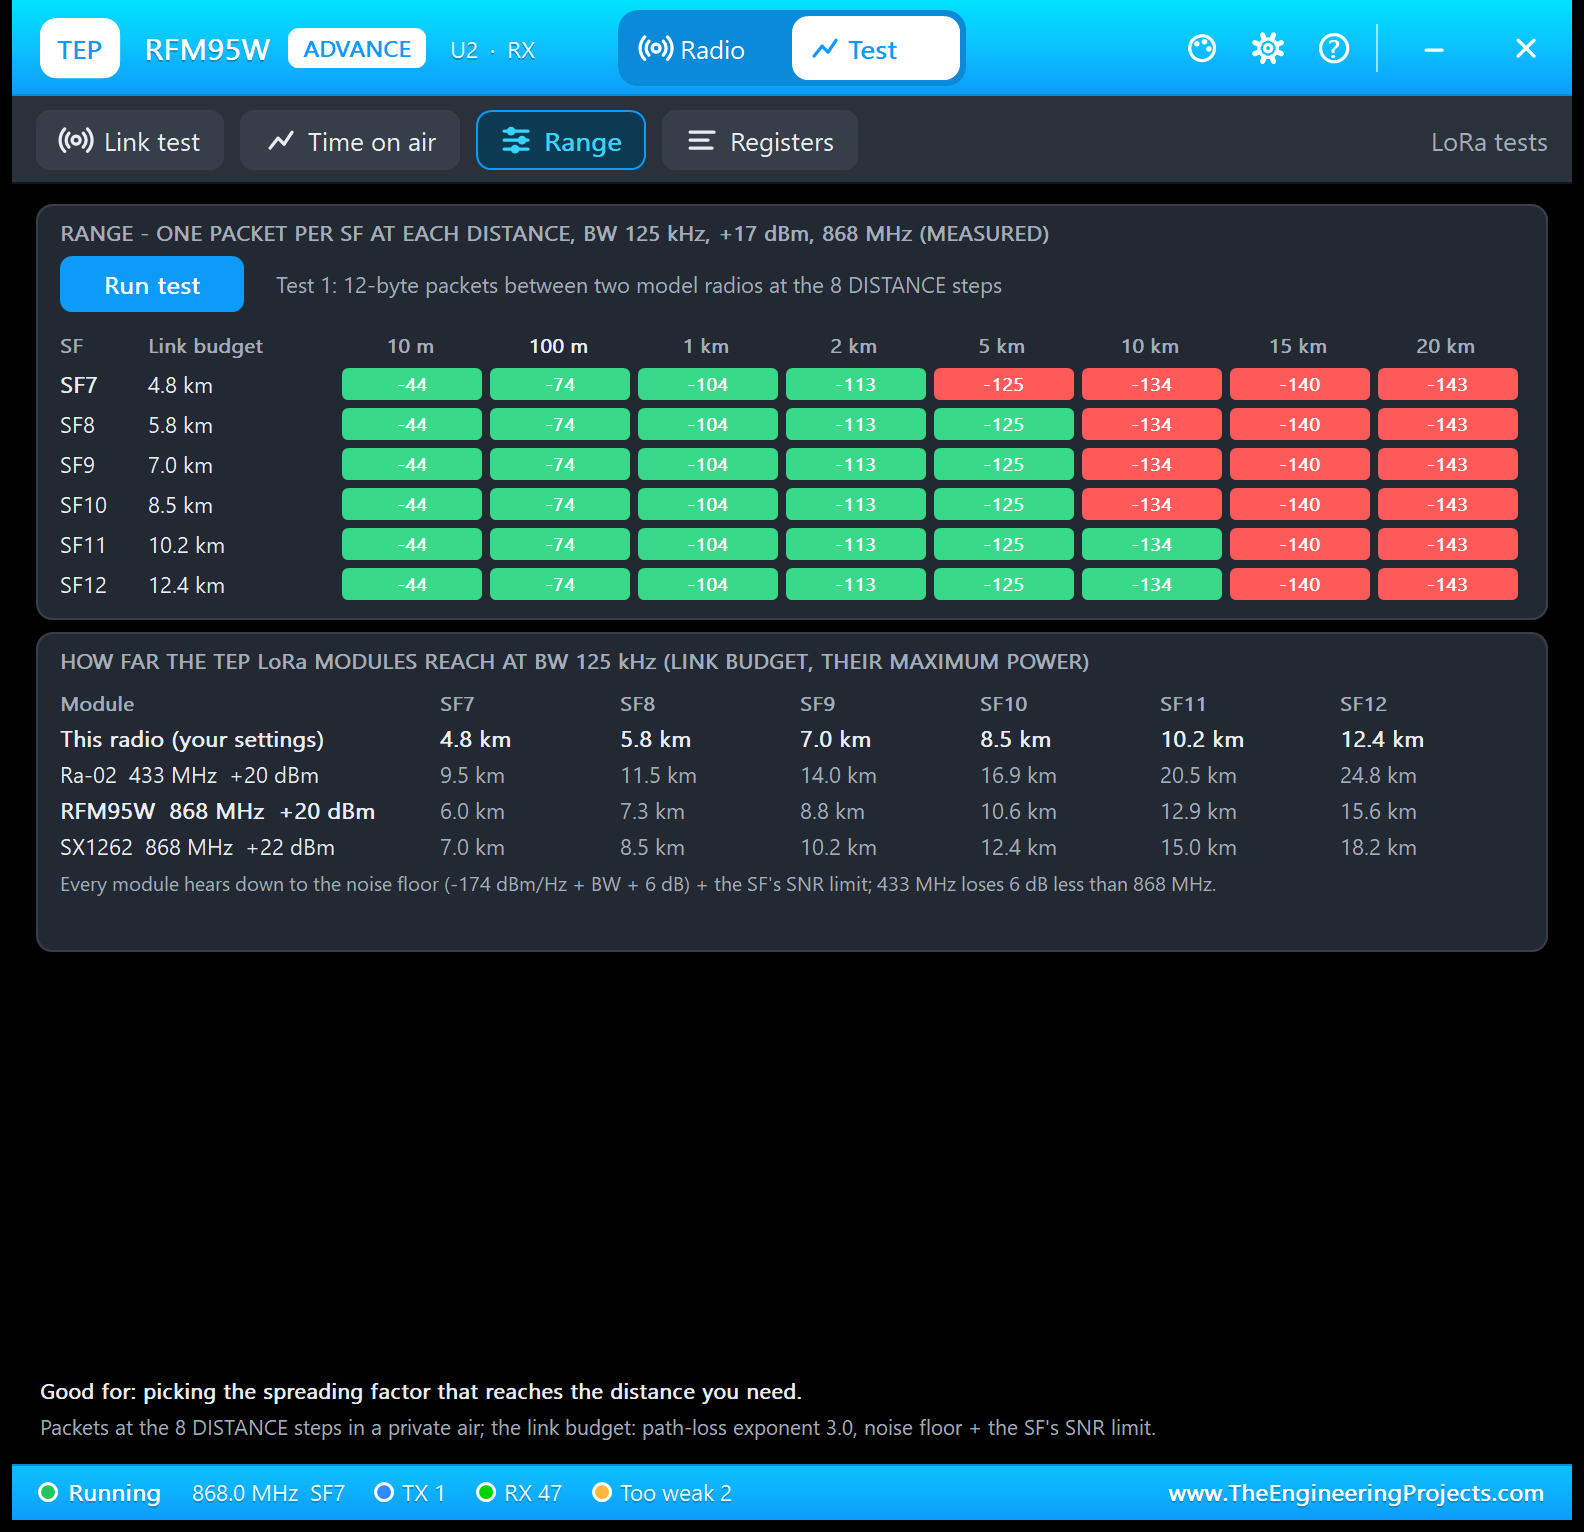
       Range: Run test - one packet per SF at each of the 8 distances.
       Register check: what the sketch wrote, its SPI accesses, U1 as partner.
  5. Close U2's window and open it again with OPEN PANEL on the board.
Closed a monitor window? Click OPEN MONITOR on the monitor part.

WIRING (SPI, the same on both UNOs - the arduino-LoRa default pins)
  RFM95W VCC (3.3V) -> supply (+5 V in the simulation - the real RFM95W needs
  3.3 V!), GND -> GND, SCK -> D13, MISO -> D12, MOSI -> D11, NSS -> D10,
  RST (RESET) -> D9, DIO0 -> D2 (the RxDone / TxDone interrupt).
  In the sketch: #define LORA_FREQUENCY 868E6   (915E6 for the US / AU band - both
  sketches have this line; sender and receiver must use the same value), then
  LoRa.begin(frequency) with frequency = LORA_FREQUENCY.
  Serial Monitor RXD <- Arduino D1 (TX), Serial Monitor TXD -> Arduino D0 (RX),
  Serial Monitor GND -> ground. RXD2 is not needed for SPI radios: the monitor's
  second input watches a serial line, and the RFM95W has none (it talks SPI).
  Serial.begin(9600) in the sketches.
Pin order in Proteus: VCC GND SCK MISO MOSI NSS RST DIO0.

REAL HARDWARE
 * 3.3 V only: feed VCC from 3.3 V and use a level shifter (or a breakout with
   one, or a 3.3 V board) for SCK, MOSI, NSS and RST - the RFM95W's pins are NOT
   5 V tolerant. A 10 - 100 uF capacitor at VCC helps at +20 dBm.
 * Fit the antenna (the 8.2 cm wire at 868 MHz, 7.8 cm at 915 MHz, or an
   SMA / U.FL antenna) before you transmit: sending into a missing antenna can
   destroy the power amplifier.
 * Use the frequency and duty cycle your country allows: EU 868.0 - 868.6 MHz
   1 % duty cycle, 25 mW e.r.p. (869.4 - 869.65 MHz: 10 %), US 902 - 928 MHz
   (400 ms dwell time per channel), Australia 915 - 928 MHz. The Time on air tool shows the rule for
   your frequency and how long to wait between packets. The RFM95W is the
   868 / 915 MHz part; for 433 MHz use the RFM98W / Ra-02 (our SX1278 library).

HOW THE RADIOS TALK (the model)
A packet arrives when the receiver is in LoRa RX (continuous or single) before
the preamble ends, on the same frequency (within a quarter of the bandwidth),
spreading factor, bandwidth, sync word, IQ setting and header mode, and the link
is strong enough:
  RSSI = TX power - path loss(distance, frequency)  (free space to 1 m, then
         exponent 3.0 - a built-up area; 31.2 dB at 1 m at 868 MHz)
  SNR  = RSSI - noise floor (-174 dBm/Hz + 10 log BW + 6 dB: -117 dBm at 125 kHz)
  decoded if SNR >= SF7 -7.5, SF8 -10, SF9 -12.5, SF10 -15, SF11 -17.5,
                     SF12 -20 dB (SX1276 datasheet)
The link uses the LARGER of the two radios' DISTANCE settings. Packets take their
real LoRa time on air (Semtech AN1200.13): 41.2 ms for 12 bytes at SF7 / 125 kHz,
991 ms at SF12 (with the low data rate optimisation). Typical at +17 dBm,
868 MHz: 100 m -74 dBm, 1 km -104 dBm, 2 km -113 dBm (SF7 works), 5 km -125 dBm
(SF8 or more), 10 km -134 dBm (SF11 or more), 15 km -140 dBm (out of reach at
+17 dBm; SF12 and +20 dBm needed). The SX1276 tunes 137-1020 MHz; outside that
the panel turns red with OUT OF BAND. The SNR reported is capped at +10 dB.

THE TEST TOOLS (RFM95W Advance, Test tab) - what they really do
Every tool runs on the live model with your sketch and shows one "Good for:"
line plus one line on how it measures.
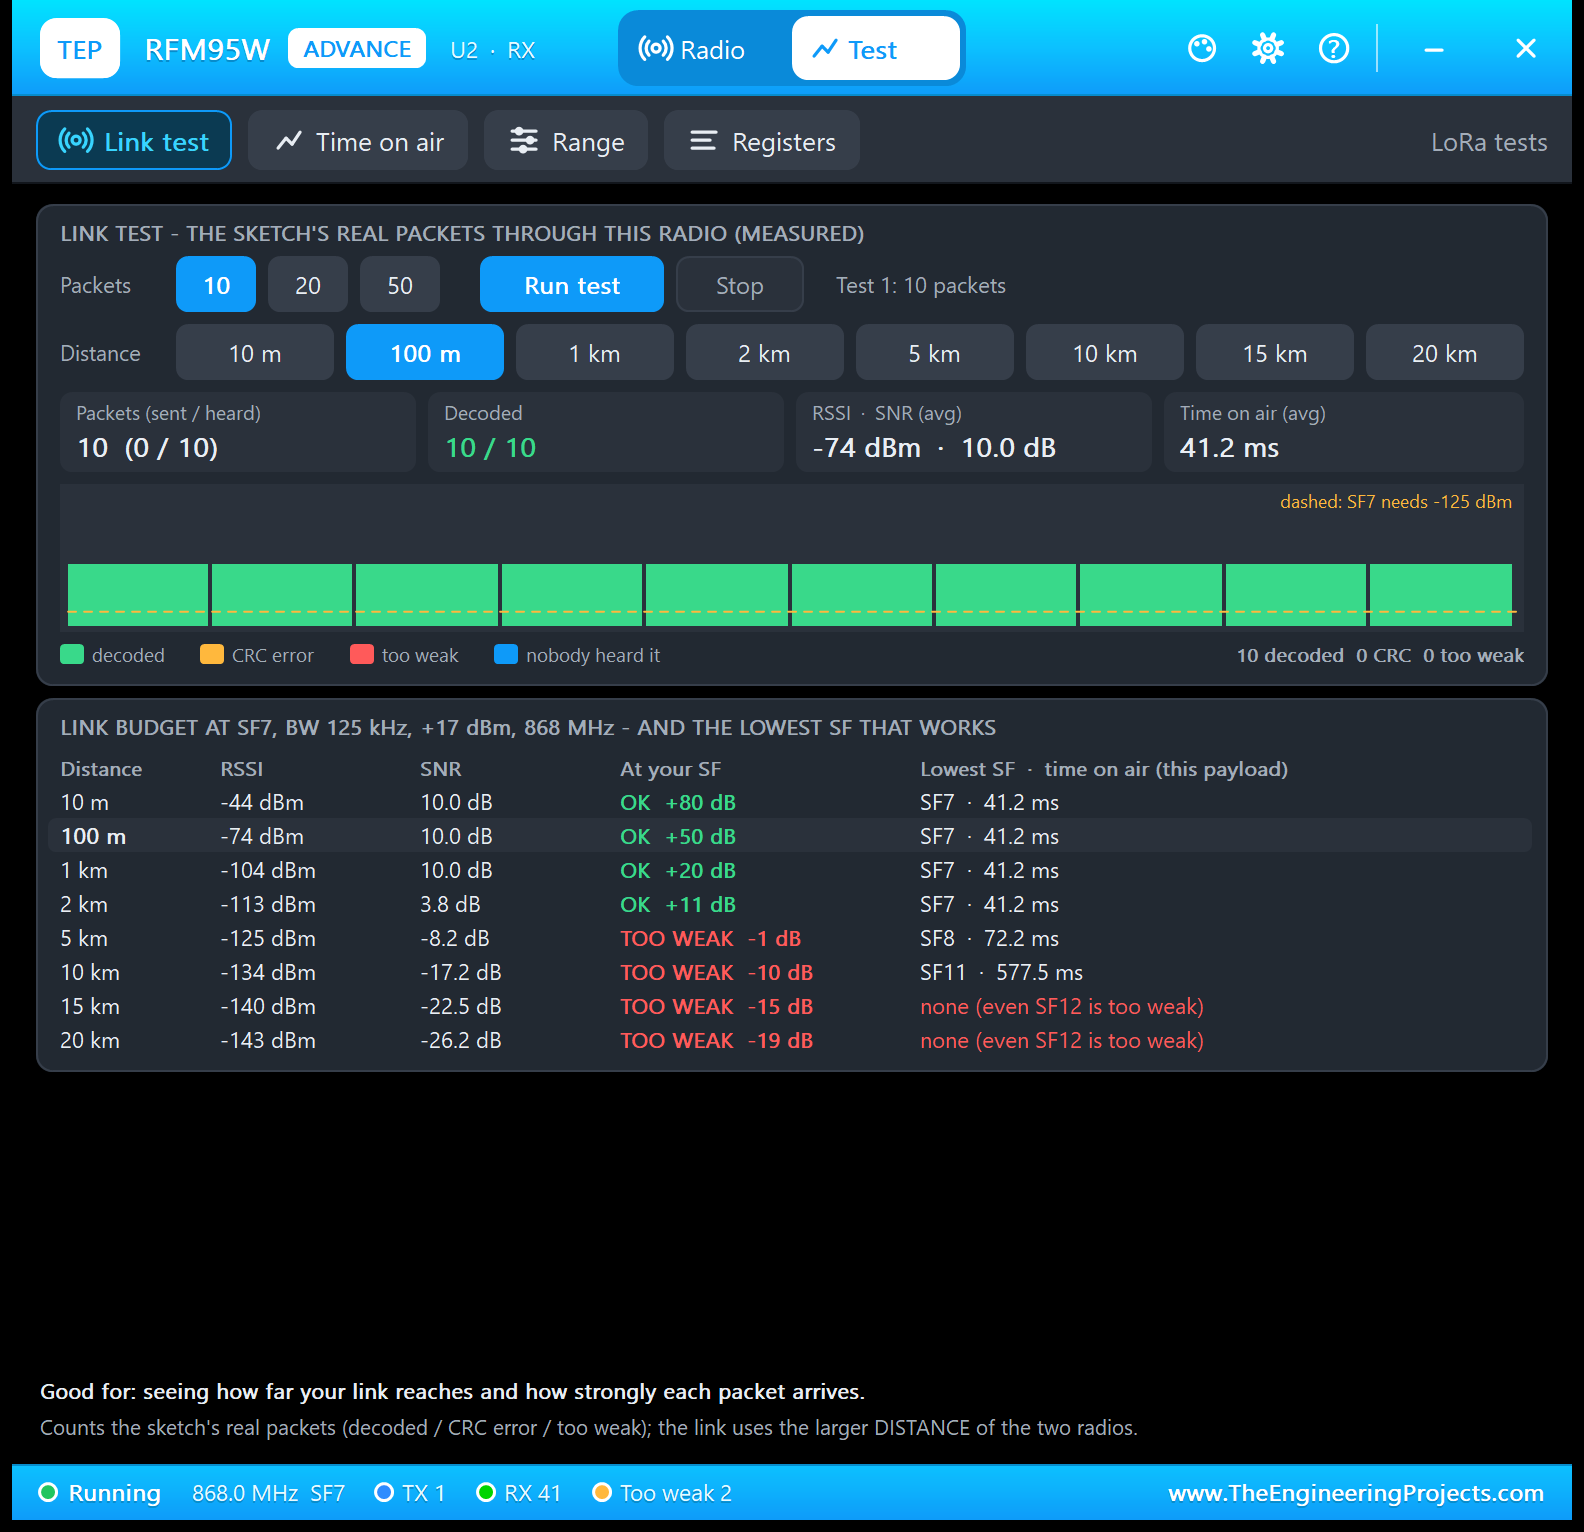
  Link test     Records the next 10, 20 or 50 packets THIS radio sends or hears
                (the sketch's real traffic): for each whether it was decoded,
                had a CRC error, was too weak or nobody heard it, with its RSSI,
                SNR and time on air; a bar graph with the sensitivity your SF
                needs as a dashed line. The DISTANCE buttons are on the tool, so
                you can move the radios while it runs. Below: the link budget at
                your SF, bandwidth and power at every distance and the lowest SF
                that works there. Example (the demo, U2): 10 packets decoded at
                -74 dBm / 10 dB at 100 m; at 5 km -125 dBm, too weak (SF8
                needed). No packet for 15 s stops it.
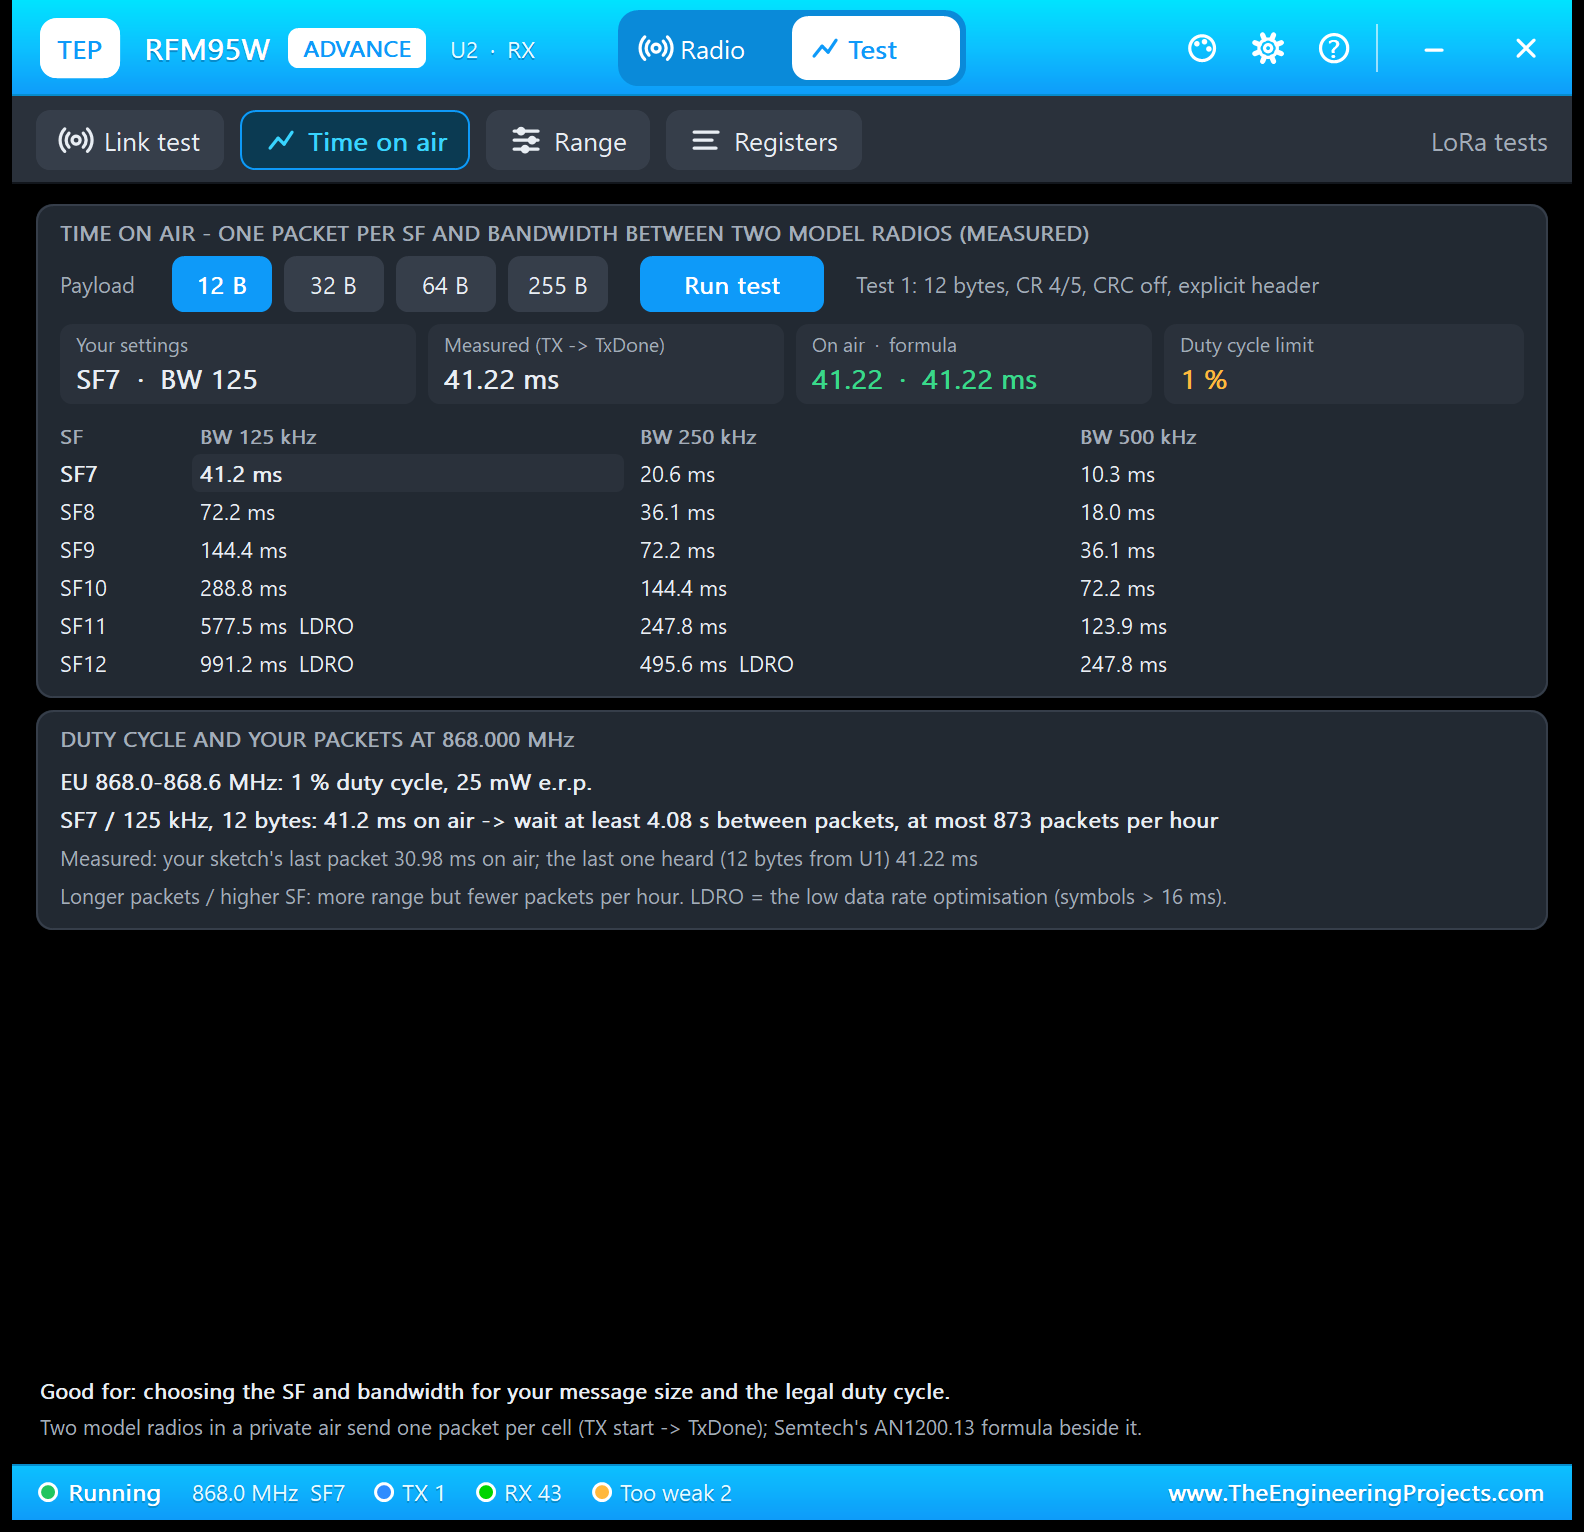
  Time on air   Two model radios in a private test air (your design never hears
                them) send one packet for every SF7..SF12 x 125 / 250 / 500 kHz
                at your payload size (12 / 32 / 64 / 255 bytes): the measured
                time from TX start to TxDone and Semtech's formula beside it,
                LDRO marked. Measured, 12 bytes, CR 4/5: SF7 41.2 / 20.6 / 10.3
                ms, SF12 991.2 / 495.6 / 247.8 ms at 125 / 250 / 500 kHz. Below:
                the DUTY CYCLE rule at your frequency (EU 868.0-868.6 MHz 1 %,
                US 902-928 MHz 400 ms dwell, ...), how long to wait between
                packets and how many fit in an hour (868 MHz, SF7, 12 bytes: wait
                at least 4.08 s, at most 873 packets per hour), and the last
                packet this radio heard, measured.
  Range         One packet per SF at each of the 8 DISTANCE steps between two
                model radios (your bandwidth and power): a table of the levels,
                green = decoded, red = too weak, and the link budget per SF.
                Measured at +17 dBm, 868 MHz, 125 kHz: SF7 reaches 2 km (budget
                4.8 km), SF12 10 km (12.4 km). Below: how far the TEP LoRa
                modules reach at their maximum power (RFM95W 868 MHz +20 dBm: SF7
                6.0 km ... SF12 15.6 km; Ra-02 433 MHz +20 dBm: 9.5 ... 24.8 km;
                SX1262 868 MHz +22 dBm: 7.0 ... 18.2 km).
  Register check The registers read live as an SPI read would (RegOpMode, RegFrf,
                RegPaConfig, RegPaDac, RegOcp, RegLna, RegModemConfig1-3,
                RegPreamble, RegSyncWord, RegPayloadLength, RegIrqFlags,
                RegDioMapping1, RegPktRssi / Snr, RegRssiValue, the FIFO bases,
                RegVersion) with their meaning, the SPI counters, the Arduino's
                last SPI accesses (time, register, data, duration; identical
                accesses in a row folded - parsePacket() polls RegIrqFlags) and
                THE OTHER RADIOS: does each match this one (frequency, SF,
                bandwidth, sync word, level here)?

THE DEMO SKETCHES ON THE SERIAL MONITOR (RFM95_Sender / RFM95_Receiver v1.1)
  SEND <text>             a message to the other node now
  PING                    the other node answers PONG - prints the round trip
  STATUS                  frequency, SF, bandwidth, coding rate, sync word,
                          power, counters, the last packet's RSSI / SNR
  SF <7-12>               spreading factor (type it on both monitors)
  BW <kHz>                bandwidth 7.8 ... 125, 250, 500 (both)
  PWR <2-20>              transmit power in dBm
  AUTO <ON|OFF>           (sender) the hello TEP packet every 2 s
  HELP                    the command list
Monitor quick buttons in the demo: PING, STATUS, SEND Hello from node 1 / 2, HELP.
Every 10 s each node prints a link line (sent, received, average RSSI / SNR).

EXPECTED MONITOR OUTPUT (from the PC test of the real sketches)
U3 (UNO 1, sender):
  TEP RFM95W LoRa Sender Demo v1.1
  LoRa ready: 868 MHz, SF7, 125 kHz, CR 4/5, sync 0x12
  Type HELP in the Serial Monitor for the commands
  Sending packet: 0
  PING: PONG from node 2 after 62.9 ms (RSSI -74 dBm, SNR 10.00 dB)
  Received from node 2: Hello from node 2  (RSSI -74 dBm, SNR 10.00 dB)
  Status: 868.000 MHz, SF7, BW 125 kHz, CR 4/5, sync 0x12, +17 dBm
    sent 3, received 0, auto-send ON (every 2 s)
  Link (10 s): 5 sent, 0 received
U4 (UNO 2, receiver):
  TEP RFM95W LoRa Receiver Demo v1.1
  Listening: 868 MHz, SF7, 125 kHz, CR 4/5, sync 0x12
  Received packet 'hello TEP 0' with RSSI -74 dBm, SNR 10.00 dB
  Received packet 'PING' with RSSI -74 dBm, SNR 10.00 dB
    -> PONG sent back
  Link (10 s): 5 received, RSSI -74 dBm avg, SNR 10.0 dB avg, 0 sent

PROPERTIES
The module has no user properties: the sketch sets frequency, SF, bandwidth and
power over SPI (as on the real chip), and the DISTANCE is chosen on the panel
(100 m at every Run). The panel style is chosen by the device (Simple /
Advance). The Advance window settings (theme, text size, open at Run, size) are
on its Settings page. The demo's Serial Monitors: BAUD 9600, THEME TEPDARK,
AUTOOPEN YES, QUICK1-4 as above (see the Serial Monitor's article for all its
properties).

LINKS.INI (OPTIONAL)
The Help page cards of the Advance device open web pages. To point them
somewhere else without a new DLL, put a text file named links.ini next to
TEPSX1278.DLL with lines KEY=URL, for example:
  ARTICLE=https://www.theengineeringprojects.com/...
Keys: WEBSITE, FORUM, BUG_REPORT, FEATURE_REQUEST, ARTICLE, USER_GUIDE,
UPDATE_CHECK, DONATE. Only http:// and https:// links are used; lines starting
with # are comments. Cards whose link is not published yet say "Link coming
soon". One links.ini serves all TEP LoRa libraries (they share the DLL).

TROUBLESHOOTING
* "LoRa module not responding - check the SPI wiring and power": check SCK D13,
  MISO D12, MOSI D11, NSS D10, RST D9 and VCC / GND, and that this package's
  TEPSX1278.DLL is in MODELS (and beside the project). A PING without answer
  prints "PING: no PONG - is node 2 running, on the same settings and in range?".
* Panel title says SX1278 instead of RFM95W: an old TEPSX1278.DLL (SX1278 v1.0)
  is installed - copy this package's DLL to MODELS.
* Nothing received: the same LORA_FREQUENCY in both sketches and the same SF,
  bandwidth and sync word (STATUS on both monitors; the Register check lists what
  does not match)? The receiver in RX? The DISTANCE too far for the SF (the
  panel's "-> TOO WEAK" line, the TOO WEAK counter)?
* SF / BW typed on one monitor only: the link breaks until the other node uses
  the same setting.
* The part is not simulated / no panel: TEPSX1278.DLL is missing from MODELS and
  from the project folder. No monitor window: TEPSERIALMON.DLL is missing, or
  click OPEN MONITOR on the monitor part.
* Advance: the pop-up does not appear - click OPEN PANEL on the module board,
  use Proteus's Debug menu, or turn "Open the panel at Run" on its Settings page
  back on.
* Simple: the red X does not close the panel - the design still holds the v1.0
  symbol; replace TEPRFM95.LIB, delete TEPRFM95.IDX and re-pick the part.
* Your own sketch: Proteus 8.5's UNO runs the hardware SPI of arduino-LoRa
  fine; only Software
…Development1 release
 Development1 release
-
V1.1RFM95W LoRa Library for Proteus V1.1this page
V1.1 is the only release in the Download Center so far. When a newer version is published, it appears above with its own download page.
Installation9 steps
 Installation9 steps
From the download to a working project, in order. The steps follow what the package contains.
You will need
- Proteus Design SuiteProteus 8 or newer (Labcenter), on Windows
- Arduino IDE1.8 or 2.x, with the board of the tutorial chosen under Tools → Board
- Any archive toolWindows, macOS and Linux extract ZIP files on their own
Steps
- 1
Extract the archive
Right-click rfm95w-tep-v1-1-64d326c026df4678896db703ecdb936a.zip and choose Extract All (or open it with 7-Zip or WinRAR) into a folder you can find again. Keep its folder structure (RFM95-TEP-v1.1) as it is.
- 2
Copy the library files into Proteus
Move ArduinoV3TEP.LIB, TEPRFM95.LIB and TEPSERIALMON.LIB and ArduinoV3TEP.IDX into the LIBRARY folder of your Proteus installation: C:\Program Files (x86)\Labcenter Electronics\Proteus 8 Professional\LIBRARY for Proteus 8, or the matching Proteus 7 folder. Older versions keep it under ProgramData\Labcenter Electronics. If Proteus is open, close it first.
- 3
Add the simulation model
Copy TEPSERIALMON.DLL and TEPSX1278.DLL into the MODELS folder next to LIBRARY, so the component can run, not only be drawn.
- 4
Restart Proteus and place the component
Start Proteus, open a schematic, press P (Pick Devices) and search for the component by the name used in the tutorial. It appears with its pins ready to wire.
- 5
Install the Arduino library
In the Arduino IDE choose Sketch → Include Library → Add .ZIP Library and pick the library, or copy its folder into Documents\Arduino\libraries. Restart the IDE to see its examples.
- 6
Open the sketch in the Arduino IDE
Open RFM95_Receiver.ino, RFM95_Sender.ino and LoRaDumpRegisters.ino and 11 more, select your board and port under Tools, then Verify. Sketch → Export Compiled Binary writes the HEX file a simulation needs.
- 7
Load the HEX file
In Proteus double-click the microcontroller, set Program File to RFM95_Receiver.hex and RFM95_Sender.hex and run the simulation. For real hardware, flash the same file with your programmer.
- 8
Open the example simulation
Open RFM95-ArduinoUnoV3.pdsprj in Proteus to see the wiring exactly as in the tutorial. Check the controller's Program File path, then press Play.
- 9
Follow the tutorial
RFM95W LoRa Library for Proteus V1.1 (868/915 MHz + Arduino) explains every connection and setting in order; keep it open beside the files while you build.
FAQs9 questionsContact TEP
 FAQs9 questions
How do I download RFM95W LoRa Library for Proteus V1.1?
Wait for the 30-second guest countdown on this page, then press the download button; the file comes straight from our storage. Members who are logged in skip the wait. If the browser opens the file instead of saving it, use its Save as option. The download link is made for you when the countdown ends and works for 15 minutes; a saved or shared link stops working, so share this page instead.
What is inside the archive?
RFM95W LoRa Library for Proteus V1.1 comes as a ZIP archive of 33 files (1.4 MB, 3.1 MB unpacked) holding Proteus library files, simulation model DLLs, a Proteus simulation, an Arduino sketch, an Arduino library and compiled HEX firmware. Open the File Structure tab for the full list of 33 files.
What should I do if the download does not start?
Check the browser's download list first; an ad blocker or a company firewall can also hold it back, so try another browser or network. If the file arrives incomplete, download it again. For an installation problem, read the Install tab or tell us in the comments with your software version and the exact error message.
Is this file free?
Yes. Every file in the TEP Download Center is free for learning, personal and student projects. If you share it, link back to this page or the tutorial so others find the latest version.
How do I check that the file arrived complete?
Compare its SHA-256 with the one on this page, 6e802a9465eaf469ad6e3af42109be8f03e78101ed3a360023ffc22a33461c89. In PowerShell run Get-FileHash "rfm95w-tep-v1-1-64d326c026df4678896db703ecdb936a.zip"; on macOS or Linux run shasum -a 256 "rfm95w-tep-v1-1-64d326c026df4678896db703ecdb936a.zip". The same value means the file is exactly the one in our storage; a different one means the download broke off, so download it again.
Do I need WinRAR to open the ZIP file?
No. Windows, macOS and Linux open ZIP archives on their own (Extract All, or double-click). WinRAR and 7-Zip work too. Extract the whole archive before using the files.
Where do I put the LIB and IDX files?
Both files go into the LIBRARY folder of your Proteus installation (Proteus 8: C:\Program Files (x86)\Labcenter Electronics\Proteus 8 Professional\LIBRARY; Proteus 7 has the same folder under its own name). Restart Proteus afterwards and search for the component with P.
Which Proteus version does the library need?
The tutorial names the Proteus version the library was made and tested with. Most TEP libraries work in Proteus 7 and Proteus 8; if the component does not appear after a restart, check that both the LIB and the IDX file were copied and that Proteus was fully closed while copying.
How do I get the HEX file into the simulation?
Compile the sketch in the Arduino IDE (Sketch → Export Compiled Binary gives you the HEX next to the sketch), then in Proteus double-click the board, set Program File to that HEX and run.
Members skip the wait. Log in or join TEP.

- 3Total downloads
- 4%Popularity
- ProteusCategory
- 0Comments
- ssyedzainnasirUploaded by
- 25 Sep 2026Uploaded at


 SHA-256
6e802a9465eaf469ad6e3af42109be8f03e78101ed3a360023ffc22a33461c89


 Need help with this file?
 Tags
Related Proteus
All Proteus tutorials


Comments
0