Stepper Motor Direction Control using Matlab


Stepper Motor Direction Control using Matlab
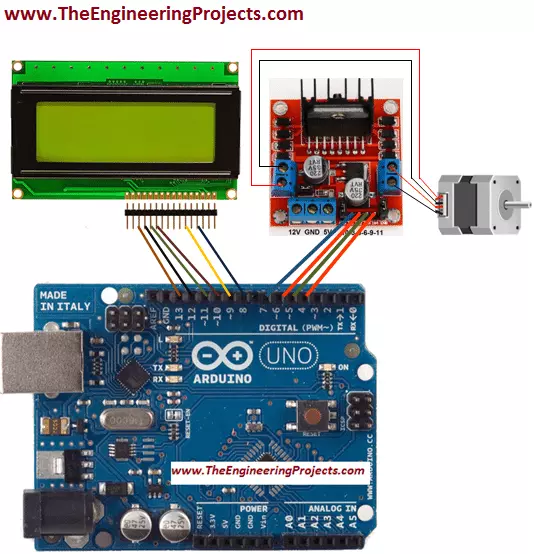
Here's the tutorial on Stepper Motor Direction Control using Matlab, I will elaborate you that how can you make a Matlab program to send different commands from Matlab to Arduino using serial communication. I have made a simple GUI first containing two different panels having five buttons in total for different purposes.Initial GUI
- The initial diagram of the GUI for Stepper Motor direction control using Matlab, is shown in the figure below.

- Here you can download the complete Matlab Simulation.
- Once the code is downloaded, simply extract the zip file and copy past the code in you Matlab software and enjoy the results. :)
- I have changed some of the properties of the GUI to make its external look better.
- The updated GUI is shown in the figure below.
Matlab Code Description
- Here I am going to explain the logic designed for this project Stepper Motor Direction Control using Matlab.
- Go to the callback function of the Start Serial button in the Matlab code.
- Copy and just paste the source code given below in its callback function.
clc
disp('Welcome to TEP');
disp('');
disp('www.TheEngineeringProjects.com');
disp('');
global tep
tep=serial('COM5'); % assign serial port object
set(tep, 'BaudRate', 9600); % set BaudRate to 9600
set(tep, 'Parity', 'none'); % set Parity Bit to None
set(tep, 'DataBits', 8); % set DataBits to 8
set(tep, 'StopBit', 1); % set StopBit to 1
%display the properties of serial port object in MATLAB Window
disp(get(tep,{'Type','Name','Port','BaudRate','Parity','DataBits','StopBits'}));
fopen(tep); % Open Serial Port Object
set(handles.text1,'String','Serial port os opened');
- The code given above first of all creates an object for the serial port named as tep.
- tep is made global so that it can be used in all the functions.
- Then it, opens the serial port and then sends command through the serial port.
- This code also prints baud rate, data bits, stop bit etc on the serial port as mentioned in the comments of the code given above.
- After sending the commands it also prints the commands executed on the GUI as well.
- The GUI with the printed command is shown in the figure below.

- Go to the callback function of the Clockwise button in the Matlab code.
- Copy and just paste the source code given below in its callback function.
global tep   %making the serial port vaiable global
fwrite(tep,'C'); %sending C through the serial port
disp('Character C is sent to the serial port'); %displaying on the serial port
set(handles.text1,'String','Clockwise rotation'); %prints on the GUI
- The code given above send the command C through the serial port in order to rotate the motor in clockwise direction.
- It prints the command on the serial port as well as on the GUI created in Matlab.
- The GUI with the updated text for Stepper Motor Direction Control using Matlab is shown in the figure below.

- Now, go to the callback function of the Anti Clockwise button in the Matlab code.
- Copy and just paste the source code given below in its callback function.
global tep
fwrite(tep,'A'); %sending command to the serial port
disp('Character A is sent to the serial port'); %displaying on the serial port
set(handles.text1,'String','Anti clockwise rotation'); %prints on the GUI
- The code given above send the command A through the serial port in order to rotate the motor in anti clockwise direction.
- It prints the command on the serial port as well as on the GUI created in Matlab.
- The GUI with the updated text is shown in the figure below.

- Now, go to the callback function of the Stop button in the Matlab code.
- Copy and just paste the source code given below in its callback function.
global tep
fwrite(tep,'S'); %sends S to the serial port
disp('Character S in sent to the serial port'); %prints on the serial port
set(handles.text1,'String','Motor is stopped'); %prints on the GUI as well
- The code given above send the command S through the serial port in order to stop the rotation of the motor.
- It prints the command on the serial port as well as on the GUI created in Matlab.
- The GUI with the updated text is shown in the figure below.

- Now, go to the callback function of the Stop Serial button in the Matlab code.
- Copy and just paste the source code given below in its callback function.
global tep
fclose(tep);%Close Serial Port Object
set(handles.text1,'String','Serial port is closed');%prints the executed command on the GUI
- The code given above prints the command Serial port is closed on the serial port as well as on the GUI created in Matlab.
- The GUI with the updated text is shown in the figure below.

- Was it difficult! I do not think so ;)
- So, try to make the same project and observe the results, are they closed to me?
×
![]()