Stepper Motor Speed Control in Matlab


Stepper Motor Speed Control in Matlab
Here, in this tutorial I will explain about how can make a program for Stepper Motor Speed Control in Matlab by creating a GUI having different buttons on it to control the direction of rotation of the stepper motor as well as the speed of the stepper motor by sending different commands through the serial port.- Here, you can download the complete simulation for Stepper Motor Speed Control in Matlab by clicking on the button below.
- Download .rar file, extract it and enjoy the complete Matlab simulation.
Block Diagram
- First of all I would like to elaborate the algorithm for Stepper Motor Speed Control in Matlab with the help of a block diagram.
- Block diagram is shown in the figure below:

- Fist of all power is supplied to the whole system to run it.
- Matlab sends commands towards the Arduino UNO through the serial port using serial communication.
- Arduino transfers those commands to the L298 motor controller andL298 drive the motor.
- Arduino prints the executed commands on the LCD as well.
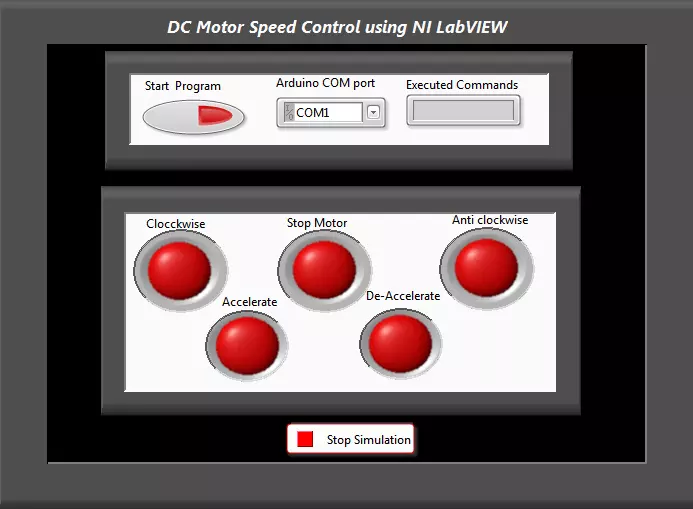
Initial GUI
- First of all I have created a very simple GUI (Graphical User Interface) for Stepper Motor Speed Control in Matlab.
- GUI has two different panels, Serial Port and Motor Controls.
- Serial Port panel has two buttons for opening and closing the serial port.
- Motor Controls panel has five buttons for clockwise and anti clockwise rotation, accelerating and deaccelerating the Stepper motor and stopping the stepper motor.
- Screen shot of the simple GUI for Stepper Motor Speed Control in Matlab is shown in the figure below.

- Then I made few of the changes by double clicking on all the buttons to make the GUI beautiful.
- The updated GUI is shown in the figure below.
- The figure shown above is the starting GUI when you just run the program.
- You can see below, after entering different commands GUI updates its text according to the command sent to the serial port.
Source Code Description
- First of all you must have to open the serial port by clicking on the button Start Serial.
- Go to the callback function of Start Serial button in the Matlab code.
- Just copy and paste the source code given below, in its callback function.
clc
global tep;
disp('Welcome to TEP');
disp('');
disp('www.TheEngineeringProjects.com');
disp('');
tep=serial('COM5'); % assign serial port object
set(tep, 'BaudRate', 9600); % set BaudRate to 9600
set(tep, 'Parity', 'none'); % set Parity Bit to None
set(tep, 'DataBits', 8); % set DataBits to 8
set(tep, 'StopBit', 1); % set StopBit to 1
%display the properties of serial port object in MATLAB Window
disp(get(tep,{'Type','Name','Port','BaudRate','Parity','DataBits','StopBits'}));
fopen(tep); % Open Serial Port Object
disp('Serial port is opened');
set(handles.text3, 'String','Serial port is opened');
- Now, as you press this button GUI will update its text as Serial port is opened.
- The updated GUI is shown in the figure below.

- Now, go the callback function of Clockwise button inside the Matlab source code.
- Just copy and paste the code given below in its call back function.
global tep
fwrite(tep,'C'); %Print character ‘a’ to the serial port
disp('Charater sent to Serial Port is “C”.');
set(handles.text1, 'String','Motor is rotating in clockwise direction'); %setting static text's text
- Now, if you press the Clockwise button the command C will be sent from Matlab to arduino via serial port.
- The GUI will update its text as Motor is rotating in clockwise direction.
- The screenshot of the updated GUI is shown in the figure below.

- Go to the callback function of Accelrate button and copy paste the code given below, in its callback function.
global tep
fwrite(tep,'H'); %Print character ‘a’ to the serial port
disp('Charater sent to Serial Port is “H”.');
set(handles.text1, 'String','Motor is accerating slowly'); %updating text on GUI
- As you press the Accelrate button the command H will be sent from Matlab to Arduino via serial port.
- The GUI will update its text as Motor is accelerating.
- If you press this button again and again, motor will continue to rotate at higher and higher speed.
- The screenshot of the updated GUI is shown in the figure below.

- Now, go the callback function of the Deaccelrate button in the Matlab source code.
- Just copy and paste the code given below in the callback function of this button.
global tep
fwrite(tep,'L'); %Print character ‘a’ to the serial port
disp('Charater sent to Serial Port is “L”.');
set(handles.text1, 'String','Motor is deaccerating slowly'); %updating GUI text
- As you press the Deaccelrate button the command L will be sent from Matlab to Arduino via serial port.
- The GUI will update its text as Motor is deaccelerating.
- If you press this button again and again, motor will continue to rotate at slower and slower speed.
- The screenshot of the updated GUI is shown in the figure below.

- Now, go the callback function of the Anti Clockwise button in the Matlab source code.
- Just copy and paste the code given below in the callback function of this button.
global tep
fwrite(tep,'A'); %Print character ‘a’ to the serial port
disp('Charater sent to Serial Port is “A”.');
set(handles.text1, 'String','Motor is rotating in anti clockwise direction'); %updating the text onto the GUI
- As you press the Anti Clockwise button the command A will be sent from Matlab to Arduino via serial port.
- The GUI will update its text as Motor is rotating in anti-clockwise direction.
- If you press this button again and again, motor will continue to rotate in anti clockwise direction.
- The screenshot of the updated GUI is shown in the figure below.

- Go to the call back function of the Stop Motor button inside the Matlab source code.
- Copy and just paste the code given below in its all back function.
global tep
fwrite(tep,'S'); %Print character ‘a’ to the serial port
disp('Charater sent to Serial Port is “S”.');
set(handles.text1, 'String','Motor is stopped');%Updating text on the GUI
- Now, if you press the Stop Motor button the command S will be sent from Matlab to Arduino via serial port.
- The GUI will update its text as Motor is stopped.
- The screenshot of the updated GUI is shown in the figure below.

- Go to the call back function of the Stop Serial button in the Matlab code.
- Copy and just paste the code given below in its call back function.
global tep;
fclose(tep);
set(handles.text1, 'String','Serial port is closed');%updating the text on the GUI
- At the end you must need to close the serial port.
- As you press the Stop Serial button the serial port will be closed.
- The GUI will update its text as Serial port is closed.
- The screenshot of the updated GUI for Stepper Motor Speed Control in Matlab is shown in below figure.

×
![]()