Hello everyone. I hope you all will be absolutely fine. Today, I am going to share an Introduction to LabView. LabView is a really exciting software and recently I have worked on many LabView Project so I thought to start this new set of series in which I am gonna explain all about LabView from beginners level to Pro Level. So, today I am gonna upload the first tutorial in this LabVIEW series so that's why I have named it Introduction to LabView and I hope you are gonna like this tutorial. :)
LabVIEW basically stands for “Laboratory Virtual Instrument Engineering Workbench”. This software is designed by the National Instruments (NI) for the control and design of the projects. You can use it for simulation purposes, can also interface hardware with ...
Hello everyone, I hope you all are doing great. Today, I am going to share a new tutorial in which we will have a look at How to Earn with Primedice. If you remember the Tutorial1: Earn with Freebitco.in in which I have shared how to earn with freebitco site and earn bitcoins. Today, I am gonna share a new bitcoin site and I must say that Primedice is quite better then Freebitco. I will share why its better then the previous one in detail.
AS I have discussed this in my previous tutorial that Engineers normally don't do well when it comes to earning so they must find some way through which they can earn some money. And online earning is the best way to earn money. In online earning, bitcoins are really very precious because if you have a look at i ...
Hello friends, we are going to learn and practice together one project from the industry. It is the bottle line production in which many processes are happening, including but not limited to filling, capping, and conveying from the start point where the bottles get in the line to the end point where the bottle gets out from the line. In the process, many concerns and restrictions must be addressed, like the bottle size, length, broken status, pretty full or empty, etc. So we have a lot to learn, program, and test right here in this project. Let’s jump into work and enjoy completing such an exciting project without further delay.
Bottle Line Assembly: Introduction
Figure 1 images the project we are going to do. Yes, it’s a massive project, with too many things we see to control. However, ...
Hello friends, I hope you all are doing great. In today's tutorial, we are gonna have a look at What are Views in ASP.NET MVC. It's our third tutorial in ASP .NET MVC series and in our first tutorial, we have seen How to Setup Your First Project in ASP.NET MVC and in our second tutorial, we have seen What is Model in ASP.NET MVC and I have told you about Views as well in previous tutorial. So, now we are gonna have a look at it in detail:
Views in ASP.NET MVC
In MVC Framework, we don't have pages or path to some html file as in php.
Instead, We have to use Views in ASP.NET MVC for front end designing.
We can use Html, Css, Javascript, Jquery or any other front end language in Views.
There are two t ...
Hello everyone! I hope you all will be absolutely fine and having fun. Today, I am going to share my knowledge about Introduction to 74HC245. 74HC 245 is a eight (8) bit transceiver. It has three (3) output states. 74HC-245 is designed for a-synchronous transfer of data between different data buses. The external timing requirement can be reduced by the implementation of control function. You should also have a look at Introduction to 74HC595.
There are two internal amplifiers in 74HS 245. They are named as A and B. Data is transferred from A amplifier to B amplifier and vice versa. Hence two way communication is done in 74HC-245. This communication depends upon the logic level on the direction control input (DIR). Out enable pin (OE) is used to ...
Hello friends, I hope you all are doing great. In today's tutorial, I am going to show you How to use Arduino PWM Pins. It's the next tutorial in our new Arduino Tutorial for Beginners series. We will design a small code in which we will be controlling a dc motor's speed using the Arduino PWM Pins but before going into the details, let me first give you an introduction to Arduino PWM Pins because without understanding the PWM, which is the abbreviation of Pulse Width Modulation, you won't be able to understand How to use Arduino PWM Pins. In our previous tutorial, we have seen How to use analogWrite in Arduino and I have told you in that tutorial that we use this command for PWM as well. So, today we will have a look at How to do that.
PWM is an a ...
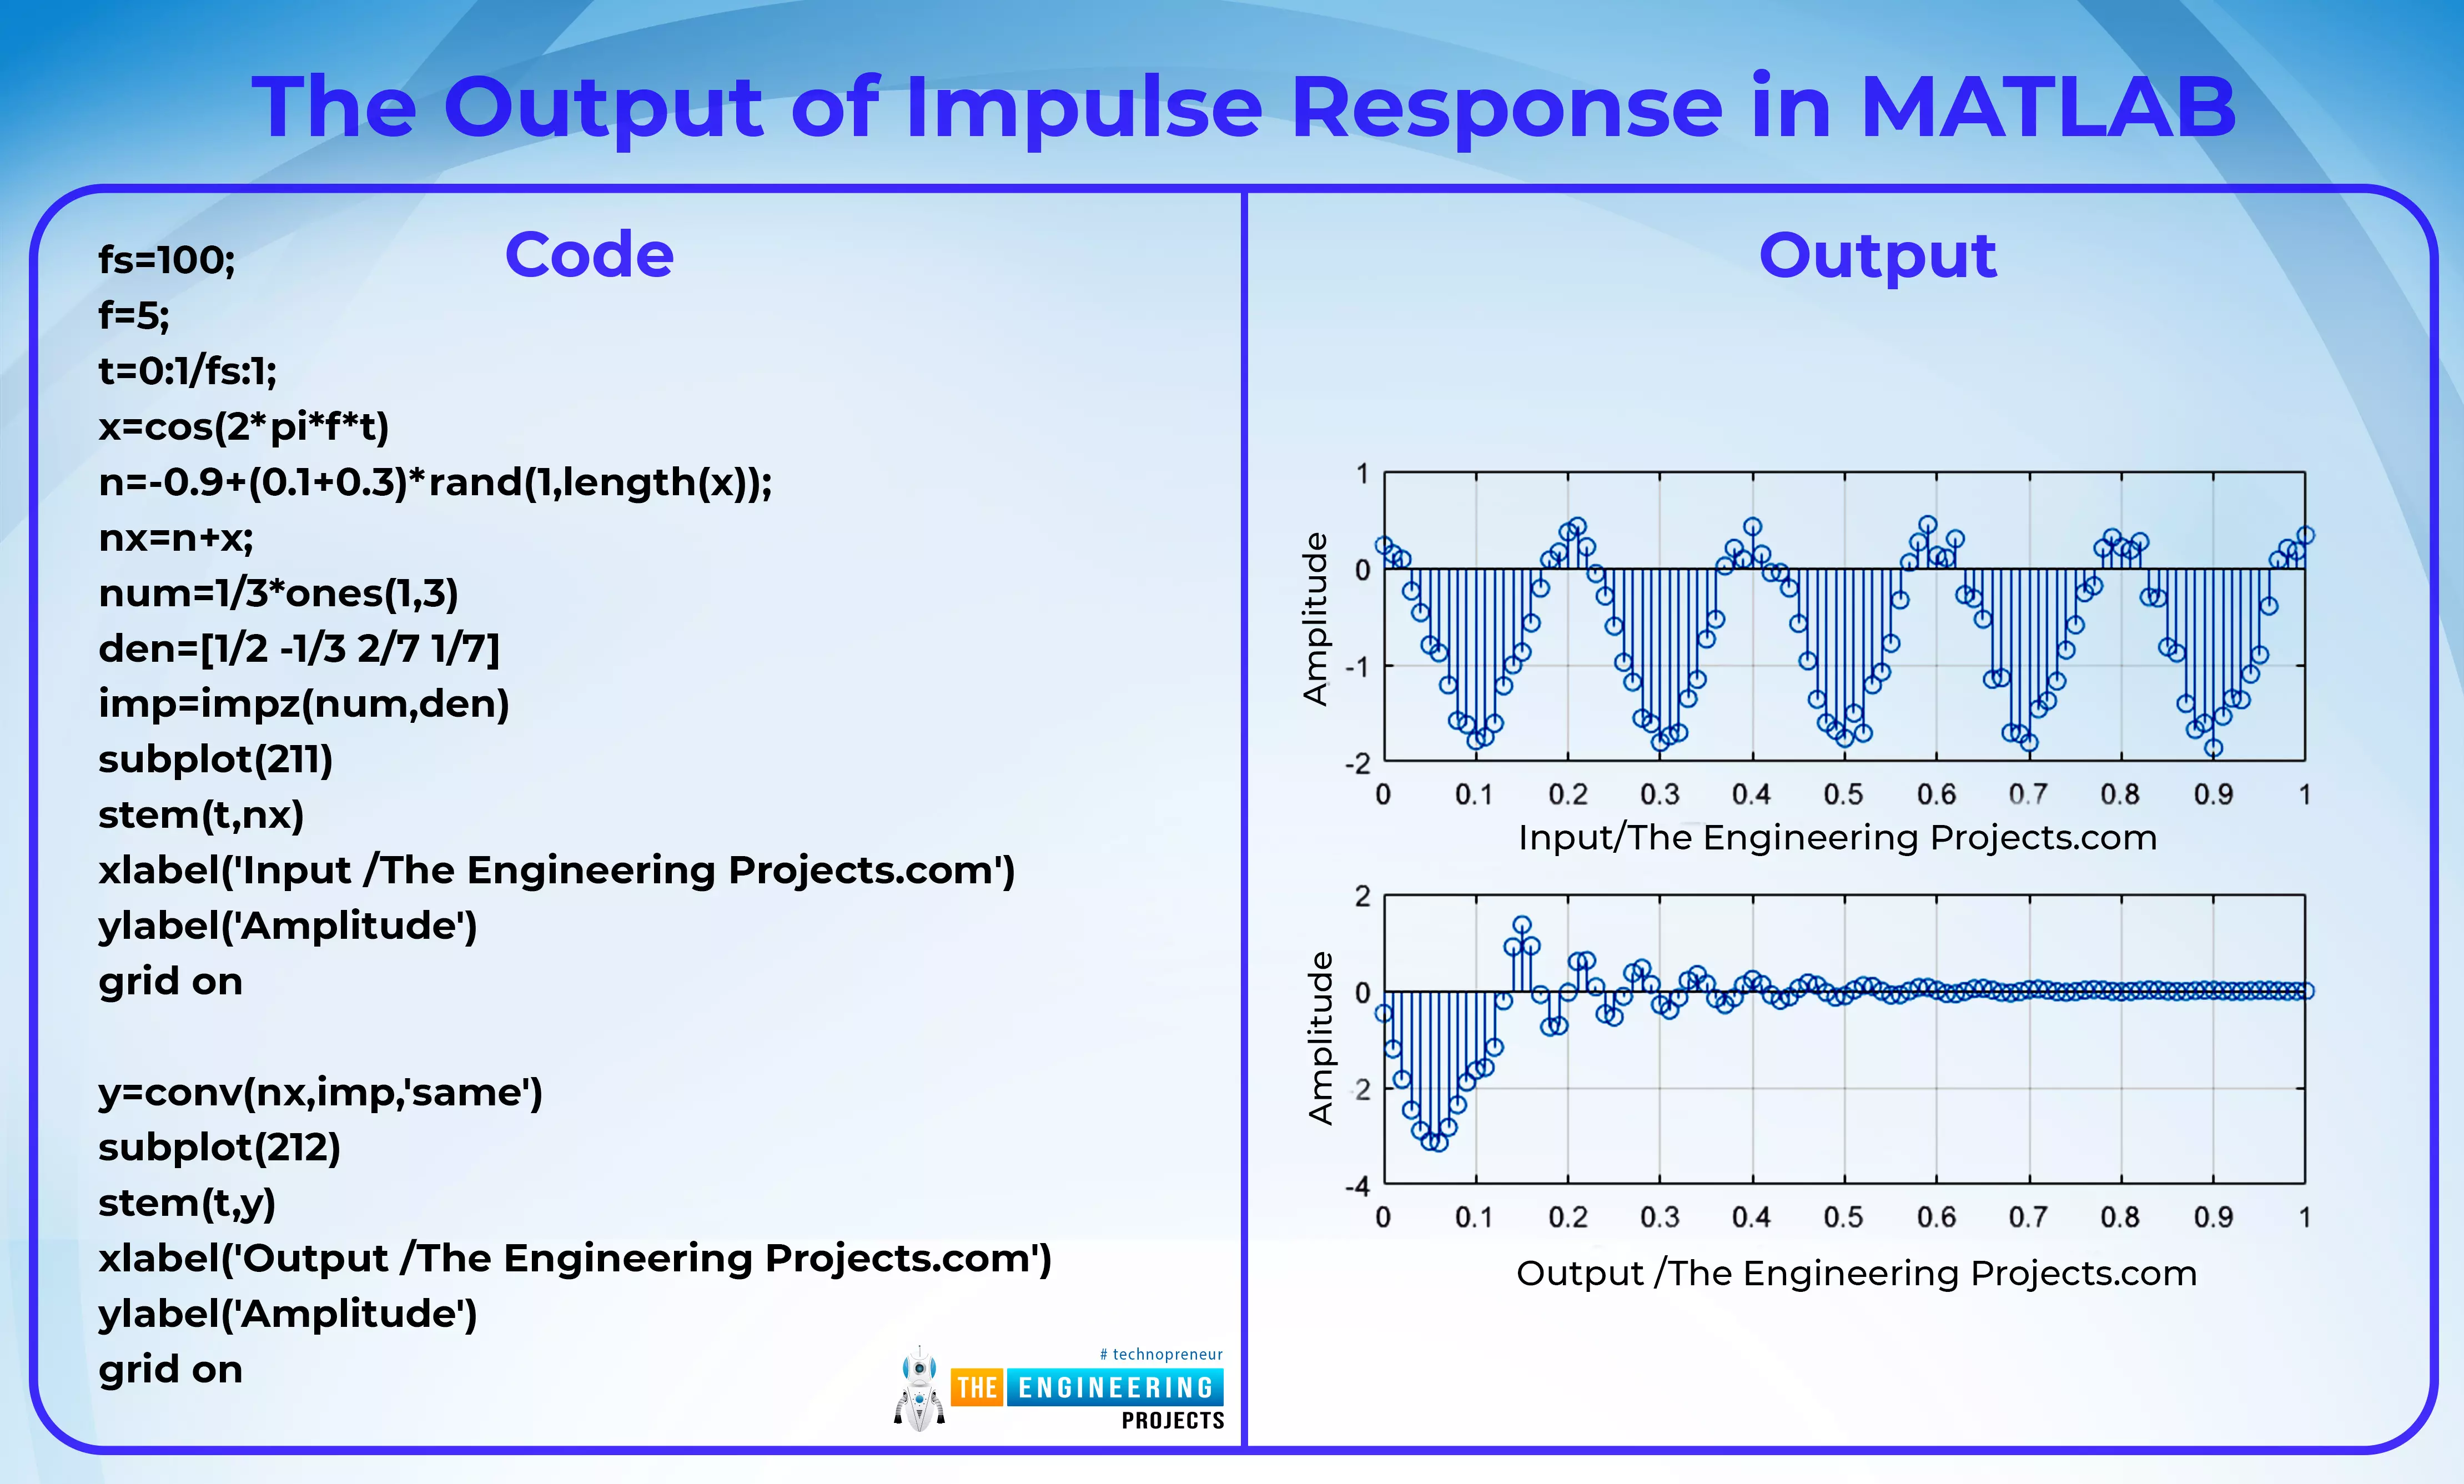
Hello learners, welcome to another topic of signals and systems. We hope you are having a reproductive day and to add more information in the simplest way to your day, we are discussing the responses in discrete-time signals. If you do not get the idea of the topic at the moment, do not worry because we are going to learn it in detail and you are going to enjoy it because we are making interesting patterns in MATLAB as the practical implementation of the topics. Have a look at the points that we are making clear today.
What is the LTI system?
What is impulse response?
How can we get the impulse response in MATLAB?
How can we have the output signal using codes and impulse response in MATLAB?
As we have learned so far in this series, there are two types of signals based on the ...
Hello friends, I hope you all are fine. In today's tutorial, I am going to share the Raspberry Pi Pico Library for Proteus. It's a dummy library, we have just designed the display. We can't add the Python Code to it, but we can make it work with Arduino code. A mixture of Arduino and Raspberry Pi, I have given it an unofficial name "Arduino Pi". It's better to have something than nothing. You can design circuit diagrams using this library and can also demonstrate your project in presentations by designing simulations.So, let's have a look at How to simulate Raspberry Pi Pico by adding this Proteus Library:
Raspberry Pi Pico Library for Proteus
First of all, we need to download the zip file of Proteus Library for Raspberry Pi Pico, by clicking the below button:Raspberry Pi Pico Library ...
Hello friends, I hope you all are fine and having fun with your lives. Today, I am going to share a new Home Automation Project using XBee & Arduino. Home Automation Project is a most commonly designed project by the engineering students. So, that's why I have thought to create a complete Home Automation Project so that engineering students can get benefit out of it.
We all know about automation which is originated from automate or automatic. In automation the task is done automatically and you don't need to control it. In normal Home automation project, there are few sensors which are displayed wirelessly to user and there are few controls like user can ON or OFF Lights, Fans etc via remote or mobile App.
In this Project, I have used Arduino ...
Hello friends, hope you all are fine and having fun with your lives. In today's post we are gonna have a look at How to use Temperature Sensor 18B20 in Proteus ISIS. I will use Arduino board as a microcontroller and will connect the temperature sensor with it and then will display the code on LCD. I have already posted the same tutorial in which I have done Interfacing of Temperature Sensor 18B20 with Arduino but in that project I have used the real components and designed the hardware. But today, I will just show you the simulation so that you could test the simulation first and then design it in hardware.
Temperature Sensor 18B20 is the most commonly used temperature sensor. Its a one wire sensor means it sends data through a single wire and we ...