Hello friends, I hope you all are doing great. Today, I am going to share the new Inductor Library for Proteus. An inductor is the quiet partner of every power supply: in a phone charger, a laptop adapter, an LED driver or the little boost module that makes 12 V from a USB port, an inductor stores energy in a magnetic field a few thousand times a second and hands it on. On a schematic it is just a coil with a value. In real life it has two current limits, a resistance that turns current into heat, and a core that can fill up. Choosing the wrong one is one of the most common reasons a converter runs hot or fails.
Inductor Library for Proteus
Latest version: V1.0 (November 2026, this tutorial)
Other component libraries: C945 Transistor · PC817 Optocoupler · Relay Module · Resistor · 5 mm LED · Designer Colour LED · Push Button · Active Buzzer · Electrolytic Capacitor · Ceramic Capacitor · Tantalum Capacitor · Film Capacitor · 1N4007 Diode · Zener Diode · Schottky Diode · Supercapacitor · Photodiode · RGB LED · Bridge Rectifier · Flashing LED · Bi-Colour LED · SMD LED · Slide Switch · Toggle Switch · Rocker Switch · Micro Limit Switch · Emergency Stop Switch · SMD Resistor · Power Resistor · Resistor Network · Potentiometer · Trimmer Potentiometer · Slide Potentiometer · NTC Thermistor · DIP Switch · Fuse · Passive Buzzer · Mini Speaker · 7-Segment Display · LED Bar Graph · IR / UV LED · Small Transistors · TIP122 Darlington · N-MOSFET · P-MOSFET · PC817 Optocoupler · Filament Bulb · Power LED · Voltage Regulator · SCR and TRIAC · Toroid Inductor · Crystal
Helping Tools
- Serial Monitor Advance: a serial terminal window for the UART of your board
- Serial Monitor Expert: the serial monitor with extra debugging tools
- LCD Library for Proteus V3.0: 16x2, 20x4 and I2C LCDs to show your readings
Our library has two through-hole inductors at true scale: a radial ferrite drum-core power inductor of 100 µH (as the Bourns RLB0914, 9 x 14 mm, saturation 2.1 A, 0.28 Ω, 1 A rated), and a small axial colour-coded inductor of 100 µH (as the Bourns 78F, 2.8 x 7.1 mm, 4.1 Ω, 165 mA rated), whose colour bands follow its value. The model has the inductance with its saturation, the winding's resistance and its heat. The pop-up shows the part in its magnetic field, a scope of its current, and the inductance falling as the current grows. The demo builds two Arduino boost converters, 5 V to 12 V, one with each inductor, and shows why the same 100 µH is not the same part.
NOTICE: Our team has put a lot of effort into these small parts: the bodies, the animation and the pop-ups are all our own design, and you get them free. Your feedback is the fuel that keeps us going, so please tell us what you think in the comments below or in the Inductor board of our forum. And if our free libraries help you, you can buy us a coffee. So, let's get started with the Inductor Library for Proteus:
What is an Inductor?
An inductor is a coil of wire, usually wound on a magnetic core. A current through the coil builds a magnetic field, and the field stores energy. Change the current and the field changes, and a changing field induces a voltage in the coil that opposes the change. That is the inductor's whole character: it resists changes of current, the way a capacitor resists changes of voltage. Its inductance, in henries, says how strongly. Practical values run from nanohenries in radio circuits to millihenries in filters; power converters mostly use a few microhenries to a few hundred.
| Radial drum core | Axial colour-coded | |
|---|---|---|
| Like | Bourns RLB0914-101KL | Bourns 78F101J |
| Size | 9 mm across, 14 mm tall | 2.8 mm across, 7.1 mm long |
| Inductance | 100 µH ±10 % | 100 µH ±5 % |
| Winding resistance | 0.28 Ω max | 4.1 Ω max |
| Rated current | 1 A | 165 mA |
| Saturation current | 2.1 A | not given (the model takes twice the rating) |
| Made for | power converters | signal filtering and chokes |
V = L di/dt
The equation behind every inductor circuit is V = L di/dt: the voltage across an inductor equals its inductance times the rate of change of its current. Turn it around and it says how fast the current grows: put 5 V across 100 µH and the current climbs by 50 mA every microsecond, a straight ramp. Take the voltage away and reverse it, and the current ramps down. The energy stored at any moment is ½ L I²: 45 µJ in 100 µH at one amp. Small, but a converter that delivers it 31,000 times a second moves more than a watt.
Saturation
The core is what makes a small inductor possible: a ferrite core multiplies the inductance of the coil many times. But a core can only hold so much magnetic flux. As the current rises the core starts to fill up, its permeability falls, and the inductance falls with it. The datasheet's saturation current, Isat, is the current where the inductance has dropped by a set amount, typically 10 %. Past it the fall speeds up; a fully saturated inductor behaves almost like a piece of wire, and in a converter the current then shoots up within a few microseconds.
The Rated Current and the Winding Resistance
The second limit is heat. The wire has a resistance, the DCR, and every amp through it costs I² x DCR in watts. The rated current is the steady (RMS) current that warms the winding by a set amount, often 40 °C. The two limits are independent: a big drum core may saturate long before it gets hot, while a tiny choke with thin wire may get hot long before it saturates. A designer checks both: the peak current against Isat, the RMS current against the rating.
Reading the Colour Code
Small axial inductors use the same colour code as resistors, read in microhenries. The first two bands are digits, the third is the multiplier, and the fourth is the tolerance. Brown, black, brown, gold is 1, 0, times 10: 100 µH ±5 %. For values under 10 µH a gold third band means times 0.1, so red, red, gold is 2.2 µH.
The Boost Converter
A boost converter makes a higher voltage from a lower one with an inductor, a switch and a diode. When the switch closes, the inductor's end is pulled to ground and the full input voltage sits across it; its current ramps up and it stores energy. When the switch opens, the current must keep flowing, so the inductor's voltage flips: it adds itself to the input and pushes the current through the diode into the output capacitor, above the input voltage. Repeat this tens of thousands of times a second and adjust the on-time, the duty cycle, and the output can be held at any voltage above the input.
At light loads the inductor's current falls all the way to zero in each cycle and rests there until the next one. That is called discontinuous mode, and in it each cycle delivers exactly the energy stored at the peak, ½ L I². At heavier loads the current never reaches zero, which is continuous mode.
Where They Are Used
Power inductors are the heart of buck, boost and buck-boost converters in chargers, LED drivers and battery-powered gadgets. Small chokes filter supply lines, block radio-frequency noise and tune filters and oscillators. Larger ones smooth the current of motors and power supplies.
Features of the Inductor Library for Proteus
- The real look, at true scale: a radial ferrite drum core with its copper winding, and a light green axial inductor whose four bands follow its value, with our small TEP signature.
- A warming winding: the copper darkens on the sheet as it heats.
- Real saturation: the inductance is 10 % down at the saturation current and keeps falling past it, so an overloaded inductor behaves as a real one does.
- The winding's heat: its resistance turns current into heat, the rated current raises it 40 °C, and its resistance rises with it.
- Any value: type the inductance; AUTO scales the resistance and the currents from the 100 µH part, or type your own.
- A pop-up for each part: the part in its magnetic field, a scope of its current and voltage, the inductance curve with the saturation current marked, eight live values, graphs, an event log and a check page.
- A complete package: about 2.9 MB with the library, our Arduino UNO V4.0, our MOSFETs, Schottky diodes, capacitors and resistors and the demo, without the source code of the model.
The Inductors in Proteus
The devices are INDUCTORRADIALTEP and INDUCTORAXIALTEP in TEPINDUCTOR.LIB, under Inductors, with the prefix L and the model TEPINDUCTOR.DLL. Search INDUCTOR in Pick Devices. The radial part stands on its two legs, 5.08 mm apart; the axial part lies flat with a lead at each end. Both have pins 1 and 2 and no polarity.
The Properties
| Property | What it does |
|---|---|
| Inductance (VALUE) | 100u, 4u7, 1m or 220n; a bare number is in µH |
| Winding resistance (DCR) | in ohms, or AUTO to scale it from the 100 µH part |
| Saturation current (ISAT) | in amps, or AUTO |
| Rated current (IRMS) | in amps, or AUTO: the current that warms the winding 40 °C |
| Colour bands while stopped | the axial part only: the bands shown on the stopped sheet; Run sets them from the value |
Download Inductor Library for Proteus
Click the button below to download Inductor-Library-for-Proteus-v1.0.zip (about 2.9 MB, without the source code of the models):
Inductor Library for Proteus V1.0- README.txt: installation, the demo, the boost converter's wiring, the colour code, troubleshooting and the limits.
- Proteus Library Files:
TEPINDUCTOR.LIB, our resistor, power resistor, N-MOSFET, Schottky diode and electrolytic capacitor libraries, and ourArduinoV4TEP.LIB. - Proteus Model Files:
TEPINDUCTOR.DLL, the DLLs of those parts andTEPARDUINO.DLL. - Arduino Code: the demo sketch.
- Proteus Simulation: the demo project, its HEX file and copies of the DLLs.
No Proteus yet? Read How to Download and Install Proteus 7 and 8. New to libraries? Follow How to Install a New Library in Proteus.
How to Install Inductor Library for Proteus
- Close Proteus and extract the whole zip file, for example to your Desktop.
- Copy the files from Proteus Library Files into the LIBRARY folder of Proteus.
- Copy the files from Proteus Model Files into the MODELS folder.
- Delete
TEPINDUCTOR.IDXfrom the LIBRARY folder if it is there. - Start Proteus, press P and search for INDUCTOR.
Demo: Two Boost Converters
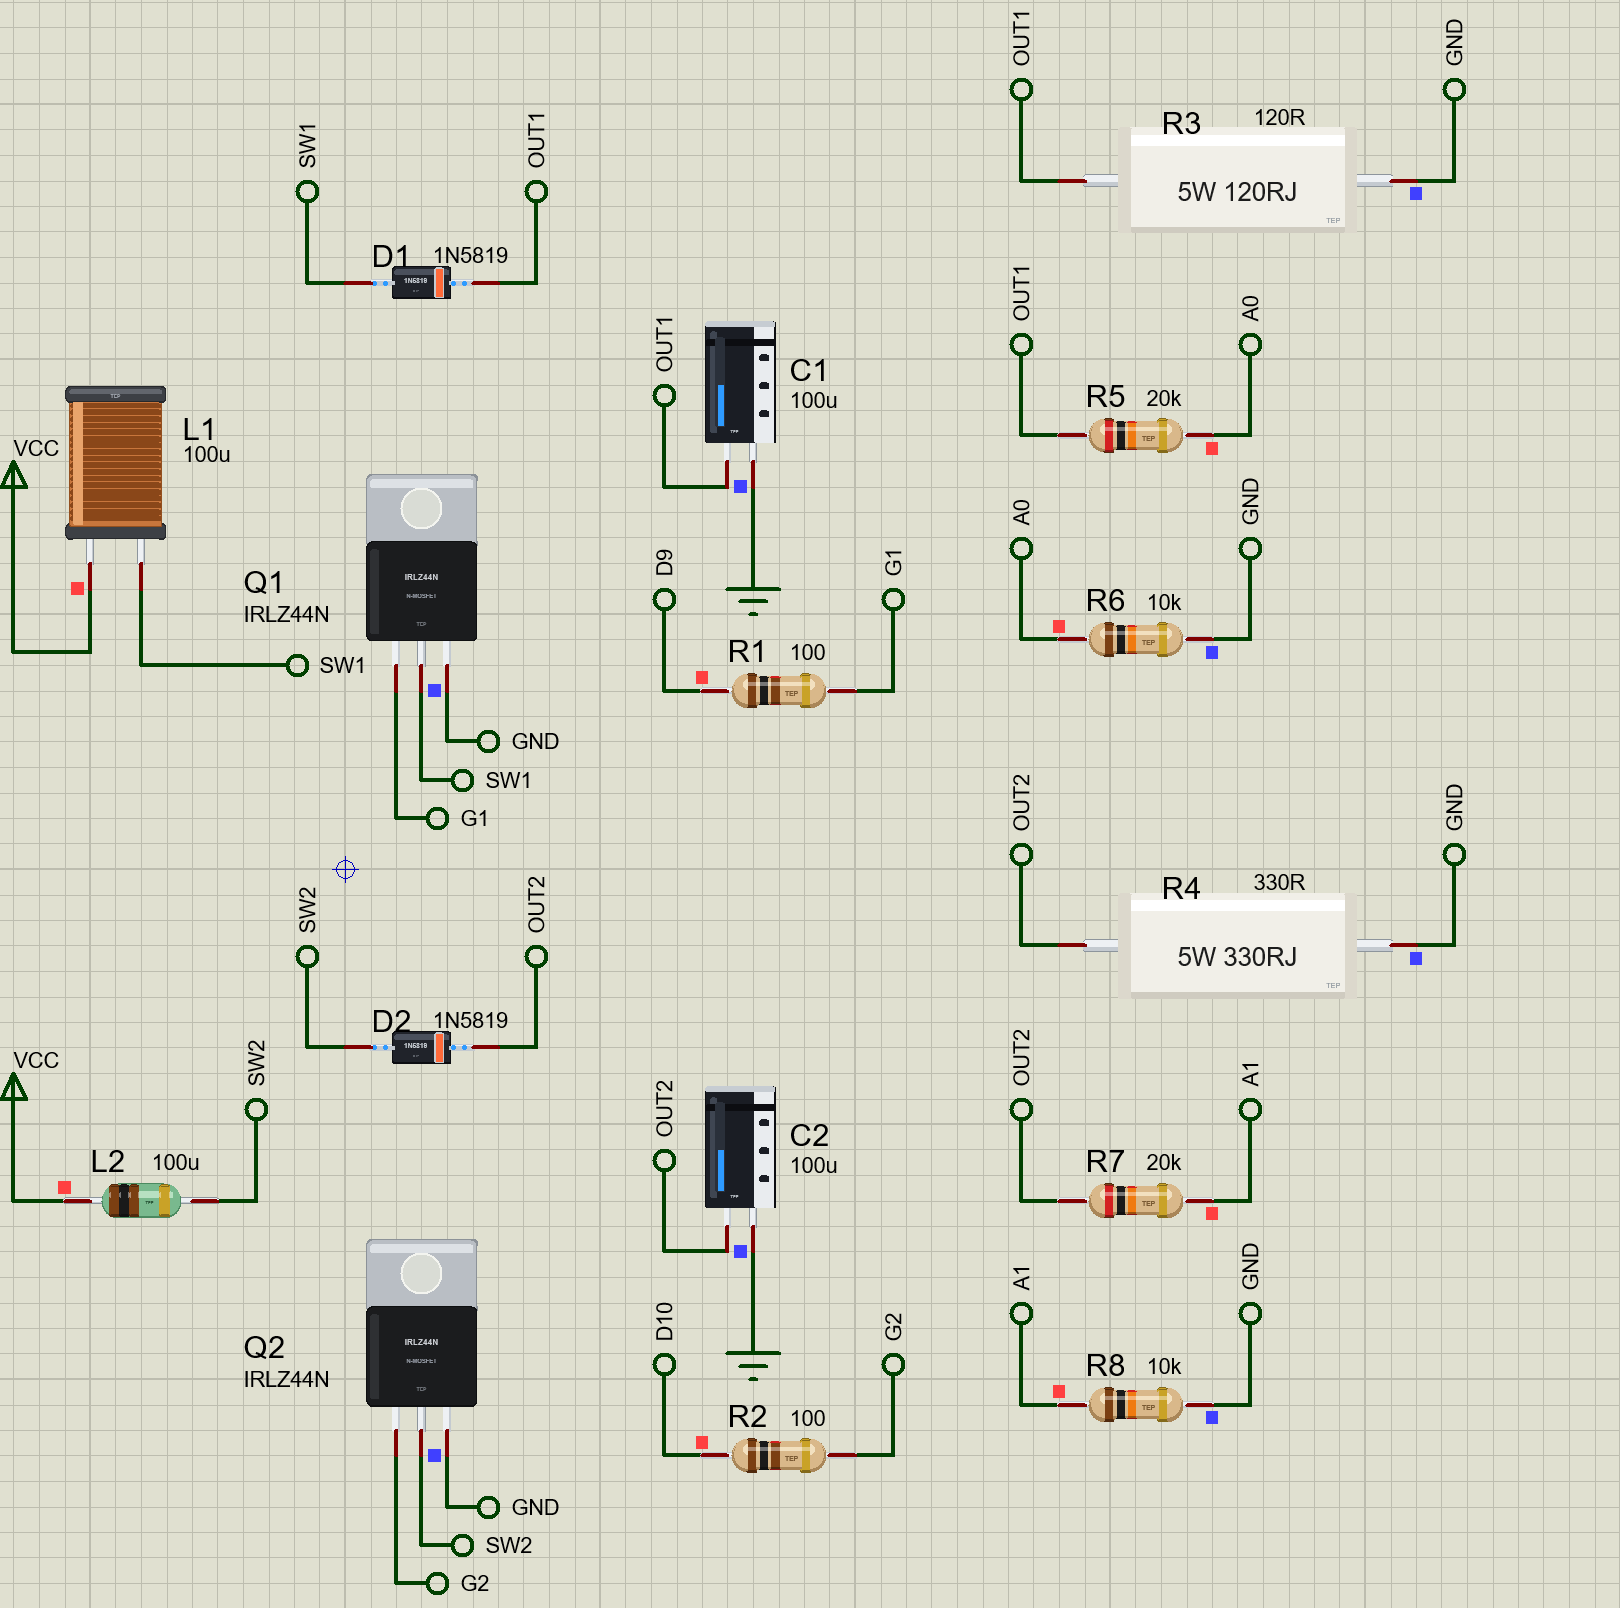
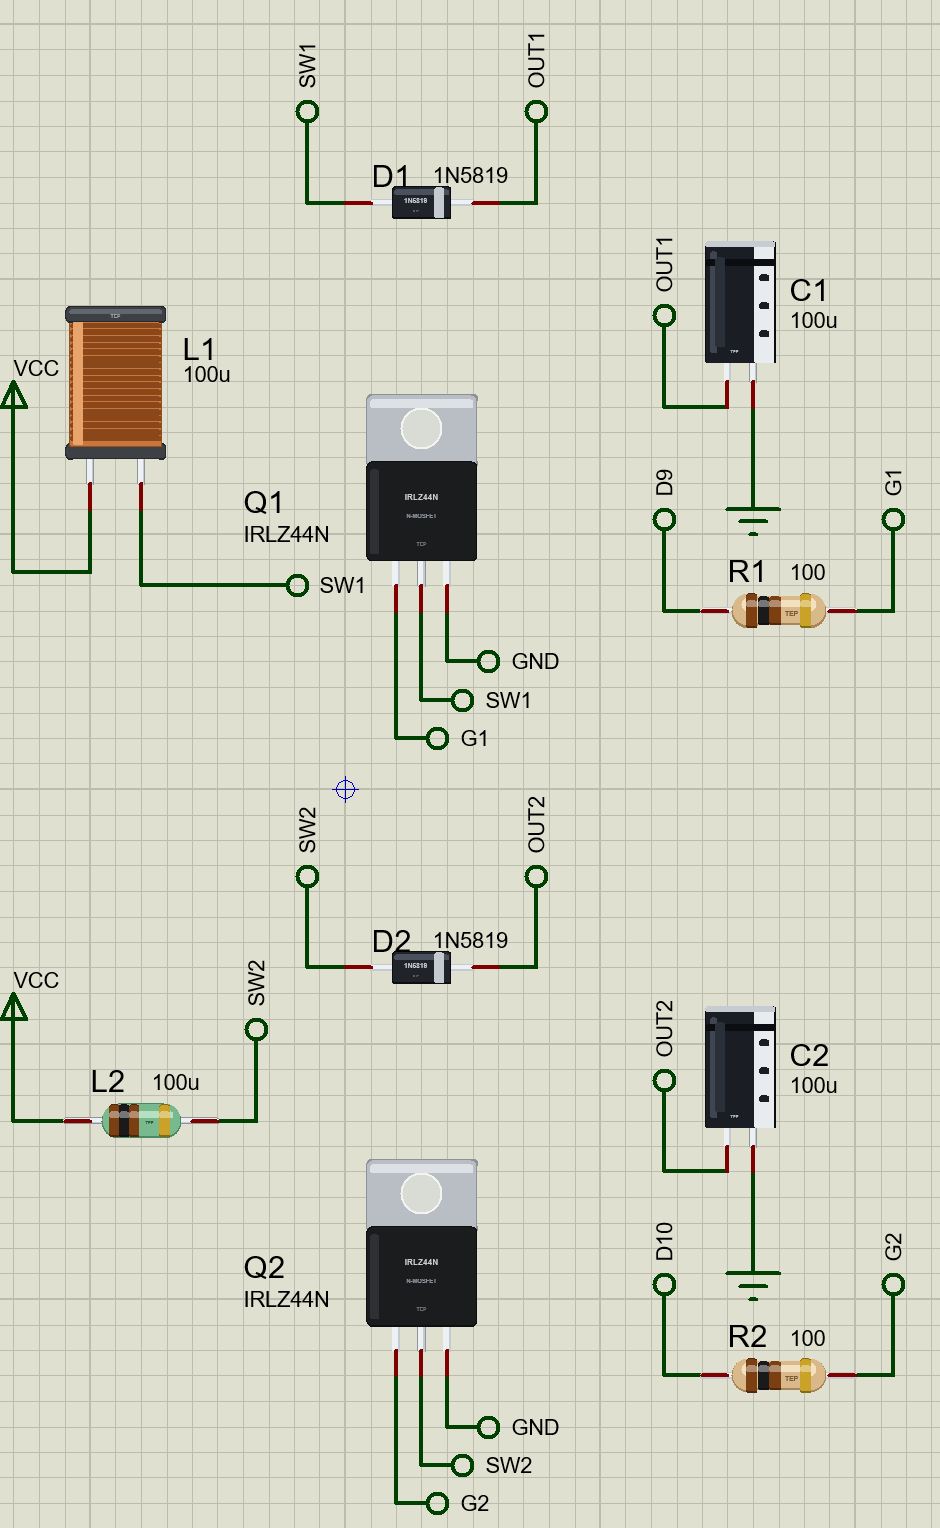
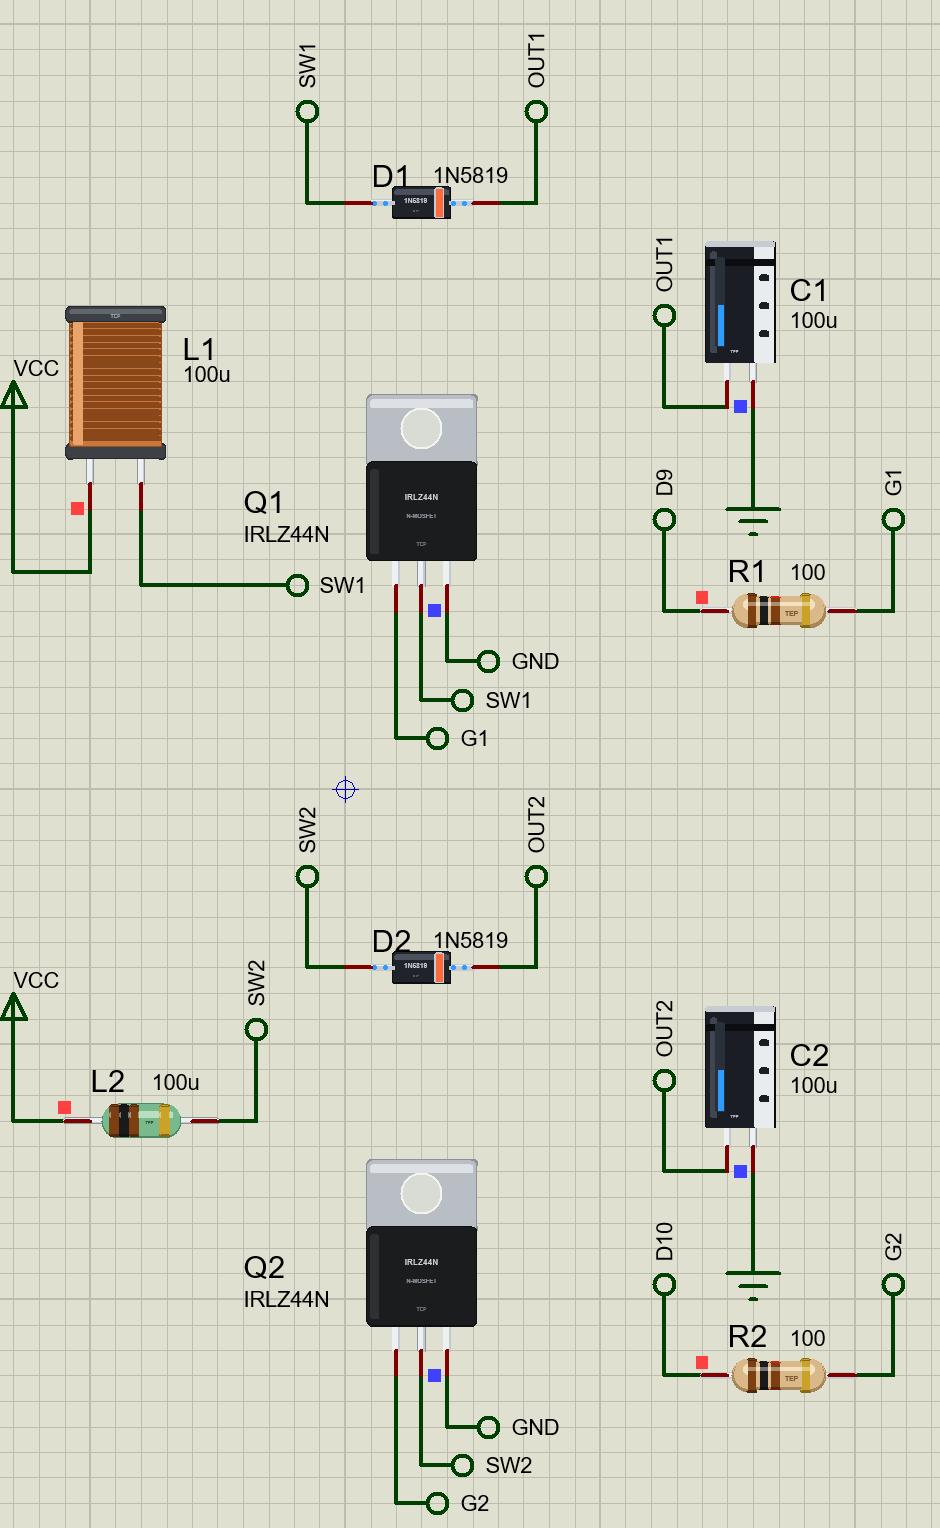
Both converters run from the 5 V rail and make 12 V. In the first, L1, the radial 100 µH power inductor, is switched by Q1, an IRLZ44N on D9 through R1 (100 Ω); D1, a 1N5819 Schottky diode, passes the energy to C1 (100 µF) and the load R3, 120 Ω, which takes 100 mA. R5 and R6 (20k / 10k) give A0 a third of the output. The second converter is the same with L2, the small axial 100 µH choke, switched by Q2 on D10, with D2, C2, the load R4 (330 Ω, 36 mA) and R7 / R8 to A1.
Open Inductors-Boost-ArduinoUnoV4.pdsprj. It runs on our Arduino UNO Library for Proteus V4.0, with its built-in monitor, the same window as our TEP Serial Monitor Advance for Proteus. The switches come from our N-MOSFET Library for Proteus, the diodes from our Schottky Diode Library for Proteus, the capacitors from our Electrolytic Capacitor Library for Proteus and the loads from our Power Resistor Library for Proteus.
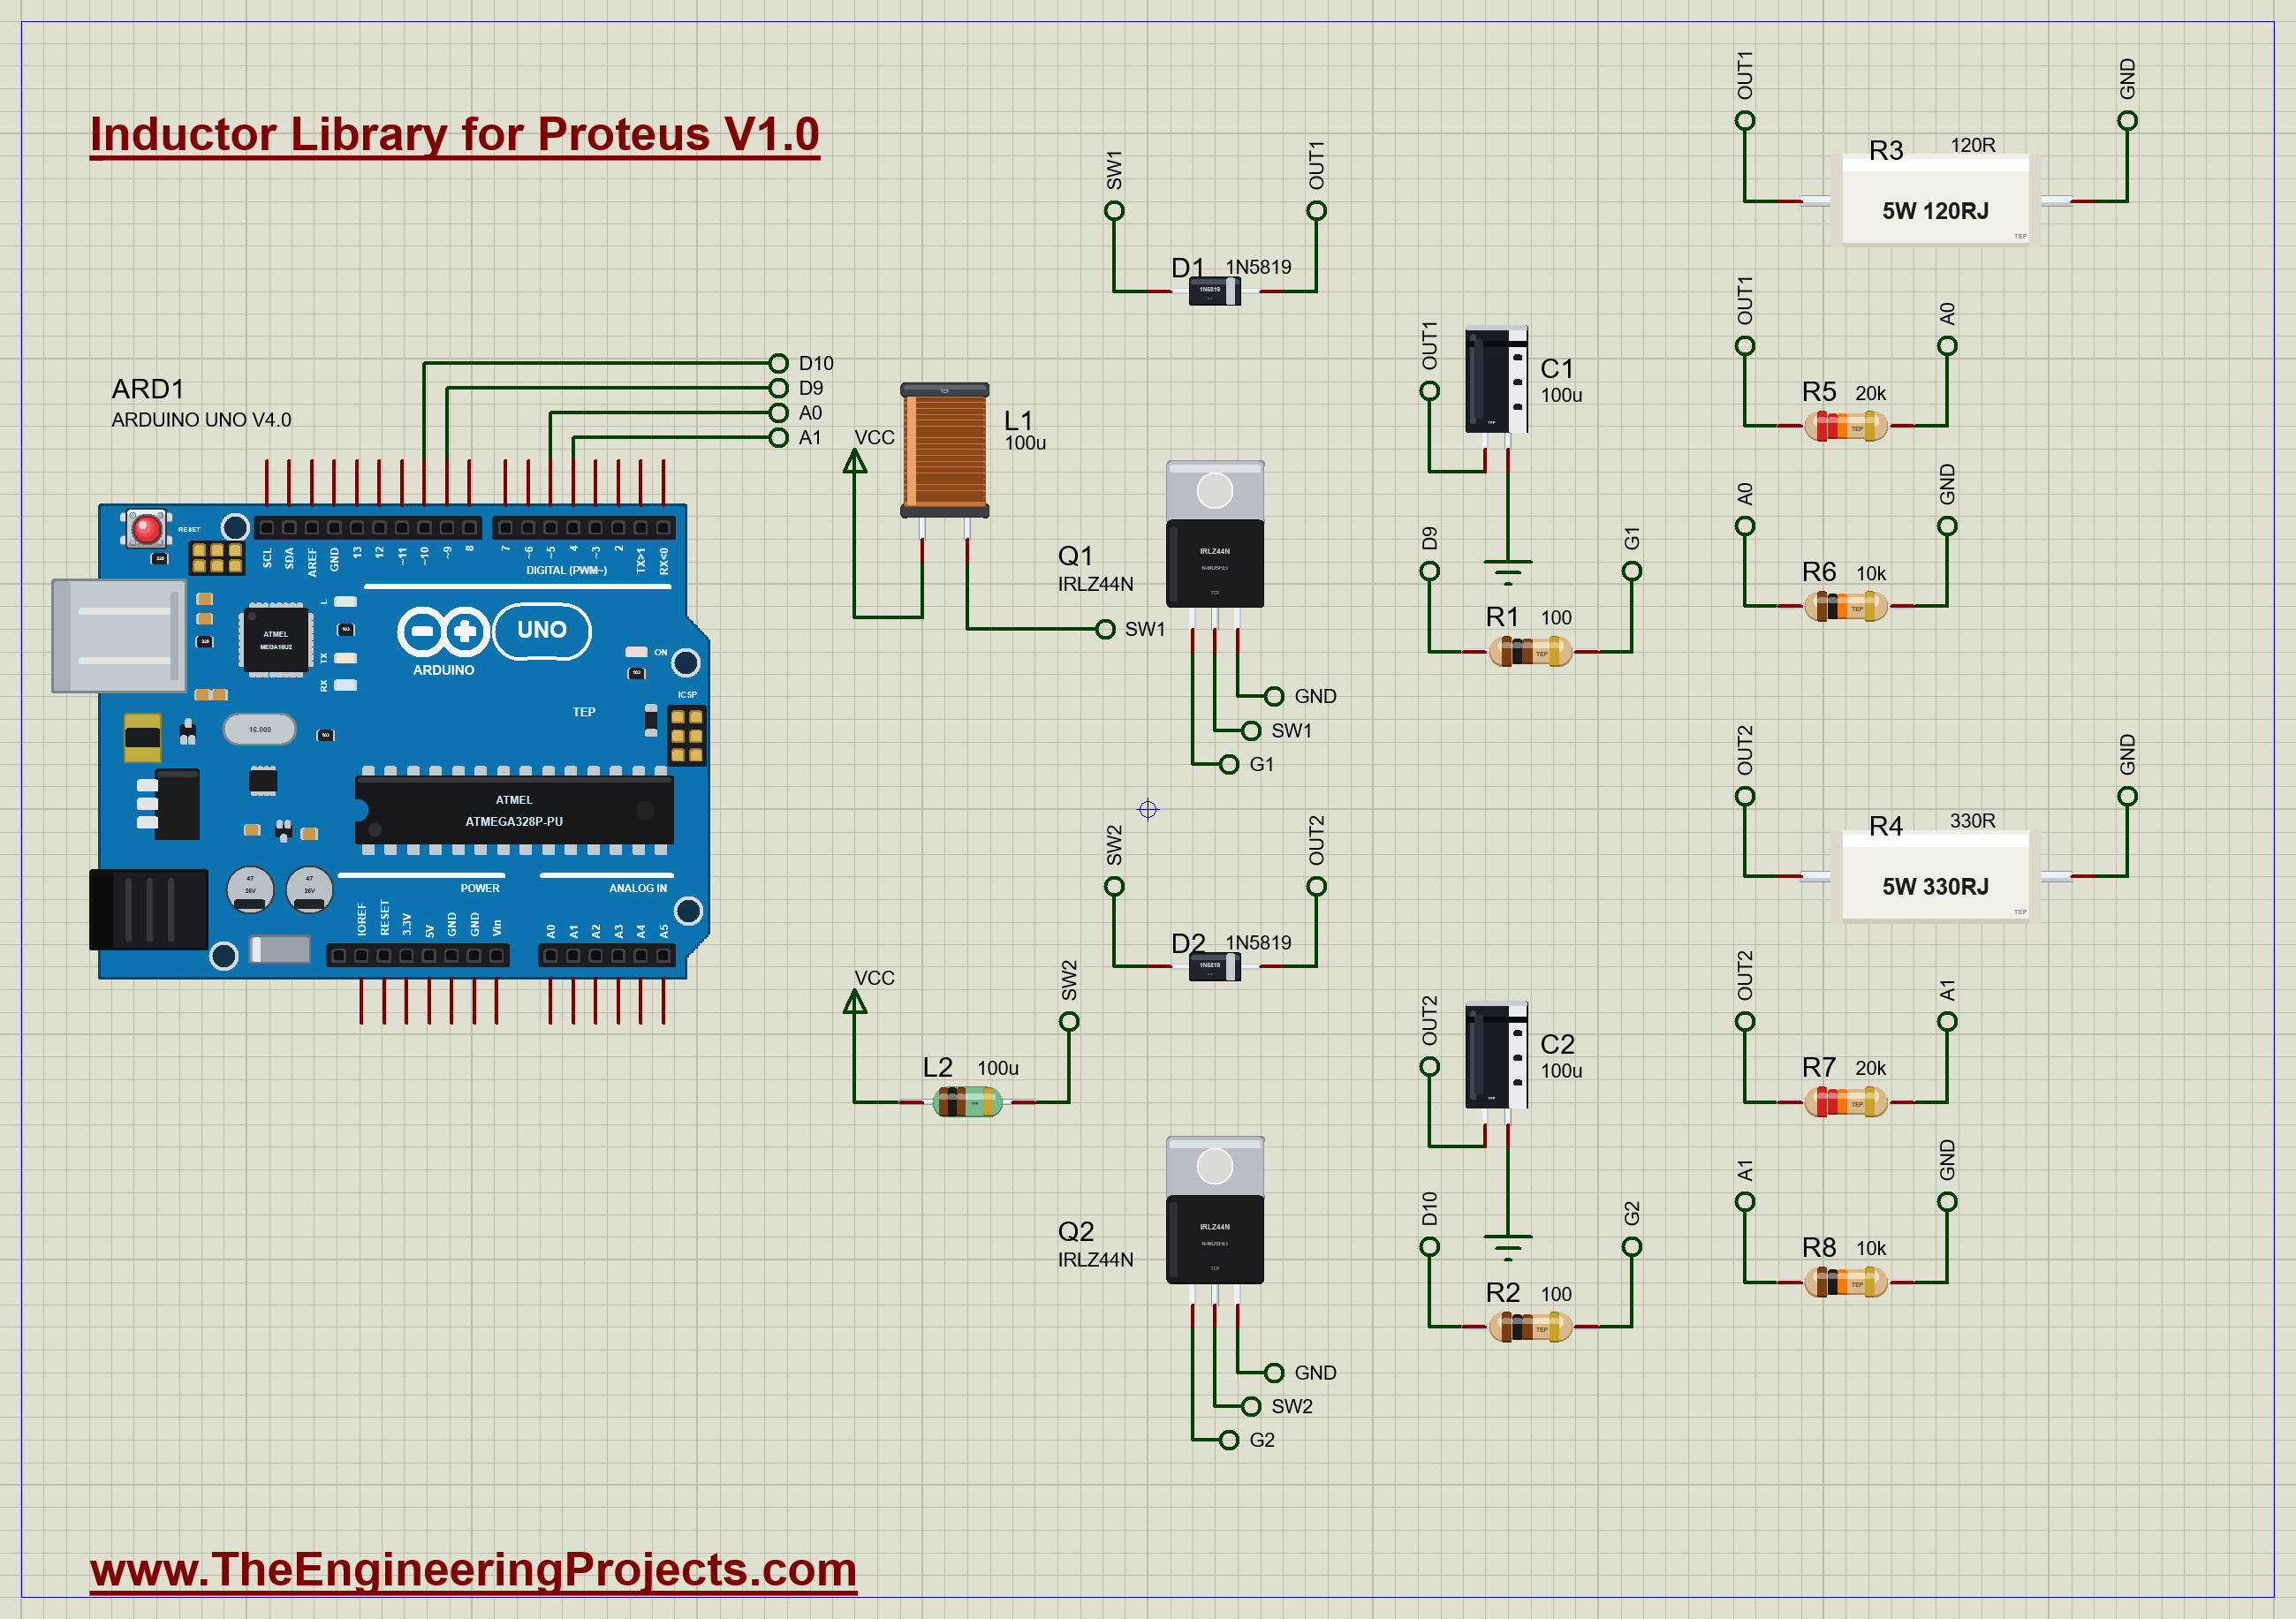
| Part | Connection | Job |
|---|---|---|
| L1 radial 100 µH, Q1, D1, C1 | VCC - L1 - SW1, Q1 to GND, D1 to OUT1 | boost converter 1 |
| R3 120R 5 W, R5 / R6 | OUT1 to GND; OUT1 - A0 - GND | its 100 mA load; its feedback |
| L2 axial 100 µH, Q2, D2, C2 | VCC - L2 - SW2, Q2 to GND, D2 to OUT2 | boost converter 2 |
| R4 330R 5 W, R7 / R8 | OUT2 to GND; OUT2 - A1 - GND | its 36 mA load; its feedback |
| R1, R2 100 | D9 and D10 to the gates | the switches' gate drive |
The Sketch
Timer1 drives both switches. A 9-bit fast PWM counts from 0 to 511 and gives 31.25 kHz on OC1A (D9) and OC1B (D10), each with its own duty:
  TCCR1A = _BV(COM1A1) | _BV(COM1B1) | _BV(WGM11);       // fast PWM, TOP = ICR1, OC1A and OC1B non-inverting
  TCCR1B = _BV(WGM13) | _BV(WGM12) | _BV(CS10);         // no prescaler
  ICR1 = TOP;
Every millisecond the sketch reads both outputs and moves each duty one step up while its output is low and one step down while it is high. It never lets a duty pass 78 %, because a boost converter switched on all the time would short its input through the inductor:
int regulate(int duty, float v) {
  if (v < TARGET - 0.05 && duty < MAX_DUTY) duty++;
  else if (v > TARGET + 0.05 && duty > 0) duty--;
  return duty;
}
Run the Demo
Press Run. Both duties start at zero and climb a step every millisecond until the outputs reach 12 V, in about a quarter of a second. Here is the complete circuit running:
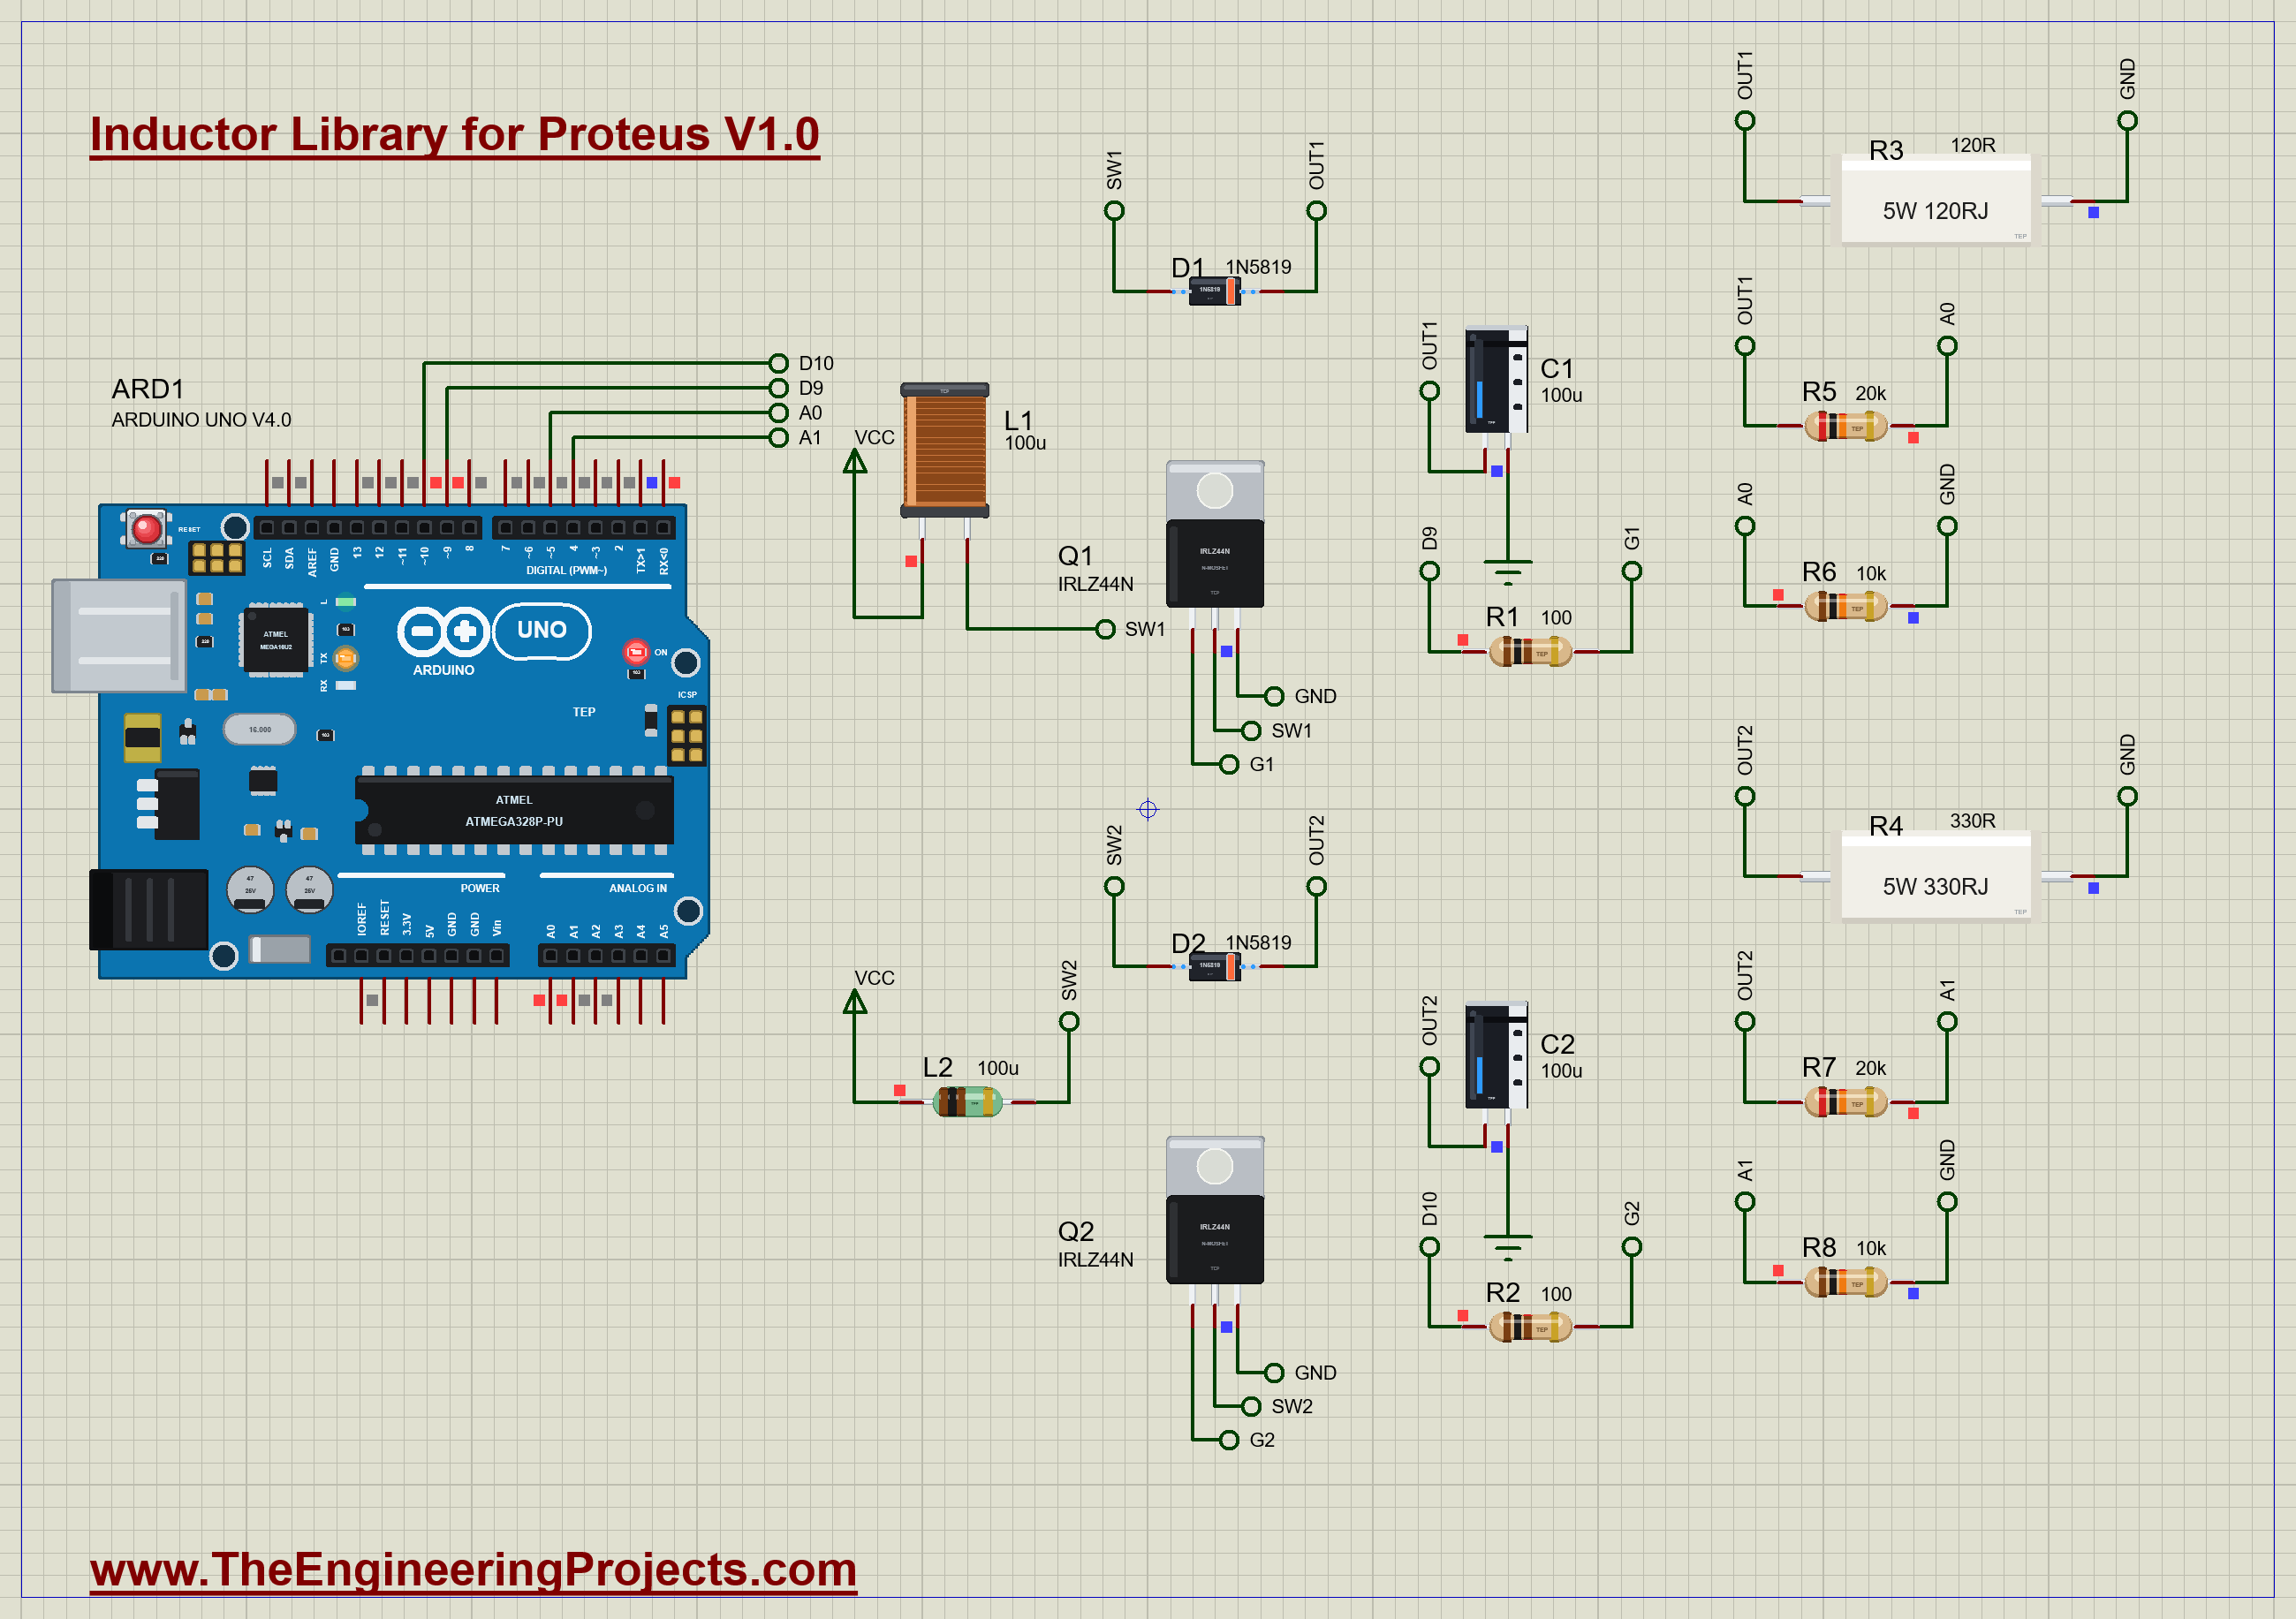
The Drum Core at 100 mA
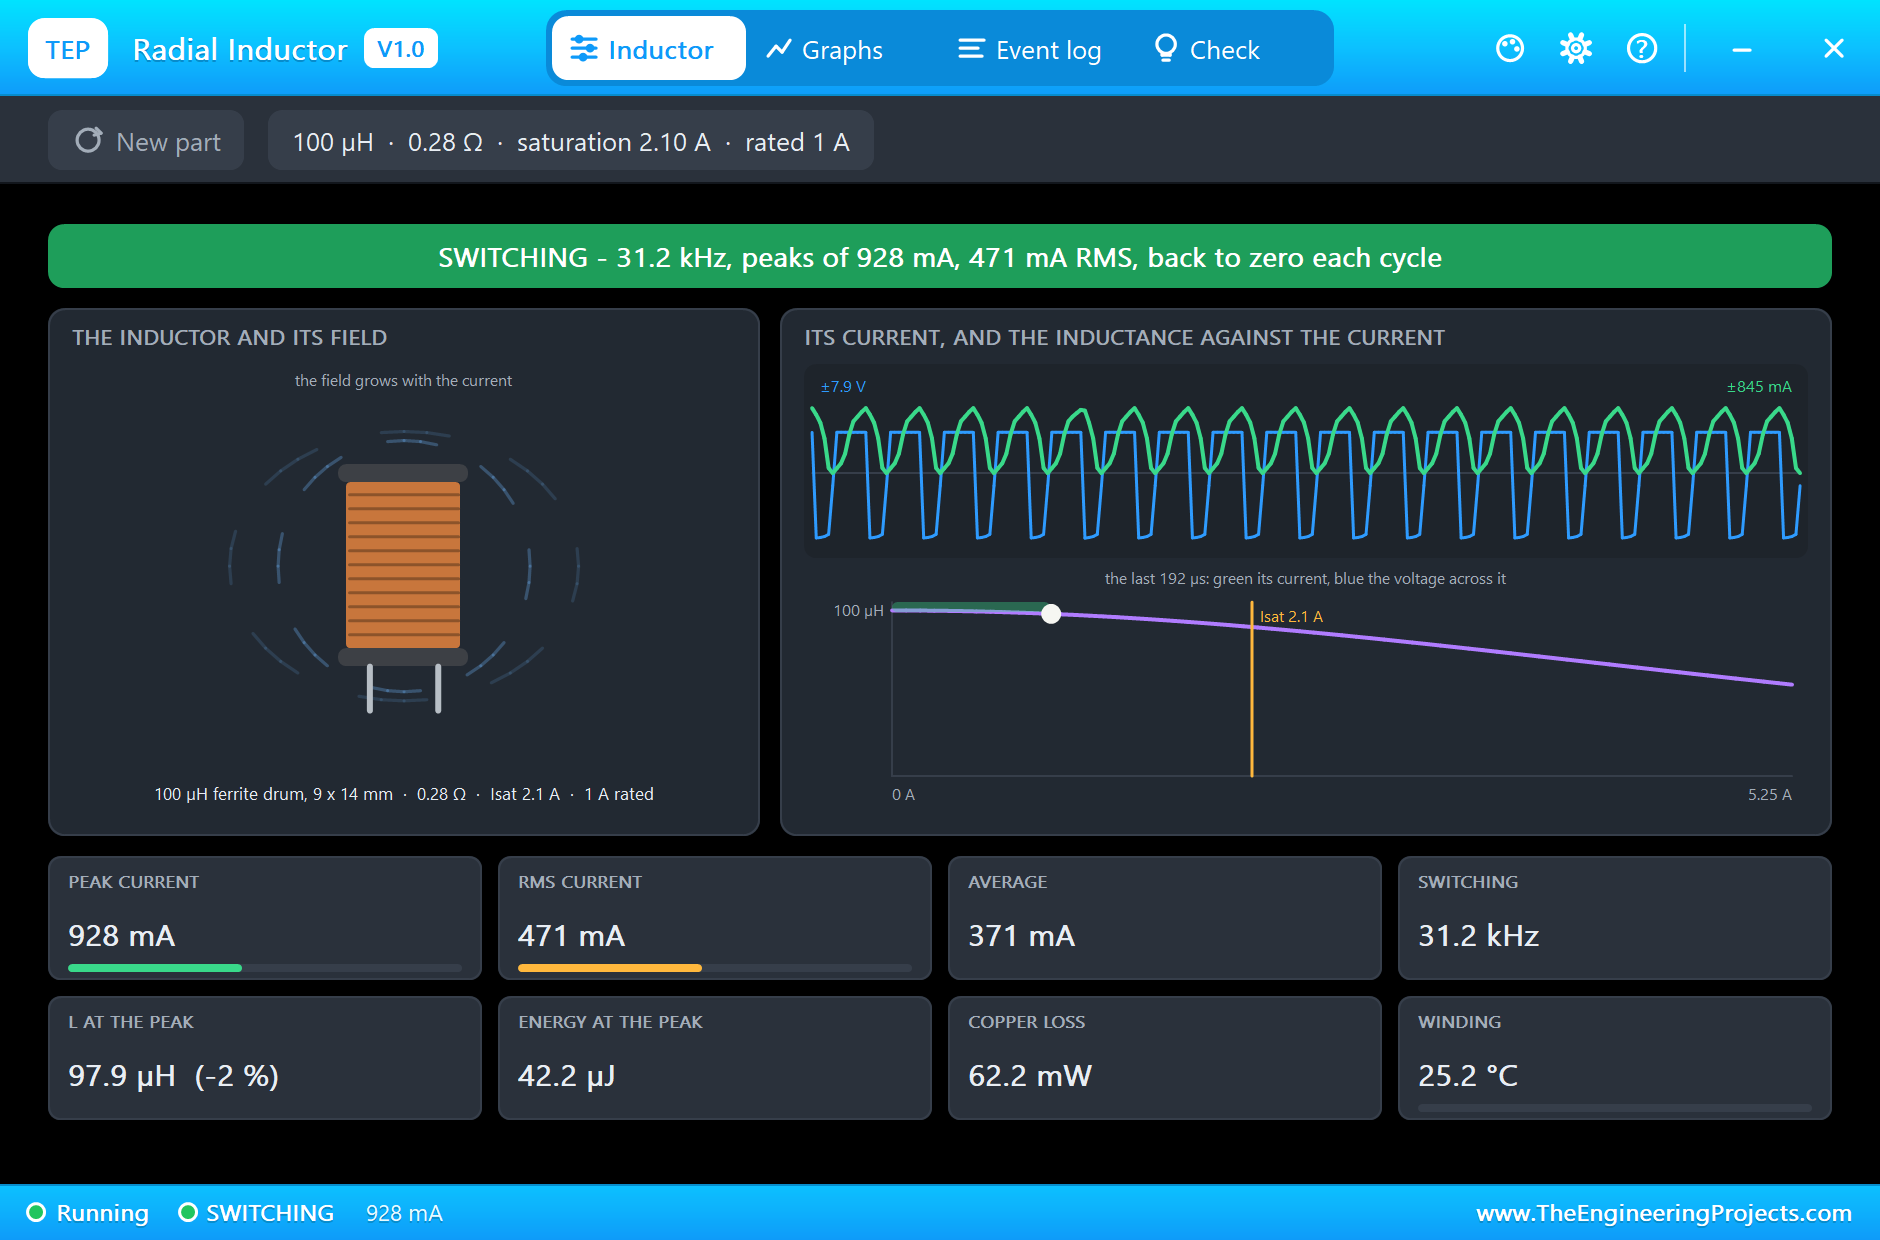
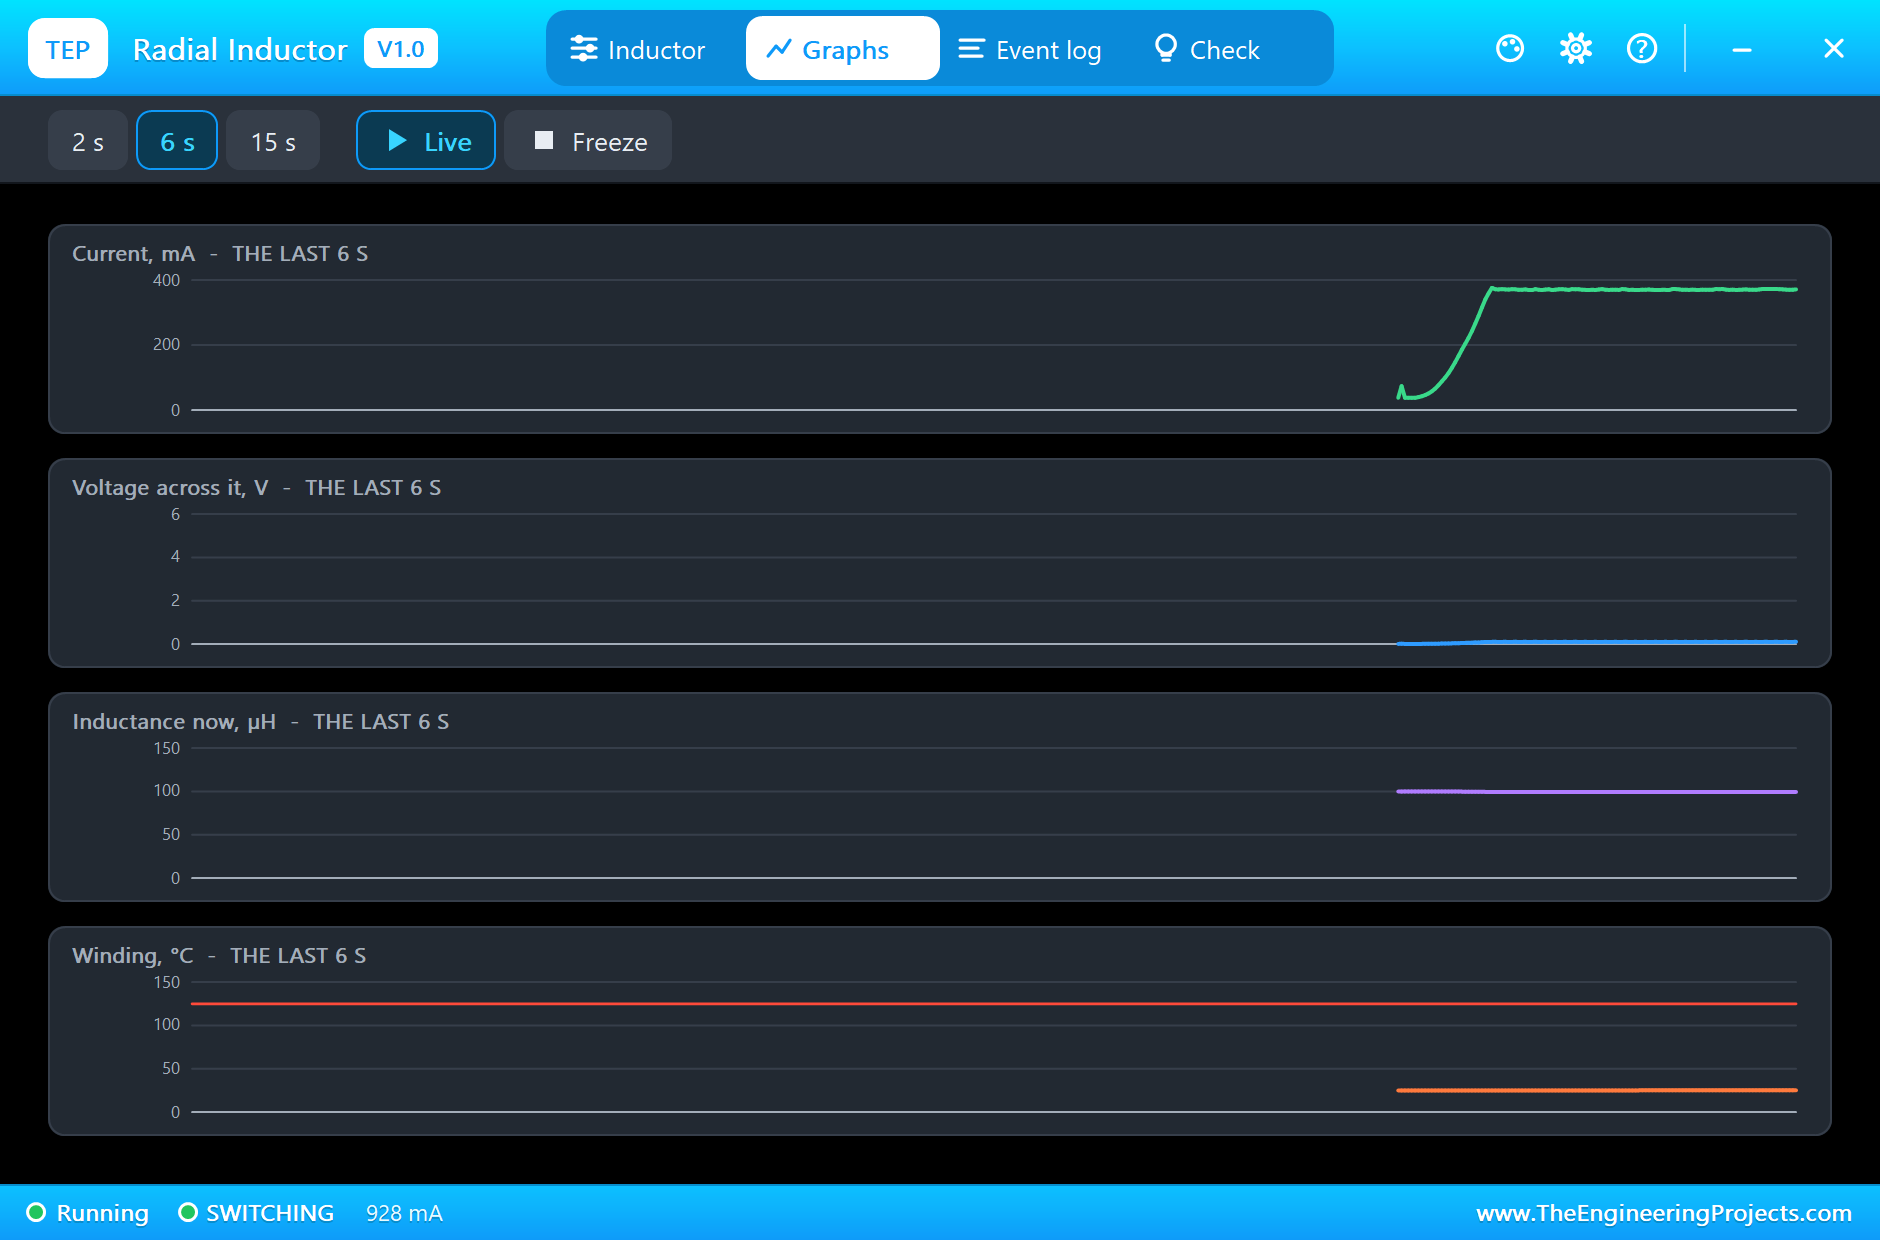
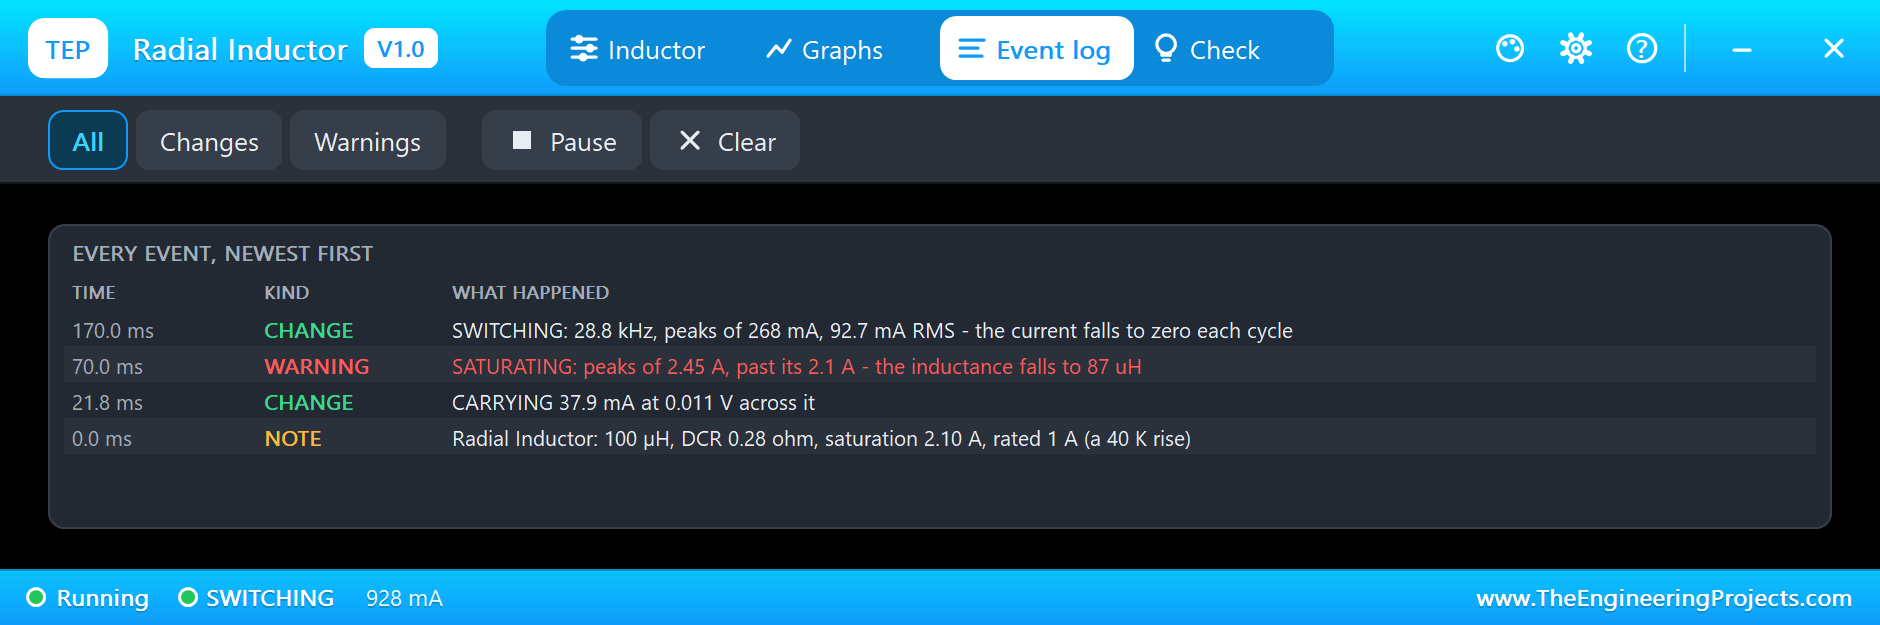
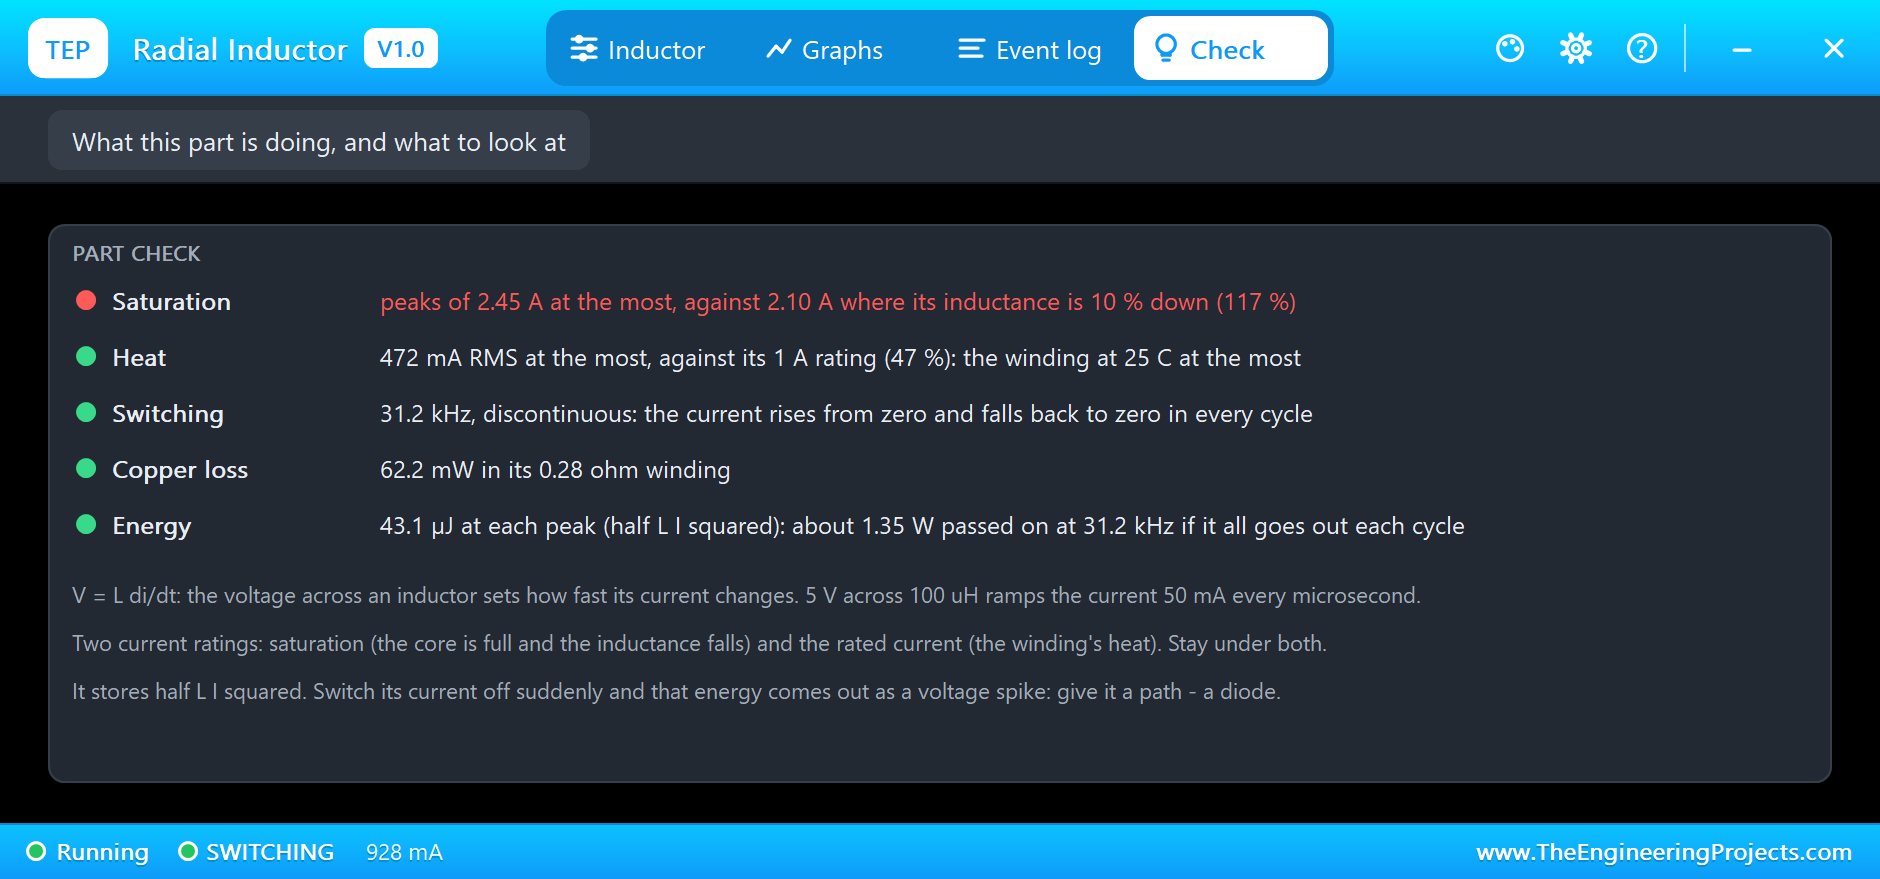
Click L1. The banner reads SWITCHING at 31.2 kHz. The scope shows its current as a train of triangles: a straight ramp up while Q1 is on, with 5 V across the inductor, and a ramp down while the energy flows into the output, with the voltage across it reversed to about 7 V. Each triangle starts and ends at zero, so the converter is in discontinuous mode. The peaks reach 928 mA, the RMS current is 471 mA and the average 371 mA. On the inductance curve the white dot sits at the peak, far left of the saturation line: the inductance is still 97.9 µH, 2 % down. The winding loses only 62 mW and stays at room temperature:
The Small Choke Asked for Too Much
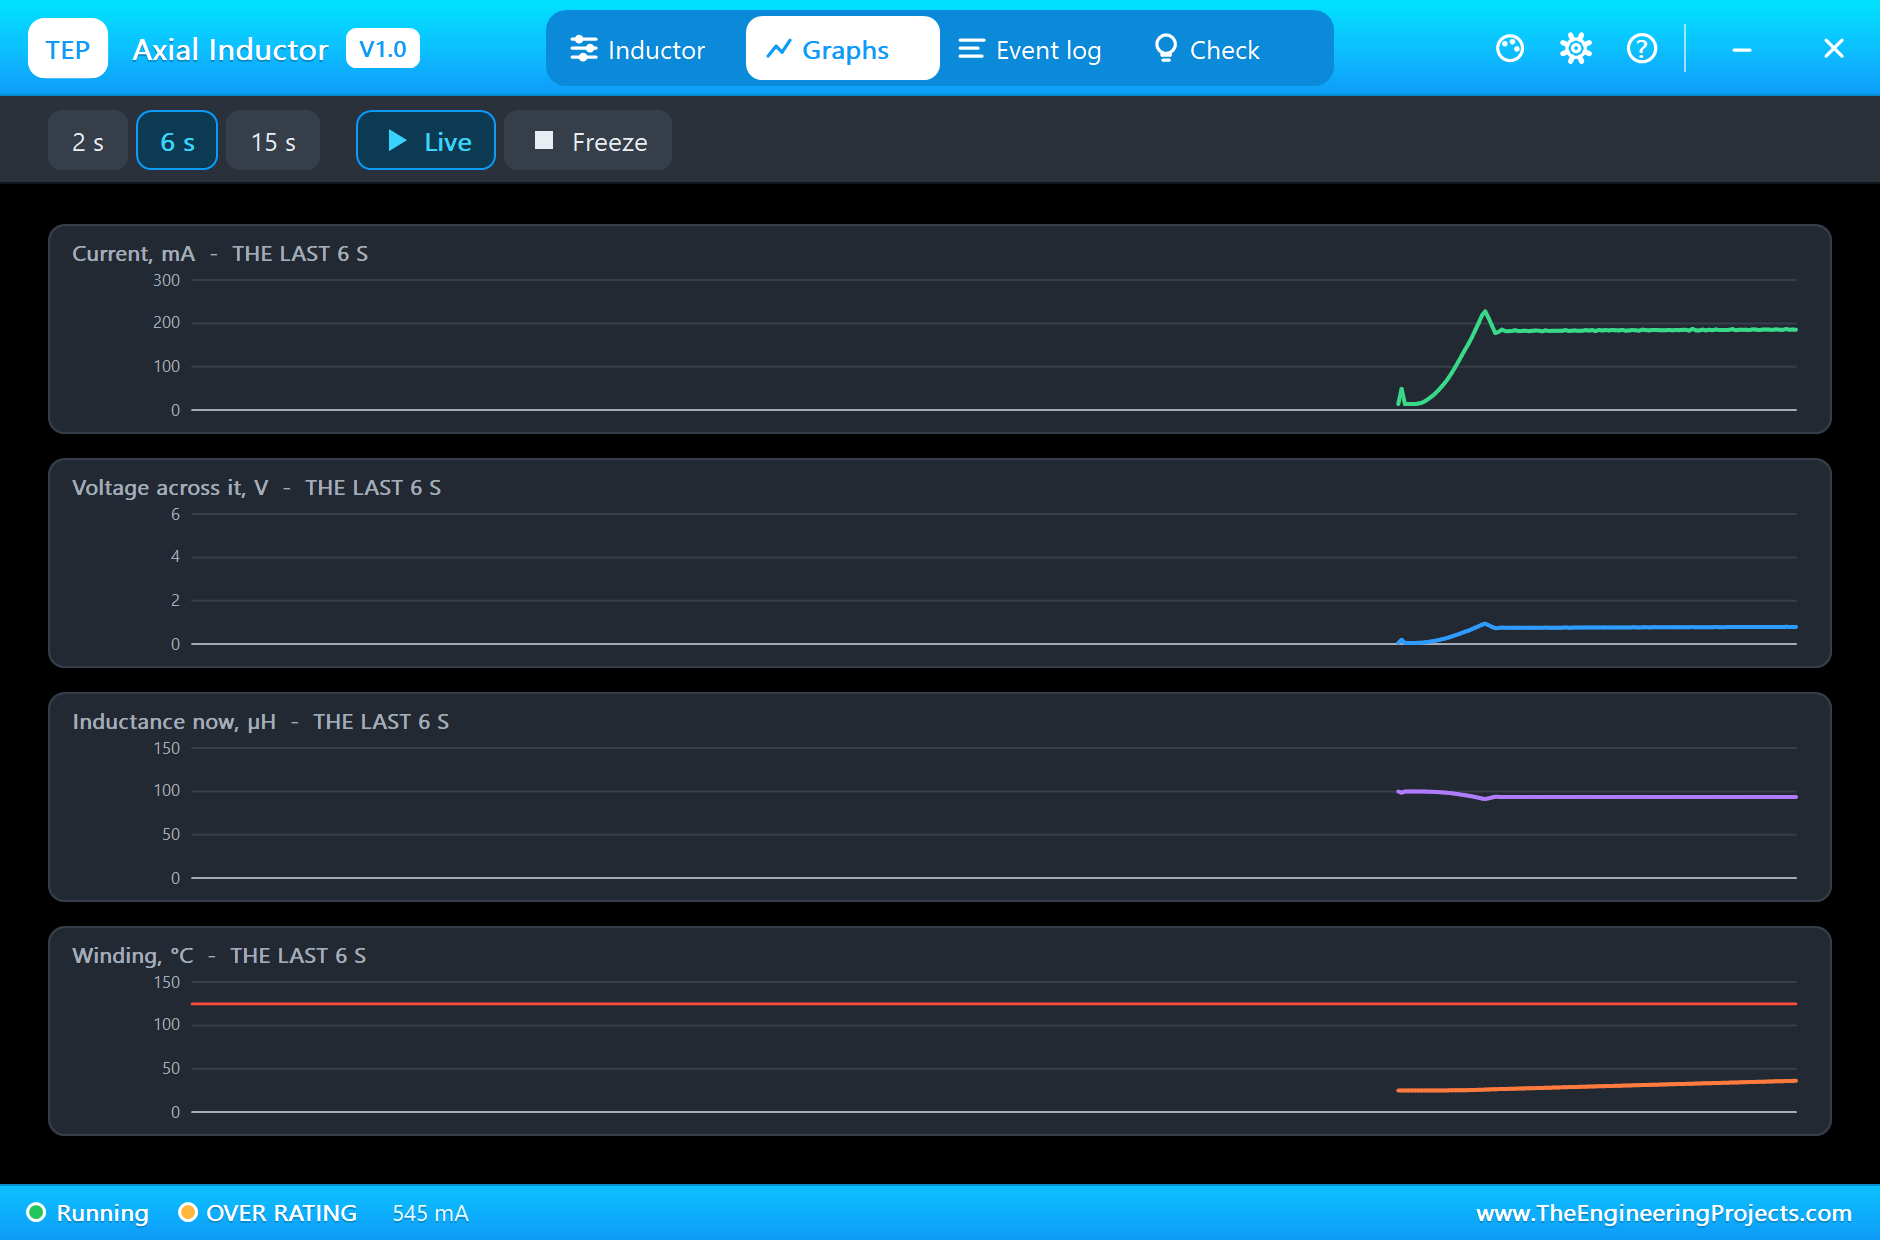
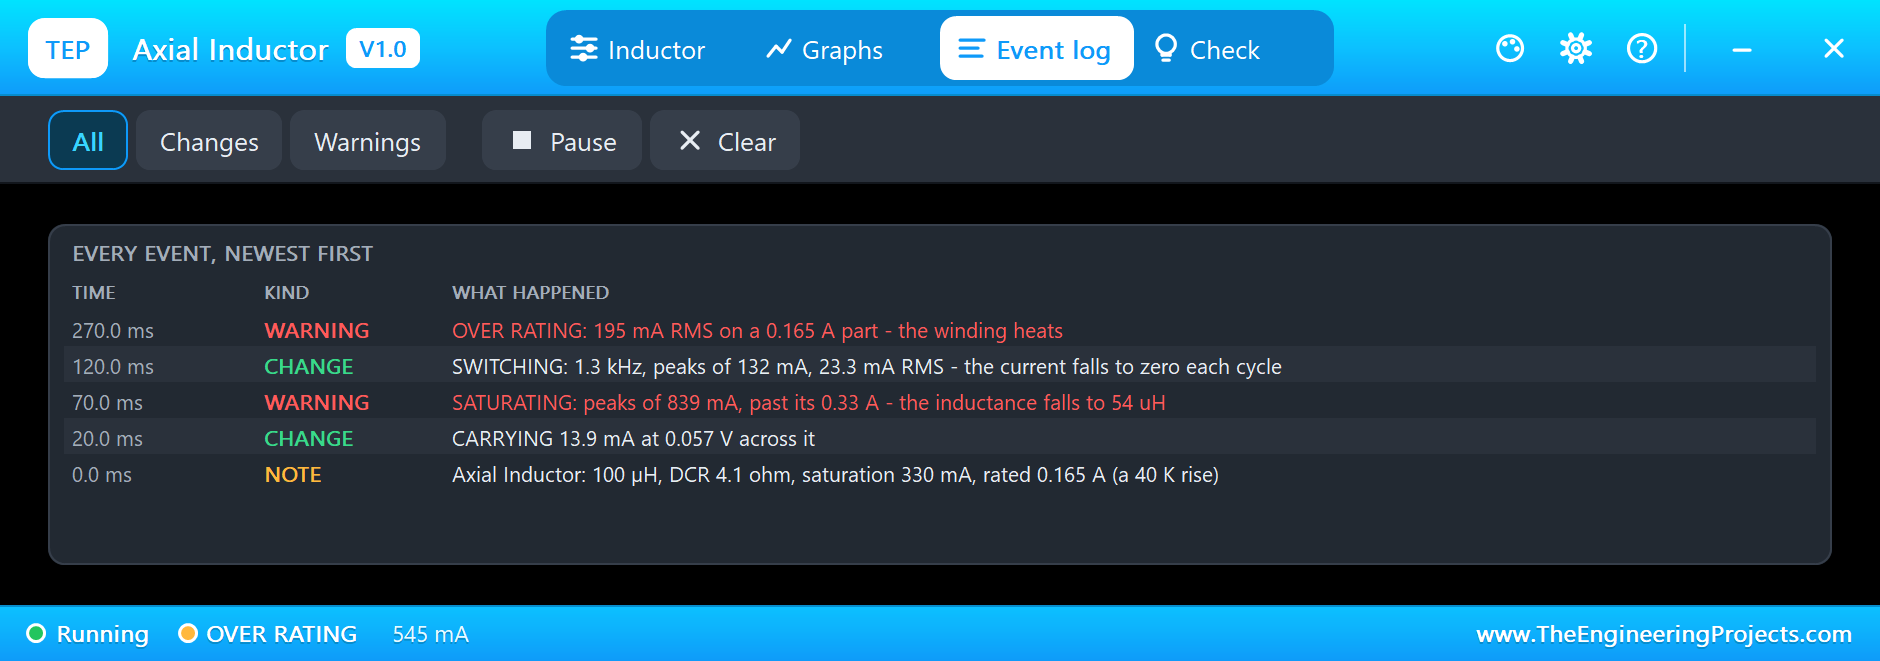
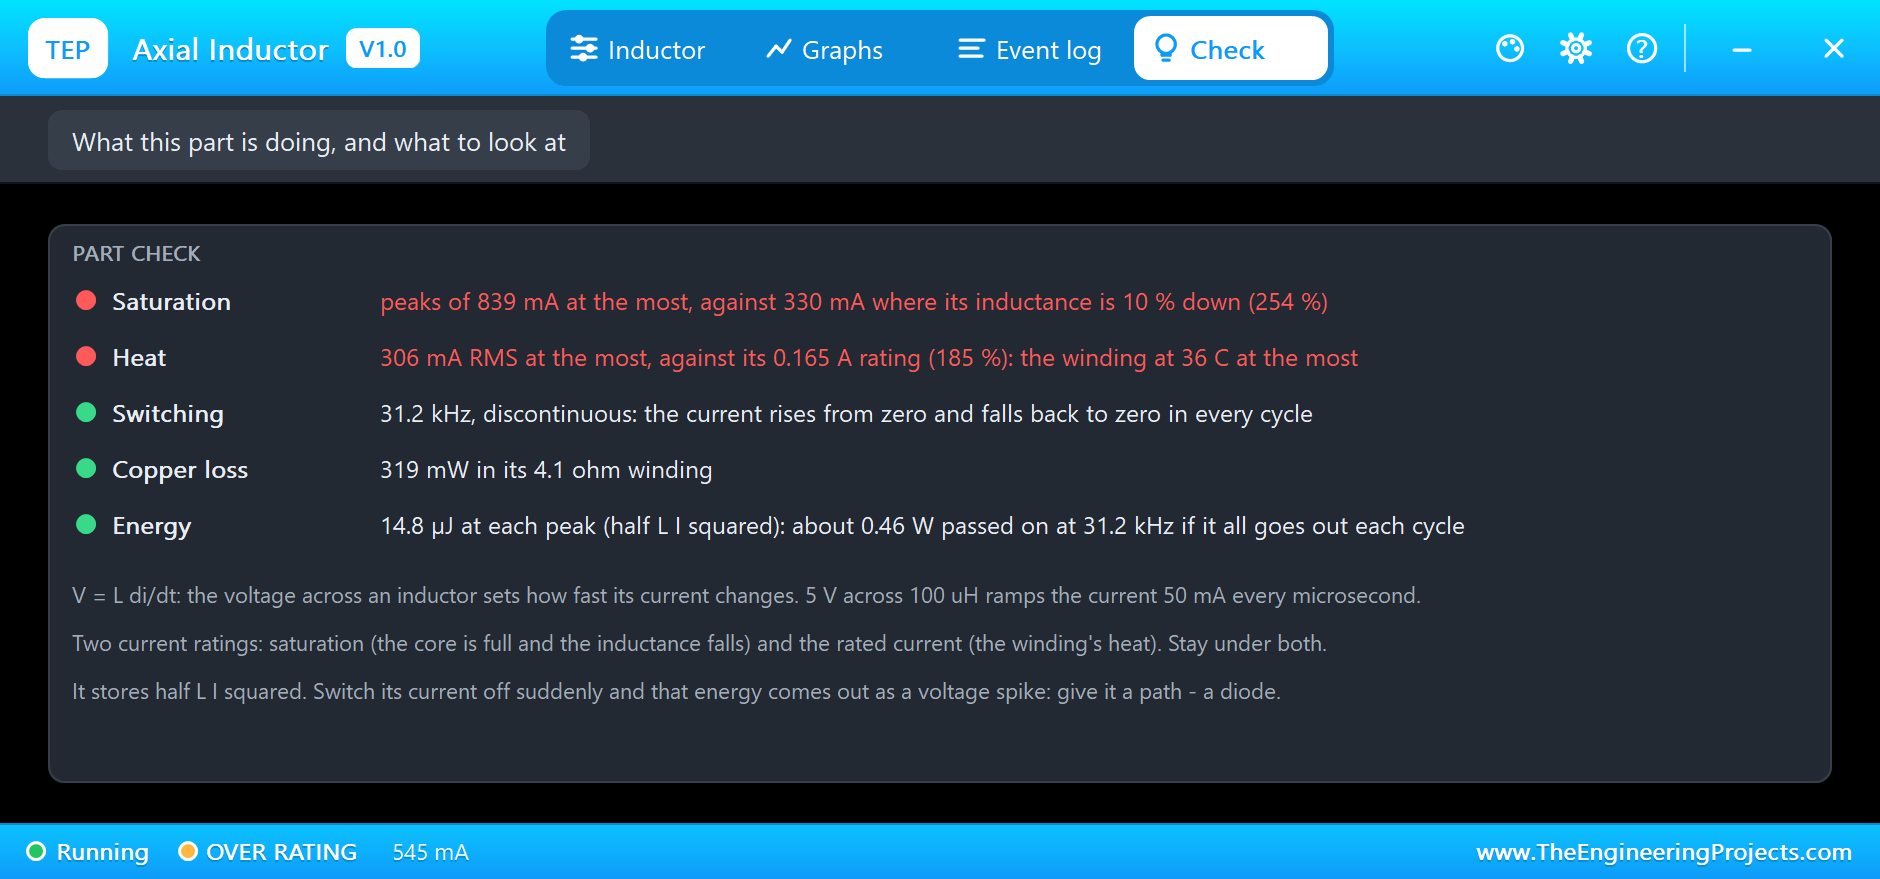
Now click L2. Its load takes only 36 mA at 12 V, but a boost converter draws more than that from its input, and in short peaks. The banner turns amber: OVER RATING, 273 mA RMS on a part rated for 165 mA. The peaks reach 545 mA, past the 330 mA where the model puts its saturation, and the dot on the curve has slid down to 75.8 µH, 24 % down. The field lines have turned amber. Its 4.1 Ω winding burns 319 mW, five times as much as L1's at a third of the load, and its winding has already warmed to 36 °C and keeps rising:
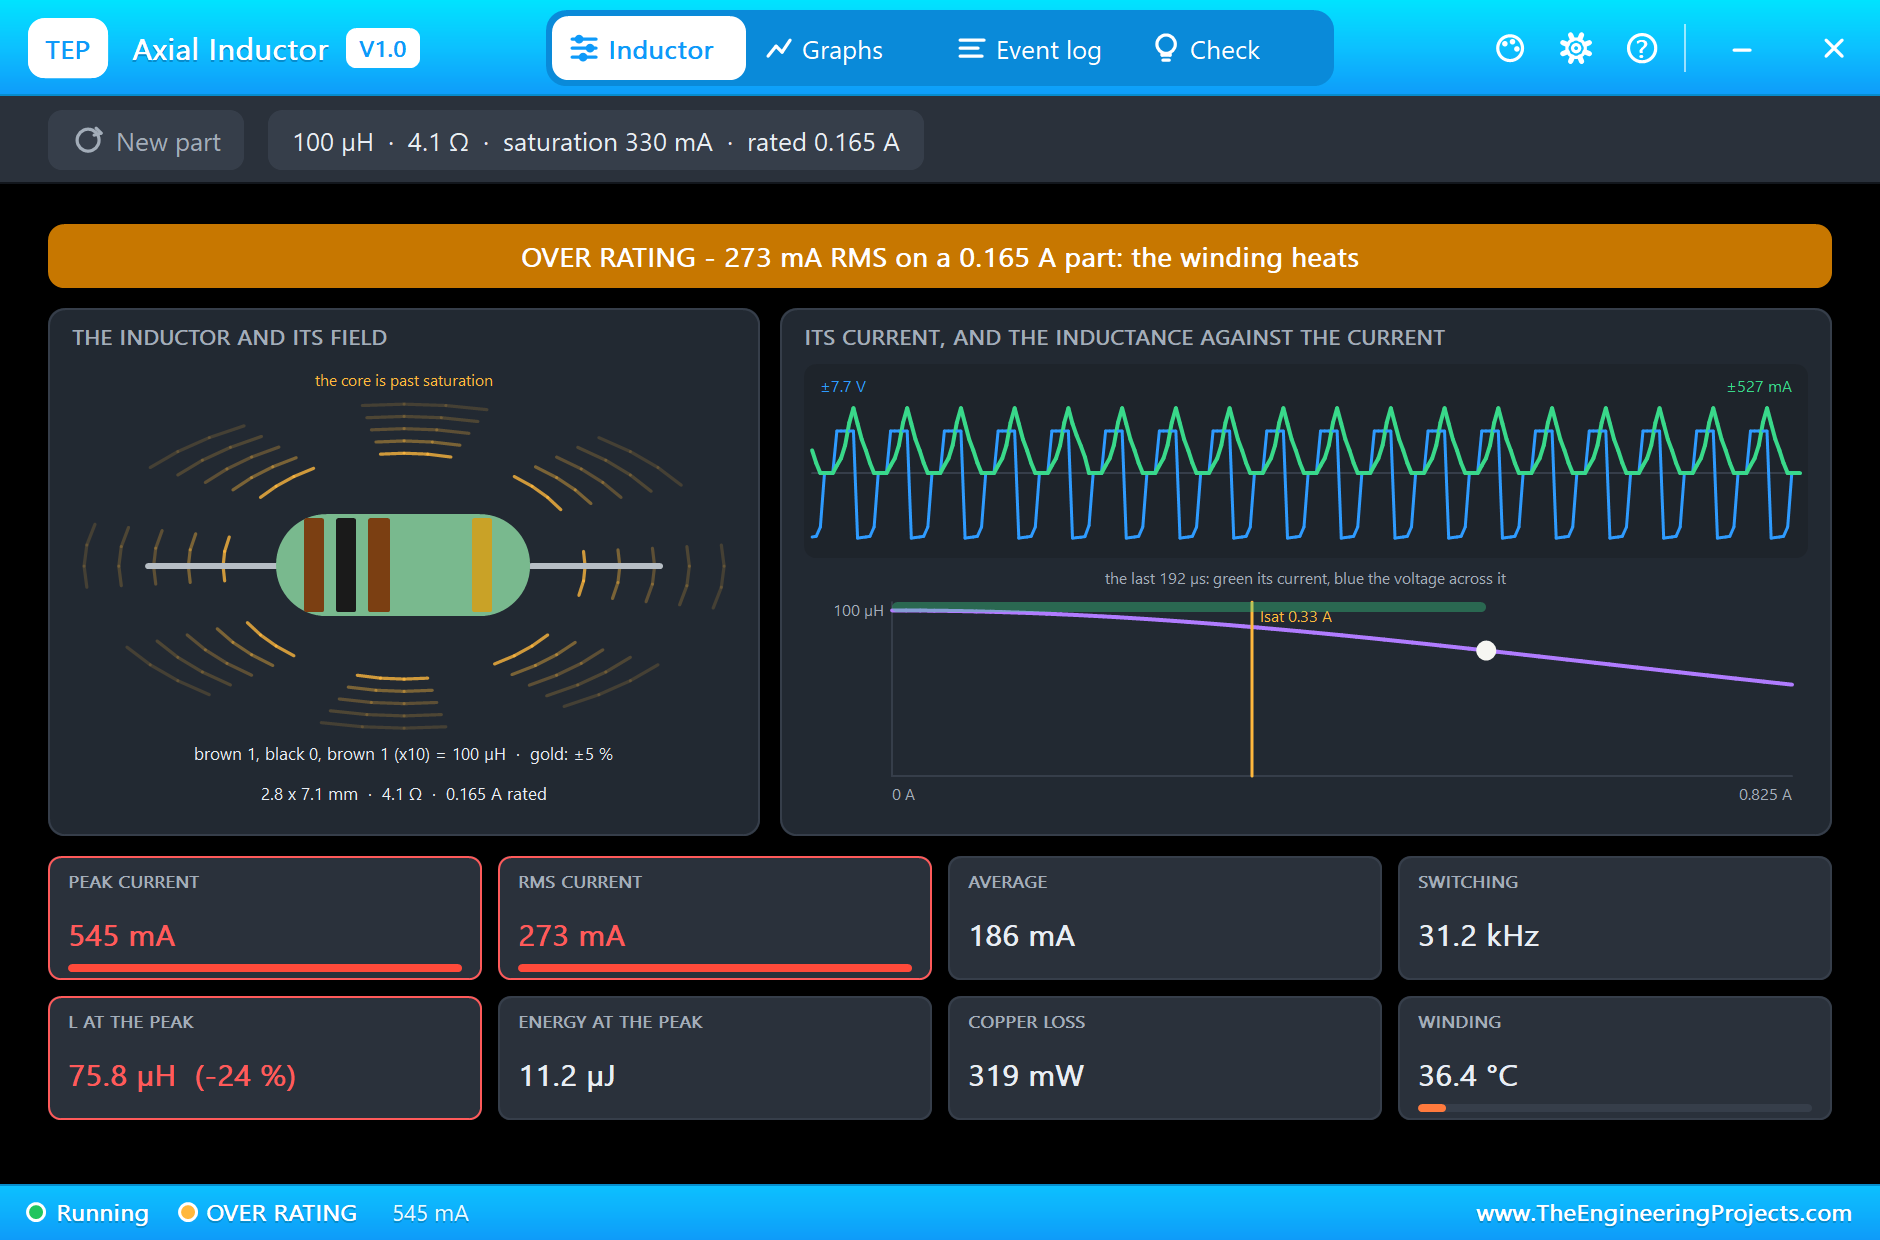
This is the lesson of the demo. Both parts are 100 µH, and on a schematic they look the same. One is built to carry an amp; the other is a signal choke whose thin wire and small core were never meant for a power path.
The Monitor
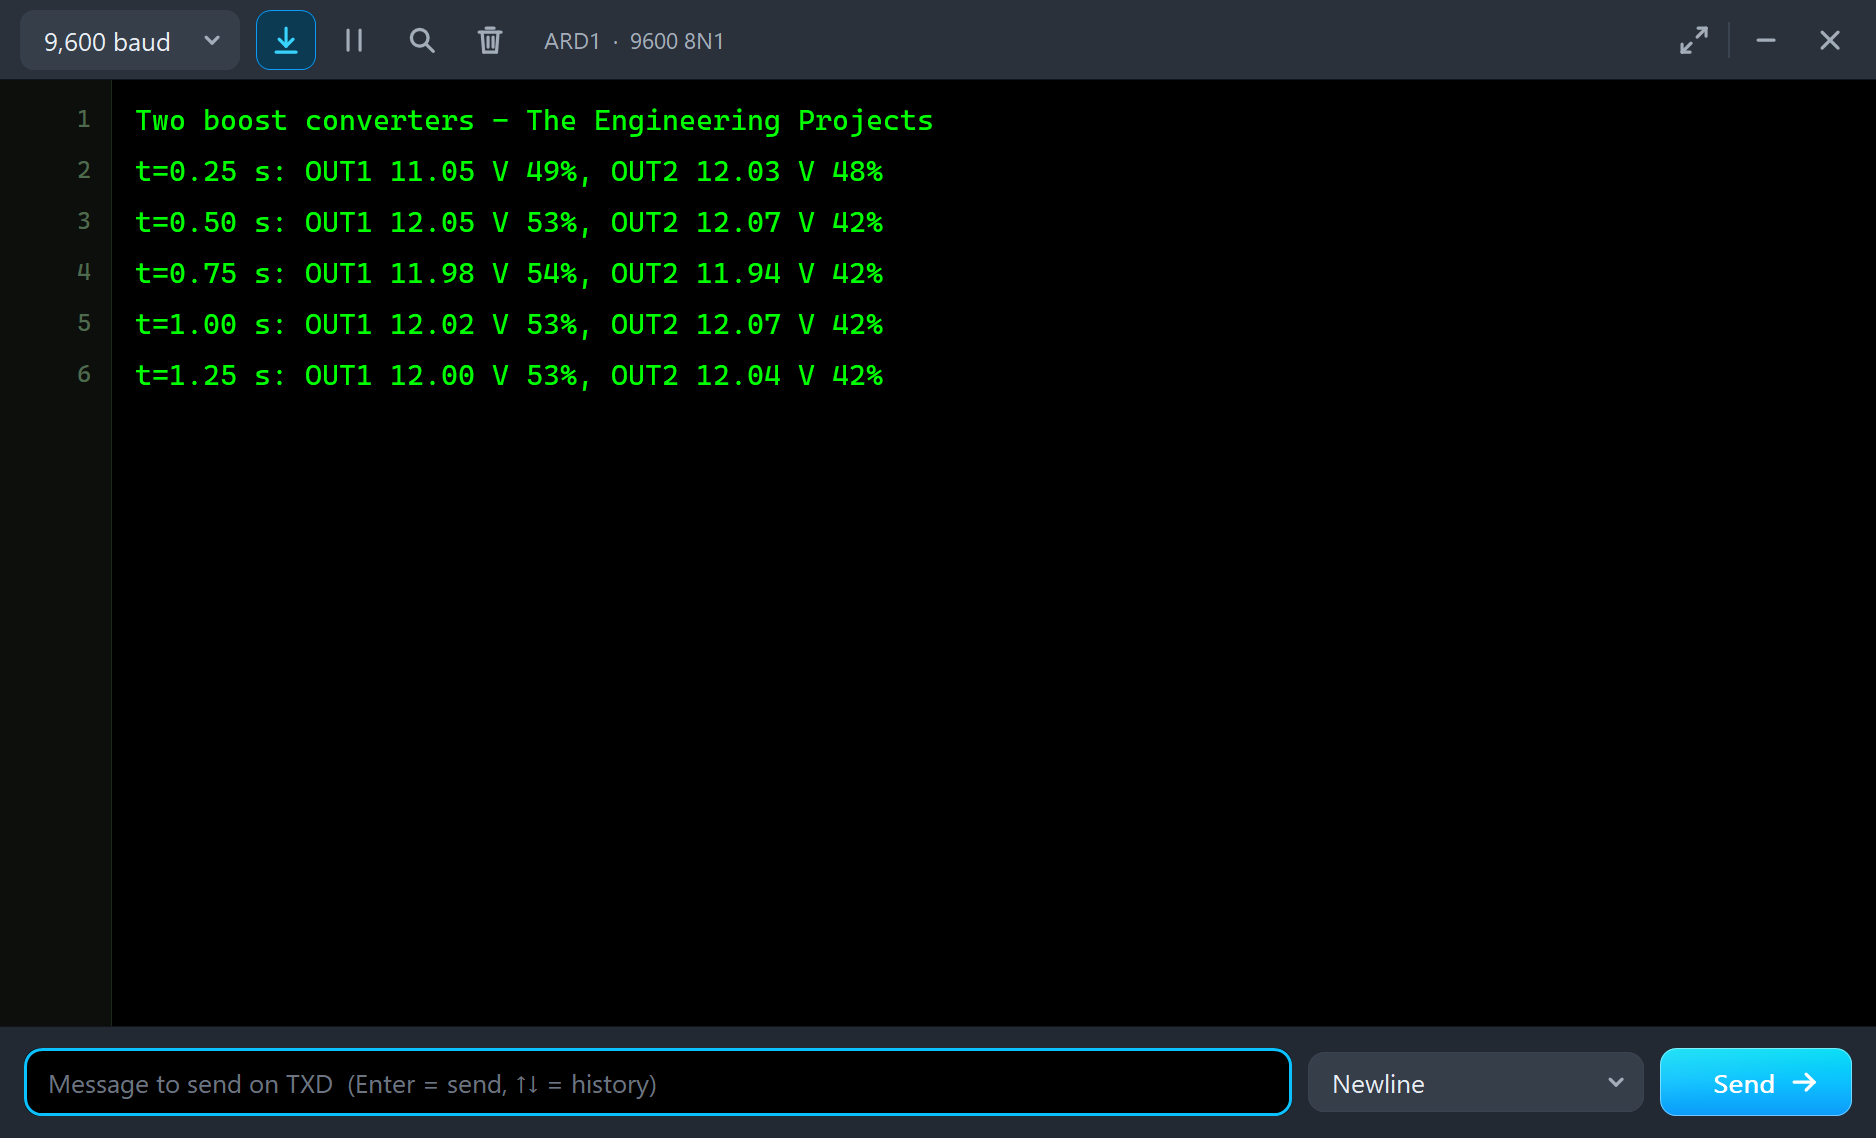
Both converters still regulate: the monitor shows OUT1 at 12.00 V with a duty of 53 % and OUT2 at 12.04 V with 42 %. A converter can hold its output while its inductor is overloaded; the trouble shows up as heat, losses and, in time, failure:
The Graphs, the Logs and the Check Pages
The Graphs page shows each inductor's average current rising as its converter starts and then holding; the average voltage across an inductor in steady operation is zero, because the volt-seconds of the ramp up and the ramp down must cancel. The Event log records the switching with its frequency and peaks, and for L2 the moments it went over its rating and past saturation:
The Check pages give the verdict. L1's is green: its peaks are under half its saturation current, its RMS under half its rating. L2's flags both limits, the saturation and the heat, and both pages report the switching mode, the copper loss and the energy each peak carries:
Try It Yourself
- Swap the two inductors and see L1 cope with either load.
- Change R3 to 47 Ω: L1's peaks rise towards its saturation current.
- Set L1 to 22u: the peaks grow and the converter needs a shorter duty.
- Change L2 to 1m: the bands change, the peaks fall, but its resistance grows tenfold with AUTO.
- Lower the target to 9 V in the sketch and watch the duties fall.
Ideas to Extend the Demo
- Build a buck converter that makes 3.3 V from 12 V with a P-MOSFET and the radial inductor.
- Add a potentiometer to set the output voltage.
- Make an LC low-pass filter with the axial choke and a capacitor, and watch a PWM signal become smooth.
- Measure the efficiency: input power against output power for both converters.
Your Own Sketches
The demo sketch is in the zip file, and you can change it in the Arduino IDE. New to Arduino? Start with our Arduino Tutorial for Beginners. Export the compiled binary, and set the UNO's PROGRAM property to the new file. Our guide on How to get the HEX file from Arduino shows you where the file ends up.
Things to Know Before Using a Real Inductor
- Check two currents: the peak against the saturation current, the RMS against the rated current.
- Mind the resistance: it costs efficiency and makes heat.
- Give the current a path: an inductor whose current is cut off suddenly makes a voltage spike; a converter's diode or a flyback diode catches it.
- Keep the switching loop small and away from sensitive signals; an open drum core spreads its field.
- Never let a boost converter's switch stay on: limit the duty in software.
Troubleshooting
- SATURATING: the peaks are past the saturation current; use a bigger inductor or less current.
- OVER RATING: the RMS current is past the rating; the winding heats.
- BURNT OPEN: the winding passed 180 °C; use New part and fix the current.
- The output will not rise: check the diode's direction and the switch's gate.
- The part is not simulated:
TEPINDUCTOR.DLLis missing from MODELS and from the project folder.
Limitations of the Simulation
- The core's losses at high frequency, the self-resonance and the winding's capacitance are not modelled.
- The values come from distributor listings of the Bourns parts; the axial part has no published saturation current, so the model takes twice its rating.
- A switching demo is slow to simulate: each second of the demo takes several minutes.
- Arduino is a name of Arduino; this library is not made or endorsed by Arduino or Labcenter.
- Tested in Proteus 8.5 in November 2026 (the demo as shipped). Proteus 7 is not supported.
So, that was all about the Inductor Library for Proteus. I hope it helps you choose your inductors by their currents as well as their values, and see what really happens inside a boost converter. If you have any questions, ask in the comments and I will help you out. Till the next tutorial, take care and have fun!