Hello friends, I hope you all are doing great. Today, I am going to share the new IR / UV LED Library for Proteus. Not every LED is meant to be seen. An infrared LED sends light just beyond red, invisible to us but perfect for remote controls, obstacle sensors and night cameras. An ultraviolet LED sends light just beyond violet, used to cure glue, check banknotes and make things glow in the dark. Both are ordinary 5 mm LEDs to wire up, and both behave a little differently from the coloured ones.
IR / UV LED Library for Proteus
Latest version: V1.0 (November 2026, this tutorial)
Other component libraries: C945 Transistor · PC817 Optocoupler · Relay Module · Resistor · 5 mm LED · Designer Colour LED · Push Button · Active Buzzer · Electrolytic Capacitor · Ceramic Capacitor · Tantalum Capacitor · Film Capacitor · 1N4007 Diode · Zener Diode · Schottky Diode · Supercapacitor · Photodiode · RGB LED · Bridge Rectifier · Flashing LED · Bi-Colour LED · SMD LED · Slide Switch · Toggle Switch · Rocker Switch · Micro Limit Switch · Emergency Stop Switch · SMD Resistor · Power Resistor · Resistor Network · Potentiometer · Trimmer Potentiometer · Slide Potentiometer · NTC Thermistor · DIP Switch · Fuse · Passive Buzzer · Mini Speaker · 7-Segment Display · LED Bar Graph · Small Transistors · TIP122 Darlington · N-MOSFET · P-MOSFET · PC817 Optocoupler · Filament Bulb · Power LED · Voltage Regulator · SCR and TRIAC · Inductor · Toroid Inductor · Crystal
Helping Tools
- Serial Monitor Advance: a serial terminal window for the UART of your board
- Serial Monitor Expert: the serial monitor with extra debugging tools
- LCD Library for Proteus V3.0: 16x2, 20x4 and I2C LCDs to show your readings
Our library has a 940 nm infrared LED and a 395 nm ultraviolet LED, both on our true-scale 5 mm dome. The IR LED is the clever one: since its light is invisible, its pop-up shows it to the eye and to a phone camera, side by side, and it reads the remote-control codes it sends: the 38 kHz carrier, the marks and spaces, and the full NEC frame, address and command, checked. The UV LED glows violet, with ultraviolet's own cautions on its Check page. The demo turns an Arduino into a small IR remote with a UV lamp beside it.
NOTICE: Our team has put a lot of effort into these small parts: the bodies, the animation and the pop-ups are all our own design, and you get them free. Your feedback is the fuel that keeps us going, so please tell us what you think in the comments below or in the IR / UV LED board of our forum. And if our free libraries help you, you can buy us a coffee. So, let's get started with the IR / UV LED Library for Proteus:
What are IR and UV LEDs?
An LED's colour is set by its semiconductor: the wider the gap the electrons cross, the shorter the wavelength of the light. Red LEDs emit around 630 nm, green around 525 nm and blue around 470 nm. Go further out and the light leaves the range of the eye. Below about 400 nm is ultraviolet; above about 700 nm is infrared. LEDs are made for both, and they are among the most common parts in electronics.
The physics of the junction does not change, so they are wired exactly like any LED: an anode, a cathode, a forward voltage and a series resistor. What changes is the forward voltage, which follows the photon energy, and what you can do with the light. Our 5 mm LED Library for Proteus covers the coloured ones; this library covers the two you cannot quite see.
| Feature | IR LED | UV LED |
|---|---|---|
| Wavelength | 940 nm, infrared | 395 nm, near ultraviolet |
| Lens | blue-grey tinted | water clear |
| Forward voltage | about 1.2 V at 20 mA | about 3.3 V at 20 mA |
| Current | 100 mA continuous | 30 mA at the most |
| To the eye | nothing at all | a deep violet |
| In the library | IRLED5MM940TEP | UVLED5MM395TEP |
The Infrared LED
A 940 nm infrared LED has a low forward voltage, about 1.2 V at 20 mA and 1.3 to 1.4 V at 100 mA, because each photon carries little energy. It is built to take much more current than an indicator LED: 100 mA continuously and far more in short pulses, which is how a remote control reaches across a room. Its light is invisible to the eye, but the sensor in a phone camera sees it: point a remote at a camera, press a key, and the LED flashes purple-white on the screen. Our pop-up shows exactly that, the LED to the eye on the left and to a camera on the right.
The Ultraviolet LED
A 395 nm UV LED sits just past violet, and the eye still catches a little of its light as a deep violet glow, although most of what it sends is invisible. Each photon carries more energy than visible light, so the forward voltage is higher, about 3.3 V, and the light makes many materials fluoresce: white paper and cloth glow blue-white, the security marks on banknotes appear, and UV glue and nail gel cure. That same energy is hard on the eyes, so you should never look into a lit UV LED from close by.
How a Remote Control Talks
A TV remote does not simply switch its LED on and off. Daylight and lamps contain plenty of infrared, so a plain flash would be lost in the noise. Instead, the remote modulates the light: it switches the LED on and off at a carrier frequency, usually 38 kHz, in bursts. The receiver in the TV has a filter tuned to that carrier, and it only answers to bursts of it. The bursts are called marks and the gaps between them spaces, and their lengths carry the data.
The NEC Protocol
NEC is one of the most widely used remote-control codes, and the one many small remotes in Arduino kits use. A frame starts with a 9 ms mark and a 4.5 ms space, the leader, which lets the receiver set its gain. Then come 32 bits, least significant bit first. Every bit starts with a 560 µs mark; a short 560 µs space after it means 0, a long 1690 µs space means 1. The 32 bits are an 8-bit address, the same address inverted, an 8-bit command and the command inverted, so the receiver can check every frame. A last 560 µs mark ends it. The whole frame takes about 68 ms.
If you keep the key pressed, the remote does not send the frame again. Every 108 ms it sends a short repeat code instead: a 9 ms mark, a 2.25 ms space and a stop mark, which simply means the key is still down. That is how volume keeps rising while you hold the button.
| Part of the frame | Mark | Space |
|---|---|---|
| Leader | 9 ms | 4.5 ms |
| A 0 bit | 560 µs | 560 µs |
| A 1 bit | 560 µs | 1690 µs |
| Stop | 560 µs | - |
| Repeat code | 9 ms, then a 560 µs stop mark | 2.25 ms |
Driving an IR LED
A remote drives its IR LED hard, often 100 to 500 mA in short bursts, through a transistor, because the light falls off with the square of the distance. From an Arduino pin, a resistor keeps the current safe: our demo uses 100 ohm for about 31 mA, enough for a receiver a short way off. The carrier comes from the sketch, switching the pin about 39 thousand times a second during each mark.
Where They Are Used
Infrared LEDs are in every TV, air conditioner and set-top box remote, in obstacle and line sensors on robots, in light curtains and smoke detectors, in the night-vision lamps of security cameras and in optical links. UV LEDs cure glue, resin and nail gel, check banknotes and documents, light up fluorescent markings, attract insects in traps and help find leaks with fluorescent dyes.
Features of the IR / UV LED Library for Proteus
- The real look, at true scale: our 5 mm dome with a blue-grey IR lens and a water-clear UV lens, and our small TEP signature.
- Real junctions: 1.2 V and 100 mA for the IR LED, 3.3 V and 30 mA for the UV LED, with over current and burn-out.
- Invisible, and shown as a camera sees it: the IR LED to the eye and to a phone camera, side by side.
- It reads the codes: the carrier's frequency and duty, every mark and space, NEC frames with their inverse checked, and repeat codes.
- The last frame drawn: its marks on a time line, with the leader, the address and the command beneath.
- UV with its cautions: a violet glow and the eye and fluorescence notes on the Check page.
- A complete package: about 1.9 MB with the library, our Arduino UNO V4.0, our resistors and push buttons and the demo, without the source code of the model.
The IR and UV LEDs in Proteus
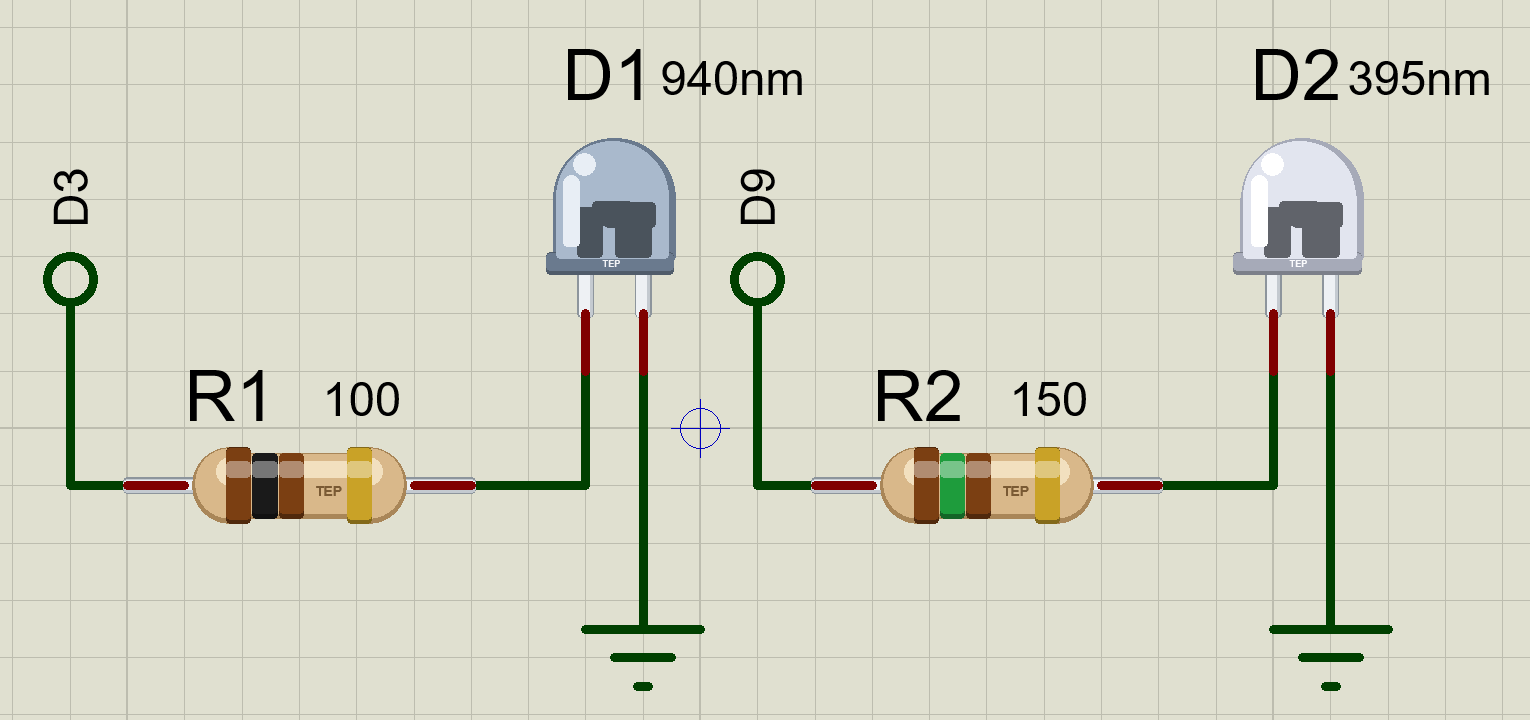
The devices are IRLED5MM940TEP and UVLED5MM395TEP in TEPIRUV.LIB, under Optoelectronics, LEDs, with the prefix D and the model TEPIRUV.DLL. Search IRLED or UVLED in Pick Devices. Each has the usual two pins: A, the long leg, and K, the short one by the flat on the rim.
The Properties
| Property | What it does |
|---|---|
| Forward voltage at 20 mA, V | 1.2 for the IR LED, 3.3 for the UV LED |
| Maximum current, mA | 100 for the IR LED, 30 for the UV LED: past it, it burns out |
Download IR / UV LED Library for Proteus
Click the button below to download IR-UV-LED-Library-for-Proteus-v1.0.zip (about 1.9 MB, without the source code of the models):
IR / UV LED Library for Proteus V1.0- README.txt: installation, the demo, the properties, the NEC timings, troubleshooting and the limits.
- Proteus Library Files:
TEPIRUV.LIB,TEPRESISTOR.LIB,TEPBUTTON.LIBand ourArduinoV4TEP.LIB. - Proteus Model Files:
TEPIRUV.DLL,TEPRESISTOR.DLL,TEPBUTTON.DLLandTEPARDUINO.DLL. - Arduino Code: the demo sketch.
- Proteus Simulation: the demo project, its HEX file and copies of the DLLs.
No Proteus yet? Read How to Download and Install Proteus 7 and 8. New to libraries? Follow How to Install a New Library in Proteus.
How to Install IR / UV LED Library for Proteus
- Close Proteus and extract the whole zip file, for example to your Desktop.
- Copy the files from Proteus Library Files into the LIBRARY folder of Proteus.
- Copy the files from Proteus Model Files into the MODELS folder.
- Delete
TEPIRUV.IDXfrom the LIBRARY folder if it is there. - Start Proteus, press P and search for IRLED.
Demo: An IR Remote and a UV Lamp
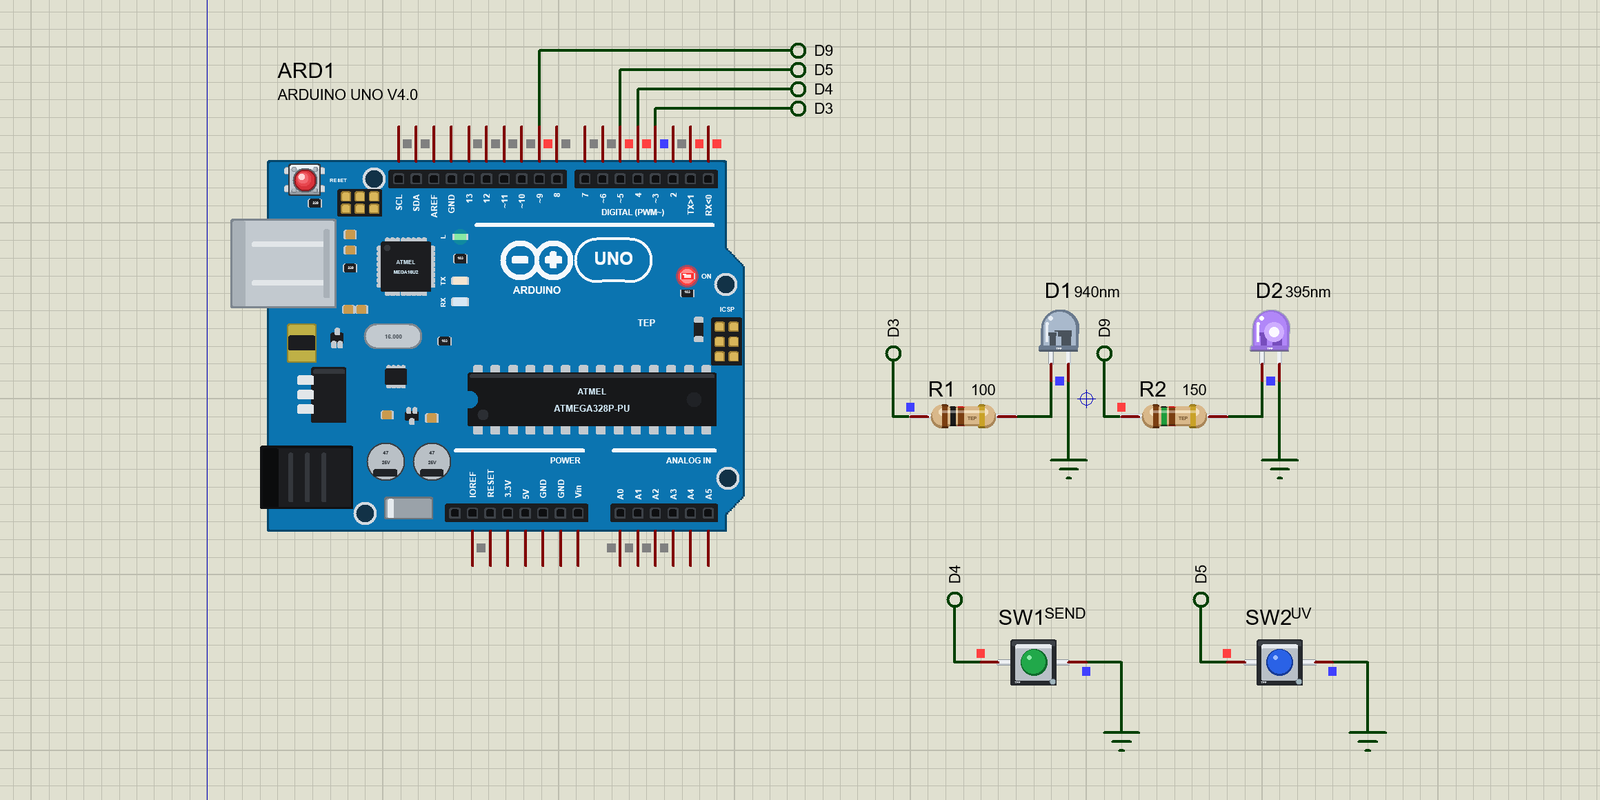
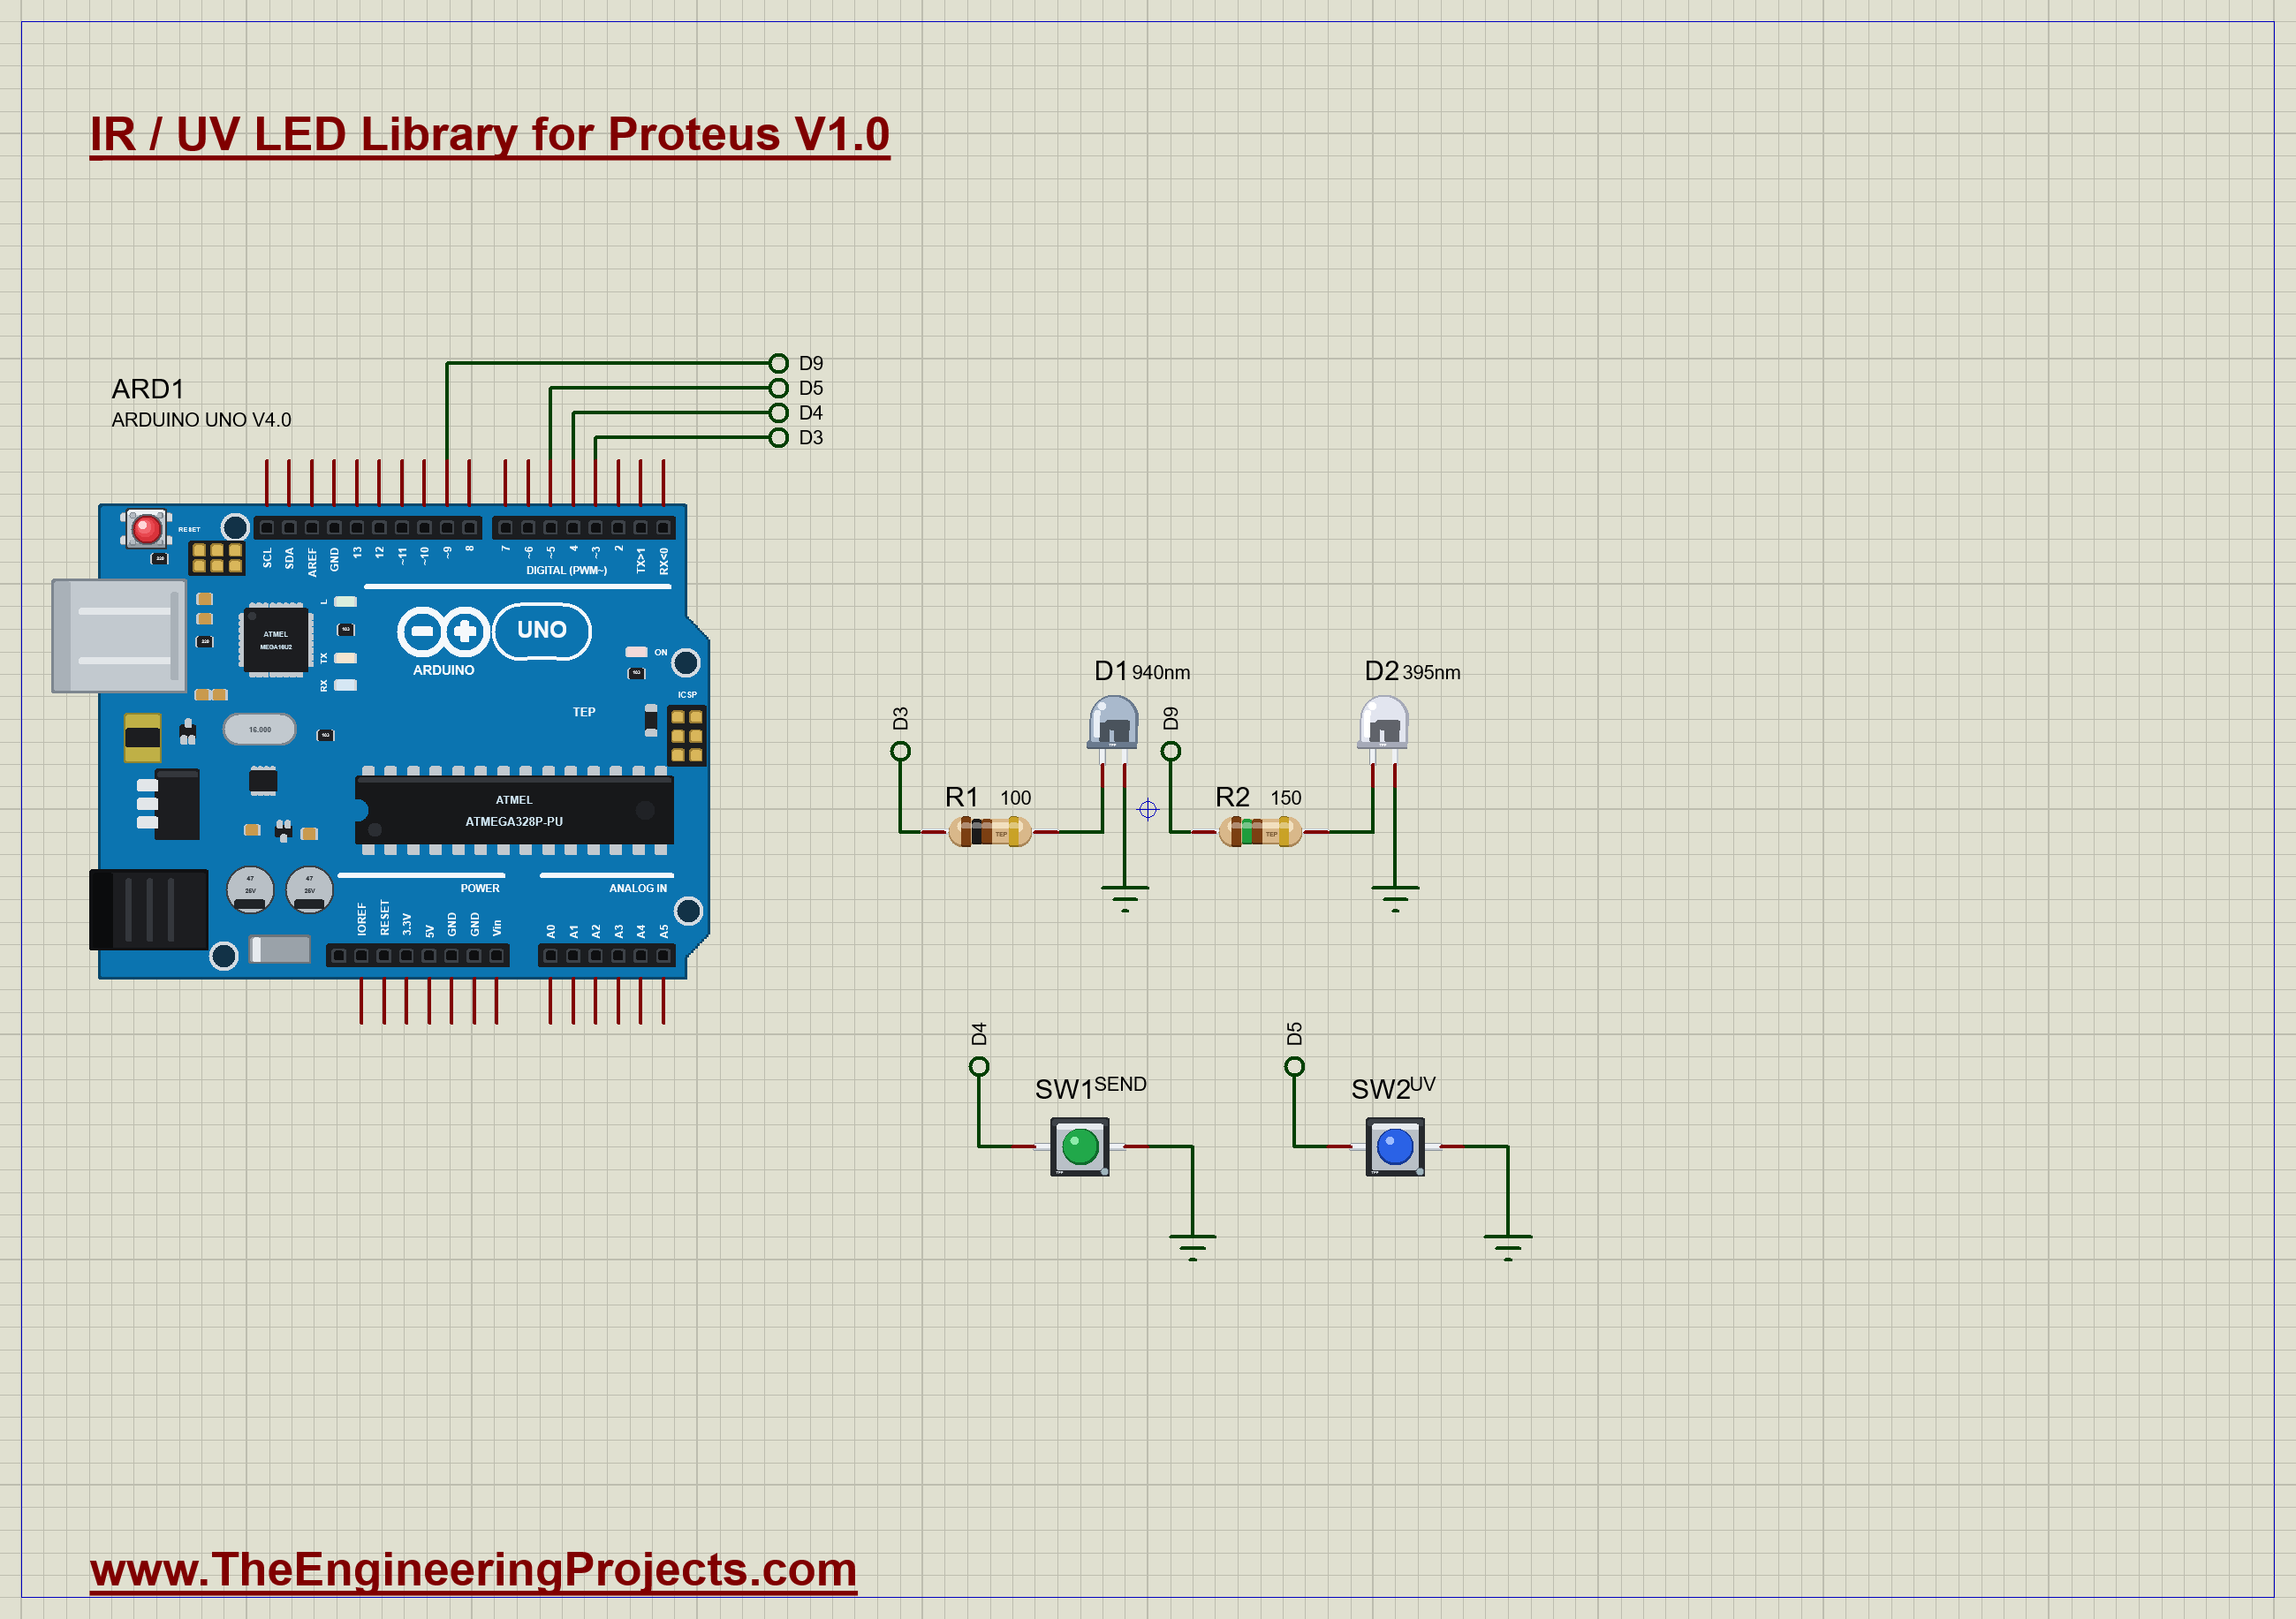
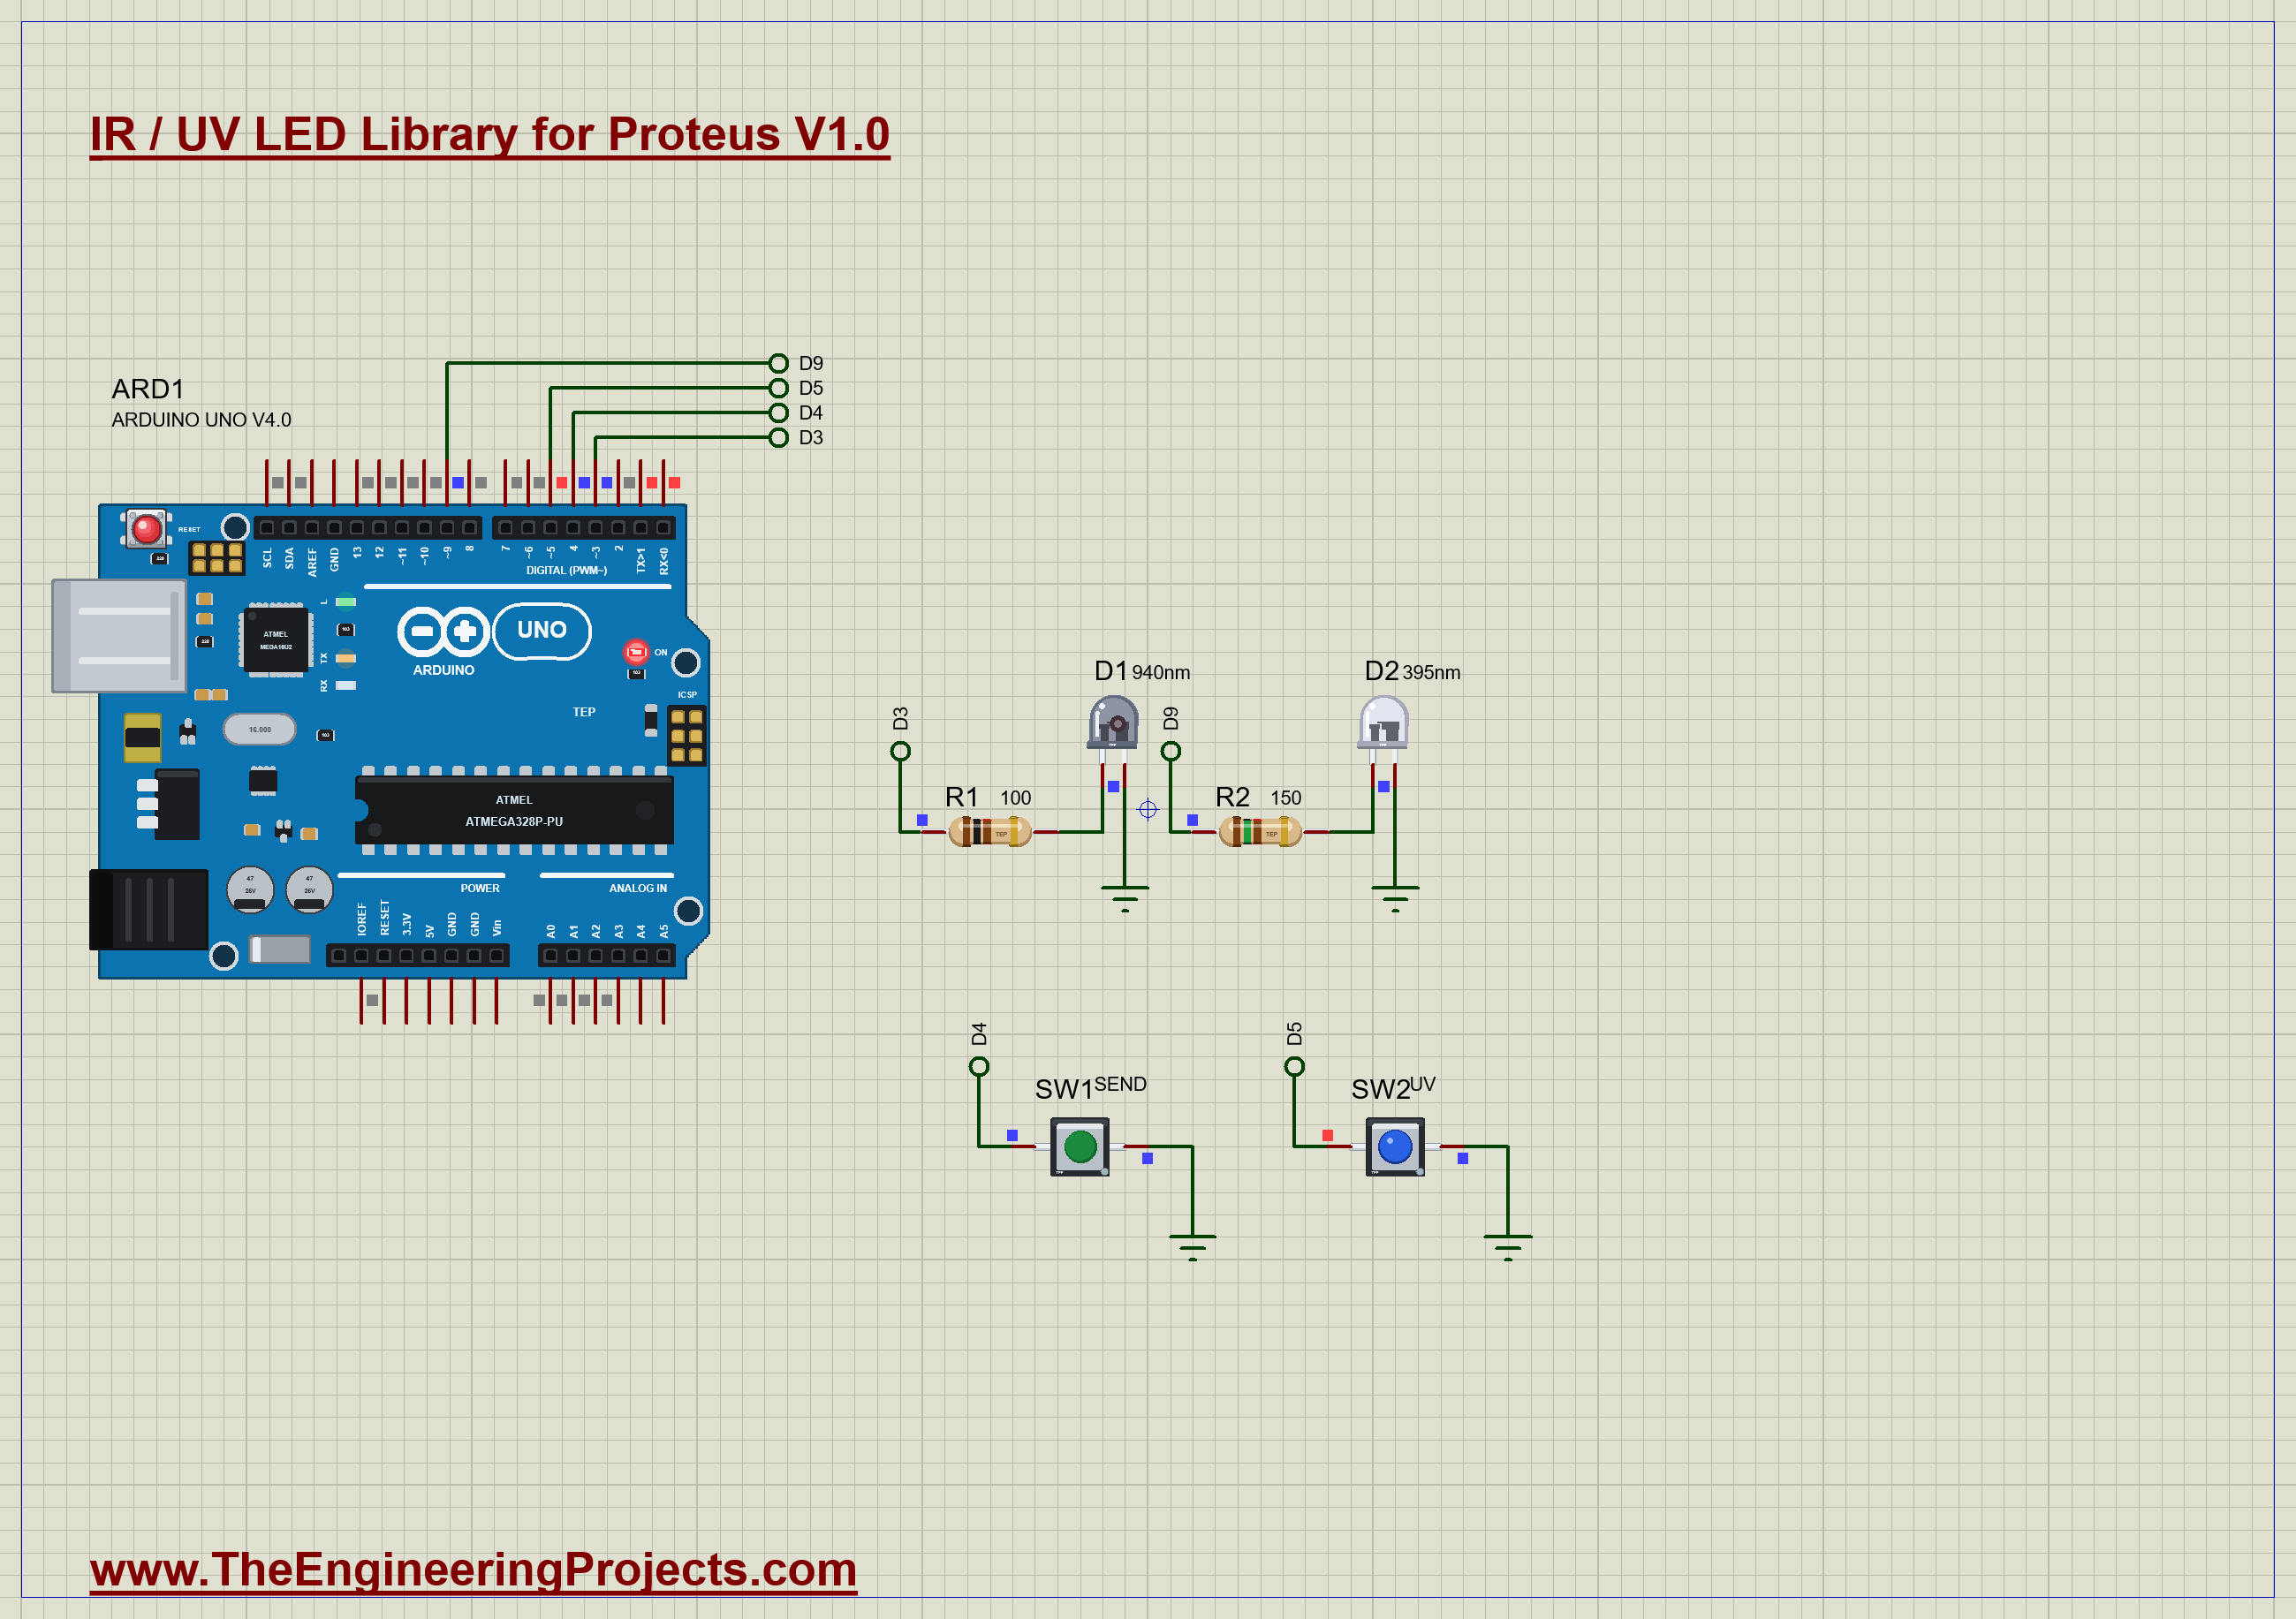
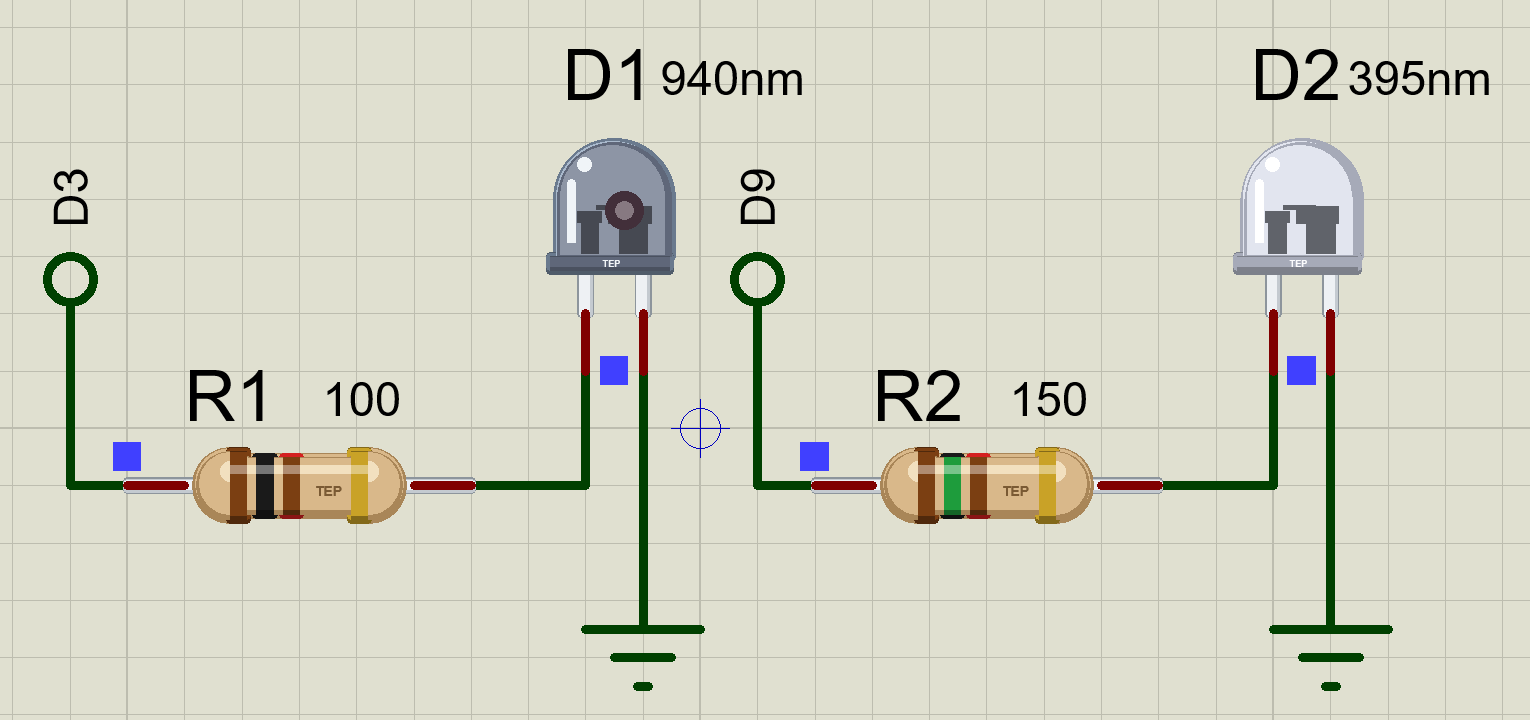
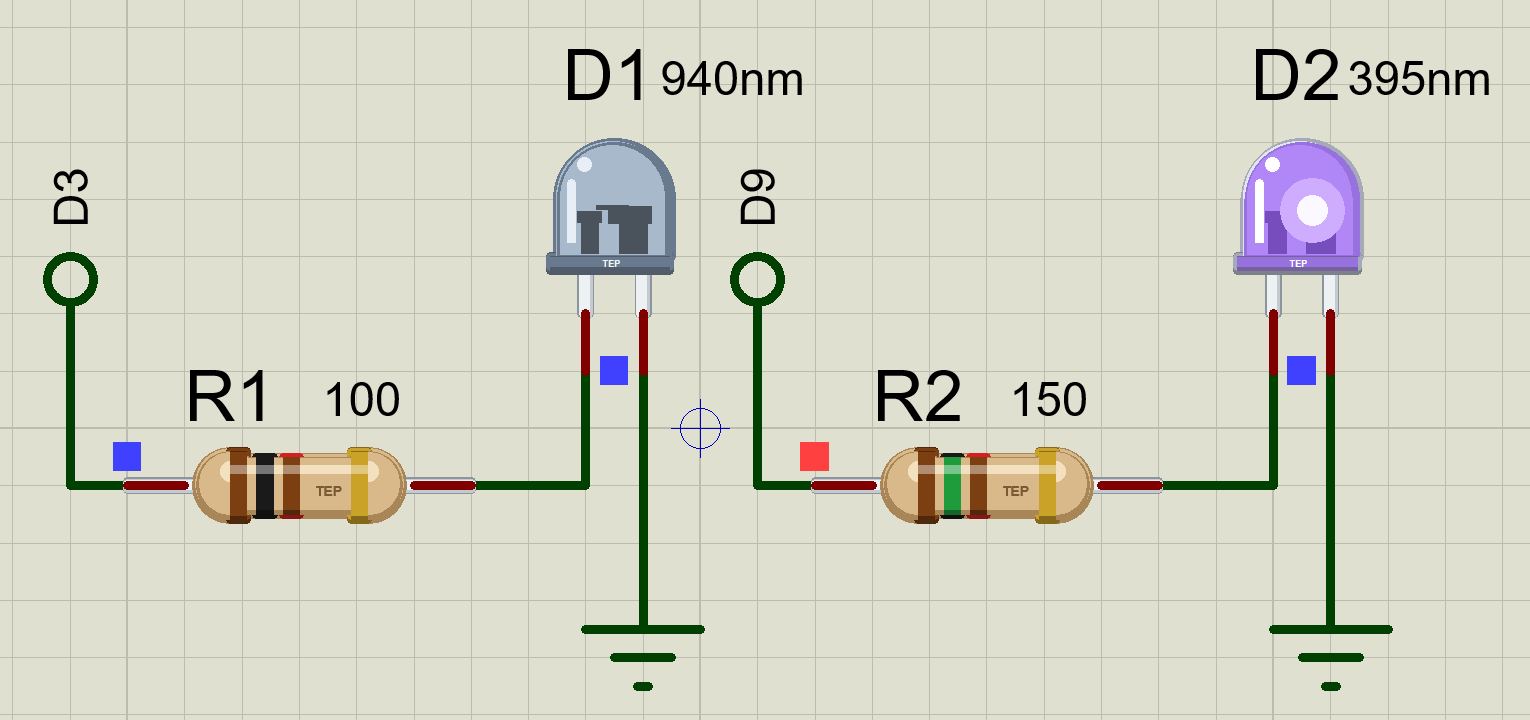
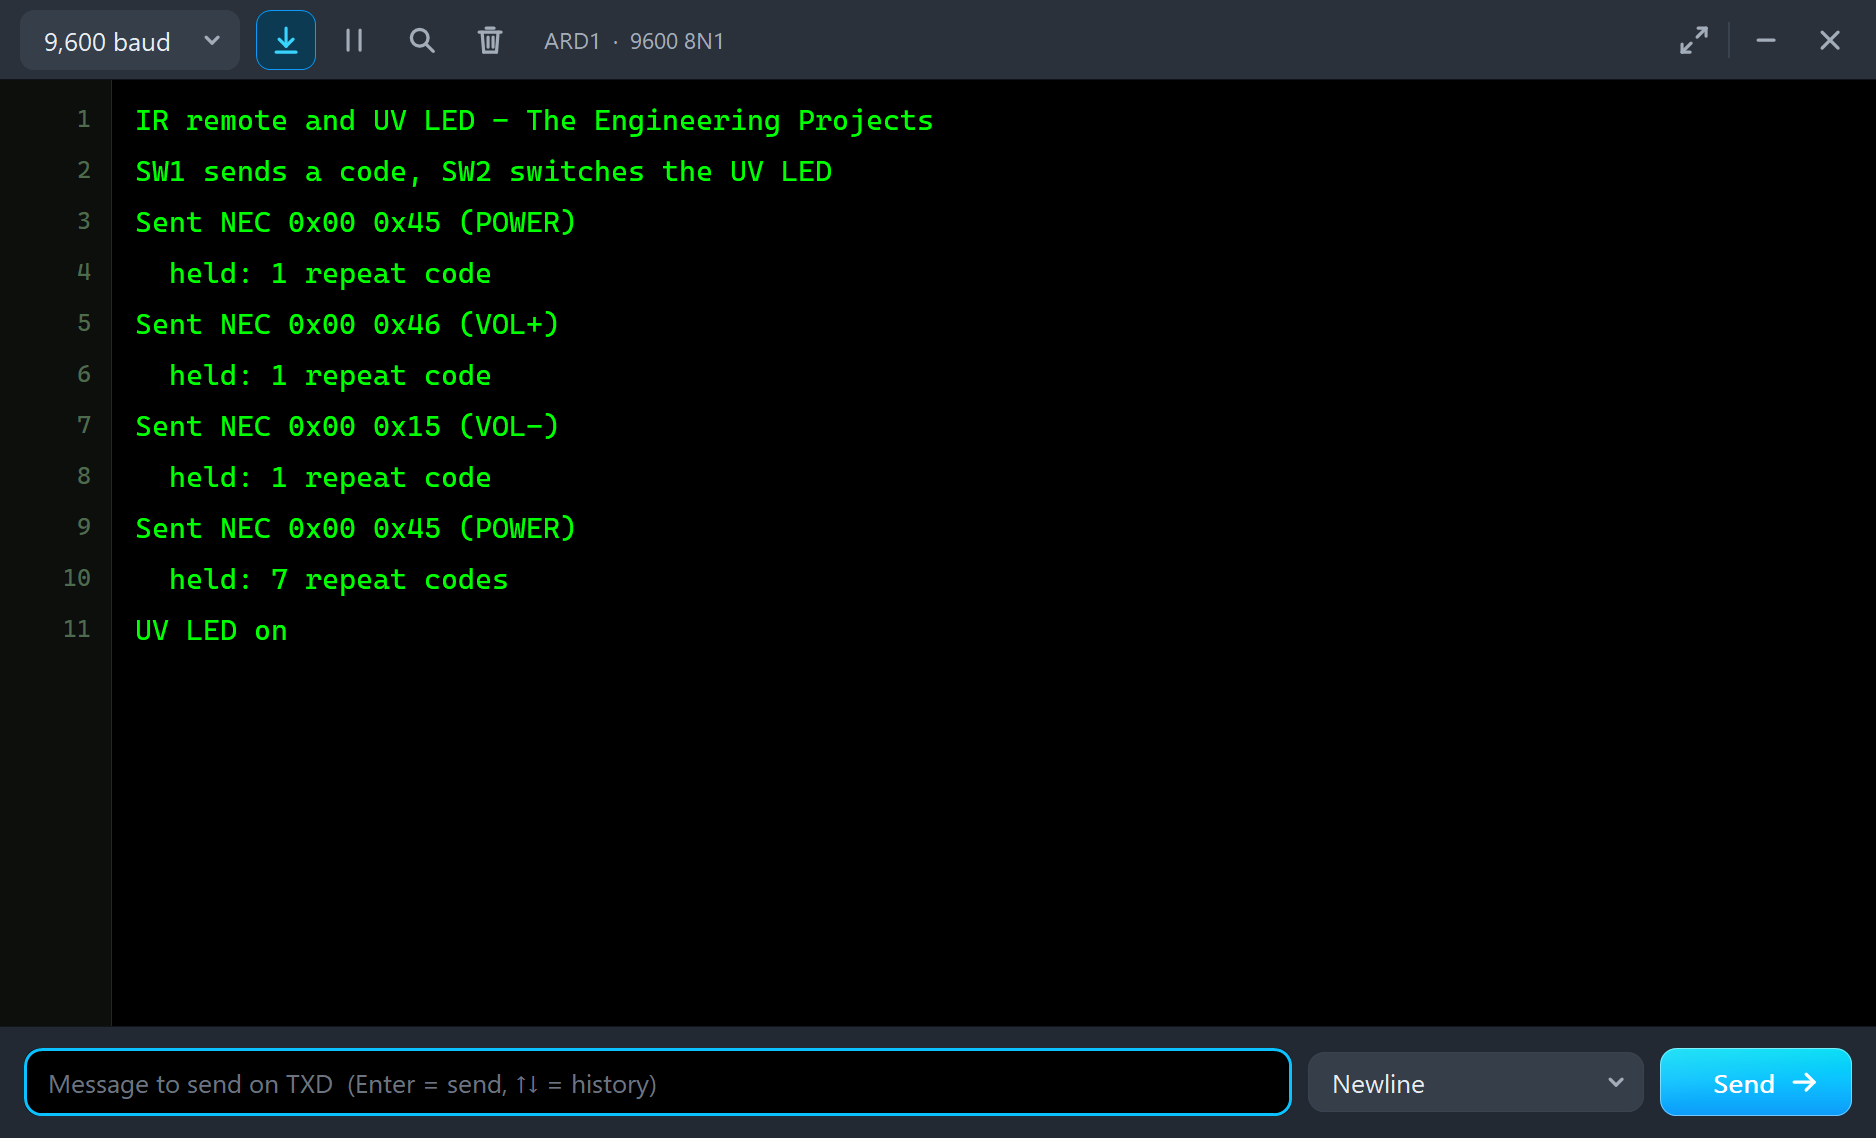
D1, the IR LED, sits on D3 behind R1, 100 ohm. D2, the UV LED, sits on D9 behind R2, 150 ohm. SW1 on D4 sends the next remote code, POWER, VOL+ and VOL- in turn, and keeps sending repeat codes while held. SW2 on D5 switches the UV LED on and off. Open IR-UV-LED-Remote-ArduinoUnoV4.pdsprj. It runs on our Arduino UNO Library for Proteus V4.0, with its built-in monitor, the same window as our TEP Serial Monitor Advance for Proteus. The resistors are from our Resistor Library for Proteus, the buttons from our Push Button Library for Proteus.
| Part | Connection | Job |
|---|---|---|
| D1 (IR LED), R1 (100 ohm) | D3, K to GND | the remote's transmitter |
| D2 (UV LED), R2 (150 ohm) | D9, K to GND | the UV lamp |
| SW1 (push button) | D4 to GND | send a code; held, repeat codes |
| SW2 (push button) | D5 to GND | the UV LED on or off |
The Sketch
A mark is a burst of the carrier. The sketch writes the pin straight to its port for even timing, about 8 µs on and the rest of each 26 µs period off:
void mark(unsigned int us) {          // the 38 kHz carrier for us microseconds: about 8 us on, 18 us off
  unsigned long start = micros();
  while (micros() - start < us) {
    PORTD |= _BV(3);
    delayMicroseconds(8);
    PORTD &= ~_BV(3);
    delayMicroseconds(14);
  }
}
A frame is the leader and then the 32 bits, least significant first, each a mark and a short or long space:
  mark(9000);
  space(4500);
  for (byte k = 0; k < 32; k++) {
    mark(560);
    space(data & 1 ? 1690 : 560);
    data >>= 1;
  }
  mark(560);
While SW1 stays down, a repeat code follows every 108 ms. Both buttons are debounced: the sketch waits until a button has been up for 50 ms, because our push buttons bounce like real ones.
Run the Demo
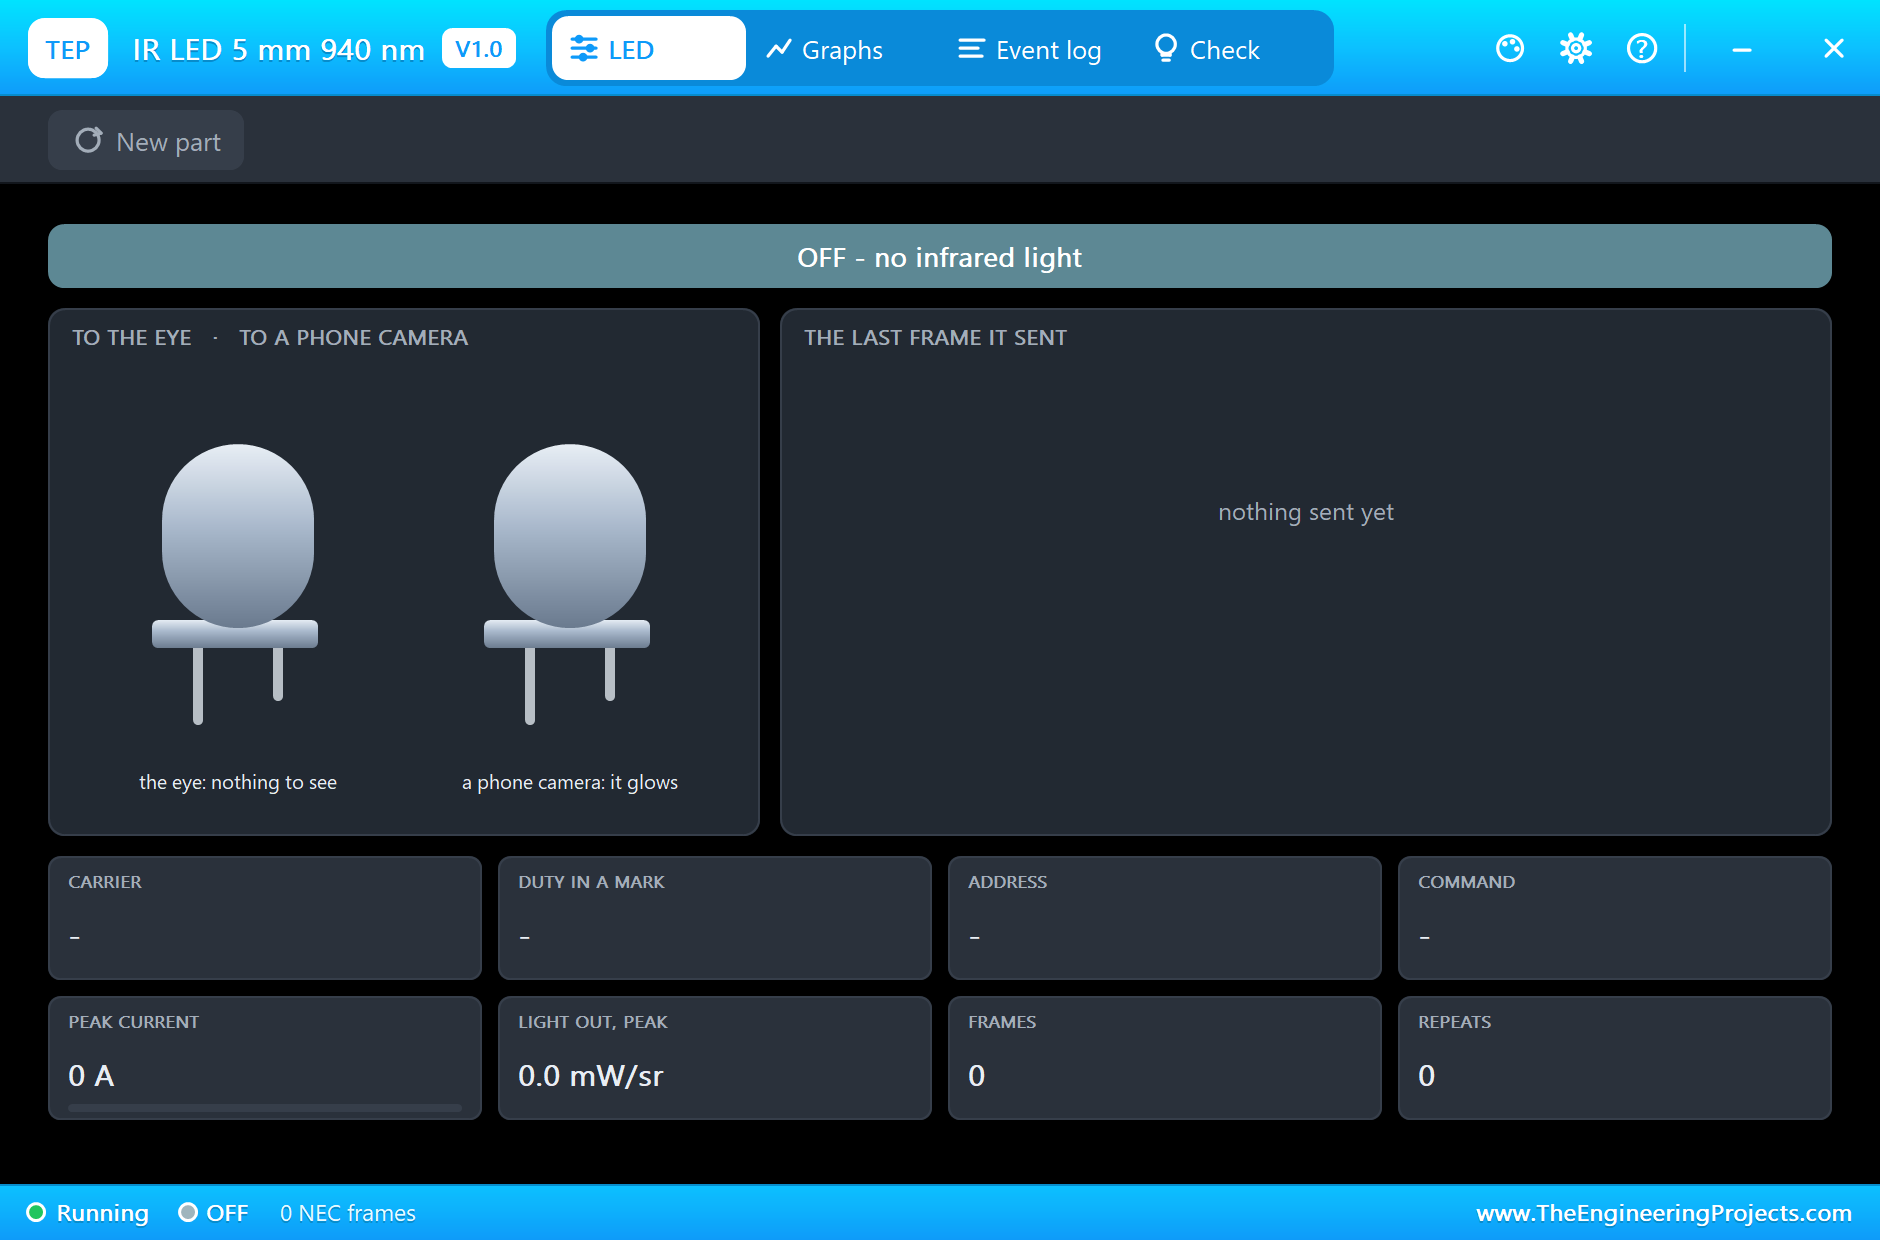
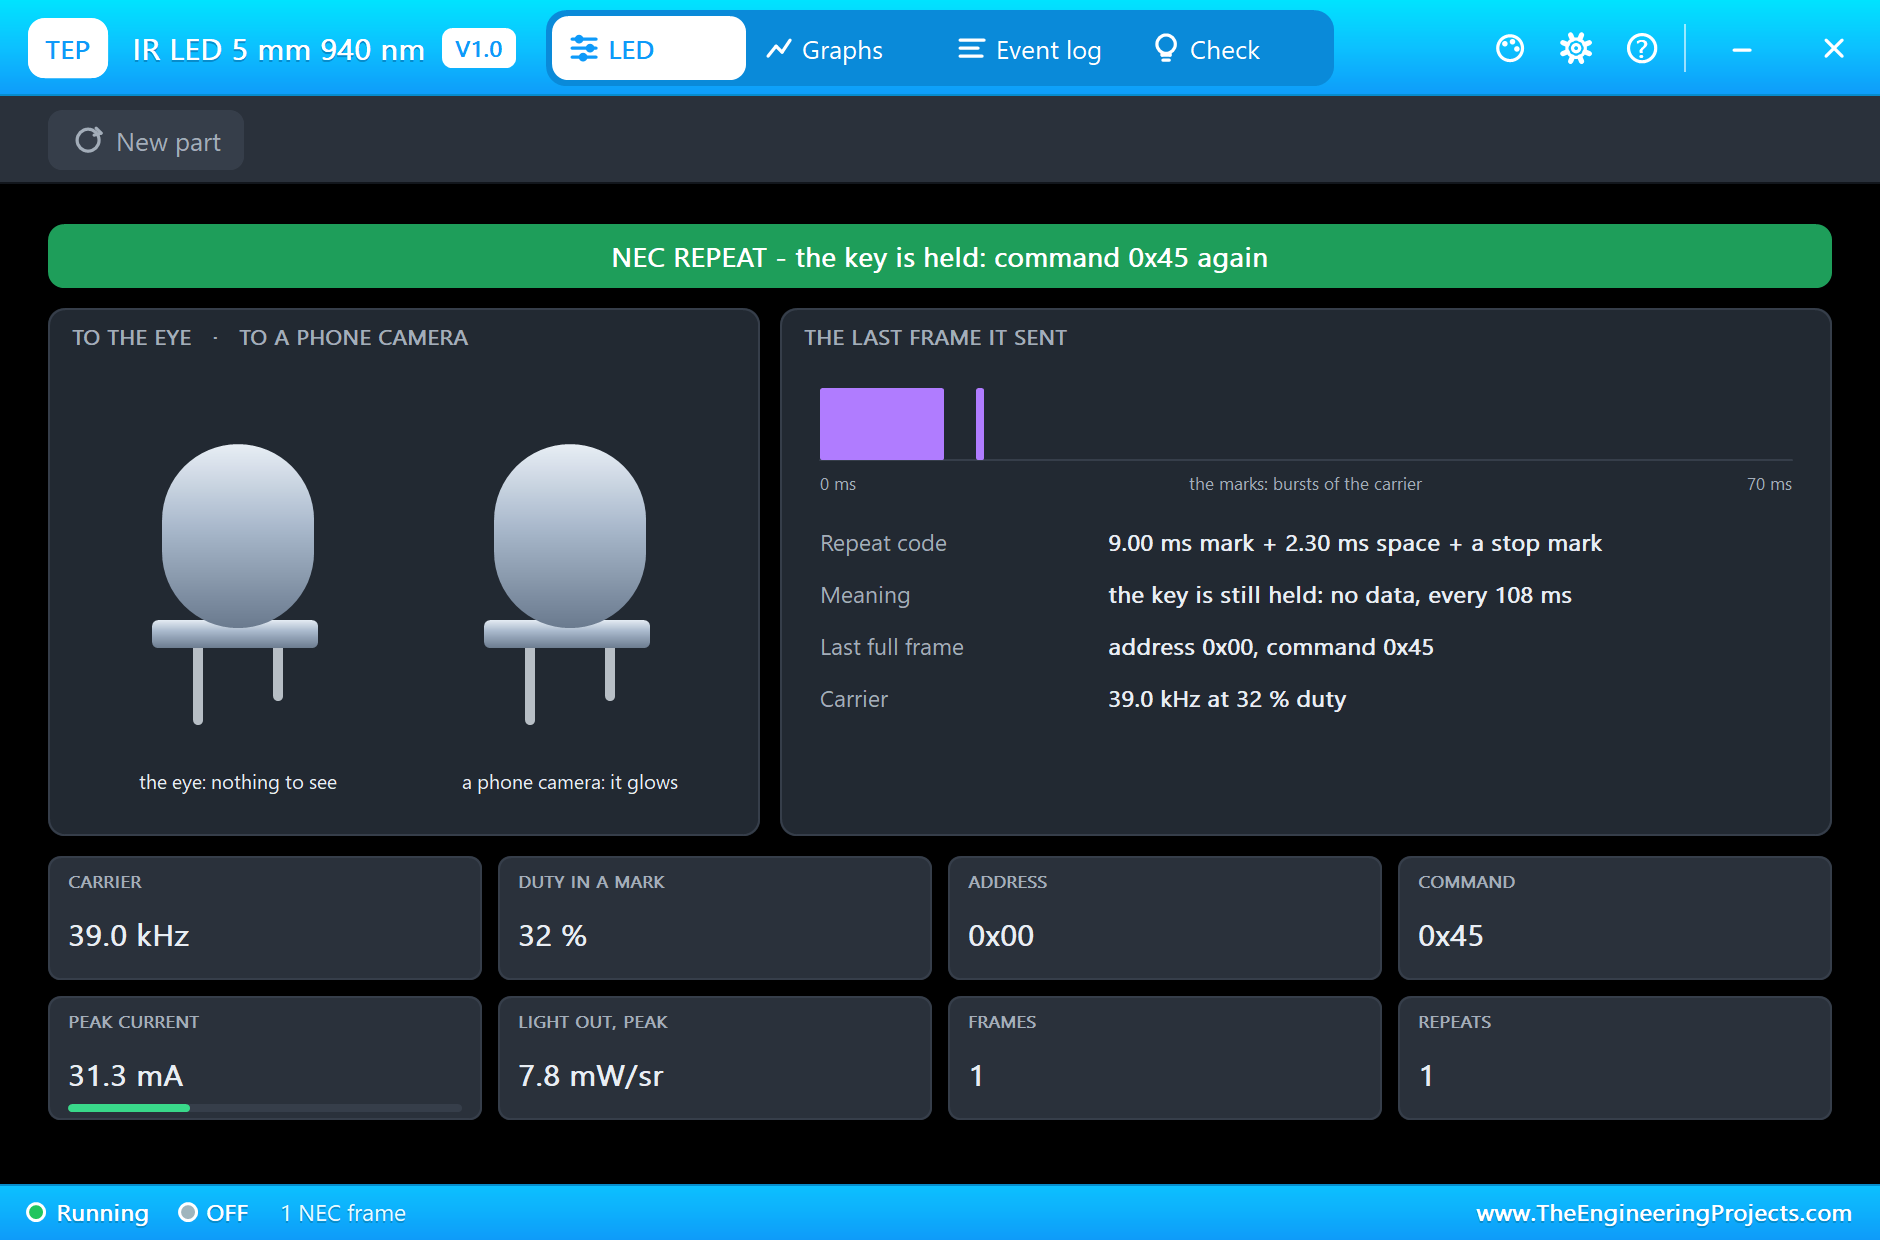
Press Run and open D1's pop-up. Nothing has been sent yet, and both views show a dark LED:
Sending a Code
Now press SW1. The UNO sends POWER, and the pop-up reads it straight back: an NEC frame, address 0x00, command 0x45, its inverse 0xBA checked. The leader measures 8.98 ms and 4.55 ms, the carrier 39.0 kHz at a duty of 32 %, and the LED takes 31.3 mA at the peak. The time line draws the frame's marks: the long leader, then 32 short marks with short and long gaps between them:
Here is the complete circuit, truly running:
What the Camera Sees
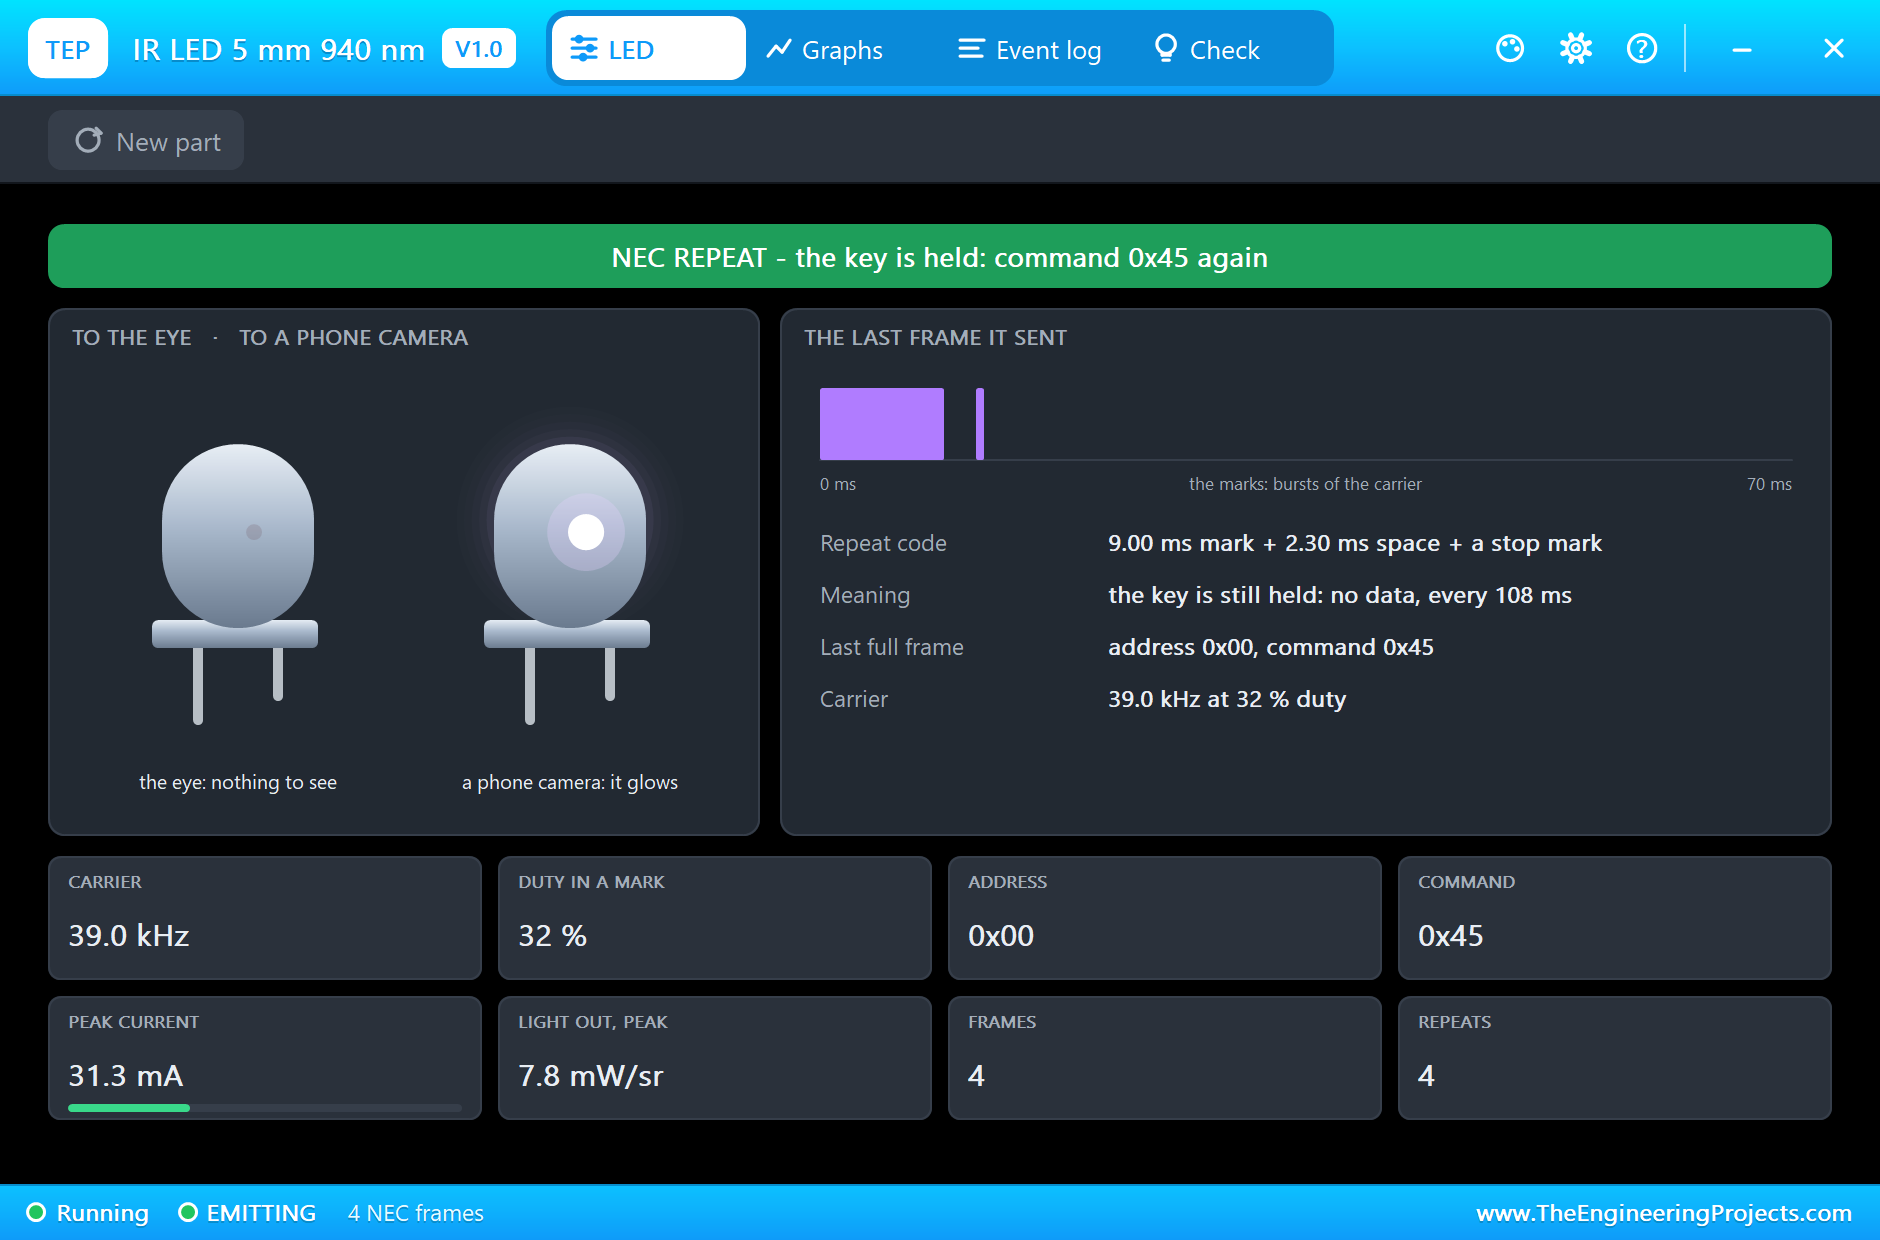
Then we held SW1 down, which sent POWER again followed by a stream of repeat codes, and paused the simulation while the LED was sending. To the eye, nothing: the IR LED on the sheet looks exactly as it does when it is off. To a phone camera, it glows. The banner reads an NEC repeat: the key is held, and the last full frame was command 0x45. The repeat code itself measures 9.00 ms and 2.30 ms:
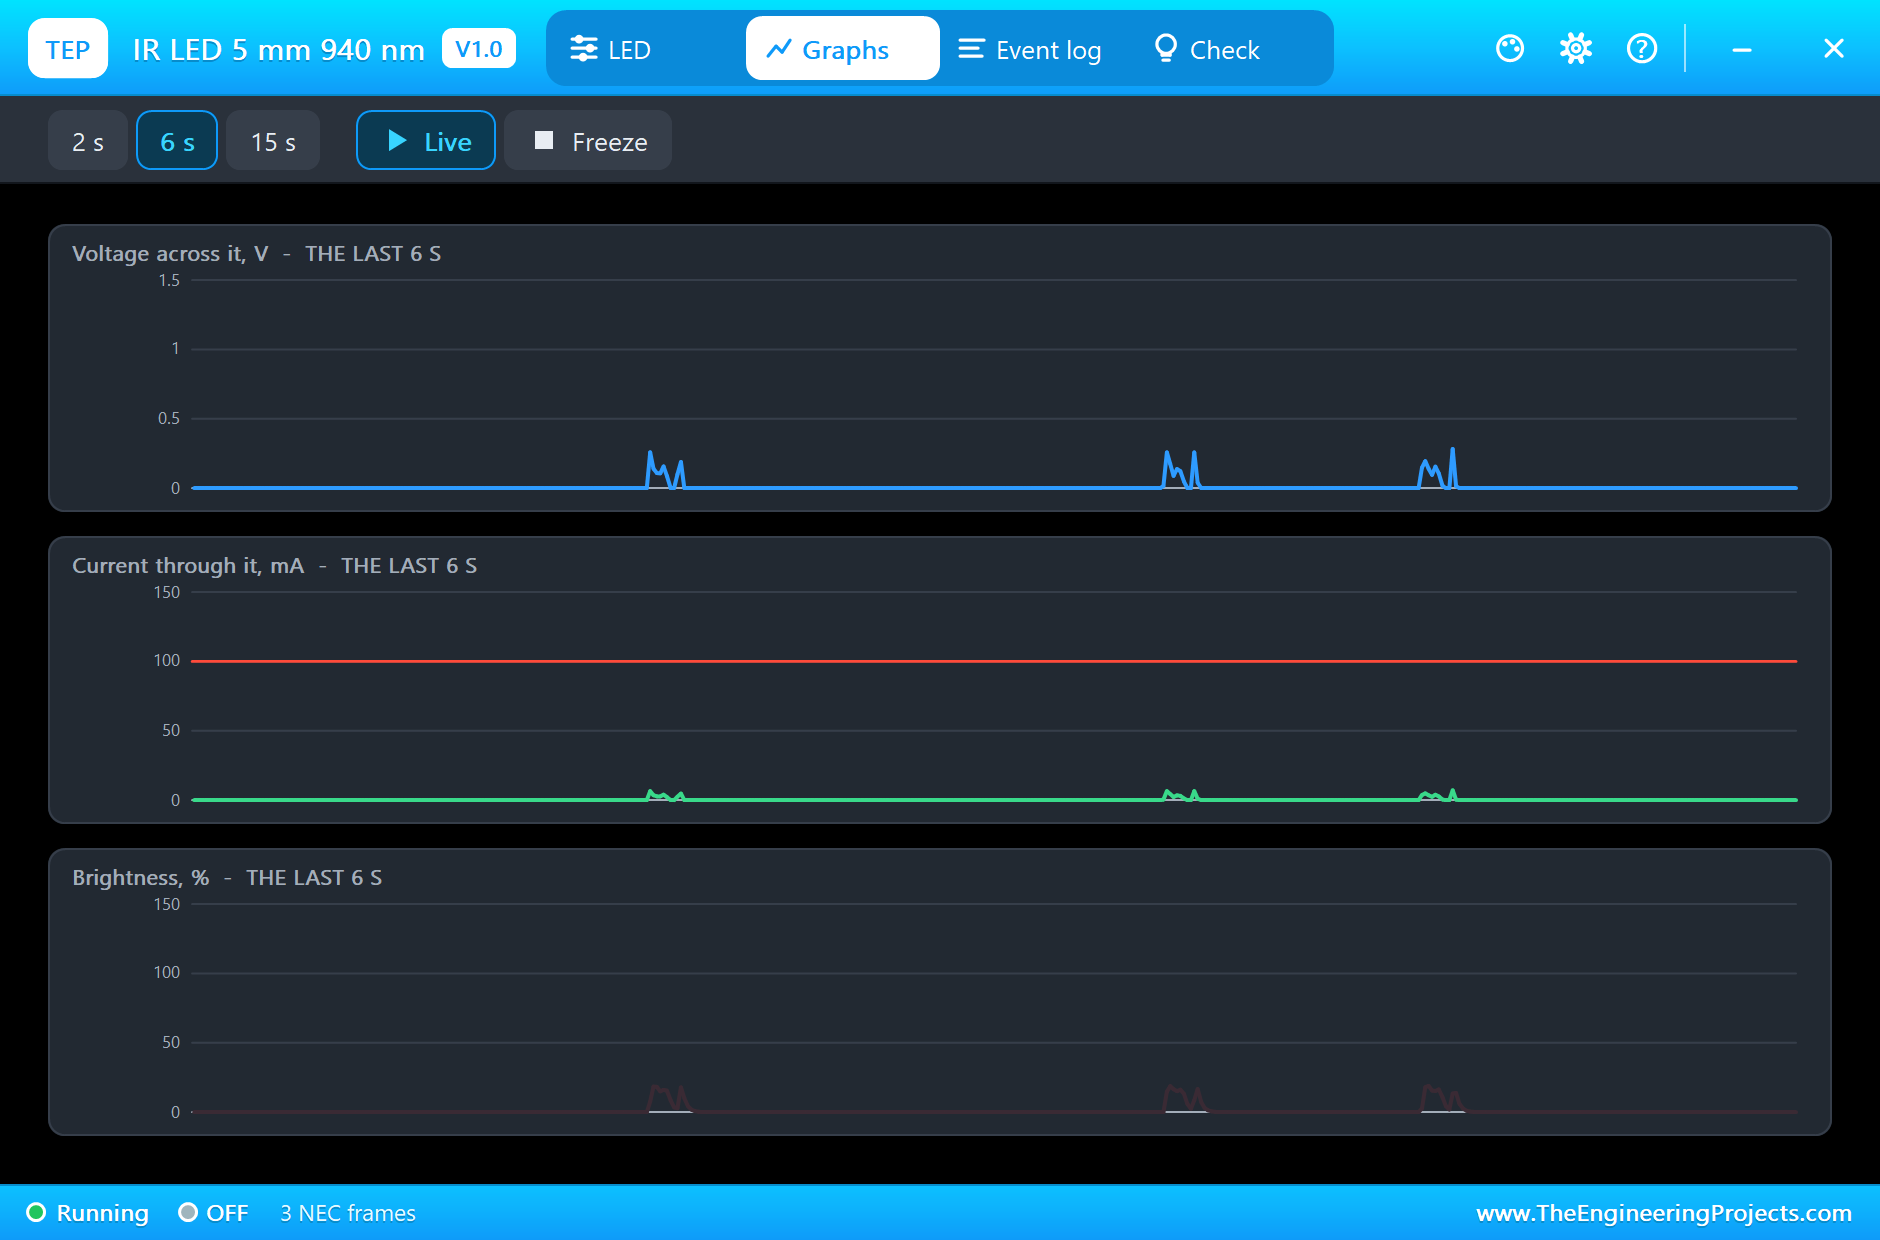
The Graphs page shows the bursts of three frames as short spikes of current, about 31 mA at the peak and far less on average, since the LED is only on for a third of each carrier cycle and only during the marks:
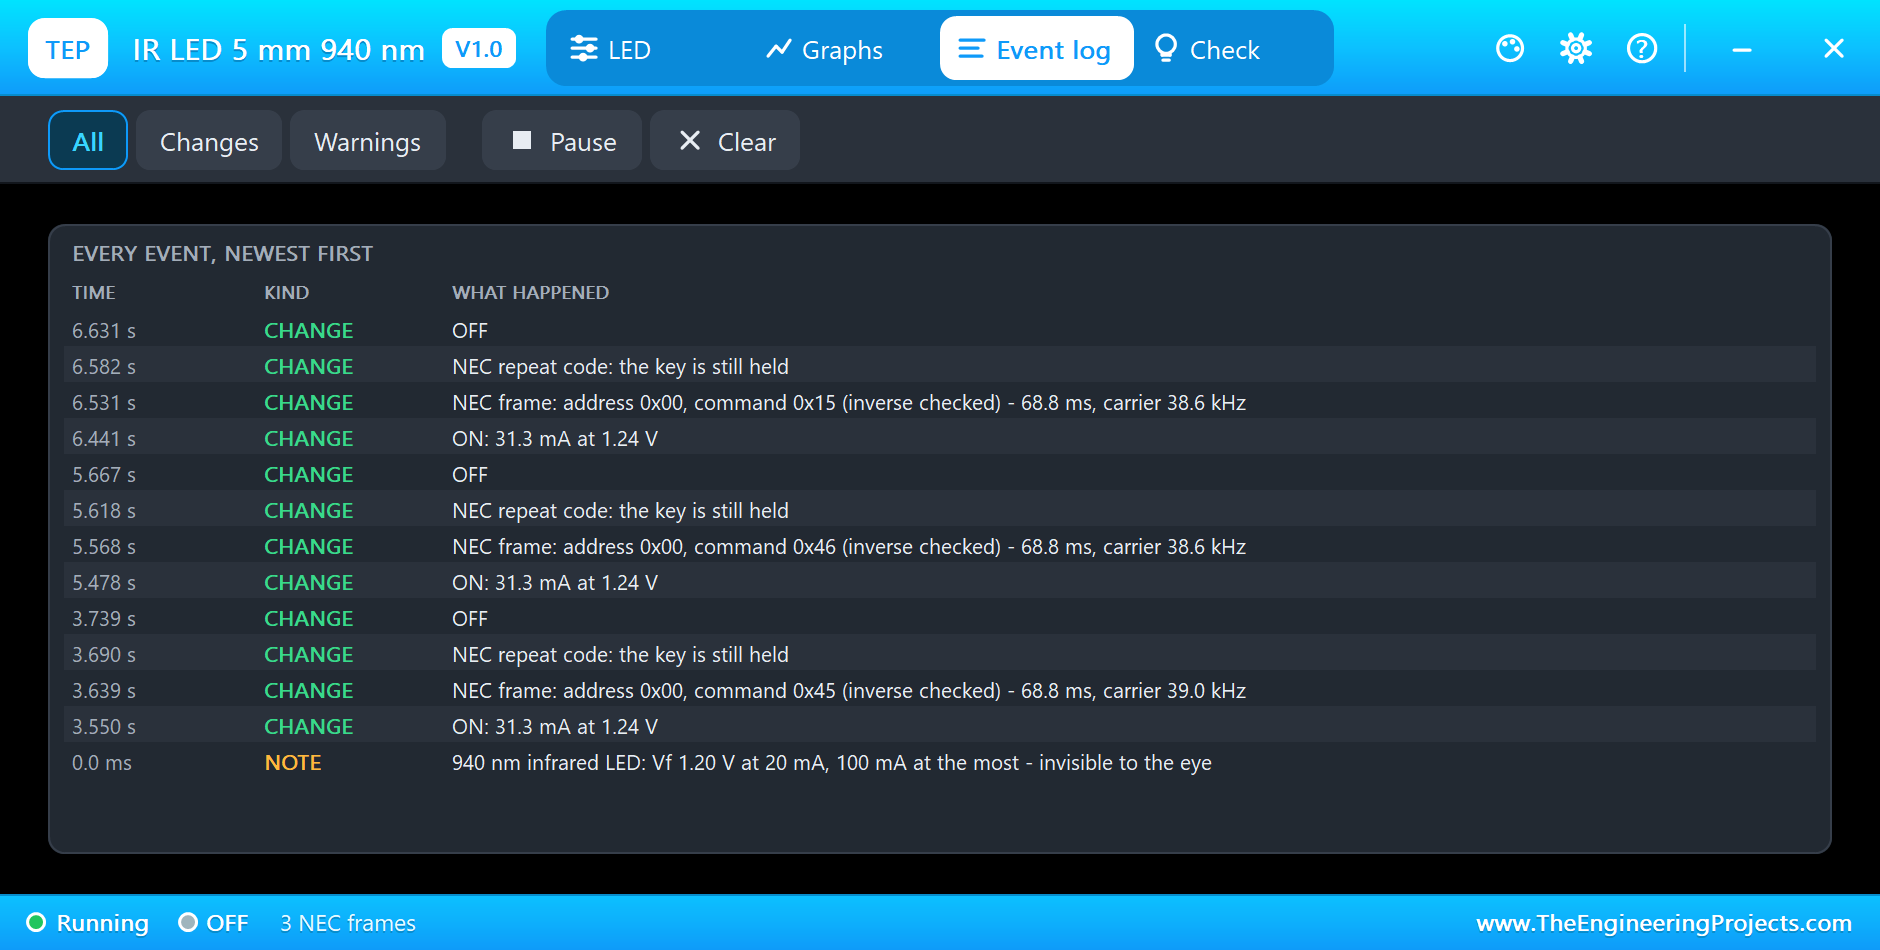
The Event log names every frame and repeat code with its address, command and carrier:
The UV Lamp
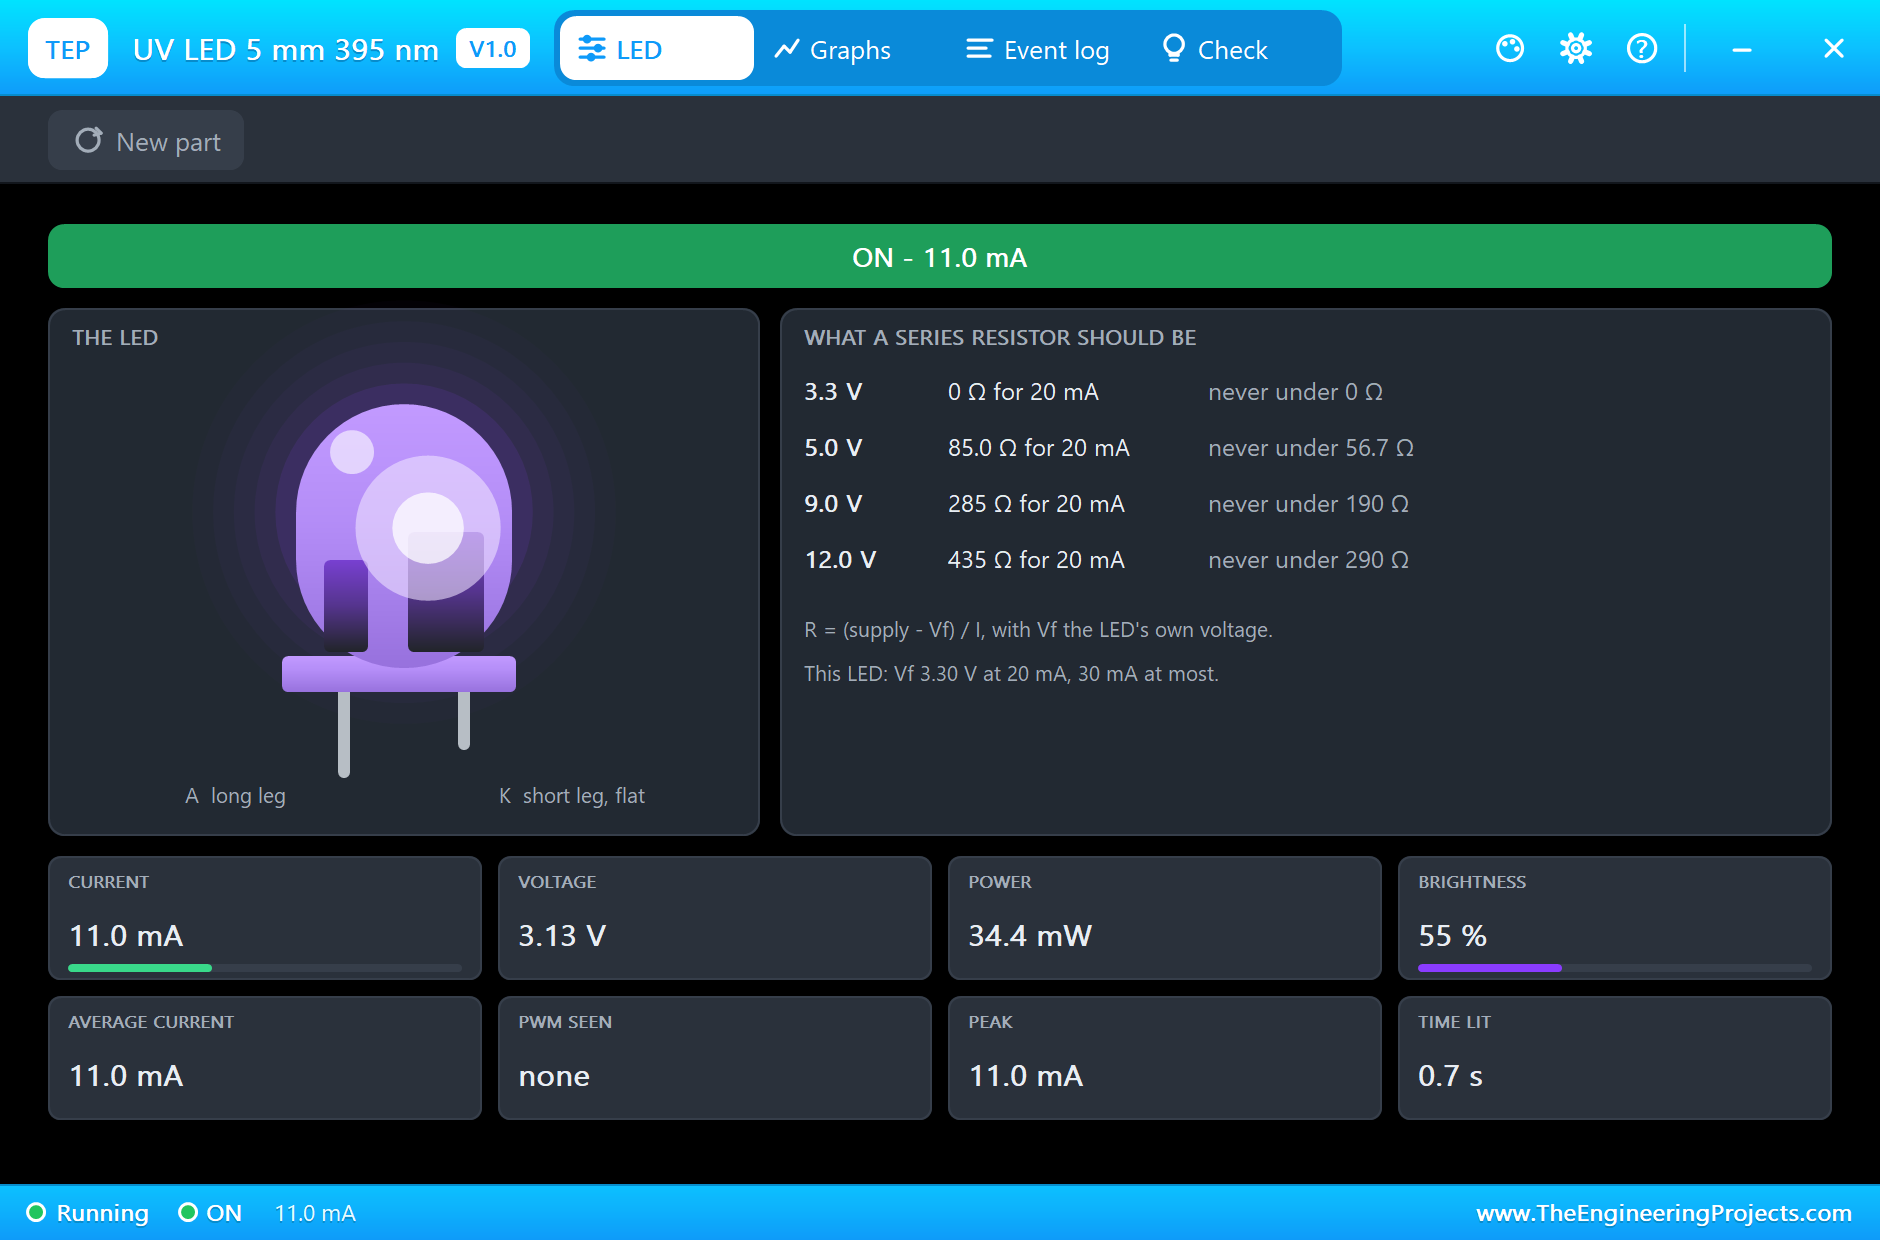
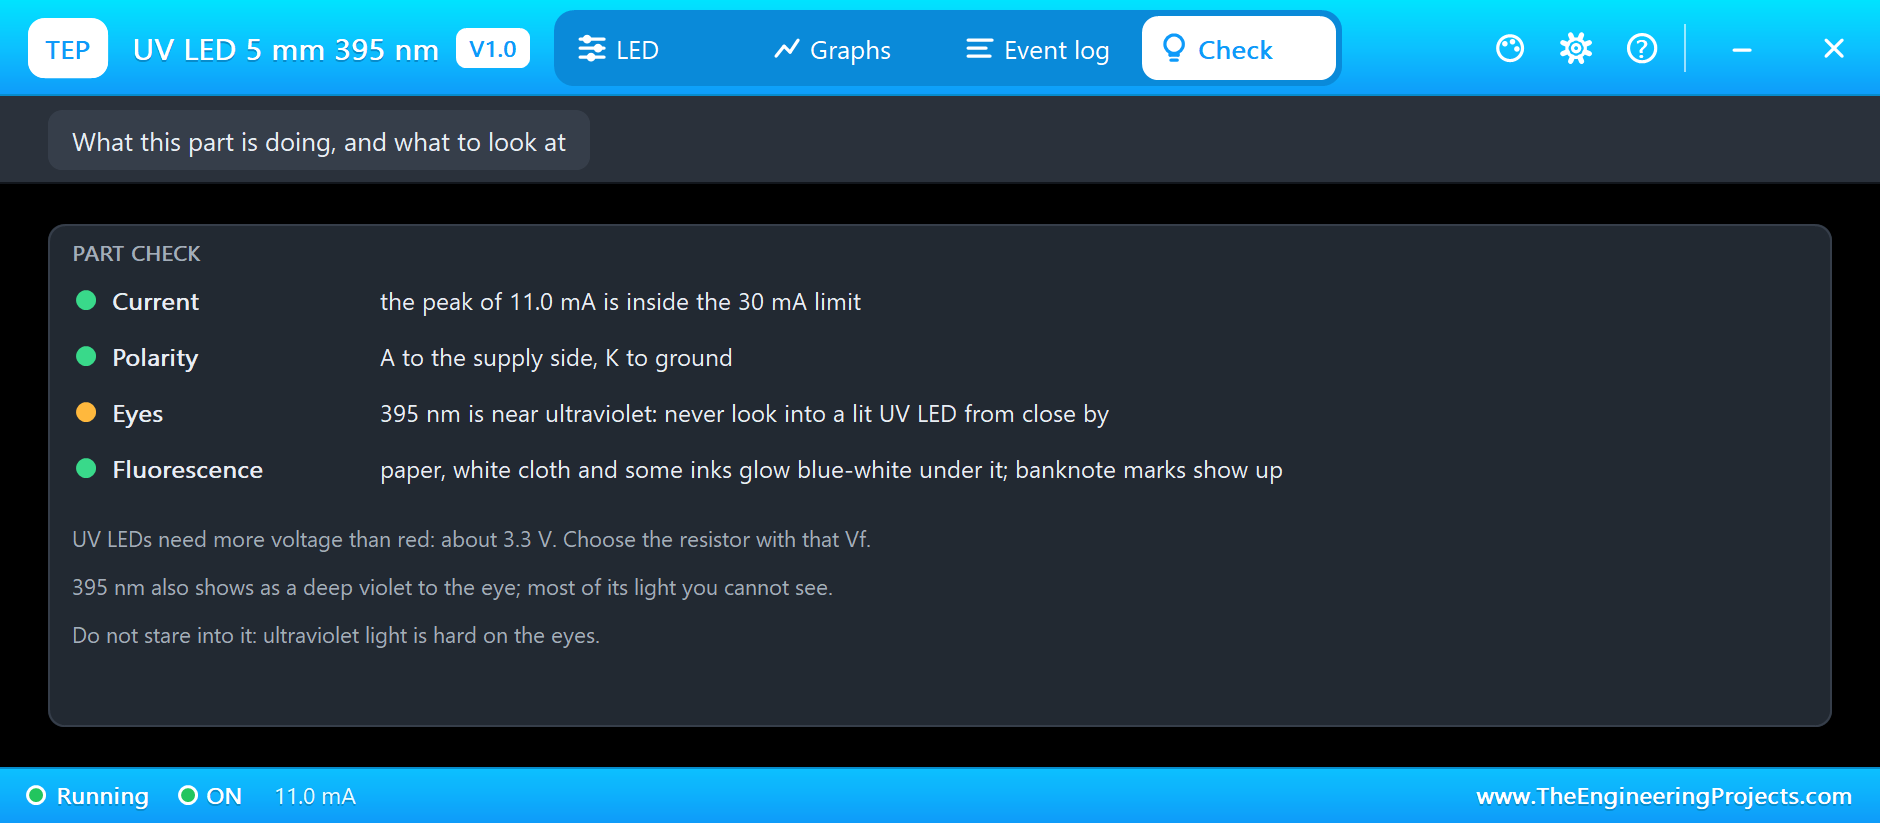
Now press SW2. The UV LED lights violet on the sheet. Its pop-up shows 11.0 mA at 3.13 V, well inside its 30 mA limit, and the right resistor for other supplies, worked out with its own 3.3 V forward voltage:
The Check Pages
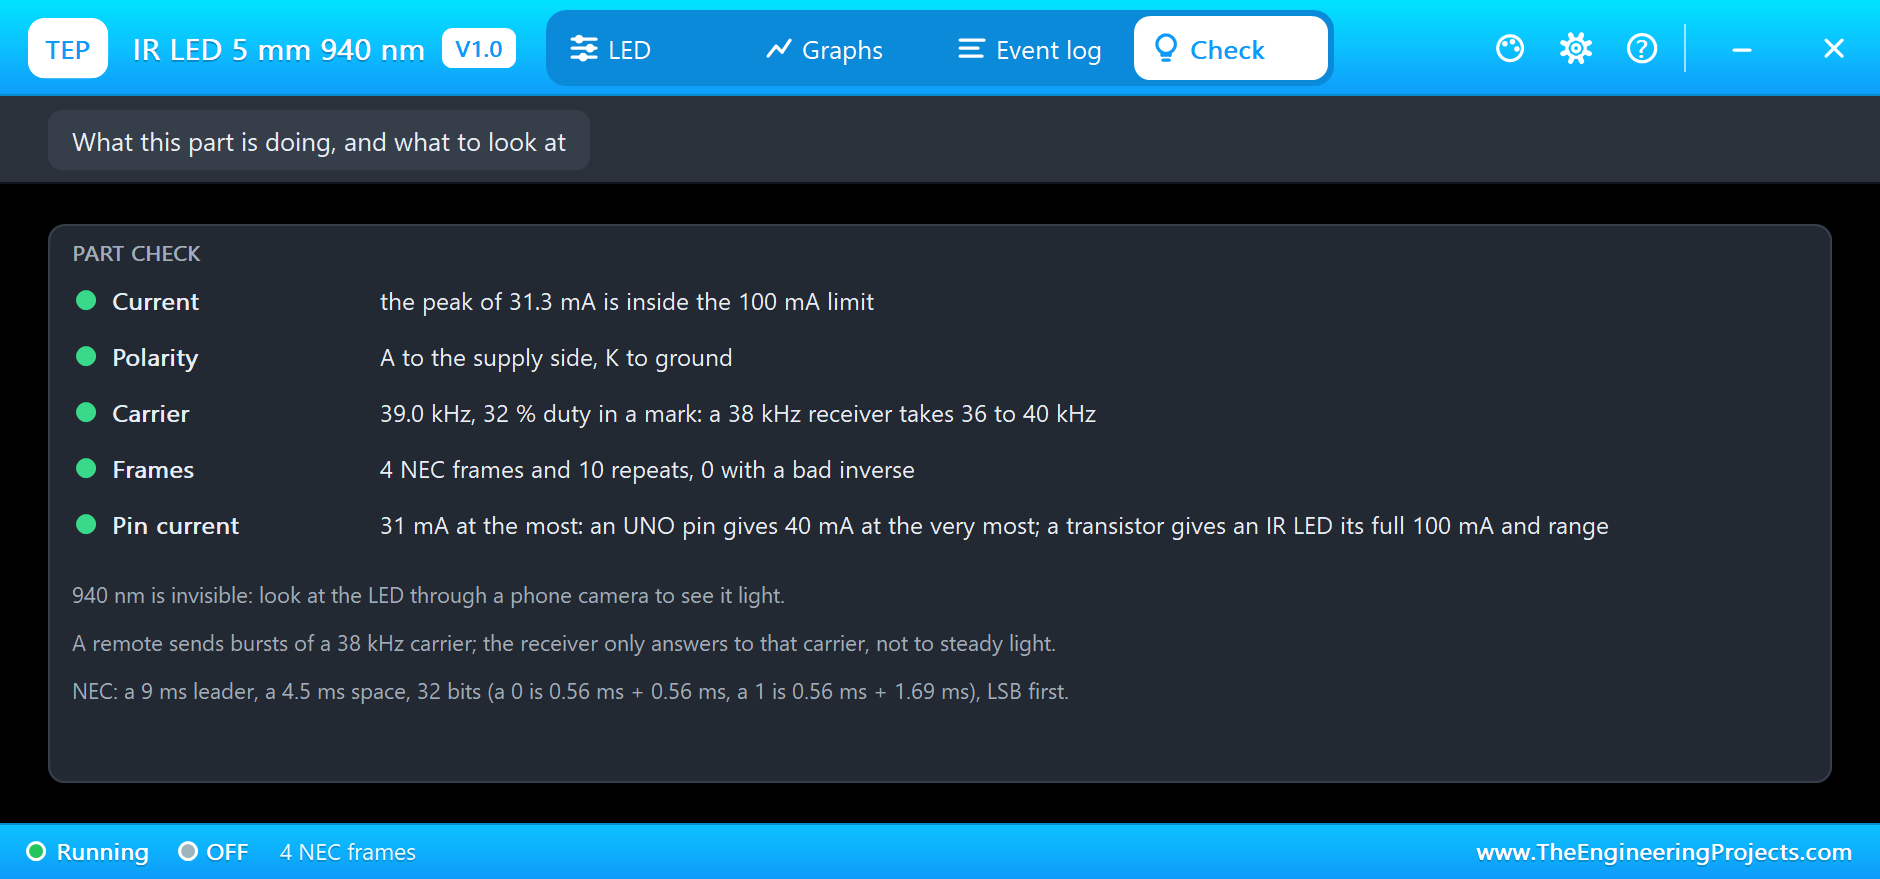
The IR LED's Check page judges the current, the carrier, 39.0 kHz and inside the 36 to 40 kHz a 38 kHz receiver accepts, the frames and repeat codes, and the pin current, with a hint that a transistor gives an IR LED its full range. The UV LED's page adds its two cautions, the eyes and fluorescence:
Try It Yourself
- Send your own address and command, and read them back in the pop-up.
- Change the carrier delays, and watch the Check page leave the 36 to 40 kHz band.
- Send a frame with a wrong inverse, and see the pop-up reject it.
- Hold SW1 for a second, and count the repeat codes.
- Raise R2 to 330 ohm, and watch the UV LED's current fall on its pop-up.
Ideas to Extend the Demo
- Drive the IR LED through a transistor at 100 mA for more range.
- Add more keys and make a full remote.
- Use the UV LED as a banknote checker with a button.
- Try another protocol, and see the pop-up name its bursts.
Your Own Sketches
The demo sketch is in the zip file, and you can change it in the Arduino IDE. New to Arduino? Start with our Arduino Tutorial for Beginners. Export the compiled binary, and set the UNO's PROGRAM property to the new file. Our guide on How to get the HEX file from Arduino shows you where the file ends up.
Things to Know Before Using Real IR and UV LEDs
- Check an IR LED with a camera: the eye sees nothing.
- Use the right carrier: 38 kHz suits most receivers; a wrong carrier shortens the range.
- Drive IR LEDs in bursts: high current is fine for short pulses, not continuously.
- Mind the forward voltage: 1.2 V for IR, 3.3 V for UV; pick the resistor with it.
- Protect your eyes from UV: never look into a lit UV LED from close by.
Troubleshooting
- The IR LED seems dead: it is invisible; open its pop-up or look through a camera.
- No NEC frame on the pop-up: the timing or the carrier is off; the log names a burst that was not NEC.
- The command reads wrong: NEC sends the least significant bit first.
- A button does two things: its contacts bounce; wait until it has been up for a while.
- The part is not simulated:
TEPIRUV.DLLis missing from MODELS and from the project folder.
Limitations of the Simulation
- The light does not reach other parts: there is no IR receiver part to take it.
- The beam angle and the range are not simulated.
- Other remote protocols are shown as bursts, not decoded.
- Arduino is a name of Arduino; this library is not made or endorsed by Arduino or Labcenter.
- Tested in Proteus 8.5 in November 2026 (the demo as shipped). Proteus 7 is not supported.
So, that was all about the IR / UV LED Library for Proteus. I hope it helps you build remotes, sensors and UV gadgets, and see what your invisible light is doing before you build it. If you have any questions, ask in the comments and I will help you out. Till the next tutorial, take care and have fun!