Hey Friends! Hope you are doing well. Today, I'll discuss the details on How to use digitalWrite Arduino Command. The digitalWrite command in Arduino is used for writing the status of the digital Pin. The Pin assigned to this command must be an OUTPUT pin so that it can transfer data to other components like LEDs, motors, and actuators and use them as per your needs and requirements.
Arduino boards have always been a great choice for both experts and newbies, as they come with built-in peripheral functions, and no need of external components is required to drive automation and develop some basic functions on the relevant project.
Basic Arduino Software is used as a compiler and no separate burner is required to burn the required code into the boa ...
Hi Geeks, welcome to our new project. Our new project is one of the most common issues you’ve seen in your cities. In this project, we are going to make a car parking system with automatic billing. In the entire world, there are an estimated 1.4 billion cars on the road, which is absolutely great news if we are considering the development of the Automobile industry. But the most serious issue is that the number of cars exceeds the number of available parking places, resulting in traffic congestion. Damaged cars due to this lack of space, fewer parking locations, lack of parking signage, informal parking, and overcharging for parking are just a few of the issues.
People are still choosing manual parking methods, which have a number of drawbacks, suc ...
Hello friends , I hope you all are fine and having fun with your lives. Today, I am going to share a new project which is XBee Arduino Interfacing. In my previous tutorials in the XBee series, we have had first Introduction to XBee Module and after that we have also discussed How to Interface XBee Module with Computer. Now we are all well aware of XBee Module and can easily do the XBee Arduino Interfacing. We have seen in the previous tutorial that XBee Module works on Serial protocol so we have to use the Serial Pins of Arduino UNO board.
If you want to use any other microcontroller then you can its not a big issue, just see the way how the programming goes and convert it to the language of your microcontroller i.e. PIC Microcontrollers or 805 ...
Hello friends, hope you all are fine and having fun with your lives. Today, I am going to share a new project in which we are gonna do Arduino Bluetooth communication. The Bluetooth module I have used for this project is HC-05, which is a serial Bluetooth module. We can quite easily perform the Bluetooth communication with this module using Arduino board. I have worked on many projects in which I have to send the data from sensors to my computer via Bluetooth. So, in such projects I normally use this Bluetooth module which is connected with the sensors and then Arduino gets the data from these sensors and then send this data to computer via Bluetooth module. In this project, I have used Arduino board but you can use PIC Microcontroller or 8051 Mic ...
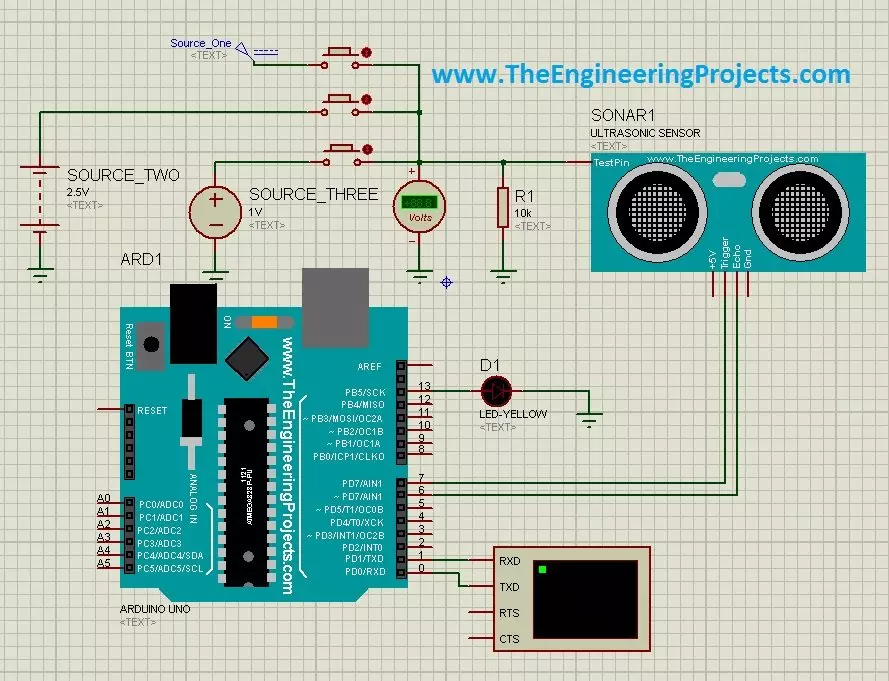
Hello friends, a few days ago I posted an Ultrasonic Sensor Library for Proteus, using which one can easily simulate ultrasonic sensor in Proteus. The post was highly praised by the reader and I have received quite good feedback from the followers. So, I thought of sharing some more examples related to it so that users can get a complete understanding of how to use Ultrasonic sensors in Proteus. Today, we are gonna have a look on different Ultrasonic Sensor Simulation in Proteus. If you haven't read the previous post then first have a look at it because without the installation of Ultrasonic Sensor Library in Proteus, you won't be able to use these examples. Ultrasonic Sensor is used widely in Embedded Systems.Today, I am gonna share three examples of Ultrasonic Sensor Simulation in Proteu ...
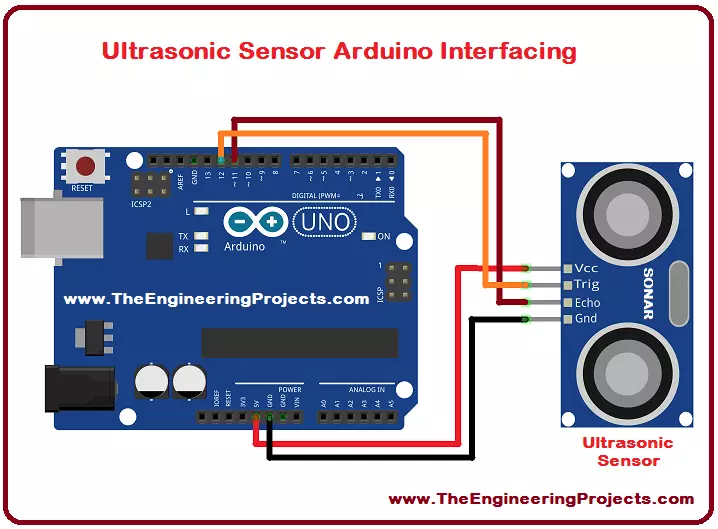
Hello everyone! I hope you all will be absolutely fine and having fun. Today, I would like to provide a complete discussion on Ultrasonic Sensor Arduino Interfacing. I would like to tell you some detail about ultrasonic sensor, after that we will move towards ultrasonic sensor Arduino interfacing. Ultrasonic sensor is also known as SONAR sensor. SONAR basically stands for Sound Navigation and Ranging. Ultrasonic is mostly used for the distance measurements. It can also be used for measuring the depth of the sea.
I have already shared Ultrasonic Sensor Library for Proteus. Ultrasonic/SONAR sensor is an electronic device used to estimate the distance of an object by continuously transmitting sound waves at a particular frequency and listens to tha ...
Hi Guys! Hope you’re well today. I welcome you on board. Happy to see you around. In this post today, I’ll detail the Introduction to Arduino Sensor Shield.
Arduino Sensor Shield is a board compatible with the Arduino Boards and comes with the standard header layout. It is used to connect sensors, servos, LCD with the Arduino board without soldering. This board is connected with the Arduino Board using the jumper wires.
I suggest you read this post all the way through as I’ll be discussing the complete Introduction to Arduino Sensor Shield.
Let’s get started.
Introduction to Arduino Sensor Shield
Arduino Sensor Shield is a board used to connect sensors, servos, LCD with the Arduino Board without the requirement of soldering.
Using Arduino ...
Hello friends, today we are gonna have a look on how to interface Seven Segment with Arduino in Proteus. In my last post, I have posted an Arduino Library for Seven Segment Display, which is designed by our team and is quite basic in functionality. So, if you haven't checked that post then first of all check that one and download the Arduino Library for Seven Segment Display as I am gonna use that library in today's post. Moreover, in order to run this library you are also gonna need to download Arduino Library for Proteus, using this library you will be able to use Arduino board in Proteus so also read that post and download this library and install it in your Proteus.
Again I am mentioning that its the first library designed by our team so its i ...
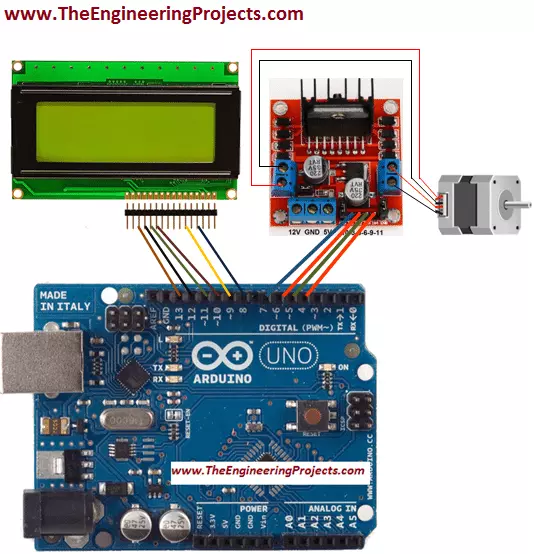
Hello friends! I hope you all will be absolutely fine and having fun. Today, I will elaborate you that how can we make a simple algorithm for Stepper Motor Direction Control using Arduino. In my previous tutorials I made algorithm for DC Motor Direction Control using Arduino, DC Motor Direction Control using Matlab, DC Motor Speed Control using Arduino and DC Motor Speed Control using Matlab. Now, in this tutorial I will control a stepper motor using Arduino by entering the different commands through its serial port.
Before going into the detail of this tutorial, you must know the basic difference between stepper and DC motors. DC motors have only two input terminal one is positive and the other one is negative. You just have to provide the powe ...
Hello friends, I hope you are all fine will be doing something interesting in your life. In today's tutorial, we are gonna have a look at detailed Introduction to Arduino Zero. Arduino Zero is a Microcontroller device. It is a 32-bit extension of UNO series. Its main features are Atmel Embedded Debugger (EDBG), it provides a full debug interface without additional hardware. This board provides a platform of new inventory projects in smart IoT devices, high technology automation, robotics and much more.
As, Electronic devices coming in our life, they have become cheaper and performing more functions then there predecessor. The microcontroller was introduced in the industry to make our task easy in electronic devices and projects. Arduino Zero is a ...