Hi Everyone! I welcome you on board. Thank you for clicking this read. In this post today, I’ll walk you through the Introduction to LM2576.LM2576 is a step-down voltage regulator, also known as a buck converter, mainly employed as a pre-regulator in linear regulators. The customized output version of this buck converter gives you the ability to set the output voltage as you like better. It is available with a remarkably good load and line regulation. Moreover, it is used to drive load under 1A and is available in fixed output voltages with 3.3V, 5V, 12V, and 15V.
I suggest you buckle up and read this post all the way through, as in this post I’ll detail the Introduction to LM2576 covering the datasheet, pinout, features, and applications. Let’s jump right in.
Introduction to LM2576
...
Hello friends, I hope you all are doing great and having fun in your lives. In today's tutorial, we are gonna design a Heart Beat Monitor using Arduino in Proteus ISIS. You should download this Heart Beat Sensor Library V2.0 for Proteus because we are gonna use that to detect heart beat in Proteus.
I have also used a 20x4 LCD which will display our heart rate value. You should download this New LCD Library for Proteus. I have counted the heart beat for ten seconds and then I have multiplied it with 6 to get the heartbeat per minute which is abbreviated as bpm (beats per minute). So, let's get started with Heart Beat Monitor using Arduino in Proteus ISIS.
Heart Beat Monitor using Arduino in Proteus
First of all, click the below button to downloa ...
Hello friends, today's the last post of this Proteus tutorial. I have tried my best to explain everything but knowledge is limitless so explore this software, play with it and you will know many new things. Today's topic is about the PCB designing in Proteus. When you install Proteus, you have seen that along with ISIS there's also another package named as Proteus ARES. This Proteus ARES is used for PCB designing. You should also check the Arduino UNO PCB Design for Proteus ARES.
In order to design the PCB in Proteus ARES, first you need to make the circuit of that PCB in Proteus ISIS. You can also make PCB directly but I recommend that use Proteus ISIS first, its quite the easy approach as you don't need to do anything in it and the software in ...
Hello friends, hope you all are fine and having fun with your lives. In today's post, I am going to share GSM Library for Proteus. Yeah you have read absolutely fine, today I am gonna share the most awaited and most demanded Proteus Library. :) Till now, I have received hundreds of suggestions and requests about this Library and I have always told them that its under designing process and I will post it real soon. So finally the wait is over and we have our new GSM Library for Proteus, ready to download and simulate in Proteus. Using this GSM library for Proteus, now you can easily simulate your GSM module in Proteus and can test your code. :)
As its the first version of our GSM Library so its not complete or perfect. It is really the basic model ...
Hello friends, I hope you all are doing great. In today's tutorial, we are gonna design a project named DC Motor Control using XBee & Arduino in Proteus ISIS. I have shared the complete code and have also explained it in detail. You can also download the complete working Proteus Simulation given at the end of this tutorial. In this project, I have designed two Proteus Simulations.
The first Simulation is of Remote control in which I have used a keypad. The second simulation contains our two DC Motors and I am controlling the direction of those DC Motors with my Remote Control. XBee Module is used for sending wireless data. The code will also work on hardware as I have tested it myself. So, let's get started with DC Motor Control using XBee &am ...
Hi Friends! Hope you’re well today. Thank you for clicking this read. In this post today, I’ll walk you through the Introduction to BD135.
BD135 is a general-purpose medium-power transistor that falls under the category of NPN transistors. It is mainly used for switching and audio amplification purposes. It comes with a collector current 1.5A, indicating it can drive loads under 1.5A. Total power dissipation is 12.5W with storage temperature ranging from -55 to 150C.
Bear with me for a couple of minutes as in this post I’ll be discussing the complete introduction to BD135 covering pinout, datasheet, working principle, power ratings, applications, and physical dimensions of transistor BD135.
Let’s jump right in.
Introduction to BD135
BD135 i ...
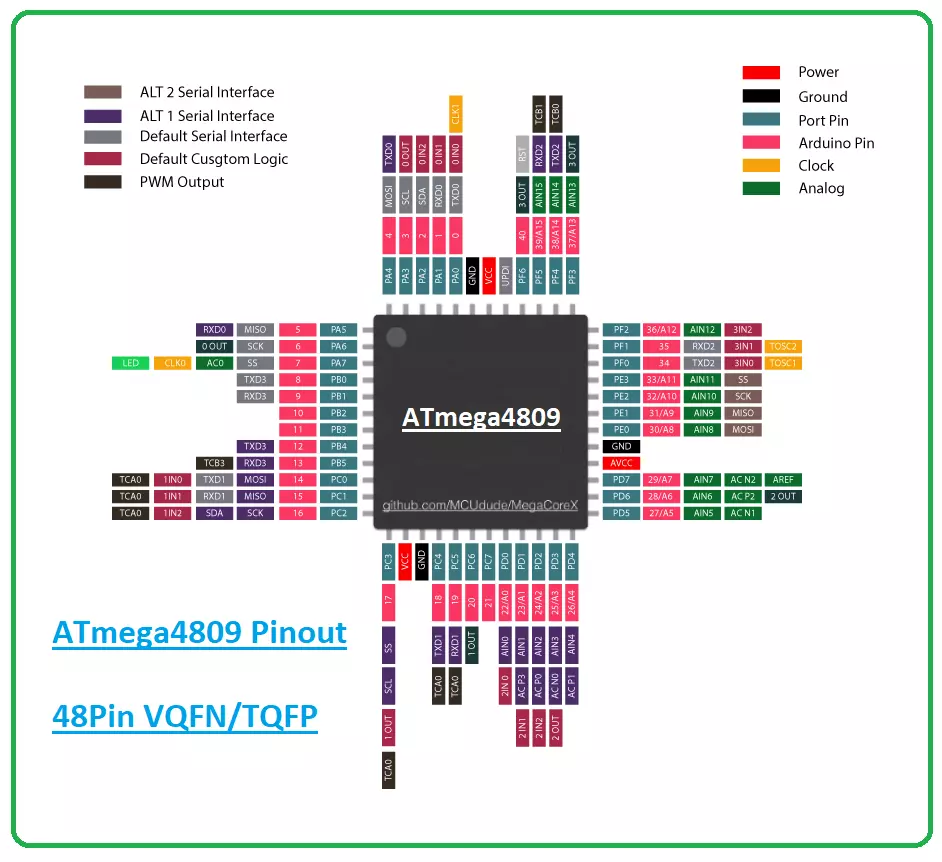
Hi Guys! I welcome you on board. Happy to see you around. In this post today, I’ll walk you through the Introduction to ATmega4809.
The ATmega4809 is a type of microcontroller that belongs to the megaAVR® 0-series. It features an AVR® processor with a clock speed running at up to 20 MHz. It comes with a Flash memory size up to 48 KB, 256 bytes of EEPROM, and 6 KB of SRAM. It is available in 28-, 32-, 40-, or 48-pin packages.
I suggest you buckle up as I’ll detail the complete Introduction to ATmega4809 covering datasheet, pinout, features, power ratings, and applications.
Let’s get started.
Introduction to ATmega4809
The ATmega4809 microcontroller belongs to the megaAVR® 0-series that contains an AVR processor.
The series carries low power ...
Hey Everyone! Hope you are getting along with life pretty well. I always strive to keep your technical appetite filled with the recent and valuable development in engineering and technology. Today, I'll unravel the detailed Introduction to USB.
The USB stands for Universal Serial Bus which is an industry standard mainly developed for laying out the communication between a computer and peripheral devices. The first USB was developed in 1996 by the collaborative effort of seven companies - DEC, Microsoft, Compaq, Nortel, IBM, Intel, and NEC
The USB device not only helps in establishing a flawless communication but also assists to power up the connected peripheral devices, setting you free from the parallel ports and the external power charg ...
Hello everyone, I hope you're all doing well. In the previous lecture(Chapter 0: ESP32 Pinout), we discussed the ESP32 features & specs in detail. Today, we are officially starting this ESP32 Programming Series. In this ESP32 Programming Series, we will start with basic concepts and
will gradually move towards complex topics. I will try to keep this
ESP32 series as simple as I can. But still, if you encounter any issues,
please ask in the comments, will try to resolve the issues as soon as
possible.As ESP32 has numerous features & applications, so I have divided this series into different sections. I have named the 1st section "ESP32 IDEs". In this section, we will discuss different IDEs used to program ESP32 boards. In each Chapter of this section, we will install one of t ...
Hello readers, I hope you are all doing great. Welcome to the 2nd lecture of Section 5(ESP32 Sensors) in the ESP32 Programming Series. In the previous tutorial, we discussed the built-in ESP32 Hall Effect Sensor. In this tutorial, we will discuss another inbuilt sensor of the ESP32 i.e. Capacitive Touch Sensor.
ESP32 Board has 10 built-in capacitive touch pins, which generate an electrical signal when someone touches these pins. These ESP32 touch pins are normally used to wake up the board from deep sleep mode. These touch pins are also used to replace the normal mechanical buttons with touch pads, improving the presentation of the IoT projects.
Here's the video demonstration of the ESP32 Capacitive Touch Sensor:
Before going forward, let's first understand how this touch sens ...