Welcome to the next tutorial of our Raspberry Pi programming course. Our previous tutorial taught us to how to print from a Raspberry pi. We also discussed some libraries to create a print server in our raspberry pi. We will learn how to take screenshots on Raspberry Pi using a few different methods in this lesson. We will also look at how to take snapshots on our Raspberry Pi using SSH remotely.
Why should you read this article?
This article will assist you when working with projects that require snapshots for documenting your work, sharing, or generating tutorials.
So, let us begin.
Screenshots are said to be the essential items on the internet today. And if you have seen these screenshots in tutorial videos or even used them in regular commu ...
Hello readers, I hope you all are doing great. In this tutorial, we will learn how to interface the BMP280 sensor with the ES32 module to get temperature, pressure and altitude readings. Later, in this tutorial, we will also discuss how to upload these sensor readings to a web server.
BMP280
BMP280 or Barometric pressure sensor is a module used to measure temperature pressure and altitude. The small size and low power consumption feature of this sensor makes it feasible for battery-powered devices, GPS modules and mobile applications etc.
Fig. 1 BMP280 Sensor
The BMP280 is the product of BOSCH which is based on Bosch’s proven Piezo-resistive pressure sensor technology featured with high accuracy, long term stability, linearity and high EMC robus ...
Hello readers, I hope you all are enjoying our Raspberry Pi Pico programming series. In our previous tutorials, we learned how to access Raspberry Pi Pico’s GPIO pins for both input as well as output operations. For demonstration, we used LED as an output component and a push button as an input component.
Now let’s learn how to interface sensor modules with the Raspberry Pi Pico module. So, in this tutorial, we will learn how to interface the DHT11 sensor with the Raspberry Pi Pico module and fetch the observed data (from its surrounding) using the MicroPython programming language.
Before writing the code for interfacing and fetching the data from the respective sensor, let’s first have a look at the working operation, features and properties of the DHT sensor.
...
Hi friends and hope you are all very well. Today, we are going to deal with one of the most important and common problems that would be there in everyday tasks in industry and its solution. The problem is the safety of equipment and operators by preventing the machine from running under specific conditions for realizing the safety of equipment and human as well. Not only does it fulfill safety but also it is for performing the designed sequence of operation. If there is a problem, then it should be the solution for it. the solution is what so-called “Interlock”. So, what is interlock? And why do we need it? And how we can design a good interlock? Well! We may find such concerns exist in two aspects which are safety and operation sequence. In the f ...
Internet of Things is a system of multiple inter-related computing devices. The factor ‘thing’ in IoT is designated to an entity capable of communicating data over a network (IOT), which can be a digital machine, sensor, human being, animals etc. Each component that is included in IoT network is assigned with an unique identity called UID and the ability to communicate data over IoT network without any external human or computer intervention.
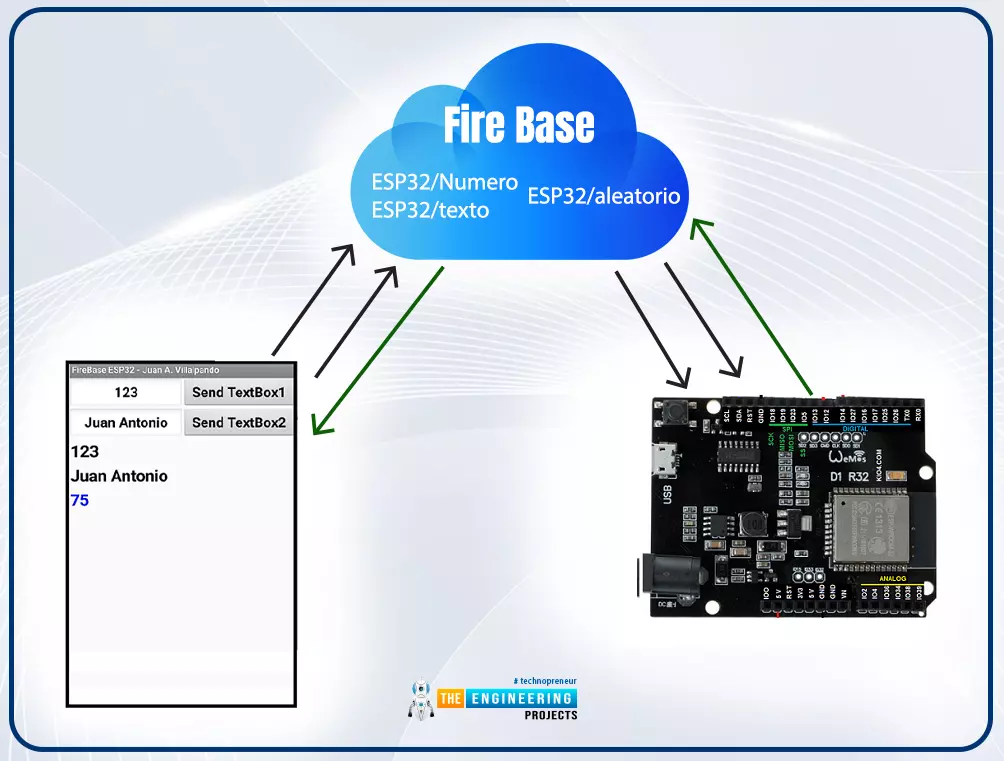
Hello readers, I hope you all are doing great. In our previous tutorial, we discussed how to upload data to Firebase Real-time Database using ESP32. In this tutorial, we will learn how to read the data stored on the Firebase Database with ESP32.
We can access the data stored in Firebase database from anywhere in the world, which makes this preferable ...
Hello geeks, welcome to our new project. In this project, we are going to make a very interesting project which is an Up-Down counter. Most of us who have an electronics background or studied digital electronics must know the counter. Counter is a simple device which counts numbers. As per the digital electronics, there are two types of counter, the Up counter which counts in increasing order and another is Down counter which counts in decreasing order. And every counter has a reset limit, on which the counter resets to its initial value and starts the counting again. The limit of every counter depends on the bits of counter. For example, we have a 8 bit Up counter which means it will count upto 255 and afterwards it will reset and will start agai ...
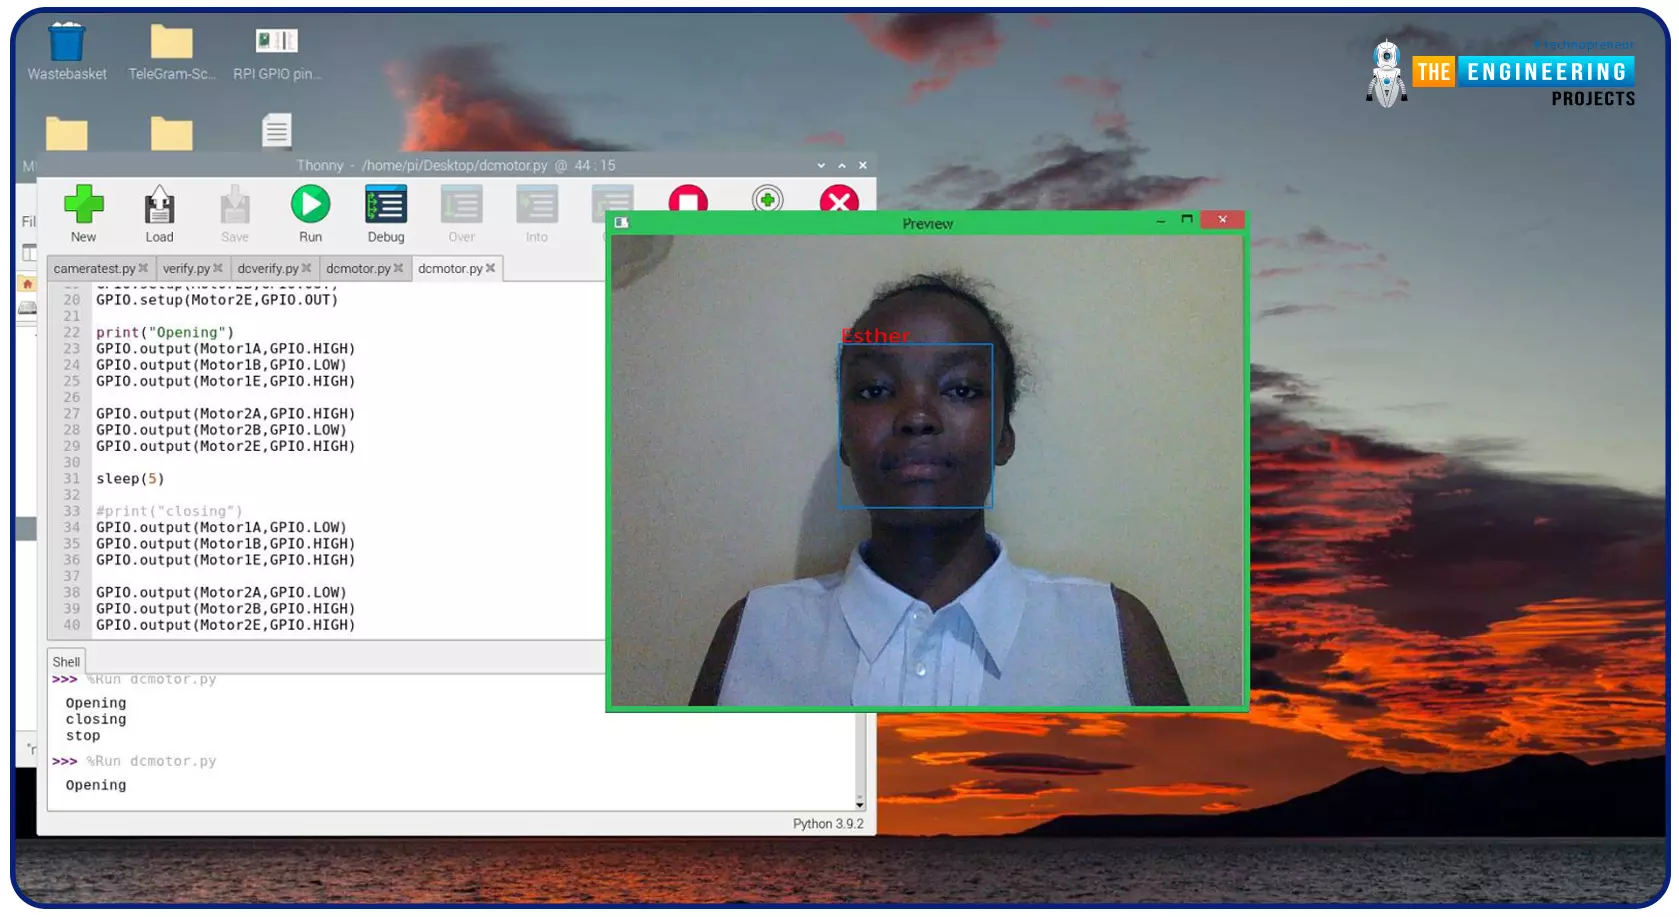
Greeting, and welcome to the next tutorial of our raspberry programming tutorial. In the previous tutorial, we learned how to build a smart attendance system using an RFID card reader, which we used to sign in students in attendance in a class. When it comes to building a face-recognition program on a Raspberry Pi, this tutorial will show you how. Two Python programs will be used in the lesson, one of which is a Training program that analyzes a collection of photographs of a certain individual and generates a dataset. (YML File). The Recognizer application uses the YML script to detect a face and afterward utters the person's name when the face is detected.
Components
Raspberry Pi
Breadboard
L293 or SN755410 motor driver chip
Jumper wir ...
Hello readers, I hope you all are doing great. In our previous tutorial, we discussed the implementation of pulse width modulation (PWM) in Raspberry Pi Pico using the MicroPyton programming example. We also implemented the LED brightness control program to demonstrate an application of the pulse width modulation technique.
In this tutorial, we are going to implement another application of pulse width modulation technique which is ‘Direction and position control of a servo motor’ with Raspberry Pi Pico module and MicroPython programming language.
Later in this tutorial, we will also discuss how to control the position of a servo motor with push buttons (to be used as control inputs) and also to use LEDs for indication purposes.
What is Servo Motor?
Before interfacing the servo motor with ...
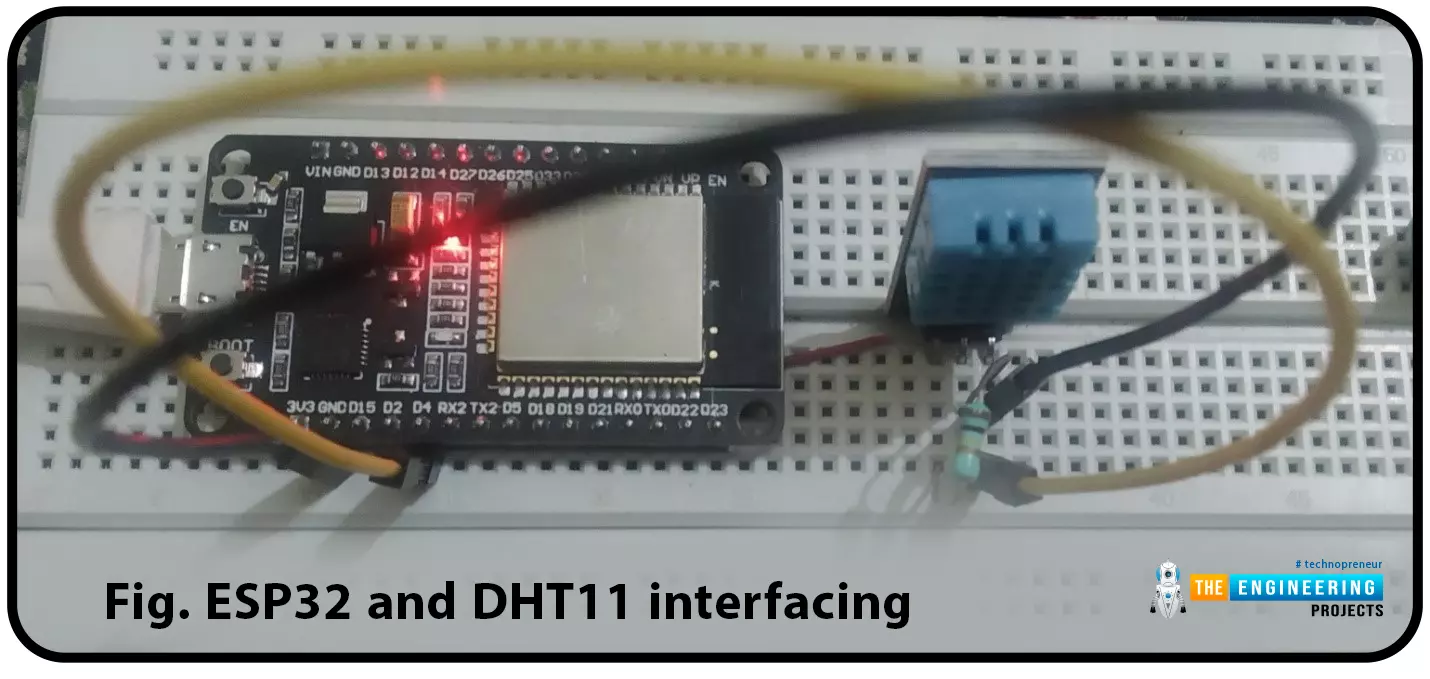
ESP32 module comes with multiple inbuilt features and peripheral interfacing capability is one of those features. ESP32 module also consists of an inbuilt temperature sensor, but that can only measure the temperature of the ESP32 core not the temperature of the surrounding environment. So it is required to use a peripheral sensor to measure the temperature of the surrounding environment like home, garden, office etc.
Hello readers. I hope you all are doing great. In this tutorial, we will learn how to interface DHT11 (temperature and humidity sensor) with the ESP32. Later in this tutorial, we will discuss how to share the sensor readings obtained from the DHT11 sensor to a web server.
Before moving towards the interfacing and programming part, let’s have a short introduction to the DHT11 ...
Hello friends. In this lecture, we are going to have a look at the different kinds of MATLAB data types.
As we have already seen in previous lectures, MATLAB stands for MATrix LABoratory and allows us to store numbers in the form of matrices.
Elements of a matrix are entered row-wise, and consecutive row elements can be separated by a space or a comma, while the rows themselves are separated by semicolons. The entire matrix is supposed to be inside square brackets.
Note: round brackets are used for input of an argument to a function.
A = [1,2,3; 4,5,6; 7,8,9];
An individual element of a matrix can also be called using ‘indexing’ or ‘subscripting’. For example, A(1,2) refers to the element in the first row and second column.
A larger matrix can al ...