This article is a review of Gtech’s AirRam Mk2, including new features, innovations, options, prices and Gtech voucher codes!
What is the Gtech AirRam Mk2?
The Gtech AirRam vacuum came into the market in 2012. At the time, there was nothing like it. The Daily Mail called it the Swiss Knife of vacuum cleaners. The cleaning appliance bore the physical profile of an upright cylinder vacuum cleaner. And yet, it was also cordless and very portable, like a stick vacuum. At that time, it sold at £149 and thanks to 10% off Gtech coupon it was considerably cheaper than Dyson’s equivalent.
Today, we have the Gtech AirRam Mk2, a profound improvement on its ground breaking Gtech AirRam sibling. Among the upgrades on this unit is a better bin, an improved sucti ...
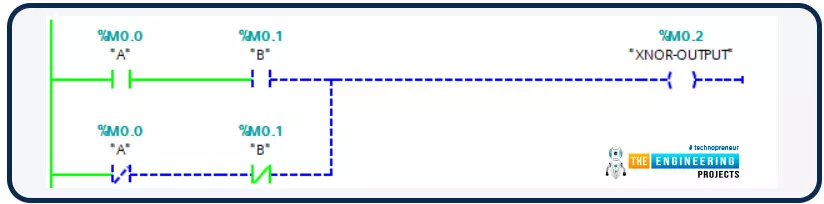
Hello friends, all of us know that PLCs are nothing but the smartest migration from relay logic control to programmable logic control. Also, you know clearly that, logic is the heart of any programming language, and the same is applied to ladder logic programming. Bitwise operators represent the logical operations including the basic logical operations like AND, OR, and NOT and the derived logical operations like NAND, NOR, and XOR. in most cases, for each bitwise operator, there are inputs based on which the output can be decided. Some of these bitwise operators have two inputs and some have only one input. In this article, we are going to present how we can use these bitwise logical operators and their instructions with examples and practice using the PLC simulator.
Logic Gates ba ...
Hello friends, I hope you all are doing great and having fun in your lives. In today's tutorial, we are gonna design a Heart Beat Monitor using Arduino in Proteus ISIS. You should download this Heart Beat Sensor Library V2.0 for Proteus because we are gonna use that to detect heart beat in Proteus.
I have also used a 20x4 LCD which will display our heart rate value. You should download this New LCD Library for Proteus. I have counted the heart beat for ten seconds and then I have multiplied it with 6 to get the heartbeat per minute which is abbreviated as bpm (beats per minute). So, let's get started with Heart Beat Monitor using Arduino in Proteus ISIS.
Heart Beat Monitor using Arduino in Proteus
First of all, click the below button to downloa ...
Hello friends, I hope you all are doing great. In today's tutorial, we will have a look at Factors To Assess While Looking For Software Outsourcing. When you decide to outsource the software development of your company, there's a lot of factors you need to consider before making a decision. There should be a thorough research of options available, and shortlisted names should be the best for you. You need to look for the desired features that you can get in the decided budget. It's essential to not be in haste while taking a decision and understanding each factor as it determines your company's future and efficiency.
Here's a list of critical factors you need to assess while looking for software outsourcing -
Experience in the industry
Looking for ...
Hello friends, I hope you all are doing great. In today's tutorial, I am going to show you How Can Financial Knowledge Help Your Engineering Career Succeed? A solid foundation in financial knowledge is the most sought after trait not only in finance jobs but also in many other fields. Perhaps, it's because finance is a common denominator that impacts all industries. Not only does it communicate the overall health of an organization, but it also affects every person in a certain workplace.
Whether it's public, corporate, or personal finance, understanding it can benefit you in many different ways. But for one thing, it can help jumpstart or advance your career in engineering. In fact, finance and engineering make up a powerful combination, especial ...
Hello friends, hope you all are fine and having fun. In today's post we are gonna have a look at LM317 Voltage Regulator in Proteus. In the previous post, we have seen how to design a 5V Power Supply in Proteus ISIS, which I have designed using IC regulator 7805. Today I am going to share How to design LM317 Voltage Regulator Circuit in Proteus. This DC power supply is a variable one means you can set its output voltage to any level you want. In order to change its output value we have used a variable resistor and by changing its value you can change the output value. It is a basic level project and very simple but used as a base to design large industrial projects. In this project, we are going to control the speed of a DC Motor and the correspon ...
Hello friends, I hope you all are doing great. In today's tutorial, I am going to share new Magnetic Reed Switch Library for Proteus. We are quite proud to share it as its not been designed before. Our TEP Team has designed it and I think they need a little appreciation. :P You can interface it with any Microcontroller like Arduino, PIC or 8051 Microcontroller etc.
As Proteus is a simulation software so we can't produce magnetic field in it. That's why, we have placed a TestPin and when you provide HIGH Signal to that TestPin then it will act as it has magnet around. Similarly, if you provide LOW Signal to that TestPin then it will behave normal and will sense no magnet around. Rite now, we have just designed two Magnetic Reed Switches but soon we ...
The article will cover essential aspects of fluid statics and pressure forces applied to the fluid. The article will start with the absolute pressure gauge and the variation of pressure with depth in different gravitational field manometers and barometers, respectively. Then I will explain the forces that deal with fluids, such as hydrostatic force, buoyant force, etc. So, dear friends, without wasting any time, let’s start.
Pressure
The definition of pressure according to fluid mechanics is as follows:
Pressure is the normal force applied by a fluid per unit area.
Unit of Pressure
The units of pressure Pascal is too small to deal with in practical cases. For instance,
Kilopascal: 1kPa=103Pa
Mega Pascal: 1MPa=106Pa
The three common pressure units used are standard atmosphere ba ...
Hello friends, I hope you all are doing great. As we are working on Raspberry Pi libraries for Proteus these days, so today, I am going to share another awesome library i.e. Raspberry Pi Zero W Libary for Proteus. We have already shared the Raspberry Pi Pico, Raspberry Pi 3 & Raspberry Pi 4 Libraries for Proteus, I hope you have already installed these libraries.We have only designed the exterior look of this module, it won't be able to read the Python code. You can use this module to design circuit diagrams of your projects or to demonstrate your project in the presentation. Although, just for fun, we have added the Arduino UNO firmware to it. So, you can add the Arduino hex file in it. Something is better than nothing.So, let's install the Proteus Library and simulate Raspberry Pi Ze ...
If you look in the past, having a website was enough to generate leads and keep yourself running in the business. But today, the concept of a website has emerged to the whole new level. It is not only a source for your business but a platform to gain exposure globally. With the advancement in the competition, the companies are investing heavily on their websites to achieve maximum ROI.
If your website doesn’t get successful in grabbing customers attention at first, then your competitors take up your place. That’s why creativity is essential!
Web Design: what's audience looking for?
If you think of a design and start implementing it right away - you won’t get the results no matter how creative, you go. At first, you need to put yourself in the audi ...