Hello friends, I hope you all are having fun. In today's tutorial, I am going to share a new Proteus library for Raspberry Pi 2. We have already shared the Proteus Libraries of other Raspberry Pi modules i.e. Raspberry Pi 4, 3, Pico etc. and we discussed that these Pi modules won't be able to read the Python code. We have just designed the external appearance of these modules and you can use these Pi modules for circuit designing and project presentations.We have also added the Arduino firmware in these boards, which is just to provide a bit of interaction with these boards. We have given these boards an unofficial title "Arduino Pi".So, let's have a look at How to simulate Raspberry Pi in Proteus:
Raspberry Pi 2 Library for Proteus
First of all, we need to download the Proteus Library ...
Yesterday, I have posted a new Arduino Lilypad / Nano Library for Proteus in which we have seen how to add that library into Proteus so that you could be able to use these boards in Proteus. That was quite easy. Today I am gonna post a small project in which we will see how to use that library and produce an Arduino Lilypad simulation in Proteus. In this Arduino Lilypad simulation in Proteus, I am gonna use obviously he Arduino Lilypad board along with few LED lightsand will make them blink. Its also quite easy and you can also download the simulation and the hex file at the end of this project but I would suggest you to do it yourself so that you learn something out of it.
Before starting this project, you must have first integrated the Arduino L ...
Hello everyone! I hope you all will be absolutely fine and having fun. Today, I am going to provide a detailed discussion on 2 Relay Module Interfacing with Arduino. First of all I would like to explain you that what is relay and how to use it and then we will move forward towards 2 relay module interfacing with Arduino. I have already controlled relay with 555 timers. 2 relay module consists of two relays. Relay is basically an electronic device or a switch which is used to open and close the circuits electronically.
A relay controls an electric circuit by opening and closing contacts in another circuit. When the relay contact is normally open (NO), there will be an open connection when the relay is not energized. When the relay contact is norm ...
If you want to decorate your landscape and table for any formal events or holidays, table runners should be the first thing to cross your mind. Table runners are known as the base of your decorations. This is why most house owners prefer table runners instead of other decorating methods. Even though the primary objective of table runners is to protect the table from damages, its effectiveness is much more than that. Table runners will allow you to add style and color to your dining table. It will also help you to increase the overall design and mood of the event.
Table runners are available in various fabric materials such as linen, polyester, cotton, and satin that might make the purchasing process of the table linens a daunting task. No matter i ...
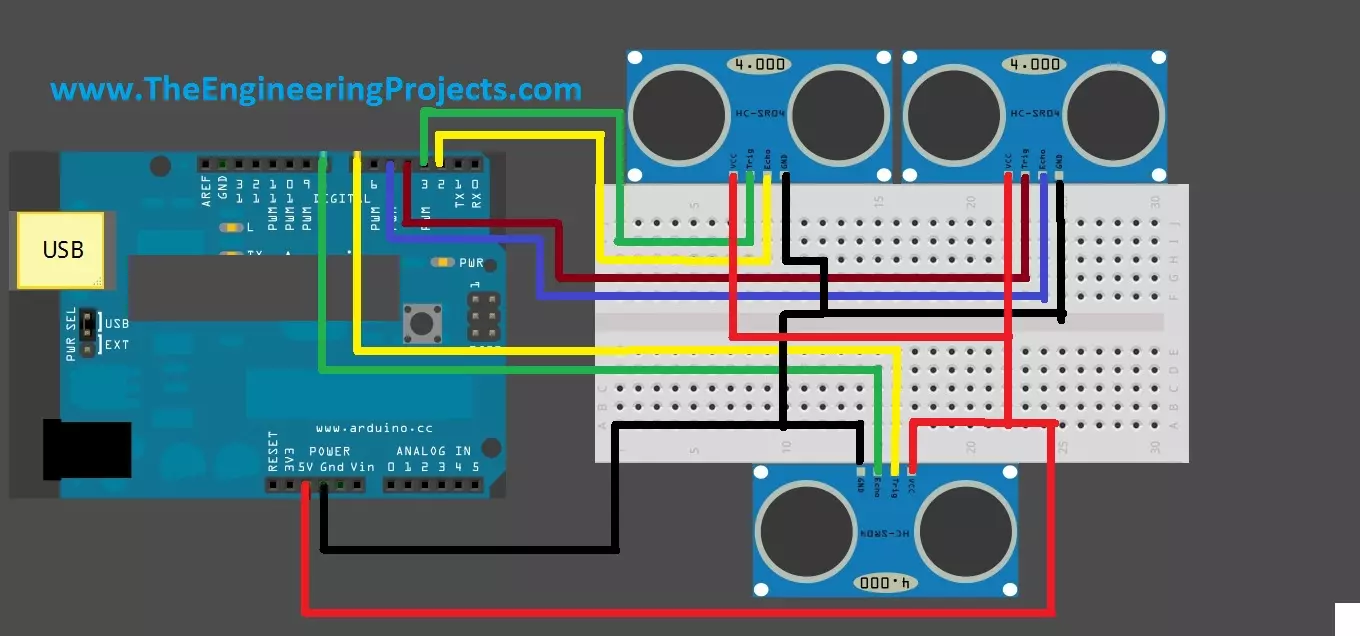
Hello friends, hope you are having fun and enjoying life. Today, I am gonna post about interfacing of multiple Ultrasonic sensor with Arduino. In the previous post, we have seen Interfacing of Ultrasonic Sensor With Arduino and in this post I have interfaced single ultrasonic sensor but in projects especially related to robotics, we have to interface multiple ultrasonic sensors. For example you have an obstacle detection robot, now in order to detect obstacle in front of robot you have to place once sensor on the front side but now you can't detect any object present on left or right side of your robot, so you have to place two sensors one on the left side of robot and one on the right side so in this project you need to use total three ultrasonic ...
Hello friends, I hope you all are doing great. In today's tutorial, we will have a look at URL Routing in ASP.NET MVC. It's the 8th tutorial in this ASP.NET MVC series. Today's tutorial is on a new concept in asp.net and it's essential to understand URL routing before going any further.
URL Routing is actually a part of core ASP.NET but MVC applications also use it. URL Routing is implemented by System.Web.Routing and ASP.NET MVC uses System.Web.Routing. So, let's have a look at what's URL Routing in ASP.NET MVC:
URL Routing in ASP.NET MVC
URL Routing is used for directing the HTTP request (generated by the user) to the respective controller in ASP.NET MVC.
Whenever a user types some url in the browser and hit enter then an HTTP request is ge ...
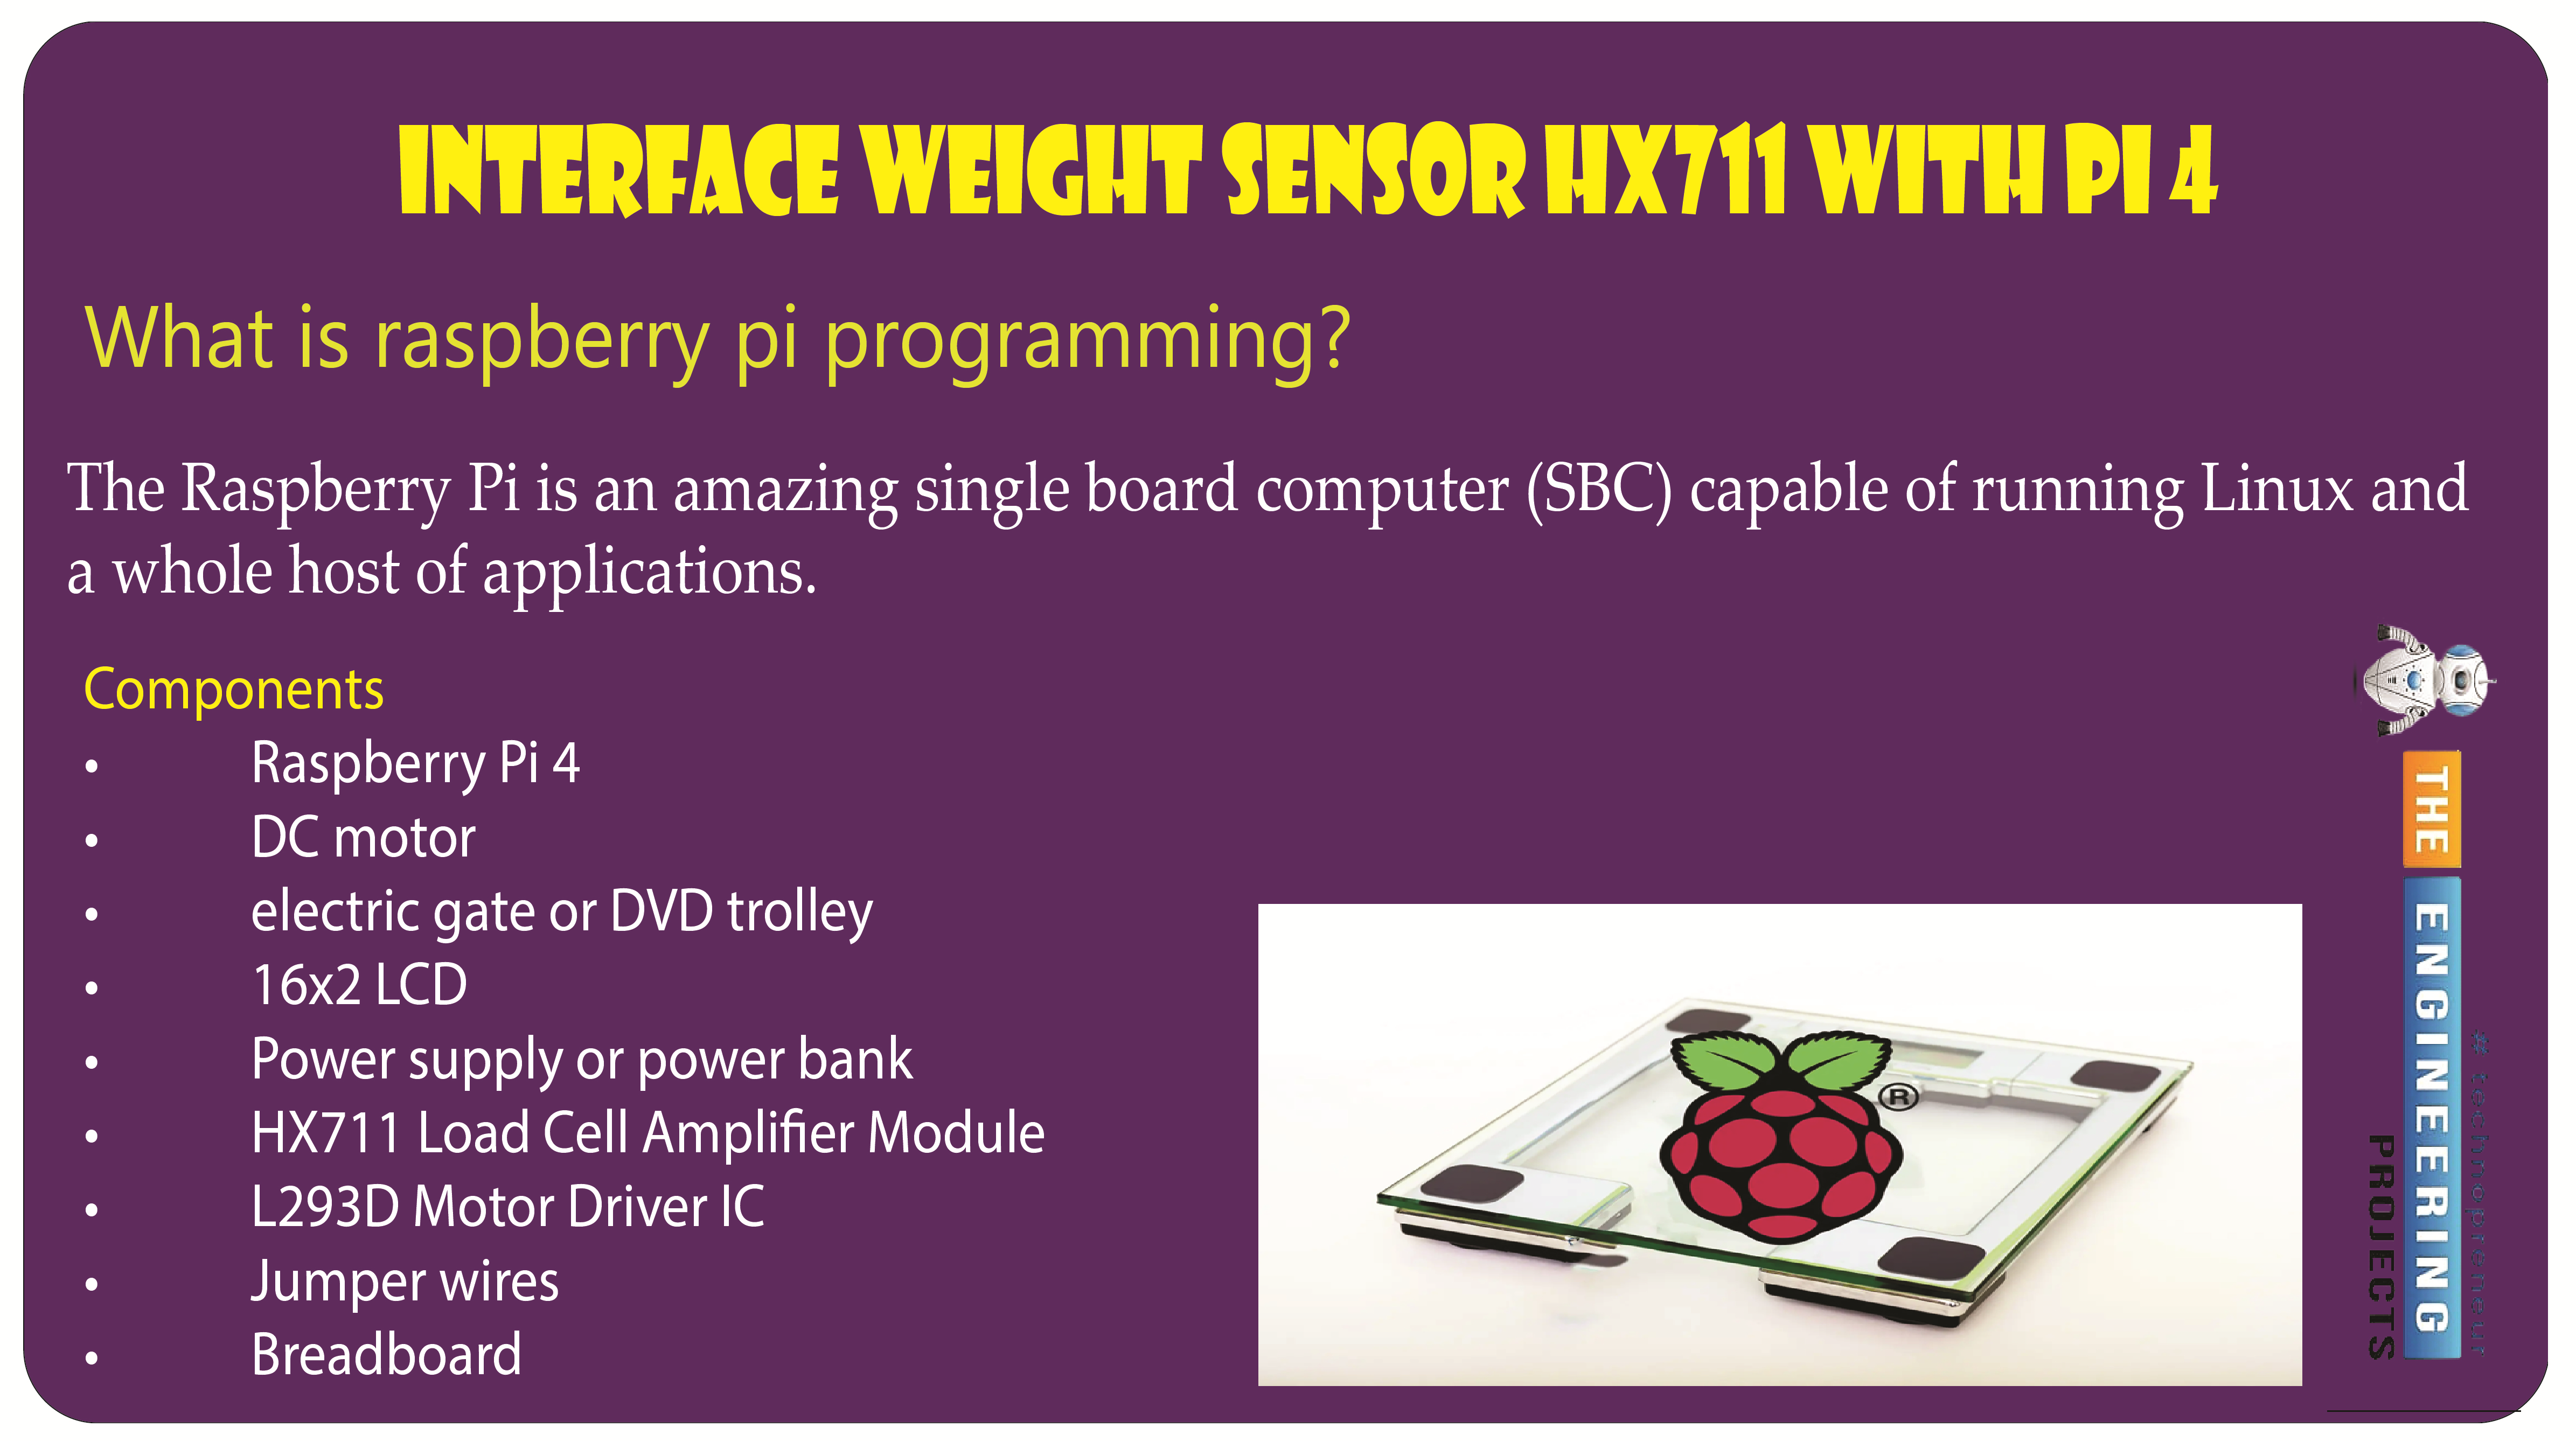
Welcome to the next tutorial of our raspberry pi programming tutorial. The previous tutorial showed us how to set up a weather station using the Internet of Things (IoT) on a Raspberry Pi 4. First, we studied how a weather station works on a fundamental level. Then we developed a Python script to collect data from the station. In contrast, we'll construct an automatic gate using a Raspberry Pi, a load cell, and an HX711 weight sensor.
These pressure-sensitive gates are common in shopping centers and showrooms; they open when someone is in the immediate vicinity and close again when the person is out of sight. Like the Automatic Gate, we just made, this one will open in response to weight or pressure and stay that way until the force is removed. If ...
Hello friends, hope you all are fine and having good life. In today's project, we will see how to display ADC value on LCD using Arduino in Proteus ISIS. Its quite a simple project in which we are gonna measure the voltage of ADC pins and then will display them over to LCD. The microcontroller I am using in this project is Arduino. The simulation is designed in Proteus ISIS. IF you are working on PIC Microcontroller then you should have a look at How to Display ADC value on LCD using PIC Microcontroller in Proteus ISIS.
Arduino has 10 bit ADC pins so whenever you apply voltage on these pins it will give you a value ranging from 0 to 1023 depending on the voltage provided. One can easily get this value using a simple function in Arduino analogRead( ...
Hi friends, today we are going to learn a good technique to run multi outputs in sequence. In another word, when we have some output that is repeatedly run in sequence. In the normal or conventional technique of programming we deal with them individually or one by one which takes more effort in programming and much space of memory. So instead we can use a new technique to trigger these outputs in sequence using one instruction which will save the effort of programming and space of memory. In this article, we are going to introduce how to implement sequencer output instruction. And practice some examples with the simulator as usual. Before starting the article, we need to mention that, some controllers like Allen Bradley have sequencer output instruction and some has not like Siemens. So we ...
Hello friends, I hope you all are doing great. In today's tutorial, we will have a look at different Razor Layout Views in ASP.NET Core. It's our 10th tutorial in ASP.NET Core series. You must have noticed in websites that they have common sections, which remains the same throughout the website i.e. Header Section, Footer Section, Sidebar etc.
In today's lecture, we will have a look at how to design these default layouts of a website. We have already discussed the MVC architecture in detail so now it's time to start building our site's layout or basic structure. Today we will just discuss different files available in ASP.NET Core for default layout designing. So, let's get started with Layout View in ASP.NET Core:
Razor Layout View in ASP.NET Core ...