


Project Files of AC Dimmer Module Library for Proteus Simulation
 Libraries
 Code
 Projects
 Simulation
ac-dimmer-module-tep-v1-0-2dc3020d77804a2f9d86d19d51b219b7.zip
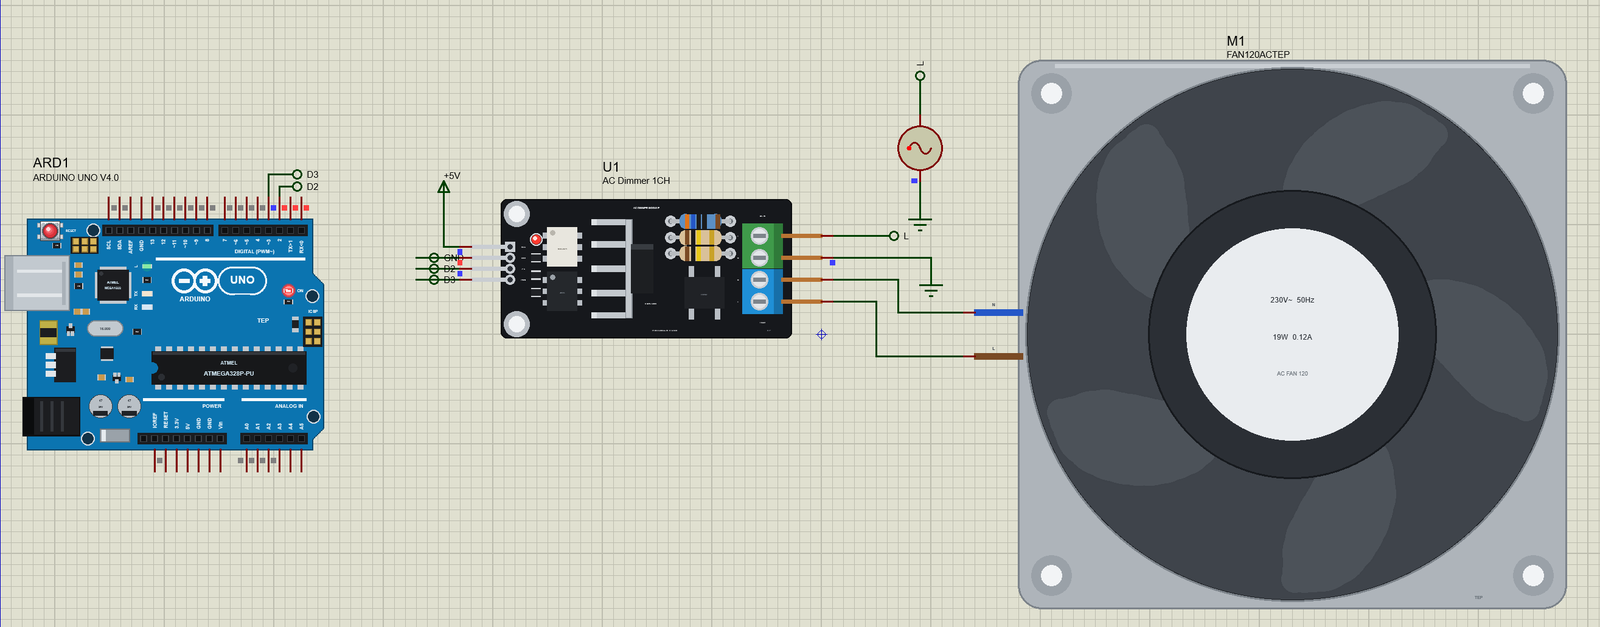
AC Dimmer Module Library for Proteus V1.0
AC Dimmer Module Library for Proteus V1.0 comes as a ZIP archive of 10 files (1.2 MB, 2.6 MB unpacked) holding Proteus library files, simulation model DLLs, a Proteus simulation, an Arduino sketch and compiled HEX firmware.
- LIBProteus library
- DLLProteus model
- DSNProteus simulation
- INOArduino sketch
- HEXHEX firmware
Description
AC-Dimmer-Module-Library-for-Proteus-v1.0.zip with the 1-channel AC dimmer module for Proteus simulation (a BTA16-600B triac, a MOC3021 gate driver and the zero-cross output; TEPACDIMMER.LIB and TEPACDIMMER.DLL), our Arduino UNO V4.0, the A3 AC fan demo with its sketch and a README.

File Structure
 File Structure
4.9 KB201.9 KB19.9 KB296.5 KB883.5 KB22.4 KB19.9 KB296.5 KB883.5 KB13.2 KBGallery12 images from the tutorialOpen the tutorial
 Gallery12 images from the tutorial
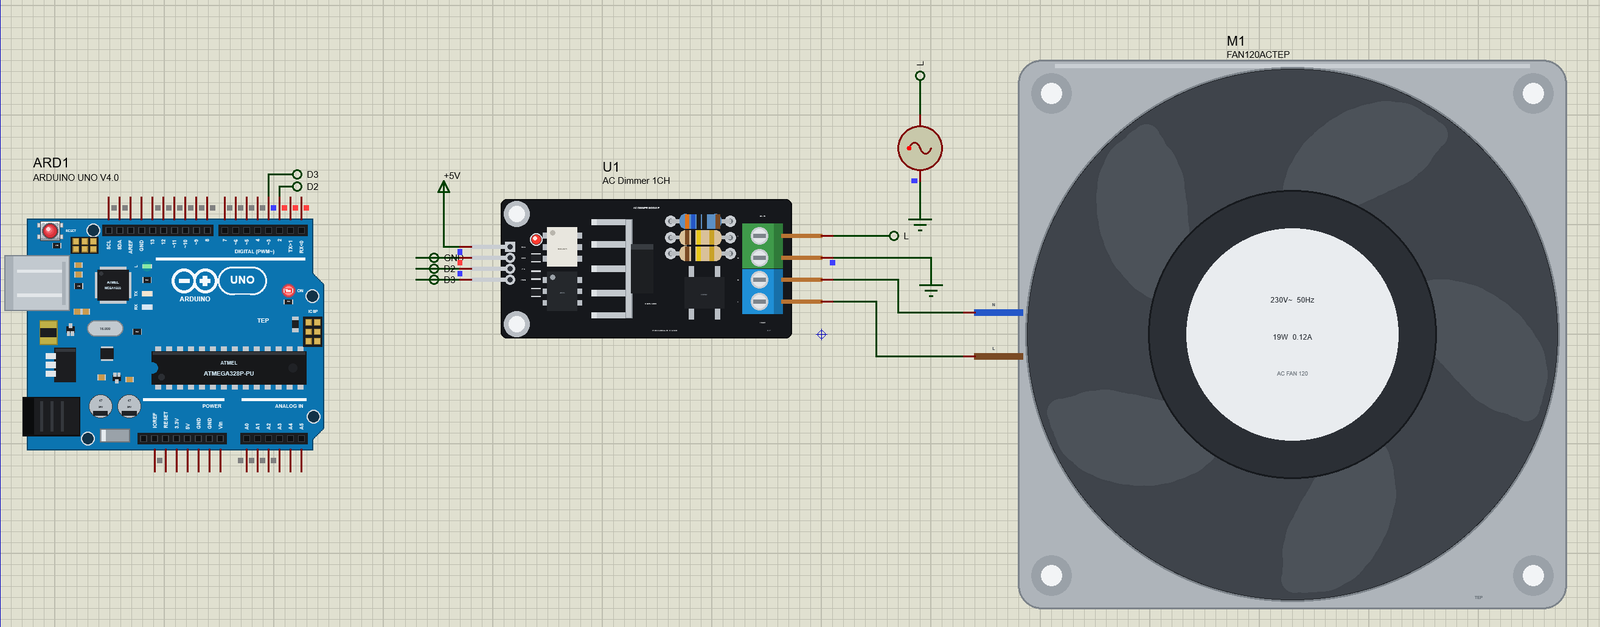
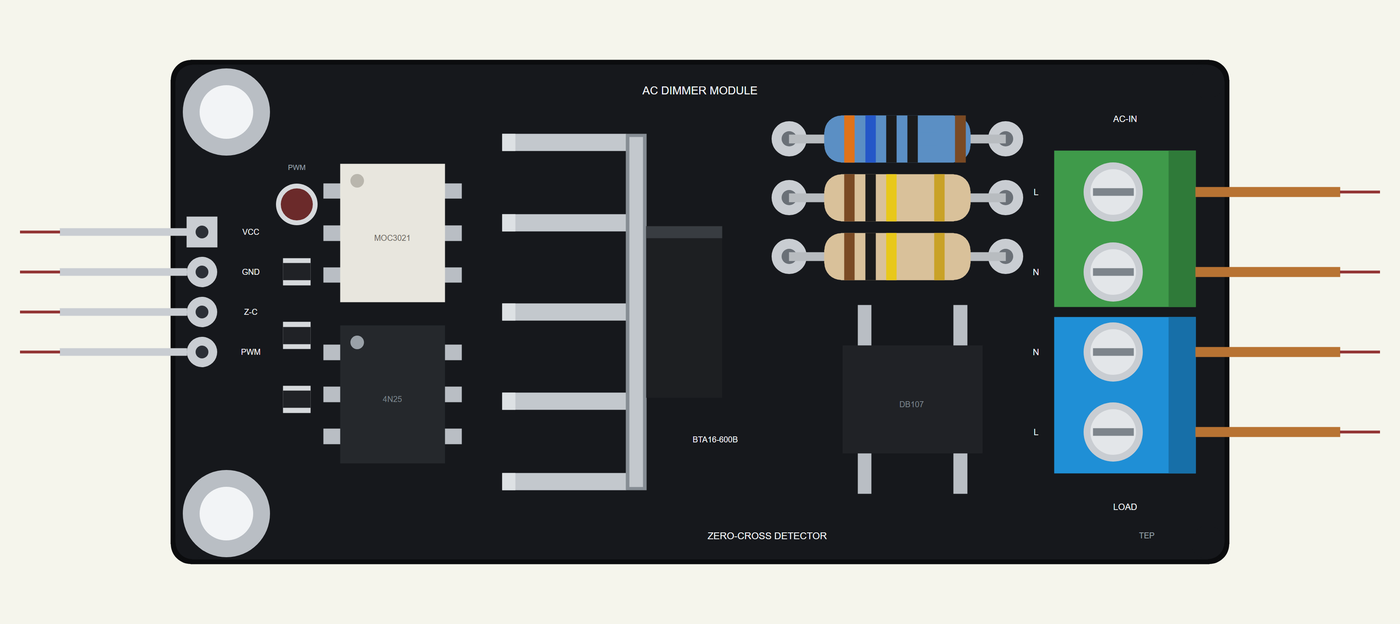
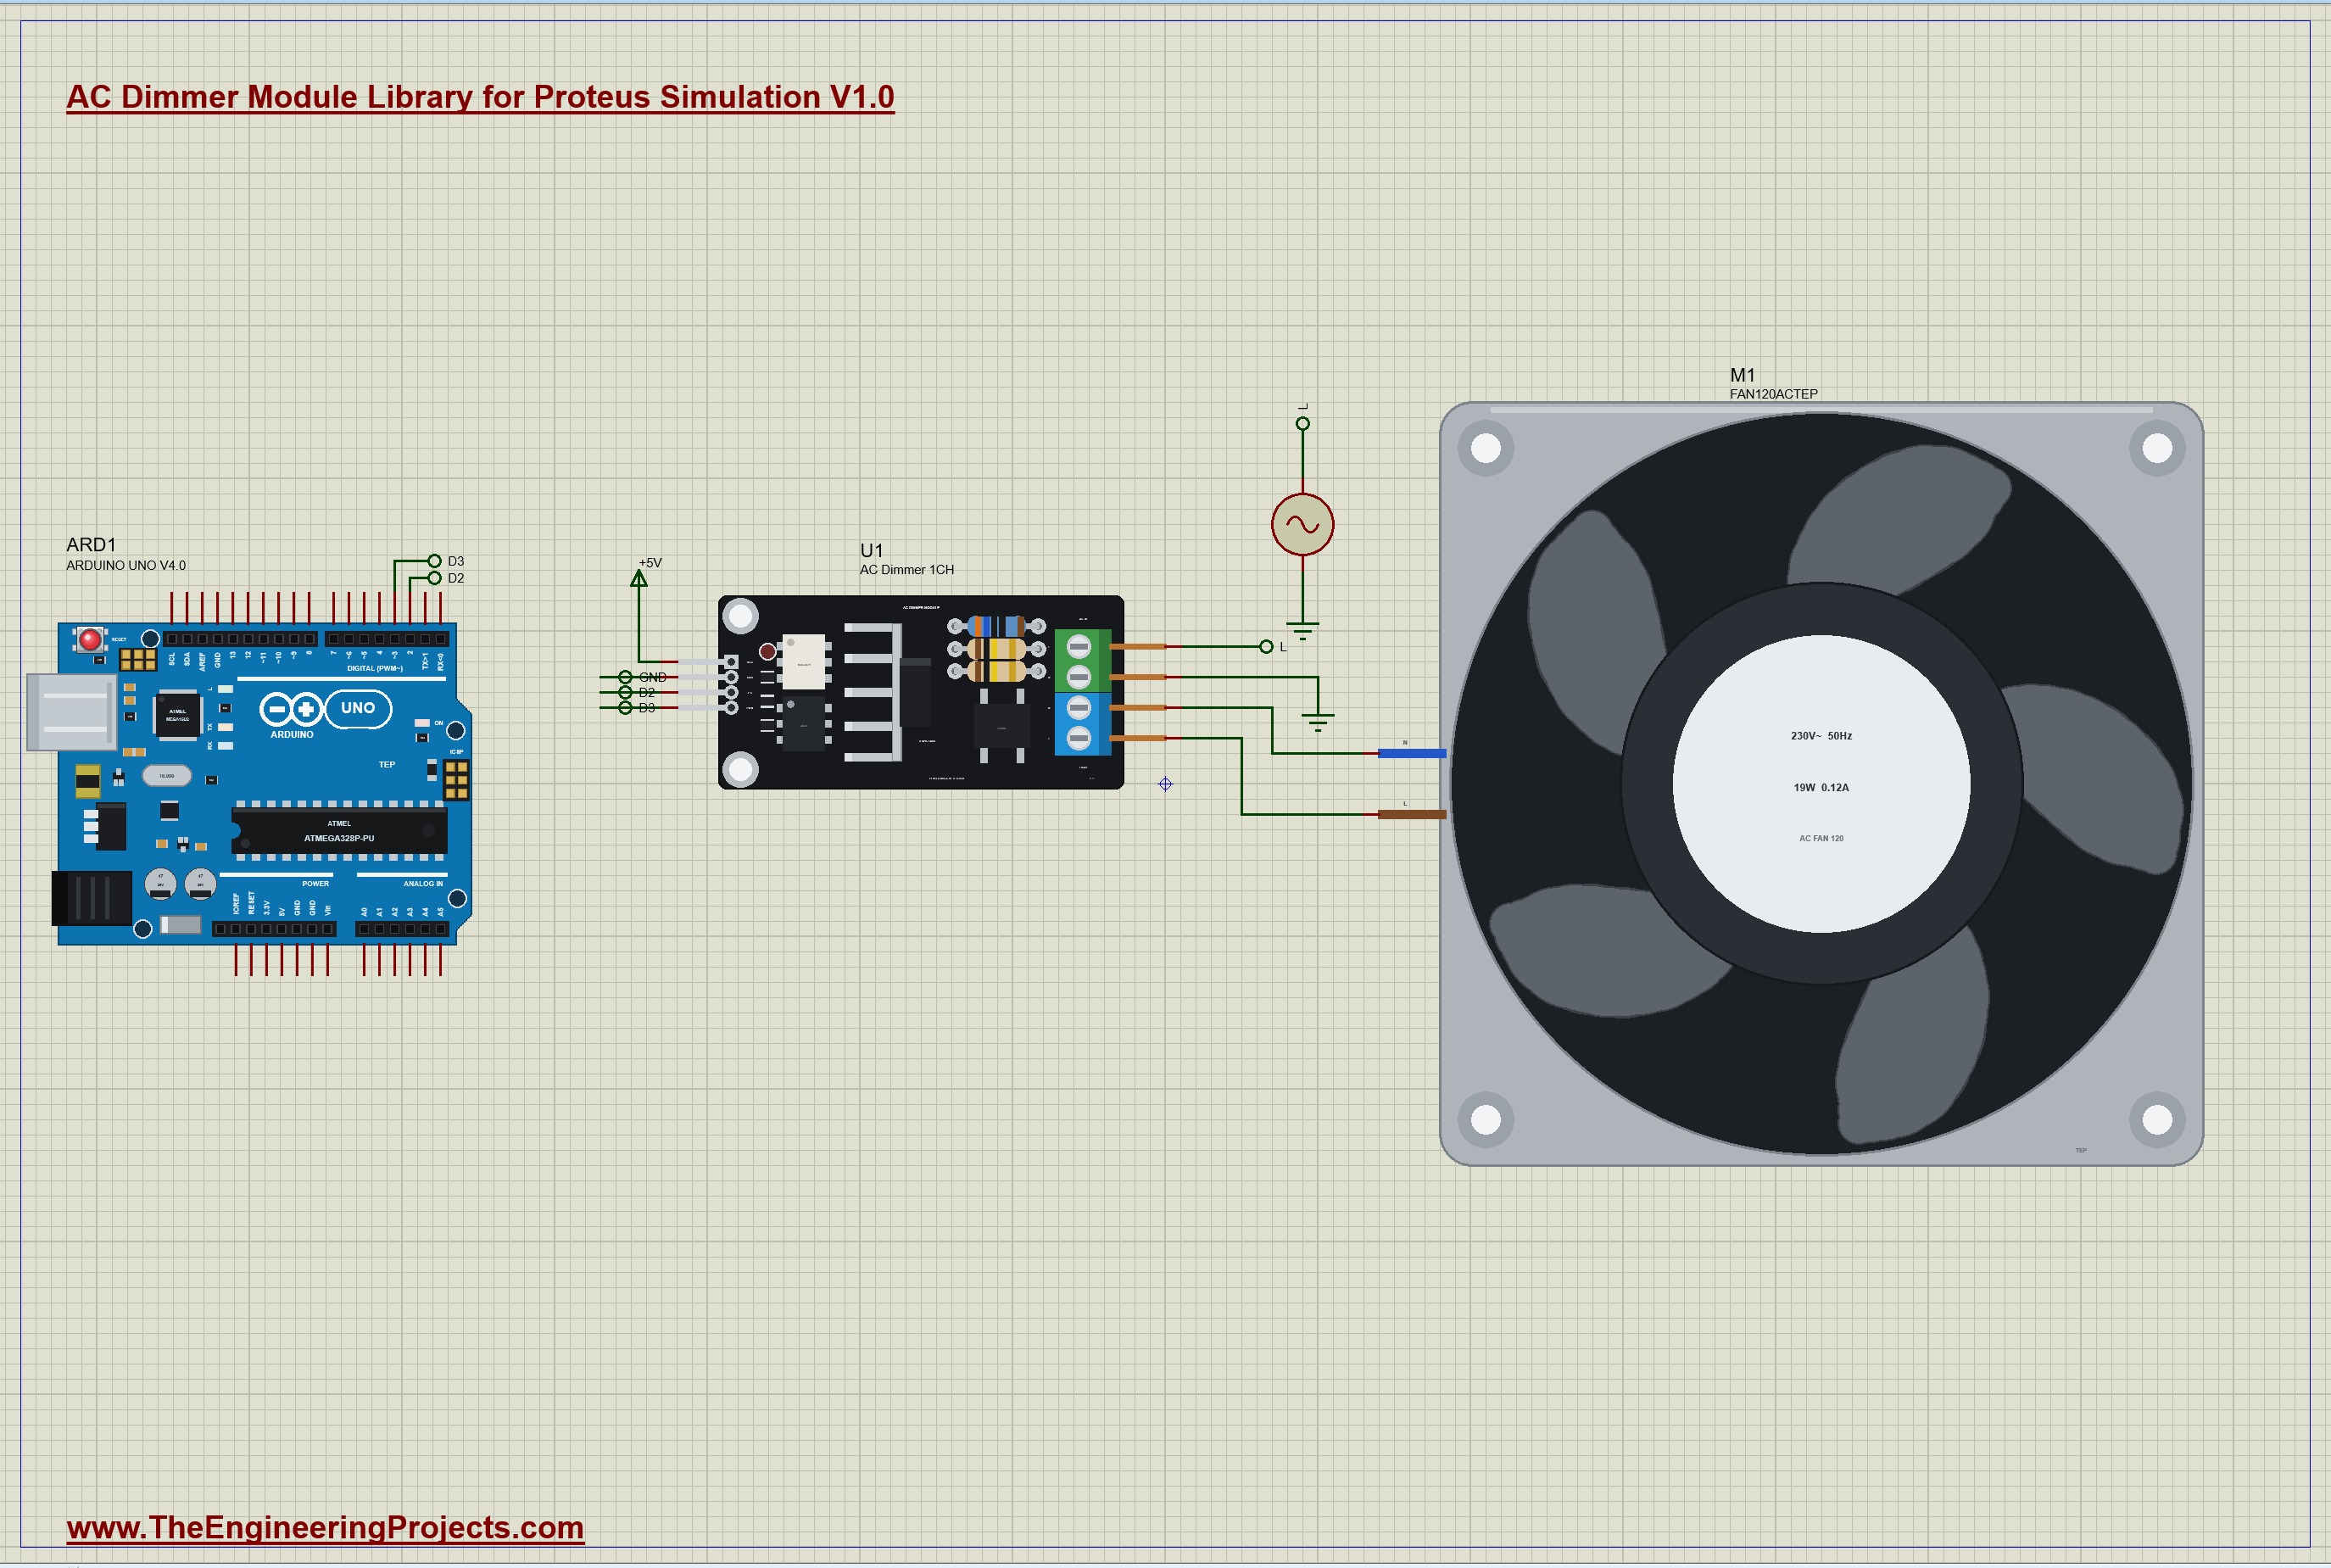
The circuit, the board and the results as they appear in AC Dimmer Module Library for Proteus Simulation. Open an image for its full size.
README
 README
AC DIMMER MODULE LIBRARY FOR PROTEUS SIMULATION - V1.0 (a triac phase-control board with zero-cross, with a pop-up)
Designed by The Engineering Projects
www.TheEngineeringProjects.com

IMPORTANT LINKS
Article (read it first - pictures, step by step, every feature explained):
  https://www.theengineeringprojects.com/2026/11/ac-dimmer-module-library-for-proteus.html
Report a bug or suggest a feature (our forum):
  https://www.theengineeringprojects.com/forum/category/motor-driver-proteus-library
The demo runs on our Arduino UNO V4.0 (included) - working LEDs, RESET and a
built-in serial monitor, no Virtual Terminal to wire - its own article:
  https://www.theengineeringprojects.com/2026/10/arduino-uno-library-for-proteus-v40.html
The demo dims our 120mm 230V AC Fan library (a SEPARATE library - install it too):
  https://www.theengineeringprojects.com/2026/11/120mm-230v-ac-fan-library-for-proteus.html
Support us (the libraries are free):
  https://www.theengineeringprojects.com/donate

FILE STRUCTURE
AC-Dimmer-Module-TEP-v1.0/
|-- Proteus Library Files/
|   |-- ArduinoV4TEP.LIB                              201.9 KB   TEP Arduino boards V4.0 (UNO) -> LIBRARY
|   |-- TEPACDIMMER.LIB                                19.9 KB   the library -> LIBRARY folder
|-- Proteus Model Files/
|   |-- TEPACDIMMER.DLL                               296.5 KB   the model -> MODELS folder
|   |-- TEPARDUINO.DLL                                883.5 KB   the Arduino board model -> MODELS folder
|-- Proteus Simulation/
|   |-- ACDIMMER-FAN120AC-ArduinoUnoV4.pdsprj          22.4 KB   the demo project
|   |-- Dimmer_Demo.hex                                19.9 KB   the demo firmware
|   |-- TEPACDIMMER.DLL                               296.5 KB   copy of the model
|   |-- TEPARDUINO.DLL                                883.5 KB   copy of the board model
|-- Arduino Code/
|   |-- Dimmer_Demo/Dimmer_Demo.ino                     4.9 KB   the demo sketch (source of the .hex)
|-- README.txt                                        ~14.6 KB   this file
Total: 2.58 MB (unzipped). The C++ source code of the models is not included.

WHAT IS IT?
The common 1-channel AC light dimmer module (3.3 V / 5 V logic, 220 V / 110 V, 50 / 60 Hz), the open
design sold by many makers,
drawn at true scale (a 63 x 30 mm black board: the logic header, two optocouplers, the BTA16 triac
upright on its finned heatsink, the
droppers and the gate resistor, the bridge rectifier, the AC-IN and LOAD screw terminals, the PWM
LED; our own drawing, no maker's mark):
  * The triac (a BTA16-600B, 16 A 600 V) switches the L line from AC-IN to LOAD; N passes straight
    through. PWM high lights a MOC3021
    opto-triac, which feeds the BTA16's gate from MT2 through 360 ohm: it fires once that path can
    push its 50 mA gate current (about 21 V
    across it), then stays on by itself until its current dies at the end of the half-cycle.
  * The zero-cross: a bridge rectifier and two 100 kohm droppers light a 4N25-type optocoupler's LED
    from the mains. Its transistor pulls
    Z-C low whenever the mains is well away from zero; the 10 kohm pull-up to VCC makes Z-C a short
    HIGH pulse round each zero - 100 a
    second on 50 Hz, about 1 ms wide on 230 V with 5 V logic. The true zero is the middle of the
    pulse.
  * The resistor values and the 5 A rating are our figures for this open design (the published
    schematic gives none).
  * Phase control: after each zero, wait, then fire. The later the triac fires, the less of each
    half-cycle reaches the load and the lower
    its RMS voltage - a lamp dims, a fan slows.
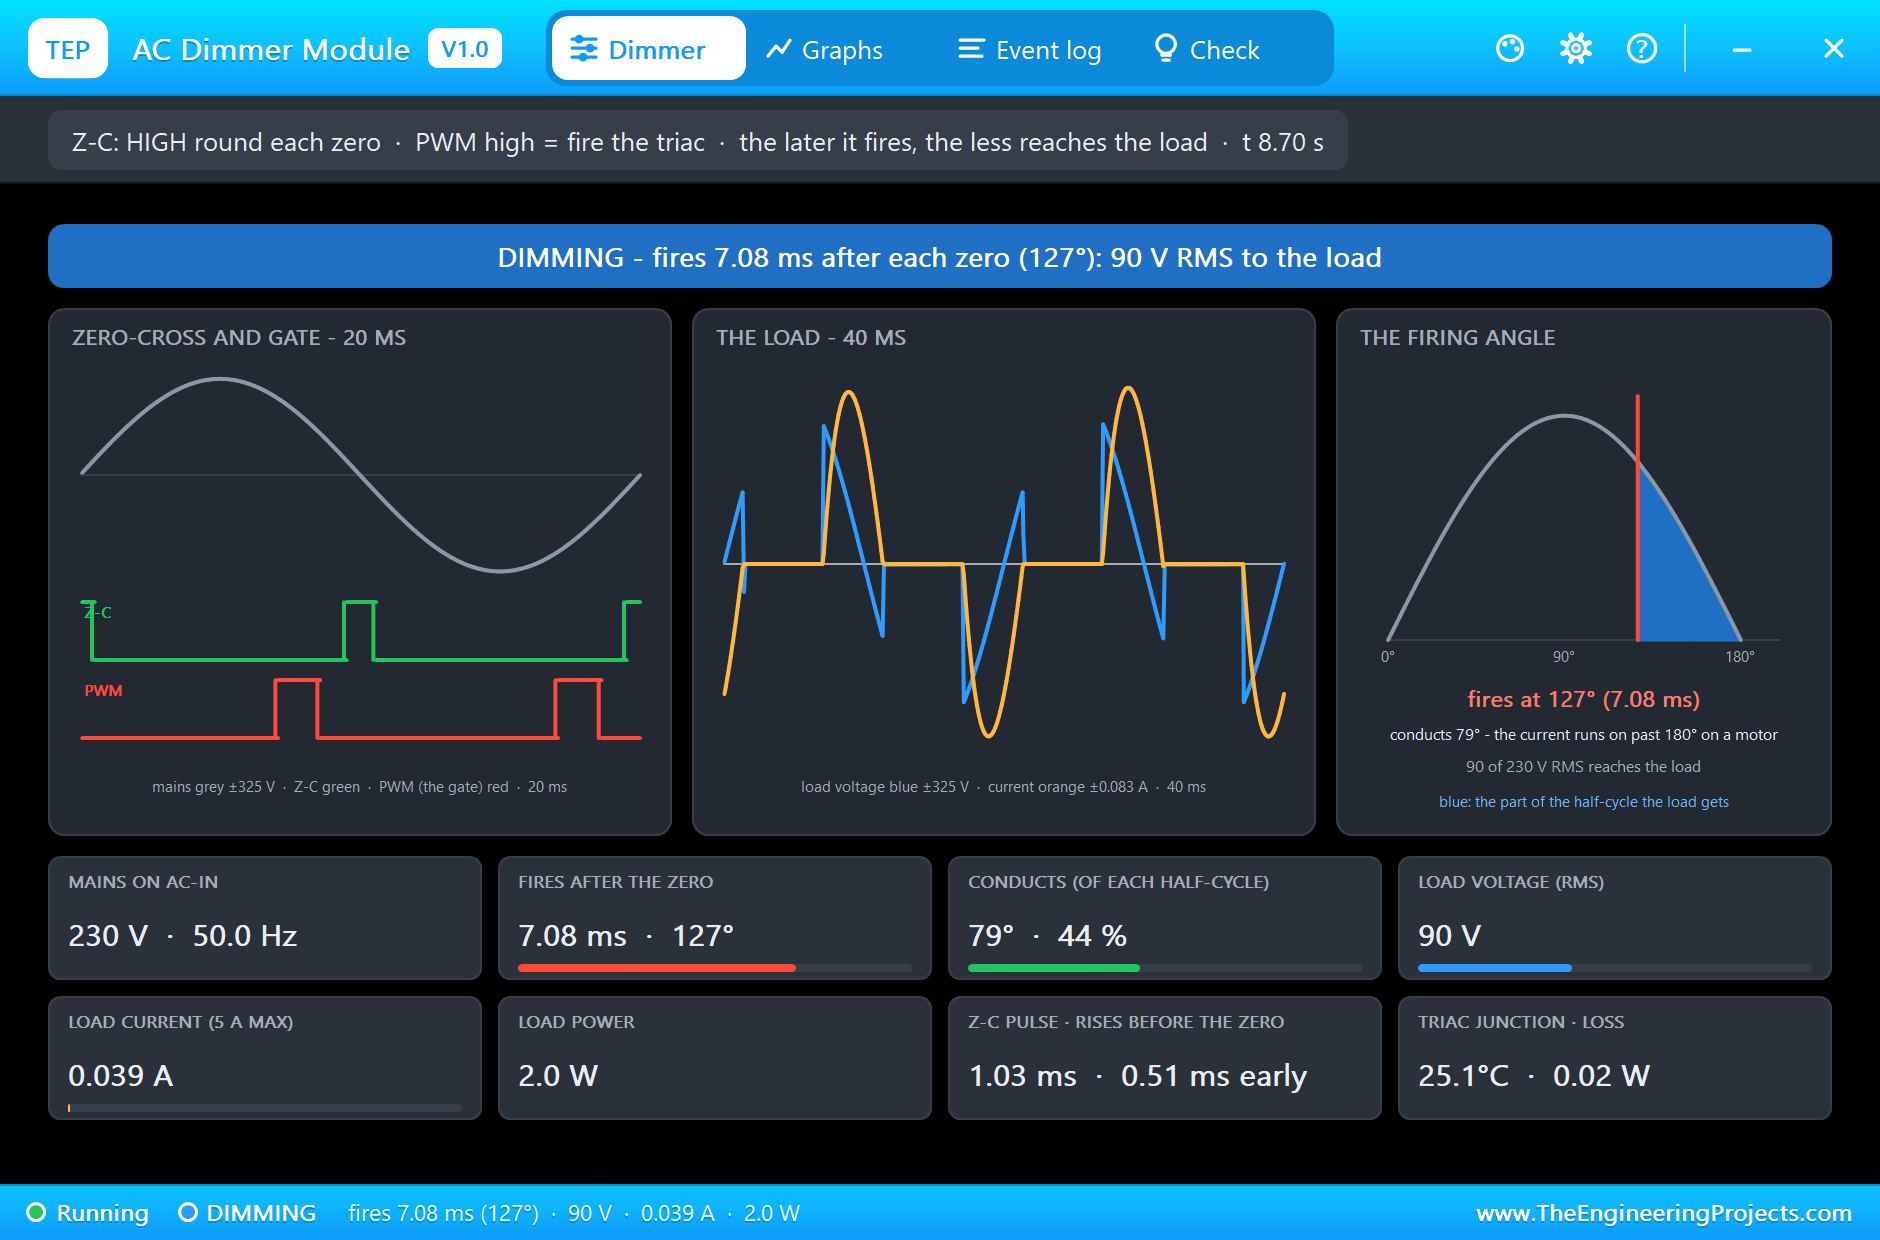
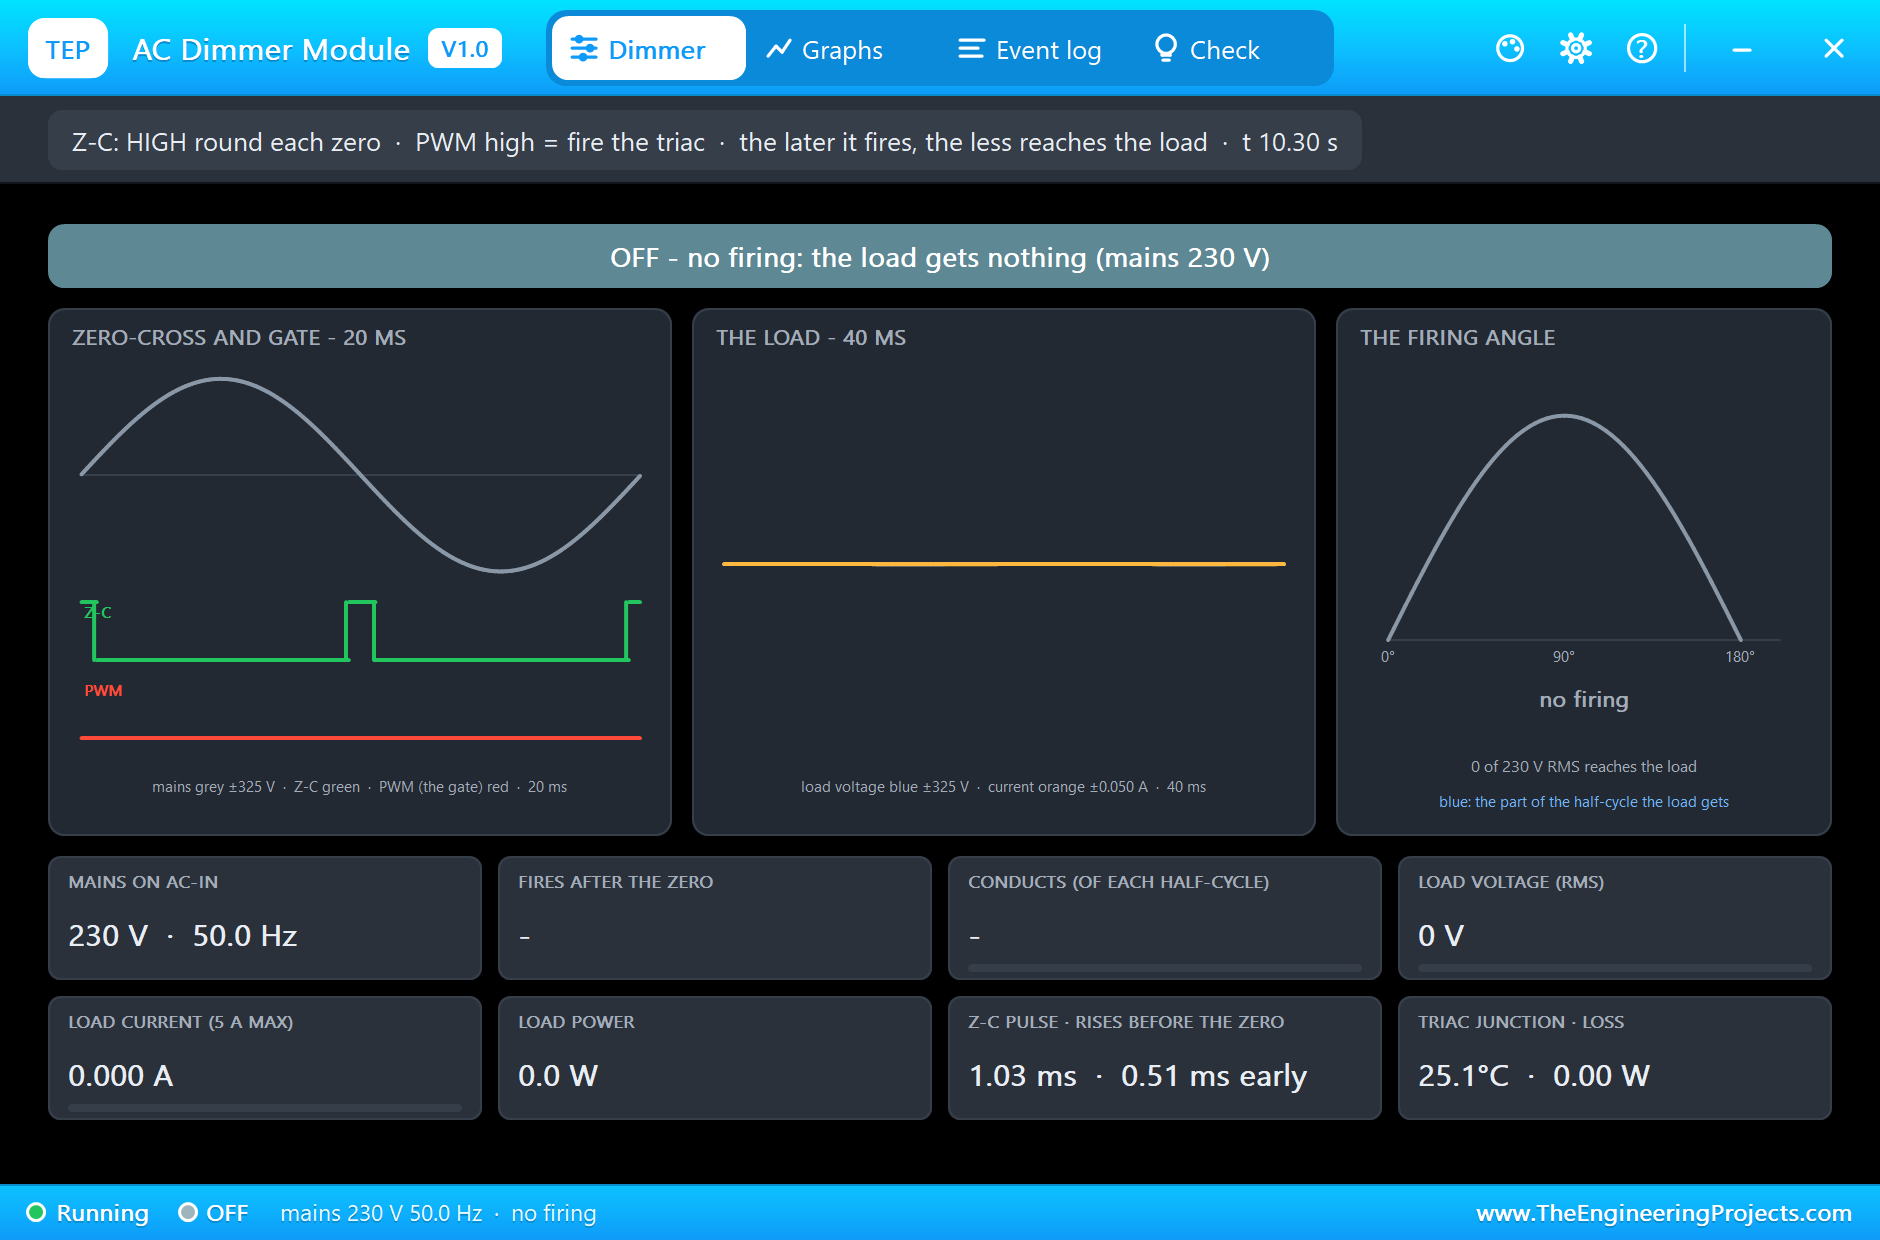
  * Click it at Run for the pop-up: the zero-cross and the gate on a 20 ms scope, the load's voltage
    and current on a 40 ms scope, the
    firing angle on a half-cycle, graphs, an event log and a check page.
The body is drawn as on the real part and to true scale against our Arduino.
The TEP signature and the pop-up are TEP additions.

ONE DEVICE (search "DIMMER" in Pick Devices):
  DIMMERACTEP  "AC Dimmer Module V1.0" in TEPACDIMMER.LIB (Electromechanical > Motor Drivers),
  prefix U, model TEPACDIMMER.DLL (mixed).
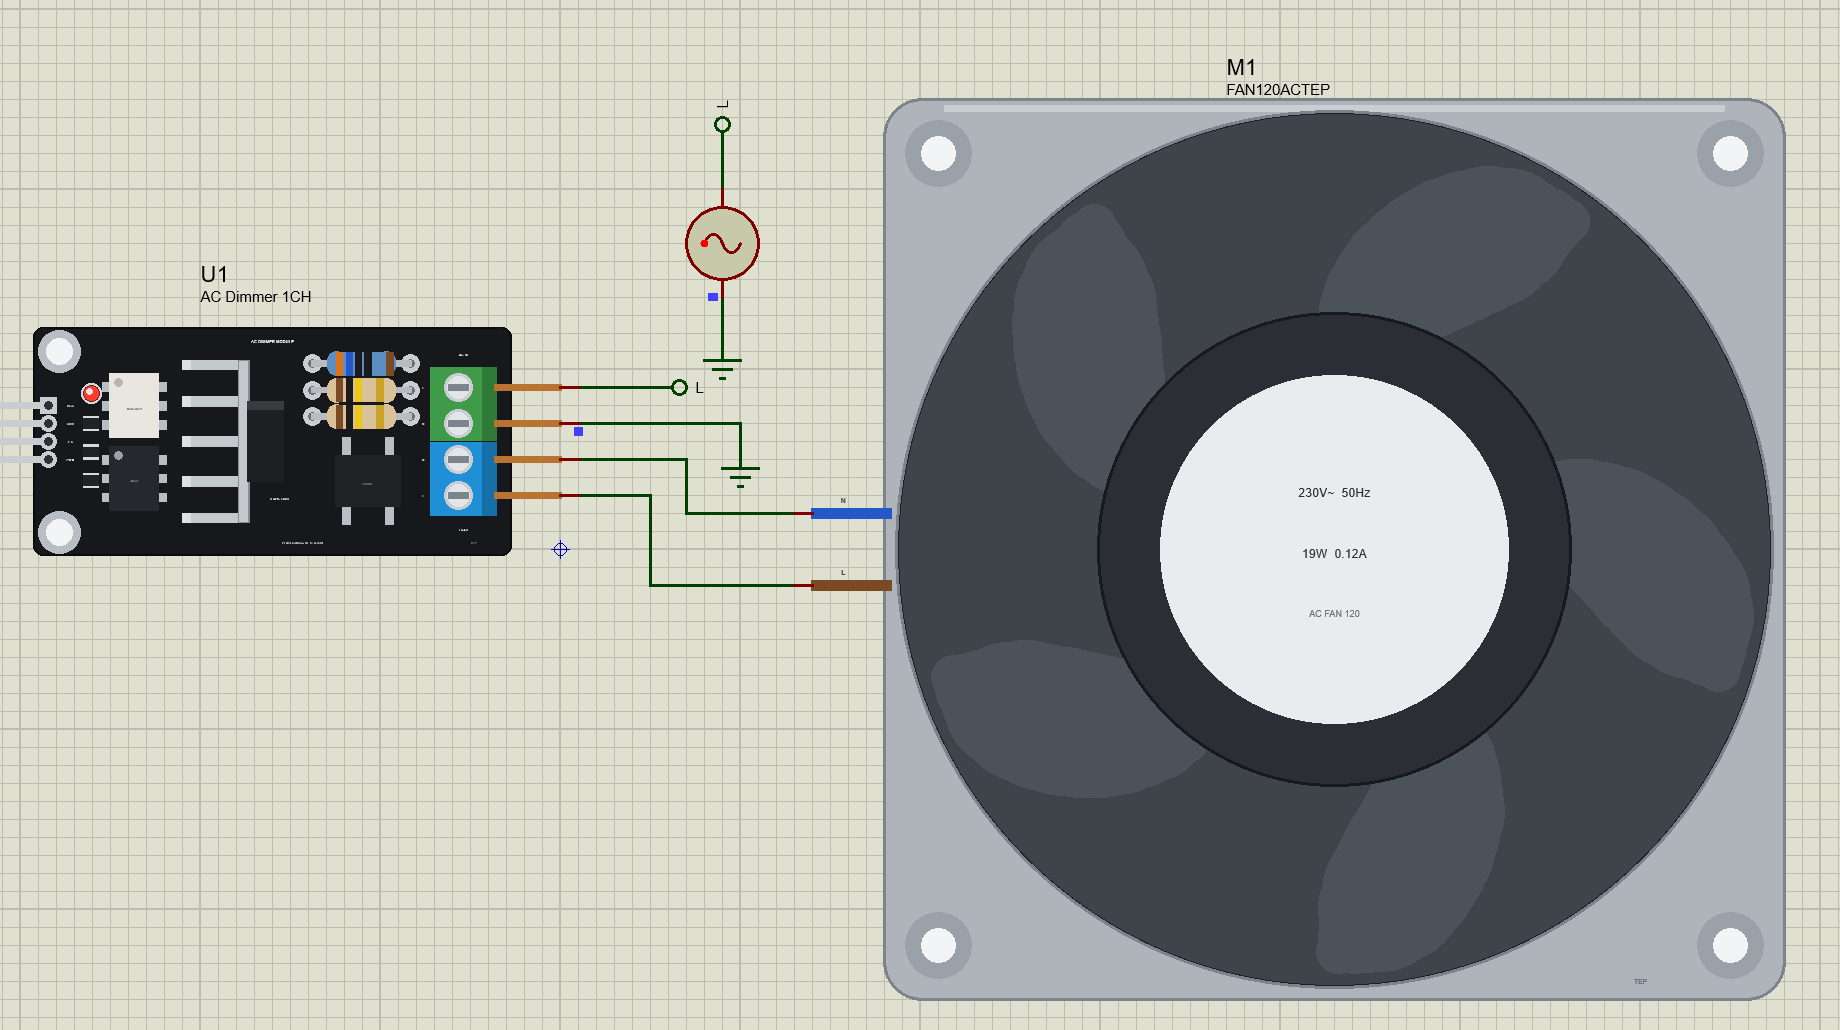
               Pins VCC, GND, Z-C (output), PWM (input) on the left; L-IN, N-IN (AC-IN) and N-OUT,
               L-OUT (LOAD) on the right. The name
               starts with D so that it sorts after the embedded ARDUINO UNO V4.0.
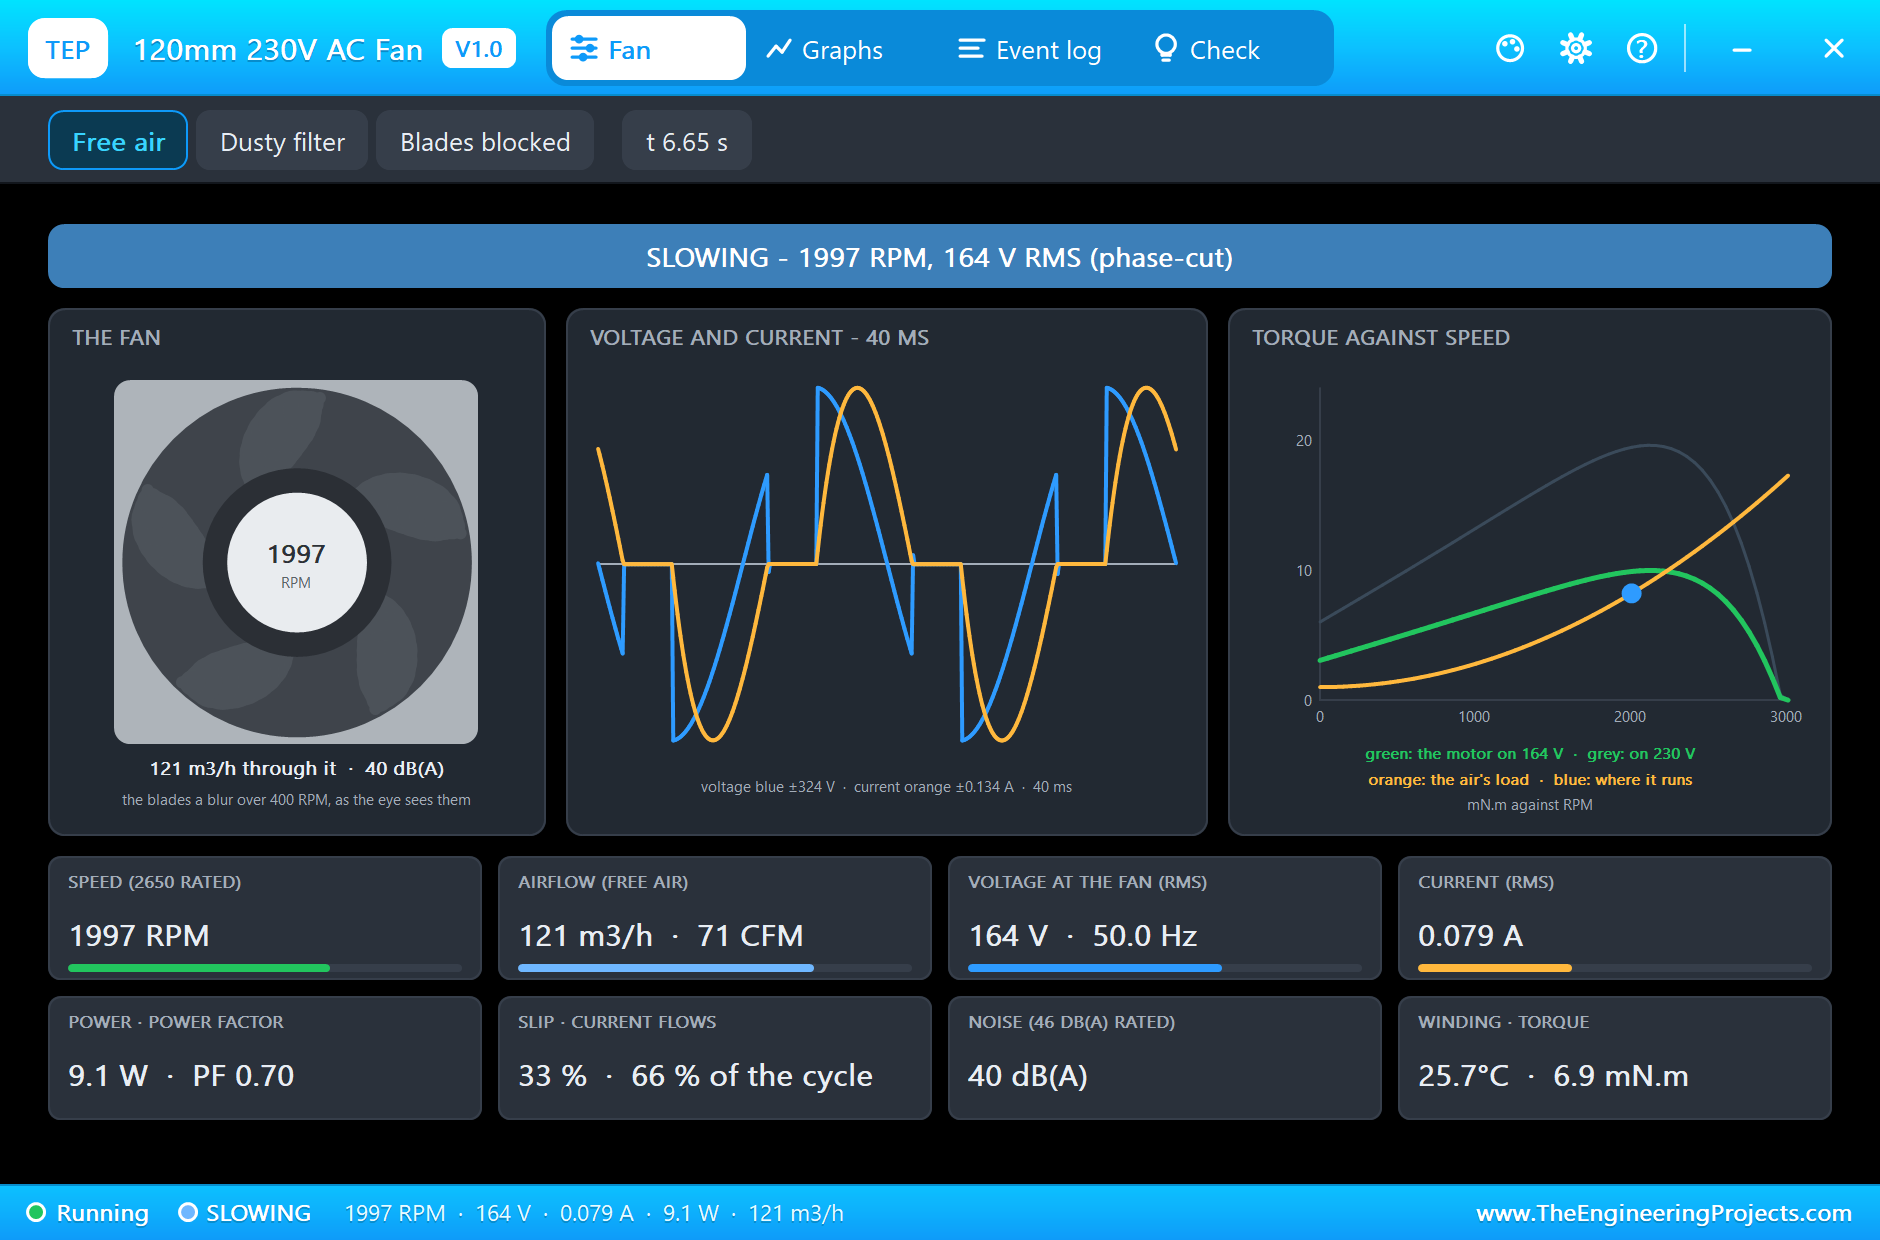
The demo's load is our 120 mm 230 V AC fan (FAN120ACTEP in TEPACFAN120.LIB / TEPACFAN120.DLL): a
separate library - install it from its own
package.

THE POP-UP
Click the part at Run. Tabs:
    Dimmer     the zero-cross and the gate (the mains with the Z-C pulses and the PWM pin under it,
    20 ms), the load's voltage and current
               (40 ms), the firing angle (one half-cycle with the part the load gets shaded), and
               eight live values: the mains, the firing
               delay and angle, the conduction angle, the load's voltage, current and power, the Z-C
               pulse, the triac's junction and loss.
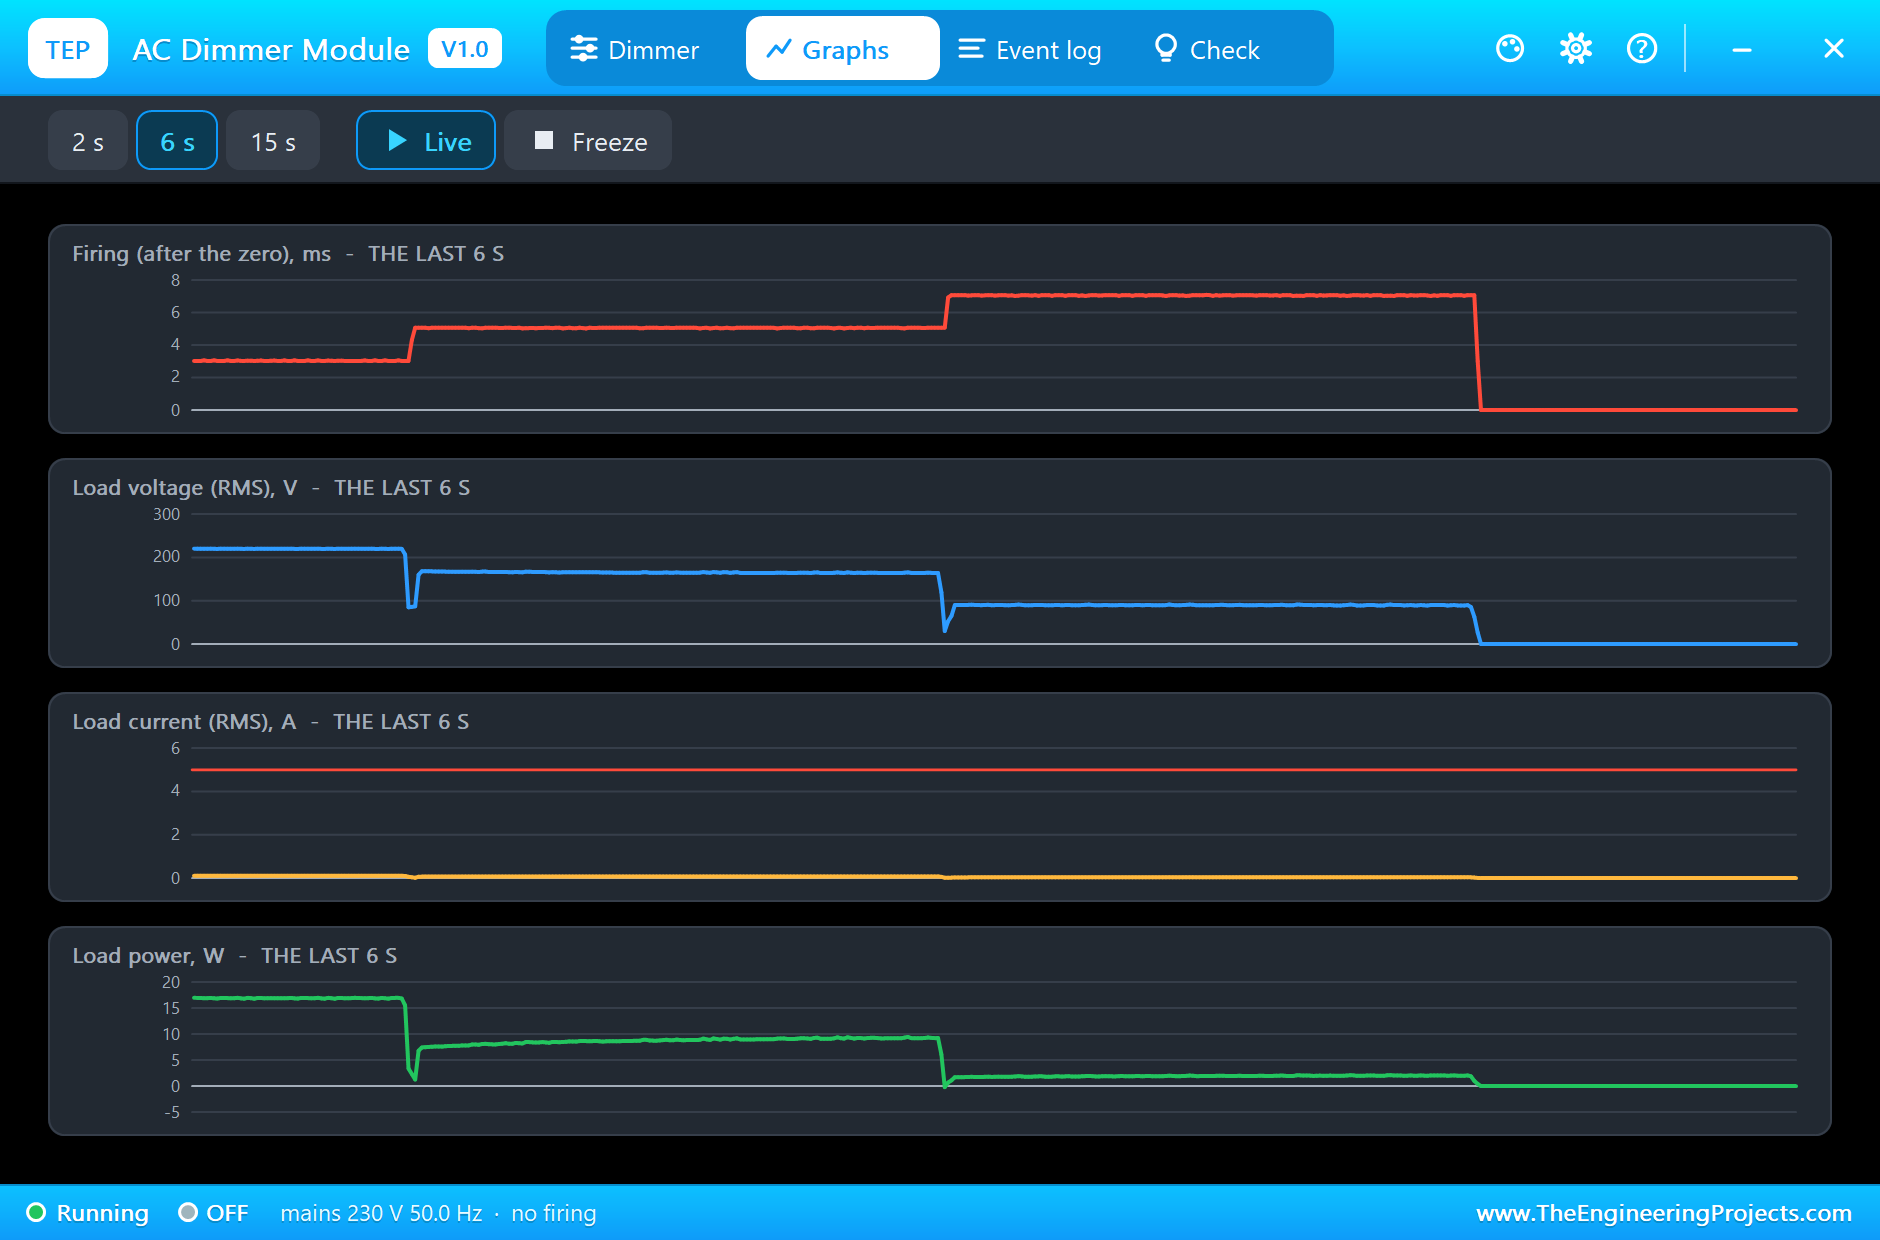
    Graphs     the live values over the last 2, 6 or 15 s. Live / Freeze.
    Event log  every change and warning; filters All / Changes / Warnings, Pause, Clear
    Check      what the part is doing and what to look at, each with a verdict (green = fine, amber
    = check, red = wrong)
    Settings   theme, text size, open at Run, window size
    Help       report a bug, suggest a feature, article, updates, donate, forum; Copy diagnostics
    for a bug report

TEST STATUS
V1.0: verified in Proteus 8.5 on 8 Nov 2026 (the demo project as shipped: an A4 sheet, an Arduino UNO V4.0).
What the runs showed (the model's own numbers and the sketch's monitor):
  * The project loads and starts cleanly; the 10 s program runs in about two and a half minutes on
    our PC (with both pop-ups open).
  * On 230 V 50 Hz (Proteus's ALTERNATOR, 325 V peak) with our 120 mm 230 V AC fan on LOAD: MAINS
    230 V at 50.0 Hz; Z-C pulses 1.03 ms
    wide, 100 a second, rising 0.51 ms before each zero (the sketch fires from the middle of the
    pulse); VCC 5 V.
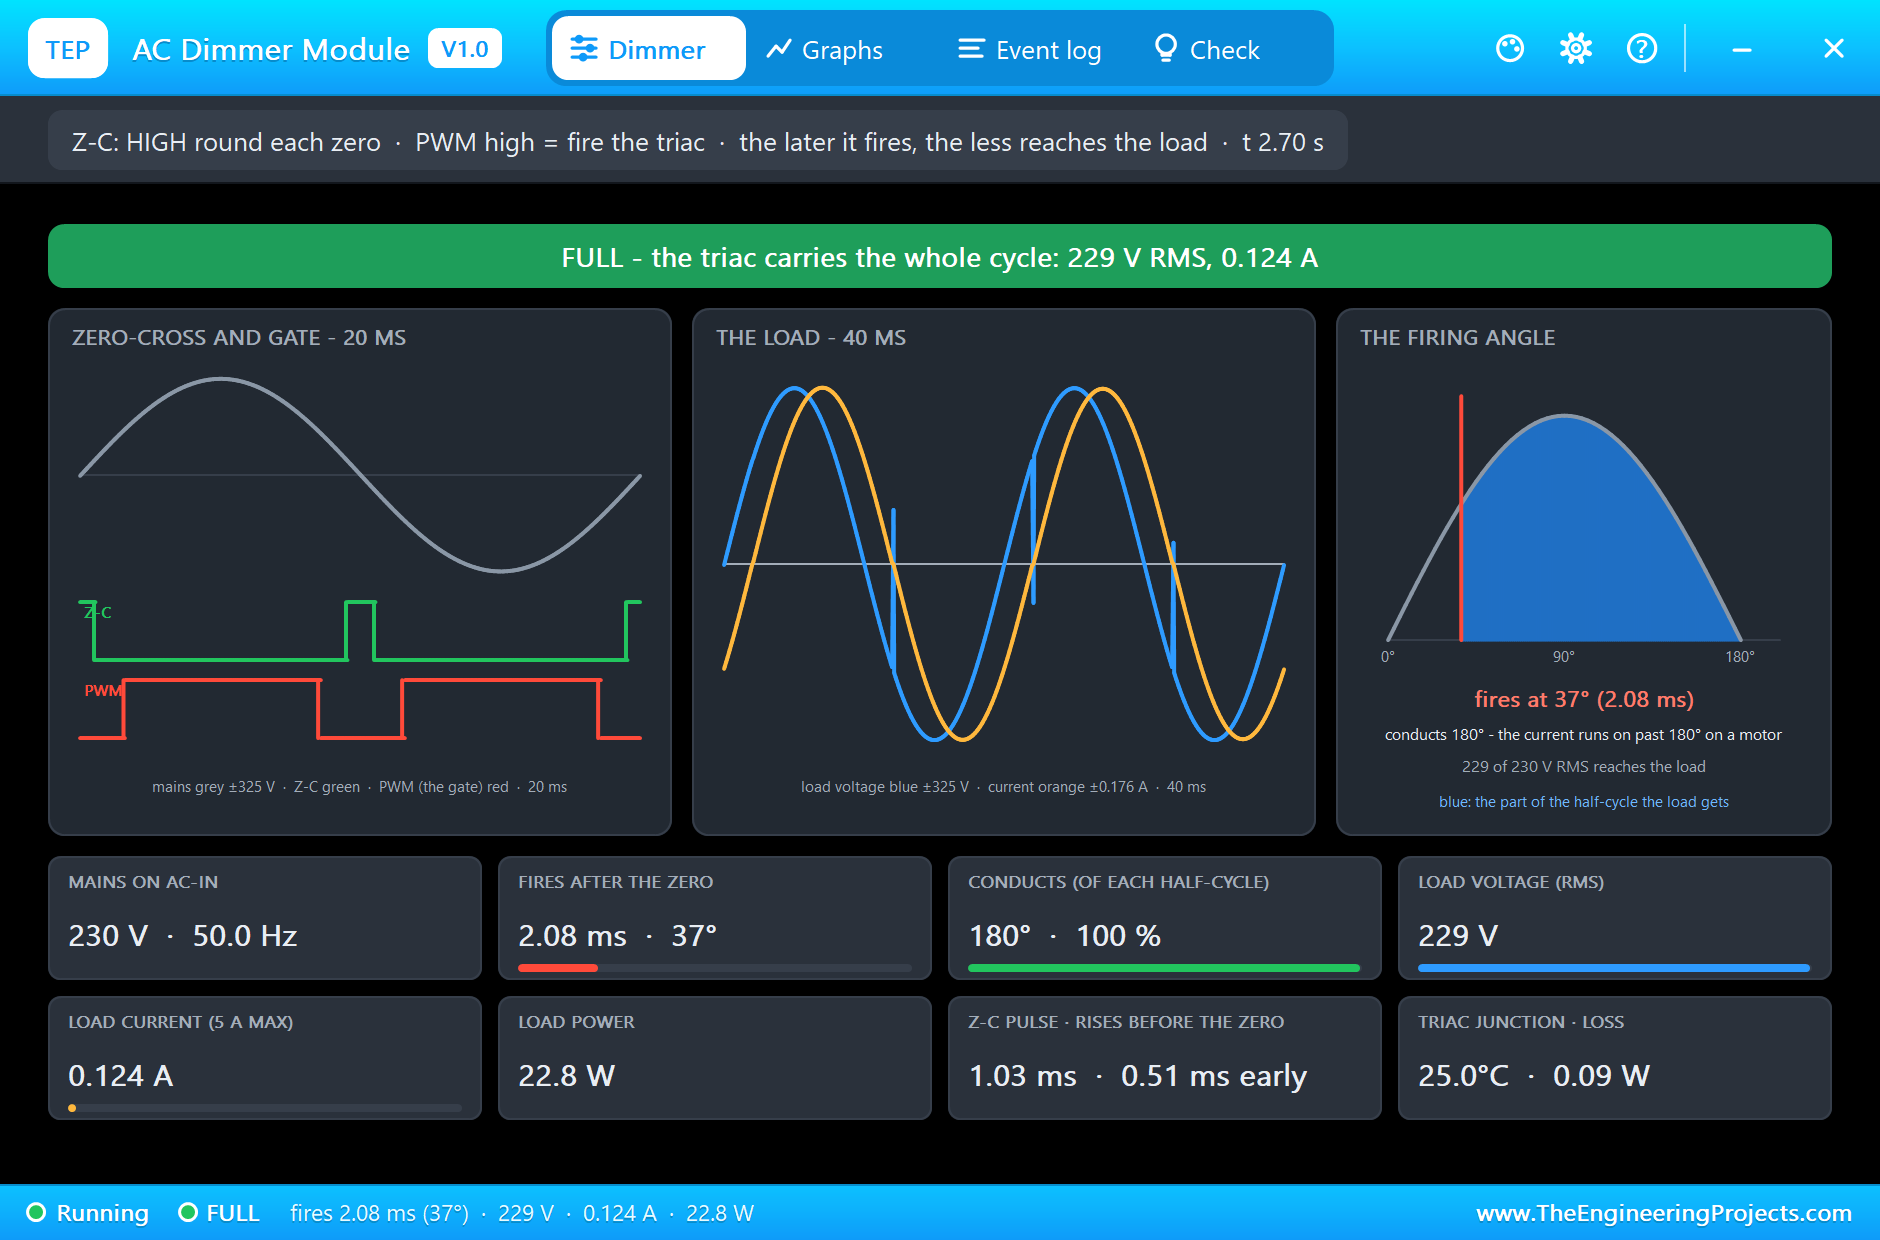
  * Fired 1.5 ms after each zero (gate held to 8.5 ms): FULL - the triac turns on at 2.08 ms, 37
    deg, where the fan's lagging current ends,
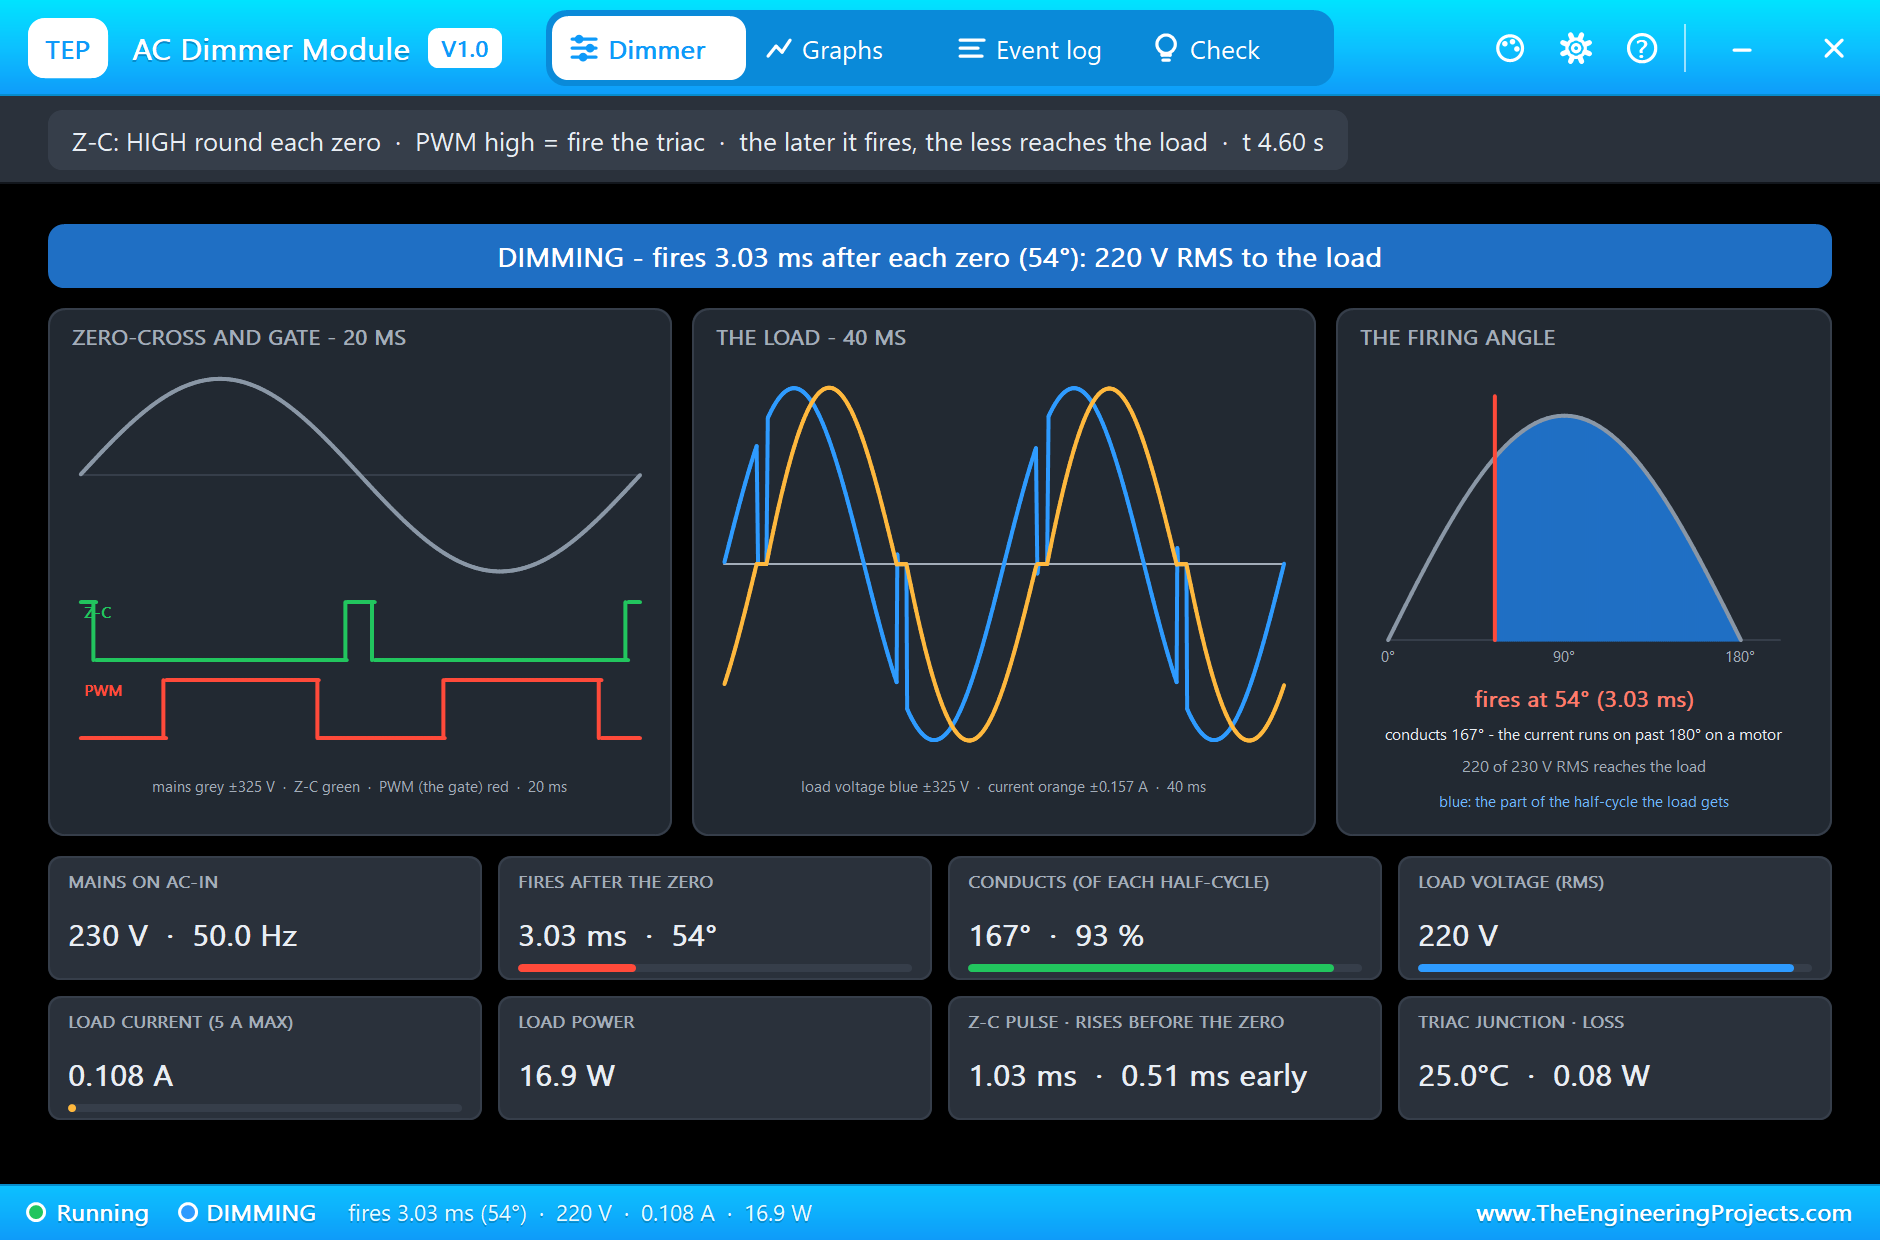
    and conducts 180 deg: 229 V RMS, 0.124 A, 22.8 W. Fired at 3 ms: on at 3.03 ms (54 deg), 167
    deg, 220 V, 0.108 A, 16.9 W.
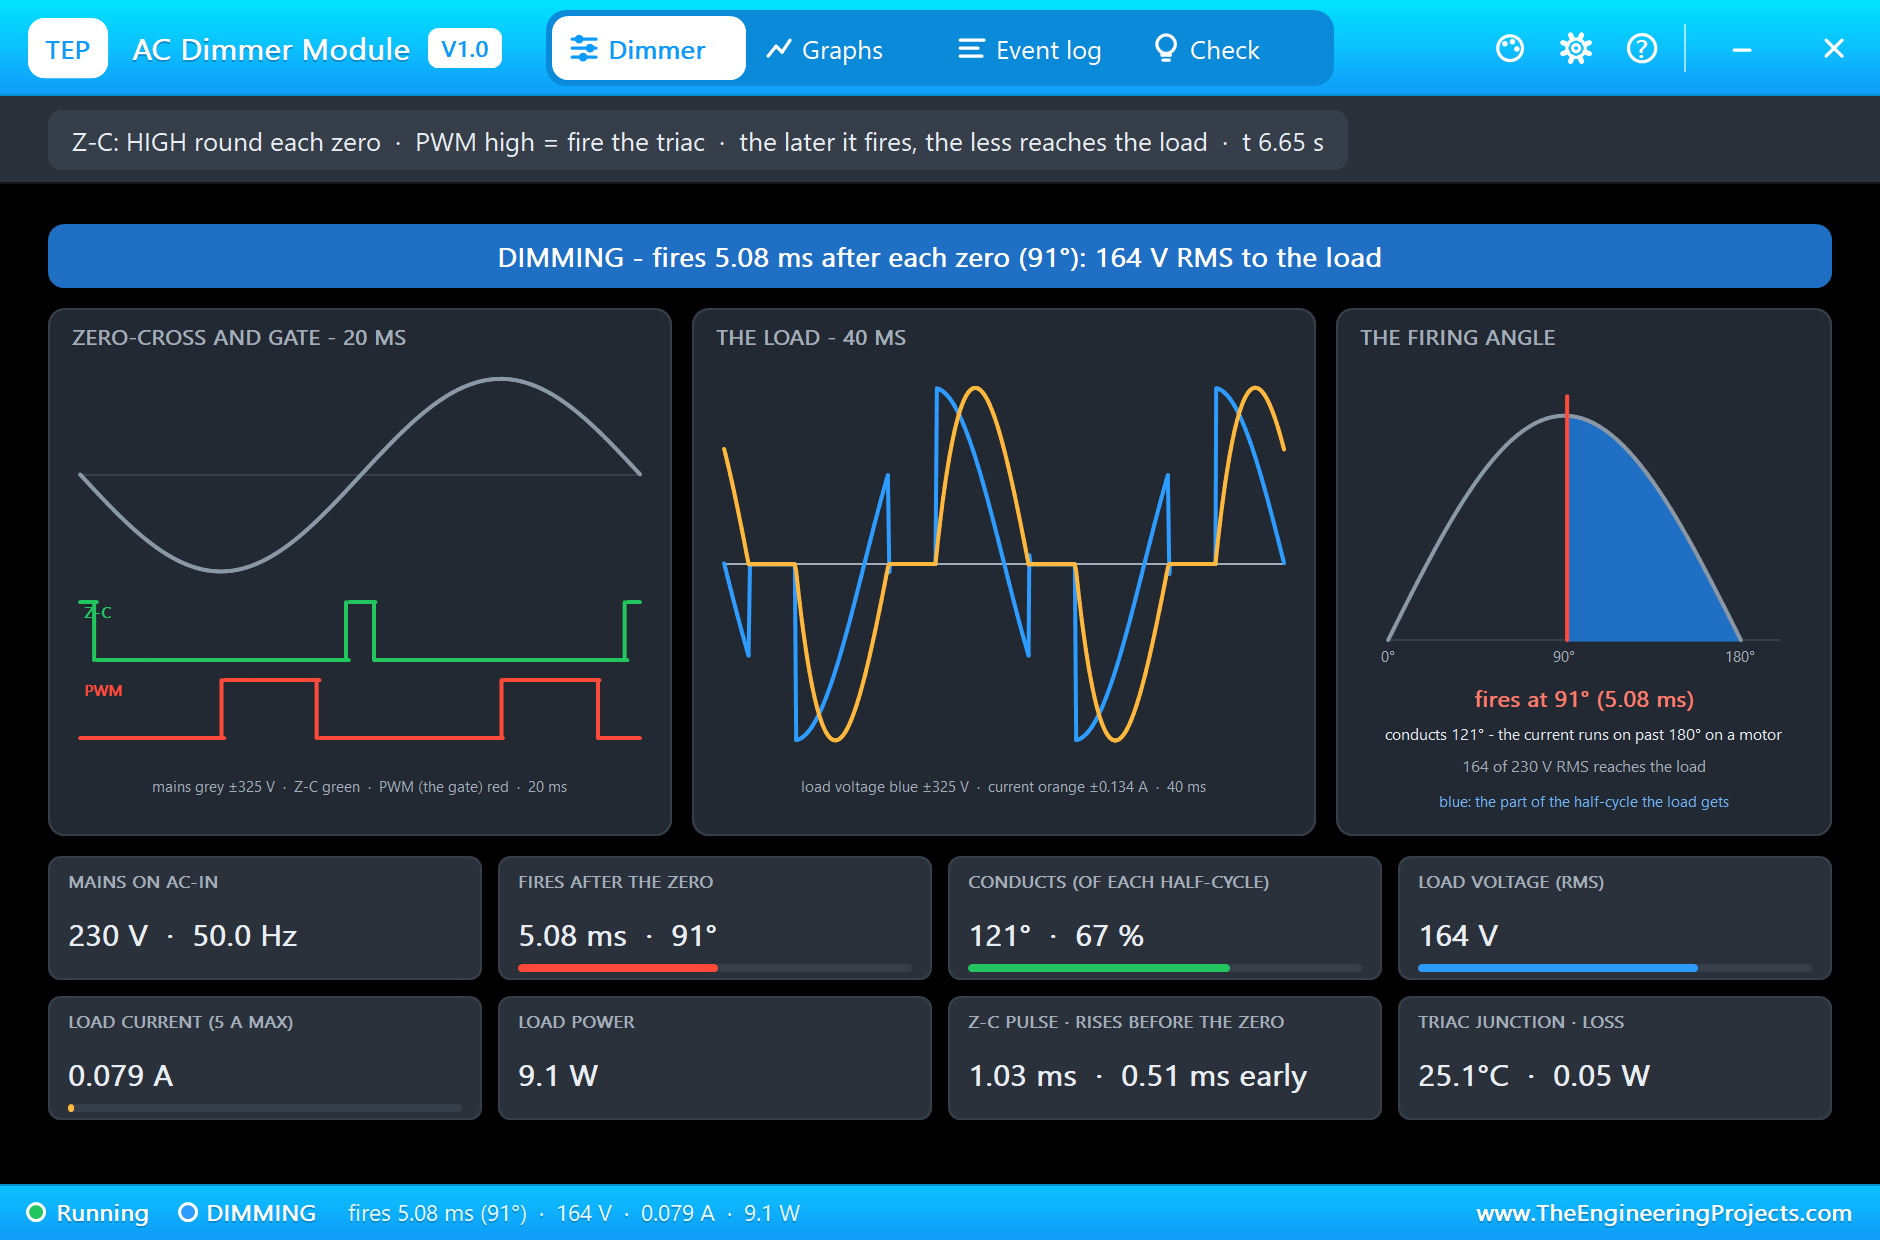
  * Fired at 5 ms: 5.08 ms (91 deg), 121 deg, 164 V, 0.079 A, 9.1 W (the fan SLOWING through 1997
    RPM); at 7 ms: 7.08 ms (127 deg), 79 deg,
    90 V, 0.039 A, 2.0 W; OFF at 9 s: no firing, nothing to the load. The triac's junction stayed at
    about 25 C (a 0.1 A load).
  * The pop-up: Dimmer (the zero-cross and the gate, the load, the firing angle), Graphs, Event log,
    Check - all four followed the run; the
    PWM LED glowed on the sheet with the gate.

INSTALLATION (about 2 minutes)
1. Close Proteus. Extract the WHOLE ZIP to a normal folder (e.g. Desktop).
2. Copy everything in "Proteus Library Files" (TEPACDIMMER.LIB and our Arduino library V4.0,
ArduinoV4TEP.LIB, with the ARDUINO UNO V4.0 used by the demo) to the LIBRARY folder of Proteus, for
example:
     C:\Program Files (x86)\Labcenter Electronics\Proteus 8 Professional\LIBRARY
   (use the folder that already holds Proteus's own .LIB files).
3. Copy TEPACDIMMER.DLL and TEPARDUINO.DLL from "Proteus Model Files" to the MODELS folder
(...\Proteus 8 Professional\MODELS).
4. Delete TEPACDIMMER.IDX from the LIBRARY folder if it is there (Proteus makes a new index).
5. Start Proteus. In Pick Devices (P) search "DIMMER".

RUN THE DEMO
"Proteus Simulation\ACDIMMER-FAN120AC-ArduinoUnoV4.pdsprj" (an A4 sheet) - keep the .hex file and
the DLLs beside the project.
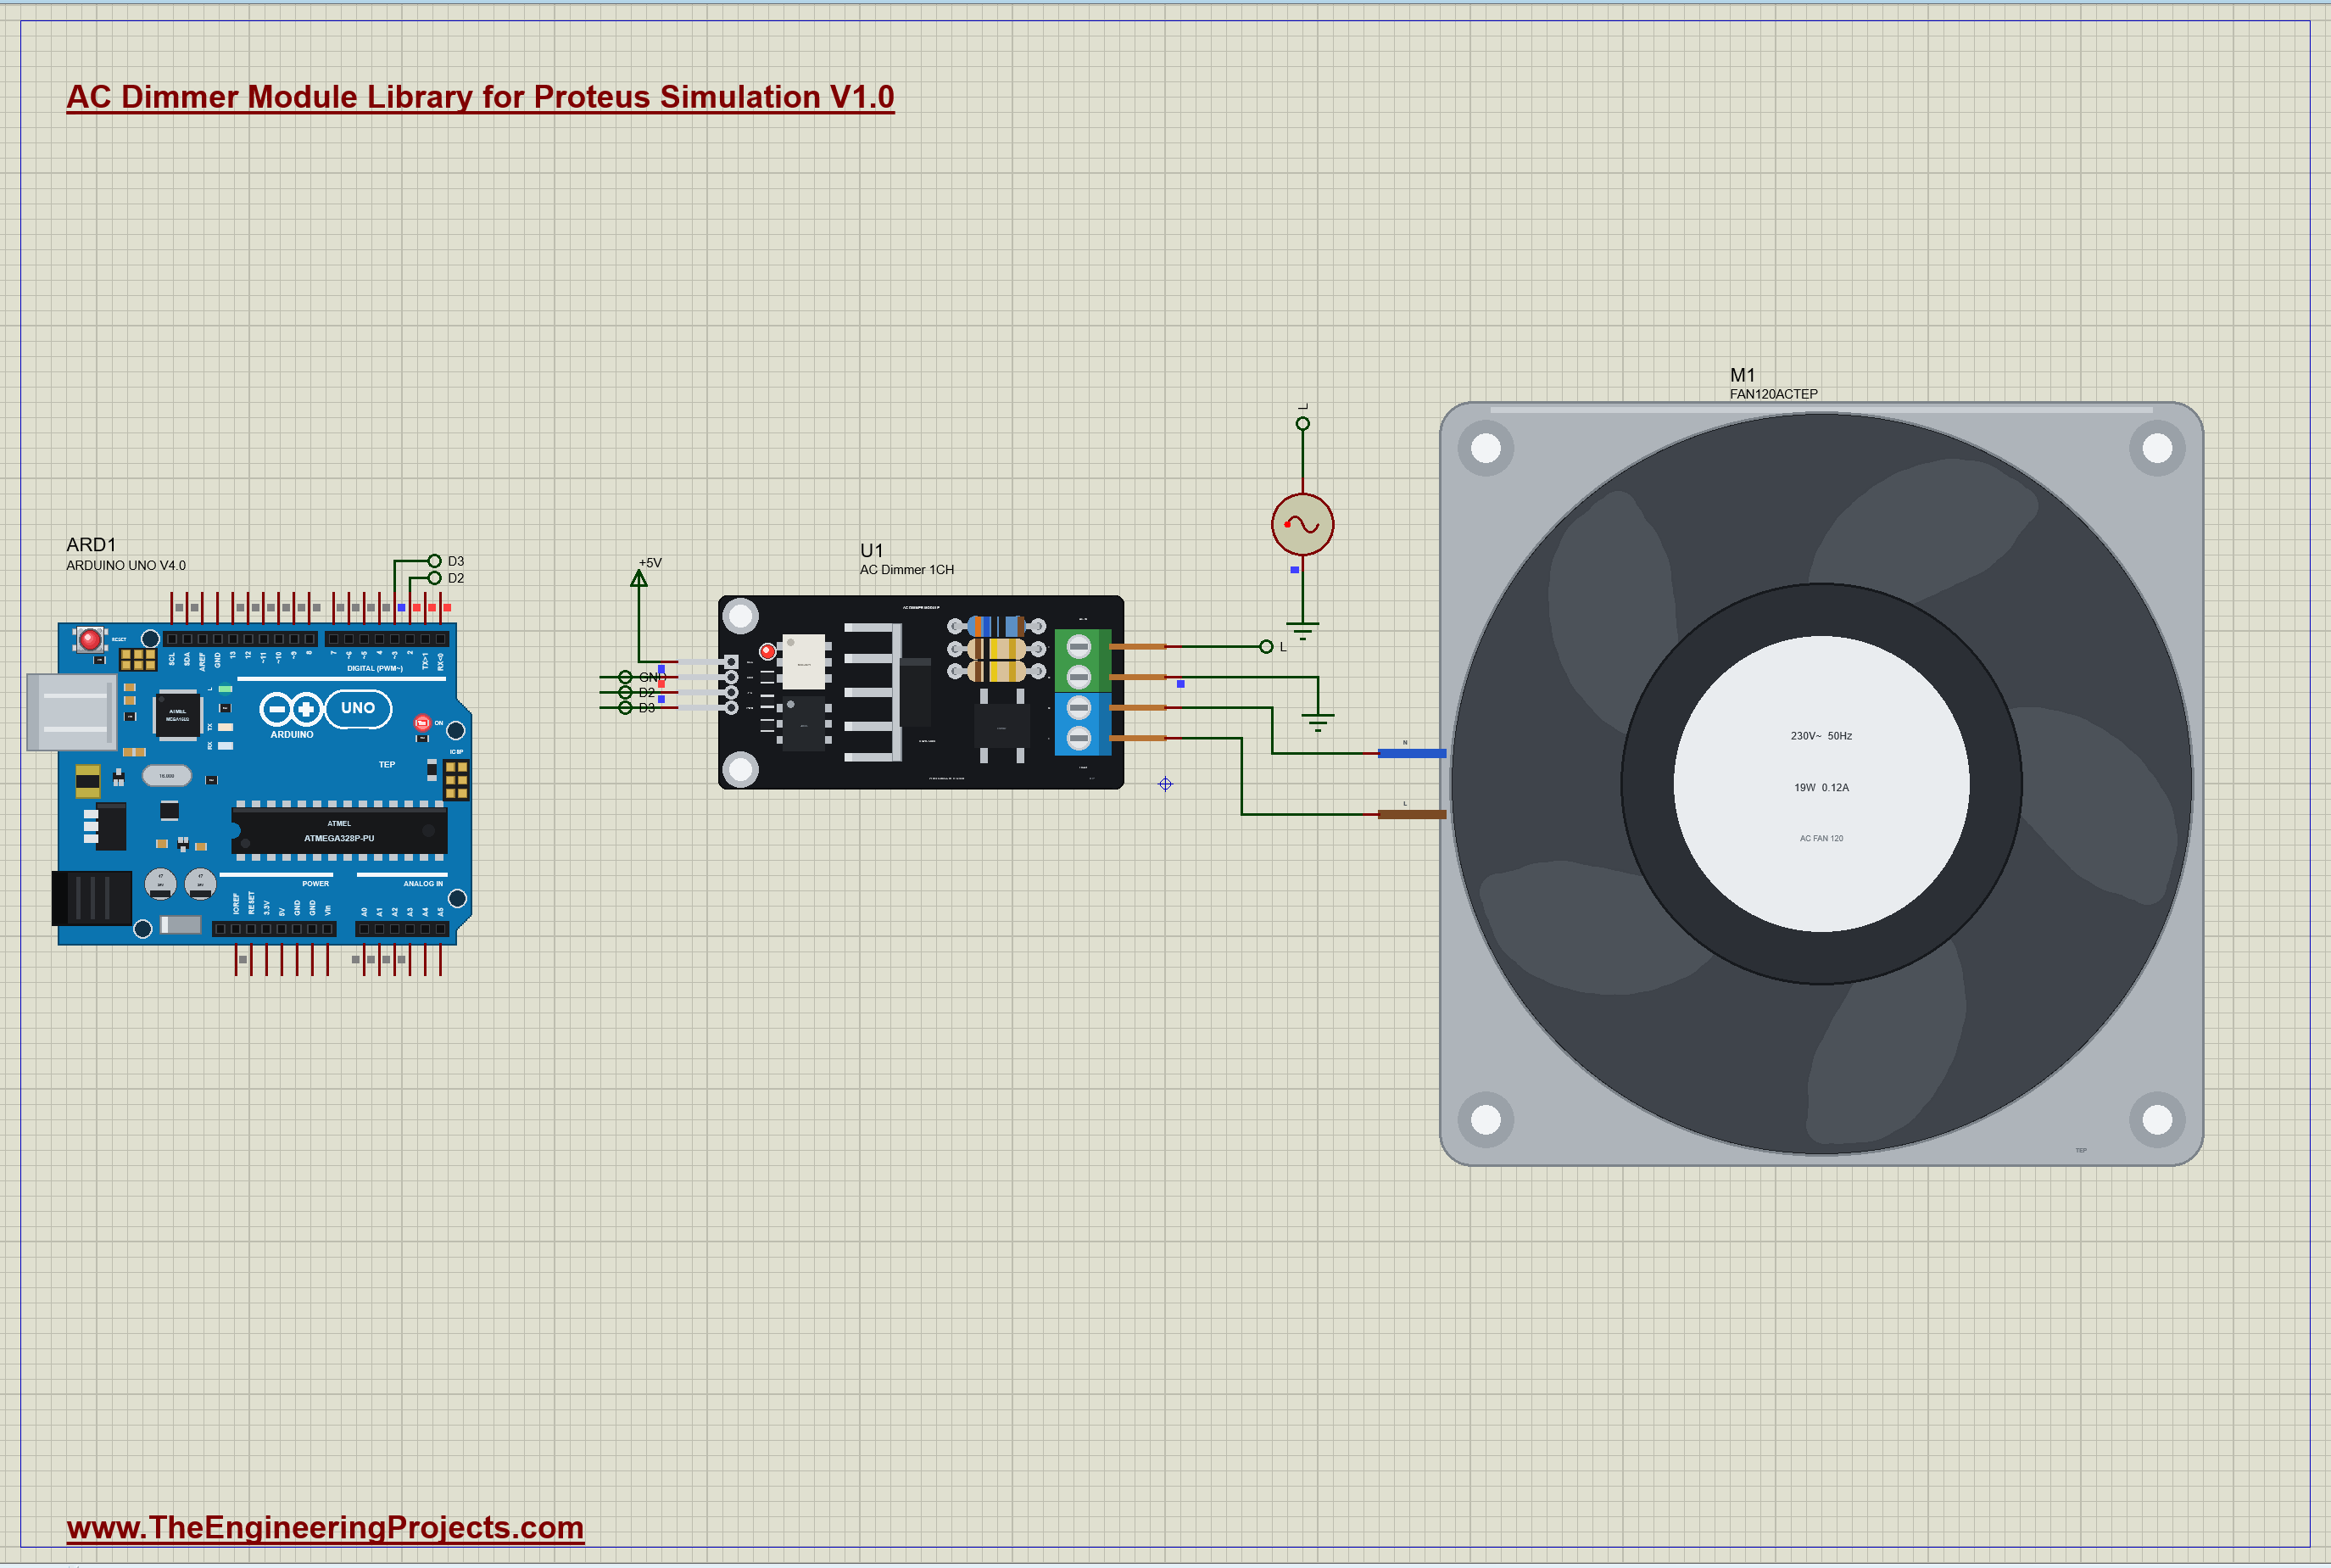
  ARD1:   Arduino UNO V4.0 running Dimmer_Demo.hex, its serial monitor built in (window "TEP Arduino
  UNO - ARD1").
  V1:     Proteus's ALTERNATOR: 325 V peak (230 V RMS), 50 Hz - its minus on the ground (the
  supply's earthed neutral).
  U1:     the AC dimmer module: AC-IN from V1, LOAD to the fan; Z-C to D2, PWM from D3, VCC on +5V.
  M1:     our 120 mm 230 V AC fan on LOAD (N and L).
  1. The UNO finds each zero (the middle of the Z-C pulse) and fires 1.5 ms after it: FULL - the
  fan's lagging current has not ended yet,
     so the triac carries the whole cycle.
  2. Firing at 3, 5 and 7 ms (3, 5 and 7 s): less of each half-cycle reaches the fan; OFF at 9 s.
Closed the monitor? Click the UNO's USB port.

WIRING (the same in Proteus and on a real board)
  VCC to 3.3 or 5 V, GND to the controller's ground; Z-C to an interrupt input (an UNO's D2), PWM to
  any output (D3 here).
  AC-IN: L and N of the mains. LOAD: N and L of the lamp, heater or motor. Never connect the logic
  side to the mains.
REAL HARDWARE:
 * Mains voltage kills: AC-IN, LOAD, the triac's tab and the heatsink carry 230 V. Build it in an
   enclosure, fuse the L line.
 * Motors and fans: their current lags the voltage. Hold PWM high for a few milliseconds (this demo
   holds it to 8.5 ms after the zero), or the
   triac can miss half-cycles. Some motors need a snubber across the triac; fans hum on a chopped
   voltage.
 * Find the true zero in the middle of the Z-C pulse: firing from its rising edge comes about half a
   pulse early.

THE DEMO SKETCH ON THE SERIAL MONITOR (Dimmer_Demo V1.0, 9600 baud)
The sketch runs its program, then waits. Type a command:
  d 3.5    fire 3.5 ms after each zero        o    off
EXPECTED MONITOR OUTPUT
  AC Dimmer Module - The Engineering Projects
  t=0.5 s: FULL - fire 1.50 ms after each zero
  t=1.0 s: Z-C 1.03 ms, 100 zeros/s, firing 1.50 ms

PROPERTIES (double-click the part > Edit Properties)
  (none: the board's parts are fixed)
Every run starts again from the properties.

LINKS.INI (OPTIONAL)
The Help page cards of the pop-up open web pages. To point them somewhere else without a new DLL,
put a text file named links.ini next to TEPACDIMMER.DLL with lines KEY=URL, for example:
  ARTICLE=https://www.theengineeringprojects.com/...
Keys: WEBSITE, FORUM, BUG_REPORT, FEATURE_REQUEST, ARTICLE, USER_GUIDE,
UPDATE_CHECK, DONATE. Only http:// and https:// links are used; lines starting
with # are comments.

TROUBLESHOOTING
* OFF / no firing: PWM is not reaching the board, or the delay is past the half-cycle (over 10 ms on
  50 Hz).
* NO LOAD: it fires but nothing draws current - check the LOAD terminal's wires.
* Z-C stays low: VCC is not connected (no pull-up), or there is no mains on AC-IN.
* The part is not simulated: TEPACDIMMER.DLL is missing from MODELS and from the project folder.
* The part is not simulated: TEPACDIMMER.DLL is missing from MODELS and from the project folder. No
  UNO / no monitor window: TEPARDUINO.DLL is missing, or click the UNO's USB port.

BUG REPORTS AND FEATURE REQUESTS
Please post them in our forum with a screenshot, the Serial Monitor text, the
simulation log and the pop-up's Copy diagnostics text:
  https://www.theengineeringprojects.com/forum/category/motor-driver-proteus-library

SUPPORT US
This library is free. If it saves you time, please support our work:
  https://www.theengineeringprojects.com/donate

WEBSITE
  https://www.theengineeringprojects.com/

LICENCES AND THIRD-PARTY NOTES
* The model (TEPACDIMMER.DLL), the symbols and artwork, the other parts of ours in the demo and the
  Arduino Library V4.0 (ArduinoV4TEP.LIB / TEPARDUINO.DLL, with its built-in TEP Serial Monitor
  Advance) are made by The Engineering Projects. The models use only standard Windows libraries; no
  Visual C++ redistributable is needed.
  The C++ source code is not included.
* Arduino UNO V4.0 (ArduinoV4TEP.LIB / TEPARDUINO.DLL, our Arduino Library V4.0 - its
  microcontroller is Proteus's own AVR model): The Engineering Projects,
  https://www.theengineeringprojects.com/2026/10/arduino-uno-library-for-proteus-v40.html
* The .hex file is built from the demo sketch and the Arduino AVR core 1.8.6, which includes
  LGPL-licensed code; its source code is available at
  https://github.com/arduino/ArduinoCore-avr/tree/1.8.6
* Proteus is a product of Labcenter Electronics and is not included. Arduino is a trademark of Arduino SA.
  This library is not made or endorsed by Arduino or Labcenter.

REBUILDING THE FIRMWARE (OPTIONAL)
The HEX file is supplied; Arduino IDE is not needed to run the demo. To edit the sketch, open
Arduino Code\Dimmer_Demo\Dimmer_Demo.ino, select Arduino Uno and use Sketch > Export Compiled
Binary. Replace the simulation's .hex with the exported HEX. The sketch needs 7,244 bytes of flash
and 300 bytes of RAM.

MODEL SCOPE AND LIMITS
Modelled: the triac's firing from the gate path (50 mA through 360 ohm), its one-way conduction
(0.85 V + 25 mohm) until its current
ends, the zero-cross from the mains through the droppers, the optocoupler (CTR 0.5) and the pull-up
to VCC, the timing of every Z-C edge, the
triac's loss and junction (14 K/W with the small heatsink - our figures).
Not modelled: dv/dt turn-on, the MOC3021's own LED current from PWM (any high level fires), radio
interference, the snubber (none on the board).

VERSION
TEP AC Dimmer Module library V1.0 (Nov 2026). Device DIMMERACTEP (TEPACDIMMER.LIB /
TEPACDIMMER.DLL). Demo sketch Dimmer_Demo V1.0. Demo board: ARDUINO UNO V4.0 (TEP Arduino Library
V4.0) with its built-in serial monitor; load: our 120mm 230V AC Fan library.Development1 release
 Development1 release
-
V1.0AC Dimmer Module Library for Proteus V1.0this page
V1.0 is the only release in the Download Center so far. When a newer version is published, it appears above with its own download page.
Installation8 steps
 Installation8 steps
From the download to a working project, in order. The steps follow what the package contains.
You will need
- Proteus Design SuiteProteus 8 or newer (Labcenter), on Windows
- Arduino IDE1.8 or 2.x, with the board of the tutorial chosen under Tools → Board
- Any archive toolWindows, macOS and Linux extract ZIP files on their own
Steps
- 1
Extract the archive
Right-click ac-dimmer-module-tep-v1-0-2dc3020d77804a2f9d86d19d51b219b7.zip and choose Extract All (or open it with 7-Zip or WinRAR) into a folder you can find again. Keep its folder structure (AC-Dimmer-Module-TEP-v1.0) as it is.
- 2
Copy the library files into Proteus
Move ArduinoV4TEP.LIB and TEPACDIMMER.LIB and the files into the LIBRARY folder of your Proteus installation: C:\Program Files (x86)\Labcenter Electronics\Proteus 8 Professional\LIBRARY for Proteus 8, or the matching Proteus 7 folder. Older versions keep it under ProgramData\Labcenter Electronics. If Proteus is open, close it first.
- 3
Add the simulation model
Copy TEPACDIMMER.DLL and TEPARDUINO.DLL into the MODELS folder next to LIBRARY, so the component can run, not only be drawn.
- 4
Restart Proteus and place the component
Start Proteus, open a schematic, press P (Pick Devices) and search for the component by the name used in the tutorial. It appears with its pins ready to wire.
- 5
Open the sketch in the Arduino IDE
Open Dimmer_Demo.ino, select your board and port under Tools, then Verify. Sketch → Export Compiled Binary writes the HEX file a simulation needs.
- 6
Load the HEX file
In Proteus double-click the microcontroller, set Program File to Dimmer_Demo.hex and run the simulation. For real hardware, flash the same file with your programmer.
- 7
Open the example simulation
Open ACDIMMER-FAN120AC-ArduinoUnoV4.pdsprj in Proteus to see the wiring exactly as in the tutorial. Check the controller's Program File path, then press Play.
- 8
Follow the tutorial
AC Dimmer Module Library for Proteus Simulation explains every connection and setting in order; keep it open beside the files while you build.
FAQs9 questionsContact TEP
 FAQs9 questions
How do I download AC Dimmer Module Library for Proteus V1.0?
Wait for the 30-second guest countdown on this page, then press the download button; the file comes straight from our storage. Members who are logged in skip the wait. If the browser opens the file instead of saving it, use its Save as option. The download link is made for you when the countdown ends and works for 15 minutes; a saved or shared link stops working, so share this page instead.
What is inside the archive?
AC Dimmer Module Library for Proteus V1.0 comes as a ZIP archive of 10 files (1.2 MB, 2.6 MB unpacked) holding Proteus library files, simulation model DLLs, a Proteus simulation, an Arduino sketch and compiled HEX firmware. Open the File Structure tab for the full list of 10 files.
What should I do if the download does not start?
Check the browser's download list first; an ad blocker or a company firewall can also hold it back, so try another browser or network. If the file arrives incomplete, download it again. For an installation problem, read the Install tab or tell us in the comments with your software version and the exact error message.
Is this file free?
Yes. Every file in the TEP Download Center is free for learning, personal and student projects. If you share it, link back to this page or the tutorial so others find the latest version.
How do I check that the file arrived complete?
Compare its SHA-256 with the one on this page, c706d7497897b1846cd27a9310662070ec543ee88fb40a1815bc9f0d8b45e262. In PowerShell run Get-FileHash "ac-dimmer-module-tep-v1-0-2dc3020d77804a2f9d86d19d51b219b7.zip"; on macOS or Linux run shasum -a 256 "ac-dimmer-module-tep-v1-0-2dc3020d77804a2f9d86d19d51b219b7.zip". The same value means the file is exactly the one in our storage; a different one means the download broke off, so download it again.
Do I need WinRAR to open the ZIP file?
No. Windows, macOS and Linux open ZIP archives on their own (Extract All, or double-click). WinRAR and 7-Zip work too. Extract the whole archive before using the files.
Where do I put the LIB and IDX files?
Both files go into the LIBRARY folder of your Proteus installation (Proteus 8: C:\Program Files (x86)\Labcenter Electronics\Proteus 8 Professional\LIBRARY; Proteus 7 has the same folder under its own name). Restart Proteus afterwards and search for the component with P.
Which Proteus version does the library need?
The tutorial names the Proteus version the library was made and tested with. Most TEP libraries work in Proteus 7 and Proteus 8; if the component does not appear after a restart, check that both the LIB and the IDX file were copied and that Proteus was fully closed while copying.
How do I get the HEX file into the simulation?
Compile the sketch in the Arduino IDE (Sketch → Export Compiled Binary gives you the HEX next to the sketch), then in Proteus double-click the board, set Program File to that HEX and run.
Members skip the wait. Log in or join TEP.

- 0Total downloads
- 4%Popularity
- ProteusCategory
- 0Comments
- ssyedzainnasirUploaded by
- 12 Nov 2026Uploaded at


 SHA-256
c706d7497897b1846cd27a9310662070ec543ee88fb40a1815bc9f0d8b45e262


 Need help with this file?
 Tags
Related Proteus
All Proteus tutorials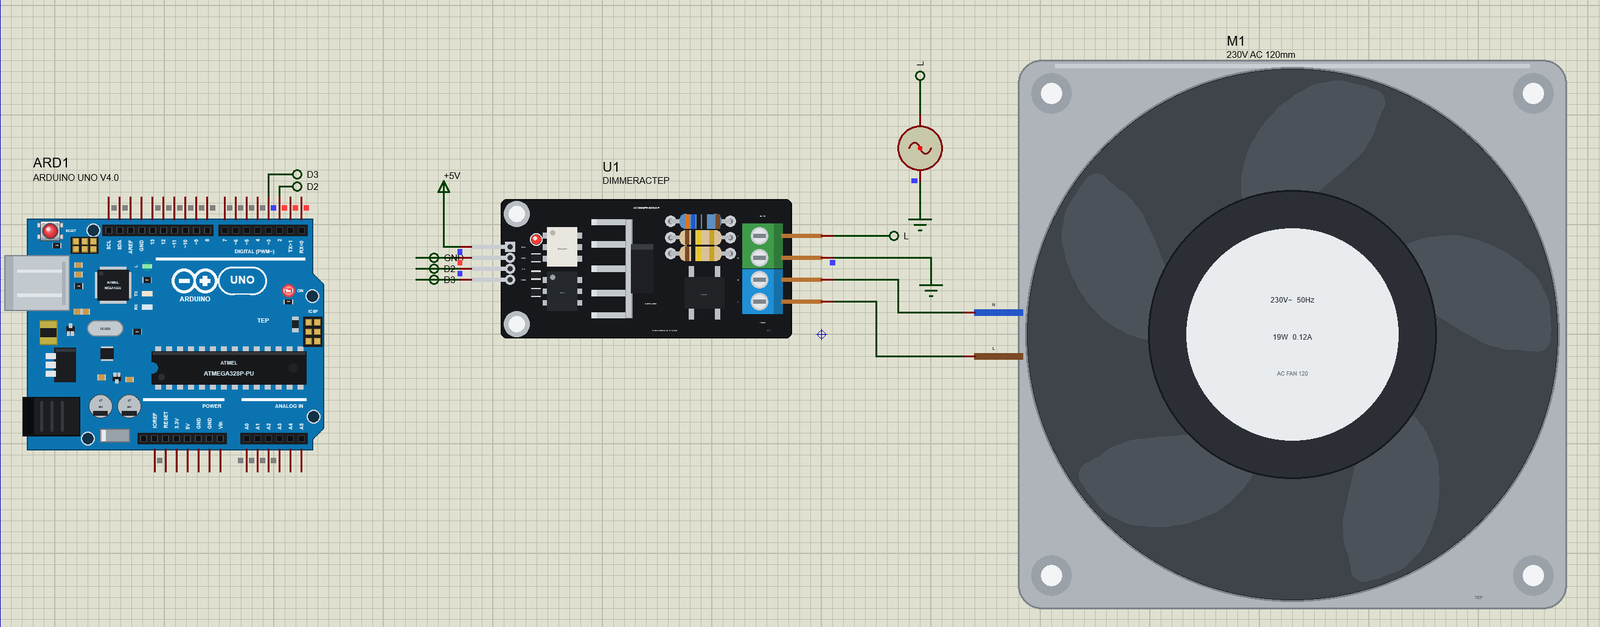


Comments
0