


Project Files of BMP280 Sensor Library for Proteus V1.1 (GY-BMP280 + Arduino)
 Libraries
 Code
 Projects
 Simulation
bmp280-tep-v1-1-69fc40253b774a95815d996fb31f5d9d.zip

BMP280 Sensor Library for Proteus V1.1
BMP280 Sensor Library for Proteus V1.1 comes as a ZIP archive of 51 files (1.6 MB, 3.4 MB unpacked) holding Proteus library files, simulation model DLLs, a Proteus simulation, an Arduino sketch, an Arduino library and compiled HEX firmware.
- LIBProteus library
- IDXProteus library index
- DLLProteus model
- DSNProteus simulation
- INOArduino sketch
- LIBArduino library
- HEXHEX firmware
Description
Looking for the files of BMP280 Sensor Library for Proteus V1.1 (GY-BMP280 + Arduino)? BMP280 Sensor Library for Proteus V1.1 is the ZIP package (1.6 MB) you need. It holds the Proteus library files (LIB and IDX), the simulation model (DLL), a ready Proteus simulation, an Arduino sketch, an Arduino library and the compiled HEX firmware. Below are the file structure, the README and the installation steps, so you can go from download to a working Proteus simulation in a few minutes.
What this library is
BMP280-Sensor-Library-for-Proteus-v1.1.zip with BMP280 Simple and Advance (TEPBMP280.LIB and TEPBMP280.DLL), the TEP Serial Monitor and Arduino UNO libraries for Proteus, the two-UNO barometer and altimeter simulation with its HEX file, the demo sketch with the Adafruit BMP280, BusIO and Unified Sensor libraries and a README.
This is version 1.1; older or newer releases, when they exist, are listed in the Development tab.
What is inside the ZIP file
- ArduinoV3TEP.LIB – Proteus library, 95.6 KB
- TEPBMP280.LIB – Proteus library, 73.9 KB
- TEPSERIALMON.LIB – Proteus library, 11.1 KB
- ArduinoV3TEP.IDX – Library index, 830 B
- TEPBMP280.DLL – Simulation model, 537 KB
- TEPSERIALMON.DLL – Simulation model, 978 KB
- and 45 more, all listed in the File Structure tab
The archive unpacks to 3.4 MB and carries its own README (README.txt), shown in the README tab above.
How to download
Use the download panel at the top of this page: after the counter (30 seconds for guests, 10 for members) the black button unlocks and the ZIP file comes straight from our content network. If the browser opens it instead of saving, use Save as; extract the whole archive before using anything inside it.
How to install
- Step 1: Extract the ZIP file with Windows (Extract All), 7-Zip or WinRAR, keeping its folders.
- Step 2: Close Proteus and copy ArduinoV3TEP.LIB, TEPBMP280.LIB and TEPSERIALMON.LIB and ArduinoV3TEP.IDX into its LIBRARY folder (Proteus 8: C:\Program Files (x86)\Labcenter Electronics\Proteus 8 Professional\LIBRARY).
- Step 3: Copy TEPBMP280.DLL and TEPSERIALMON.DLL into the MODELS folder next to it, so the part simulates.
- Step 4: Start Proteus, press P and search for "ArduinoV3TEP"; place and wire it as in the tutorial.
- Step 5: In the Arduino IDE use Sketch → Include Library → Add .ZIP Library, then restart the IDE.
- Step 6: Open BMP280_Demo.ino, bmp280test.ino and bmp280_forced.ino and 12 more in the Arduino IDE, pick board and port and Verify (Export Compiled Binary gives the HEX).
- Step 7: In Proteus set the controller's Program File to BMP280_Demo.hex; on hardware, flash the same file.
- Step 8: Open BMP280-ArduinoUnoV3.pdsprj in Proteus and press Play.
Read the detailed guide
This page is for the files. The full tutorial, BMP280 Sensor Library for Proteus V1.1 (GY-BMP280 + Arduino), explains the circuit and the code step by step and shows the working results and the simulation; read it before you build. Questions about the download or the installation go in the comments below; more Proteus downloads are listed further down this page.

File Structure
 File Structure
6.4 KB2.5 KB2.3 KB2.6 KB14.7 KB7.9 KB1.4 KB349 B1 KB2.7 KB0 B6.1 KB0 B2.6 KB1 KB465 B1.1 KB1 KB805 B963 B991 B8.9 KB12.2 KB3.7 KB3.2 KB2.2 KB9.2 KB1.1 KB252 B14 KB5.4 KB340 B1.1 KB525 B4.1 KB3.6 KB9.5 KB381 B11.1 KB12 KB830 B95.6 KB73.9 KB11.1 KB537 KB978 KB24.6 KB53 KB537 KB978 KB27.2 KBGallery12 images from the tutorialOpen the tutorial
 Gallery12 images from the tutorial
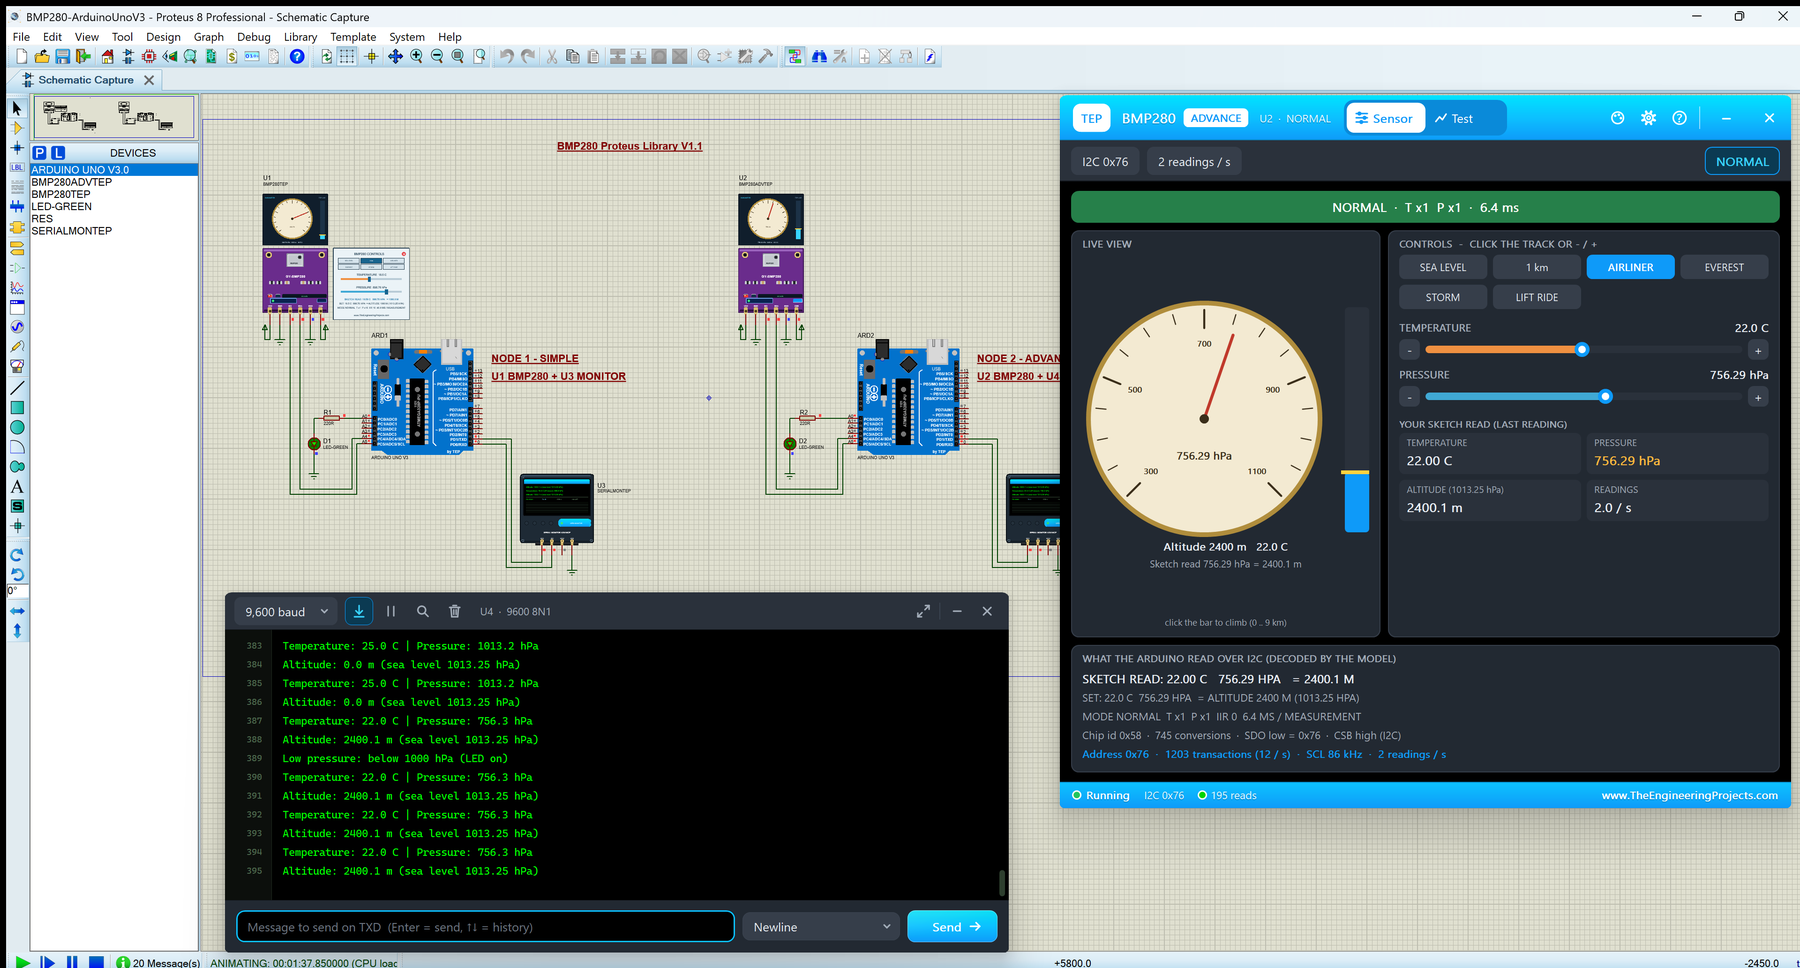
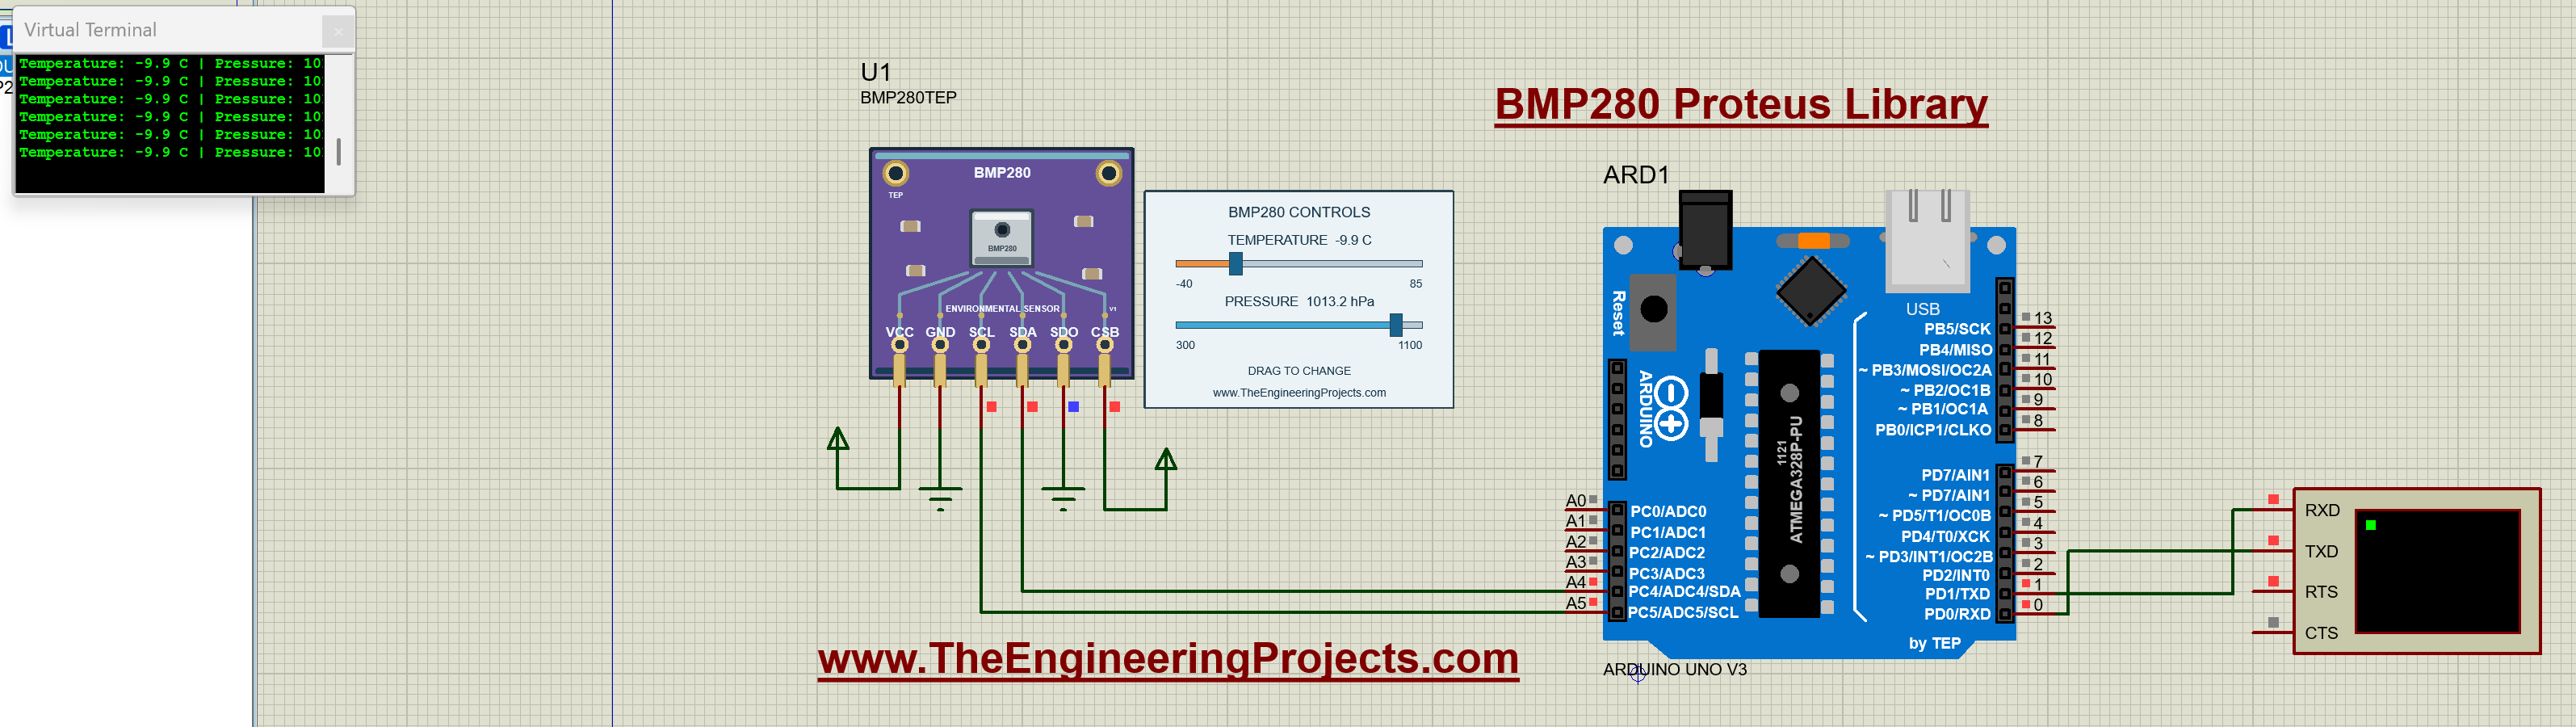
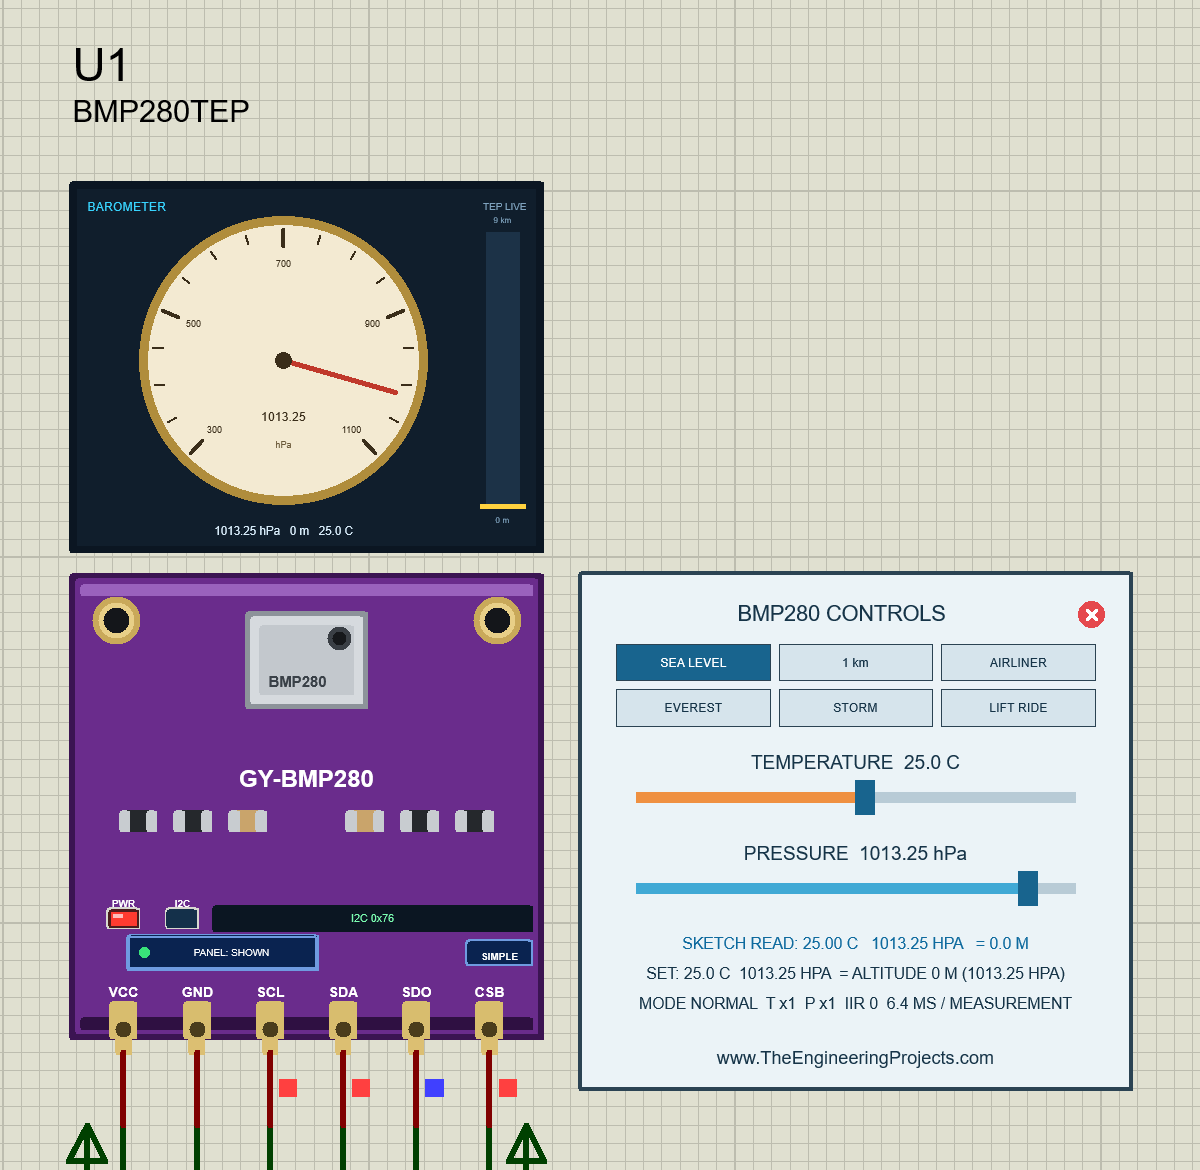
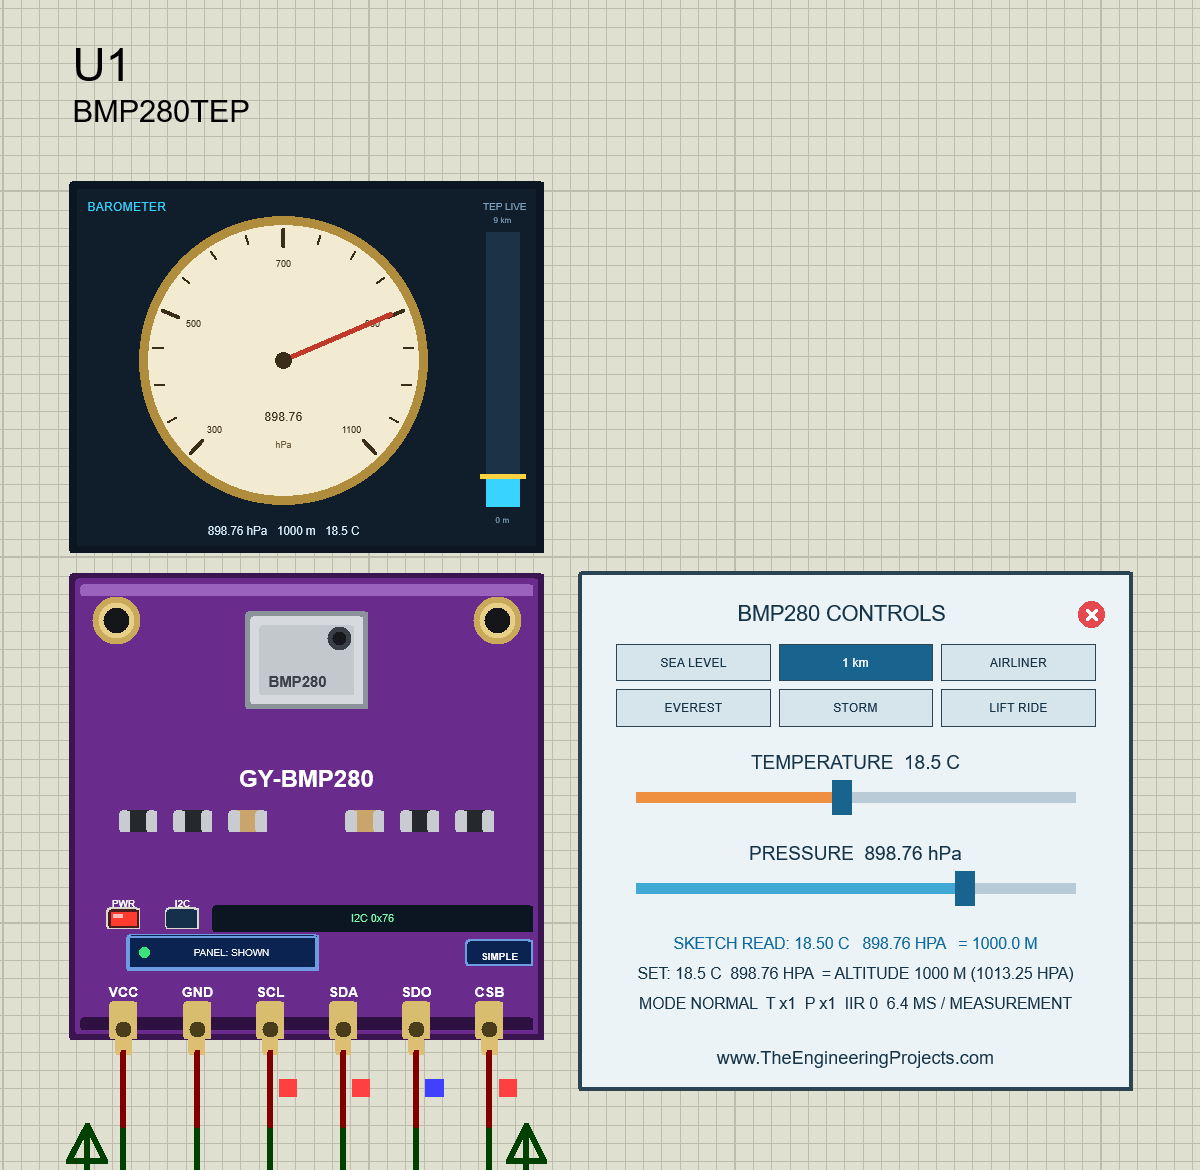
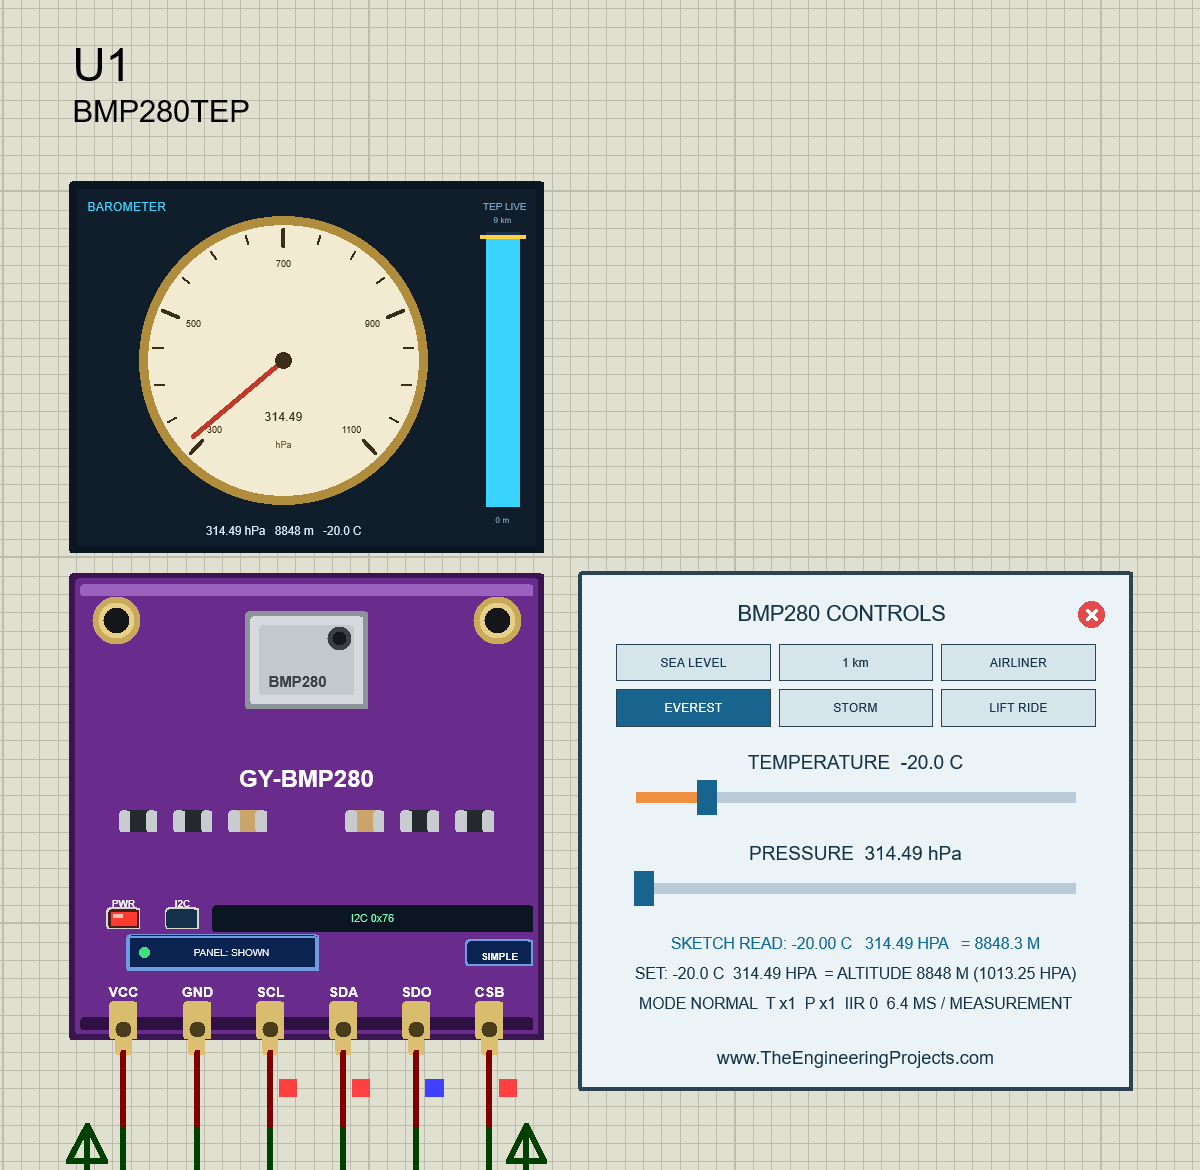
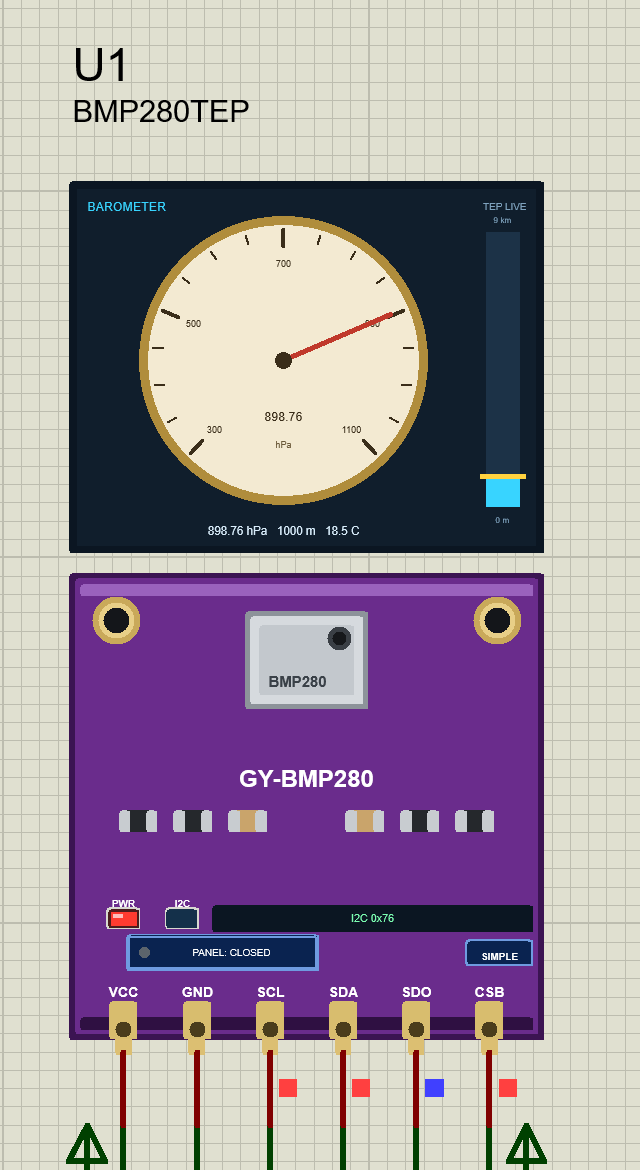
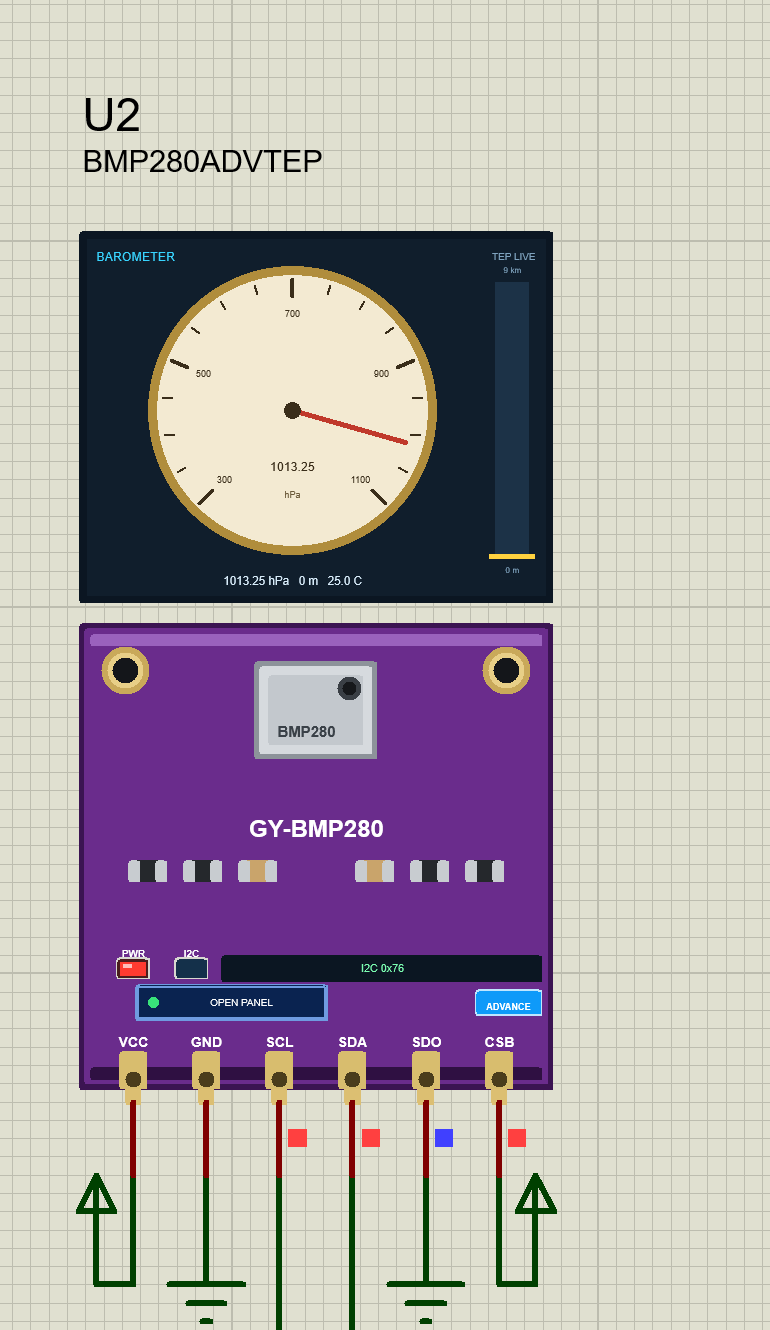
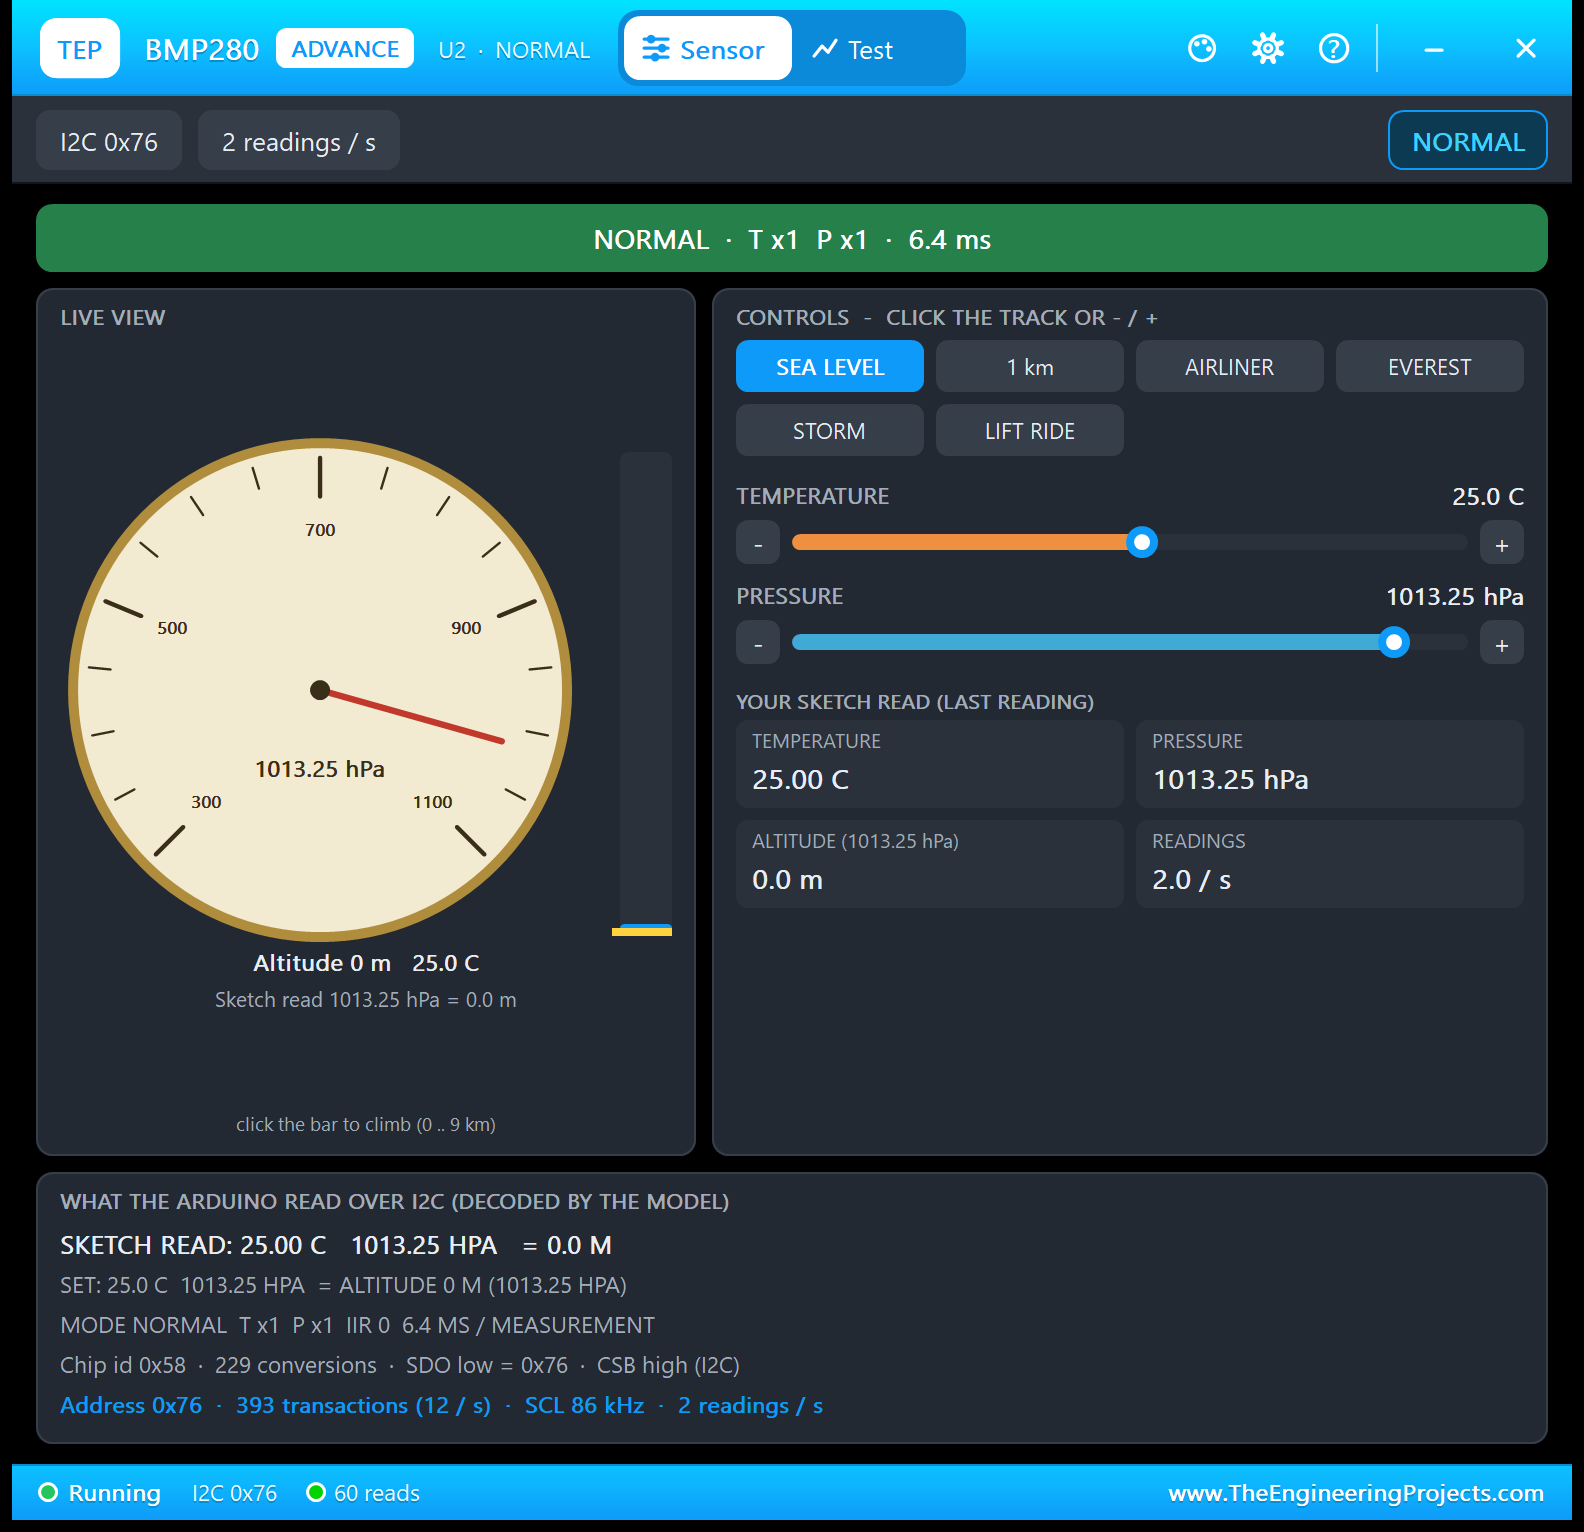
The circuit, the board and the results as they appear in BMP280 Sensor Library for Proteus V1.1 (GY-BMP280 + Arduino). Open an image for its full size.
README
 README
BMP280 PRESSURE SENSOR (GY-BMP280) LIBRARY FOR PROTEUS - V1.1
Designed by The Engineering Projects
www.TheEngineeringProjects.com

IMPORTANT LINKS
Article (read it first - pictures, step by step, every feature explained):
  https://www.theengineeringprojects.com/2026/09/bmp280-proteus-library.html
Report a bug or suggest a feature (our forum):
  https://www.theengineeringprojects.com/forum/category/bmp280-proteus-library
The demo uses our TEP Serial Monitor Advance (included) instead of Proteus's
Virtual Terminal - its own article:
  https://www.theengineeringprojects.com/2026/10/serial-monitor-advance-proteus-library.html
Support us (the libraries are free):
  https://www.theengineeringprojects.com/donate

FILE STRUCTURE
BMP280-TEP-v1.1/
|-- Proteus Library Files/
|   |-- ArduinoV3TEP.IDX                          0.8 KB   its index -> LIBRARY folder
|   |-- ArduinoV3TEP.LIB                         95.6 KB   TEP Arduino UNO (demo) -> LIBRARY folder
|   |-- TEPBMP280.LIB                            73.9 KB   BMP280 Simple + Advance (2 devices) -> LIBRARY
|   |-- TEPSERIALMON.LIB                         11.1 KB   TEP Serial Monitor Advance -> LIBRARY folder
|-- Proteus Model Files/
|   |-- TEPBMP280.DLL                           537.0 KB   the TEP I2C sensor model -> MODELS
|   |-- TEPSERIALMON.DLL                        978.0 KB   Serial Monitor model -> MODELS folder
|-- Proteus Simulation/
|   |-- BMP280_Demo.hex                          53.0 KB   both UNOs (the demo sketch v1.1)
|   |-- BMP280-ArduinoUnoV3.pdsprj               24.6 KB   demo: UNO 1 + BMP280 Simple, UNO 2 + Advance
|   |-- TEPBMP280.DLL                           537.0 KB   copy of the model so the demo runs as is
|   |-- TEPSERIALMON.DLL                        978.0 KB   copy of the monitor model
|-- Arduino Code/
|   |-- BMP280_Demo/BMP280_Demo.ino               6.4 KB   sketch (source of the .hex)
|   |-- libraries/Adafruit_BMP280_Library/       35.6 KB   Adafruit BMP280 3.0.0, MIT, 9 files
|   |-- libraries/Adafruit_BusIO/                77.0 KB   Adafruit BusIO 1.17.4, MIT, 24 files
|   |-- libraries/Adafruit_Unified_Sensor/       40.6 KB   Unified Sensor 1.1.15, Apache 2.0, 6 files
|-- README.txt                                  ~27.0 KB   this file
Total: 3.39 MB (unzipped). The C++ source code of the model is not included.

WHAT IS IT?
A simulation model of the Bosch BMP280 barometric pressure + temperature sensor
on the common purple GY-BMP280 breakout, for Proteus 8. Your Arduino talks to it
over I2C exactly as to the real chip (address 0x76 with SDO low, 0x77 with SDO
high; CSB high = I2C) and the popular Adafruit BMP280 library runs unmodified:
begin, readTemperature, readPressure, readAltitude, setSampling (SLEEP / FORCED
/ NORMAL, oversampling x1 .. x16, the IIR filter, the standby time),
takeForcedMeasurement, reset. The model holds the chip's calibration words
(dig_T1 .. dig_P9) and turns your temperature and pressure into the raw 20-bit
ADC values the Bosch compensation formula expects - your sketch computes the
result itself, as with the real sensor. Measurements take their datasheet time
(1.25 + 2.3 ms per temperature and pressure sample + 0.575 ms), NORMAL mode
repeats them after the standby time, the IIR filter smooths them. You set the
temperature and the pressure with sliders, presets (SEA LEVEL, 1 km, AIRLINER,
EVEREST, STORM, LIFT RIDE) or by clicking the altitude bar above the board.
The part looks like the GY-BMP280: the purple board, the two gold mounting
holes, the BMP280's silver metal lid with its vent hole, the small resistors
and capacitors and the GY-BMP280 print. Above the board sits an animated
instrument window: a barometer dial (300 .. 1100 hPa) with a needle that moves
with the pressure, and an altitude bar (0 .. 9 km) - click it to climb. On the
board: a red PWR LED and a blue I2C LED that flashes for every I2C transaction
to this sensor - a TEP addition (the real GY-BMP280 has no LED) - and the live
I2C address (0x76 / 0x77, "I2C OFF" when CSB is low).

TWO DEVICES IN ONE LIBRARY (search "BMP280" in Pick Devices):
  BMP280 Simple     device BMP280TEP      "BMP280 Pressure Sensor (GY-BMP280) - Simple"
                    On-Sheet Panel: a control panel on the schematic next to the
                    board - six presets, the two sliders of v1.0 (drag them:
                    TEMPERATURE, PRESSURE) and what your sketch READ over I2C
                    (decoded by the model: "SKETCH READ: 25.00 C 1013.25 HPA =
                    0.0 M"), the set values and the mode, oversampling and
                    filter your sketch chose. The red X in the panel's header
                    closes it, the PANEL button on the board opens it again.
                    Your v1.0 designs keep working with this device.
  BMP280 Advance    device BMP280ADVTEP   "BMP280 Pressure Sensor (GY-BMP280) - Advance"
                    Pop-Up Panel: only the board on the schematic; at Run a TEP
                    pop-up window opens - the same look as the TEP Serial Monitor
                    (move it by its header, resize it, minimise it). The tabs
                    Sensor and Test sit in the header; the gear and ? icons open
                    Settings and Help; the palette icon switches the theme:
                      Sensor    the live barometer (click the altitude bar to
                                climb), the presets, a click-slider with - / + for
                                both inputs, the last reading as big tiles, and
                                what the Arduino read over I2C (the values, the
                                altitude, the mode, the chip id, SDO / CSB, the
                                I2C address and the measured SCL clock)
                      Test      four tools measured on the model with your sketch:
                                I2C check, Timing, Step response, Altitude (see
                                THE TEST TOOLS below)
                      Settings  theme (TEP Dark / Light), text size, open at Run,
                                window size - remembered for your Windows user
                      Help      Help & Support like the TEP Serial Monitor: report a
                                bug, suggest a feature, article, user guide,
                                updates, donate, website, forum; Copy diagnostics
                                (the inputs, what was read, the registers, the last
                                transactions, the test results) for a bug report
                    The OPEN PANEL button on the board opens the window again
                    after you close it.
Both devices use the same model (TEPBMP280.DLL) and the same properties.

NEW IN V1.1
* Two devices: BMP280 Simple (panel on the sheet, close / open) and BMP280
  Advance (pop-up window with the live barometer, four test tools, settings and
  help) - see above.
* Board: the real GY-BMP280's look (purple, two gold holes, the silver BMP280
  lid with its vent) with an animated instrument window above it (barometer
  dial + altitude bar), PWR / I2C LEDs (a TEP addition), the live I2C address,
  a PANEL / OPEN PANEL button and a SIMPLE / ADVANCE badge.
* Model - counters for the test tools (every conversion with its start and end
  time); the measurement timing, IIR filter and standby of v1.0 are unchanged
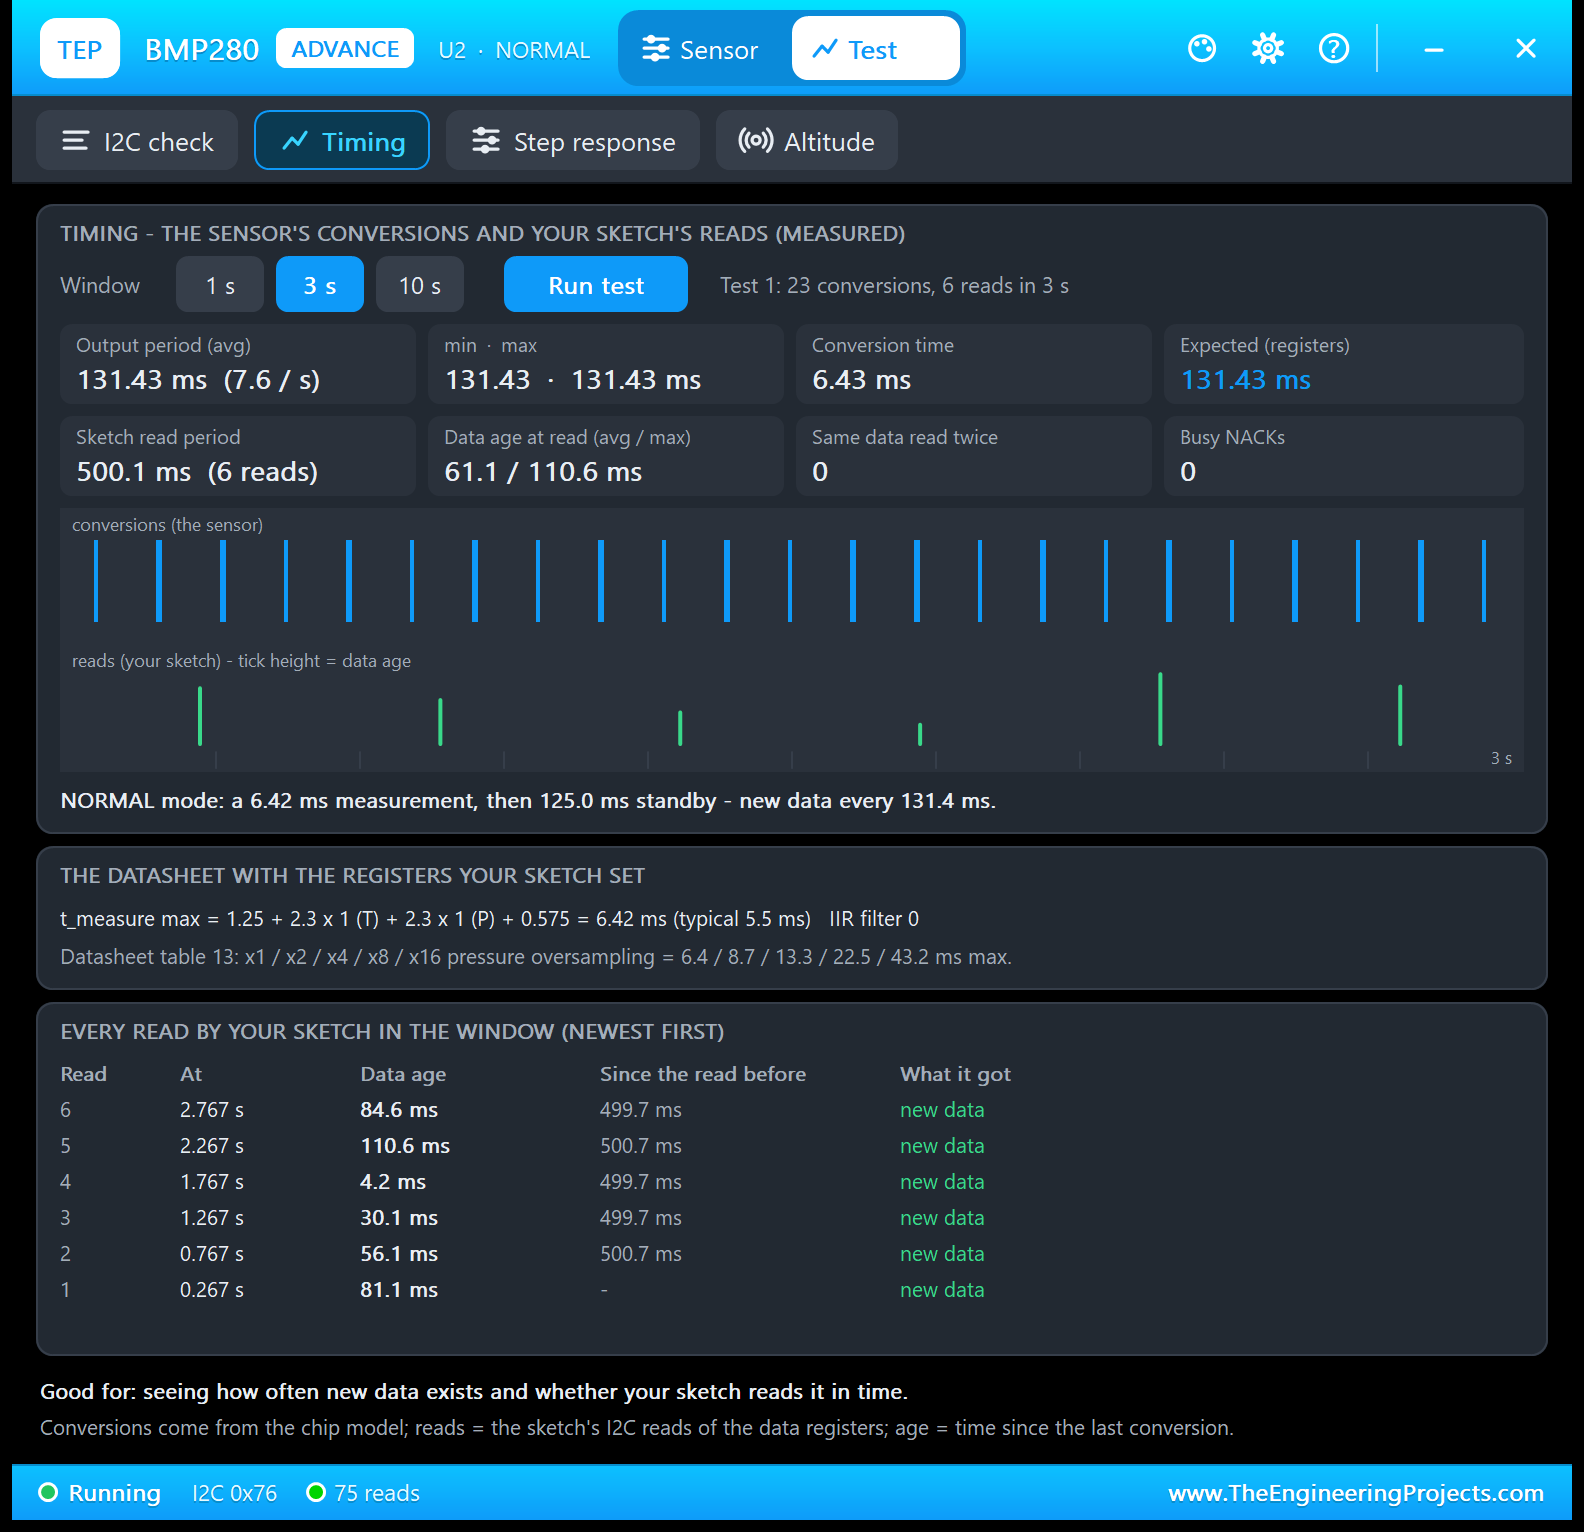
  and now visible: the Timing tool shows a 6.43 ms measurement every 131.4 ms
  with the demo's settings.
* Model - the datasheet rule "writes to config in NORMAL mode may be ignored"
  (v1.0 already ignored them) is now reported: the I2C check marks the config
  register when a write was ignored and the requested filter / standby is not
  in effect. The v1.1 demo puts the chip to SLEEP before it changes them.
* Model - an I2C transaction log (every read / write decoded: "write ctrl_meas
  = 27", "read press_msb -> " with the raw bytes) and the measured SCL clock.
* The demo: ONE project with two UNOs - UNO 1 with BMP280 Simple, UNO 2 with
  BMP280 Advance - each with the TEP Serial Monitor Advance instead of the
  Virtual Terminal (U3 = UNO 1, U4 = UNO 2, quick buttons) and an LED on A0.
* The demo sketch (v1.1) keeps every v1.0 line and adds: the altitude line, a
  low-pressure LED (below 1000 hPa), and the Serial Monitor commands HELP,
  STATUS, SEA, ALT, MODE, OS, FILTER, STANDBY. It prints nothing periodically
  except the readings.
* Version 1.1 everywhere; the C++ source code is no longer included (and
  neither is the Arduino AVR core archive - its GitHub link is below).

TEST STATUS
v1.1: verified in Proteus 8.5 on 8 Oct 2026 (the demo run from this package's
Proteus Simulation folder):
  * start-up: "TEP BMP280 Demo v1.1 - type HELP in the Serial Monitor", then
    "Temperature: 25.0 C | Pressure: 1013.2 hPa" and "Altitude: 0.0 m";
  * the 1 km preset: 18.5 C, 898.8 hPa, "Altitude: 1000.1 m", "Low pressure:
    below 1000 hPa (LED on)";
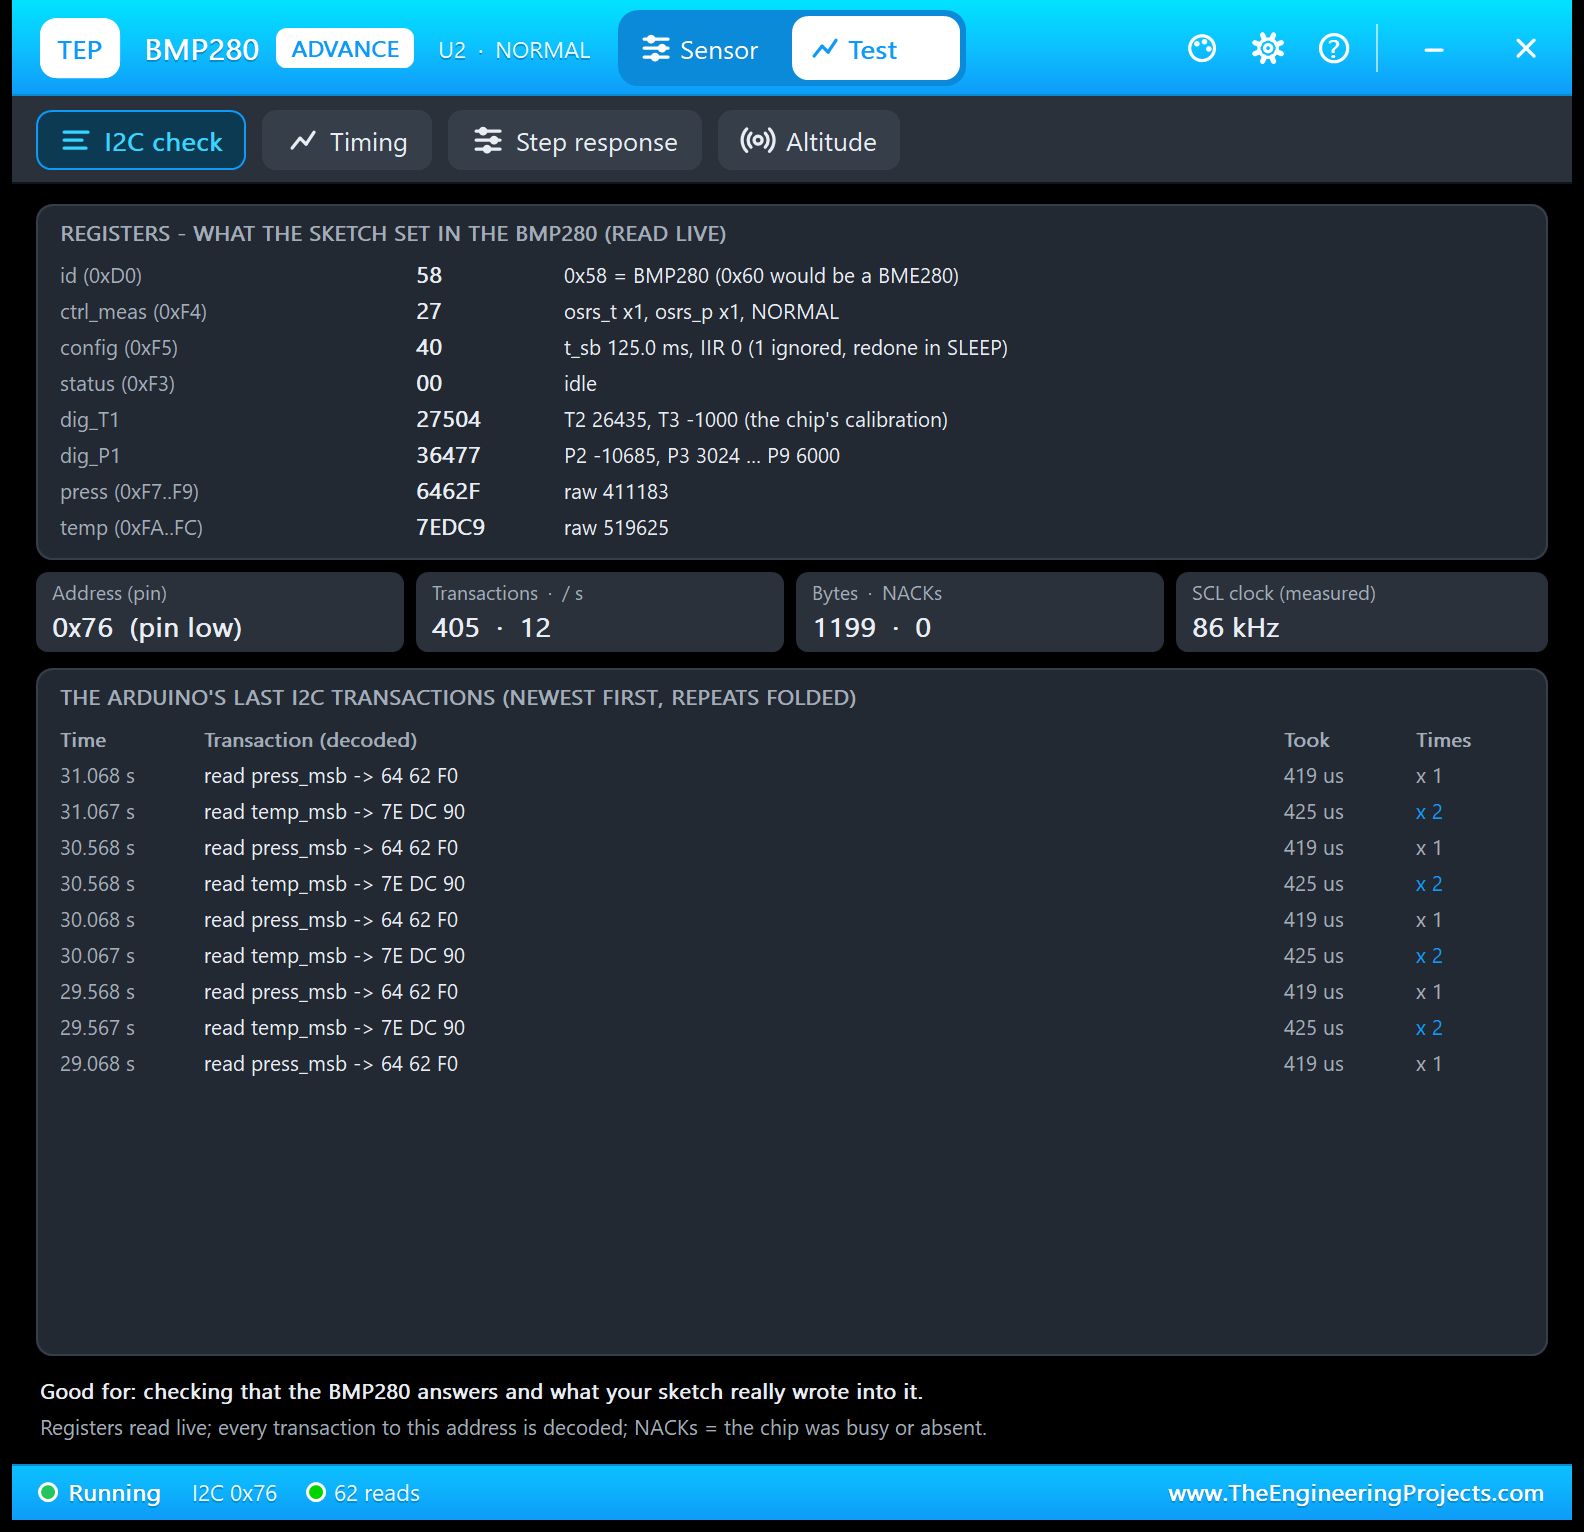
  * the four tools on U2: I2C check (id 0x58, ctrl_meas 27, config 40 - one write
    ignored and redone in SLEEP -, 0 NACKs, SCL 86 kHz); Timing 3 s (22
    measurements of 6.43 ms every 131.43 ms, 6 reads every 499.9 ms, data age
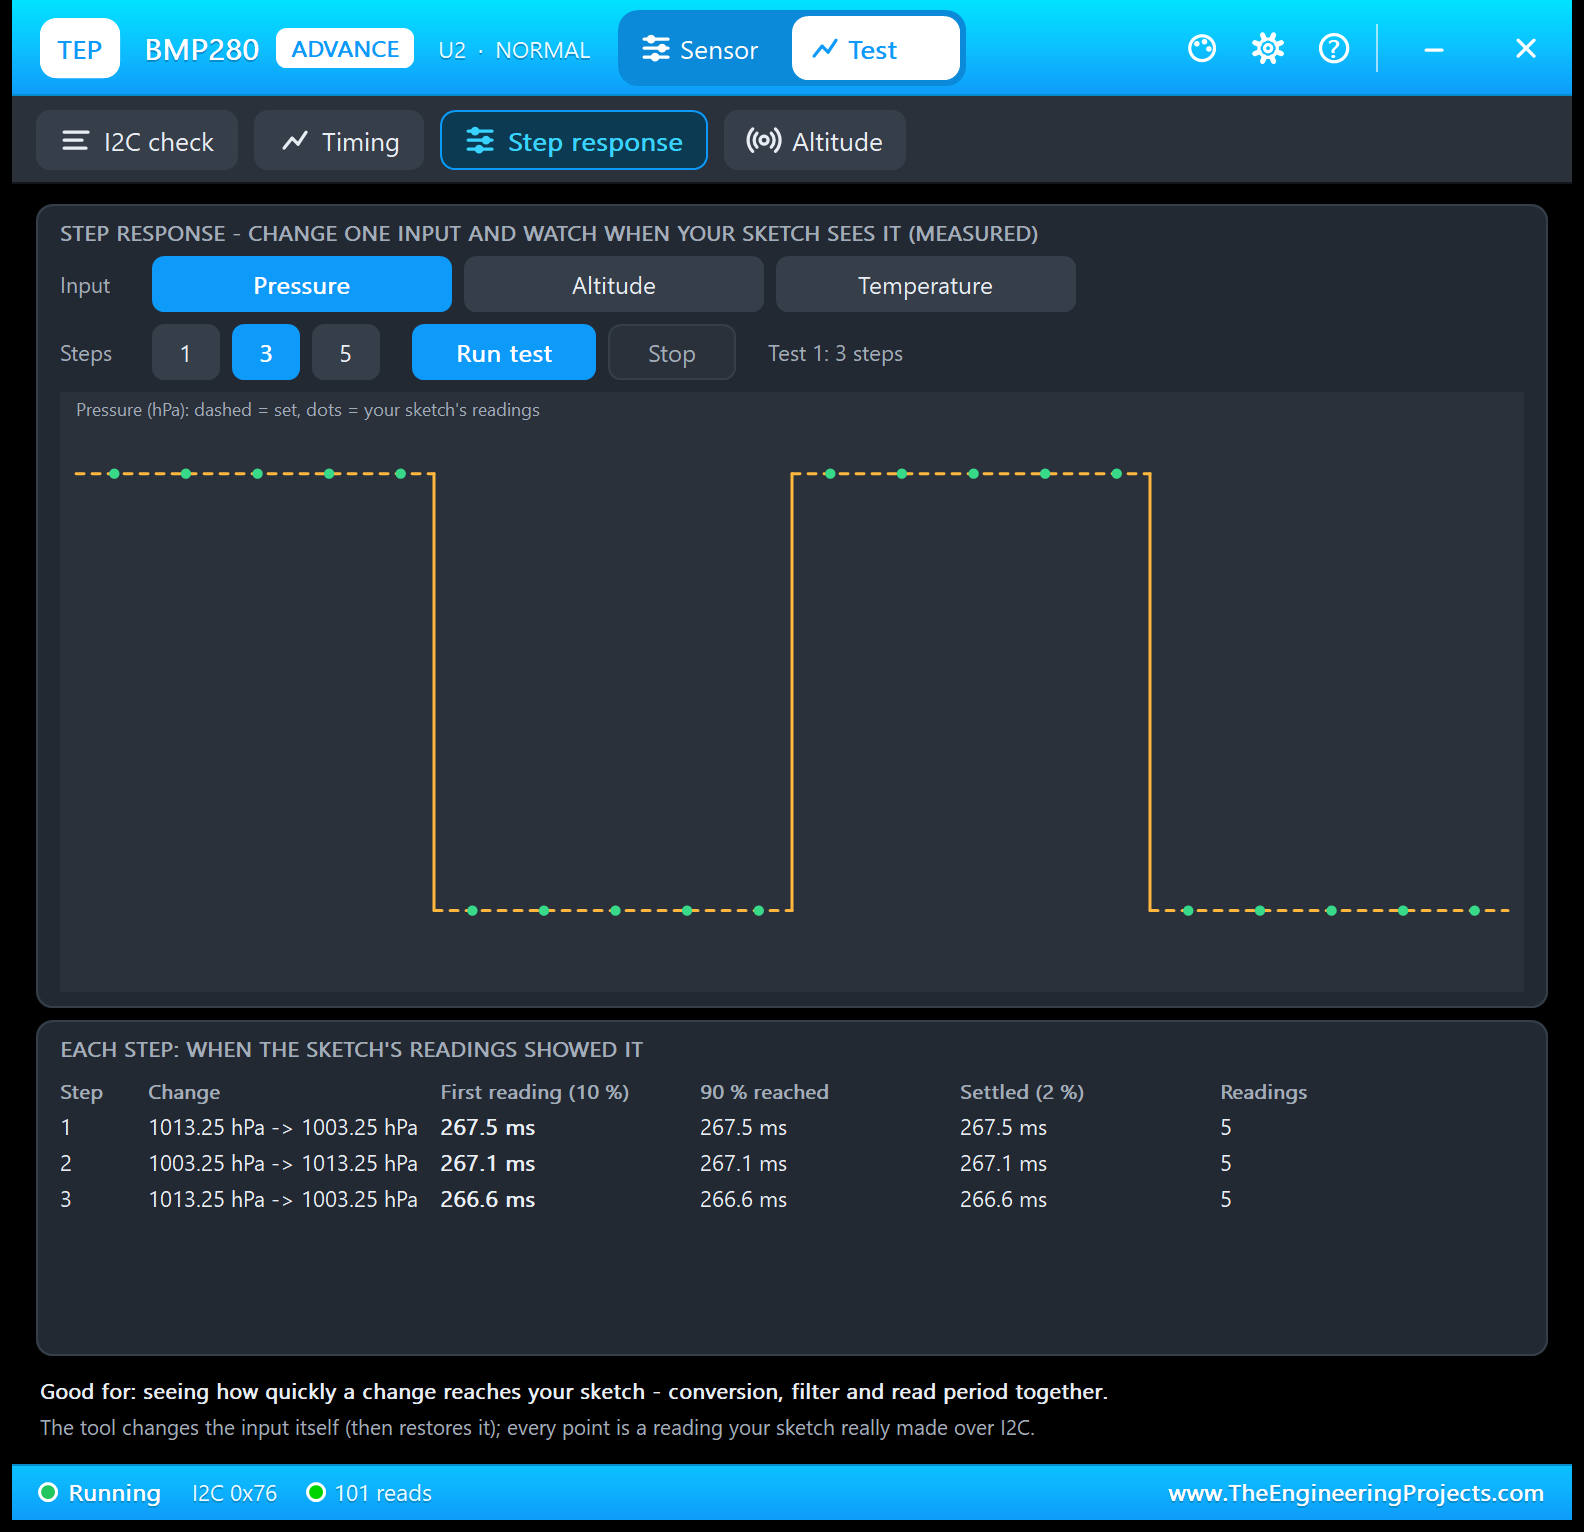
    71.3 / 124.5 ms); Step response (pressure 1013.25 / 1003.25 x3: the first
    reading = 90 % = settled after 328.1 / 327.7 / 328.3 ms, 5 readings each);
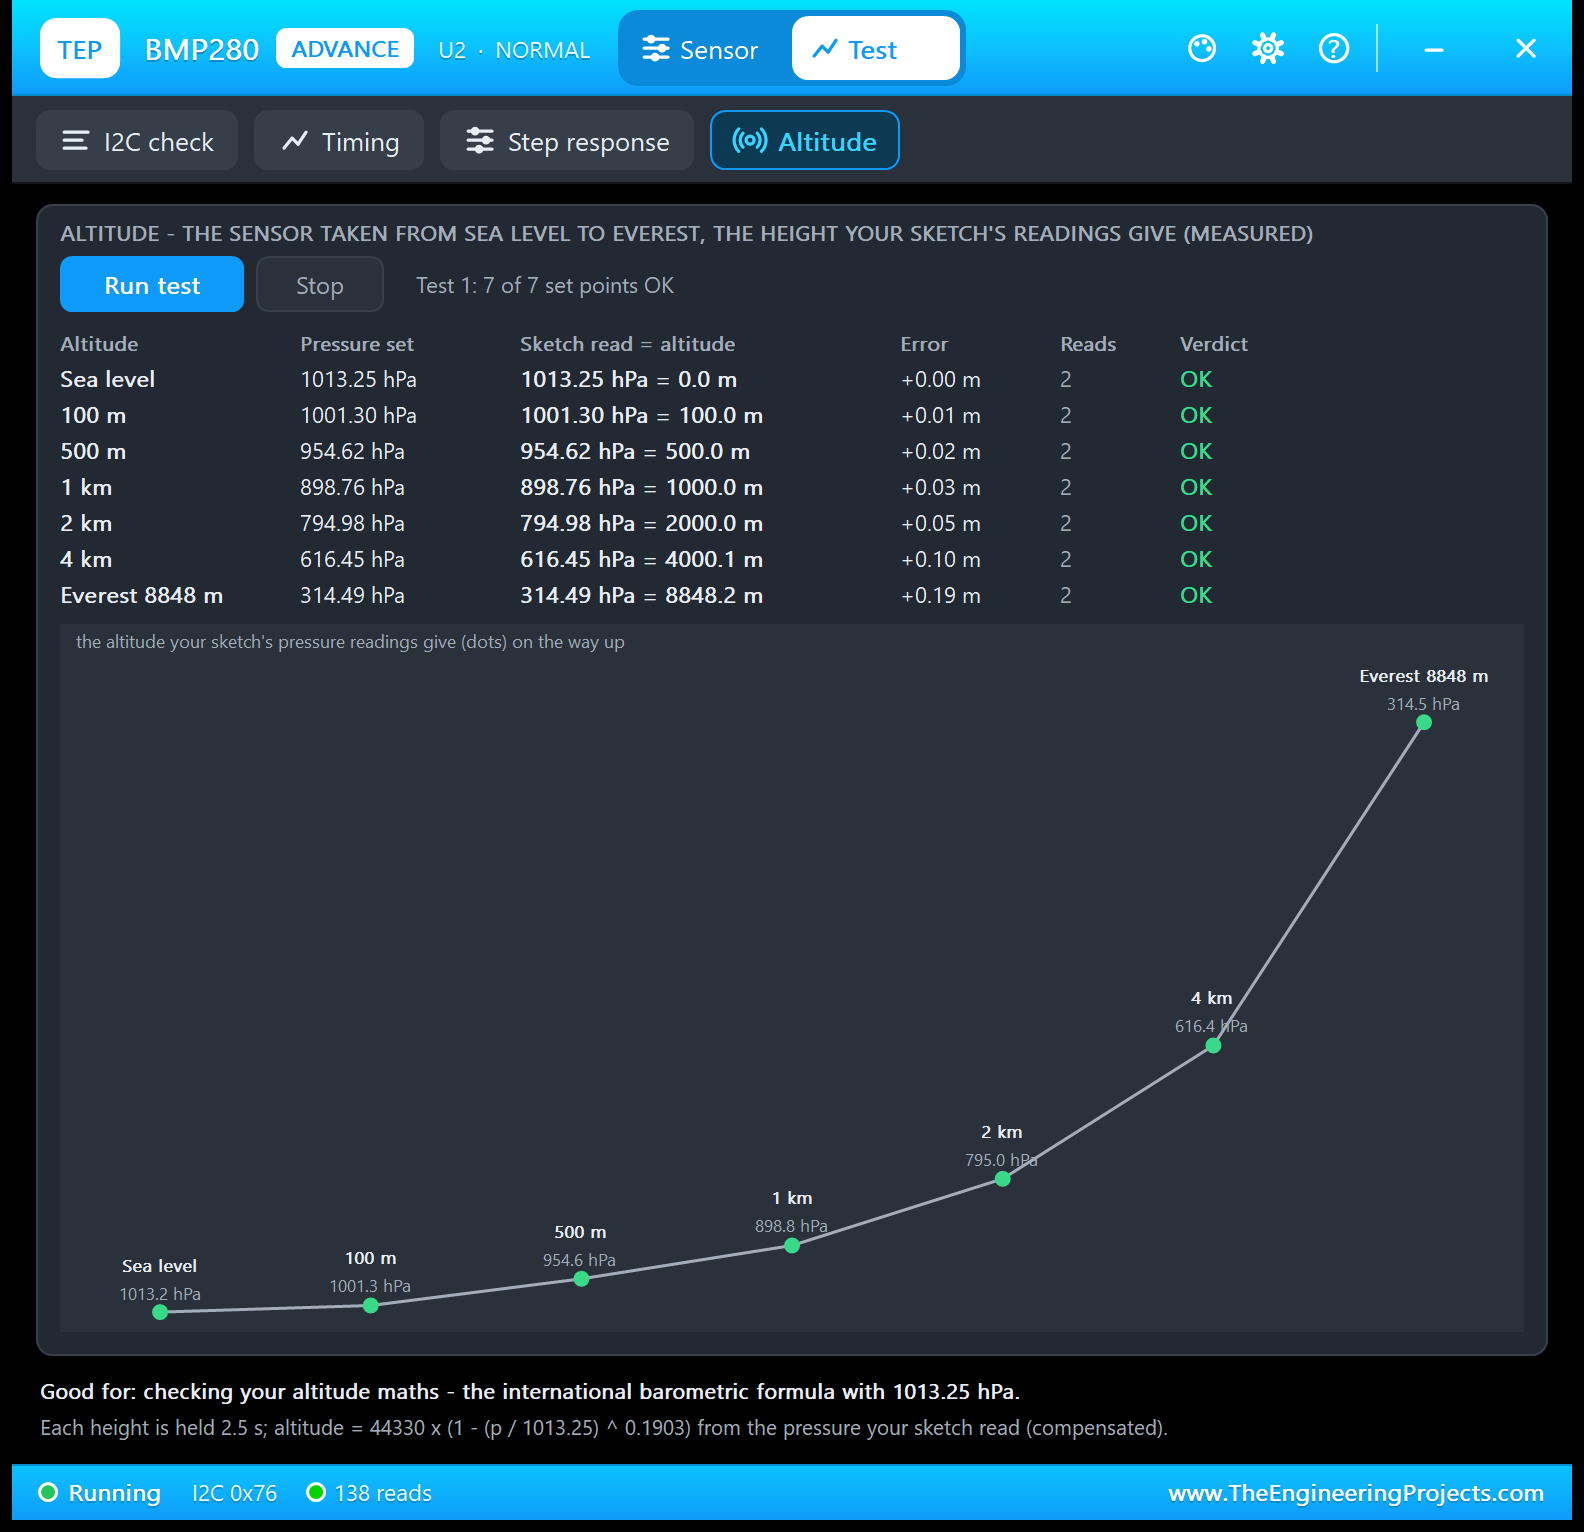
    Altitude (7 / 7, Everest 314.49 hPa = 8848.2 m, +0.19 m);
  * a v1.0 design (the v1.0 release demo with this DLL): the v1.0 panel; the
    temperature slider to -9.9 C gave "Temperature: -9.9 C".
(After that run only the Test pages' layout changed - they fill the window, the
register table has one register per row: no behaviour, no numbers. PC-tested, to
be re-checked in Proteus. Later the same day, also PC-tested: while the LIFT
RIDE runs, the pressure slider stays at the value you set, labelled "(base)",
and says what the sensor gets now ("LIFT now 1009.7 hPa"); the Step response
waits until the readings sit at the start value before step 1 - with the IIR
filter on, that is a few seconds.)
PC tests (8 Oct 2026, this package's DLL / LIB / sketch):
  1647 automatic checks on a PC, 0 failed, plus the v1.0 test, unchanged and
  passing with the v1.1 model (BMP280: official Adafruit driver, forced
  conversions and compensation across 12 environments); 9 chip checks for v1.1
  (the conversion time formula, config only in SLEEP, the normal-mode cadence,
  status.measuring, forced mode, the IIR filter, soft reset); 68 on the complete
  Proteus model (the LIB (pins, properties, both devices), power, the PWR / I2C
  LEDs, SDO / CSB, the panel, red X / PANEL, OPEN PANEL, the pop-up pages and
  links, the decoded readings, the conversion timing, the IIR filter, the
  presets and the lift ride (the pressure slider keeps the base and says what
  the sensor gets now), the altitude bar, the four tools (the step waits for the
  IIR filter to settle), a design with the v1.0 symbol); 26 with the real v1.1
  demo sketch and the unmodified driver library on two UNOs (every v1.0 output
  line, the altitude line and low-pressure LED, every Serial Monitor command,
  the Timing / Step response / Altitude tools with the real sketch); 1544 on the
  rendered boards and pop-up windows (every page fits in TEP Dark and Light, at
  Large text and 150 % DPI; every tool's hint lines and every header state fit).
v1.0 (29 Sep 2026): the v1.0 demo was run in Proteus 8.5 and confirmed working
  by the owner (temperature and pressure sliders and the serial readings); the
  v1.0 tests (the unmodified Adafruit BMP280 library over the bit-level I2C
  slave: forced conversions and the compensation across 12 environments) still
  pass with the v1.1 model.

INSTALLATION (about 2 minutes)
1. Close Proteus. Extract the WHOLE ZIP to a normal folder (e.g. Desktop).
2. Copy everything in "Proteus Library Files" (TEPBMP280.LIB with both devices,
   TEPSERIALMON.LIB and the TEP Arduino UNO V3 library ArduinoV3TEP.LIB / .IDX
   used by the demo) to the LIBRARY folder of Proteus, for example:
     C:\Program Files (x86)\Labcenter Electronics\Proteus 8 Professional\LIBRARY
   (on some PCs: C:\ProgramData\Labcenter Electronics\Proteus 8 Professional\
   LIBRARY - use the folder that already holds Proteus's own .LIB files).
3. Copy TEPBMP280.DLL and TEPSERIALMON.DLL from "Proteus Model Files" to the
   MODELS folder (...\Proteus 8 Professional\MODELS).
4. Updating from v1.0: replace TEPBMP280.LIB and TEPBMP280.DLL, and
   delete TEPBMP280.IDX if there is one in the LIBRARY folder. A v1.0 design keeps
   its v1.0 symbol: it runs with the new model and shows the v1.0 panel (without
   the v1.1 board parts and the red X) - re-pick the part to get the v1.1 symbol.
5. Start Proteus. In Pick Devices (P) search "BMP280": you get the Simple and the
   Advance device (category Sensors > Environmental, as in v1.0).
The model DLL is the TEP I2C sensor family model: TEPMPU6050.DLL, TEPBMP280.DLL,
TEPMAX30102.DLL, TEPVL53L0X.DLL, TEPSHT31.DLL and TEPTCS34725.DLL are identical
files under the v1.0 names, so every v1.0 design finds its model.

RUN THE DEMO
"Proteus Simulation\BMP280-ArduinoUnoV3.pdsprj" - keep BMP280_Demo.hex and the
two DLLs beside the project.
  UNO 1 (ARD1): BMP280 Simple (U1), Serial Monitor U3.
  UNO 2 (ARD2): BMP280 Advance (U2), Serial Monitor U4.
  Both UNOs run BMP280_Demo.hex. An LED (D1 / D2) with 220 ohm on A0 of each
  UNO: the low-pressure warning.
  1. Press Run. Both monitor windows open (9600 baud) and so does U2's pop-up.
     U3 and U4 show "TEP BMP280 - drag the temperature and pressure sliders."
     and "TEP BMP280 Demo v1.1 - type HELP in the Serial Monitor", then every
     500 ms:
       Temperature: 25.0 C | Pressure: 1013.2 hPa
       Altitude: 0.0 m (sea level 1013.25 hPa)
     (1013.25 hPa prints as 1013.2: the raw ADC step puts the computed value a
     few thousandths below 1013.25.) The blue I2C LED on each board flashes with
     every read.
  2. U1: click 1 km on the panel - the dial's needle and the altitude bar move,
     U3 prints "Temperature: 18.5 C | Pressure: 898.8 hPa", "Altitude: 1000.1 m
     (sea level 1013.25 hPa)" and "Low pressure: below 1000 hPa (LED on)"; LED
     D1 lights. SEA LEVEL: "Low pressure: off". LIFT RIDE takes the sensor 30 m
     up and down again in 18 s (watch the altitude line). Click the altitude bar
     to climb anywhere up to 9 km. Close the panel with its red X and open it
     with PANEL.
  3. U3 / U4 quick buttons: STATUS, ALT (this place = 0 m: the altitude line
     shows 0.0 m from now on), OS 16 (pressure oversampling x16), HELP. Type
     FILTER 16 and drag the pressure - the readings now crawl to the new value
     (the IIR filter); FILTER OFF, MODE FORCED, STANDBY 1000 ...
  4. U2 (Advance): the Sensor page shows the same inputs and what the sketch
     read; the Test page has the four tools (below).
  5. Close U2's window and open it again with OPEN PANEL on the board.
Closed a monitor window? Click OPEN MONITOR on the monitor part.

WIRING (as in the v1.0 demo)
VCC -> supply, GND -> GND, SCL -> A5, SDA -> A4, SDO -> GND (address 0x76; SDO
high = 0x77), CSB -> VCC (I2C mode; CSB low selects SPI and the chip stops
answering on I2C).
In the sketch: Adafruit_BMP280 sensor;  sensor.begin(0x76);  Serial 9600.
Serial Monitor RXD <- Arduino D1 (TX), Serial Monitor TXD -> Arduino D0 (RX),
Serial Monitor GND -> ground. RXD2 is not needed: I2C has no serial line to
watch. The low-pressure LED + 220 ohm from A0 to GND.
Pin order in Proteus: VCC GND SCL SDA SDO CSB (v1.0; the real GY-BMP280 header
reads VCC GND SCL SDA CSB SDO - the last two are swapped, mind it on a PCB).
REAL HARDWARE:
 * Supply: most GY-BMP280 boards are 3.3 V only (no regulator; "BMP280-3.3"):
   feed VCC with 3.3 V from the Arduino. A 5 V variant with a regulator
   exists - check your board before you connect 5 V.
 * I2C pull-ups: the board has 10 k pull-ups to its VCC (3.3 V) on SDA and SCL,
   so A4 / A5 need nothing else; a 5 V UNO reads the 3.3 V levels correctly
   (for long wires or a 5 V-only bus use a level shifter).
 * Address: SDO decides it - GND = 0x76, VCC = 0x77. Some boards leave SDO
   floating: tie it. Many cheap "BMP280" boards carry a BME280 (chip id 0x60) -
   the I2C check shows the id this model answers (0x58 = BMP280).
 * CSB: tie it to VCC for I2C. A low pulse on CSB switches the chip to SPI until
   the next power-up.
 * Self-heating, noise and the absolute accuracy (+-1 hPa, +-1 C) of the real
   sensor are not simulated; the model gives exact values.

THE TEST TOOLS (BMP280 Advance, Test tab) - what they really measure
Every tool runs on the live model with your sketch: it changes the sensor's
inputs (and restores them) and watches the I2C reads your Arduino really makes -
it never talks to your Arduino. Each tool shows one "Good for:" line and one
line on how it measures.
  I2C check       Good for: checking that the BMP280 answers and what your
                  sketch really wrote into it. The registers read live and
                  decoded (id 0x58, ctrl_meas: oversampling and mode, config:
                  standby and IIR filter - marked when a config write was
                  ignored -, status, the calibration words, the raw pressure and
                  temperature), the address and the SDO / CSB levels,
                  transactions, bytes, NACKs, the measured SCL clock and the
                  last transactions decoded (repeats folded). With the demo:
                  "write ctrl_meas = 27" (x1 / x1, NORMAL) and the reads of
                  temp_msb and press_msb with their three raw bytes.
  Timing          Good for: seeing how often new data exists and whether your
                  sketch reads it in time. Records for 1, 3 or 10 s every
                  measurement the BMP280 makes and every read of the data
                  registers: the output period (avg / min / max), the
                  measurement time, the sketch's read period, the data age at
                  each read, reads of the same result twice, and the datasheet
                  formula with your registers (t_measure = 1.25 + 2.3 x osrs_t +
                  2.3 x osrs_p + 0.575 ms, + the standby time in NORMAL mode).
                  With the demo: a 6.43 ms measurement every 131.4 ms, the
                  sketch reads every 500 ms.
  Step response   Good for: seeing how quickly a change reaches your sketch -
                  conversion, filter and read period together. Steps the
                  pressure (1013.25 -> 1003.25 hPa), the altitude (0 -> 50 m) or
                  the temperature (25 -> 35 C) 1, 3 or 5 times (2.5 s each) and
                  plots every reading your sketch made; per step: the first
                  reading that shows it (10 %), 90 % and settled (2 %). With the
                  demo the step shows within one read; with FILTER 16 the
                  pressure needs about 36 measurements to reach 90 %.
  Altitude        Good for: checking your altitude maths - the international
                  barometric formula with 1013.25 hPa. Takes the sensor from
                  sea level to 100 m, 500 m, 1 km, 2 km, 4 km and the top of
                  Everest (8848 m, 314.5 hPa), 2.5 s each, and computes the
                  altitude from the pressure your sketch read (44330 x (1 - (p /
                  1013.25) ^ 0.1903)) - with a mountain profile of the measured
                  points. With the demo: 7 / 7 within 0.2 m.

THE DEMO SKETCH ON THE SERIAL MONITOR (BMP280_Demo v1.1)
  HELP                    the command list
  STATUS                  mode, oversampling, filter, standby, sea level
  SEA hPa                 sea-level pressure for the altitude (300 .. 1100,
                          default 1013.25)
  ALT                     this place = 0 m (sea level := the pressure now)
  MODE NORMAL | FORCED    continuous, or one measurement per reading
  OS 1|2|4|8|16           pressure oversampling (temperature stays x1)
  FILTER OFF|2|4|8|16     the IIR filter coefficient
  STANDBY ms              1, 63, 125, 250, 500, 1000, 2000, 4000 (NORMAL mode)
Monitor quick buttons in the demo: STATUS, ALT, OS 16, HELP.
Every line the sketch prints has at most 80 characters (it fits the Serial Monitor's
Simple interface); longer answers are split, the second line indented.

EXPECTED MONITOR OUTPUT (U3 and U4)
  TEP BMP280 - drag the temperature and pressure sliders.
  TEP BMP280 Demo v1.1 - type HELP in the Serial Monitor
  Temperature: 25.0 C | Pressure: 1013.2 hPa
  Altitude: 0.0 m (sea level 1013.25 hPa)
After 1 km on the panel:
  Temperature: 18.5 C | Pressure: 898.8 hPa
  Altitude: 1000.1 m (sea level 1013.25 hPa)
  Low pressure: below 1000 hPa (LED on)
After STATUS:
  Status: NORMAL mode, pressure x1, filter OFF, standby 125 ms
    sea level 1013.25 hPa

PROPERTIES (double-click the sensor > Edit Properties; the same on Simple and
Advance - the v1.0 properties)
  TEMPERATURE     temperature in C, -40 .. 85 (default 25)
  PRESSURE        pressure in hPa, 300 .. 1100 (default 1013.25 = sea level)
The panel style is chosen by the device (Simple / Advance), not by a property.
The Advance window settings (theme, text size, open at Run, size) are on its
Settings page. The demo's Serial Monitors: BAUD 9600, THEME TEPDARK, AUTOOPEN
YES, QUICK1-4 as above (see the Serial Monitor's article for all its
properties).

LINKS.INI (OPTIONAL)
The Help page cards of the Advance device open web pages. To point them
somewhere else without a new DLL, put a text file named links.ini next to
TEPBMP280.DLL with lines KEY=URL, for example:
  ARTICLE=https://www.theengineeringprojects.com/...
Keys: WEBSITE, FORUM, BUG_REPORT, FEATURE_REQUEST, ARTICLE, USER_GUIDE,
UPDATE_CHECK, DONATE. Only http:// and https:// links are used; lines starting
with # are comments.

TROUBLESHOOTING
* "BMP280 not found. Check SDA, SCL, SDO/GND and CSB/VCC.": check VCC / GND (the
  PWR LED must be lit and the board shows "I2C 0x76"), SDA -> A4, SCL -> A5,
  CSB high (the board shows "I2C OFF" when CSB is low) and that SDO matches the
  address in begin() (0x76 = SDO low).
* The values do not change: the blue I2C LED must flash with every read; the
  sliders change the physical input - the sketch sees it at its next read after
  the next measurement (NORMAL mode: up to the standby time later; with the IIR
  filter on, gradually).
* FILTER / STANDBY in your own sketch seem to do nothing: the BMP280 may ignore
  a config write in NORMAL mode (the model does) - call setSampling with
  MODE_SLEEP first, then with your settings, as the demo does. The I2C check
  marks the config register when this happened.
* The pressure prints 1013.2 instead of 1013.25: Serial.print(p, 1) rounds, and
  the raw ADC step puts the value a little below 1013.25; print(p, 2) shows
  1013.25.
* The part is not simulated / no panel: TEPBMP280.DLL is missing from MODELS
  and from the project folder. No monitor window: TEPSERIALMON.DLL is missing, or
  click OPEN MONITOR on the monitor part.
* Advance: the pop-up does not appear - click OPEN PANEL on the board, use
  Proteus's Debug menu, or turn "Open the panel at Run" on its Settings page
  back on.
* Simple: the red X does not close the panel / the board looks like v1.0 - the
  design still holds the v1.0 symbol; replace TEPBMP280.LIB, delete
  TEPBMP280.IDX and re-pick the part.
* Your own sketch uses SoftwareSerial to receive: Proteus 8.5 cannot receive
  with SoftwareSerial (pin-change interrupts are not simulated) - use the
  hardware Serial (as the demo does) or AltSoftSerial.

BUG REPORTS AND FEATURE REQUESTS
Please post them in our forum with a screenshot, the Serial Monitor text, the
simulation log and (Advance) the Copy diagnostics text:
  https://www.theengineeringprojects.com/forum/category/bmp280-proteus-library

SUPPORT US
This library is free. If it saves you time, please support our work:
  https://www.theengineeringprojects.com/donate

WEBSITE
  https://www.theengineeringprojects.com/

LICENCES AND THIRD-PARTY NOTES
* The BMP280 model (TEPBMP280.DLL), the symbols and artwork and the TEP Serial
  Monitor Advance (TEPSERIALMON.LIB / .DLL) are ma
…Development1 release
 Development1 release
-
V1.1BMP280 Sensor Library for Proteus V1.1this page
V1.1 is the only release in the Download Center so far. When a newer version is published, it appears above with its own download page.
Installation9 steps
 Installation9 steps
From the download to a working project, in order. The steps follow what the package contains.
You will need
- Proteus Design SuiteProteus 8 or newer (Labcenter), on Windows
- Arduino IDE1.8 or 2.x, with the board of the tutorial chosen under Tools → Board
- Any archive toolWindows, macOS and Linux extract ZIP files on their own
Steps
- 1
Extract the archive
Right-click bmp280-tep-v1-1-69fc40253b774a95815d996fb31f5d9d.zip and choose Extract All (or open it with 7-Zip or WinRAR) into a folder you can find again. Keep its folder structure (BMP280-TEP-v1.1) as it is.
- 2
Copy the library files into Proteus
Move ArduinoV3TEP.LIB, TEPBMP280.LIB and TEPSERIALMON.LIB and ArduinoV3TEP.IDX into the LIBRARY folder of your Proteus installation: C:\Program Files (x86)\Labcenter Electronics\Proteus 8 Professional\LIBRARY for Proteus 8, or the matching Proteus 7 folder. Older versions keep it under ProgramData\Labcenter Electronics. If Proteus is open, close it first.
- 3
Add the simulation model
Copy TEPBMP280.DLL and TEPSERIALMON.DLL into the MODELS folder next to LIBRARY, so the component can run, not only be drawn.
- 4
Restart Proteus and place the component
Start Proteus, open a schematic, press P (Pick Devices) and search for the component by the name used in the tutorial. It appears with its pins ready to wire.
- 5
Install the Arduino library
In the Arduino IDE choose Sketch → Include Library → Add .ZIP Library and pick the library, or copy its folder into Documents\Arduino\libraries. Restart the IDE to see its examples.
- 6
Open the sketch in the Arduino IDE
Open BMP280_Demo.ino, bmp280test.ino and bmp280_forced.ino and 12 more, select your board and port under Tools, then Verify. Sketch → Export Compiled Binary writes the HEX file a simulation needs.
- 7
Load the HEX file
In Proteus double-click the microcontroller, set Program File to BMP280_Demo.hex and run the simulation. For real hardware, flash the same file with your programmer.
- 8
Open the example simulation
Open BMP280-ArduinoUnoV3.pdsprj in Proteus to see the wiring exactly as in the tutorial. Check the controller's Program File path, then press Play.
- 9
Follow the tutorial
BMP280 Sensor Library for Proteus V1.1 (GY-BMP280 + Arduino) explains every connection and setting in order; keep it open beside the files while you build.
FAQs9 questionsContact TEP
 FAQs9 questions
How do I download BMP280 Sensor Library for Proteus V1.1?
Wait for the 30-second guest countdown on this page, then press the download button; the file comes straight from our storage. Members who are logged in skip the wait. If the browser opens the file instead of saving it, use its Save as option. The download link is made for you when the countdown ends and works for 15 minutes; a saved or shared link stops working, so share this page instead.
What is inside the archive?
BMP280 Sensor Library for Proteus V1.1 comes as a ZIP archive of 51 files (1.6 MB, 3.4 MB unpacked) holding Proteus library files, simulation model DLLs, a Proteus simulation, an Arduino sketch, an Arduino library and compiled HEX firmware. Open the File Structure tab for the full list of 51 files.
What should I do if the download does not start?
Check the browser's download list first; an ad blocker or a company firewall can also hold it back, so try another browser or network. If the file arrives incomplete, download it again. For an installation problem, read the Install tab or tell us in the comments with your software version and the exact error message.
Is this file free?
Yes. Every file in the TEP Download Center is free for learning, personal and student projects. If you share it, link back to this page or the tutorial so others find the latest version.
How do I check that the file arrived complete?
Compare its SHA-256 with the one on this page, 1e66412c84000e4da1c704b4e6f1093fd002f029ed8b1731d3ca9f3dd3f0d0e3. In PowerShell run Get-FileHash "bmp280-tep-v1-1-69fc40253b774a95815d996fb31f5d9d.zip"; on macOS or Linux run shasum -a 256 "bmp280-tep-v1-1-69fc40253b774a95815d996fb31f5d9d.zip". The same value means the file is exactly the one in our storage; a different one means the download broke off, so download it again.
Do I need WinRAR to open the ZIP file?
No. Windows, macOS and Linux open ZIP archives on their own (Extract All, or double-click). WinRAR and 7-Zip work too. Extract the whole archive before using the files.
Where do I put the LIB and IDX files?
Both files go into the LIBRARY folder of your Proteus installation (Proteus 8: C:\Program Files (x86)\Labcenter Electronics\Proteus 8 Professional\LIBRARY; Proteus 7 has the same folder under its own name). Restart Proteus afterwards and search for the component with P.
Which Proteus version does the library need?
The tutorial names the Proteus version the library was made and tested with. Most TEP libraries work in Proteus 7 and Proteus 8; if the component does not appear after a restart, check that both the LIB and the IDX file were copied and that Proteus was fully closed while copying.
How do I get the HEX file into the simulation?
Compile the sketch in the Arduino IDE (Sketch → Export Compiled Binary gives you the HEX next to the sketch), then in Proteus double-click the board, set Program File to that HEX and run.
Members skip the wait. Log in or join TEP.

- 9Total downloads
- 4%Popularity
- ProteusCategory
- 0Comments
- ssyedzainnasirUploaded by
- 17 Sep 2026Uploaded at


 SHA-256
1e66412c84000e4da1c704b4e6f1093fd002f029ed8b1731d3ca9f3dd3f0d0e3


 Need help with this file?
 Tags
Related Proteus
All Proteus tutorials


Comments
0