Hello friends, hope you all are fine and having fun with your lives. Today, I am going to combine all of my MATLAB Projects in this post. I have posted quite a lot of projects on MATLAB but they are not well arranged that's why are not easily accessible. So, today I finally thought to combine all my MATLAB Projects and post their links in this post so that you guys can easily access all of them in one place just like Arduino , PIC Microcontroller Projects. All these MATLAB Projects and tutorials are designed and written by our team and we have done quite a lot of work in compiling these projects as you all know MATLAB is the most difficult and vast educational tool.
Most of these MATLAB Projects are free to use and users can easily download their ...
Hello friends, hope you all are fine and having fun with your lives. Today, I am going to share a tutorial on Speech Recognition in MATLAB using Correlation. Speech recognition is used in almost every security project where you need to speak and tell your password to a computer and is also used for automation. For example, I want to turn my AC on or off using voice commands then I have to use Speech Recognition. I have to make the system recognize that whether I am saying ON or OFF. In short, speech recognition plays a vital role in voice control projects. In today's post, I am gonna show you How to do Speech Recognition in Matlab and the technique I have used in this project is known as cross correlation. You should also have a look at Eye Ball D ...
Hello friends, hope you all are fine and having fun with your lives. Today, I am going to share a simple tutorial on Image zooming with bilinear Interpolation in MATLAB. We have seen many software in which there's an option of zooming an image. For example, if you have used paint or photoshop then you have seen that you can zoom your image quite easily by clicking a button. Today's we are gonna do the same thing but in MATLAB and we will have a look at the code behind this feature.
Now, when we are zooming some image then in fact we are increasing the pixels of that image and in order to do that we have to fill those extra pixels with the color of their neighbor pixel. This thing is know as interpolation. There are many different techniques for in ...
Hello Friends, hope you all are fine and having fun. In today tutorial i am going to elaborate How to Automatically Connect with Wifi SSID using Arduino YUN. If you recall one of my previous tutorials named Getting started with Arduino YUN , in which i gave a brief introduction about Arduino YUN, its working and features. In that tutorial, I have explained How to connect Arduino YUN with Wifi manually. A little problem encounters while connecting Arduino manually to available wifi networks that if wifi connection drops then, then Arduino will also disconnect automatically and if wifi connection is energized again, it will still remain disconnected unless you reconnect it by yourself. This thing has very serious drawbacks in industrial projects, wh ...
Hello friends, hope you all are fine and having fun with your lives. Today I am gonna post 555 Timer projects list which are already posted on our blog. Actually, I have posted many 555 Timer Projects on my blog but we don't have a list of these tutorials and they are quite scattered. So, today I thought to arrange them in a proper list so that you can find all of them in one place. All these 555 timer projects are simulated in my favorite simulating software Proteus. I have also given their simulations for download in almost all tutorials. If you feel problem in any of them then ask in comments and I will resolve them.
All these 555 Timer Projects and tutorials are written and designed completely by our team so we hold the complete ownership for ...
Hello everyone, hope you all are fine and having fun with your lives. In today's post, I am going to share How to generate PWM in 8051 Microcontroller. PWM is an abbreviation of Pulse Width Modulation and is used in many engineering projects. It is used in those engineering projects where you want an analog output. For example, you want to control the speed of your DC motor then you need a PWM pulse. Using PWM signal you can move your motor at any speed from 0 to its max speed. Similarly suppose you wanna dim your LED light, again you are gonna use PWM pulse. So, in short, it has numerous uses. If you are working on Arduino then you should read How to use Arduino PWM Pins.
PWM, as the name suggests, is simply a pulse width modulation. We take a pu ...
Hello friends, hope you all are fine and having fun with your lives. In today's post, I am going to share Interrupt based Digital clock with 8051 Microcontroller. In the previous post, I have explained in detail How to use Timer Interrupt in 8051 Microcontroller. We have seen in that post that we can use two timers in 8051 Microcontroller which are Timer0 and Timer1. Using these timers we can easily generate interrupts. So, before going into details of this post, you must read that timer post as I am gonna use these timer interrupts in today's post.
After reading this post, you will also get the skilled hand on timer interrupt and can understand them more easily. In today's post, I am gonna design a digital clock which will increment after every o ...
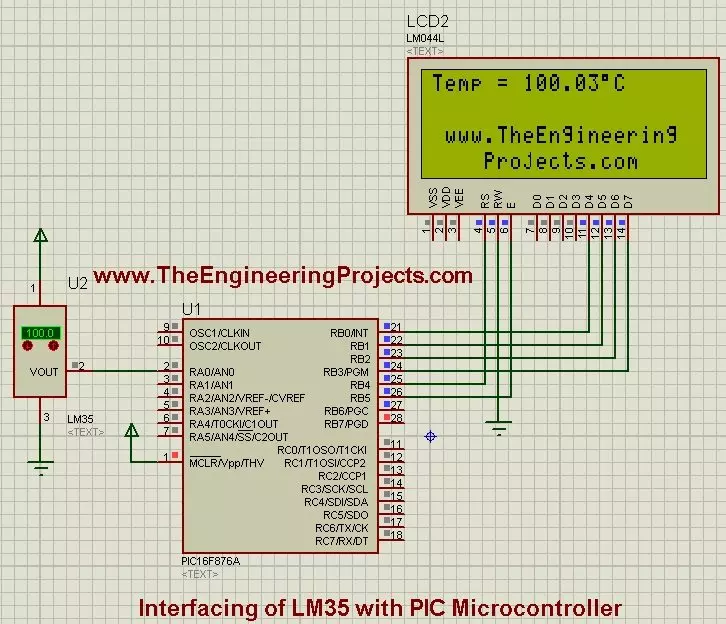
Hello friends, I hope you all are fine and having fun with your lives. In today's post, I am going to share How to interface LM35 with PIC Microcontroller. I have already shared Interfacing of LM35 with Arduino so now we are gonna interface this same temperature sensor with PIC Microcontroller. Interfacing LM35 with PIC isn't much difficult as its a simple sensor which gives us analog output and we just need to read this output and convert it into temperature format. Before going into details, you should first read the Interfacing of LM35 with Arduino as I have given the basic details of this LM35 sensor in that post. You should also have a look at How to use 18B20 in Proteus.
So, today I am not gonna go into the details of this temperature sensor ...
Hello friends, hope you all are fine and having fun with your lives.In today's post, we are gonna see How to use timer interrupt in 8051 Microcontroller.8051 Microcontroller comes with timer as well. They normally have two timer in them named as Timer0 and Timer1. These timers are used for counting purposes like you want to start some countdown in your project then you can use these timers or you wanna create some clock then in that case as well you need timers. So, in short there are numerous uses of timers in a project. Timers are also used for delays like you wanna create some delay of 10 sec but you dont wanna use the delay function in your project so you can use timers. You start the timer and then when it comes to 10 seconds then you can do ...
Hello everyone, hope you all are fine and having fun with your lives. Today, I am going to share 8051 Microcontroller Projects. Recently, I have shared quite a lot of tutorials on 8051 Microcontroller which are not much arranged as a whole. So, today, I thought to arrange all those tutorials and place them here so that you can get all of them quite easily. I will upload more 8051 Microcontroller Projects and I am gonna add their links in this post so stay subscribed to this post if you are interested in learning 8051 Microcontroller.
8051 Microcontroller, as we all know, is another Microcontroller series just like PIC Microcontroller or Arduino etc. The benefit of 8051 Microcontrollers is that they are quite cheap and easily available so if you ar ...