Hello everyone! I hope you all will be absolutely fine and having fun. Today, I will give you a detailed discussion on myRIO Ultrasonic Sensor Interfacing. In this tutorial, you will learn about NI myRIO ultrasonic sensor interfacing. We will go into the details of the ultrasonic sensor and then will move forward towards its interfacing with myRIO. I have already shared many articles on ultrasonic sensors and will share their link in this article as well.
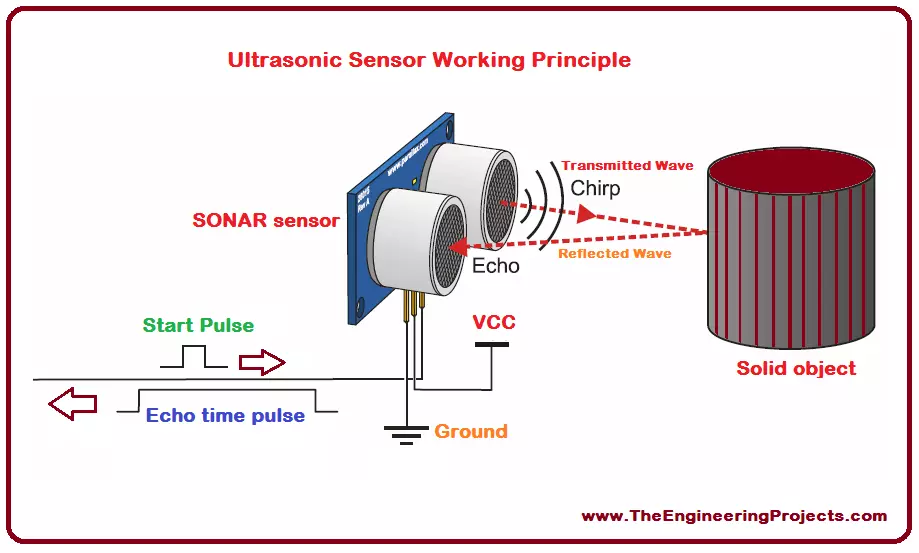
The ultrasonic sensor is also known as SONAR (Sound Navigation and Ranging). As it is clear from its name, it transmits sound waves and these waves are received back to it after getting reflected from any object. It measures the total time elapsed during the entire transmission as well as during the reception of the reflected waves. The ...
Hello friends, hope you all are fine and having fun with your lives. Today, I am going to share all the LabView Projects, posted on our blog. These LabView projects are entirely designed by the TEP team and I hope they will help you in some way. Rite now the list is quite small but I am gonna post more tutorials and projects related to LabView soon. So, keep visiting or subscribe us via email so that you get these exciting tutorials straight to your inbox.
Moreover, LabView is really a difficult software and it really took us a lot of time in designing these projects so other blogger are more than welcome to share our projects on their blog but do mention the respective link from where you copied as a favor. I am gonna share the complete list here ...
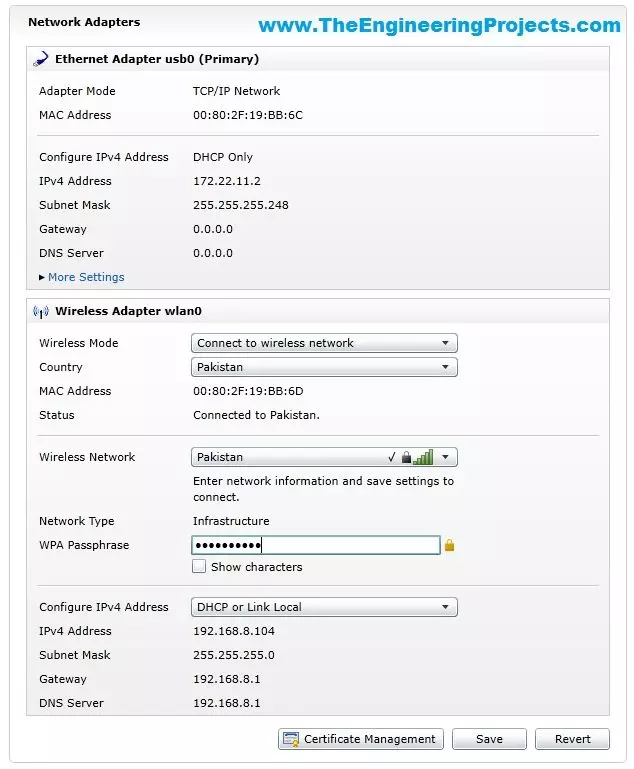
Hello friends, hope you all are fine and having fun with your lives. In today's tutorial, I am gonna show you How to Configure NI MyRio on Wifi. In our previous tutorial, Getting Started with NI MyRio I have show you how to get started with NI MyRio and control LEDs of NI MyRio but you have seen that we have done that over USB. In simple words, we have controlled the LEDs and gyroscope of MyRio over USB but in today's tutorial, first of all, we are gonna configure NI MyRio on Wifi and then we are gonna control all those things over Wifi instead of USB.
If you have a project on MyRio then its my recommendation to use Wifi instead of USB for upload and testing your codes because Wifi is quite flexible in use and you no more restricted to use the USB ...
Hello friends, hope you all are fine and enjoying good health. Today's post is my first post on LabView Software. I have worked on LabView quite a lot in past but these days I am continuously working on LabvView so I thought to write some tutorials on it. In today's tutorial, I will explain in detail How to get continuous data from COM Port in LabView software. LabView is a very handy tool for the engineers. One can easily plot graphs and can work on different hardware modules with it. One of the best feature of LabView is its extensive help desk. There are many examples present in it which are ready to run and can help a lot, moreover their online is also very extensive. I got into many problems while working on it and I never get stuck, I just s ...
Hello everyone! I hope you all will be absolutely fine and having fun. Today, I am going to share my knowledge with all of you guys, about Communication Signals Generation in LabVIEW. In the previous tutorial, we have seen the Introduction to LabView and after that we have designed our First Project using LabView Programming so if you haven't read them yet then I would suggest you to read them so that you have the basic knowledge of LabView. In earlier days people used to convey their messages or some important notifications using a piece of paper and by delivering it to the other places with the help of the pigeons. It took a lot of time for the message conveying procedure because there are some notifications or messages in which such a huge delay ...
Hello everyone. I hope you all will be absolutely fine. Today, I am going to share an Introduction to LabView. LabView is a really exciting software and recently I have worked on many LabView Project so I thought to start this new set of series in which I am gonna explain all about LabView from beginners level to Pro Level. So, today I am gonna upload the first tutorial in this LabVIEW series so that's why I have named it Introduction to LabView and I hope you are gonna like this tutorial. :)
LabVIEW basically stands for “Laboratory Virtual Instrument Engineering Workbench”. This software is designed by the National Instruments (NI) for the control and design of the projects. You can use it for simulation purposes, can also interface hardware with ...
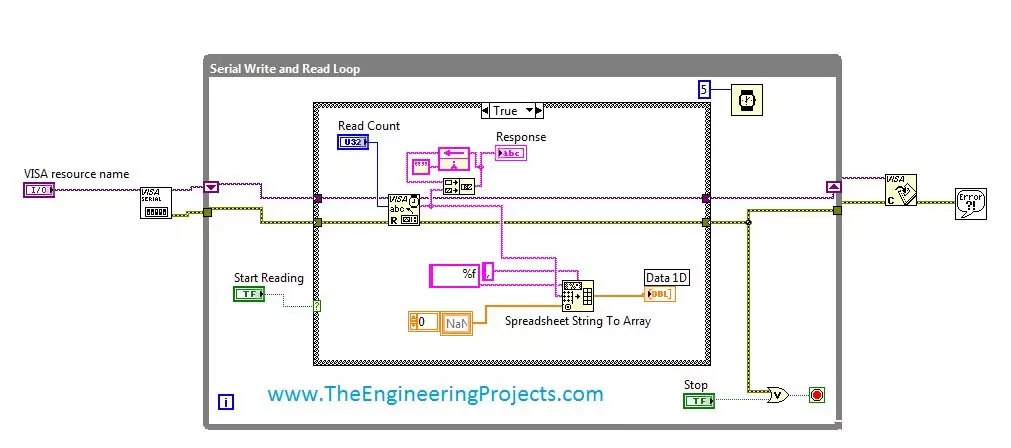
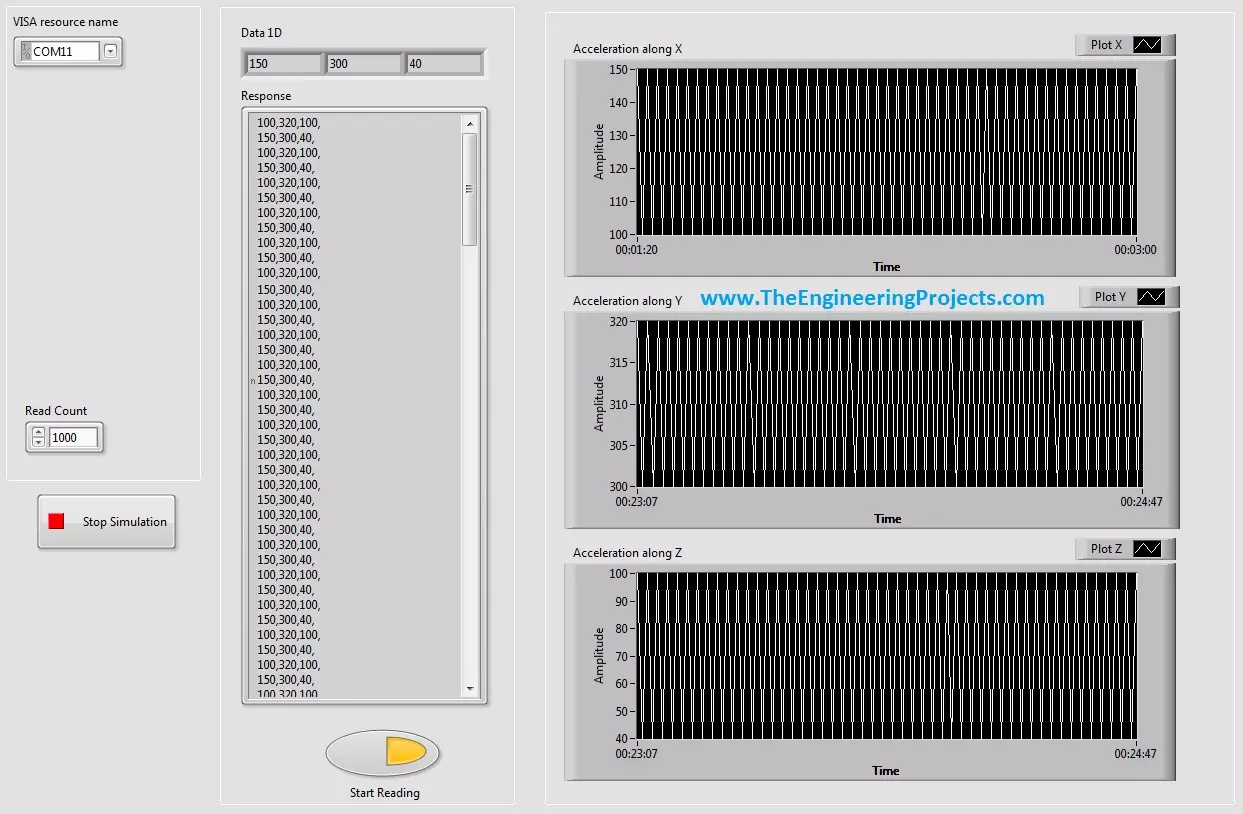
Hello friends, hope you all are fine and having fun with your life. Today's post, as the name suggests is about How to Display Serial Data on Real Time Graph in Labview. In our previous post, we have seen that how to Get Continuous Data From COM Port in Labview. Today's post is a sequel of this previous post so I would recommend that if you haven't had a look on that post then first visit it as I am gonna start today's post from where I stopped the previous one.
In the last post, we were able to get the continuous data from COM port using Labview and we have also separated the data based on a character which I have used this one "," i.e. comma. Now, suppose you are sending 3 values from your COM port and these are the sensors' values so tthe best ...
Hello friends! Hope you all will be absolutely fine. Today I am going to share my knowledge with you about how to create an algorithm for Water Level Detector in LabVIEW 2015. LabVIEW is an excellent software for simulation purpose as well as for the hardware interfacing (interfacing with the external devices). I support the "Graphical Language" which is usually known as "Field Programmable Gate Array (FPGA) " based language. In other software we have to create logic first and then we need to write a complete syntax for the created logic. This software is very easy to use and is quite helpful. Because, we don't have to write the complete complex syntax, instead we have to just create our logic and implement this logic using FPGA blocks. In this t ...
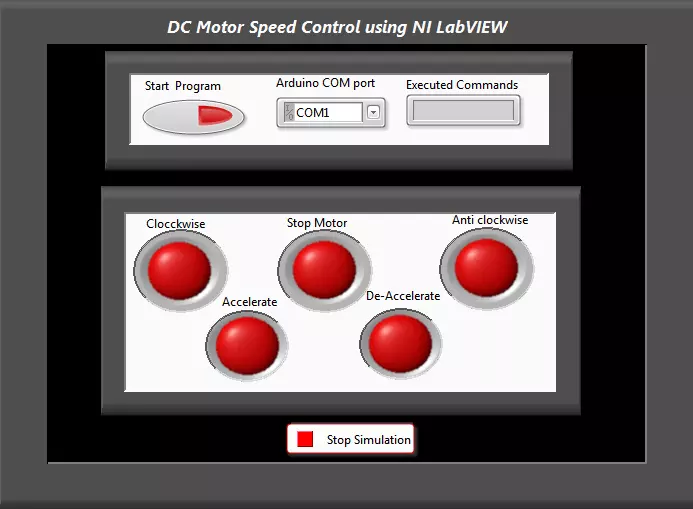
Hello everyone! I hope you all will be absolutely fine and having fun. Today, I am going to share my knowledge with all of you guys, about how to make a simple Virtual Instrument (VI) for DC Motor Speed Control in LabVIEW. In my previous tutorials, I have worked on DC Motor Speed Control using Arduino, in which I have controlled the DC Motor Speed using Arduino and after that I made some advancements in it and then created DC Motor Speed Control in Matlab in which commands were sent from Matlab. So, now we are gonna do the DC Motor Speed Control in LabVIEW.If you are working on DC Motor then you should also have a look at DC Motor Direction Control using Arduino.
In this tutorial, I am going to work on the program for DC Motor speed Control usin ...
Hello everyone! I hope you all will be absolutely fine and having fun. Today, I am going to share my knowledge about Creating First Program with myRIO. Before doing anything on NI myRIO you must know that how to configure this device. So, before going into the details of this tutorial I would like to suggest you to must visit Getting Started with myRIO and How to Configure myRIO on WiFi for the better understanding of this tutorial.
NI myRIO is an amazing processing tool that has a very high processing speed as compared to other microcontroller e.g. Arduino, raspberry pi, gellilio etc. So, it can be used for the real time projects where there is need to respond very quickly according to the assigned tasks. NI myRIO was launched by National Instr ...