Hello friends, hope you all are fine and having fun with your lives. Today, I am going to share all the LabView Projects, posted on our blog. These LabView projects are entirely designed by the TEP team and I hope they will help you in some way. Rite now the list is quite small but I am gonna post more tutorials and projects related to LabView soon. So, keep visiting or subscribe us via email so that you get these exciting tutorials straight to your inbox.
Moreover, LabView is really a difficult software and it really took us a lot of time in designing these projects so other blogger are more than welcome to share our projects on their blog but do mention the respective link from where you copied as a favor. I am gonna share the complete list here ...
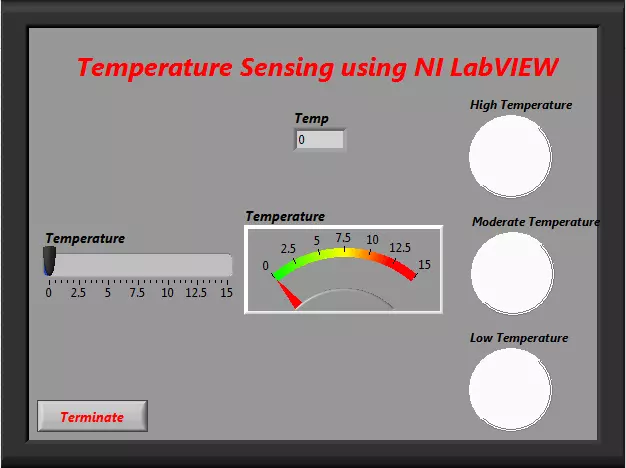
Hello friends! I hope you all will be absolutely fine and having fun. Today, I am going to share my knowledge about how to create program for "Temperature Sensing using NI LabVIEW". To sense the temperature is compulsory at a lot of the places e.g. refrigerators, air conditioners, storage rooms, kitchen etc. At these places to sense the temperature and its proper indication is compulsory because it can cause serious problems otherwise. For example, if the temperature in the food storage room is higher than an adjusted threshold, it will be harmful for all of the food items.
You can also consider "Fire Alarm" as an example of temperature sensor. First of all it measures the level of the temperature. If it founds that the temperature is higher tha ...
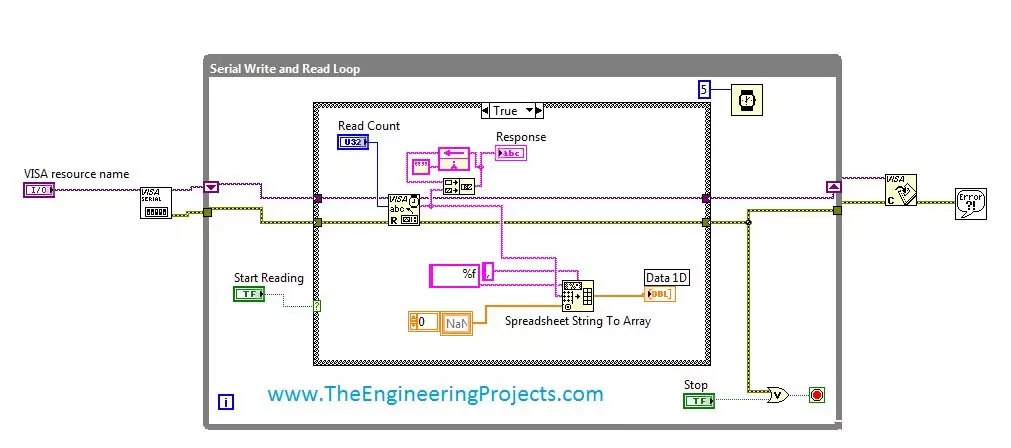
Hello friends, hope you all are fine and enjoying good health. Today's post is my first post on LabView Software. I have worked on LabView quite a lot in past but these days I am continuously working on LabvView so I thought to write some tutorials on it. In today's tutorial, I will explain in detail How to get continuous data from COM Port in LabView software. LabView is a very handy tool for the engineers. One can easily plot graphs and can work on different hardware modules with it. One of the best feature of LabView is its extensive help desk. There are many examples present in it which are ready to run and can help a lot, moreover their online is also very extensive. I got into many problems while working on it and I never get stuck, I just s ...
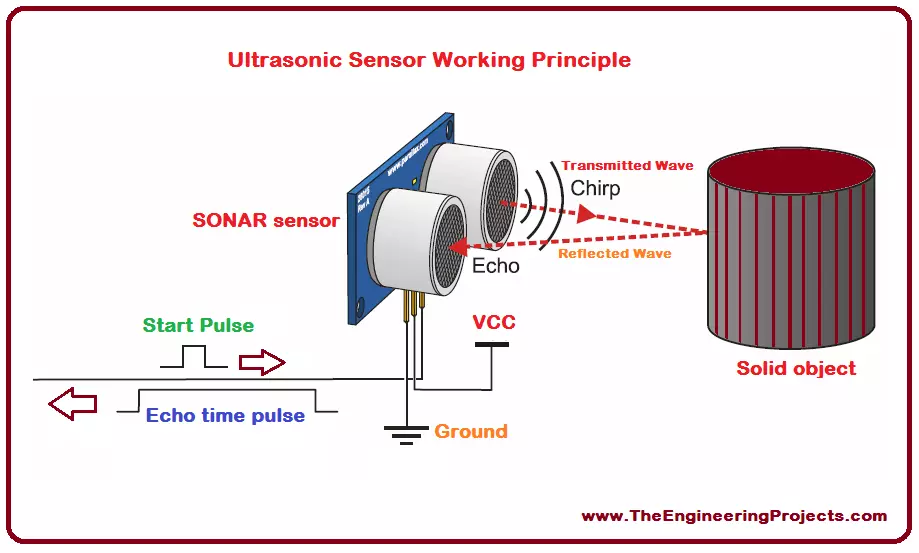
Hello everyone! I hope you all will be absolutely fine and having fun. Today, I will give you a detailed discussion on myRIO Ultrasonic Sensor Interfacing. In this tutorial, you will learn about NI myRIO ultrasonic sensor interfacing. We will go into the details of the ultrasonic sensor and then will move forward towards its interfacing with myRIO. I have already shared many articles on ultrasonic sensors and will share their link in this article as well.
The ultrasonic sensor is also known as SONAR (Sound Navigation and Ranging). As it is clear from its name, it transmits sound waves and these waves are received back to it after getting reflected from any object. It measures the total time elapsed during the entire transmission as well as during the reception of the reflected waves. The ...
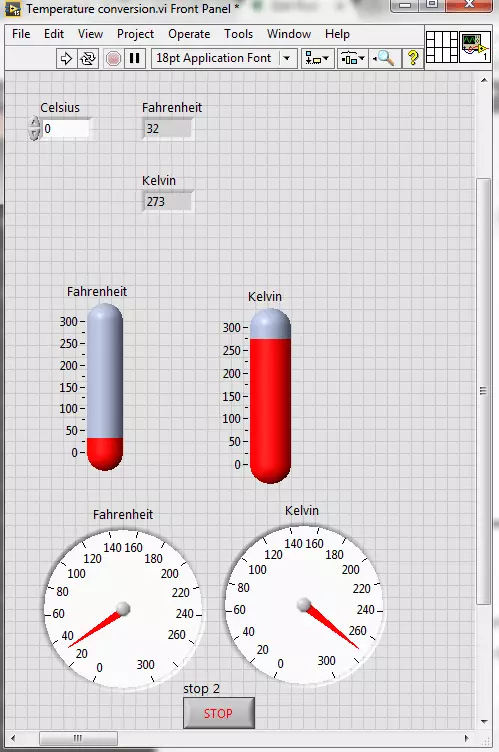
Hello friends! I hope you all will be absolutely fine. Today, I am going to share my knowledge with all of you guys, on how to make a Temperature Conversion in LabVIEW. Temperature is actually measured with different units at different places all across the world. However, there are three basic standard units for measuring the temperature i.e. Celsius, Fahrenheit and Kelvin. We can convert them in each other by performing some mathematical operations. In this tutorial I am going to elaborate only one of these conversions.
I would like to tell the standards of these scales with reference to the freezing and boiling point of water. "Celsius" scale is basically the scale based on 0 degrees for the freezing point of water and 100 degree for the boil ...
Hello friends! I hope you all will be absolutely fine and having fun. Today, I am going to share my knowledge with all of you about how to make a simple program for DC Motor Direction Control in LabVIEW. In my previous tutorials, I have also worked on DC Motor Direction Control using Arduino. You should go through these tutorials they will be helpful in better understanding of the tutorial DC Motor Direction control using NI LabVIEW. The word DC is basically an abbreviation of Direct current. So, a direct current motor is commonly used motor having two input terminals, one is positive and the other one is negative. If we connect these terminals with the voltage supply the motor will rotate. If you change the polarity then motor will rotate in oppo ...
Hello everyone! I hope you all will be absolutely fine and having fun. Today, I am going to share my knowledge about Creating First Program with myRIO. Before doing anything on NI myRIO you must know that how to configure this device. So, before going into the details of this tutorial I would like to suggest you to must visit Getting Started with myRIO and How to Configure myRIO on WiFi for the better understanding of this tutorial.
NI myRIO is an amazing processing tool that has a very high processing speed as compared to other microcontroller e.g. Arduino, raspberry pi, gellilio etc. So, it can be used for the real time projects where there is need to respond very quickly according to the assigned tasks. NI myRIO was launched by National Instr ...
Hello everyone! I hope you all will be absolutely fine and having fun. Today, I would like to provide a complete discussion on DC Motor Control using myRIO. I will first provide you a bit information about DC motor then we will move forward towards DC motor control using myRIO. DC motor is an electronic instrument which is used to convert electrical energy into mechanical energy. It plays a vital role in industrial applications. It has also great importance for the engineers to to study about its working principle. DC motor has basically two input terminals. At one terminal we have to provide voltage supply and the other terminal will be attached to the ground (0V). And if we change the polarity, the direction of the motor will also be changed co ...
Hello everyone! I hope you all will be absolutely fine and having fun. Today, I am going to share my knowledge about how to make a simple Virtual Instrument (VI) for Stepper Motor Direction Control in LabVIEW. In my previous tutorial, I have worked on Stepper Motor Direction Control using Arduino, in which I have controlled Stepper Motor Direction Control using Arduino and I am gonna use the same setup but this time I am gonna do the Stepper Motor Direction Control in LabVIEW. Moreover, you should also have a look at Stepper Motor Direction Control using Matlab.
In this tutorial, I going to work on the program for Stepper Motor Direction Control in LabVIEW. So, before going into the details of this tutorial, you must go through my previous tutor ...
Hello everyone! I hope you all will be fine. Today, I am going to elaborate that how to create your First Project using NI LabVIEW Programming. This software is very easy to use in comparison to the other software. You do not have to write the complete source code for the desired output, like in other software e.g. Arduino, MATLAB, Dev C++, Eclipse etc. instead you have to just implement your logic using Field Programmable Gate Array (FPGA) blocks. The program is designed with the help of the FPGA blocks, is usually known as “Virtual Instruments”.
Normally we used to call it as VI’s. We create in “Block Diagram” window as described in our previous tutorial on Introduction to LabView. If you haven't read that tutorial then I owuld suggest you to ...