Hello friends, I hope you all are doing great. Today, I am going to share the 6th tutorial of Section-III in the Raspberry Pi Programming Course. In our previous tutorial, we have seen how to interface an Ultrasonic Sensor with Raspberry Pi 4 and used Python to perform its calculations. In today's tutorial, we'll discuss how to interface a DHT11 temperature and humidity sensor to a Raspberry Pi. So, let's get started:
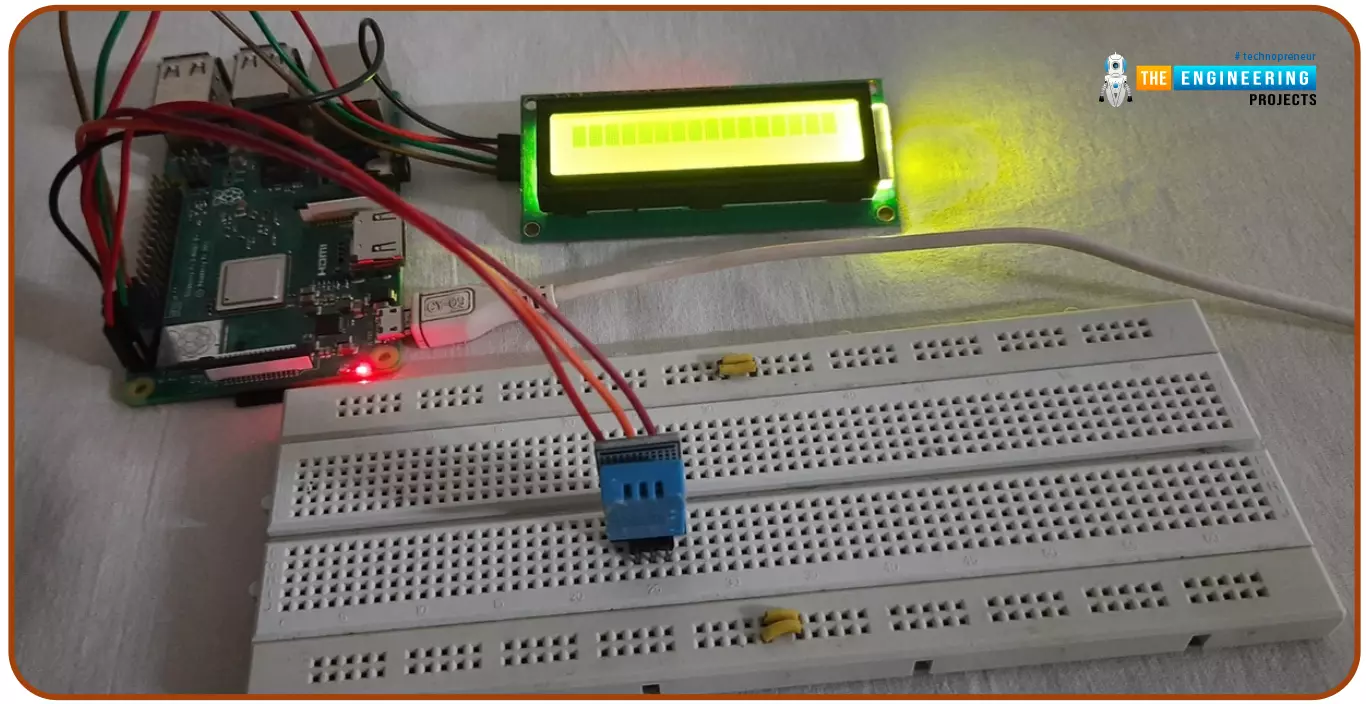
ComponentsHere's the list of components, we are going to use in today's circuit:
LCD display
DHT11 sensor
Raspberry pi
Breadboard
Male-to-female jumper wires
What is a DHT11 sensor?
DHT11 is a low-cost digital sensor, used to measure temperature and humidity in the surr ...
Welcome to today's article on our comprehensive Raspberry Pi 4 programming guide. As we saw in the previous article, the Raspberry Pi 4 may power a single seven-segment display. In addition, we also interfaced a Raspberry Pi with 4 Seven-Segment Display Modules to display the time. However, this guide will show you how to construct a Raspberry Pi 4 crypto miner that uses very little electricity.
Cryptocurrencies have been the subject of widespread conversation for some time now. It's possible to use your computer to create them, and they can be used as currency. Because of this, the Raspberry Pi can also be used for Bitcoin mining. It's also possible to mine other cryptocurrencies. One drawback of mining is that the cost of electricity often excee ...
Following this, we will configure bitwarden and host it on our Raspberry Pi 4. The last tutorial discussed utilizing a Raspberry Pi to install and run zeroTire on pi 4. By the end of the project, you will have learned how to set up a Raspberry Pi 4 with the necessary software for password management, including bitwarden, docker containers, and portainer, and how to configure their respective user interfaces.
Why Would You Do This?
An effective password manager is a must-have. For the past decade-plus, I've relied on a password manager. The catch is that not all security-focused apps are created equal. Initially, I relied on password managers in my browser, but I soon switched to KeePass. It was an intelligent move ten years ago. The export f ...
Hello readers, I hope you all are doing great. This is the first tutorial of our Raspberry Pi programming series. In this tutorial, we are going to provide a brief description of the Raspberry Pi Pico module designed and developed by the Raspberry Pi organization itself. We will also discuss various features, memory, peripherals interfacing capabilities, hardware architecture, programming techniques etc.
Before moving towards the detailed study of the Raspberry Pi Pico module, let’s first understand the traditional Raspberry Pi Computers.
What is Raspberry Pi?
Raspberry Pi is a single-board computer or a minicomputer. It was created with the goal of making computing knowledge more accessible to those who cannot afford laptops or desktop computers ...
Welcome to the next tutorial of our raspberry pi four programming course. Before, we saw how to connect a Raspberry Pi 4 to a relay with four independent channels. To complement the relay circuit, we programmed a python script to turn on and off a single bulb. However, in this tutorial, we'll show you how to connect a GPS module to a Raspberry Pi 4.
Raspberry Pi 4, one of the most popular embedded platforms, has made it simple for developers to obtain location data via a GPS module, allowing them to create devices with a greater reliance on precise positioning. Because of the Raspberry Pi's impressive processing capabilities, this essay focuses on the exciting prospect of creating GPS-based projects using the same inexpensive GPS chips.
Since thi ...
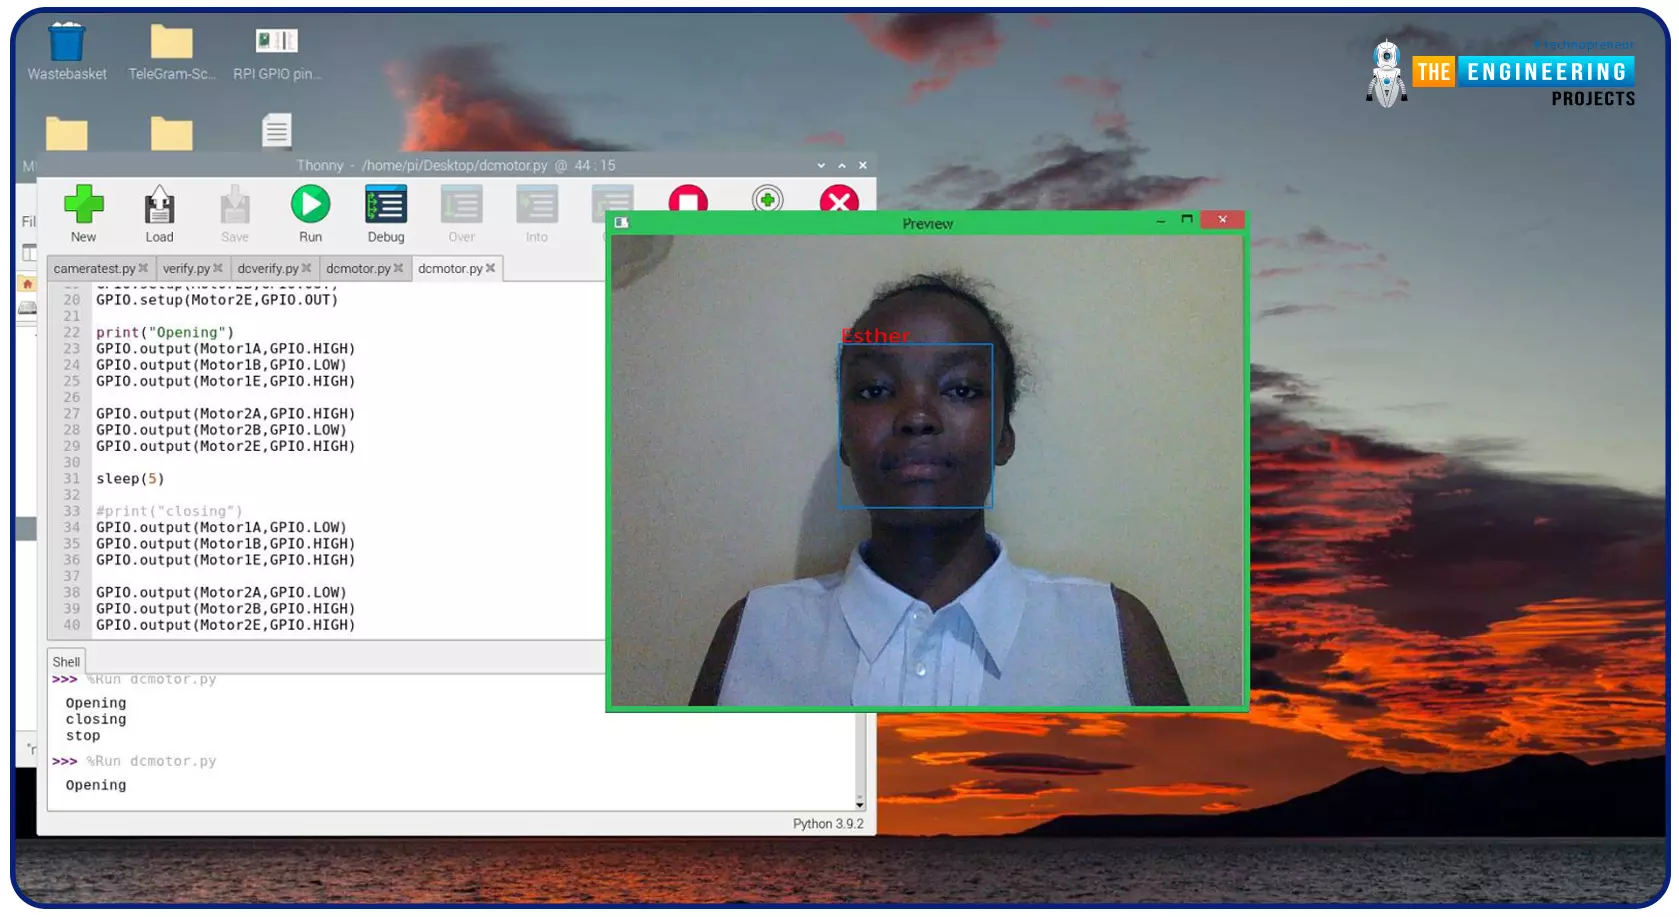
Greeting, and welcome to the next tutorial of our raspberry programming tutorial. In the previous tutorial, we learned how to build a smart attendance system using an RFID card reader, which we used to sign in students in attendance in a class. When it comes to building a face-recognition program on a Raspberry Pi, this tutorial will show you how. Two Python programs will be used in the lesson, one of which is a Training program that analyzes a collection of photographs of a certain individual and generates a dataset. (YML File). The Recognizer application uses the YML script to detect a face and afterward utters the person's name when the face is detected.
Components
Raspberry Pi
Breadboard
L293 or SN755410 motor driver chip
Jumper wir ...
Hello readers, I hope you all are doing great. This is the second tutorial of the Raspberry Pi programming series. In our previous tutorial, we discussed the basic features and hardware architecture of Raspberry Pi Pico.
In this tutorial, we will discuss the various available development environments for programming the Raspberry Pi Pico. Later, in this tutorial, we will also discuss the installation of Visual Studio Code for Pi Pico programming.
Fig. Raspberry Pi Pico
RP2040 supports multiple programming languages like C/C++, Circuit python, and MicroPython cross-platform development environments. Raspberry Pi Pico module consists of a built-in UF2 bootloader enabling programs to be loaded by drag and drop and floating point routines are bake ...
Hi Folks! I welcome you on board. Today, I am sharing the 2nd
tutorial in the Raspberry Pi 4 learning series. In this post today,
we’ll cover What is Raspberry Pi 4?
Raspberry Pi 4 Pinout, Specs, Projects, Datasheet etc.
Raspberry
Pi 4 is a tiny dual-display single-board computer, developed by
Raspberry Pi Foundation. This foundation has introduced a series of
Raspberry Pi boards to teach computer basics in schools.
With Raspberry Pi 4, you can control two monitors at once. Moreover, it
is incorporated with a quad-core processor that is powerful and comes
with more speed compared to its predecessors.
I suggest you read this post till the end as I’ll cover Raspberry Pi 4
in detail.
Let’s get started.
What is Raspberry Pi 4?
Raspberry Pi 4
is a dua ...
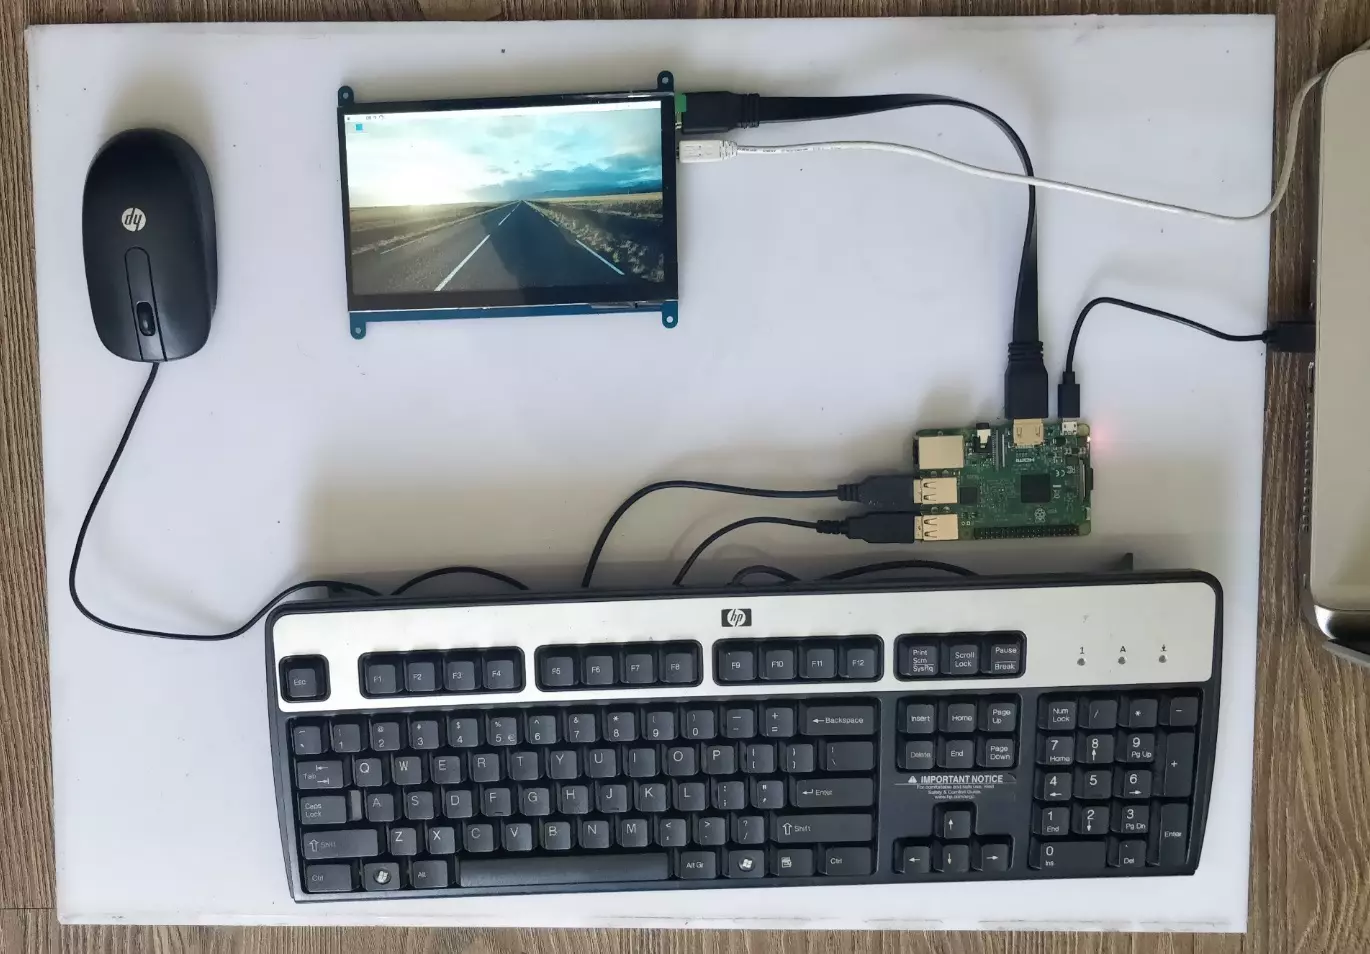
Hello friends, I hope you all are doing great. In today's tutorial, we are gonna have a look at How to Setup 7 inch HDMI LCD with Raspberry Pi 3. It's our second tutorial in Raspberry Pi 3 series. In our previous tutorials, first we have seen the basic Introduction to Raspberry Pi 3 and after that in our first tutorial, we have had a look at How to Install Raspbian on SD Card for Raspberry Pi 3.
Now we are ready to Setup 7 inch HDMI LCD with Raspberry Pi3 and then will start our raspbian for the first time on Raspberry Pi 3. We will also connect keyboard and mouse. In simple words, we are developing our own simple computer. So, let's get started with How to Setup 7 inch HDMI LCD with Raspberry Pi3:
How to Setup 7 inch HDMI LCD with Raspberry Pi3 ? ...
Hello readers, I hope you all are doing great. In our previous tutorial, we discussed the installation procedure of Visual Studio Code for programming Raspberry Pi Pico.
We have already mentioned in our previous tutorials that RP2040 or Raspberry Pi Pico supports multiple programming languages like C/C++, Circuit python, MicroPython cross-platform development environments. Raspberry Pi Pico module consists of a built-in UF2 bootloader enabling programs to be loaded by drag and drop and floating-point routines are baked into the chip to achieve ultra-fast performance.
There are multiple development environments to program a Raspberry Pi Pico board like Visual Studio Code, Thonny Python IDE, Arduino IDE etc.
So, in this tutorial, we will learn how t ...