Our next step in the Raspberry Pi training program is to get zero tiers up and run on a Raspberry Pi 4. How to utilize a Raspberry Pi to measure internet speed and store the results in Grafana or Onedrive was the topic of the last piece. During the project, you will discover how to install ZeroTier on a Raspberry Pi and get it up and running. We will also learn how to set up a firewall to secure our network.
Components
Raspberry pi 4
Power supply
Ethernet or wifi
What is zeroTier
ZeroTier is a software that provides a streamlined web-based interface for constructing virtual networks connecting various gadgets. Somewhat akin to configuring a virtual private network on a Raspberry Pi, these networks exist only in cyberspace. The process o ...
Following up on our Raspberry Pi programming course is the next lesson. In the previous post, we learned how to construct an FM radio using a Raspberry Pi. Analog FM broadcasting's circuit construction was also studied in detail. How to use a Raspberry Pi as an internet speed meter and save the data in Grafana or Google Drive is the subject of this article.
You can use this article if you want to keep track of how your downloads, uploads, and ping speeds change over time, and it's easy to use. In addition, you can use this to determine when your internet is at its busiest or if your internet speed has deteriorated. We'll demonstrate how to use Ookla's Internet speed test command-line interface in conjunction with Python code to create an internet speed meter.
...
Thank you for joining us for yet another session of this series on Raspberry Pi programming. In the preceding tutorial, we constructed a personal Twitter bot using Tweepy, a Py framework for querying the Twitter application programming interface. We also constructed a Response to robot mentions that would post a response to everybody's tweet mentioning it with a certain keyword. However, in this tutorial, we will implement a security system using a motion sensor with an alarm. This is what it looks like:
PIR Motion Sensors can be implemented with RPi by understanding how it is connected to a Raspberry Pi. Whenever the motion sensor detects human movement, an alarm is triggered in this project and the LEDs blink. You may create a simple motion-det ...
Thank you for joining us for yet another session of this series on Raspberry Pi programming. In the preceding tutorial, we integrated a real-time clock with our raspberry pi four and used it to build a digital clock. However, In this tutorial, we will construct your personal Twitter bot using Tweepy, a Py framework for querying the Twitter application programming interface.
You will construct a Response to mentions robot that will post a response to everybody's tweet mentioning it with a certain keyword.
The response will be a photo we will make and put any text over it. This message is a quote you will acquire from a 3rd application programming interface. Finally, we will look at the benefits and drawbacks of bots.
This is what it looks like:
...
Introduction
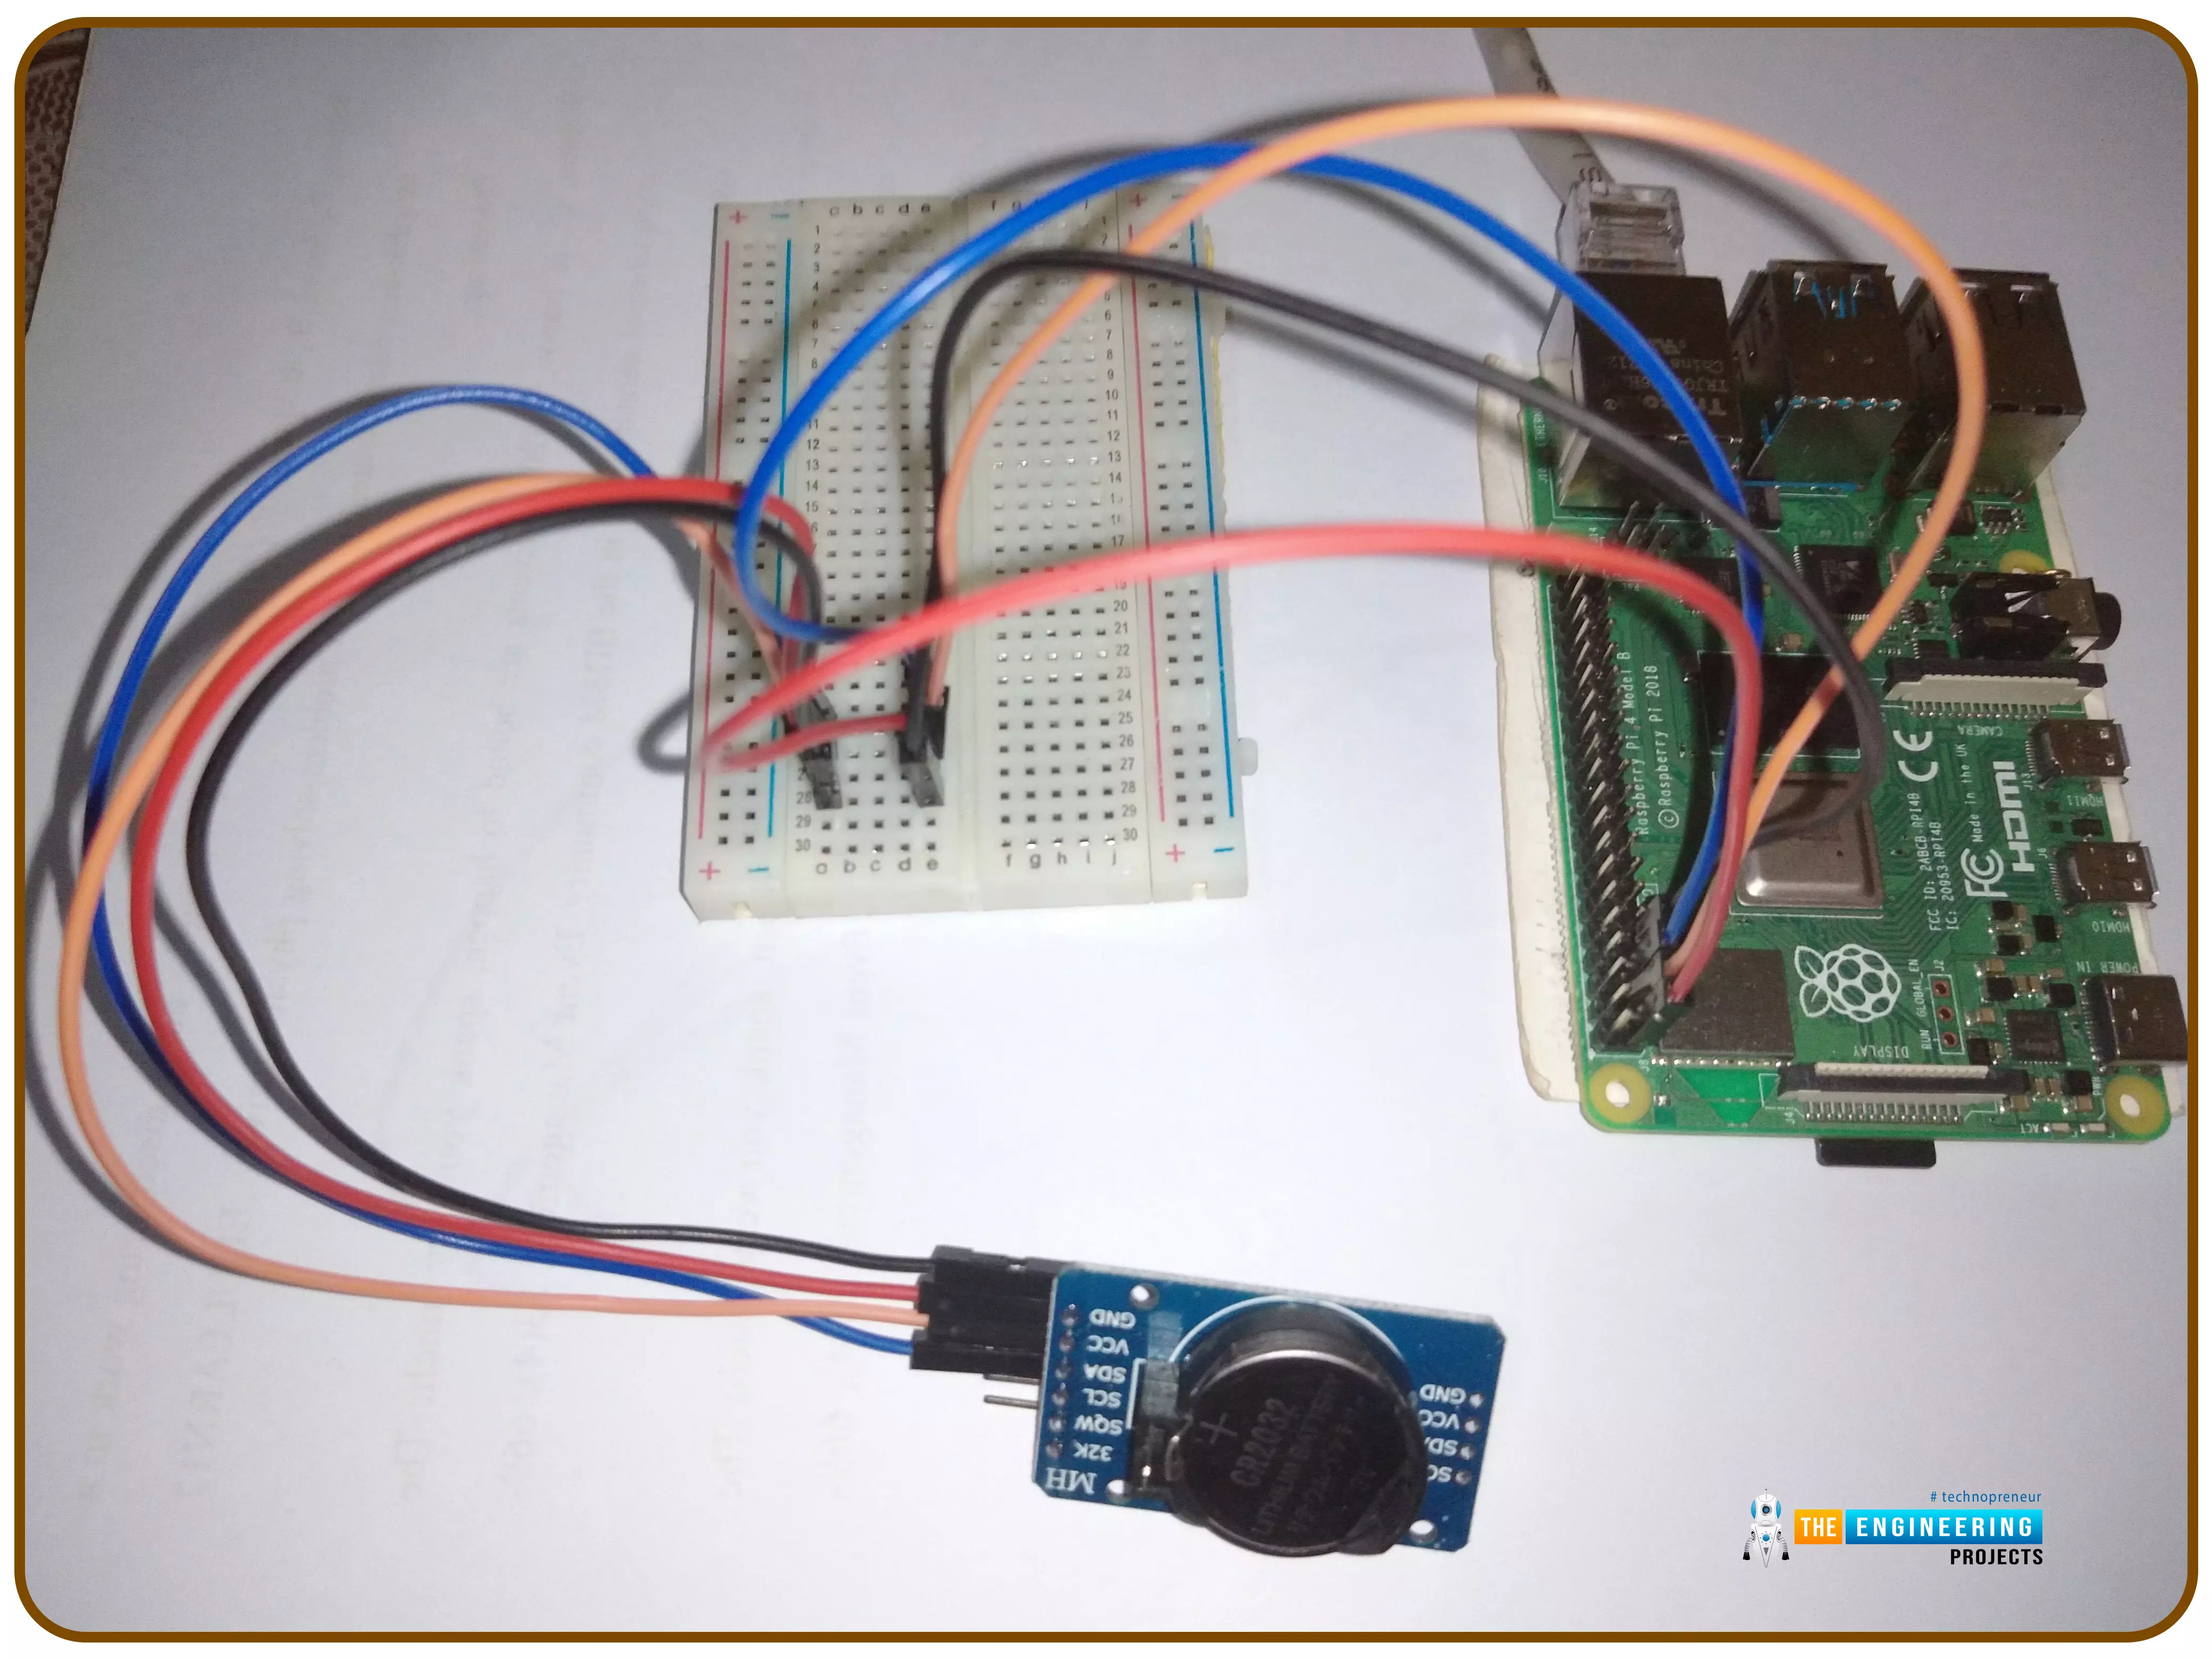
Thank you for joining us for yet another session of this series on Raspberry Pi programming. In the preceding tutorial, we implemented a speech recognition system using raspberry pi and used it in our game project. We also learned the fundamentals of speech recognition and later built a game that used the user's voice to play. However, this tutorial will integrate a real-time clock with our raspberry pi four and use it to build a digital clock. First, we will learn the fundamentals of the RTC module and how it works, then we will build a digital clock in python3. With the help of a library, we'll demonstrate how to integrate an RTC DS3231 chip with Pi 4 to keep time.
Real-Time Clocks: What Are They?
RTCs are clock units, as the name ...
Introduction
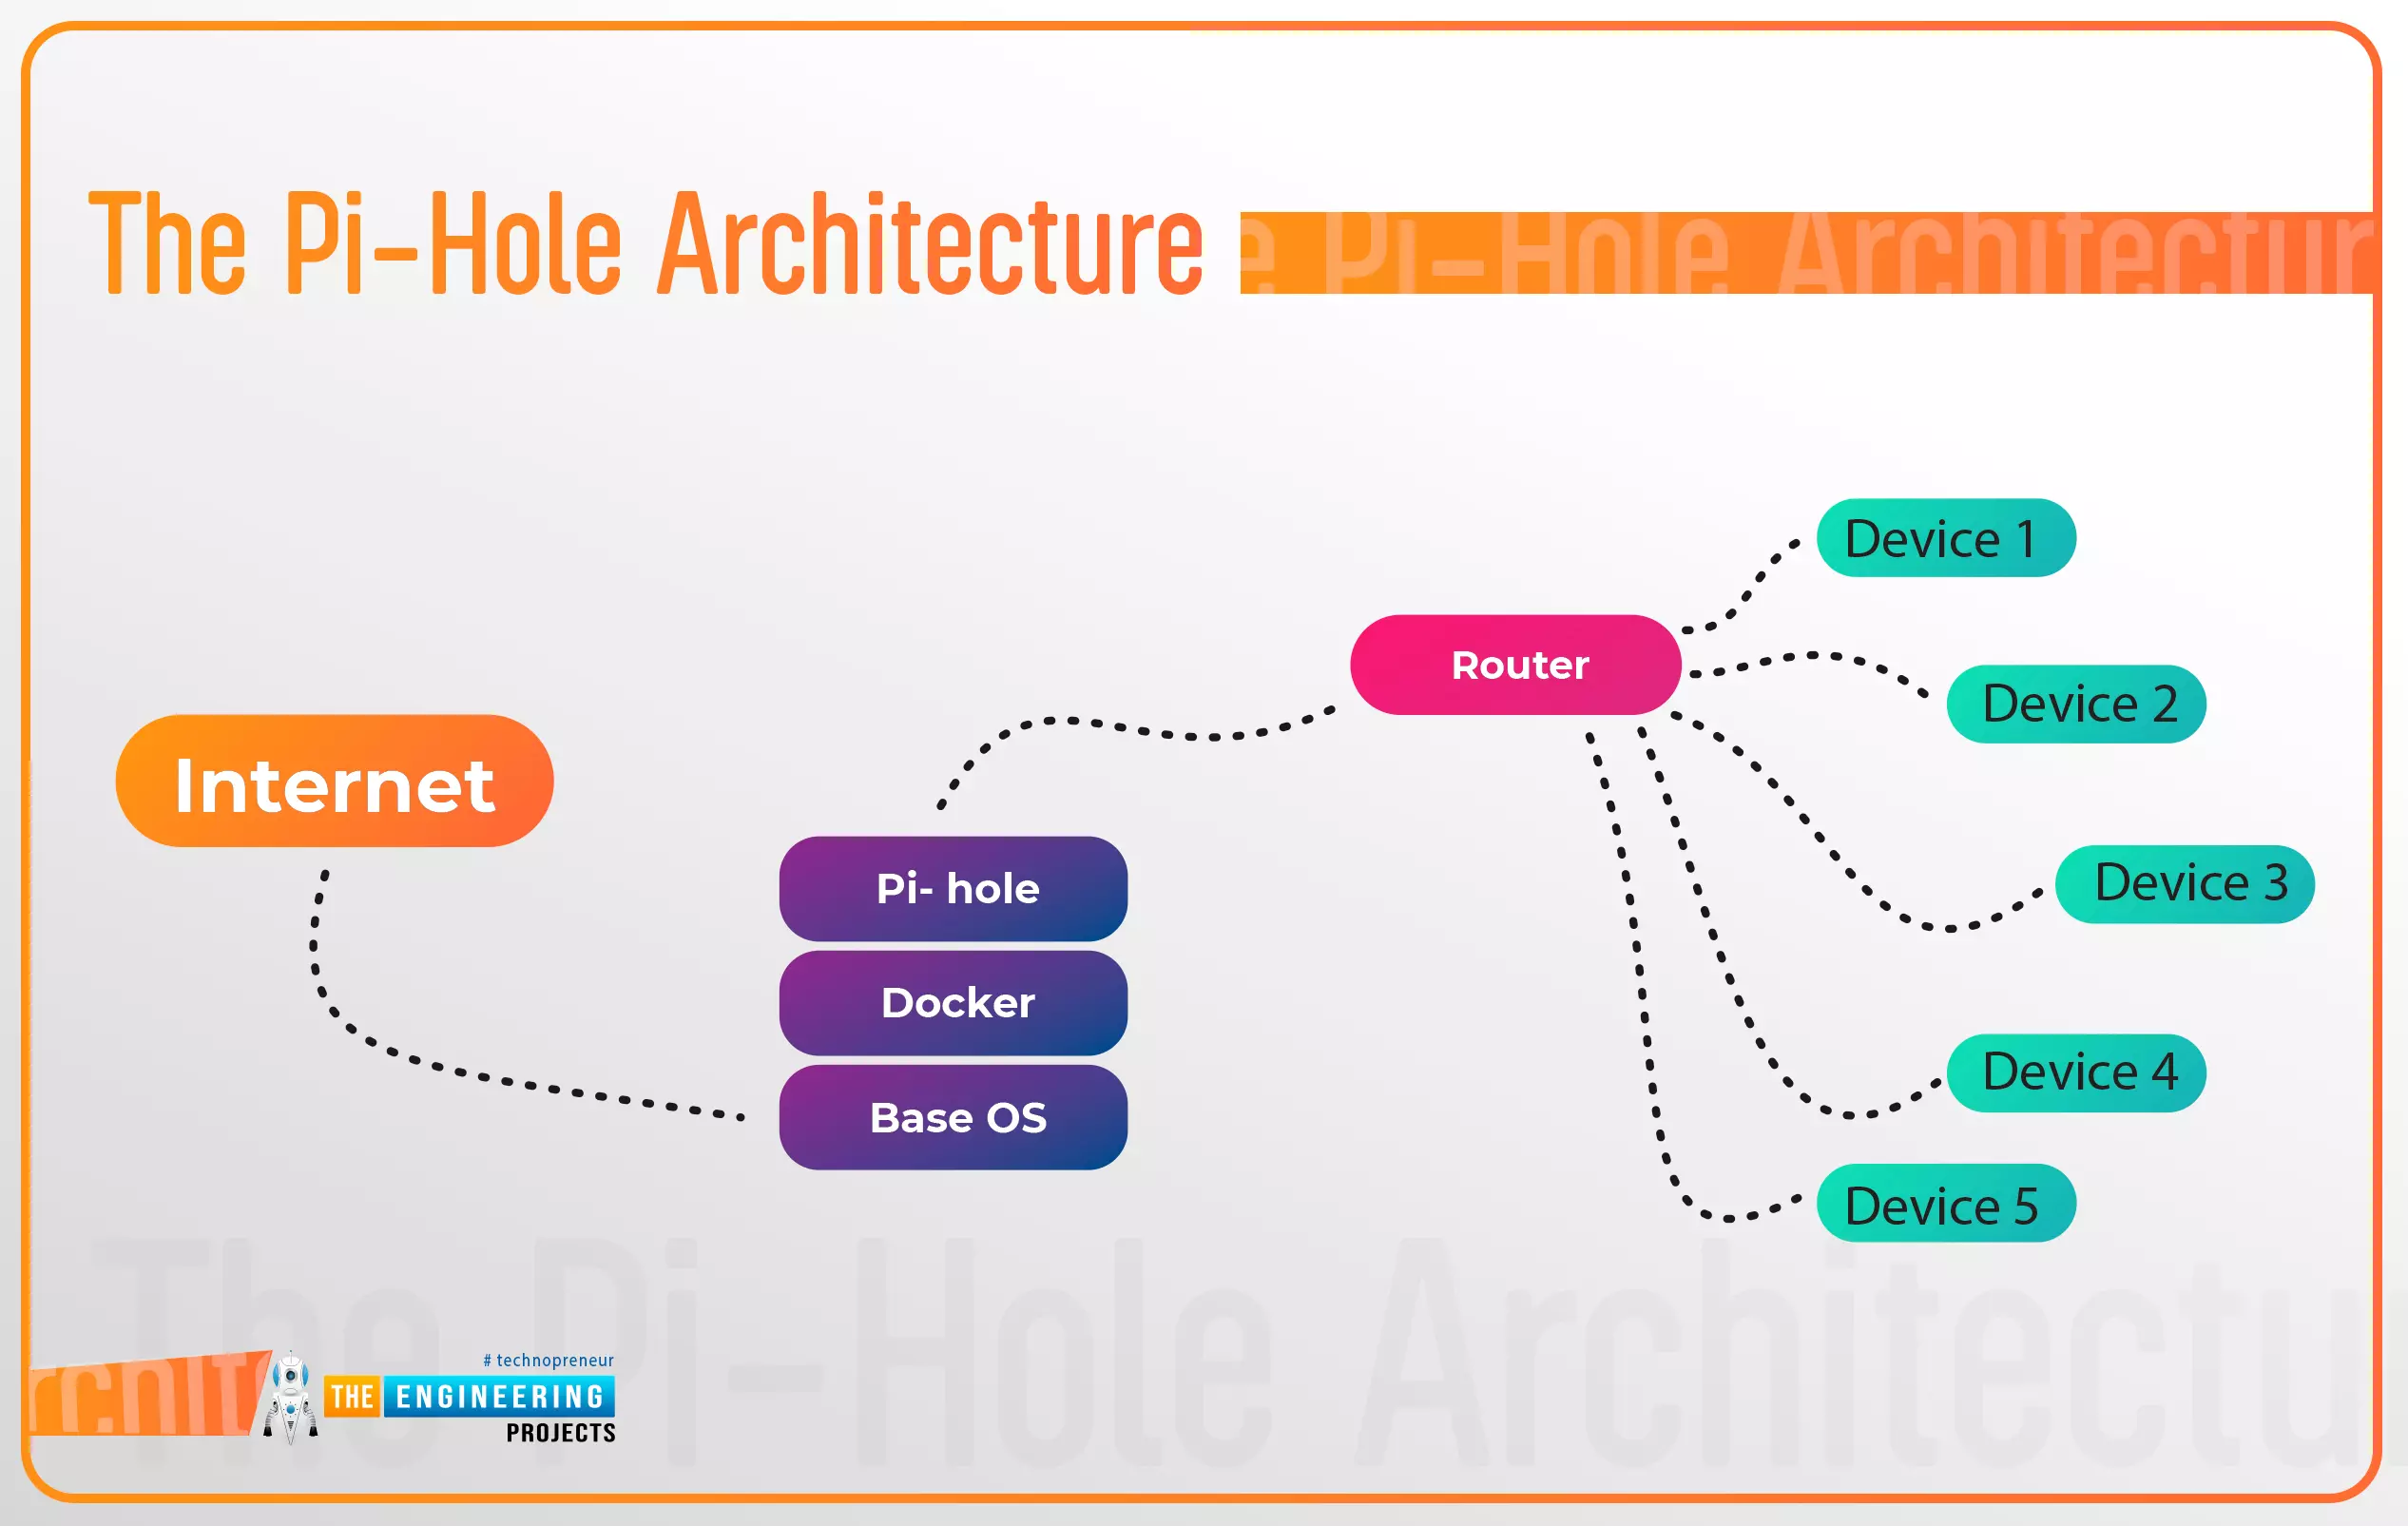
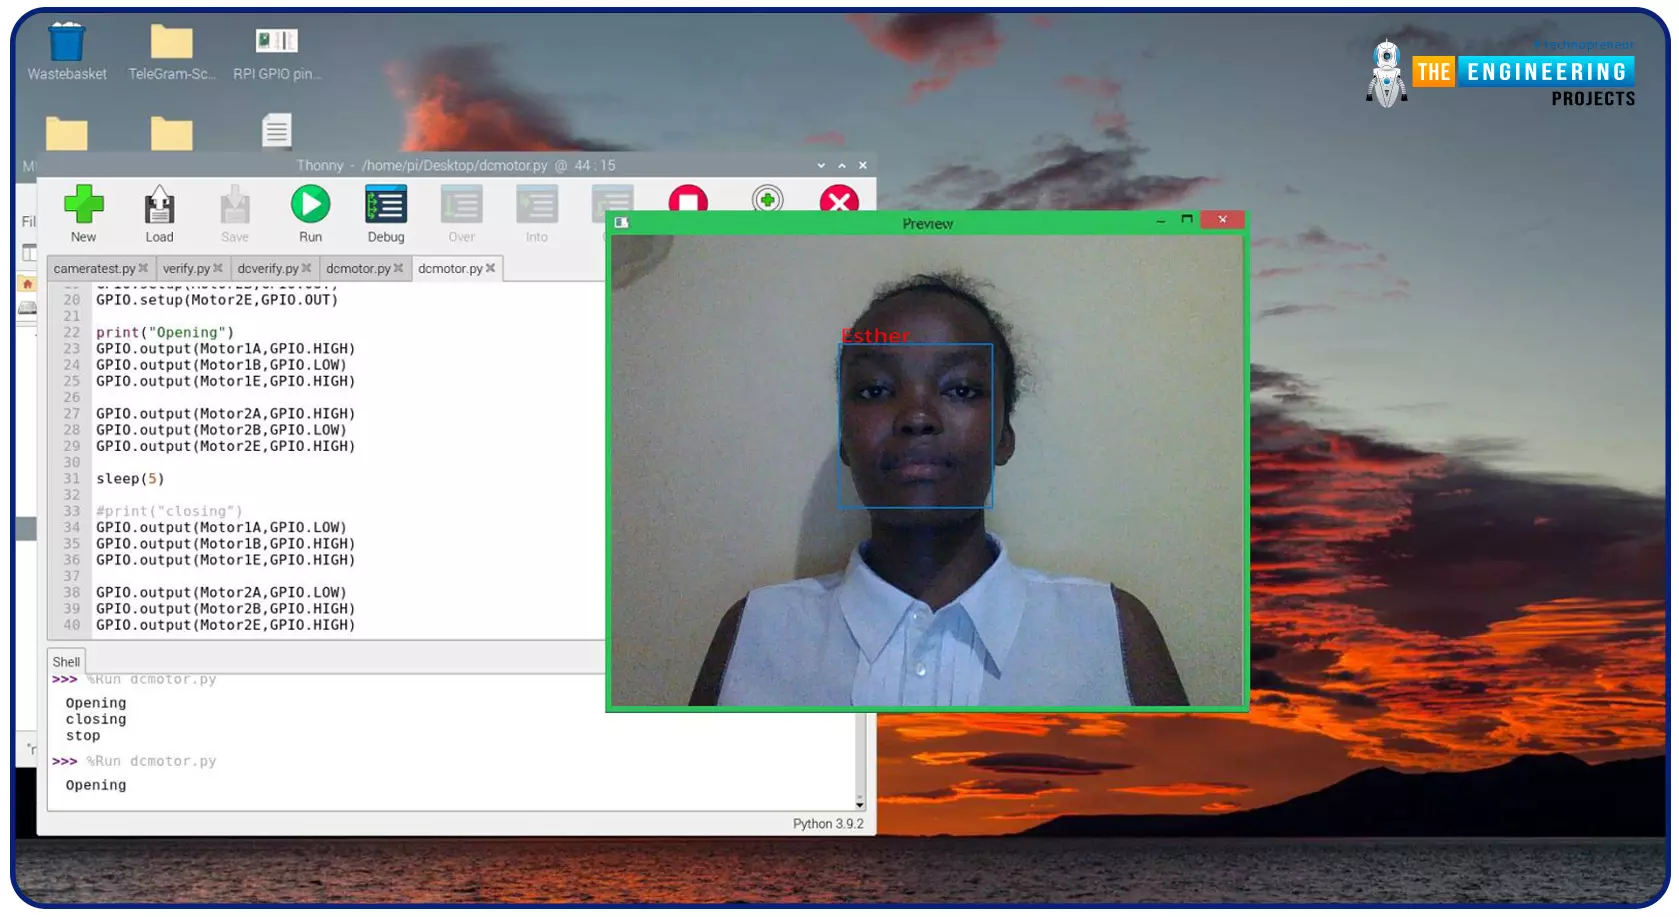
Thank you for joining us for yet another session of this series on Raspberry Pi programming. In the preceding tutorial, a facial recognition system on a Raspberry Pi 4 was used to develop a smart security system. We also learned how to create a dataset using two Python scripts to train and analyze a series of photographs of a certain person. This tutorial will teach you how to install pi-hole on a Raspberry Pi 4 and use it to block advertisements from anywhere. This is a great initiative for folks who are tired of annoying pop-up adverts while browsing. First, we'll learn how to set up the pi-hole without the need for an environment, then we'll use Docker to install pi-hole, and ultimately we'll see how we can access it from anywhere.
Prerequisites
A minimum of 512MB ...
Thank you for joining us for yet another session of this series on Raspberry Pi programming. In the preceding tutorial, we created a pi-hole ad blocker for our home network using raspberry pi 4. We also learned how to install pi-hole on raspberry pi four and how to access it in any way with other devices. This tutorial will implement a speech recognition system using raspberry pi and use it in our project. First, we will learn the fundamentals of speech recognition, and then we will build a game that uses the user's voice to play it and discover how it all works with a speech recognition package.
Here, you'll learn:
The basics of voice recognition
On PyPI, what packages may be found?
Utilize the SpeechRecognition package with a wide range ...
Hello readers, I hope you all are doing great. In this tutorial, we will learn how to interface the PIR sensor to detect motion with the Raspberry Pi Pico module and MicroPython programming language. Later in this tutorial, we will also discuss the interrupts and how to generate an external interrupt with a PIR sensor.
Before interfacing and programming, the PIR and Pico boards let’s first have a look at the quick introduction to the PIR sensor and its working.
Fig. 1 Raspberry Pi Pico and PIR sensor
PIR motion sensor and its working
PIR stands for Passive Infrared sensors and the PIR module we are using is HC-SR501. As the name suggests the PIR or passive infrared sensor, produces TTL (transistor transistor logic) output (that is either HIGHT o ...
Greeting, and welcome to the next tutorial of our raspberry programming tutorial. In the previous tutorial, we learned how to build a smart attendance system using an RFID card reader, which we used to sign in students in attendance in a class. When it comes to building a face-recognition program on a Raspberry Pi, this tutorial will show you how. Two Python programs will be used in the lesson, one of which is a Training program that analyzes a collection of photographs of a certain individual and generates a dataset. (YML File). The Recognizer application uses the YML script to detect a face and afterward utters the person's name when the face is detected.
Components
Raspberry Pi
Breadboard
L293 or SN755410 motor driver chip
Jumper wir ...
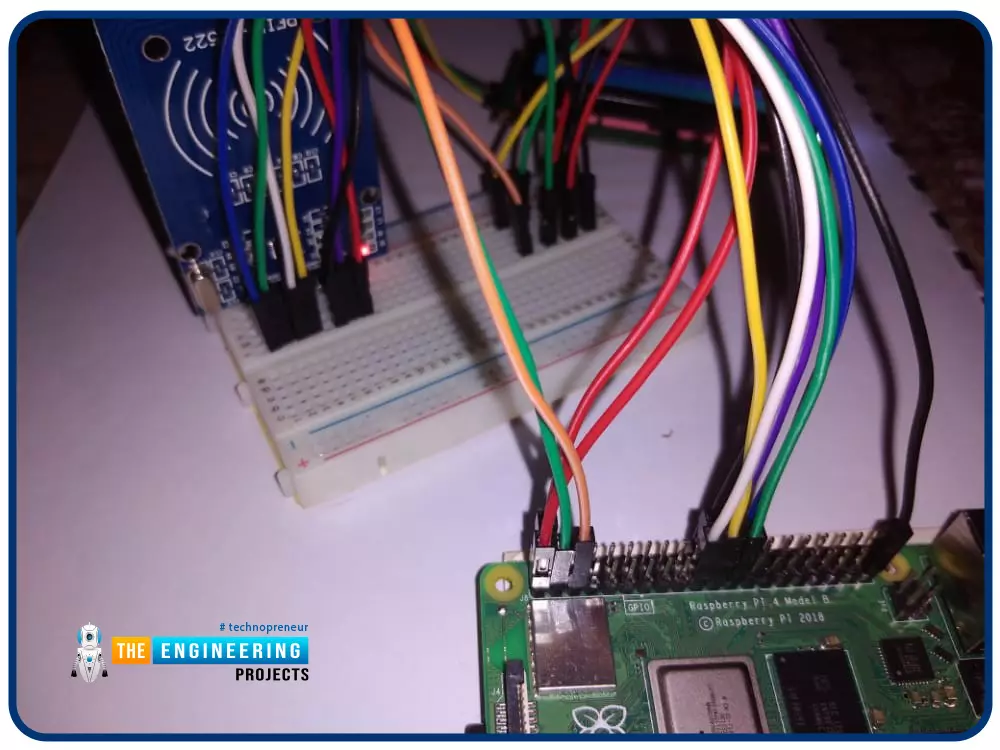
Greetings! This is the complete project of our Raspberry Pi 4 tutorials. In our previous tutorial, we learned to set up our raspberry pi as a virtual private network server. In this tutorial, we will design a smart attendance system using an RFID card reader, which we will use to sign in students in attendance in a class.
First, we will design a database for our website, then we will design the RFID circuit for scanning the student cards and displaying present students on the webpage, and finally, we will design the website that we will use to display the attendees of a class.
Components
RFID card kit
Breadboard
Jumper wires
Raspberry pi 4
I2C LCD screen
Design a database in MySQL server
Additionally, the Database server offers a DBMS ...