Creating a Pi-hole That Blocks Ads in Raspberry Pi 4


Introduction
Thank you for joining us for yet another session of this series on Raspberry Pi programming. In the preceding tutorial, a facial recognition system on a Raspberry Pi 4 was used to develop a smart security system. We also learned how to create a dataset using two Python scripts to train and analyze a series of photographs of a certain person. This tutorial will teach you how to install pi-hole on a Raspberry Pi 4 and use it to block advertisements from anywhere. This is a great initiative for folks who are tired of annoying pop-up adverts while browsing. First, we'll learn how to set up the pi-hole without the need for an environment, then we'll use Docker to install pi-hole, and ultimately we'll see how we can access it from anywhere.
Prerequisites
- A minimum of 512MB of RAM on the Raspberry Pi 4
- A minimum of 2GB of space on a Memory card.
- The Raspberry Pi must be able to connect to the internet.
- The ability to log into the management interface of your router.
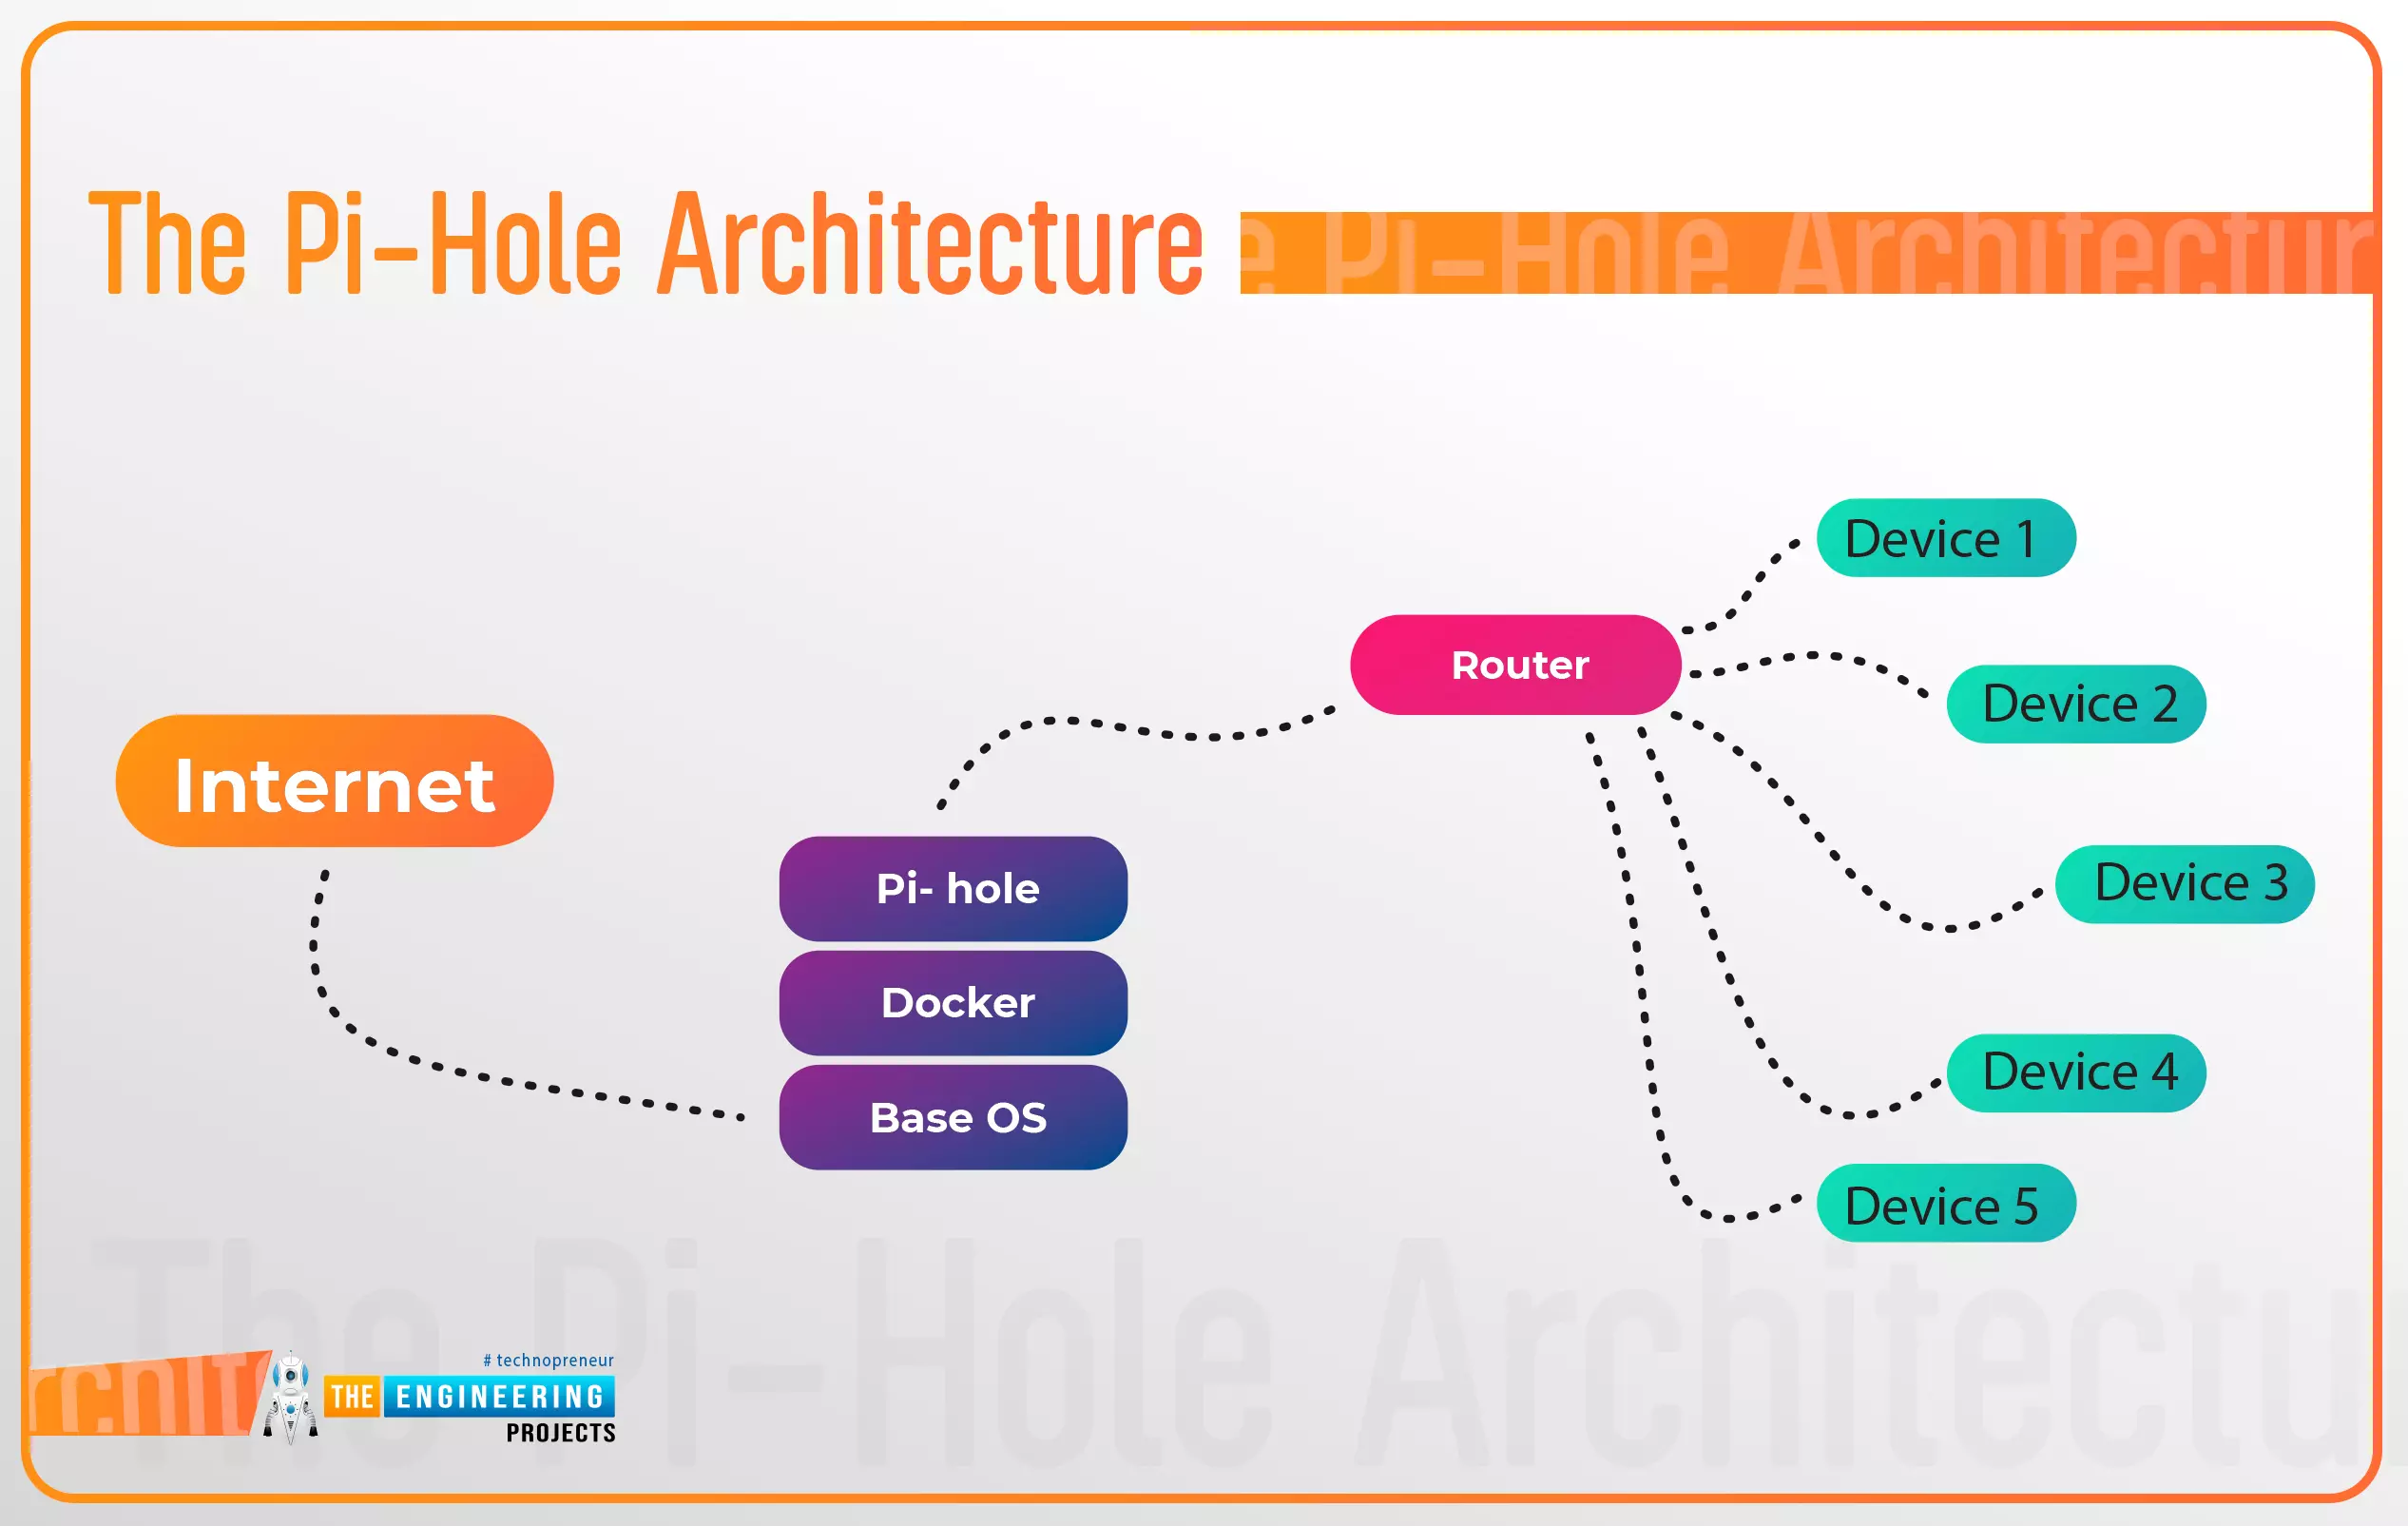
The Pi-hole architecture
Ads with poor quality are all over the internet, causing havoc with the entire user experience. Various varieties of these intrusive ads are available, ranging from video content that takes control of your browser to ads that infect your computer with malware and steal your private information without your knowledge.
So far, using an ad blocker has shown to be an effective method of preventing advertising of this nature. What if you could have an ad blocker that works on all your local area network devices instead?
Using Pi-hole, an ad-blocking program for the raspberry pi computer, you can block all major advertising networks from loading adverts on your networked devices.
You must first install and configure Pi-hole on your RPi before using it.
What is pi-hole, and how does it work?
DNS server requests are used by all internet services, including adverts, to get you from source to destination. A DNS server translates theengineeringprojects.com into server IP addresses that your web browser can use to connect to the site. As with DNS, ad networks use it to request that their advertising be served.
When you see a Google ad, your internet explorer is likely making requests to domains like theengineeringprojects.com to deliver them appropriately. You have to intercept and prevent these adverts from loading, and that's exactly what Pi-hole does.
You can use Pi-hole to operate as a DNS server for your network. Requests to ad networks are initially routed through Pi-hole, which serves as your Domain name server. Thousands of domains on its blocklist are compared to see if any match these. Ads will be prohibited if the website is blocked, allowing you to have an ad-free experience.
Devices with limited ad-blocking options will find this useful. If you want to avoid adverts on your smart TV or gaming console, you'll need a third-party tool such as Pi-hole to handle the job for you.
Pi-web hole's interface allows you to block or allow specific domains to prohibit strange advertising networks or other questionable sites from loading if you need to tailor the system.
Options for installing pi-hole
Pi-hole can be installed in two methods on a Raspberry Pi and other Unix distributions such as Debian and Ubuntu. When running a Linux distribution other than rasbian, a single-line command can be used to install it.
Alternatively, you can utilize Docker on the RPi to isolate Pi-hole in a software container. However, Docker requires many configurations, but it does enable you to host pi-hole on a virtual machine.
Option 1: Install using an automated installation script
The fastest approach to get Pi-hole up and running is to utilize the designer's installation script. Running the script via curl or downloading it manually are two options.
Launch a command line and enter:

sudo curl -SSL https://install.pi-hole.net | bash
Before the setup is complete, you can customize Pi settings holes by running the automatic installation script and downloading any necessary packages.
Curling a program from the web is generally terrible practice because you can't preview what the script does before running it, even if it is allowed. You could download your program and then explicitly run it as a last resort.
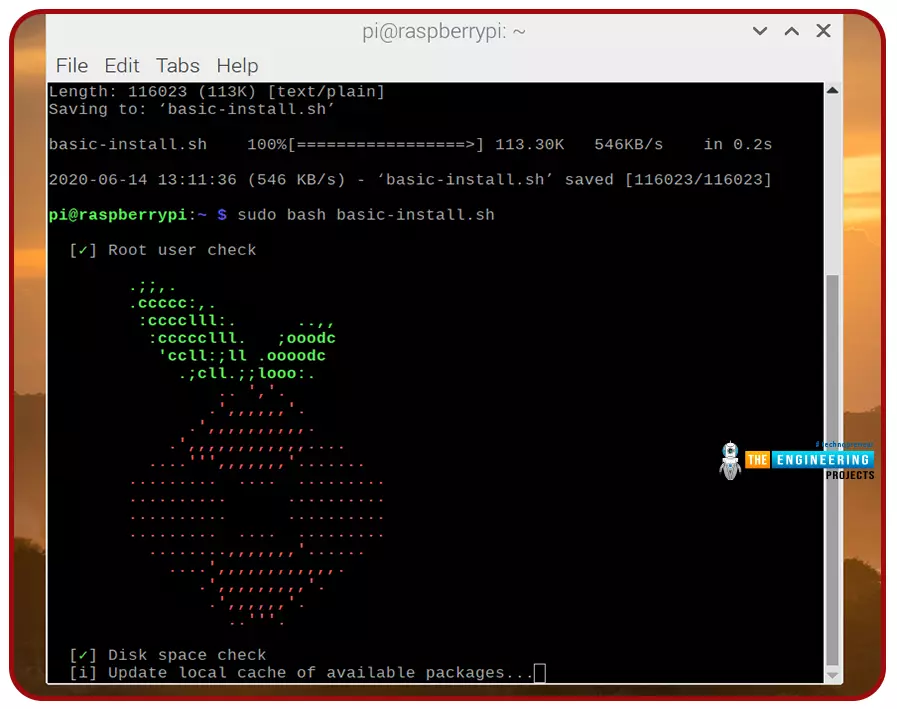
Obtaining the file is as simple as opening a terminal and typing.

wget -O basic-install.sh https://install.pi-hole.net
sudo bash basic-install.sh
Installing Pi-hole and any other required tools will be completed using the same script used during setup.
Configuring Pi-hole during installation
Your network connection and chosen logging level will be requested for confirmation at some stage in the installation procedure under the terminal's config choices.
- Start by pressing return to get through some initial setup screens. Use the arrow buttons to select Wi-Fi or ethernet, then tap space or return to complete the selection process. You can shift to the OK selection by pressing the tab key, then press enter to verify.
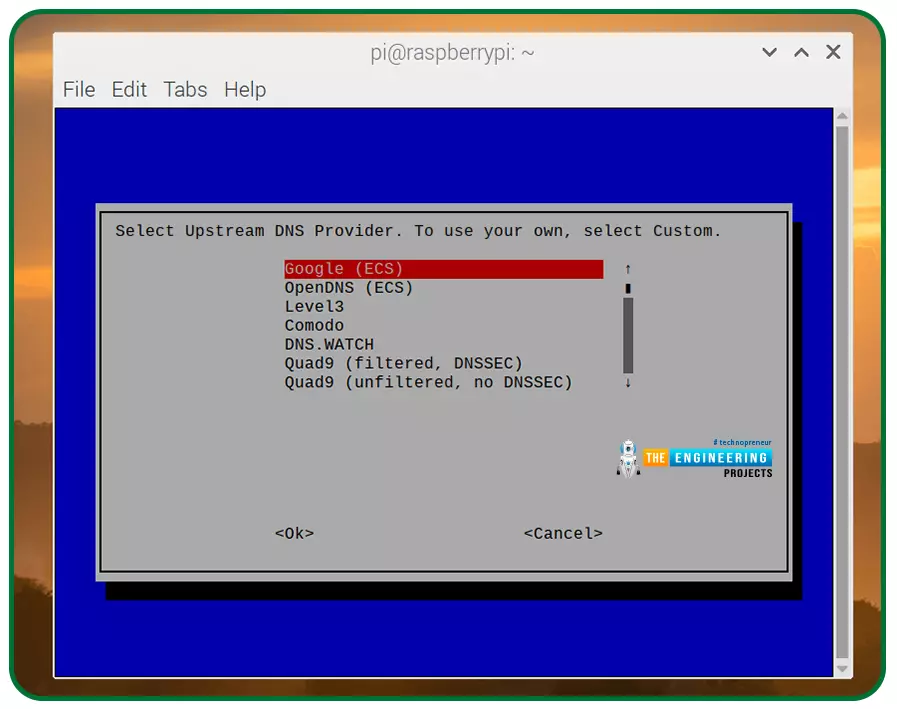
- Next, you will be requested which external Domain name server you would like to use. Use the arrow buttons to navigate to the service provider you want, then press return to verify your selection.
- A question about advertisement blocking lists will come up next. By default, Pi-hole gives four lists, which you should leave chosen, and you can always activate or deactivate any of them by clicking them and pressing space on the keyboard.
- The next step is to press enter after selecting OK using the tab key.
- By default, Pi-hole blocks advertisements on both IPv4 and IPv6 networks. Unless you choose to alter this, leave the default settings enabled, hit the tab to choose OK, and then press enter.
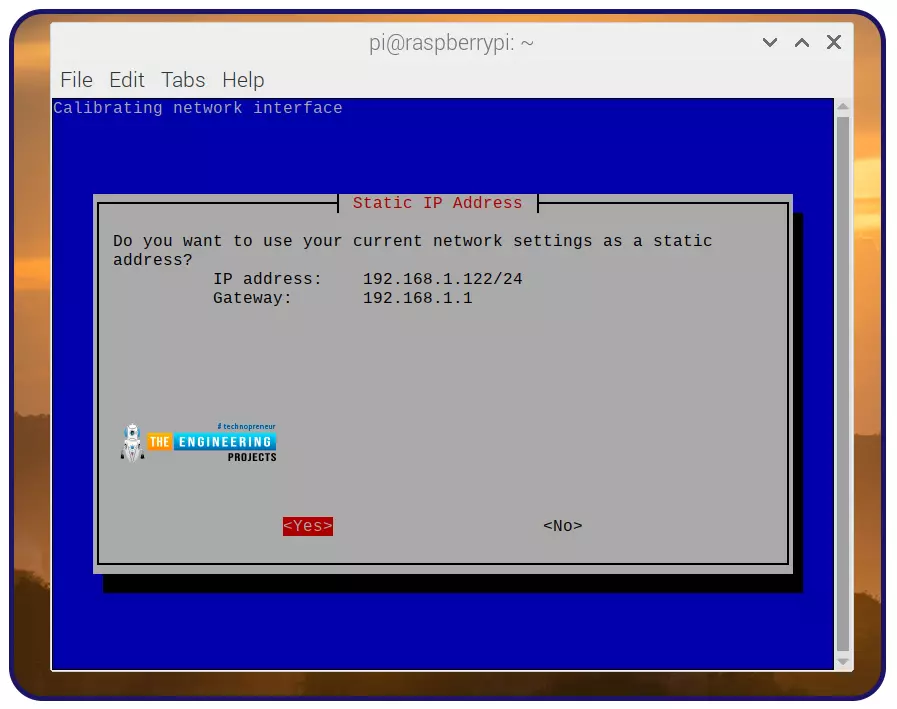
- If the Internet protocol and Internet gateway displayed are valid, you'll be prompted to verify its use in Pi-static hole's Internet protocol setting. Type Yes or No, to update your preferences.
-
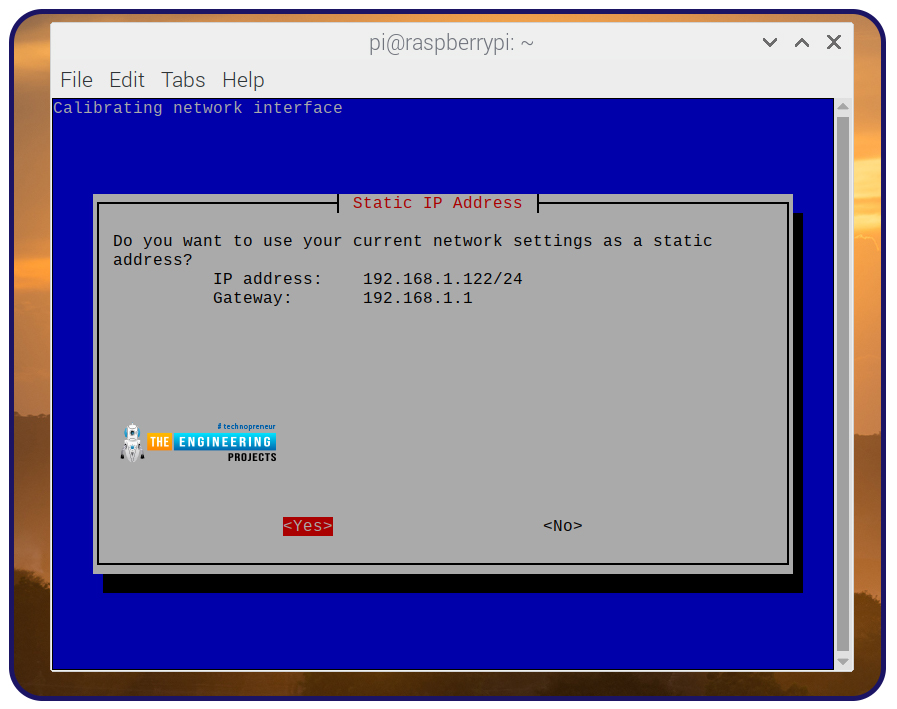
- In the event of an IP clash, Pi-hole will provide an alert. Accept this notice by using the enter key.
- Pi-hole comes with a web browser-based admin panel that you may use to customize and monitor it. This is the default setting for setup, and it is the best choice here. To continue, press the tab, then select the OK option. In the next step, you will need to verify that a web server has been installed for the administration interface.
- To log inquiries, Pi-hole will prompt you. What Pi-hole is restricting and how frequently certain domains are restricted may be found here. To check that this is the default option, press the tab and return.
- You can choose how much information you want to see about the Pi-hole, so if you're okay with the default setting, press the tab and return.
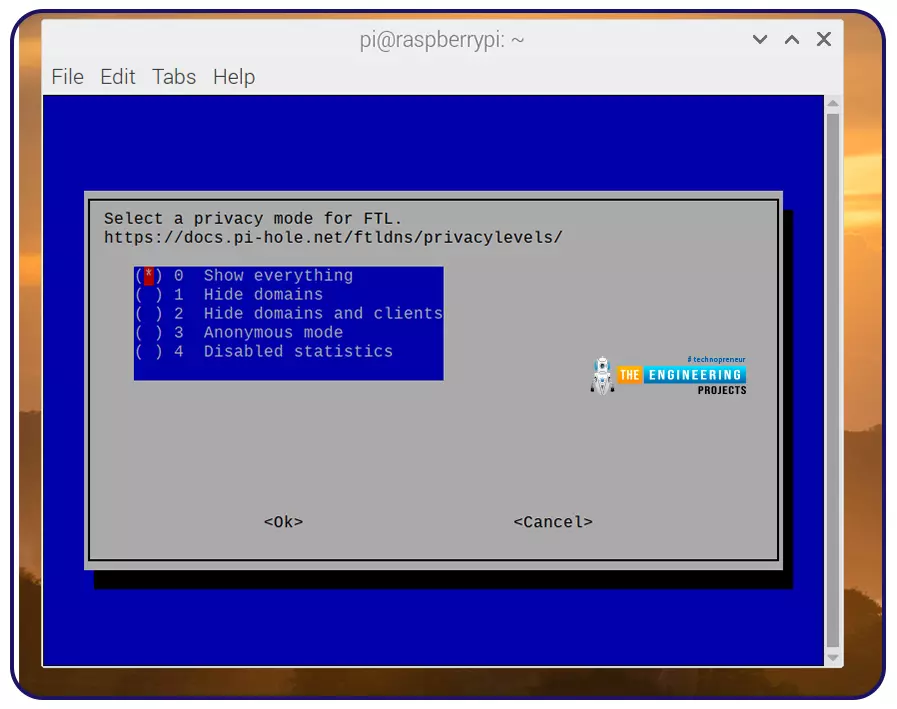
- The Pi-hole setup will begin after you've chosen your desired login level. You will receive a final confirmation request in the command line once the setup is finished and will be given instructions on where to access the online portal and a password that was automatically generated. The installation can be terminated by pressing the tab and entering this stage.
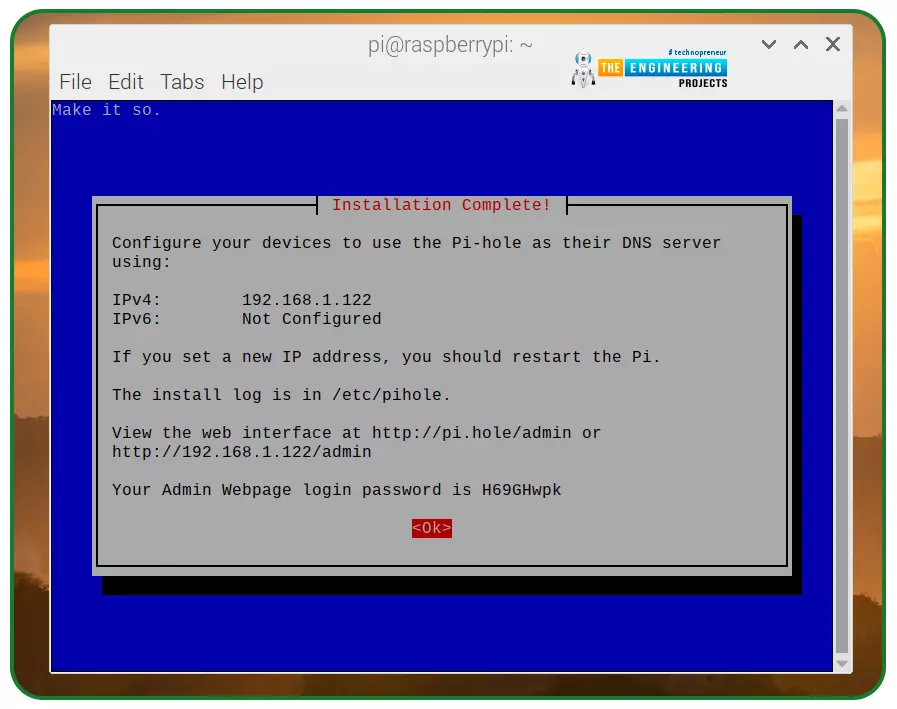
If you don't want to risk losing the randomly created admin passcode displayed at the end of the installation, make a note of that information. If you lose or forget the passcode, you will have to open a command line and run the below to change the password.

sudo pihole -a -p
Option 2: Install using Docker container
A Docker container can be used instead of the script supplied above to manage Pi-hole.
What is Docker?
Docker is a free software platform for creating containers. With the rise of cloud-native systems, container delivery has gained popularity as a more efficient means of distributing dispersed applications.
It's possible to develop a container without Docker. However, the framework makes the process easier and more secure to do. Docker is a set of tools that make it easy for programmers to create, deploy, operate, upgrade and terminate containers with a single application programming interface and a few basic instructions.
How does Docker work?
The Unix kernel has inbuilt isolation and virtualization features that make containers practical. Many of the same functionality that a hypervisor provides to allow multiple virtual machines to share a common hardware CPU and memory can also be found in the os.
Since containers provide all the benefits and features of Virtual machines, like software isolation, low-cost scaling, and disposability, they also offer some major new benefits:
- Lighter weight:Virtual machines carry the whole Operating system and hypervisor; containers comprise operating system processes and requirements required to run code. Megabyte-sized containers make greater use of hardware resources and start up more quickly.
- High resource efficiency:As a result, containers allow you to execute several instances of the same program on single hardware as virtual machines. This can help you save money on cloud storage.
- Improve developer’s productivity:Containers are more convenient and quicker to deploy, manage, and reboot than VMs.
How can we install Docker?
Install using shell script
Docker provides a shell script that makes it simple to get it up and run.

curl -sSL https://get.docker.com | sh
The following two commands can be used to analyze programs before they are executed:

curl -SSL get.docker.com -o get-docker.sh
sh get-docker.sh
Using Docker as a non-root user
The "permission denied" message will appear if you run several Docker commands, indicating that the root account can only use Docker. For non-root users that want to run Docker commands, the following command will work:
sudo usermod -aG docker pi
It is possible to add users to groups using usermod with -aG. A person called "pi" is now part of a " docker group." This made it possible for pi to perform docker instructions. Any other user can substitute the default pi account.
The command below can be used to confirm this:

groups pi
Check to see if Docker is mentioned as a group.
Test Docker
We will use the hello-world image to see how well Docker works.

docker run hello-world
To tell whether you have installed Docker correctly, you will see "Hello from Docker!"
How can we install Docker-compose?
With the help of Docker-compose, you can create and maintain your environment with YAML files. For applications that require various interconnected services, this is a particularly helpful feature.
To get docker-compose up and running, run pip3 to get it started.

sudo pip3 -v install docker-compose
Setting up Pi-hole as a Docker container
You'll need to clone the Pi-hole Docker installer from the Pi-hole Git repository to run Pi-hole in a docker container. Let us install Git so that we can get started on this.
Installing Git
Git keeps track of all the modifications you make to scripts, allowing you to roll back to previous versions if necessary. Using Git, many people may merge their contributions into a single source, making it easier for everyone to work together.
You can use Git irrespective of whether or not you develop code that you alone will view or if you are collaborating.
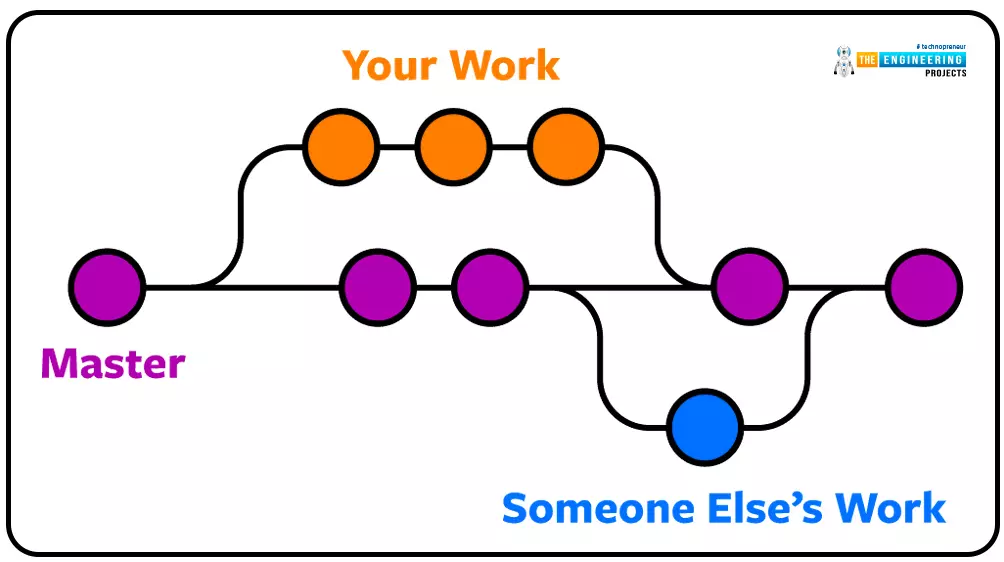
Git program can be executed on a computer's hard drive. You have access to all of your documents and their histories on your computer. Online hosting can also be used to keep a duplicate of the documents and the histories of their modifications. Sharing your modifications and downloading others' updates in a central location makes it easier to collaborate with other programmers. You may even integrate the modifications made by two people working on the same project without losing one another's work, thanks to Git's ability to combine changes automatically.
Download and install Git
You may get the software of any os from the Git official site.
Installing Git from the command-line interface is as simple as typing the commands below into your terminal window:

sudo apt-get install git-all
Create your git username
Type in the following command:

git config --global user.name "TheEngineeringProjects"
The quote marks are for your name. The —global parameter specifies that your Git name will be set for all your computer's repositories.
Type the command below to make sure you typed your username accurately when in doubt.

Git config --global user.name
this should return your username:

Set up email
When pushing code to GitHub, you'll need to provide a valid email address. This can be done in Git.

git config --global user.email "Theengineeringprojects@example.com"
To make sure you've entered your email address correctly, here's a final check:

git config --global user.email Theengineeringprojects@example.com
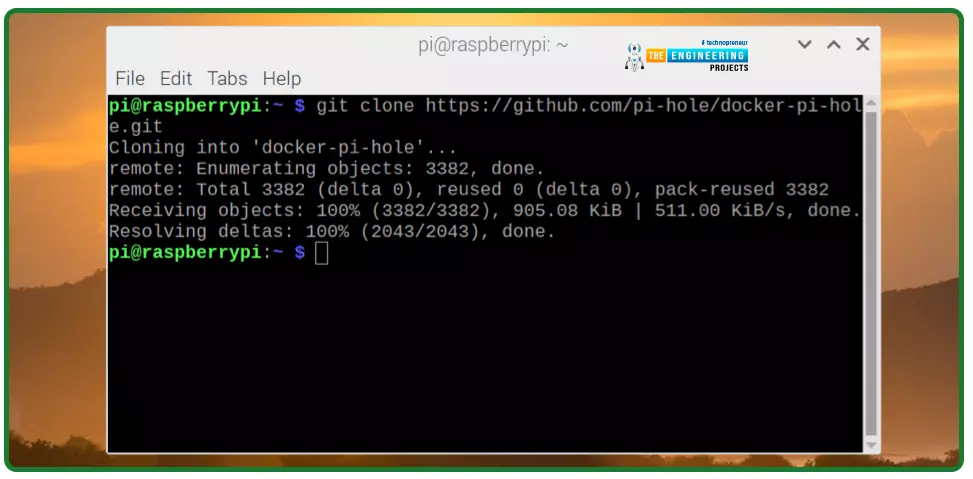
Let us clone the pi-hole GitHub repository.
In a command window, enter the following commands.

git clone https://github.com/pi-hole/docker-pi-hole.git
The pi-hole git repository will be fetched to run Pi-hole in a Virtualized environment. Your container's setup script may be found in the copied Pi-hole directory. You should look over and make any necessary changes to the setup script before executing it.
The program automatically generates an admin passcode for Pi-hole, as are other options like the time - zone Pi-hole utilizes and the standard Domain name server it uses for outbound DNS queries.
- It's possible to make modifications to these parameters in the nano editor.
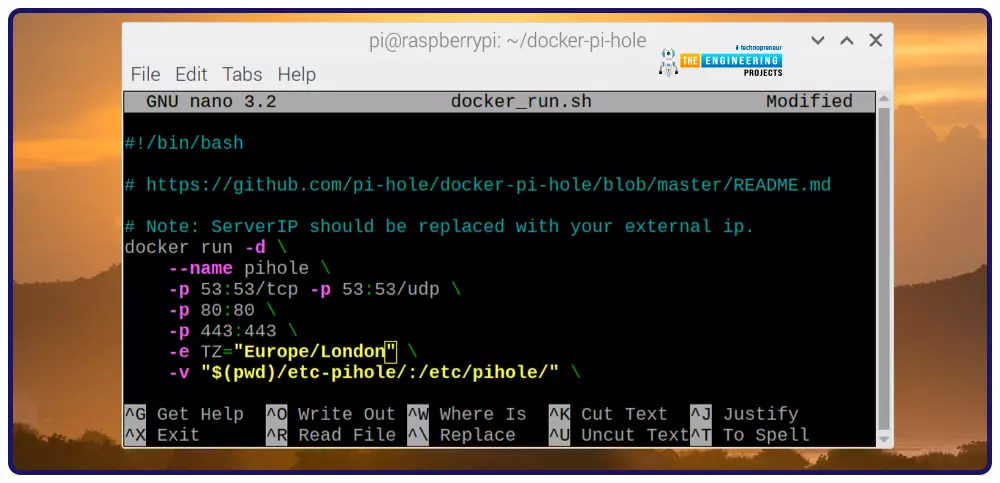
- Open a command window and type the following command into it. Pi-hole should now be running in its own Virtualized environment upon successful completion of the script.

./docker_run.sh
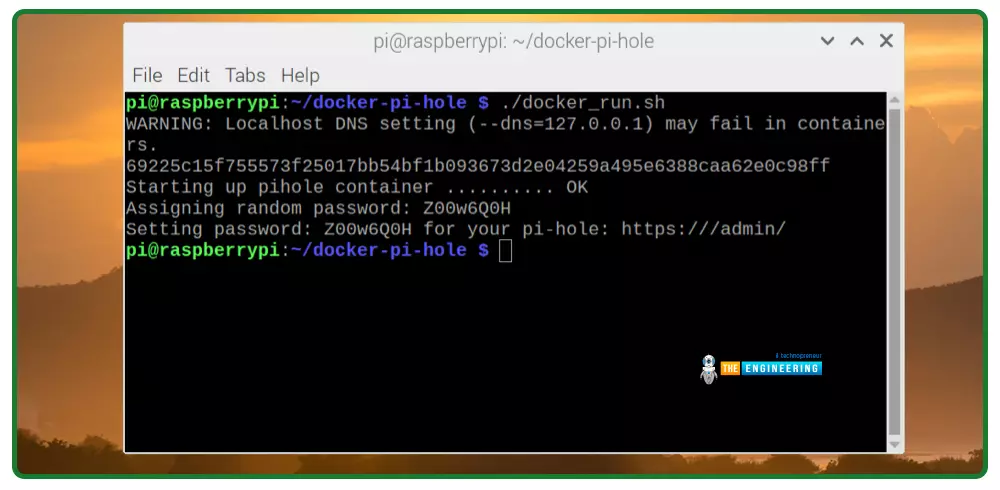
Take note of the passcode displayed when the script has been completed successfully. Please note that this passcode is required for further configuration of the Pi-hole.
A reboot of your raspbian should immediately start the service Pi-hole, thanks to its Docker launch script use of the —restart=unless stopped parameter.
However, this only works if you have performed the above steps to activate the container init file to ensure the Docker container is automatically launched upon startup.
Configure individual devices to use pi-hole
Your gadgets should be ready to use Pi-hole now that it has been installed and operating. Default by Pi-hole does not block advertisements in your network. Change your device Domain name server settings to use the Rpi's internet address instead, and they will work.
Each gadget on the local network can be configured for Pi-hole as its Domain name server manually or set up your home network router for Pi-hole instead. To physically configure each device to use Pi-hole, please follow the instructions below.
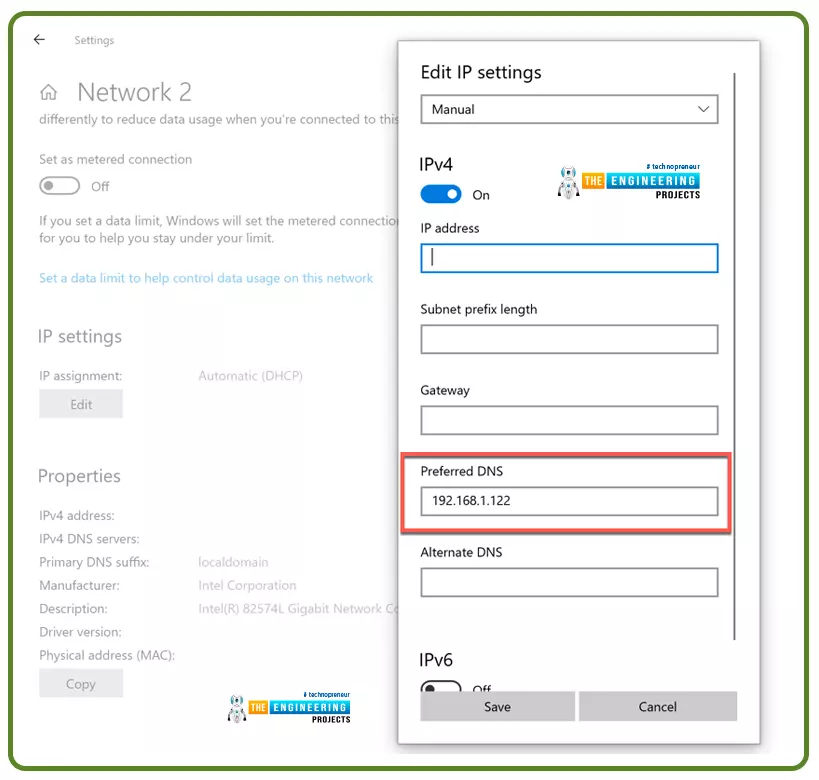
- Windows 10:A list of available DNS servers can be found under "Network Connections" in the Windows control panel. Select Change connection settings and note the info in the Property section under Status. IPv4 should be set to manual with the slider beside it, and the rest of your Internet protocol settings should match what was originally indicated under Properties by selecting edit from the Internet protocol settings menu. Preserve the Pi-hole Internet address in the column titled "Preferred DNS."
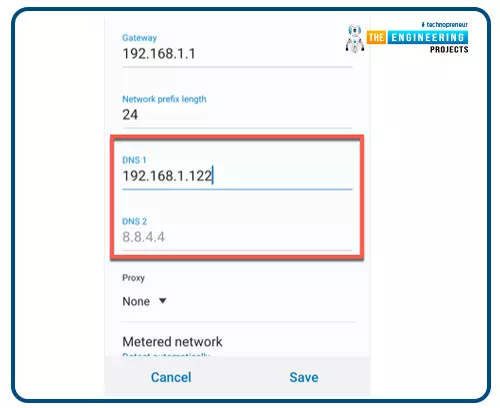
- Android: To modify your Domain name server settings, you'll need to go into the Configurations on your Android phone or tablet, but the process will differ greatly based on the device type and os version. Click the Connectivity area and then click Advanced to proceed. Static internet address configurations, rather than dynamic host configuration protocol, may be required to configure your Domain name server manually. Add the Pi-hole Internet address as a Domain name server in this section and then save.
- Other devices:Utilize the instructions below to set up the router for Pi-hole rather than your router's default network configuration, or review the manual that came with your devices to learn how to do this.
Your Pi-hole admin interface should begin to show web requests from all devices once configured to utilize the Raspberry Pi's Internet address. Launch an ad-supported application or visit a site like Forbes if you want to ensure Pi-hole is restricting advertisements.
Pi-hole should function properly if the adverts are blocked. In some cases, restarting your devices may be necessary for the Domain name server settings to take effect.
Configure the router for pi-hole domain name server
To utilize Pi-hole on many devices within your network, you'll need to configure all of the local network's computers and routers, which is time-consuming and inefficient.
You should use your Rpi's internet address instead of your router's Domain name server settings. As a result, no advertising will be sent to any gadgets on the local area network. By contrast, manually configuring the Domain name server on each device is time-consuming and inconvenient.
To change your Domain name server settings, you will need to know what kind of router you have and what model it is. This information should be displayed on the router or included in the package that came with it.
As a last resort, you might examine your router's guide, use an internet browser, and try out some popular internet protocol addresses.
Internet providers' Domain name servers are typically pre-configured in the router. Ensure the Internet protocol address of the RPi is used as the DNS server.
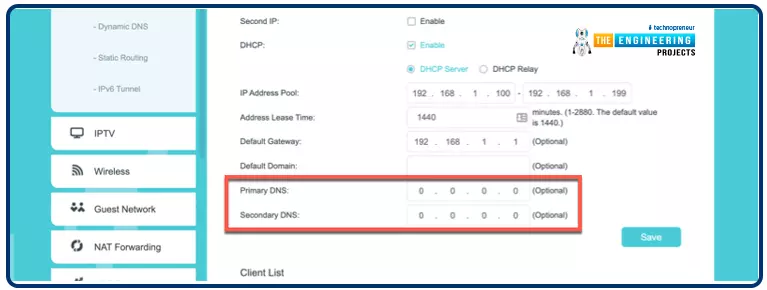
As a result, all devices connected will be directed to use Pi-hole as the initial gateway for all Domain name server requests. There will be no processing of banned queries, while approved queries will be forwarded to the internet domain name server provider you've selected in your Pi-hole settings.
You may need to reset your router for your new Domain name server configurations to take effect throughout your whole network.
How to configure pi-hole from the admin portal?
If Pi-hole is up and running, you may log into the administrator site from any internet browser by entering the URL below.

If that doesn't work, it may be necessary to look up your Rpi Pi's internet protocol address if that doesn't work.
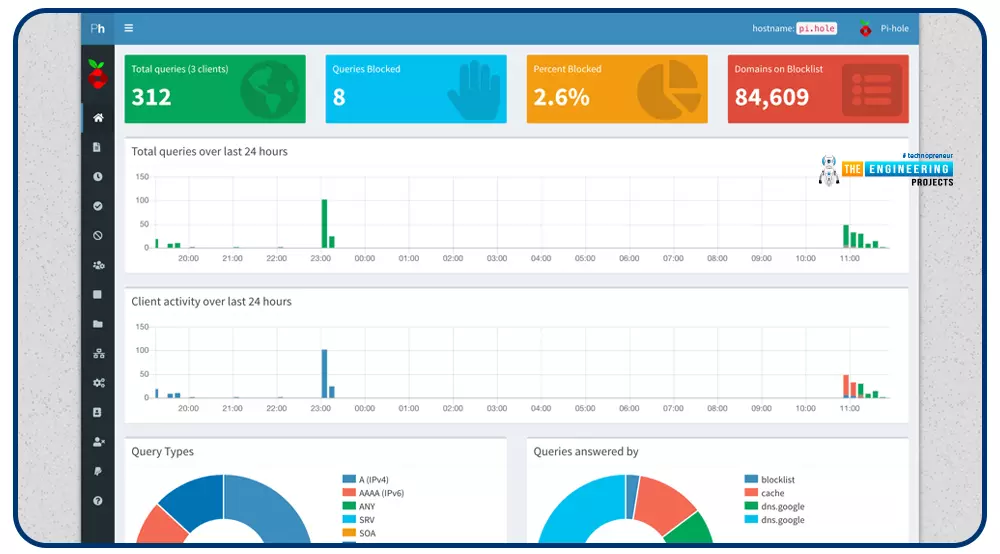
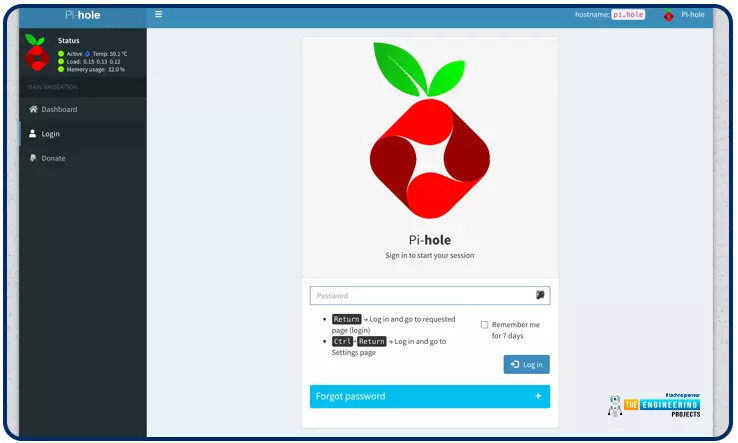
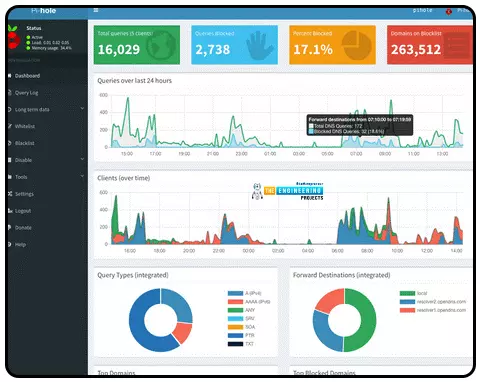
Users who haven't logged in to Pi-admin hole's site should be able to see a summary of the service's statistics. Even though Pi-hole is designed to be a "set it and leave it" solution, you will have to make any necessary changes to the settings here.
The Pi-hole administrator site can be accessed by clicking the Login button in the left navigation. Signing in requires you to use the passcode you set up while installing Pi-hole.
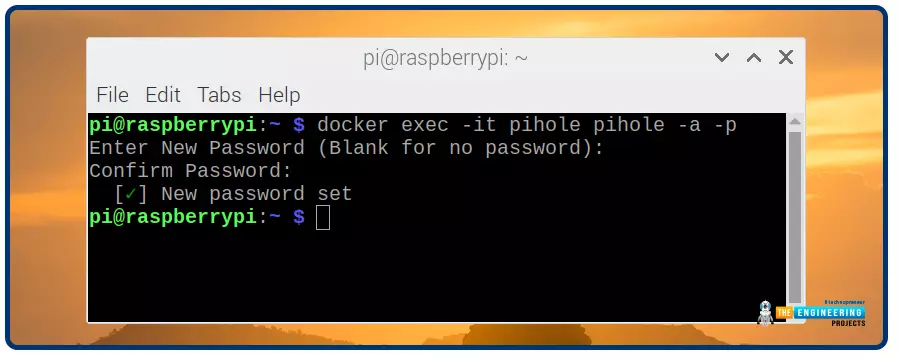
If you ever forget the Pi-hole administrative passcode, launch a command prompt or remote SSH connect and use the following command to change the passcode.

sudo pihole -a -p
or

docker exec -it pihole pihole -a -p
When using Docker containers to execute Pi-hole.
You will see all of Pi's features, hole stats, and reports after you have logged in. Pi-hole logs, bans and access control lists, and settings area are all accessible from this left navigation bar.

Most popular advertising networks are blocked by Pi-hole's lists which are frequently updated and managed by individuals and companies.
You can see them by selecting Group Management afterward Adlists in the left menu, where you may deactivate or delete any existing groups, or you can create your own.
Restrict and unblock domains by adding and removing them from the Blacklisted domain list. You can add a DNS server and descriptions to either the Blacklisted or Allowed domains menu by clicking on the Add button.
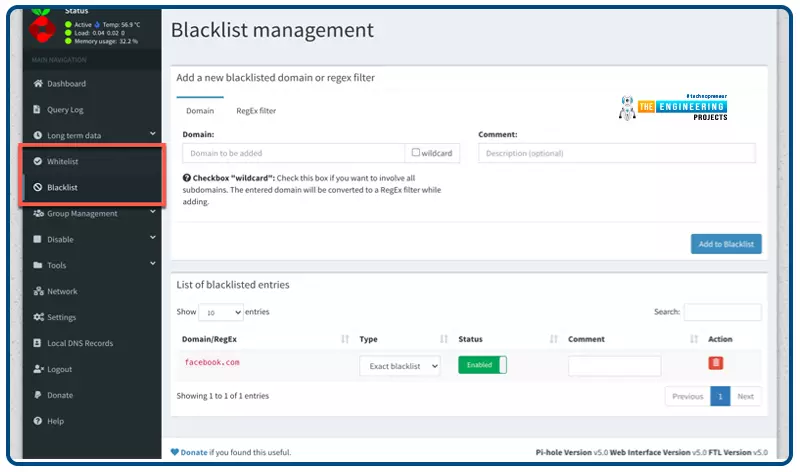
Select the red delete button symbol next to any entry in the Category of items section below that you want to delete.
How can we access pi-hole from anywhere?
If you've got an RPi running Pi-hole, you can utilize it as the Wi-Fi network's domain name server. At home, this is a terrific way to relax. However, you must be at home for this to work. Your Pi-hole must be accessible from any location if you wish to utilize it to prevent advertisements.
Pi-holes in the cloud is the most obvious method of accomplishing this. As long as you don't take further safeguards, malicious actors could exploit your Pi-hole to target other network portions. You also need to subscribe to it and integrate a cloud server. Regardless, we'll go with the low-cost and simple solution of using our RPi with Tailscale.
What is the tail scale?
There is no better way to connect every device safely and conveniently than Tailscale. It gives you the option of selecting a Domain name server.
Tailscale can be used for free in most situations like this by individuals.
Step 1: Install Tailscale in Pi 4
the first step is the installation of transport HTTP

sudo apt-get install apt-transport-https
Afterward, include the tailscale sign key and repo in the

curl -fsSL https://pkgs.tailscale.com/stable/raspbian/buster.gpg | sudo apt-key add -
curl -fsSL https://pkgs.tailscale.com/stable/raspbian/buster.list | sudo tee /etc/apt/sources.list.d/tailscale.list
With the code provided below, tailscale is now up and running

sudo apt-get install tailscale
Link your computer to the Tailscale network by authenticating and connecting it there.

sudo tailscale up --accept-dns=false
Pi-upstream hole's servers are Linux-configured Domain name servers, to which it sends DNS requests it cannot answer. Pi-Hole should not attempt to act as its source as it will serve as our Domain name server in this configuration.
Now you're linked up! You can discover your Tailscale Internet protocol address by:

tailscale IP -4
Step 2: Install Tailscale
Tailscale's official website has the software you need to get started.
Step 3: Set your Raspberry Pi as your DNS server
Tailscale's administrator console allows you to set up Domain name servers for your whole network. As a universal name server, provide the Internet address of your RPi's Tailscale as the Domain name server address.
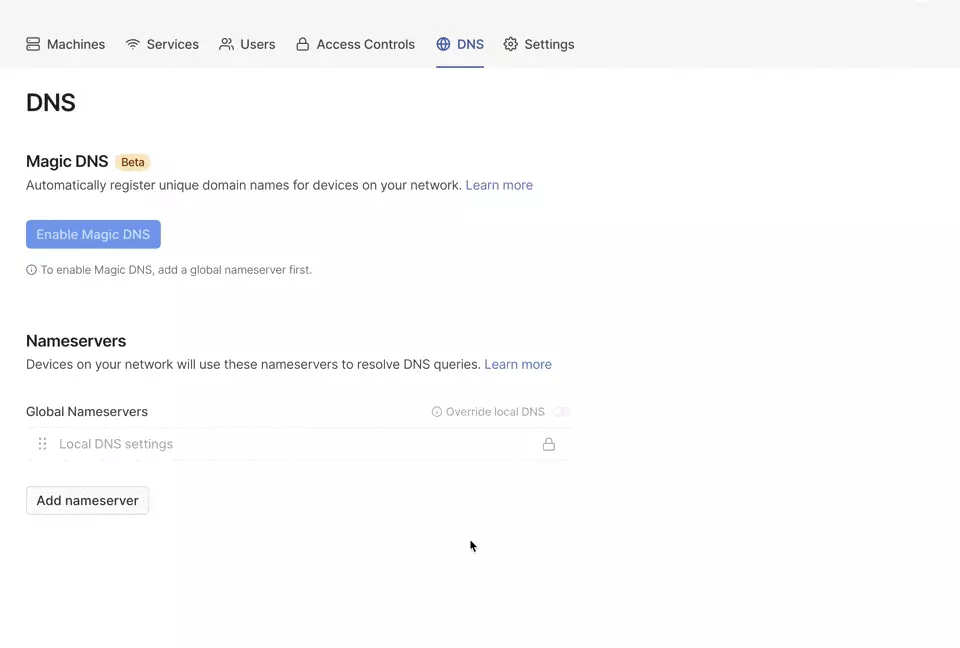
Ensure to use the Override domain Name server option upon entering the Rpi's Tailscale Internet address so that our internet Domain name server will overwrite any local Domain name server settings that endpoints may have.
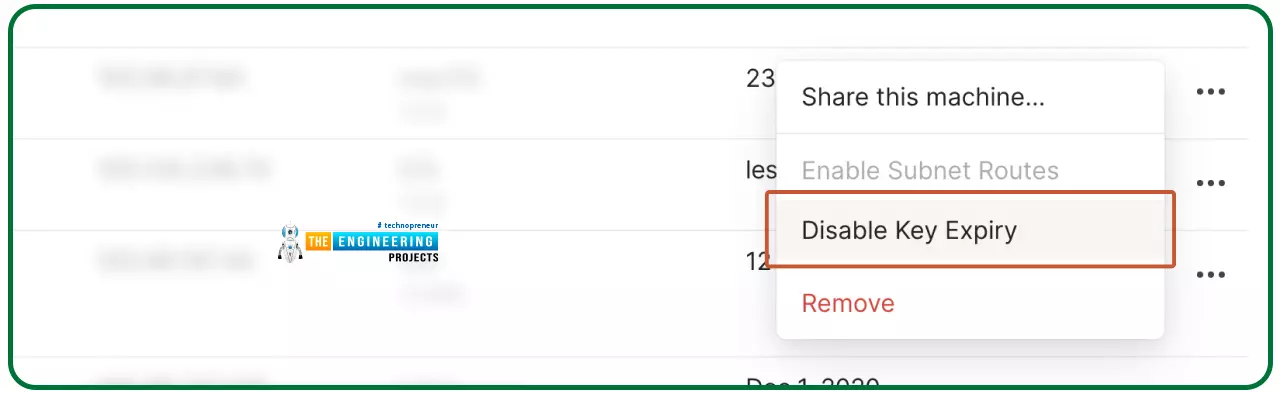
Step 4: Disable key expiry
The security of your network may require that from time to time, you re-authenticate your devices with Tailscale. You'll want to turn off key expiration on the RPi in the administrator dashboard to prevent Domain name server outages when this happens.
That's all there is to it! Whenever you sign in to Tailscale, the Pi-hole will immediately serve as the Domain name server for that machine.
If the Pi-hole is preventing you from accessing whatever you need, you can deactivate it by deactivating Tailscale and reconnecting whenever you're ready.
Once Pi-hole is configured, what next?
If something goes wrong, you'll want to be comfortable with the Pi-hole administrator interface, but you won't need to use it regularly. Advertising networks and trackers will be secured and blocked on all or some of your equipment when your gadgets have been configured with Pi-hole in the background.
Because of Docker, you can run multiple programs on the Raspberry Pi simultaneously, providing a 24-hour DNS for you to access. As we've described in earlier chapters, you can use a Rpi network storage or a Rpi VPN to protect your privacy and anonymity online.
Benefits of pi-hole
Ad-serving Domains will be blocked.
A list of well-known ad-serving domains is produced using data obtained from third parties.
Ads Can Be Banned On All Devices.
Using internet filtering, it is possible to ban adverts in many platforms, such as mobile applications and smart screens.
Enhance the network's performance.
Your network connection will perform better because advertising is prevented before they load.
Reduce the amount of data you use on your phone
Use adblocking software with a VPN service for advertisement blocking and data savings.
Keep Track Of Results And Statistics
You can see the number of ads prevented and a query history on the Graphical interface.
Limitations of pi-hole
Pi-hole blocks not all advertisements; however, the majority of them are. Pi-hole is a Domain name server with some blocked and allowed features pre-installed. It's not much more than that. Those guidelines determine whether or not a request is granted or refused. To filter advertising that does not use a Domain name server, Pi-hole uses a Domain name server and domain matching. This is a common occurrence in games played on smartphones. Ads are a common feature in many video games. It will not be possible to ban adverts that use the same domains as legitimate traffic. You'll have to put up with the YouTube advertising, even on pi-hole.
Conclusion
With Pi-hole and docker container, we learned how to filter intrusive advertisements from the world wide web. Our datagrams will be accessed more quickly, data loss will be minimized, and cost-effective. Using a raspberry pi 4, we'll develop a voice recognition system in the next chapter.