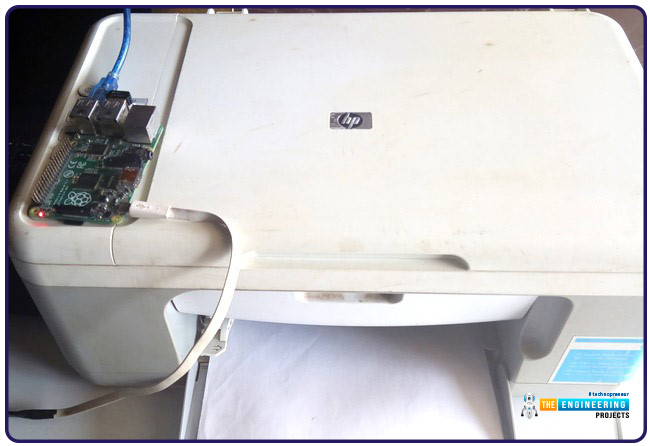
Thank you for being here for today's tutorial of our in-depth Raspberry Pi programming tutorial. The previous tutorial demonstrated the proper wiring of the photoresistor sensor to the GPIO pins. Finally, we learned how it might be included in a Python script for data collection and analysis needs. We also looked at the functions of each component in the circuit. However, I'll walk you through installing a Pi 4 Print Server in this guide. While installing the program is straightforward, setting it up so that a Windows network can locate the print server requires a little more effort. Rather than spending hundreds of dollars upgrading to a laser printer, you may easily upgrade your current USB printer to laser quality by installing a print server.
Because of this software, you no longer have to have the printer physically linked to a single computer, and you may place it wherever you choose and share it with as many computers as you like. In addition, it's a fantastic method of printer sharing that eliminates the need for a pricey tower computer to be on and active all the time. CUPS is the program we'll be using to make this happen. Common Unix Printing System, or CUPS, is the foundation of Linux printing applications. But, the program facilitates communication between your computer and printer. It would help if you visited available printing to verify that the CUPS printing software supports your printer model.
Components
Raspberry Pi 4
Wi-Fi
USB Printer
Pi Print Server Software Installation
Since the Raspberry Pi print server is included in the Debian Jessie distribution, setting it up is a breeze. In this lesson, I'll be using Raspbian, so if you're unfamiliar with it and would like to learn how to set it up, check out my guide on how to do so.
We must ensure the Raspberry Pi is up-to-date with the most recent software to get started. Just type in the appropriate instructions into the terminal to accomplish this.

sudo apt update
sudo apt upgrade
We can begin setting up the print software after the Pi 4 has been upgraded. Here, we will be setting up CUPS.
CUPS
CUPS, short for Common Unix Printing System, is a printing system designed for computers running UNIX-like operating systems. The software transforms the host computer into a print server. A CUPS-enabled server may receive print jobs from various client devices, sort them, and send them to the correct printer for output. Conveniently, this program can handle the administration of your printers, whether they're linked locally through USB or remotely via the network. Using the terminal, enter the following command to install the software. Considering HP has CUPS that support its open source project, HP printers, in particular. Even if your specific printer model isn't listed as being directly supported by CUPS, you may still be able to find a compatible generic driver online that will get the job done. These links will take you to a list of CUPS-compatible printers.

sudo apt install cups
We still have some work to do after CUPS's installation is complete. The first step is to include the pi user in the lpadmin set of users. With this group, the pi user can manage CUPS settings without logging in as the superuser.

sudo usermod -a -G lpadmin pi
To make sure it functions properly on your home network, there is one more thing we must do to CUPS: make it available to every computer on your network. At this time, Cups is configured to refuse connections from addresses outside the local network. By entering the following two commands, we can make it listen to all incoming connections:

sudo cupsctl --remote-any
sudo systemctl restart cups
After this, any machine on the network can send prints to the Pi 4 print server. The following command can be used if you need to know your Raspberry Pi's local IP Address.

hostname -I
If you know your Raspberry Pi's IP address, you can use it to access the website at the address below. Be sure to replace "192.168.1.105" with your IP address.

We'll examine how to configure SAMBA so that Windows can find the Raspberry Pi print server. Furthermore, we will demonstrate how to install a printer using the CUPS interface.
Pi 4 Print Server SAMBA Configuration
A proper SAMBA configuration is required if you use your print server in conjunction with Windows. To get SAMBA up and running with the CUPS print drivers, we'll have to install it and tweak its settings.
First, check that SAMBA is installed; to do so, we can use the terminal's built-in install command. Just by typing this into the terminal, we can accomplish our goal.

sudo apt install samba
Now that SAMBA is installed on our Pi 4, we can access its config file and make some changes. The following command will cause the file to be opened in the nano text editor:

Sudo nano /etc/samba/smb.conf
Once the file has been opened, it must be scrolled to the end. To do this quickly, press the Control key plus the V key. The following lines should be added or edited once you reach the very end of the file. The file already contained the "[printers]" and "[print$]" sections; all I had to do was update the values to reflect the following.
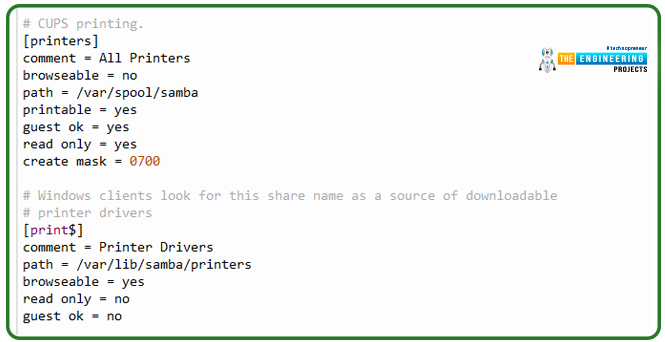
[printers]
comment = All Printers
browseable = no
path = /var/spool/samba
printable = yes
guest ok = yes
read only = yes
create mask = 0700
[print$]
comment = Printer Drivers
path = /var/lib/samba/printers
browseable = yes
read only = no
guest ok = no
To save the file, hit CTRL+X, Y, and ENTER. SAMBA needs to be restarted to pick up the updated settings. The following command, when entered into the terminal, will restart SAMBA.

sudo systemctl restart smbd
Installation of a Printer in CUPS
It's easy to set up a printer using CUPS, but first, we need to open the program's graphical user interface. For the IP address of your Raspberry Pi, enter "hostname" into the terminal.
hostname -I
To access the IP configuration page for your Raspberry Pi, type the following into your web browser and enter the IP address you just jotted down. Replace "192.168.1.105" with your IP address when entering this address.

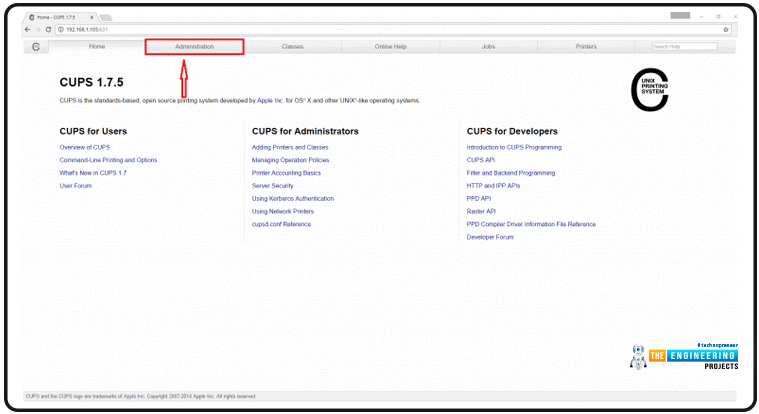
The following homepage is what you should see. Here, we'll go to "Administration" on the main menu.
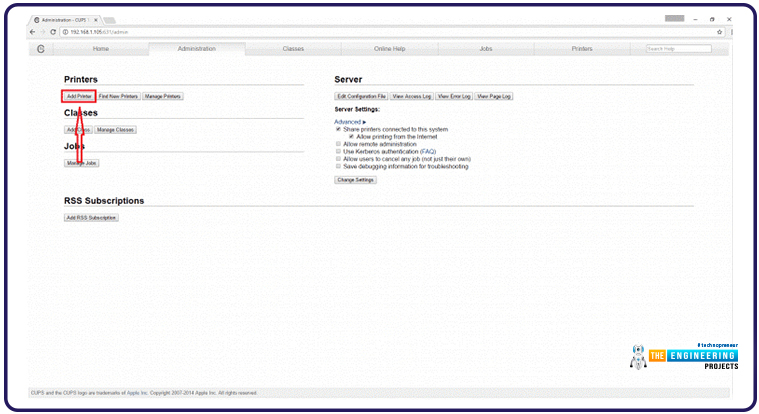
You'll be directed to Cups's control panel when you click here. On this page, select the "Add Printer" option.
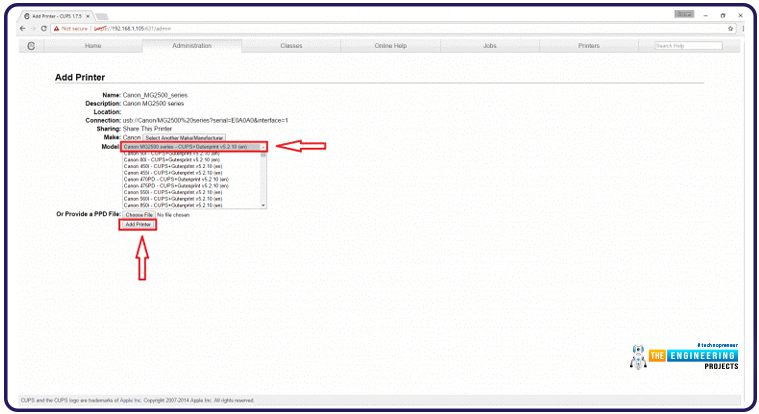
The "Add Printer" screen has been brought up, allowing us to choose the printer we wish to configure Cups with. That printer is a Canon MG2500 series machine. When you've made your print choices, click the "Continue" button.
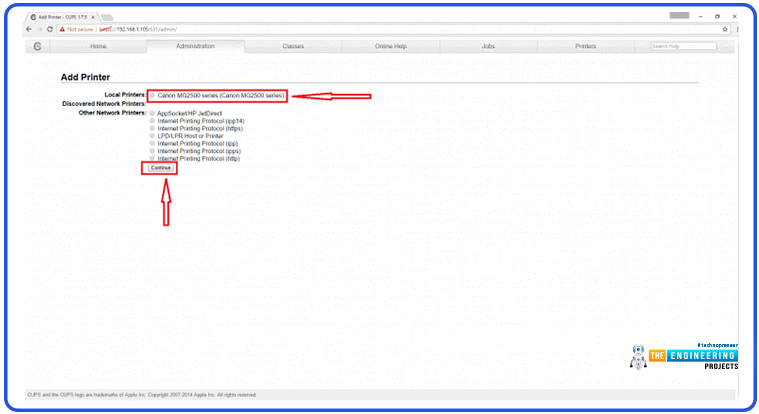
Ensure the printer is turned on and plugged into the Raspberry Pi through a USB connection if it does not appear here. If your Raspberry Pi still doesn't show up, try restarting it while ensuring your printer is on and connected.
Choose your printer's model from the dropdown menu here. CUPS will automatically identify the printer model and install the appropriate driver when possible. However, this may only sometimes work, so you may need to sift through the list to locate the proper driver manually. Once you've double-checked everything and are pleased, click the "Add Printer" button.
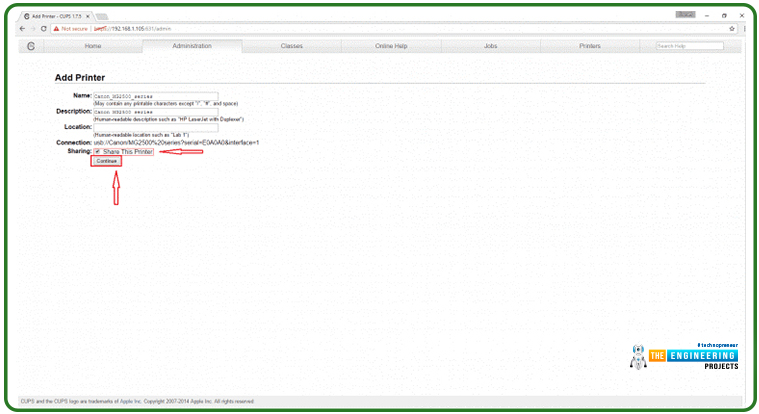
After completing the steps on this screen, the printer will have been added successfully. Here, you can give it a name and a summary that mean whatever you choose. If you have more than one printer in your residence, specifying its location will make your life easier. If you want other computers to be able to use the printer, you must also turn on "Share This Printer." If everything looks good, hit the "Continue" button.
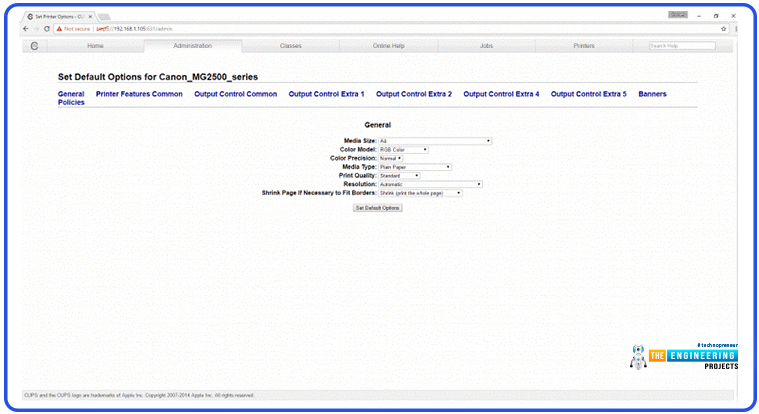
After finishing the printer setup process, you will see the screen shown in the image below. Several of the printer's more nuanced settings are accessible through this panel—the number of pages printed, the quality of the printout, and so forth.
Having finished setting up our Raspberry Pi print server, we will now discuss how to add it to Windows. Having SAMBA set up earlier in the course should make this step less painless.
Setting up a Raspberry Pi as a Print Server in Windows
Installing a CUPS printer on Windows requires selecting the driver that will allow Windows to communicate with and comprehend the printer. Launching "My Computer" or "This PC" and then clicking "network" in the left-hand navigation pane is a quick method to get to Windows' network page, where you can get started. When you get there, you should see a screen like the one below, where your Raspberry Pi's hostname (in my instance, RASPBERRYPI) is displayed. If you double-click your Raspberry Pi's share, it may prompt you to log in. If entering anything other than "enter" fails to log you in, try "pi."
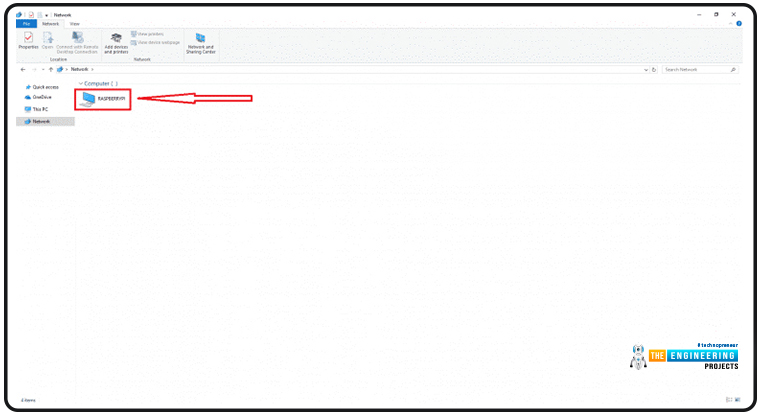
The printers used with your Pi 4 print server should now be displayed on the screen. Select the printer you wish to use by double-clicking on it.
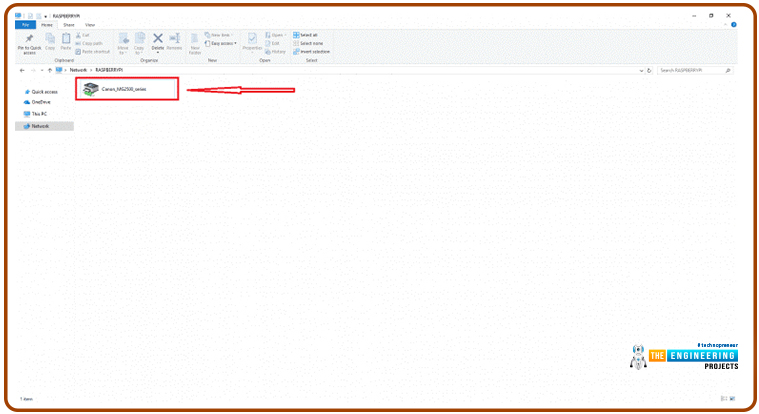
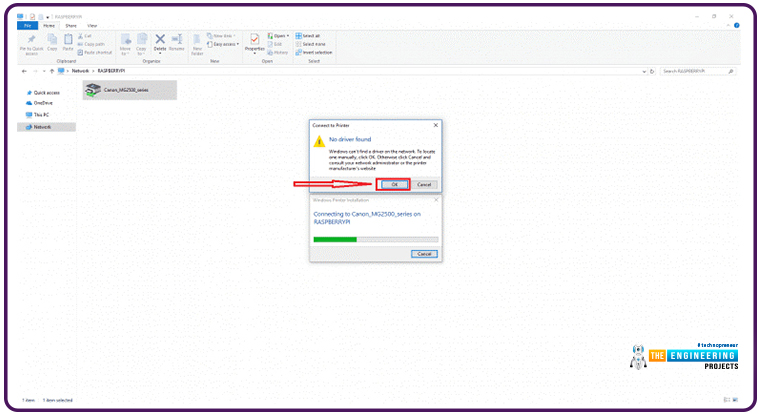
You'll see the cautionary message below if you try to double-click this. Select "OK" to proceed with the tutorial.
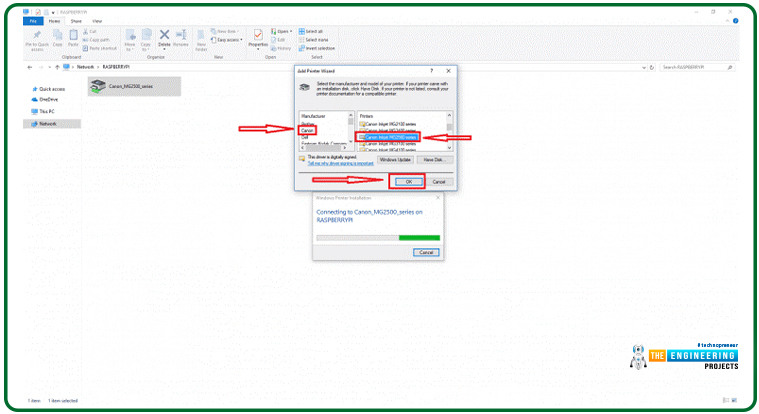
Select your printer brand on the left, and then select your printer model from the available drivers for that brand on the right. If your printer isn't listed here, you can identify its model online and install the necessary drivers. For me, that meant tracking down the Canon MG2500 series. When you've decided which printer to use, you may move forward by clicking the "Ok" button.
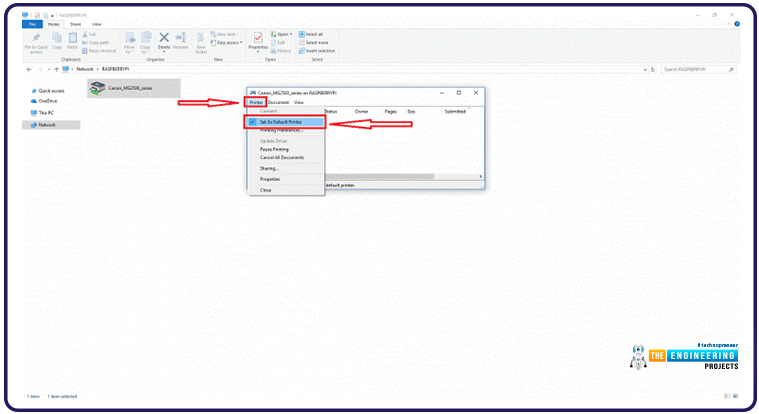
The procedure will now initiate a link to your printer. Select "Printer" > "Set as Default Printer" to make this the system's default printer.
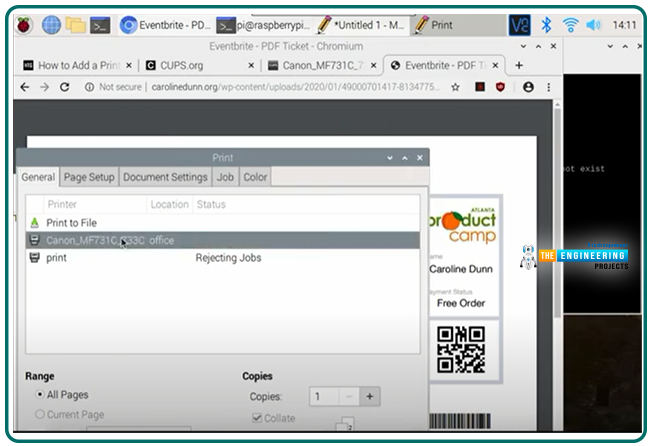
Now that the printer has been installed on your computer, you can use it with any application that supports printing. By printing a test page, you may verify that the printer is configured correctly.

If you're having trouble printing a file, check to see if you've picked the correct printer driver in CUPS and Windows. Ensure the printer is turned on as well; the Canon MG2500 series, for example, do not immediately restart when a print job is delivered. Adding Apple AirPrint capability to your Pi 4 print server is a great way to expand its capabilities.
The Raspberry Pi AirPrint Server Setup
Apple's AirPrint printing technology eliminates the requirement for users of Apple products to acquire and install the separate printing software. By adding AirPrint functionality, you may quickly and effortlessly print from your iOS smartphone to any nearby printer. You can run an AirPrint server from your Raspberry Pi, and Cups is the software that will power it. It will take care of talking to your printer on your Raspberry Pi's behalf.
The "Avahi daemon" must be set up before AirPrint may be used on your computer. The following command will install the package onto your Raspberry Pi.

sudo apt install avahi-daemon
Using this package, you can make Apple's Zeroconf design a reality. Bonjour has become widely used to refer to this type of network architecture. Using Bonjour, AirPrint can link disparate gadgets like an iPhone and a Raspberry Pi. Once you've selected the files you'd like to print, the Bonjour daemon will forward them to the designated printer.
Let's restart the machine to see whether the AirPrint server has worked appropriately, and everything is ready. Execute this command to force the Raspberry Pi to restart.

sudo reboot
After rebooting your Raspberry Pi, you can check to see if anything went wrong. This should get you to the point where you can print from any AirPrint-enabled device.
Display printer and print
Conclusion
Have you succeeded in following this guide and setting up a Pi 4 network print server? If you've followed these steps carefully, your Raspberry Pi should be ready to function as a network AirPrint server. We were able to accomplish this by putting the Avahi daemon in place. This daemon implements the bonjour protocol used by AirPrint. Feel free to leave a message below if you have any thoughts, suggestions, or problems you'd want to discuss. The following tutorial will review the steps for monitoring a patient's heart rate with a Raspberry Pi 4.


 Raspberry Pi
 syedzainnasir
 0 Comments


 2.3k
2.3k
 953
953
 921
921
 2.1K
2.1K

