


Interfacing of RTC module with Raspberry Pi 4 for real-time Clock


Introduction
Thank you for joining us for yet another session of this series on Raspberry Pi programming. In the preceding tutorial, we implemented a speech recognition system using raspberry pi and used it in our game project. We also learned the fundamentals of speech recognition and later built a game that used the user's voice to play. However, this tutorial will integrate a real-time clock with our raspberry pi four and use it to build a digital clock. First, we will learn the fundamentals of the RTC module and how it works, then we will build a digital clock in python3. With the help of a library, we'll demonstrate how to integrate an RTC DS3231 chip with Pi 4 to keep time.

Real-Time Clocks: What Are They?
RTCs are clock units, as the name suggests. There are eight pins on the interface of the RTC IC, the DS1307. An SRAM cell backup of 56 bytes is included in the DS1307, a small clock, and a calendar. Secs, mins, hrs, days, and months are all included in the timer. When a month has fewer than 31 days, the date of the end of this month is automatically shifted.
They can be found in integrated circuits that monitor time and date as a calendar and clock. An RTC's key advantage is that the clock and calendar will continue to function in the event of a power outage. The RTC requires only a small amount of power to operate. Embedded devices and computer motherboards, for example, contain real-time clocks. The DS1307 RTC is the subject of this article.
The primary purpose of a real-time clock is to generate and keep track of one-second intervals.
The diagram to the right shows how this might look.
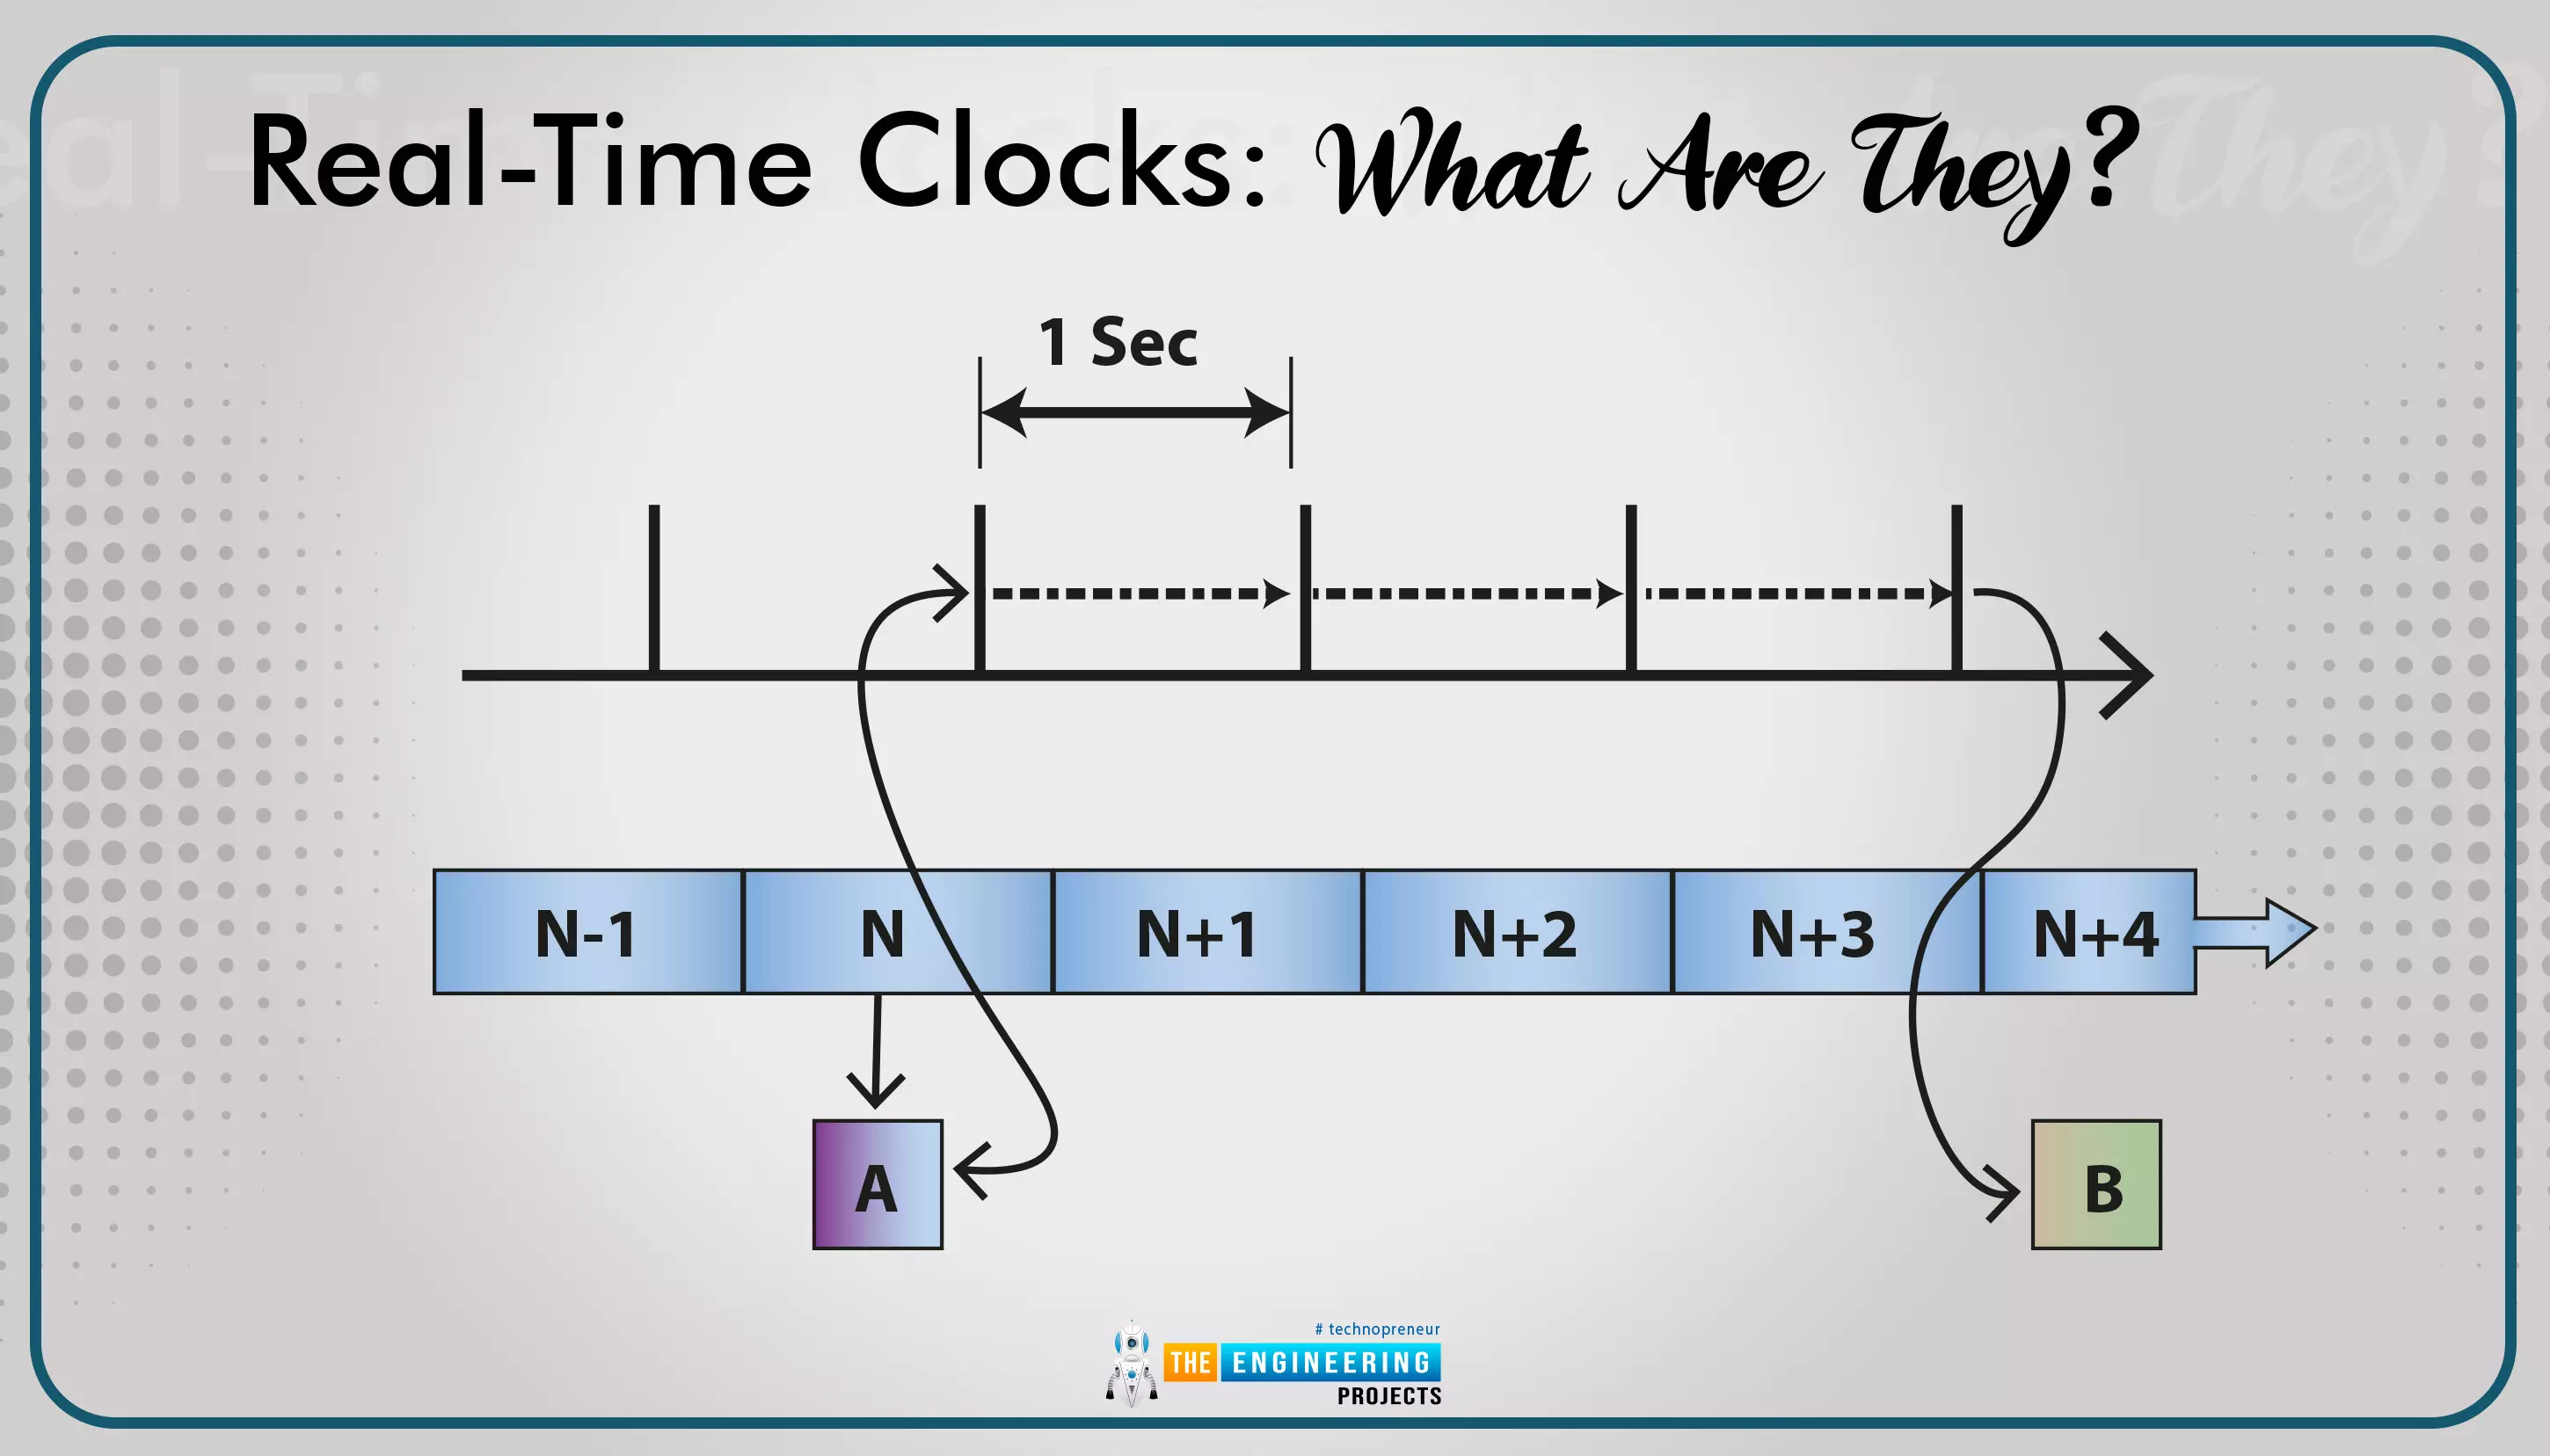
A program's method, A, is also displayed, which reads a second counter and schedules an action, B, to take place three secs from now. This kind of behavior is known as an alarm. Keep in mind that the secs counter doesn't start and stop. Accuracy and reliability are two of the most important considerations when choosing a real-time clock.
A real-time clock's hardware components are depicted in the following diagram.
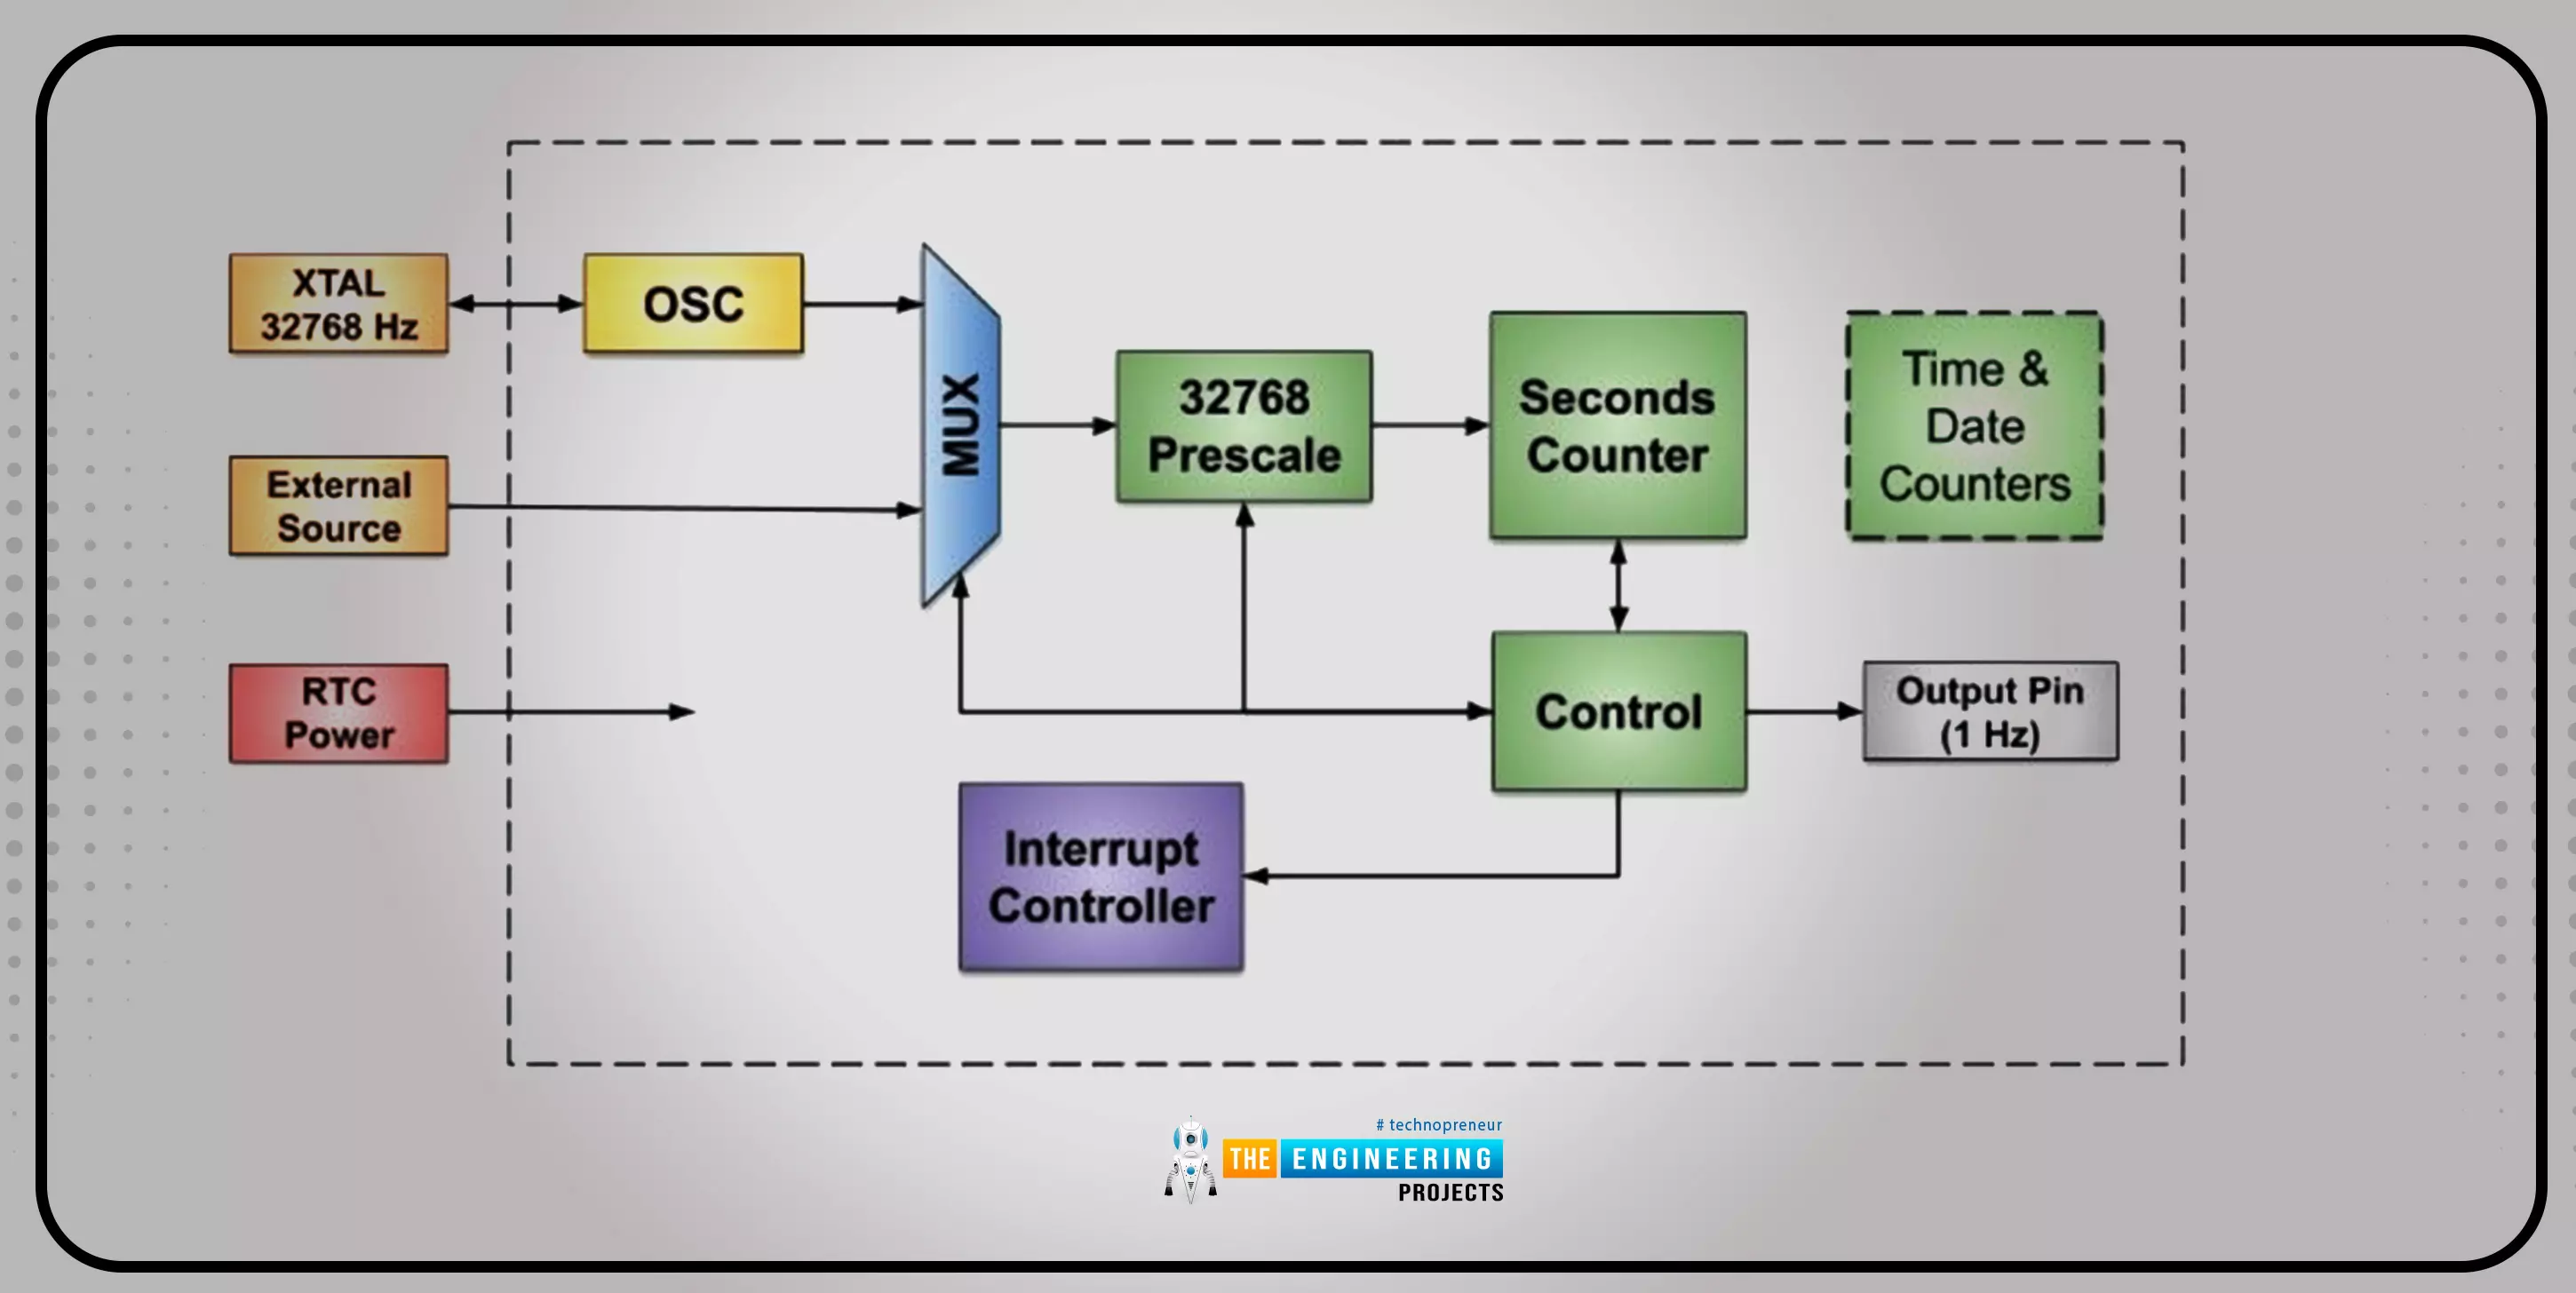
An auxiliary crystal and a spectral reference can be used with a real-time clock's internal oscillator, frequently equipped with an interior crystal. The frequency of all clocks is 32,768 Hertz. A TCXO can be used with an exterior clock input since it is extremely accurate and steady.
An input to a Prescaler halves the clock by 32,768 to generate a one-second clock, which is selectable via a multiplexer.
For the most part, a real-time clock features a secs counter with at least thirty-two bits. Certain real-time clocks contain built-in counters to maintain track of the date and time.
Firmware is used to keep track of time and date in a simple real-time clock. The 1 Hertz square waveform from an output terminal is a frequent choice. It's feasible for a real-time clock to trigger a CPU interrupt with various occurrences.
Whenever the whole microcontroller is turned off, a real-time clock may have a separate power pin to keep it running. In most cases, a cell or external power source is attached to this pin's power supply.
Achieving Accurate and Fair RTC Timing
Using a 32,768 Hertz clock supply, real-time clock accuracy is dependent on its precision. The crystals are the primary source of inaccuracy in a perfectly-designed signal generator. The internal oscillators and less costly crystals can be employed with sophisticated frequency enhancement techniques for incredibly precise timing. A crystal has three primary causes of inaccuracy.
Tolerances for the initial circuitry and the crystal.
Temperature-related crystal smearing.
Crystallization
Real-time clock accuracy is seen graphically in the figure below:
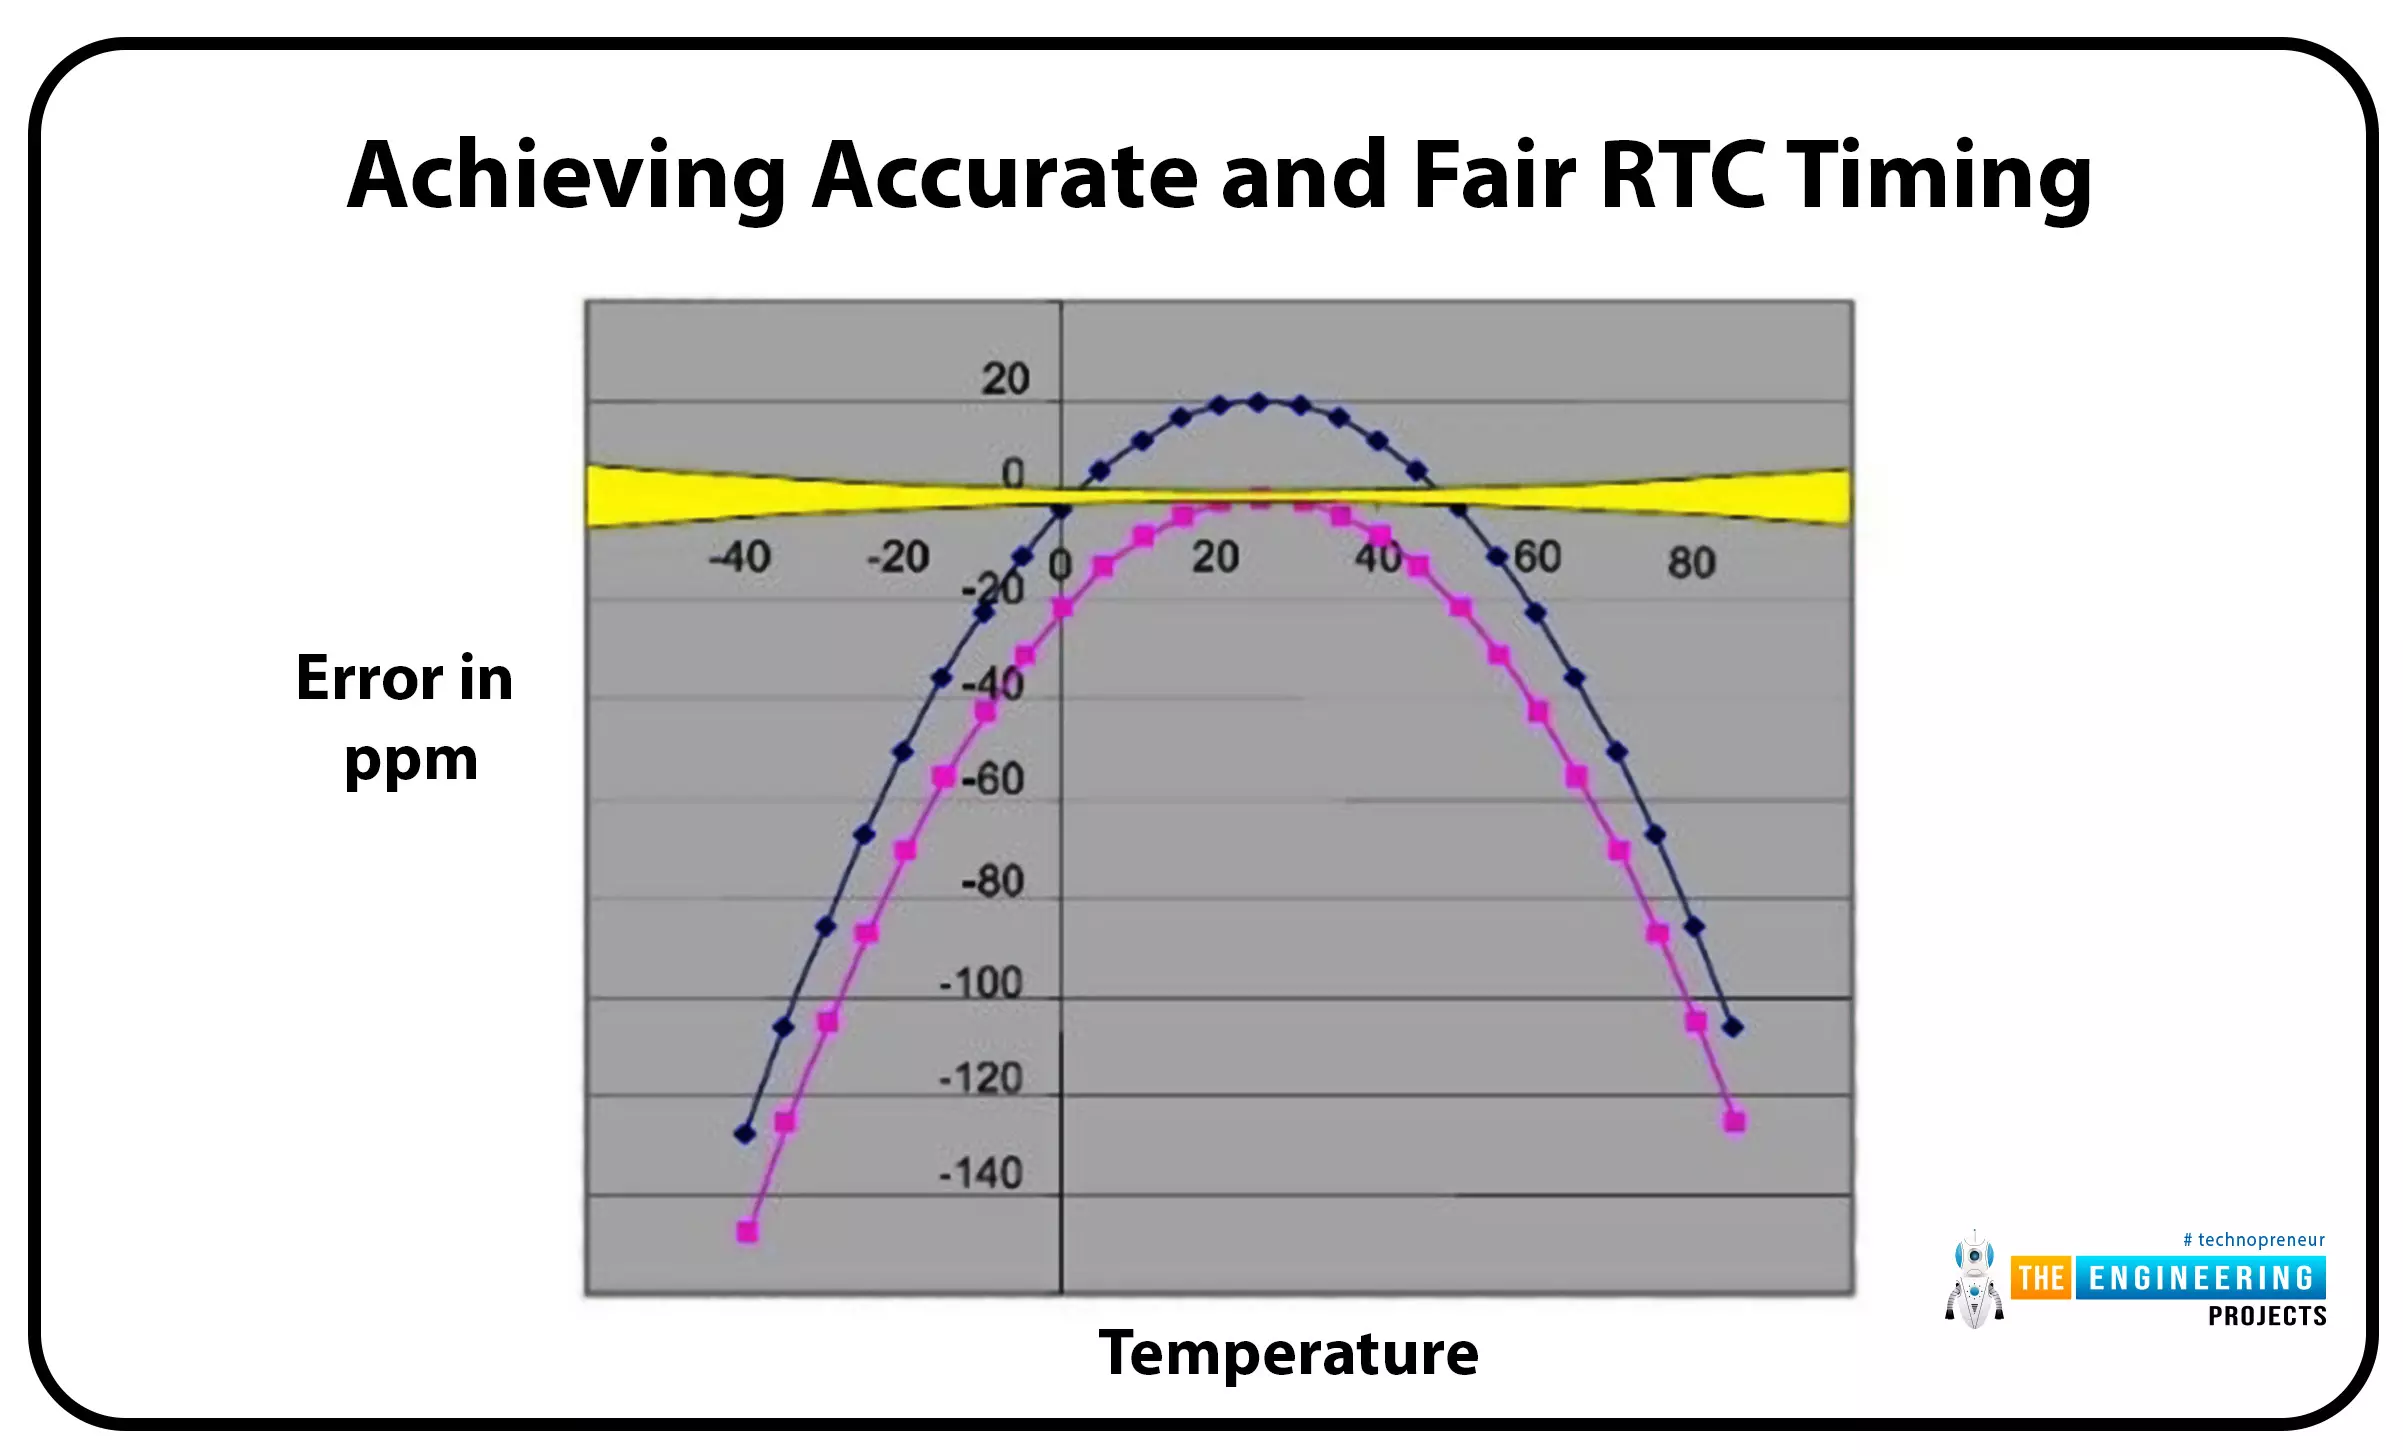
Using this graph, you can see how a particular concern tolerance changes with increased temperature. The temperature inaccuracy is visible inside the pink track. The quadratic function used to predict the future characteristics of crystals is essential to correct for temperature. Once a circuit board has been built and the temp is determined, an initial error measurement can be used to correct most of the other sources of error.
To acquire an accurate reading, you'll need to adjust to the yellow band. A year's worth of 1 ppm equals 30 seconds of your life. To some extent, the effects of crystallization can't be undone. Even though you're getting older, it's usually just a couple of years.

DS1307 Pin Description:
Pin 1, 2: The usual 32.768-kilohertz quartz crystal can be connected here.
Pin 3: Any conventional 3 Volt battery can be used as an input. To function properly, the battery voltage must be in the range of 2V to 3.5V.
Pin 4: This is the ground.
Pin 5: Streaming data input or output. It serves as the serial interface input and output, and a resistor is required to raise the power to the maximum of 5.5 volts. Irrespective of the current on the VCC line.
Pin 6: Input for the serial timer Data sync is done via the interface clock here.
Pin 7: Driver for the output waveform. A square wave frequency can be generated by connecting a signal to the out pin with the sqwe value set to 1.
Pin 8: The main source of power. Data is written and read whenever the voltage provided to the gadget is within standard limits.
Features of RTC Module
an output waveform that can be programmed
Power-failure detection and switch circuitry automation
Consume less power
Real-time data and time is provided
The rtc is mainly used for writing and reading to and from its registers. Addresses for the rtc registers can be found from zero to 63. If necessary, transitory variables can be stored in random access memory in place of the first eight clock registers. Second, minute, hour, dates, months, and years are all included in the clock's top seven registers. Let's have a look at how DS1307 operates.
The sole purpose of a real-time clock is to record the passage of time. Regular monitoring of the passing of time is critical to the operation of computers and many smaller electronic devices. Although it simply serves one purpose, managing time has many applications and functions. Nearly every computer activity uses measurements taken and monitoring the present time, from the generation of random numbers to cybersecurity.
Kinematic activities or a real-time clock module keep track of time in a classic watch, so how does it work?
The answer is in crystal oscillators, as you would have guessed. The real-time clock uses oscillator pulses in electronic components to keep track of time. Quartz crystals are commonly used in this oscillator, which typically operates at a frequency of 32 kilohertz. Software cleverness is needed to take the processing times and correct any differences related to power supply variations or tiny changes in cycle speed.
Auxiliary tracking is used in real-time clock modules, which uses an exterior signal to lock onto a precise, uniform time. As a result, this does not override the internal measures but complements them to ensure the highest level of accuracy. An excellent example is a real-time clock module that relies on external signals, such as those found on cell phones. Oscillation cycles are counted again if the phone loses access to the outside world.
An object made of quartz crystals has a physical form. As a result, the real-time clock module accuracy can degrade over time due to extreme heat and cold exposure. Many modules include a temperature sensing technique to counteract the effects of temperature variations and improve the oscillator's overall accuracy. There is a wide range of frequencies available in cheap a crystal used in Computer systems. So, the error rate is around 72 milliseconds per hr in real-time. In this case, the following criteria are met:
Start data transfer: Clock and Data lines must be high for a START.
Stop data transfer: In STOP mode, data lines go from low to high while the clock lines remain high.
Data valid: START conditions must be met before a clock signal high period can be used to determine if the transmission line is stable. The info on the channel must be updated when the clock signal is at a lower frequency. Each piece of data has one clock frequency.
Each data transfer begins and ends with START and END conditions, respectively. During the START or STOP circumstances, the data rate bytes that can be sent are not restricted and are set by the master unit. Byte-by-byte, each recipient validates the transmission with a 9th bit.
RTC Timing Modification
A real-time clock can be used in systems to correct timing faults in two different ways. The graphic below shows the Prescaler counting the oscillation cycles per the second period.

The advantage of this method is that the time interval between each second is only slightly altered. However, a variable Prescaler and an extra register for storing the prescale counts, and the interval between applications are necessary for this technology to work.
Suppose the real-time clock does not contain a built-in prescaler that can be used to fine-tune the timing. This diagram illustrates a different way of approaching the problem.
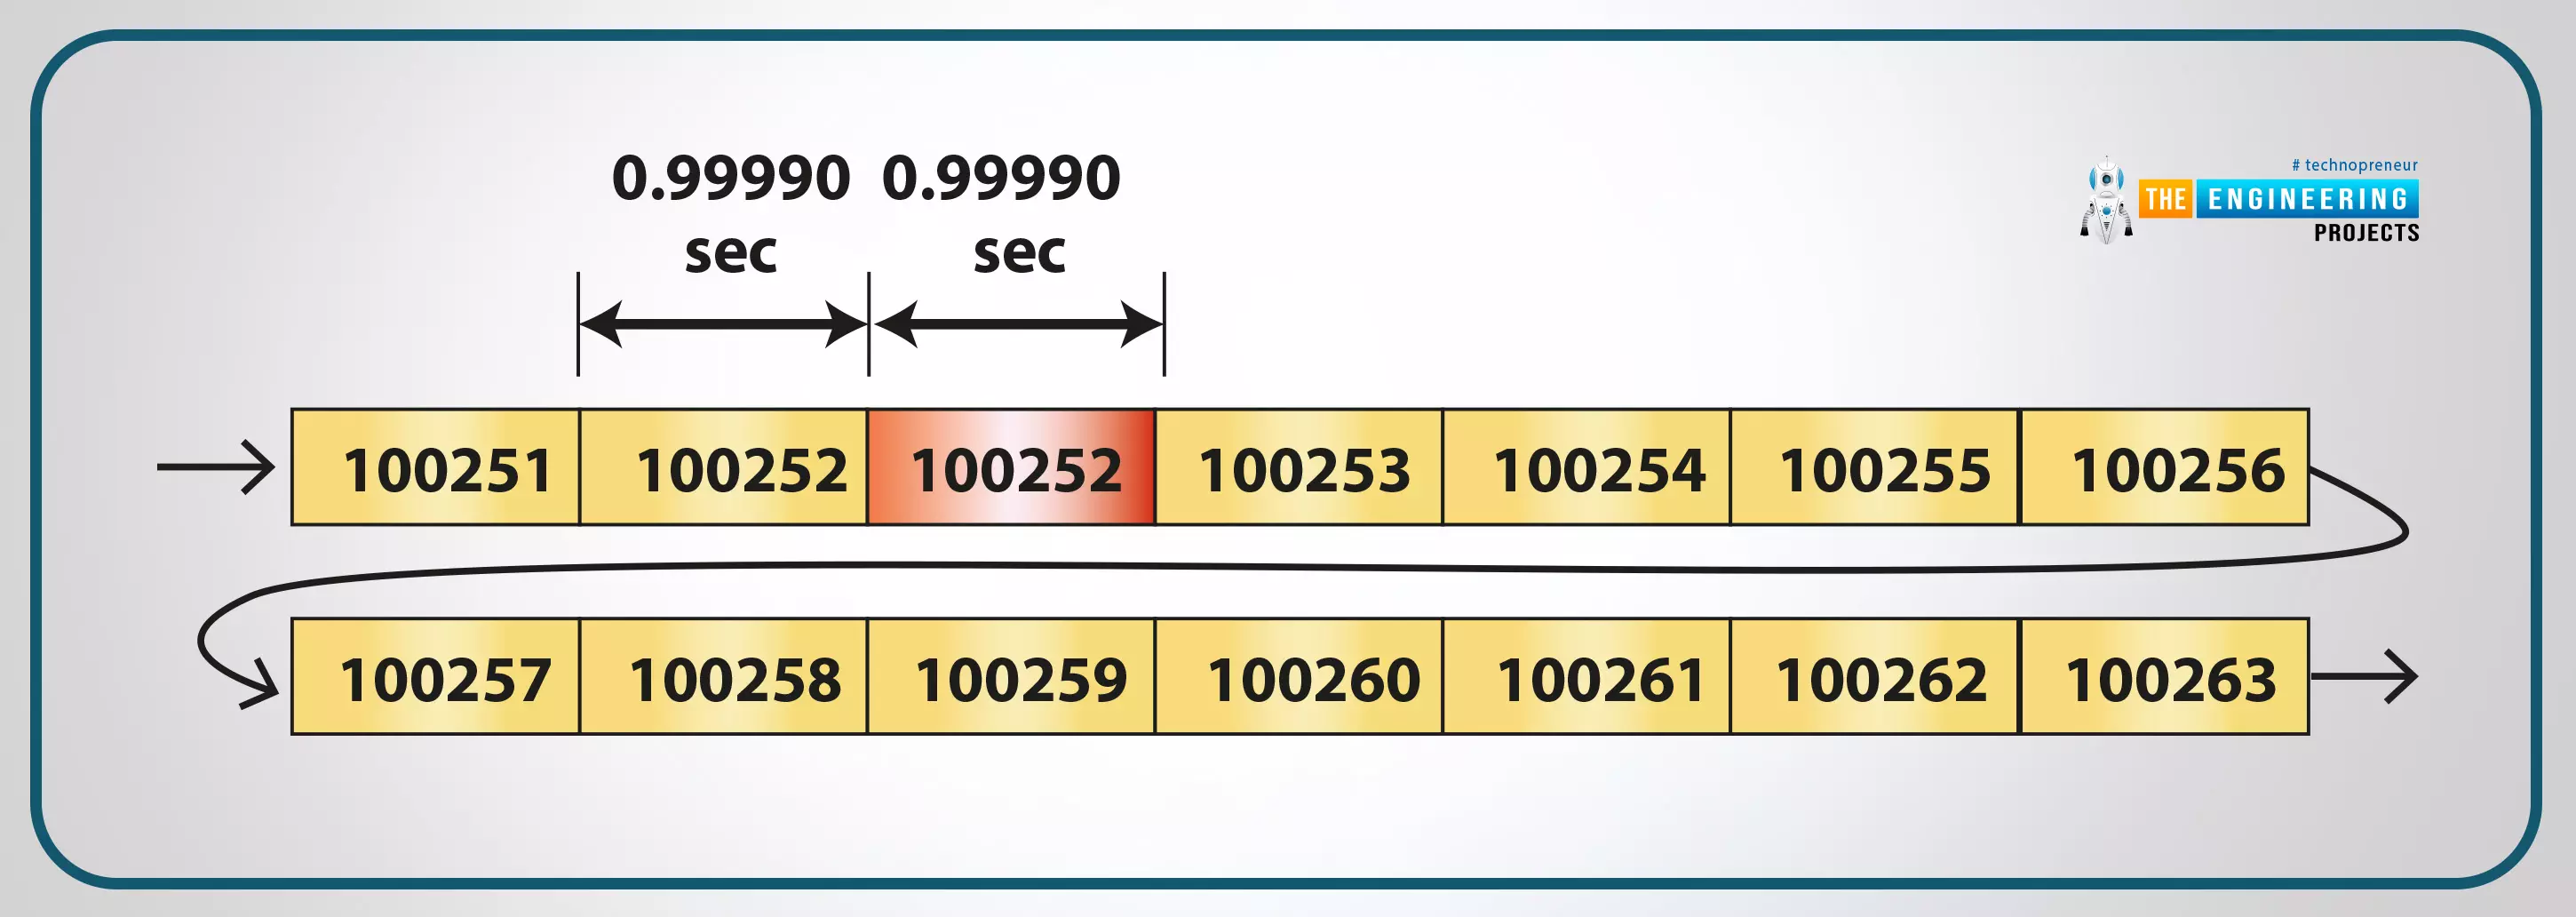
The numbers in the rectangles indicate the secs counter. The program continuously tracks and calculates the real-time clock seconds count. A second is added or subtracted to compensate for the cumulative mistake whenever the error reaches 1 second.
This strategy has a drawback: the difference in seconds whenever an adjustment is made might be rather considerable. With this method, you can use it with any real-time clock.
Time and Date
To keep track of the current date and time, certain RTCs use electronic counters. Counting seconds, mins, hours, days, weeks, months, and years and taking leap years into account is necessary. Applications can also keep track of the time and date.
The second counter of a real-time clock can be used to implement this system on a microcontroller.
The proprietary method gets time(), or something similar is commonly used to access the device timer. Using get time() is as simple as taking a second counter and printing out the resulting value. The library handles the remainder of the work to convert this time in secs to the present time of day and date.
The real-time clock circuit
If you turn off your RPi, you won't have access to its internal clock. It uses a network clock protocol that requires an internet connection when it is turned on. A real-time timer must be installed in the raspberry pi to keep time without relying on the internet.
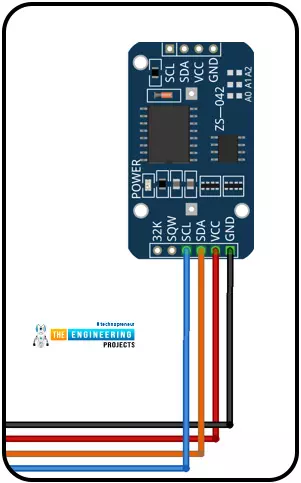
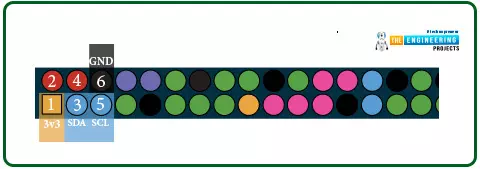
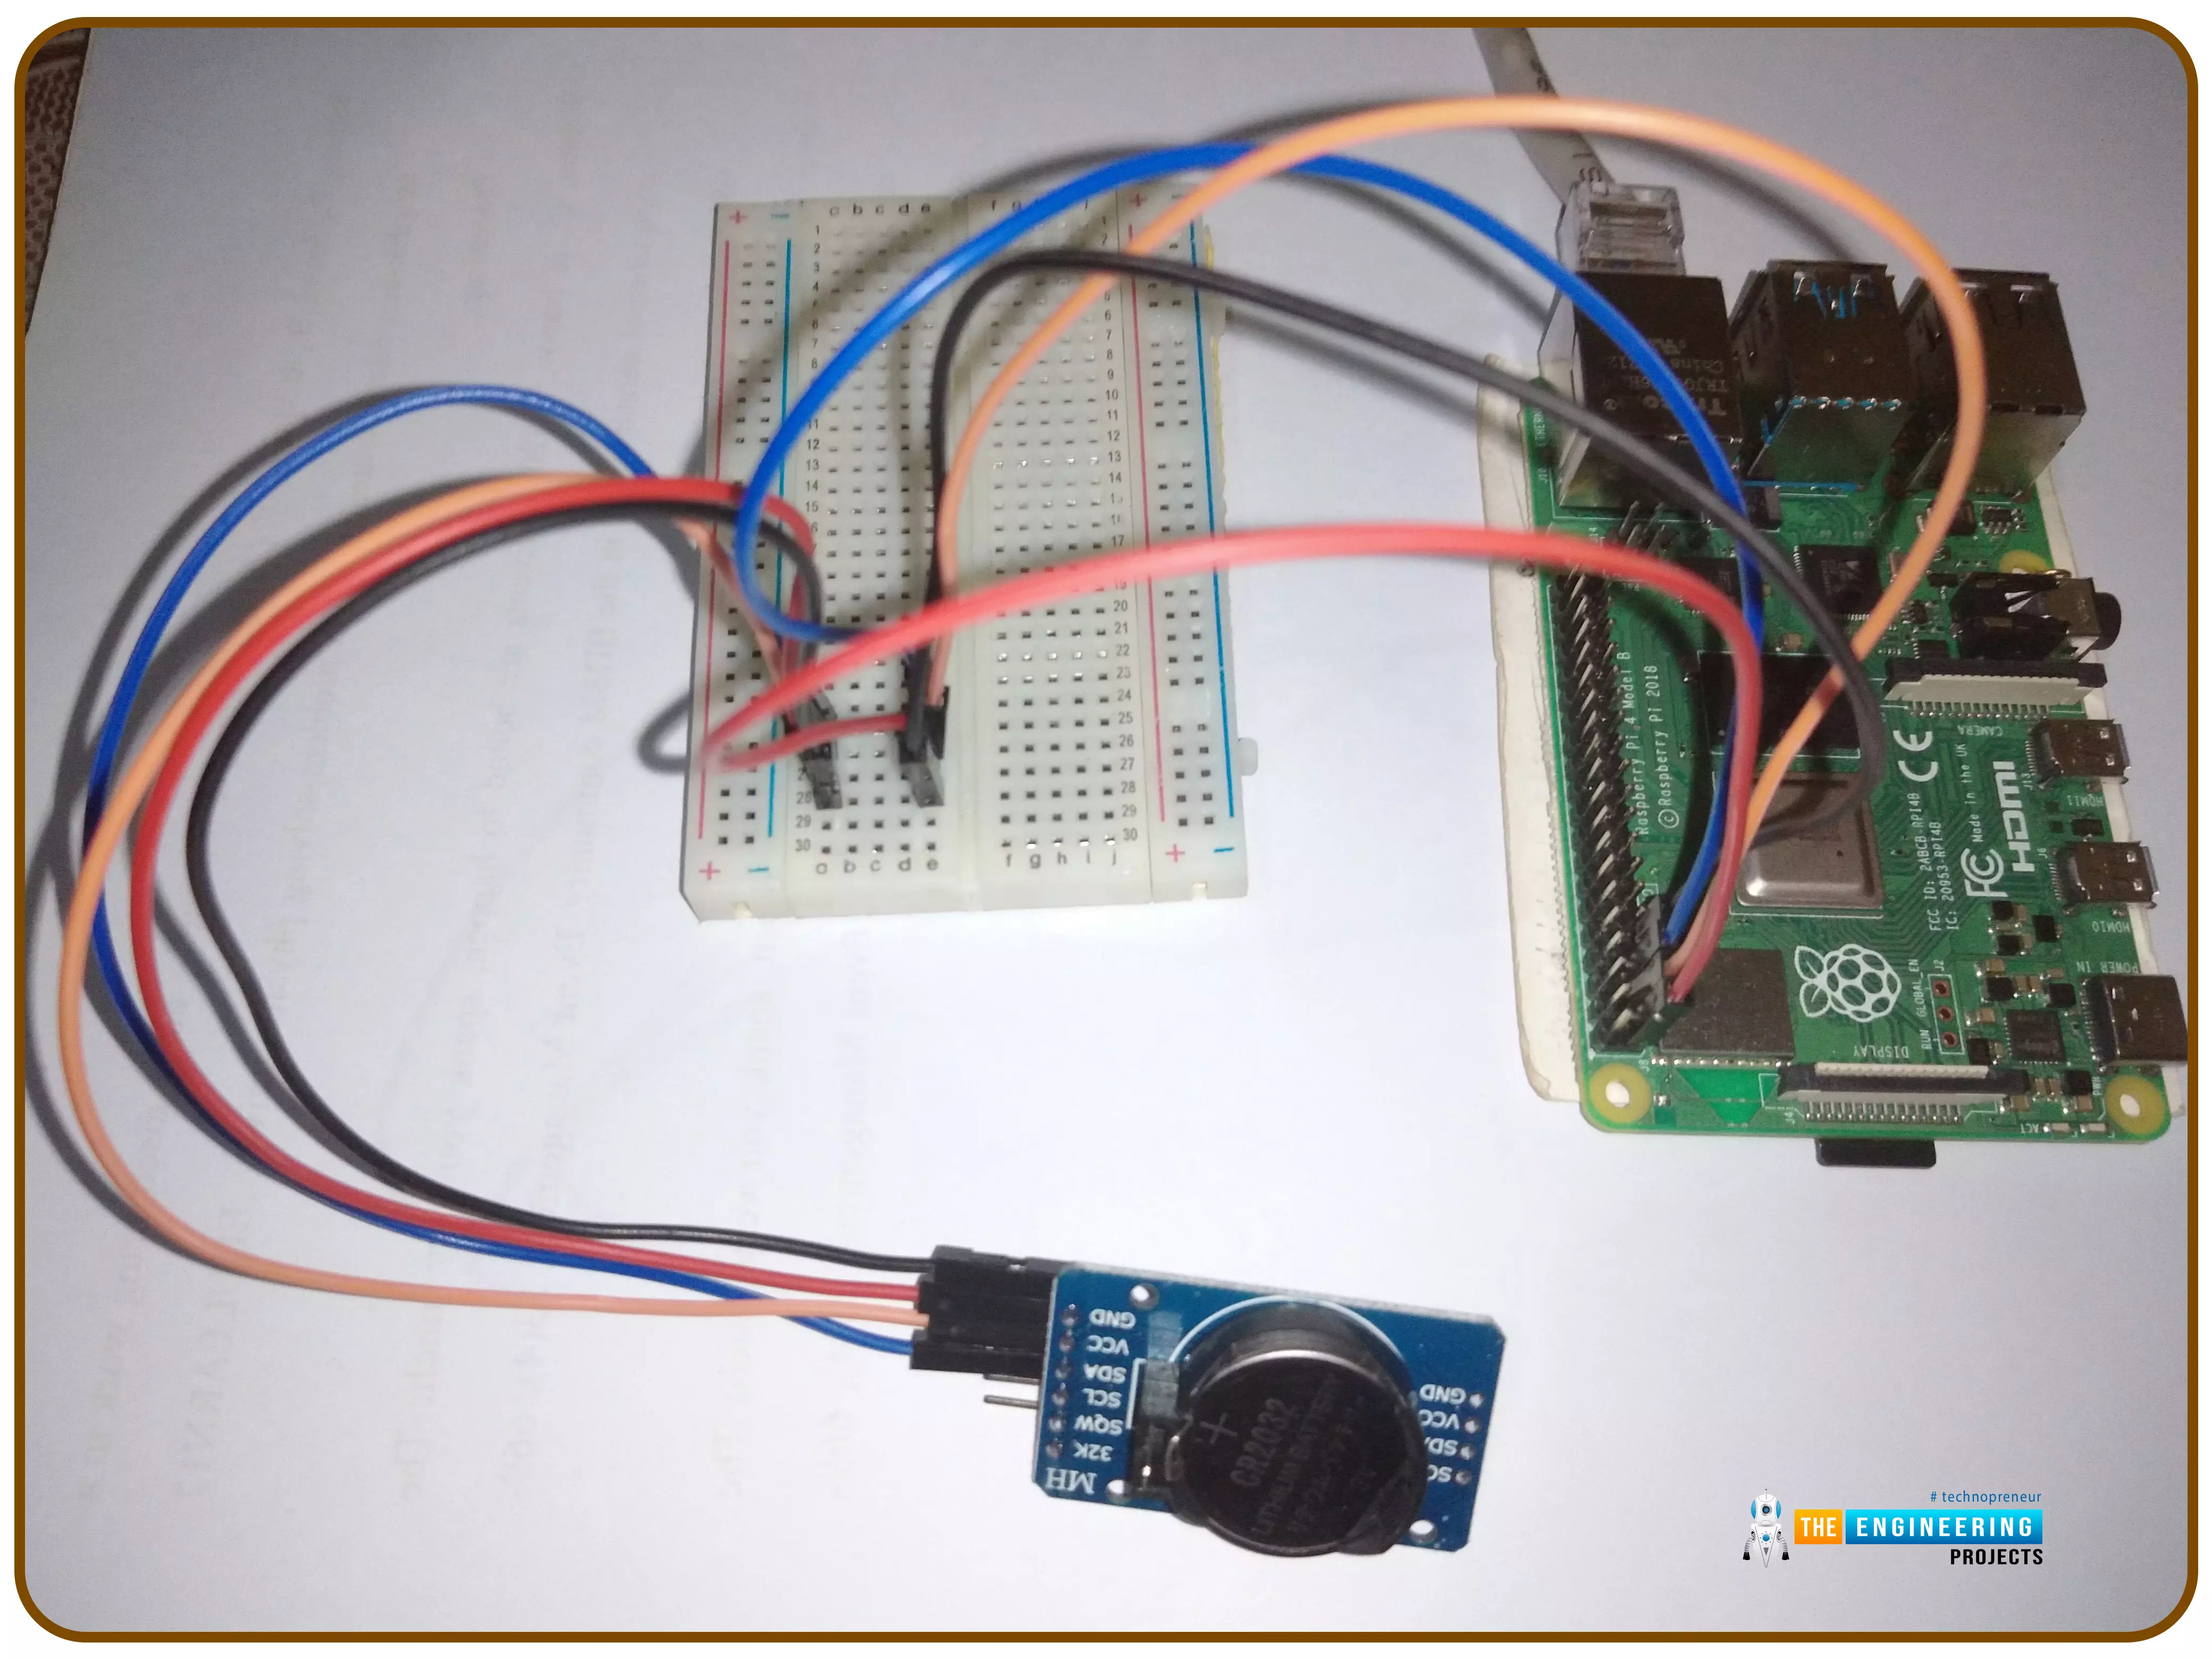
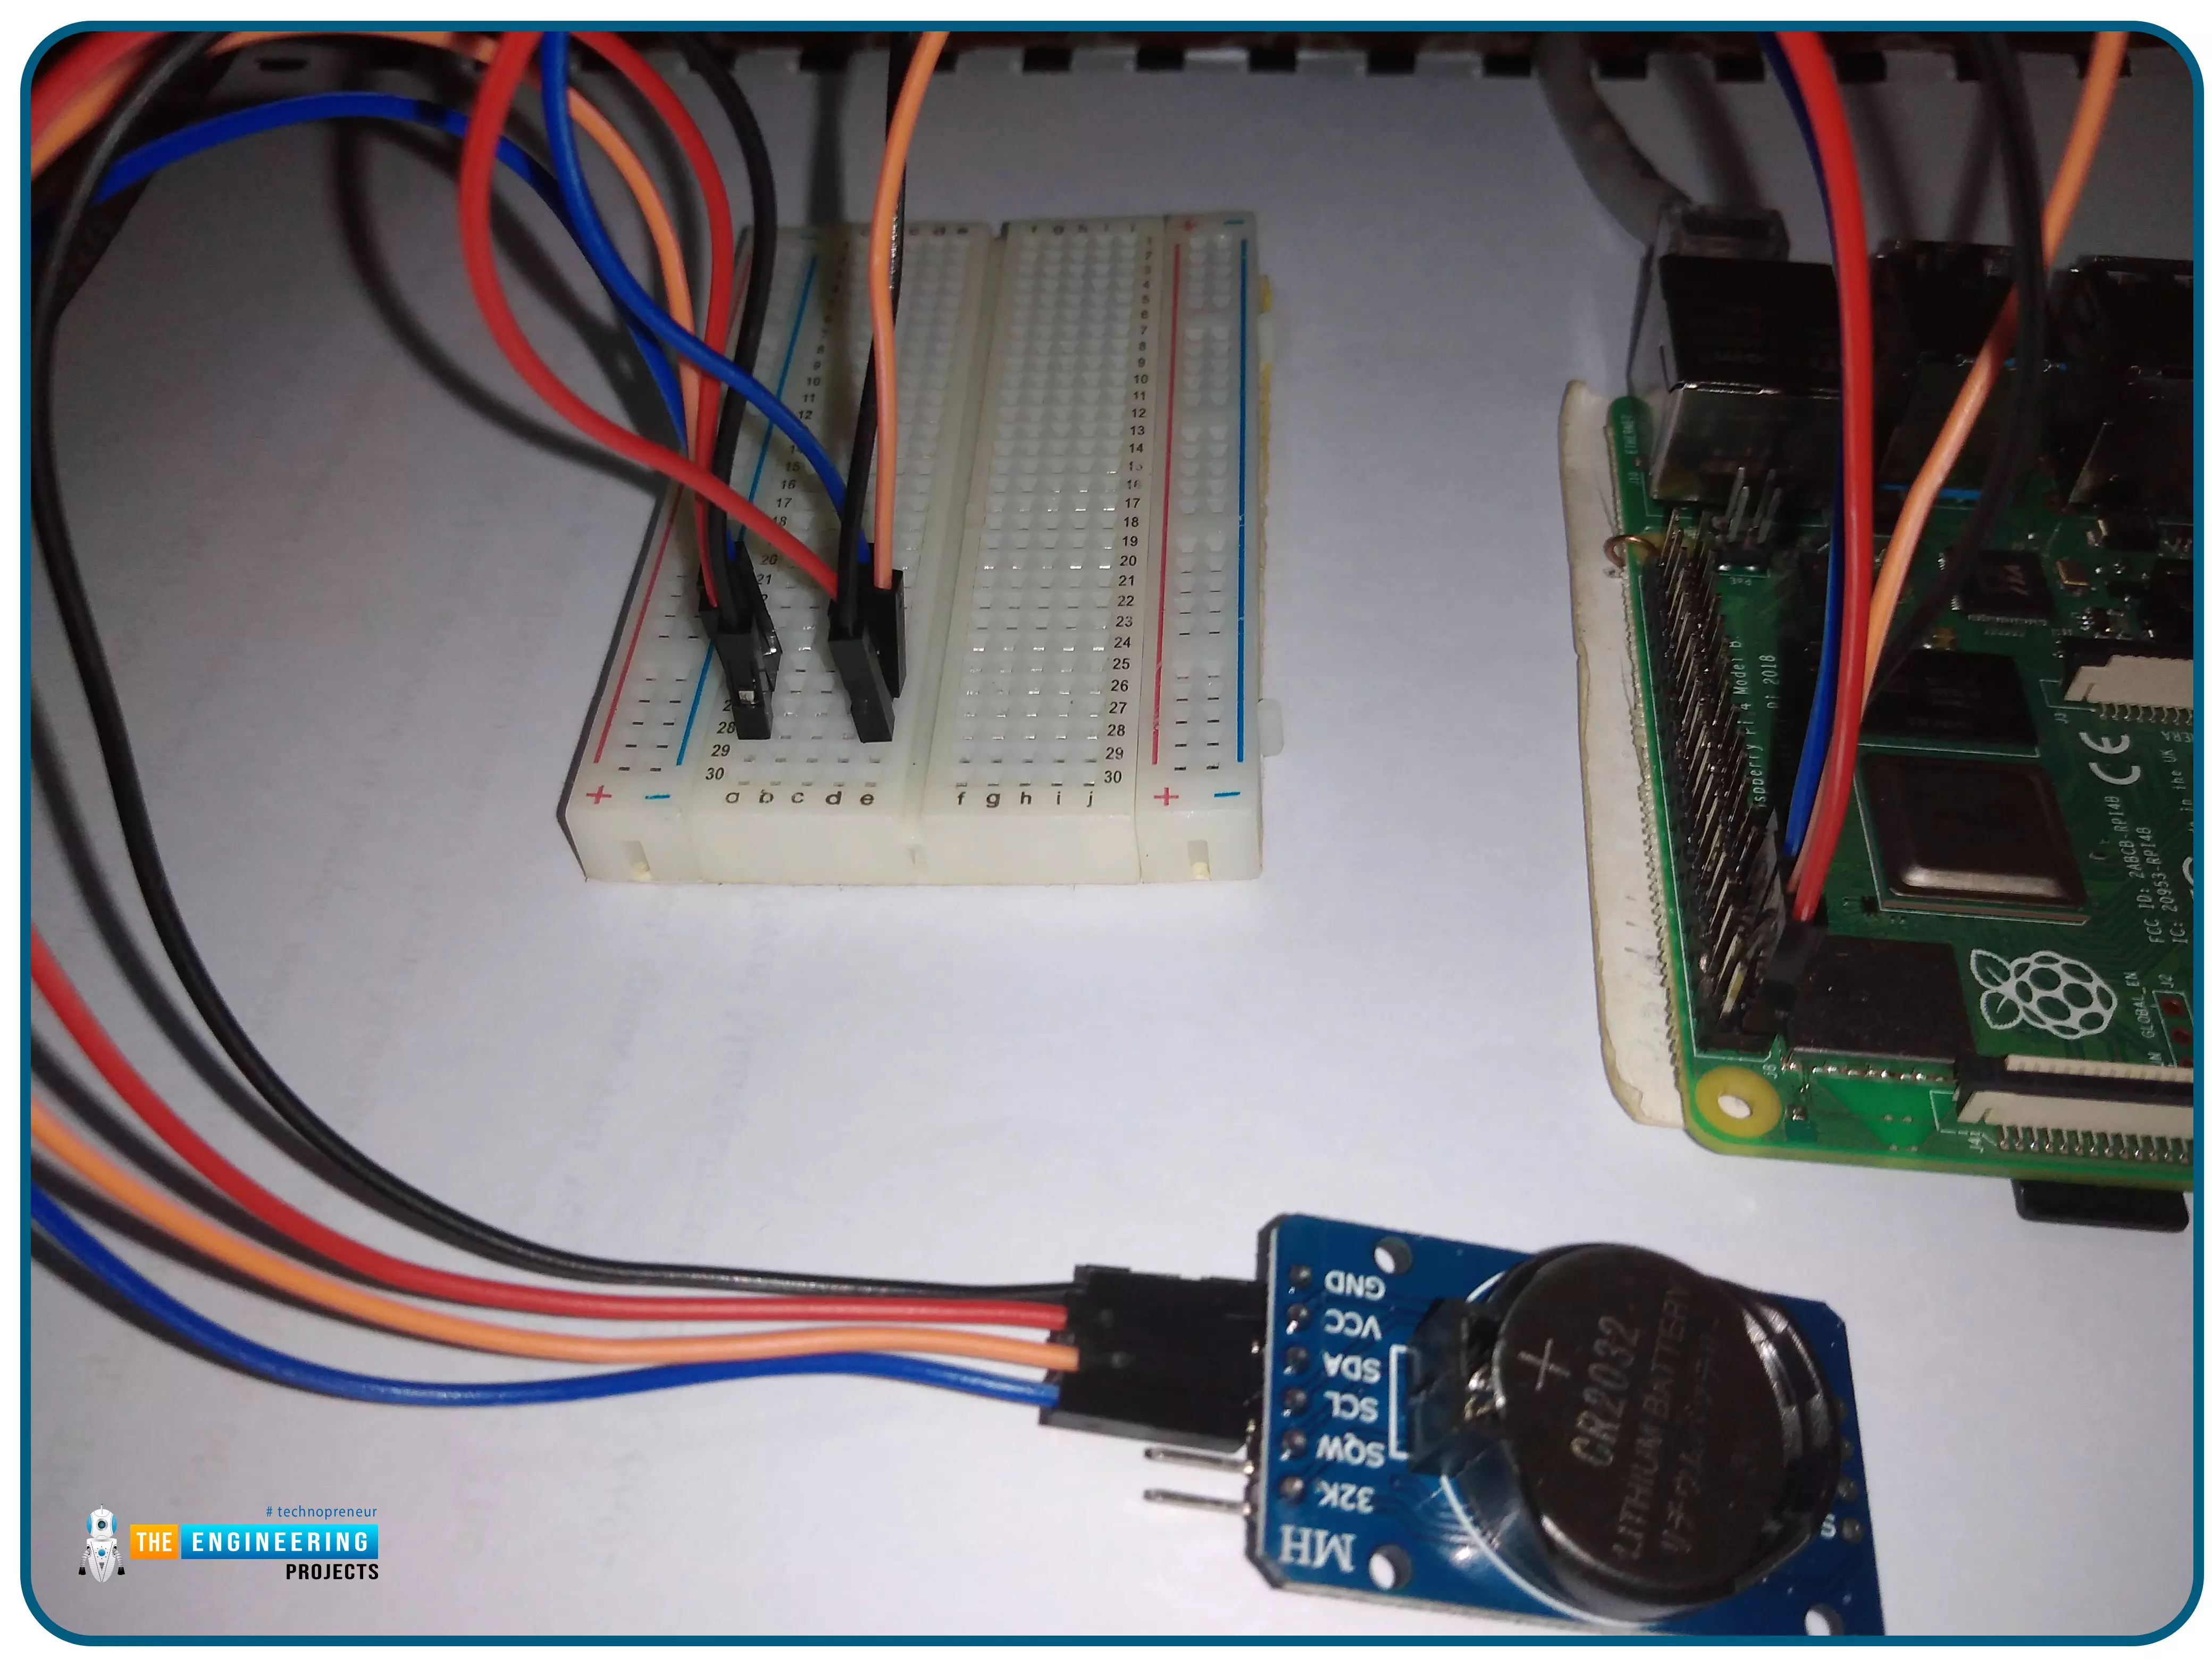
Wiring Pi 4 with the rtc board.
First, we'll need to attach our real-time control module to the RPi board. Ensure the Rpi is deactivated or unplugged before beginning any cabling.
Make use of the links in the following table and figure:
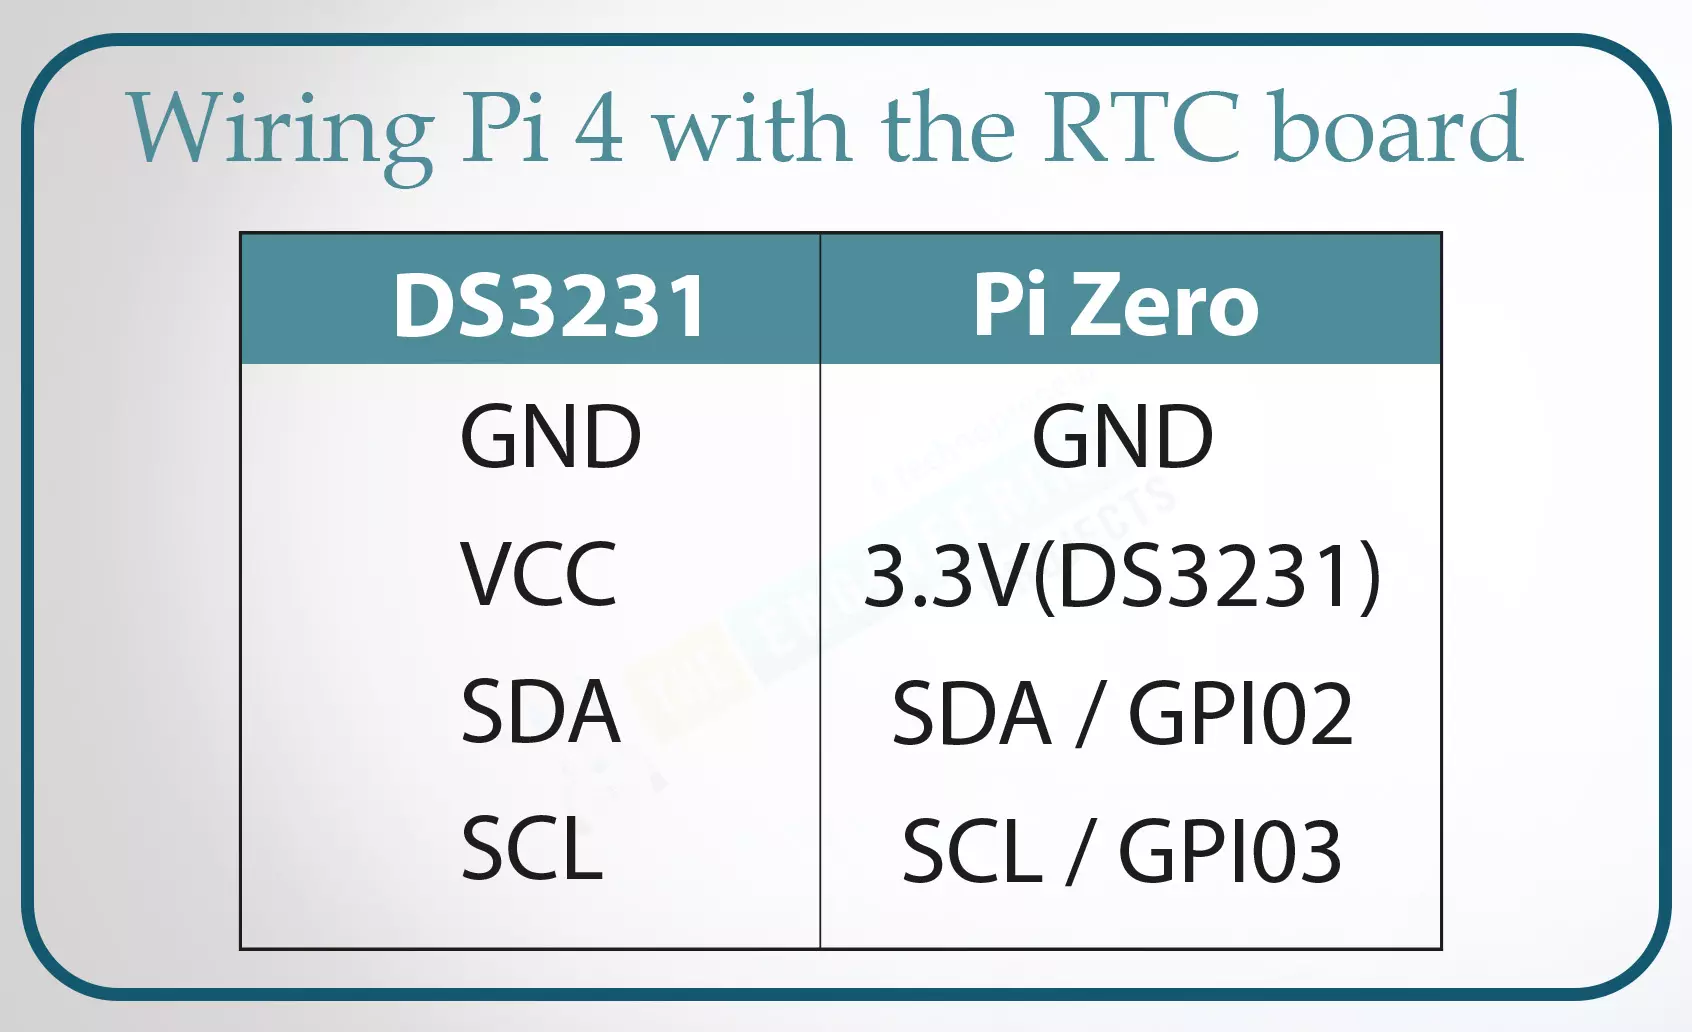
The rtc is powered by a 3.3V supply; hence it needs an input of 3.3V. Connect the RTC to the Pi 4 via a communication protocol.
Configuring the RTC Chip
We must first enable I2C in the RPi to use the RTC component.
Open a terminal window and enter the command raspi-config:

sudo raspi-config
Select the Interfacing Option in the configuration tool.
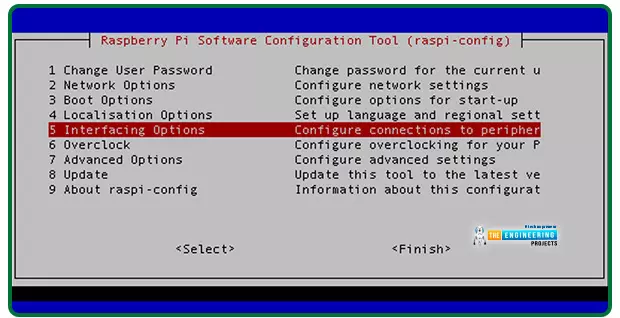
Selecting I2C will allow I2C in the future.
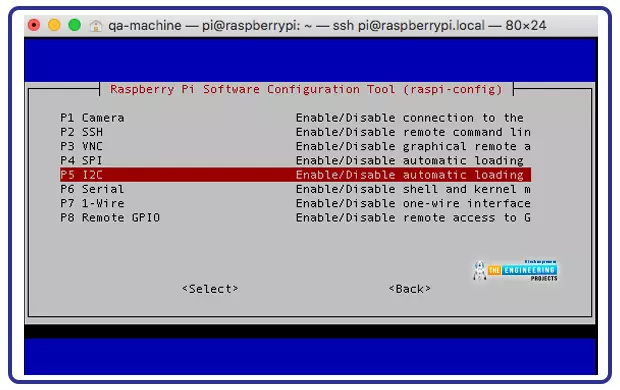
Before rebooting, enable the I2C.

sudo reboot
Confirm the Connections of the RTC. Then using the I2C interface, we can check to see if our real-time clock module is connected to the device.
Ensure your Pi's software is updated before putting any software on it. Defective dependencies in modules are frequently to blame for installation failures.

sudo apt-get update -y
sudo apt-get upgrade -y
If our RPi detects a connection from the real-time clock module, we'll need python-SMBus i2c-tools installed.
On the command line:

sudo apt-get install python-SMBus i2c-tools
Then:

sudo i2cdetect -y 1
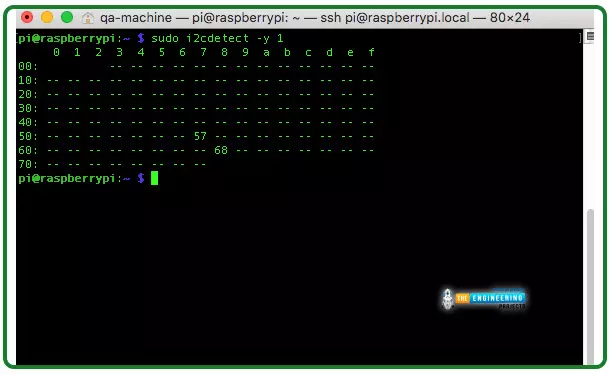
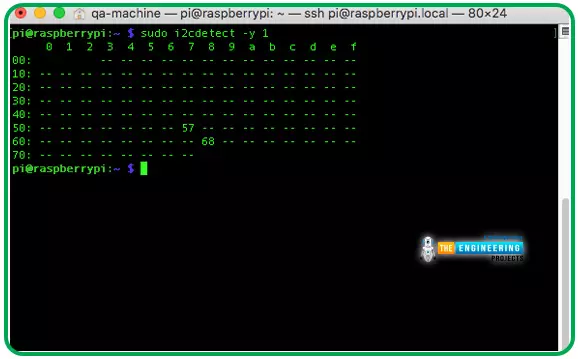
Many real-time devices use the 68 address. This indicates that any driver is not using the address. If the address returned by the system is "UU," it indicates that a program actively uses it.
Using the RTC Package
Install Python.

sudo apt-get install python-pip
sudo apt-get install python3-pip
To get the git library, you'll first need to get the git installed on your computer.

$sudo apt install git-all
First, we will have to download the library using the following command in the command line.

sudo git clone https://github.com/switchdoclabs/RTC_SDL_DS3231.git
A file called "RTCmodule" should be created after cloning. The following code should be copied and pasted into a new py file. Please save it.
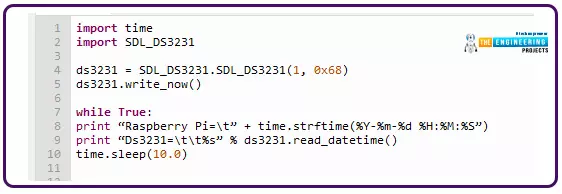
import time
import SDL_DS3231
ds3231 = SDL_DS3231.SDL_DS3231(1, 0x68)
ds3231.write_now()
while True:
print “Raspberry Pi=\t” + time.strftime(%Y-%m-%d %H:%M:%S”)
print “Ds3231=\t\t%s” % ds3231.read_datetime()
time.sleep(10.0)
Code Walkthrough
We begin by importing the packages we plan to use for this project.

The clock is initialized.

Next, the RPi and real-time clock module times are printed.

Then, execute the program.

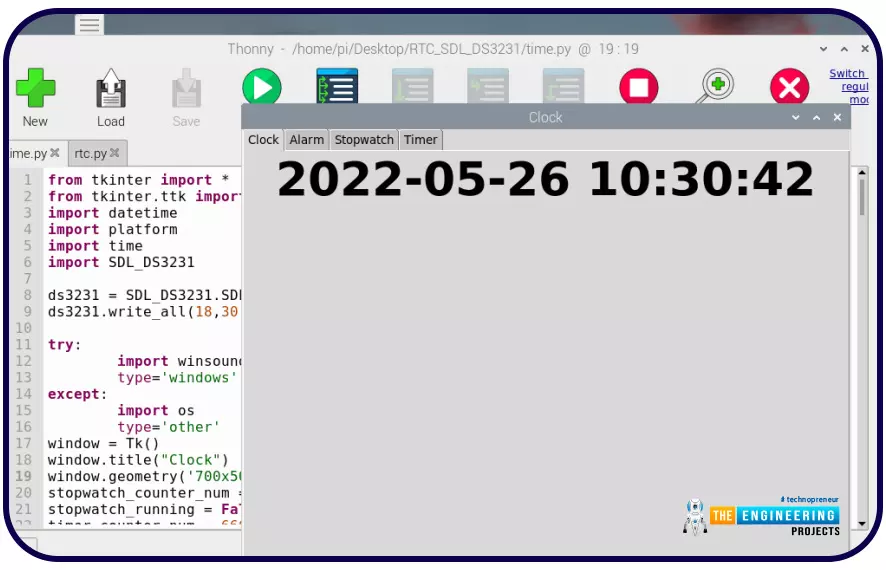
$ python rtc.py
In this case, the output should look something like the following.

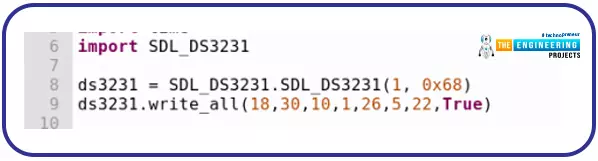
Clock Differences: Making the RTC different From RPi Clock
The write all() function can alter the rtc to run at a different rate than the Pi's clock.
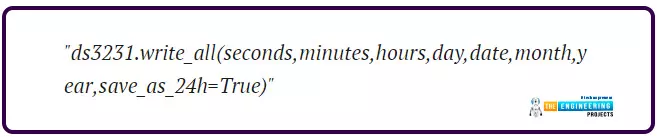
ds3231.write_all(29,30,4,1,3,12,92,True)

import time
import SDL_DS3231
ds3231 = SDL_DS3231.SDL_DS3231(1, 0x68)
ds3231.write_all(29,30,4,1,3,12,92,True)
while True:
print “Raspberry Pi=\t” + time.strftime(%Y-%m-%d %H:%M:%S”)
print “Ds3231=\t\t%s” % ds3231.read_datetime()
time.sleep(10.0)

Time and date are shown to have adjusted on the rtc. With this, we'll be able to use the real-time clock and the package for various projects. However, more setup is required because we'll use the RPi's real-time clock for this project.
RPI with the real-time clock Module
, we will configure the rtc on the RPi used in this project. The first thing to do is to follow the steps outlined above.
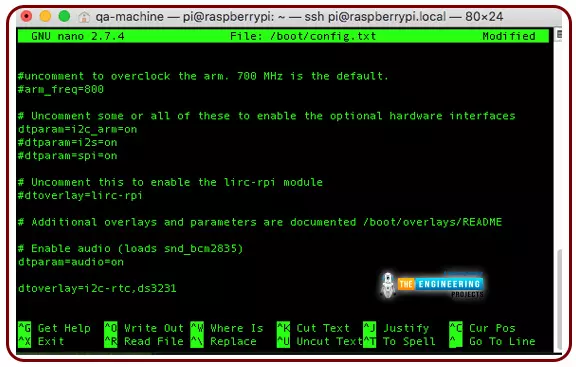
The real-time clock address is 0x68, so we must use that. Configuration.txt must be edited so that a device tree layer can be added.

sudo nano /boot/config.txt
Please note where your real-time clock chip is in the Pi config file and include it there.

dtoverlay=i2c-rtc,ds1307
or

dtoverlay=i2c-rtc,pcf8523
or

dtoverlay=i2c-rtc,ds3231
After saving and restarting the Pi, inspect the 0x68 address status.

sudo reboot
After reboot, run:

sudo i2cdetect -y 1
Once the "fake hwclock" has been disabled, we can use the real-time clock real hwclock again.
The commands below should be entered into the terminal to remove the bogus hwclock from use.
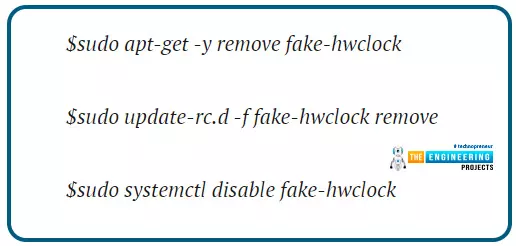
sudo apt-get -y remove fake-hwclock
sudo update-RC.df fake-hwclock remove
sudo systemctl disable fake-hwclock
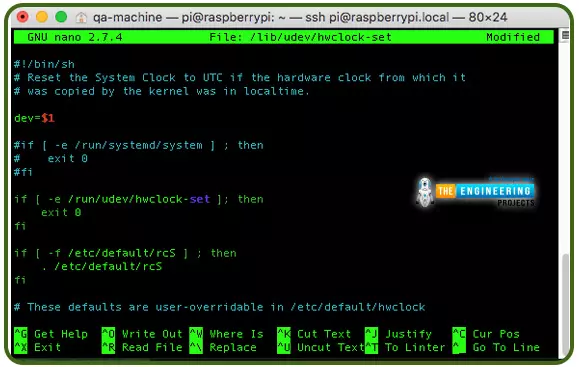
RTC as the primary timer
We can use our rtc hardware as our primary clock after disabling the fake hwclock.

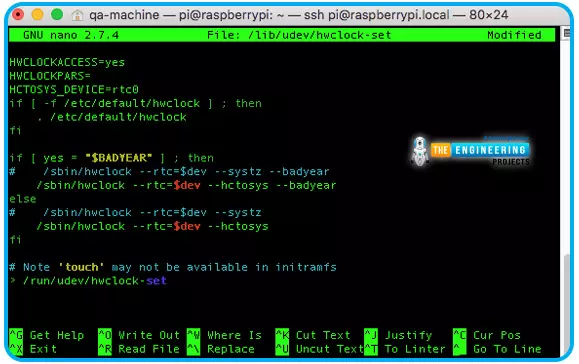
sudo nano /lib/udev/hwclock-set
Afterward, type in the lines below.
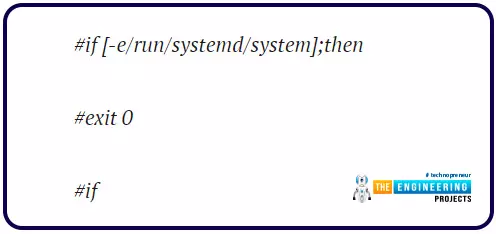
#if [-e/run/systemd/system];then
#exit 0
#if
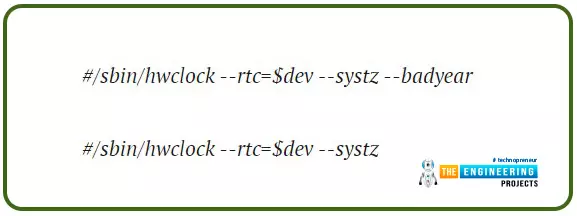
#/sbin/hwclock --rtc=$dev --systz --badyear
#/sbin/hwclock --rtc=$dev --systz
We can now run some tests to see if everything is working properly.
On the RPi, how do we sync real-time clock time?
To begin with, the real-time clock will show an inaccurate time on its screen. To use the real-time clock as a device, we must first correct its time.
To verify the current date, the real-time clock is launched.

$sudo hwclock
It is necessary to have an internet connection to our real-time clock module to synchronize the accurate time from the internet.
To verify the date of the terminal and time input, type in:

date.
Time can also be manually set using the line below. It's important to know that the internet connection will immediately correct it even if you do this manual process.
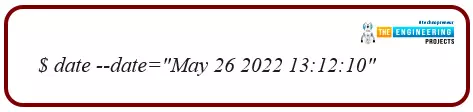
date --date="May 26 2022 13:12:10"
How to Sync Time From RTC to Pi
The real-time clock module time can also be used to set the time of the Rpi.

sudo hwclock –systems
or

sudo hwclock –w
Setting the time on our real-time clock module is also possible using:

sudo hwclock --set --date "Thu May 26 13:12:10 PDT 2022"
Or

sudo hwclock --set --date "26/05/2022 13:12:45"
Once the time has been synchronized, the real-time clock module needs a battery inserted to continue saving the timestamp. Once the real-time clock module has been installed on the RPi, the timestamp will be updated automatically!
Building our application
Next, we'll build a digital clock that includes an alarm, stopwatch, and timer features. It is written in Python 3, and it will operate on a Raspberry Pi using the Tkinter GUI library.
What is Tkinter???
The library includes the Tkinter Graphical interface framework, which runs on various operating systems and platforms. Cross-platform compatibility means that the code can be used on every platform.
As to why Tkinter?
Tkinter is a small, portable, and simple-to-use alternative to other tools available. Because of this, it is the best platform for quickly creating cross-platform apps that don't require a modern appearance.
Python Tkinter module makes it possible to create graphical user interfaces for Python programs.
Tkinter offers a wide range of standard GUI elements and widgets to create user interfaces. Controls and menus are included in this category.

Advantages of Tkinter
Layered technique
Tkinter has all of the benefits of the TK package, thanks to its layered design. When Tkinter was first developed, its Graphical interface toolkit had already had time to evolve, so it benefited from that experience when it was created. As a result, Tk software developers can learn Tkinter very quickly because converting from Tcl/Tcl to Tkinter is extremely simple.
Accessibility
Because Tkinter is so user-friendly, getting started with it is a breeze. The Tkinter application hides the complex and detailed calls in simple, understandable methods. When it comes to creating a working prototype rapidly, python is a natural choice. Because of this, it is anticipated that its favorite Graphical interface library will be applied similarly.
Portability
Tkinter-based Py scripts don't require any running changes on a different platform. Any environment that implements python can use Tkinter. This gives it a strong benefit over many other competitive libraries, typically limited to a single or a handful of operating systems. Tkinter, on the other hand, provides a platform-specific look and feel.
Availability
Python distributions now include Tkinter by default. Therefore, it is possible to run commands using Tkinter without additional modules.
Tkinter's flaws
Tkinter's slower execution may be due to the multi-layered strategy used in its design. Most computers are relatively quick enough to handle the additional processes in a reasonable period, despite this being an issue for older, slower machines. When time is of the essence, it is imperative to create an efficient program.
Importing Modules
Import the following modules.
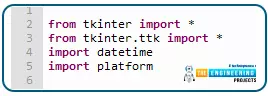
from Tkinter import *
from Tkinter. ttk import *
import DateTime
import platform
Tkinter Window Creation
We are now going to build a Tkinter window.

window = Tk()
window.title("Clock")
window.geometry('700x500')
Here, we've created a basic Tkinter window. "Clock" has been officially renamed. And make it a 700X500 pixel image.
Control tabs in Tkinter
Tkinter notebook can be used to add tab controls. We'll create four new tabs, one for each of the following: Clock, Alarm, Stopwatch, and Timer.
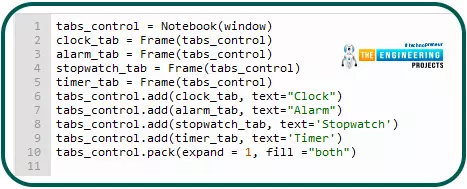
tabs_control = Notebook(window)
clock_tab = Frame(tabs_control)
alarm_tab = Frame(tabs_control)
stopwatch_tab = Frame(tabs_control)
timer_tab = Frame(tabs_control)
tabs_control.add(clock_tab, text="Clock")
tabs_control.add(alarm_tab, text="Alarm")
tabs_control.add(stopwatch_tab, text='Stopwatch')
tabs_control.add(timer_tab, text='Timer')
tabs_control.pack(expand = 1, fill ="both")
We've created a frame for every tab and then added it to our notebook.
Create Clock
We are now going to add the clock Tkinter components. Instead of relying on the RPi to provide the date and time, we'll use the rtc module time and date instead.
We'll include a callback function to the real-time clock module in the clock code to obtain real-time.
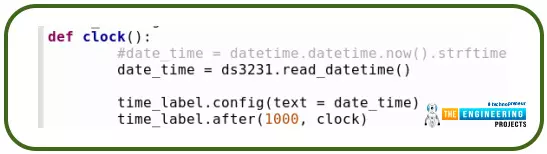
def clock():
date_time = ds3231.read_datetime()
time_label.config(text = date_time)
time_label.after(1000, clock)
Timestamps are retrieved from the DateTime package and transformed to Am or Pm time. This method must be placed after Tkinter's initialization but before the notebook.
Create Alarm
We'll design an Alarm that will activate when the allotted time has expired in the next step.
Tkinter Components for Alarms
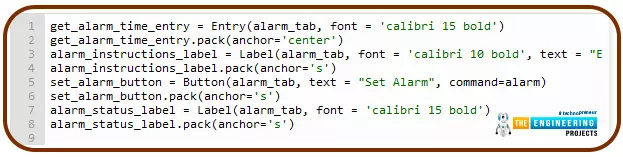
get_alarm_time_entry = Entry(alarm_tab, font = 'calibri 15 bold')
get_alarm_time_entry.pack(anchor='center')
alarm_instructions_label = Label(alarm_tab, font = 'calibri 10 bold', text = "Enter Alarm Time. Eg -> 01:30 PM, 01 -> Hour, 30 -> Minutes")
alarm_instructions_label.pack(anchor='s')
set_alarm_button = Button(alarm_tab, text = "Set Alarm", command=alarm)
set_alarm_button.pack(anchor='s')
alarm_status_label = Label(alarm_tab, font = 'calibri 15 bold')
alarm_status_label.pack(anchor='s')
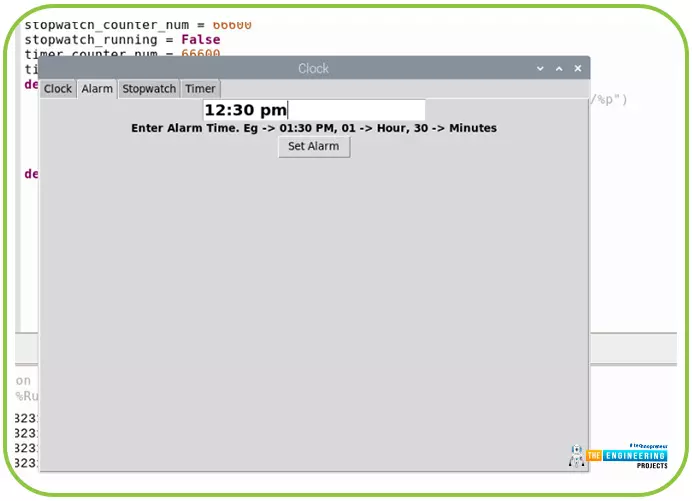
Set the alarm with the following format: HH: MM (PM/AM). For example, the time at which 01:30 PM corresponds to 1:30 p.m. As a final step, a button labeled "Set Alarm Button." In addition, the alarm status label indicates if the alarm has been set and shows the current time.
Make an alarm method
The set alarm button will trigger an alarm when this method is called. Replace Clock and Notebook setup functions with this one.
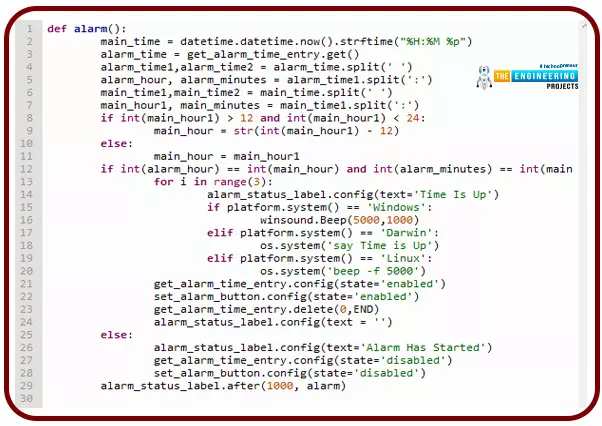
def alarm():
main_time = datetime.datetime.now().strftime("%H:%M %p")
alarm_time = get_alarm_time_entry.get()
alarm_time1,alarm_time2 = alarm_time.split(' ')
alarm_hour, alarm_minutes = alarm_time1.split(':')
main_time1,main_time2 = main_time.split(' ')
main_hour1, main_minutes = main_time1.split(':')
if int(main_hour1) > 12 and int(main_hour1) < 24:
main_hour = str(int(main_hour1) - 12)
else:
main_hour = main_hour1
if int(alarm_hour) == int(main_hour) and int(alarm_minutes) == int(main_minutes) and main_time2 == alarm_time2:
for i in range(3):
alarm_status_label.config(text='Time Is Up')
if platform.system() == 'Windows':
winsound.Beep(5000,1000)
elif platform.system() == 'Darwin':
os.system('say Time is Up')
elif platform.system() == 'Linux':
os.system('beep -f 5000')
get_alarm_time_entry.config(state='enabled')
set_alarm_button.config(state='enabled')
get_alarm_time_entry.delete(0,END)
alarm_status_label.config(text = '')
else:
alarm_status_label.config(text='Alarm Has Started')
get_alarm_time_entry.config(state='disabled')
set_alarm_button.config(state='disabled')
alarm_status_label.after(1000, alarm)
In this case, the module's time is taken and formatted in this way in case the If the time provided matches the time stored, it continues. In this case, it beeps following the operating system's default chime.
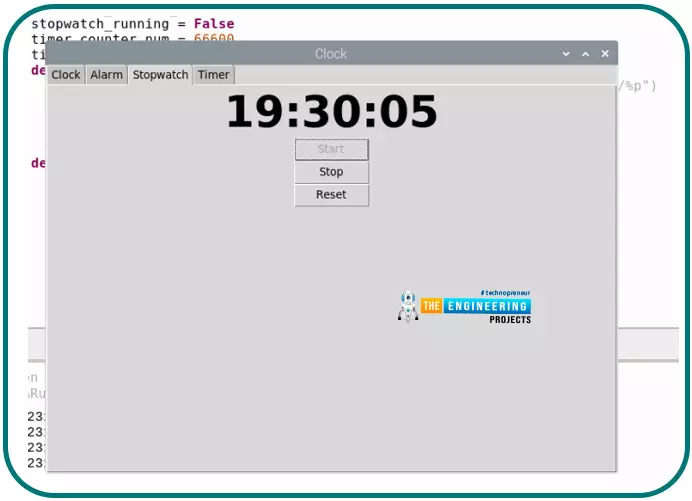
Make Stopwatch
As a final step, we'll add a stopwatch to our code.
Add stopwatch Tkinter component.
To complete our timer, we'll add all Tkinter elements now.
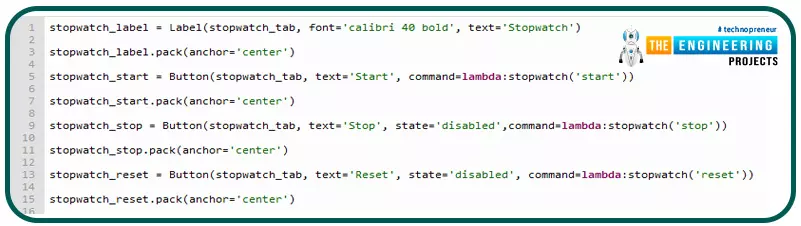
stopwatch_label = Label(stopwatch_tab, font='calibri 40 bold', text='Stopwatch')
stopwatch_label.pack(anchor='center')
stopwatch_start = Button(stopwatch_tab, text='Start', command=lambda:stopwatch('start'))
stopwatch_start.pack(anchor='center')
stopwatch_stop = Button(stopwatch_tab, text='Stop', state='disabled',command=lambda:stopwatch('stop'))
stopwatch_stop.pack(anchor='center')
stopwatch_reset = Button(stopwatch_tab, text='Reset', state='disabled', command=lambda:stopwatch('reset'))
stopwatch_reset.pack(anchor='center')
The stopwatch method is activated by pressing the Start, Stop, and Reset Buttons located below the Stopwatch Label.
Add stopwatch counter method.
Stopwatch counters will be included in the next section. Two stopwatch counters will be added first. Tkinter Initialization and the clock's method should be added to the bottom of the list.
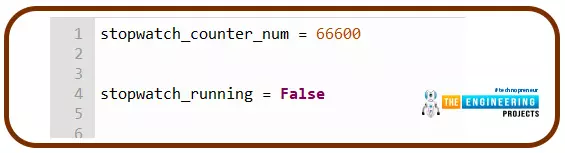
stopwatch_counter_num = 66600
stopwatch_running = False
The stopwatch is described in these words. Adding a Stopwatch Counter is the next step. Add it to the bottom of the alarm clock and the top of the notebook's setup procedure.
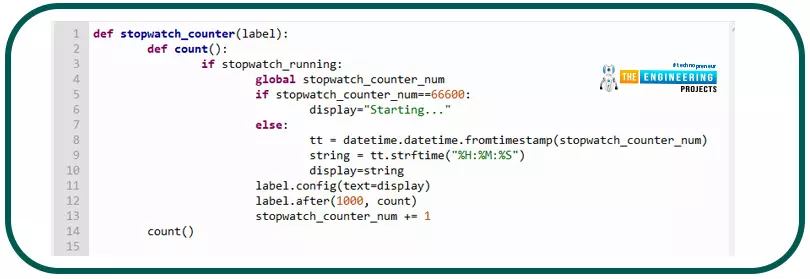
def stopwatch_counter(label):
def count():
if stopwatch_running:
global stopwatch_counter_num
if stopwatch_counter_num==66600:
display="Starting..."
else:
tt = datetime.datetime.fromtimestamp(stopwatch_counter_num)
string = tt.strftime("%H:%M:%S")
display=string
label.config(text=display)
label.after(1000, count)
stopwatch_counter_num += 1
count()
The counter controls the stopwatch on the stopwatch. At the rate of one second each second, the Stopwatch counter is incremented by 1.
Add stopwatch method
The stopwatch method, which is invoked by the Stopwatch Controls, is now complete.
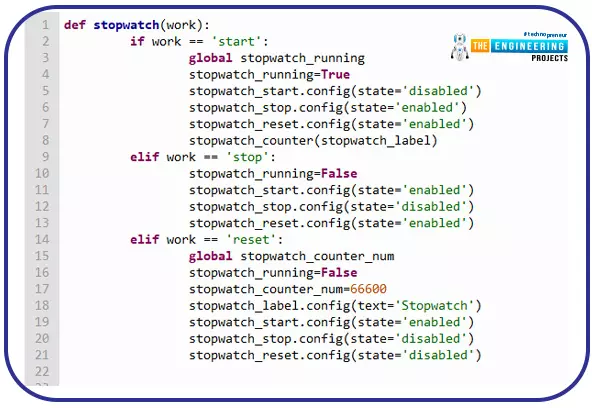
if work == 'start':
global stopwatch_running
stopwatch_running=True
stopwatch_start.config(state='disabled')
stopwatch_stop.config(state='enabled')
stopwatch_reset.config(state='enabled')
stopwatch_counter(stopwatch_label)
elif work == 'stop':
stopwatch_running=False
stopwatch_start.config(state='enabled')
stopwatch_stop.config(state='disabled')
stopwatch_reset.config(state='enabled')
elif work == 'reset':
global stopwatch_counter_num
stopwatch_running=False
stopwatch_counter_num=66600
stopwatch_label.config(text='Stopwatch')
stopwatch_start.config(state='enabled')
stopwatch_stop.config(state='disabled')
stopwatch_reset.config(state='disabled')
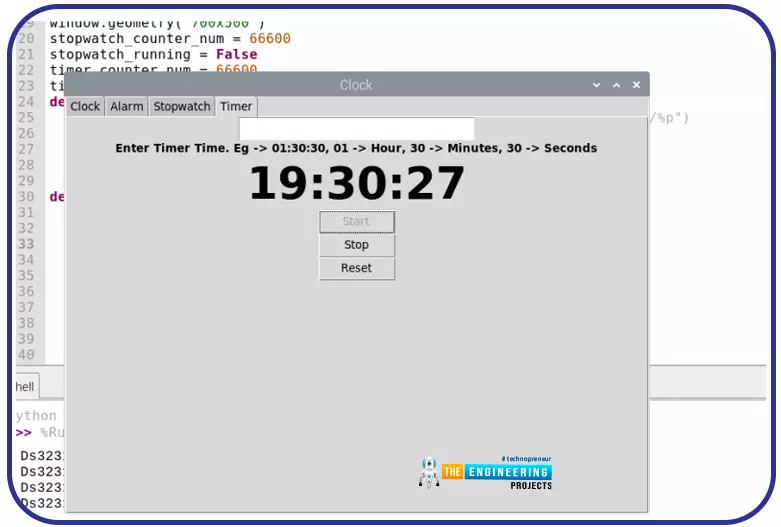
Make Timer
We will now create a timer that rings when the timer has expired. Based on the stopwatch, it deducts one from the counter rather than adding 1.
Add timer Tkinter component
The timer component will now be included in Tkinter.
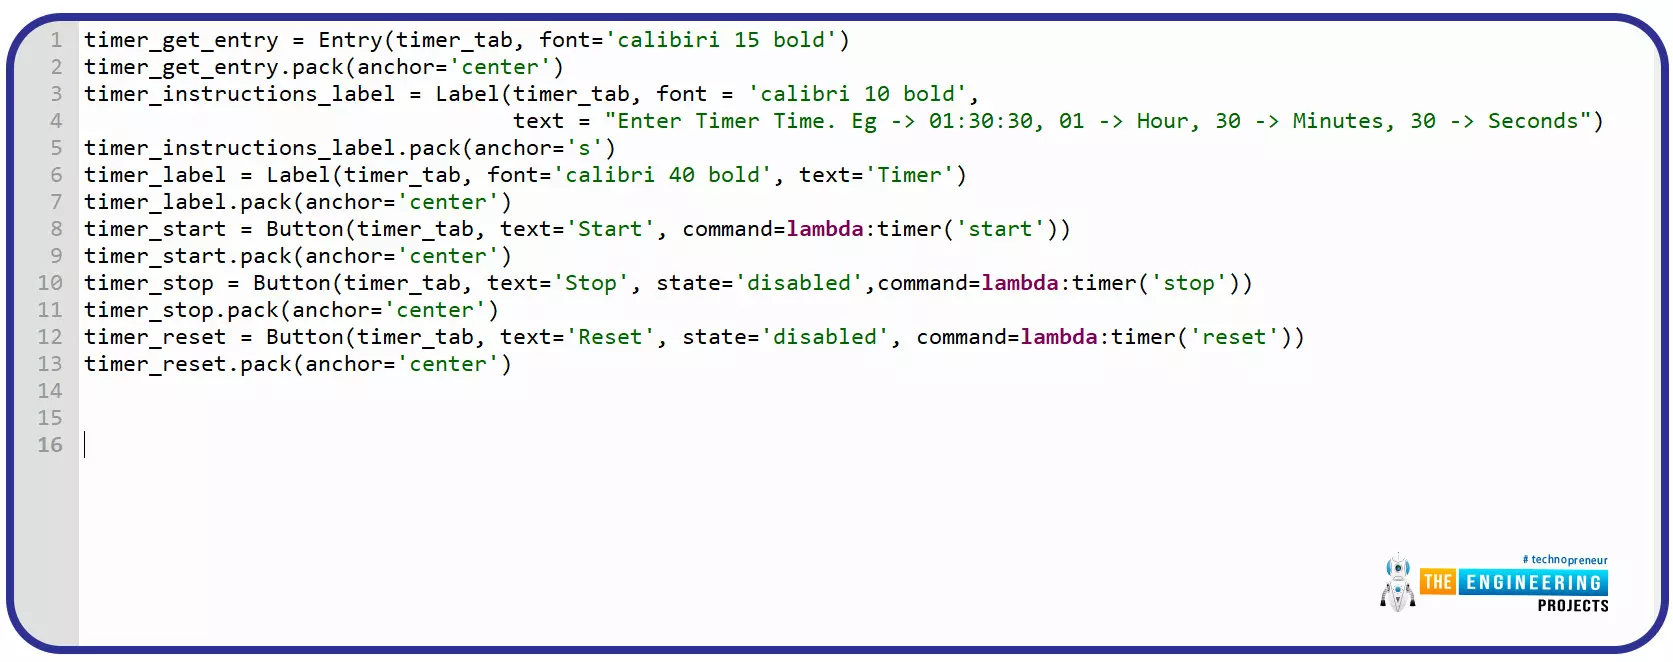
timer_get_entry = Entry(timer_tab, font='calibiri 15 bold')
timer_get_entry.pack(anchor='center')
timer_instructions_label = Label(timer_tab, font = 'calibri 10 bold', text = "Enter Timer Time. Eg -> 01:30:30, 01 -> Hour, 30 -> Minutes, 30 -> Seconds")
timer_instructions_label.pack(anchor='s')
timer_label = Label(timer_tab, font='calibri 40 bold', text='Timer')
timer_label.pack(anchor='center')
timer_start = Button(timer_tab, text='Start', command=lambda:timer('start'))
timer_start.pack(anchor='center')
timer_stop = Button(timer_tab, text='Stop', state='disabled',command=lambda:timer('stop'))
timer_stop.pack(anchor='center')
timer_reset = Button(timer_tab, text='Reset', state='disabled', command=lambda:timer('reset'))
timer_reset.pack(anchor='center')
Get timer provides guidance that explains how to set the timer. HH:MM: SS, For instance, 01:30:40 denotes a time interval of one hour, thirty minutes, and forty secs. It then has a toggle that calls the Timer method, which has a start, stop, and reset button.
Add timer counter method
To begin, we'll insert 2 Timer counters. The two lines of code below the stopwatch and the clock method below should be added.
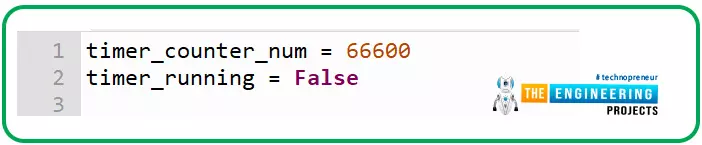
timer_counter_num = 66600
timer_running = False
In this section, we learn more about the "Timer" feature. Next, we'll implement the Timer Counter feature. In between the Stopwatch method and Notebook Initiation, put it.
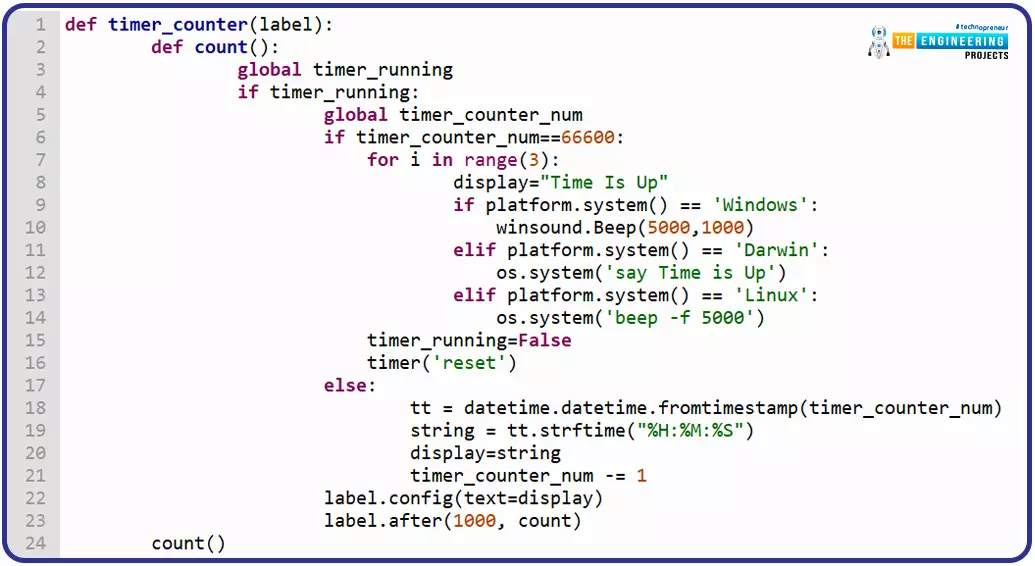
def timer_counter(label):
def count():
global timer_running
if timer_running:
global timer_counter_num
if timer_counter_num==66600:
for i in range(3):
display="Time Is Up"
if platform.system() == 'Windows':
winsound.Beep(5000,1000)
elif platform.system() == 'Darwin':
os.system('say Time is Up')
elif platform.system() == 'Linux':
os.system('beep -f 5000')
timer_running=False
timer('reset')
else:
tt = datetime.datetime.fromtimestamp(timer_counter_num)
string = tt.strftime("%H:%M:%S")
display=string
timer_counter_num -= 1
label.config(text=display)
label.after(1000, count)
count()
The Timer counter controls the timer. Timer counter-variable num is decreased by one each second.
Add timer method
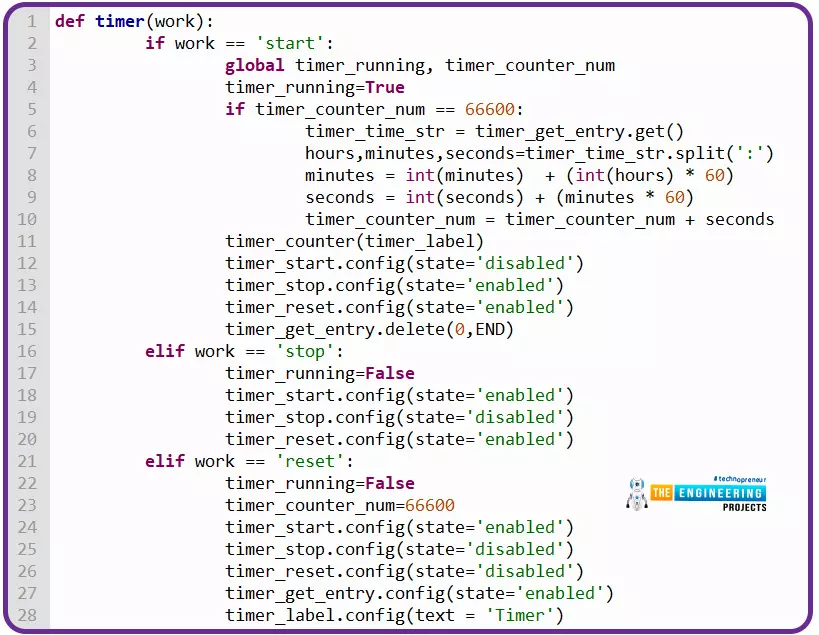
def timer(work):
if work == 'start':
global timer_running, timer_counter_num
timer_running=True
if timer_counter_num == 66600:
timer_time_str = timer_get_entry.get()
hours,minutes,seconds=timer_time_str.split(':')
minutes = int(minutes) + (int(hours) * 60)
seconds = int(seconds) + (minutes * 60)
timer_counter_num = timer_counter_num + seconds
timer_counter(timer_label)
timer_start.config(state='disabled')
timer_stop.config(state='enabled')
timer_reset.config(state='enabled')
timer_get_entry.delete(0,END)
elif work == 'stop':
timer_running=False
timer_start.config(state='enabled')
timer_stop.config(state='disabled')
timer_reset.config(state='enabled')
elif work == 'reset':
timer_running=False
timer_counter_num=66600
timer_start.config(state='enabled')
timer_stop.config(state='disabled')
timer_reset.config(state='disabled')
timer_get_entry.config(state='enabled')
timer_label.config(text = 'Timer')
If the task is started, this method retrieves the Timer input text and formats it before setting the Timer counter and calling the Timer counter to set the clock running. The timer is set to "False" if programmed to Stop. The counter is set to 666600, and running is configured to "False."
Start clock and Tkinter
Finally, here we are at the end of the project. Finally, add the code below to start Tkinter and the clock.
clock()
window.main loop()
It will open the Tkinter and clock windows.
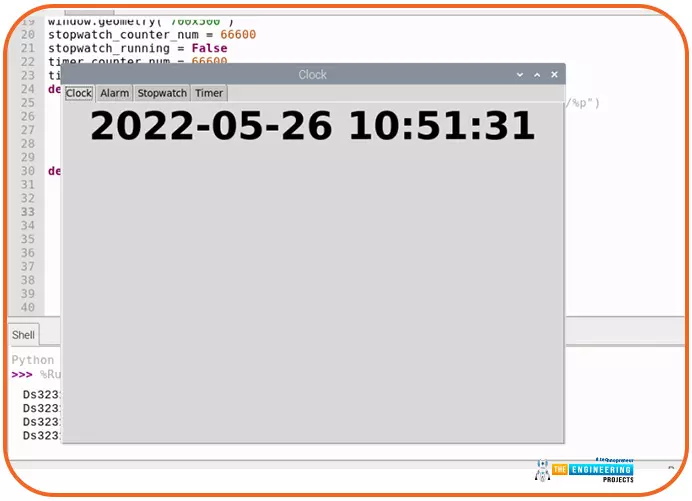
Output
Alarm
Stopwatch
Timer
Disadvantages of RTC module
32-Bit Second Counter Problems
Even while this counter can operate for a long period, it will eventually run out of memory space. Having a narrow count range can pose problems.
Application of an RTC module
Management of the streetlights
Lighting Street Management System is a one-of-a-kind solution that regulates the automatic reallocation of lights in public spaces. It can measure electric consumption and detect tampering and other electrical situations that hinder the most efficient use of street lights. IoT-based automated streetlight management systems are intended to cut electricity usage while decreasing labor costs through precession-based scheduling. Streetlights are a vital element of any town since they improve night vision, offer safety on the streets, and expose public places, but they waste a significant amount of energy. Lights in manually controlled streetlight systems run at full capacity from sunset to morning, even if there is adequate light. High reliability and lengthy stability are guaranteed by this method. This task is carried out using computer software. When compared to the previous system, the new one performs better. Automated On and Off processes are based on the RTC module for the time frame between dawn and dusk of the next day. Manual mode was removed because of human flaws and difficulties in timely on and off activities, which necessitated the relocation of certified electricians over wide distances and caused time delays. Using an Internet of things controlled from a central command center and portable devices helps us avoid these delays while also identifying and correcting faults, conserving energy, and providing better services more efficiently.
Conclusion
This tutorial teaches the mechanics of a real-time clock and some major applications in real life. With ease, you can integrate this module into most of your projects that require timed operations, such as robot movements. You will also understand how the RTC works if you play around with it more. In the next tutorial, we will build a stop motion movie system using Raspberry pi 4.


