Interface a Ws2812 RGB with Raspberry Pi 4


Thank you for joining us today for our in-depth Raspberry Pi programming tutorial. The previous guide covered the steps necessary to connect a fingerprint scanner to a Raspberry Pi 4. In addition, we developed a python script to complement the sensor's ability to identify fingerprints. Yet, in this guide, we'll discover how to interface a ws2812 RGB to a Raspberry Pi 4.

Bright, colorful lights are the best, and this tutorial shows you how to set up Fully Configurable WS2812B led strips to run on a Pi 4 computer as quickly and flexibly as possible. In that manner, you can have the ambiance of your home reflect your tastes.
In most cases, when people talk about a "WS2812B Strip," they mean a long piece of extensible PCB with a bunch of different RGB LED Nodes spread out and dotting all along the top. As a bonus, WS2812B strips can be addressed individually. Each RGB node can independently set its own color and brightness. The functionality of non-addressable RGB strips will be identical to that of WS2812B strips. WS2812B Strips are superior in every way, allowing for more imaginative LED light shows. It is possible to create more complex animations, stripes, and chases by individually programming the actions of each LED Node.
The "WS" in WS2812B indicates that this is the second major revision of this design; "World Semi" refers to the chip's original equipment manufacturer, "2812" to its specific part number, and "B" to its revision number. Each WS2812B LED Node contains an integrated circuit chip, as shown below.

Fully Configurable Strip LEDs now come in wide varieties. It's important to remember whether the strip operates on 5 volts or 12-volt power. To power our 5V-powered Raspberry Pi Computer, we need to use a 5V power supply. Or we'll have to install extra gear to meet the 12v Dc power specifications. LED Node densities also vary across WS2812B LED strips. Since our strip consists of WS2812B nodes soldered onto rigid PCBs, it may also be controlled by the Python script included in this article. ws2812B LED strips are the ideal LEDs to use because of the benefits above. What this manual entails is listed below.
The control mechanism implemented in this tutorial works with WS2812B LED nodes, whether they are rigidly coupled on a PCB or flexibly arranged over a long strip. No prior experience with Raspberry Pi has required, thanks to our comprehensive online raspberry pi 4 for the introduction. You should be able to follow these guidelines if you've read at least chapter 1.

WS2812B protocol
Let's go over the protocol for these addressable LEDs so you can see how they function. Each WS2812B unit's red, green, and blue LEDs can be independently controlled to one of 256 brightness levels. Each LED module needs 24 bits of data or three groups of eight brightness bits. Here's a quick rundown of the steps involved:
The first LED in the string receives this data stream from the microcontroller, which consists of eight green bits, eight red bits, and eight blue bits.
In the case of several LEDs, the data sequence for the second LED begins with green, red, and blue information immediately after the information for the first LED. The process repeats itself until each LED is turned on.
The first LED acts as a receiver for data for all subsequent LEDs in the chain and then sends that data to the second LED without applying the same sequence.
When the original "number one" LED unit runs out of binary LED sequences, it passes the baton to the next available unit.
What You Need
What follows are detailed instructions for configuring a single Raspberry Pi board to manage many individually addressable LEDs.
A pi 4
5v led strip
A DC barrel jack to 2-pin terminal block adapter.
More than 30 WS2812B strip Nodes will necessitate the usage of an external power supply. Even with highly efficient LEDs, producing brilliant light takes a lot of energy. On average, each pixel will consume 20mA, and while projecting white light at full brightness, each pixel will consume 60mA. This information shows us that 30 Pixels can consume 600mA on average and 1.8A at full brightness. As a side note, staring directly into a room with the lights set to full white causes blind spots in my vision. Because of this, I typically set the brightness of my WS2812B lights to 20%. Ensure your WS2812B strip's power source is adequate for the illumination level you intend to achieve.
In today's world, 3.3V data logic is compatible with most WS2812B LED nodes. The GPIO Pins on a Raspberry Pi have an operational voltage range of 0 to 3.3V; therefore, this works out perfectly. This surface-mounted WS2812B strip Node has seen five minor changes since its inception. Since the earlier WS2812B strip can only work on 5V Data Logic, a logical level shifter may be necessary if you're experiencing strange or intermittent issues.
Assembling Hardware
We'll configure our Raspberry PI to look and act like a desktop PC because that's how most people use computers at home and because it's the most user-friendly setup for novice makers. To convert our Raspberry Pi into a desktop computer, we'll need to install a micro-SD card pre-flashed with the operating system. Then hook it up to a monitor via HDMI and a mouse/keyboard combo. Also, this is a good moment to install a small heatsink on the Raspberry Pi Board's central processing unit IC. Look at the image below to see the setup adjacent to a short WS2812B LED strip with three wires protruding from it. The WS2812B has three wires that have not yet been connected to the Raspberry Pi. WS2812B LED Strip PCBs are often marked with arrows to indicate the direction of data flow. It is a common problem in troubleshooting when this is ignored.

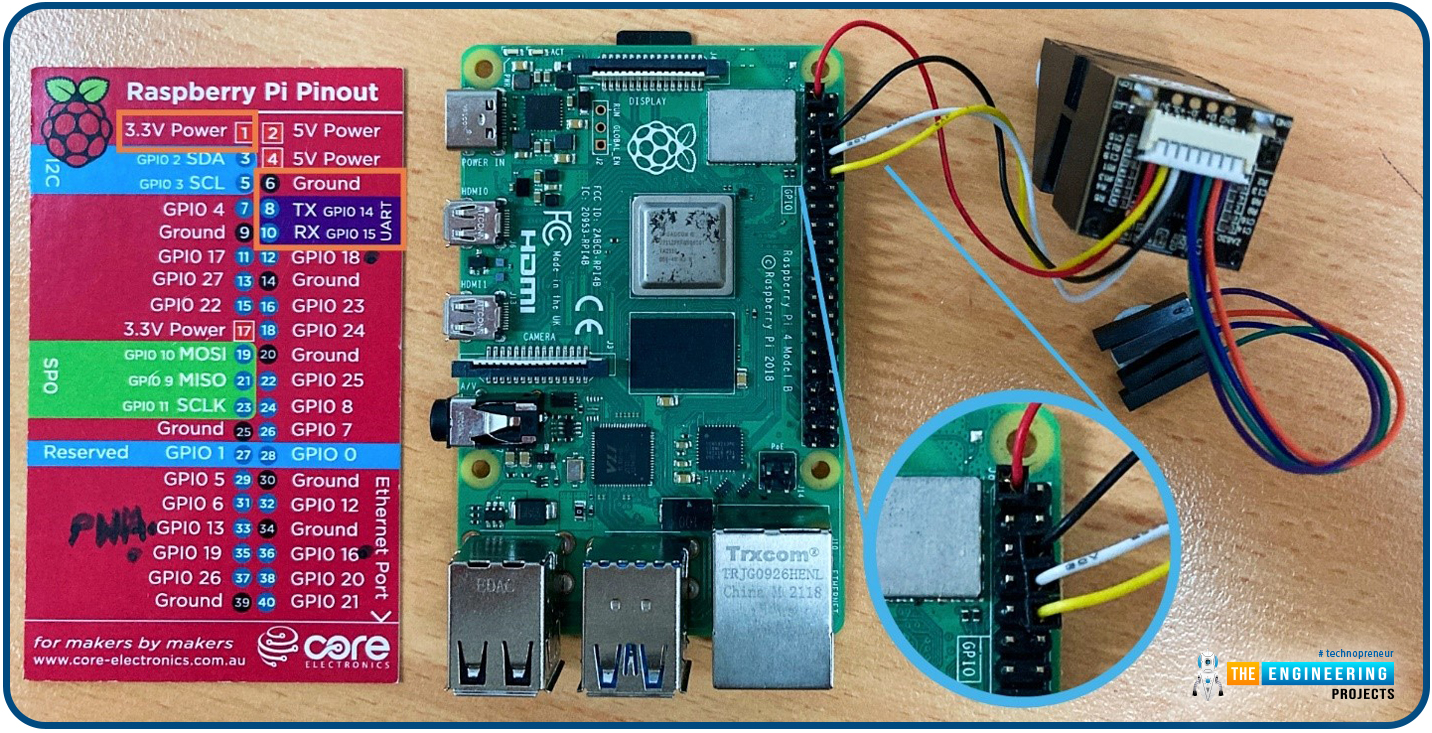
How to Configure Hardware for WS2812B Chains with fewer than 30 Nodes We need to plug in the 5V WS2812B Strip's three wires to the Raspberry Pi before turning the power on. Link the Raspberry Pi's 5V Power Input Pin with the Red Power Cable. Join the white wire labeled "Ground" to the Pi's Ground pin. Join the Raspberry Pi's Green Input Pin to its GPIO 18 port. It is important to remember that the Green Input Pin could be any GPIO pin as long as the appropriate adjustments are made in your Python programs. In this manual, GPIO 18 will be used for the Data Line in all scripts. The picture below shows how these three wires are joined together. This straightforward system can provide power and data transmission for a limited amount of LEDs.

Hardware Configuration for a WS2812B Strip with more than 30 Nodes in Length. However, the Pi 4 Power Pin Out is not powerful enough to power a full LED strip. It's important to know the power requirements of fully addressable WS2812B LEDs, especially when used in large quantities. 150 fully illuminated RGBW LEDs should be manageable by a high-quality 5v 4A power supply.
Following the diagram below, we will connect a 5V 4A power source via a DC barrel jack. Our WS2812B LEDs are pre-soldered with one green data wire, two red power wires, and two white ground wires. The white wire should be attached to the DC barrel jack's negative terminal using a screwdriver. Join the Red Wire to the Terminal With the Positive Screw Down. The White Connectors all link to one other, indicating a Common Ground shared by the Raspberry Pi and the power source. The two devices can't be connected without ground, which will prevent voltage fluctuations and data transmission mistakes.
Furthermore, the WS2812B Strip is no longer connected to the Pi 4 computer via a red power wire. We have found an alternative to using a Raspberry Pi to run our system. See the diagram below for details on connecting a Raspberry Pi to a string of WS2812B LEDs so that they may be controlled remotely.

There are several great best practices to keep in mind if you're planning on powering many LED strips. If you need to run more than a 5-meter roll of LEDs, I recommend consulting the adafruit documentation on the subject. It's important to think about heat and currents.
Now that everything is hooked up how you like it, you can turn on the Pi 4 System by inserting a USB-C cable.
Set up of software.
You'll need to install a few packages if you're starting with a clean install of Raspberry Pi OS. Since this is the case, WS2812B LEDs will function properly. When you plug the Raspberry Pi into an electrical outlet and finish the initial boot-up wizard, you will be taken to the operating system's familiar desktop.
Click the black button in the upper left corner to open a new terminal window. An interactive terminal will launch. Below is a picture of this happening, with a huge red arrow indicating the pressed terminal icon.

With this terminal window, we can search for specific programs and download them from the internet. Here are the command lines you use in the terminal to install everything you need. Type | Y | to confirm installs if prompted.

sudo pip3 install rpi_ws281x
sudo pip3 install adafruit-circuitpython-neopixel
sudo python3 -m pip install --force-reinstall adafruit-blinka

You now have the software and programming packages installed on your Device to power and run WS2812B properly.
Flashing led demonstration
You may trigger the Raspberry Pi to turn on the associated WS2812B LED strips in various ways. To begin, I will utilize the simplest and quickest technique, which involves hooking up this Raspberry Pi to a monitor, mouse, and keyboard so that I can execute Python scripts directly to control it. Below, you'll find the best and most fun Python script to start with: | strandtest.py |. Even though it's far more involved than the rest of the Python scripts in this tutorial, we felt it was essential to include it first because it provides a comprehensive overview of the various possible patterns and lighting styles.
import time
from rpi_ws281x import *
import argparse
LED_COUNT = 30
LED_PIN = 18
LED_FREQ_HZ = 800000 # LED signal frequency in hertz (usually 800khz)
LED_DMA = 10 # DMA channel to use for generating a signal (try 10)
LED_BRIGHTNESS = 65 # Set to 0 for darkest and 255 for brightest
LED_INVERT = False # True to invert the signal (when using NPN transistor level shift)
LED_CHANNEL = 0 # set to '1' for GPIOs 13, 19, 41, 45 or 53
def colorWipe(strip, color, wait_ms=50):
"""Wipe color across display a pixel at a time."""
for i in range(strip.numPixels()):
strip.setPixelColor(i, color)
strip.show()
time.sleep(wait_ms/1000.0)
def theaterChase(strip, color, wait_ms=50, iterations=10):
"""Movie theater light style chaser animation."""
for j in range(iterations):
for q in range(3):
for i in range(0, strip.numPixels(), 3):
strip.setPixelColor(i+q, color)
strip.show()
time.sleep(wait_ms/1000.0)
for i in range(0, strip.numPixels(), 3):
strip.setPixelColor(i+q, 0)
def wheel(pos):
"""Generate rainbow colors across 0-255 positions."""
if pos < 85:
return Color(pos * 3, 255 - pos * 3, 0)
elif pos < 170:
pos -= 85
return Color(255 - pos * 3, 0, pos * 3)
else:
pos -= 170
return Color(0, pos * 3, 255 - pos * 3)
def rainbow(strip, wait_ms=20, iterations=1):
"""Draw rainbow that fades across all pixels at once."""
for j in range(256*iterations):
for i in range(strip.numPixels()):
strip.setPixelColor(i, wheel((i+j) & 255))
strip.show()
time.sleep(wait_ms/1000.0)
def rainbowCycle(strip, wait_ms=20, iterations=5):
"""Draw rainbow that uniformly distributes itself across all pixels."""
for j in range(256*iterations):
for i in range(strip.numPixels()):
strip.setPixelColor(i, wheel((int(i * 256 / strip.numPixels()) + j) & 255))
strip.show()
time.sleep(wait_ms/1000.0)
def theaterChaseRainbow(strip, wait_ms=50):
"""Rainbow movie theater light style chaser animation."""
for j in range(256):
for q in range(3):
for i in range(0, strip.numPixels(), 3):
strip.setPixelColor(i+q, wheel((i+j) % 255))
strip.show()
time.sleep(wait_ms/1000.0)
for i in range(0, strip.numPixels(), 3):
strip.setPixelColor(i+q, 0)
# Main program logic follows:
if __name__ == '__main__':
# Process arguments
parser = argparse.ArgumentParser()
parser.add_argument('-c', '--clear', action='store_true', help='clear the display on exit')
args = parser.parse_args()
# Create NeoPixel object with appropriate configuration.
strip = Adafruit_NeoPixel(LED_COUNT, LED_PIN, LED_FREQ_HZ, LED_DMA, LED_INVERT, LED_BRIGHTNESS, LED_CHANNEL)
# Intialize the library (must be called once before other functions).
strip.begin()
print ('Press Ctrl-C to quit.')
if not args.clear:
print('Use "-c" argument to clear LEDs on exit')
try:
while True:
print ('Color wipe animations.')
colorWipe(strip, Color(255, 0, 0)) # Red wipe
colorWipe(strip, Color(0, 255, 0)) # Blue wipe
colorWipe(strip, Color(0, 0, 255)) # Green wipe
print ('Theater chase animations.')
theaterChase(strip, Color(127, 127, 127)) # White theater chase
theaterChase(strip, Color(127, 0, 0)) # Red theater chase
theaterChase(strip, Color( 0, 0, 127)) # Blue theater chase
print ('Rainbow animations.')
rainbow(strip)
rainbowCycle(strip)
theaterChaseRainbow(strip)
except KeyboardInterrupt:
if args.clear:
colorWipe(strip, Color(0,0,0), 10)
Get started with Python using an IDE like Thonny IDE. You can use any Python Interpreter you like, as Thonny IDE is one of many. Thonny IDE can be accessed through the Application Menu under the Programming submenu. Then, copy the above code inside Thonny Python Editor and save it as strandtest.py on your desktop. Proceed by clicking the large green Run button. See what happens when you do that in the image below.


With that, you should see vibrant hues coming from your LED strip. If individual LEDs on your WS2812B LED Strip aren't lighting up, but the others are, open the Python script, locate the variable labeled LED COUNT, and raise its value till it's in line with the number of LEDs on your strip. The script can be saved and re-run by clicking the Run button. To accommodate the enormous quantity of WS2812B LED Strip, I set this variable to 150. In the next image, you can see a long WS2812B strip that has been wired to an external power source and is controlled by the modified Python script.

Basic Code for WS2812B LED Tape
Now you can check if your Device is properly constructed and functioning with the help of the above strandtest.py script. Moreover, the resulting illumination is just breathtaking. Maker may be left wanting more, though. This is of special importance to the readability of the code, which facilitates its adaptation to specific tasks. This section will show you how to control the WS2812B strip with a few basic Python programs easily modified to suit your needs.
To get started, look at OneStripNeopixels.py, a very basic WS2812B Control Script.
import time
import board
import neopixel
#Initialise, a strips variable, provide the GPIO Data Pin
# utilized and the amount of LED Nodes on the strip and brightness (0 to 1 value)
pixels1 = neopixel.NeoPixel(board.D18, 55, brightness=1)
#Also, create an arbitrary count variable
x=0
pixels1.fill((0, 220, 0))
#LED Node 10 and the color Blue were selected
pixels1[10] = (0, 20, 255)
#Showing a different color
time.sleep(4)
#Below will loop until variable x has a value of 35
while x<35:
pixels1[x] = (255, 0, 0)
pixels1[x-5] = (255, 0, 100)
pixels1[x-10] = (0, 0, 255)
#Add 1 to the counter
x=x+1
#Add a small time pause which will translate to 'smoothly' changing color
time.sleep(0.05)
#Below section is the same process as the above loop, just in reverse
while x>-15:
pixels1[x] = (255, 0, 0)
pixels1[x+5] = (255, 0, 100)
pixels1[x+10] = (0, 255, 0)
x=x-1
time.sleep(0.05)
#Add a brief time delay to appreciate what has happened
time.sleep(4)
#Complete the script by returning all the LEDs to the off
pixels1.fill((0, 0, 0))
The Python script has been thoroughly commented on, so you should have no trouble following along. The script in the previous paragraph includes readily apparent dials and switches. You'll learn the fundamentals of making a captivating LED Pattern, including how to adjust the number of LED Nodes, the brightness of the LED strips, whether to illuminate the entire board or just a section of it and how to illuminate individual LEDs. Each Node color can be customized by entering a corresponding Red, Blue, or Green numeric value. A number can have any value between zero and 255. The term "RGB Color Code" is commonly used to describe this. While experimenting with different hues can be a lot of fun, the best method to find the precise shade you need is to use a website that lists RGB color codes. Choose any color on this site, and you'll get its corresponding RGB color code in three numbers. After you've located the three-digit color code, you can easily enter it into the Python program.
You can copy and paste the script into Thonny IDE and run it. Once you've saved the file, you can press the run button to activate the script. Below are some screenshots displaying the output.

Control Several LED Strips at Once
Next is to hook up a few different LED Strips to the Pi 4 SBC and run a Python script to manage everything. Hardware-wise, I've replicated the procedure described in Hardware Configuration for Small, fewer than 30 Nodes long WS2812B, adding a second, similarly-sized WS2812B LED Strip.
I wired an additional WS2812B strip of lights up to the GPIO in the manner described below. The Raspberry Pi's other 5V Pin was connected to the red power line. The Raspberry Pi's White Ground Wire was attached to the board's second Ground Port. In this case, GPIO 21 received the green data wire. Check out the diagram of the wired components below; using two WS2812B LED strips of varying density is fine.

Using Thonny IDE as previously, run the python script titled TwoStripsNeopixels.py to control these two WS2812B Strips in a no-frills fashion. Look at this thoroughly documented Python script down here.
#include all necessary packages to get LEDs to work with Raspberry Pi
import time
import board
import neopixel
#Initialise two strips variables, provide the GPIO Data Pin
# utilized and the amount of LED Nodes and brightness (0 to 1 value)
pixels1 = neopixel.NeoPixel(board.D18, 30, brightness=1)
pixels2 = neopixel.NeoPixel(board.D21, 6, brightness=1)
#Focusing on a particular strip, use the command Fill to make it all a single color
#based on decimal code R, G, B. Number can be anything from 255 - 0. Use an RGB Colour
#Code Chart Website to quickly identify a desired fill color.
pixels1.fill((0, 255, 0))
pixels2.fill((0, 0, 255))
#Sleep for one second, and then code repeats for different color combinations. Light changes
#Could happen instead in response to certain buttons being pressed or due to threshold values
time.sleep(1.5)
pixels1.fill((200, 200, 0))
pixels2.fill((0, 200, 200))
time.sleep(1.5)
pixels1.fill((50, 70, 215))
pixels2.fill((215, 50, 70))
time.sleep(1.5)
pixels1.fill((0, 0, 0))
pixels2.fill((0, 0, 0))
Note that a Pi 4Computer has four Data Wire locations that can control individual WS2812B LED Strips, provided the corresponding Python script is updated correctly. The pinouts are numbered as follows: GPIO18, GPIO21, GPIO12, and GPIO10. With some tweaking and development of this technique, you can use a single Raspberry Pi as a standalone controller for four individually addressable WS2812B strips.
Ensure the right number of LED Nodes has been assigned to both LED WS2812B Strips before running the script. Once the script is ready to be executed, click the Thonny IDE's large green Run button. Both strands will suddenly come to life, each filled with a unique color. In the picture below, you can see this in action.

Conclusion
In this tutorial, we looked at connecting a WS2812B led strip to a Raspberry Pi. We also programmed the LEDs to blink in various patterns and colors using Python. You may now explore with your raspberry pi and these led strips to create patterns or whatever you like. Next, we'll look at connecting a Pi 4 to a sharp infrared distance measurement sensor.