We're glad you could join us for another lesson in our comprehensive Raspberry Pi programming guide. I will show you how to install and connect the RFID card chip to your Raspberry Pi through step-by-step instructions.
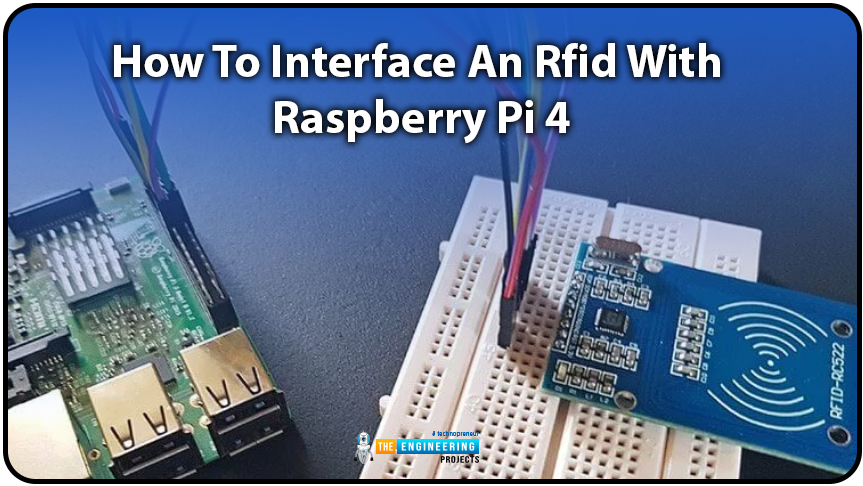
Modern security systems would only be complete using radio frequency (RFID) devices. To control who can enter a facility or which rooms they can access, RFID chips and card readers are employed. The RFID card's unique identification number can be read wirelessly with a wall-mounted RFID reader. A door will only unlock and allow entry if the RFID card's unique identification number matches a list of approved cards.
It's fun to tinker with this circuit, and it may be used in many other applications, from opening locks to taking attendance. The MFRC522 microcontroller underpins the RFID RC522, a cheap RFID (Radio-frequency identification) reader/writer. The RFID tags can connect with this microcontroller using an electromagnetic field it generates at 13.56MHz and sends to them via the SPI protocol. If you want to use your RFID RC522 with tags, you must ensure that they are 13.56MHz compatible. We'll walk you through the wiring of the RC522 and the creation of Python programs to communicate with the chip, allowing you to read and write RFID tags. Adding a 16x2 LCD to the Raspberry Pi is a simple extension of this tutorial, and it can be helpful if you need to show the user some information or provide a visual prompt.
Components
Raspberry Pi
Micro SD Card
Power Supply
RC522 RFID Reader
Breadboard
Breadboard Wire
What is an RFID RC522
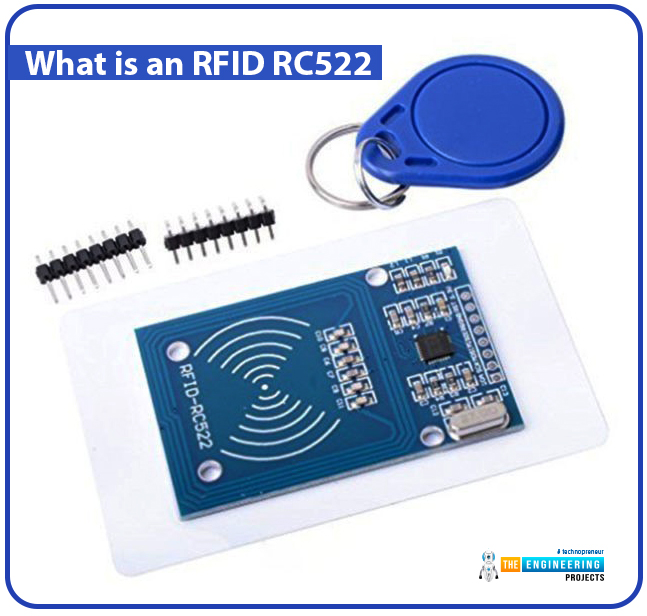
An RFID reader reads the tag's data when a Rfid card is attached to a specific object. An RFID tag communicates with a reader via radio waves.
In theory, RFID is comparable to bar codes because it uses radio frequency identification. While a reader's line of sight to the RFID tag is preferable, it is not required to be directly scanned by the reader. You can only read an RFID tag up to three feet away from the reader. The RFID tech quickly scans many objects, making it possible to identify a specific product rapidly and effortlessly, even if it is sandwiched between several other things.
Explained: the functioning of rfid readers and writers
Major components of Cards and tags include an integrated circuit (IC) that stores the unique identification value and a copper that acts as the antenna.
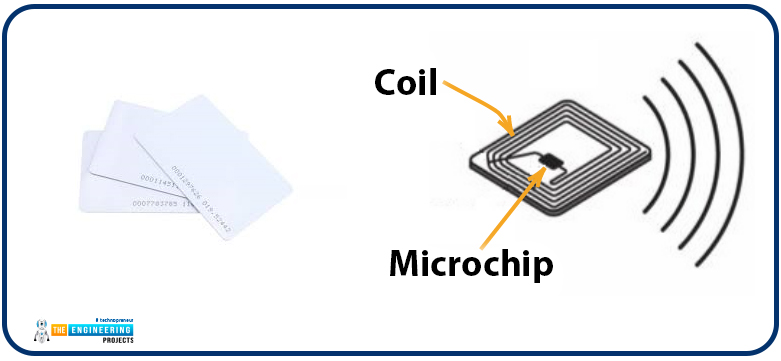
Inside the Rfid reader is another copper wire coil. This coil produces a magnetic field when current flows through it. Magnetic flux creates a current inside the wire coil when the card is brought close to the reader. This current can power the card's internal integrated circuit. The reader then takes in the card's serial number. A card reader will send the card's serial number to a central processing unit (CPU) like a Raspberry Pi for further processing.
Assembling the RFID RC522
When you buy an RFID RC522 Reader, you may discover that 90% of them do not have the header pins pre-installed. Due to a lack of pins, you'll have to solder them yourself; however, this is a relatively easy task, even for amateurs. Assuming the header pins that came with your RC522 are too large, you may snap them in half to reduce them to a single column of eight.
Start by inserting the header pins into the RC522 from the top. The circuit may be easily placed on top of the connector pins by inserting the large side of the pins onto a breadboard. The breadboard's secure holding of the pins will make soldering them to the RFID circuit much simpler.
Solder each pin individually by carefully heating your soldering iron and applying it to the pins. Remember that heating the junction slightly before to solder application increases the solder's adhesion and decreases the likelihood of generating a cold joint. When using solder, we advise you to be conservative. When you've finished soldering the header pins onto your RFID circuit, you'll be ready to move on with the guide.
Wiring the RFID RC522
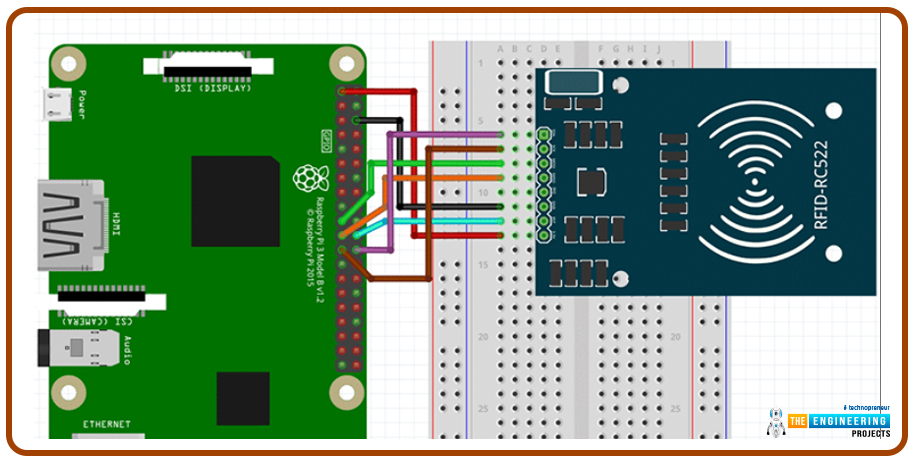
There are eight different connectors on the RFID RC522. Except for the IRQ, we need to connect all these to the GPIO pins on our Raspberry Pi.
This guide shows how to connect an RFID RC522 to a Breadboard and then to the Raspberry Pi's GPIO Pins, although you could also wire the components straight to the Pi.
Simply connecting 7 of the Raspberry Pi's GPIO pins to the RFID RC522 reader is all needed to get it up and to run. Refer to the GPIO pin locations detailed in our tutorial and the table below when deciding how to wire your RC522.
SDA connects to Pin 24.
SCK connects to Pin 23.
MOSI connects to Pin 19.
MISO connects to Pin 21.
GND connects to Pin 6.
RST connects to Pin 22.
3.3v connects to Pin 1.

Setting up Raspbian for the RFID RC522
We need to adjust the Raspberry Pi's settings before we can use the RFID RC522. Inconveniently, our RFID reader circuit relies on the Raspberry Pi's SPI (Serial Peripheral Interface), which is disabled by default. Worry not, though, as it is easy to restore this interface; follow our instructions below to set up your RPi and Raspbian to use the SPI port. Launch the raspi-config utility by opening a terminal and typing the following command.

sudo raspi-config
A menu of choices will appear when you use this tool. You may read up on all of these options in the raspi-config documentation. Choose "5 Interfacing Options" using the arrow keys. Select this choice, and then hit the Enter key. Once "P4 SPI" is selected in the next screen, press Enter once more to confirm your selection. To continue, use the arrow keys to choose "Yes" and then press Enter when prompted to confirm that you want to activate the SPI Interface. For the raspi-config utility to finish enabling SPI, you'll have to be patient for a while.
The raspi-config tool's success in enabling the SPI interface will be shown by the display of the message "The SPI interface is enabled." Activating the SPI Interface requires a full reboot of the Raspberry Pi. Press Enter, and then ESC, to return to the terminal. If you want to restart the RPi, enter the following Unix instruction into the terminal.

sudo reboot
It is time to verify that Raspberry Pi has been activated now that it has rebooted. Checking if spi bcm2835 is available is as simple as running the following command.

lsmod | grep spi
If you get spi bcm2835, you're good to go with the rest of the tutorial. If you tried the preceding command and it didn't work, try the following three things. If the SPI component is not enabled, we can manually modify the boot config file by issuing the following code to our RPi.

sudo nano /boot/config.txt
You can use CTRL + W to search the configuration file for "dtparam=spi=on" If you think you have discovered it, look if it has a number in front of it. If there is, delete it because it disables the code. If you cannot find the line, add "dtparam=spi=on" to the very end of the file. To commit your modifications, use CTRL + X, followed by Y and Enter. You can double-check that the module has been activated by restarting your Raspberry Pi, as in Step 5.
Getting Python ready for the RFID RC522
After connecting our RFID circuit to the RPi, we can turn it on and start writing Python scripts to communicate with the chip. You'll learn how to read and write information to RFID chips by composing scripts like the ones we'll provide. These will serve as the foundation for future RFID RC522 tutorials and provide you with a fundamental understanding of how data is handled. The Raspberry Pi must be brought up to date with the most recent software versions before we can begin programming. Get the latest version of Raspbian for your Pi by running these two commands.

sudo apt update
sudo apt upgrade
Installing the python3-dev, python-pip, and git packages is the last thing to do before moving forward. To get your RFID reader set up with this guide, type the following command into your Raspberry Pi's terminal.

sudo apt install python3-dev python3-pip
Now that we have python "pip" installed on our Raspberry Pi, we can install the spidev Python library. An integral part of this guide, the spidev library allows the RPi to communicate with the RFID via the SPI. Run the following command to get spidev set up on your Raspberry Pi via pip. It's important to remember that we're using sudo to guarantee that the package gets installed for everyone's usage, not just the logged-in user.

sudo pip3 install spidev
After getting the spidev library up and running on our Raspberry Pi, we'll move on to setting up the MFRC522 library with pip. Two files, in particular, are used by us, both of which are part of the MFRC522 library:
This library, MFRC522.py, implements the RC522 interface for communicating with RFIDs via Raspberry Pi's SPI port.
Simplifying the MFRC522.py file so that you only need to work with a small subset of its many functions, SimpleMFRC522.py is a significant time saver.
Enter this command into your terminal to have pip setup the MFRC522 library on your Pi 4:

sudo pip3 install mfrc522
Now that the library has been transferred to the Pi, we can start writing code for the RFID RC522. First, we'll explore how to use the RC522 to program your RFID cards. Move on to the following part, where we will write our first Python code.
Writing with the RFID RC522
In this first Python script, we'll go over the steps needed to send information from the RC522 to RFID tags. This is made more accessible by the SimpleMFRC522 script, but we'll still break down the code's individual components for you. To begin, let's create a directory to hold the scripts we'll be using. Create the "pi-RFID" folder by using the following command.

mkdir ~/pi-rfid
To get started, navigate to the folder you just cloned and create the Write.py script in Python.

cd ~/pi-RFID
sudo nano Write.py
Add the following blocks of code to this file. This code prompts you for some text, which it then uses to update the RFID Tag.

#!/usr/bin/env python
import RPi.GPIO as GPIO
from mfrc522 import SimpleMFRC522
The very first line of the code snippet instructs the terminal to use Python rather than another scripting language like Bash to parse and run the file. To guarantee that the GPIO Pins are reset when the script terminates, we must first import the RPi.GPIO package contains all the necessary functions for communicating with the GPIO Pins. The second import is our SimpleMFRC522 library, which will be used to communicate with the RFID RC522. Compared to the standard MFRC522 library, it dramatically simplifies working with the chip.

reader = SimpleMFRC522()
In this line, we make a new instance of the SimpleMFRC522 object, use its setup function, and save the result in our readers variable.

try:
text = input('New data:')
print("Now place your tag to write")
reader.write(text)
print("Written")
We enclose the following section of code with a try statement to ensure that any unforeseen problems are handled, and the code is cleaned up correctly. Python is whitespace sensitive; it uses tabs to distinguish between code sections, so keep them after trying. In this case, the second line reads a command-line input and stores it in a text variable using Python 3's input function.
The third line makes advantage of print() to prompt the user to set the RFID tag onto the reader. After that, on line 4, we utilize our scanner object to instruct the RFID Circuit to write the text field's contents to a certain sector of the RFID tag. On line 5, after successfully writing to the RFID tag, we call print() once more to inform the user.

finally:
GPIO.cleanup()
The script will terminate in the last two lines of code. The finally statement always follows the try statement. Thus the GPIO.cleanup() method is called after each iteration of the try block. These lines are essential because improper cleanup can disrupt the functionality of other programs. Upon completion, your script should be like the example given below.
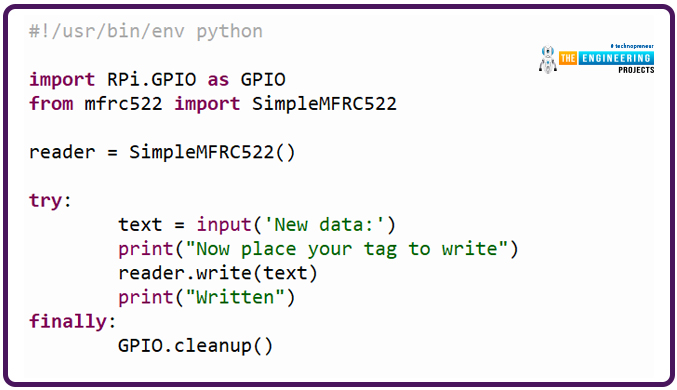
The file can be saved by pressing CTRL Plus X, Y, then ENTER once you've double-checked the code and are convinced it's correct. Now that the script is written, we need to put it through some testing. Get an RFID tag ready before running the script for testing. When you're ready, open the terminal on your Raspberry Pi and enter the following command.

sudo python3 Write.py
In this situation, we're just going to type in "any word" because it's easy to remember and short. Press the Enter key when you have finished writing and are ready to send. After that, your RFID Tag can be placed directly above your RFID circuit. It will immediately update the tag with fresh information when it does. You'd see the word "Written" on the command prompt if it worked. Now that you have your Write.py script completed, we can move on to explaining how to read information from the RFID RC522.
Reading with the RFID RC522
We have successfully programmed our RC522 to print to RFID tags and can now move on to writing a script to retrieve the data from the tags. First, we'll make sure we're in the correct location by switching directories, and then we'll use nano to start drafting the Read.py script.

cd ~/pi-rfid
sudo nano Read.py
Incorporate the following code into this document. When an RFID tag is placed in the RFID reader, the script will wait until the tag's data has been read before displaying the results.

This file's first line of code instructs the operating system on how to proceed when the user clicks the "Run" button. If you don't specify that it's a Python file, it'll try to run it like any other script. An initial RPi.GPIO import is made. Importing this library ensures that the Raspberry Pi's GPIO pins are cleaned up after script termination, as it contains all the necessary functions. SimpleMFRC522 is the second import. With the assistance functions included in this script, reading and writing to an RFID RC522 is a breeze, whereas, with them, the scripts would quickly grow to be manageable.

This line is crucial because it invokes SimpleMFRC522's creation method, which returns an object that is subsequently stored in our reader variable.

try:
id, text = reader.read()
print(id)
print(text)
The following code section will be encapsulated in a try block to allow us to handle any unforeseen errors gracefully. Because Python is sensitive to whitespace, you must use the 'tabs' as displayed following try:
In this scenario, the second line of this code block initiates a call on our scanner object, instructing the circuits to begin scanning any Rfid card that is positioned on top of the reader. On the third and forth lines, we use print() to display the data we gleaned from the RFID Chip; this includes the tag's unique identifier and any text it may consist of.

finally:
GPIO.cleanup()
The script ends with the last two lines of code. No of what happens inside the try block, the final statement is always executed afterward. No matter what, the GPIO.cleanup() code will be executed thanks to this try statement. It's vitally important, as not doing so can disrupt the proper operation of other scripts that rely on the GPIO. Your completed Read.py script for the RFID RC522 should resemble the example below.
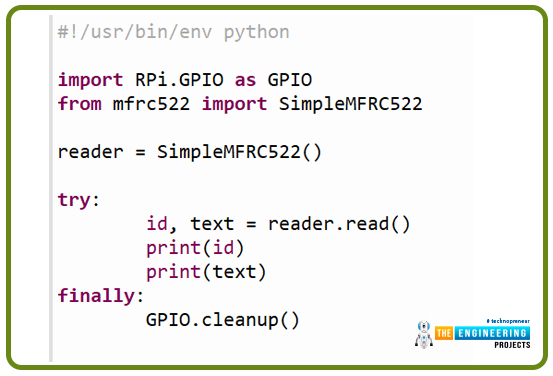
When you've double-checked your code and are satisfied with it, press Ctrl + X, then Y, and finally ENTER to save the file. The time has come to put our completed Read.py script to the test. Get ready to test the script by picking up any of the RFID tags. If you're all set, enter this command into the terminal on your Raspberry Pi.

sudo python3 Read.py
Now that the script is active, you can set your RFID Tag atop your RFID circuit. When the RFID tag is placed on top, the Python program will immediately begin reading the information from the tag and display the results on the screen. What a finished product might look like is shown below as an illustration.

To test whether your Raspberry Pi is properly connected on the RFID RC522 Circuit, run the Read.py script and see if it returns any data that matches the text you wrote to the card in the Write.py script.
Conclusion
Connecting an RC522 RFID module to a Pi 4 makes reading MIFARE chips and cards is now possible. This might be very useful in security systems and other applications where identifying an item or person is required without the user having to physically interact with the device by pressing buttons, switching, or activating any sensors. Eventually, you should be able to use this to decipher the UID encoded on your MIFARE tags. You should know that these cards can be duplicated and assigned a new unique identifier (UID) if you plan on employing this technique in a security system. To ensure the safety of your system, you must ensure that no one learns your UID or gains remote access to your devices. The contactless tags are convenient because they can be attached to a keychain, and the cards are convenient because they can be carried in a wallet. Both things can be concealed inside others to give them a hidden identifier that the Pi can access. With the help of our Pi 4-powered RFID attendance systems guide, you can learn how to set up your RFID Reader/Writer for use in checking attendance. Our exploration of the RFID chip and the scripts above will continue in subsequent guides. A door security system is one of the fantastic DIY Pi ideas we'll look into. The next lesson will teach you how to connect a 16x2 LCD screen to a Raspberry Pi 4.


 Raspberry Pi
 syedzainnasir
 0 Comments


 2.3k
2.3k
 953
953
 921
921
 2.1K
2.1K

