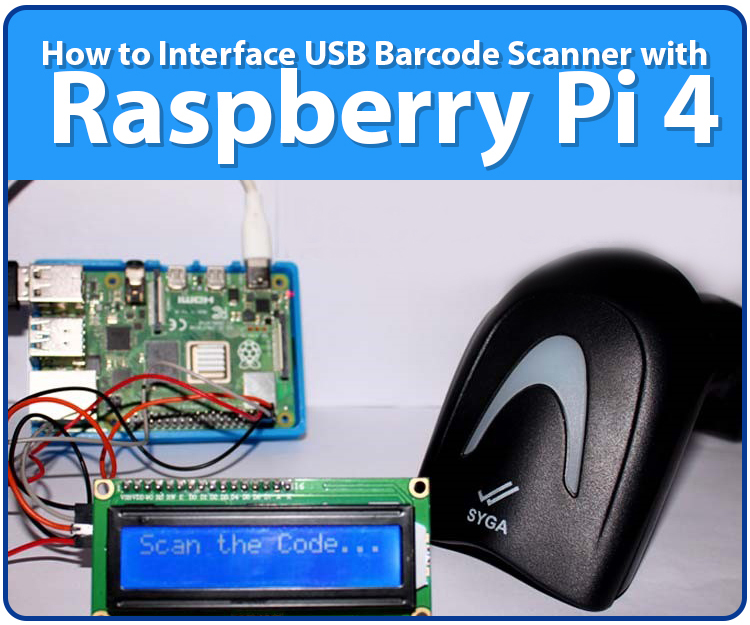
Hello friends, I hope you all are doing great. Today, we are going to start a new section in our Raspberry Pi Programming Course. In this section-VIII, we will implement advance protocols in the RPi4 board. Today's our first lecture in this section and we are going to interface a USB Bar Code Scanner with Raspberry Pi 4.
If you have visited any big grocery store, you must have seen, it's quite important as well as difficult to maintain the products in stock at all times. To ease the job, barcode technology is used because it can easily maintain an organized database of your items, costs, and inventory levels in one convenient location. Price changes can be implemented whenever you desire without requiring new labels for previously packaged goods. You can tell exactly when your supply of a particular item is getting low, so you may place a new purchase before you run out. Since the barcode system is so precise, you may assume that any missing (and seemingly unsold) items have been stolen.
Here's the video demonstration of this barcode tutorial:
So, let's get started with the implementation of a barcode scanner with Raspberry Pi 4:
Project Description
In this post, you'll learn how to read the Barcode scanner's output in the Serial interface of Raspberry Pi 4 and display the scanned code on the 16x2 LCD. When a User reviews an item's code, the LCD will update to reflect the new total number of items in the shopping basket. This configuration allows us to create an intelligent cart with an integrated billing system.
Components Required
Here's the list of components, used in designing today's project:
- Raspberry Pi 4
- USB Handheld Barcode Scanner
- 16x2 alphanumeric LCD
- I2C Module for LCD
- Jumper Wires
- Sample Barcoded Items
Simple Bar Code Scanner: The Fundamentals
- A barcode is an electronic module used to read a graphical code represented by a series of black-and-white parallel bars.
- These black and white bars are actually representing a numeric digit, which is extracted by the barcode scanner.
- Barcode Scanner sends its data to the microcontroller via USB/UART.
- We are going to use the below barcode scanner:

Barcode Scanner can read a wide range of linear barcodes. Barcode
scanners are commonly utilized in retail settings like supermarkets,
grocery stores, restaurants, boutiques, warehouse inventory,
invoices for bookkeeping and other retail establishments.
Intelligent shopping carts now use barcode scanners to quickly and
accurately identify products.
Connecting your handheld barcode scanner to a computer is as simple as plugging it into a USB port. Barcode scanners can typically decode at speeds of up to 300 scans/second. Additionally, they can easily read a wide range of scratchy, blurry barcodes.
Serial output through USB is provided in either H.I.D. mode or RS232 mode, depending on the device's configuration. Users can change the Baud rate from 9600 to 115200 and modify the Suffix by adding a C.R., L.F., CR+LF, or no ending characters. And you may set it to read in either Trigger Mode or Continuous Mode. Scanning the included settings sheet's Barcode will also restore the machine to its factory defaults.
Barcode Working Principle
As we discussed above, the black & white bars are actually representing a numeric digit. We are hiding the numeric digit in black & white bars because it's difficult for computers to recognize decimal numbers but reading a simple bar is quite easy. The below figure shows the respective bars for numeric digits 0-9:
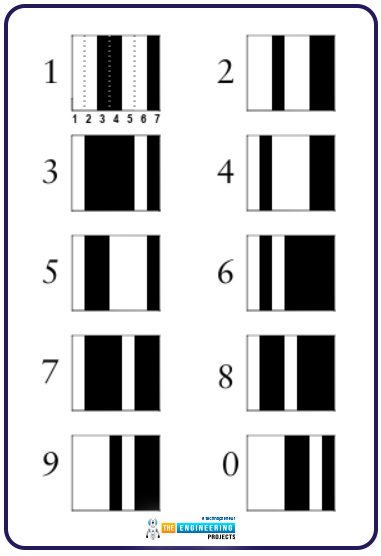
Looking at a barcode, it might be difficult to determine, where one set of numbers stops and another starts. But in reality, it's pretty easy. There are precisely seven units of horizontal space in each letter. So, in order to get the numeric digit "1", the bar code(starting from left) has two white lines, two black lines, two white lines, and finally one black line, as shown in the above figure.
The barcode printing on the consumer goods has a universal representation i.e. a series of vertical stripes and the numeric code imprinted below, so that, the Barcode can be manually keyed in, if it is incorrectly printed or scratched in the store. Two-dimensional barcodes are also used on some items i.e. postal stamps, as shown in the below figure:
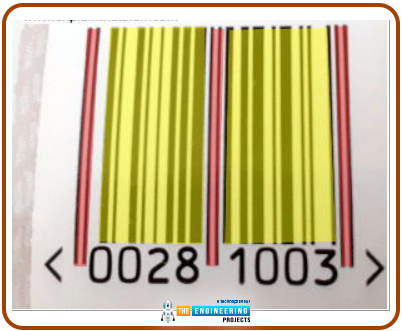
Let's pretend that barcodes are specific on-off binary sequences, with every black stripe representing a one and every white stripe representing a zero. (We've seen that actual barcodes are more complex than this, but for now, simplicity is in order.)
- The Barcode is illuminated by the scanning head's L.E.D. or laser.
- Second, a photoelectric cell, an electronic component that detects light, receives the light reflected from the Barcode. The Barcode's white spaces are the most reflective, while the black ones are the least.
- Third, the cell produces an on/off pulse sequence corresponding to black and white lines when the scanner goes through the Barcode. The cell would read "off off off off off off" if the shown Code were to be entered.
- These on/off pulses are then translated into numeric values via an electronic circuit connected to the scanner.
- A computer program generates the final Barcode using the digital data sent from the scanner.
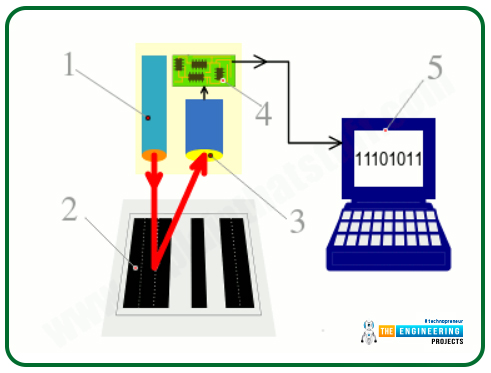
Some scanners use a single photosensitive cell that reads the barcode pixel by pixel as you slide the sensor head over the item (or the product across the reader). The complete Code is detected in a single pass, thanks to a row of photoelectric cells in more complex scanners.
Types of Barcodes
The following are examples of well-known barcode types:
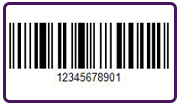
The European Item Numbering Scheme (EAN) is a specialized version of the Uniform Product Code (U.P.C.) for items with a thirteen-digit identifier. There are 13 digits in an EAN13 barcode.
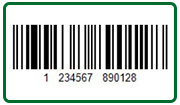
The retail sector heavily uses UPC-A barcodes based on the U.P.C. The Universal Product Code, Extended (UPC-A), comprises 12 digits.
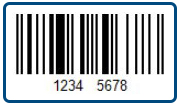
(EAN -8) uses a set of numbers superseding the U.P.C. EAN-8 for compact shipments; these numbers include eight digits.
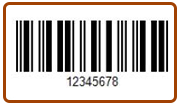
Like code 128's character set C, Intermingled 2 of 5 (I.T.F.) is an arithmetic barcode used to encode pairs of integers in a space-efficient manner.
The Code 39 Q.R. code is the most straightforward of all the alphanumeric barcodes because it performs its character verification.
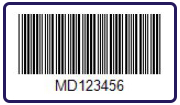
Code 128 is a high-density, efficient symbology for encoding alphanumeric data. The checksum digit is incorporated into the symbology, and the Barcode's integrity can be checked by comparing the checksum with the original data or by comparing the Barcode's bytes to the original data's parity.
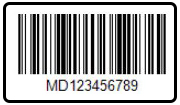
Since Code 128 is widely utilized for its ability to hold alphanumeric data of a fixed length, we've chosen it to employ in our project.
Types of Barcode Scanners
Pen-type Barcode
This scanner is widely used in retail stores as its cordless. A photodiode and L.E.D. are integrated into its tip. When light is shone on a barcode, its dark bars soak up the rays. In addition, the photodiode's output is reflected in the white areas. Because of this, the scanner can read the generated output waveform. They guarantee low costs and long service life. More specifically, the scanner has to maintain a fixed angle as it moves across the barcodes at a fixed rate. The user may have to spend some time at the gym to get good at this.
Laser-type Barcode
They follow the same principle as traditional pen readers. They use a laser beam as the light source and a revolving prism to detect it. Therefore, they are effective even at a distance of two feet. This allows them to be surface-mounted, eliminating the need for handshakes. Compared to traditional pen-style scanners, these are far superior due to their speed and accuracy.
Light-Emitting Diode Scanner
The ambient light that the Barcode emits is what is measured. The information is translated into a voltage pattern, which is then read by an L.E.D. scanner. Unlike other barcode scanners, this one doesn't come with a light source. Although the C.C.D. systems are pricey, they are more adaptable and accurate than alternatives. They're commonly found in stores.
Camera barcode reader
The two-dimensional Barcode is usually scanned using a barcode scanner with a two-dimensional camera. The camera must be set to auto-focus and maintained at a fixed distance. Multiple small lights are placed to form the camera. The barcodes will be photographed digitally and uploaded to the system.
Imaging barcodes with a cell phone
These days, practically every smartphone has a built-in scanner. Successfully scanning the 2-dimensional Bar code will not necessitate autofocus. These barcodes are unreadable by a regular scanner.
Circuit Diagram of Barcode Scanner with Raspberry Pi 4
The Barcode detected by the barcode reader will be displayed on a 16x2 LCD screen connected to the Raspberry Pi 4.
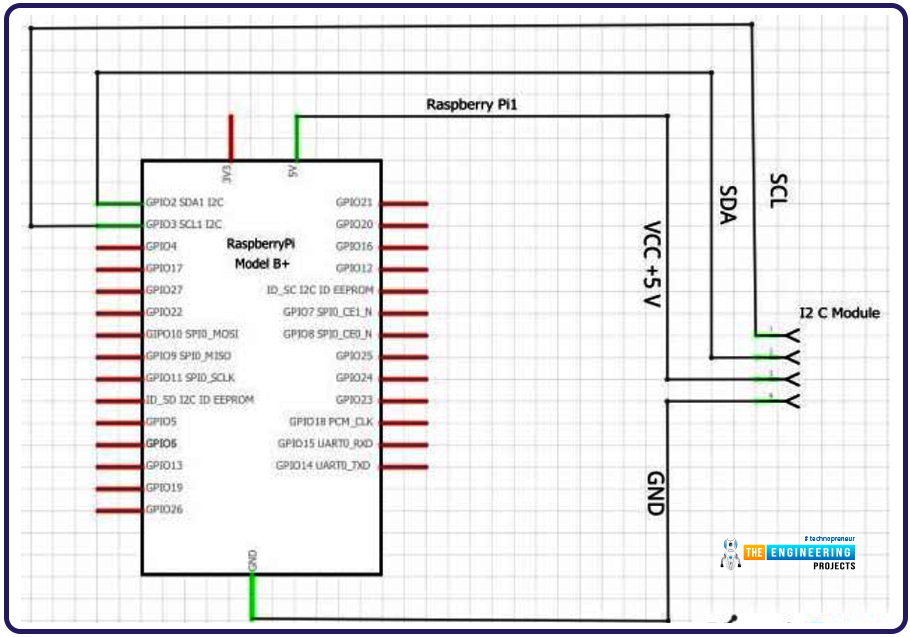
The image below illustrates the circuit diagram of Raspberry Pi 4 with an LCD display and barcode scanner.
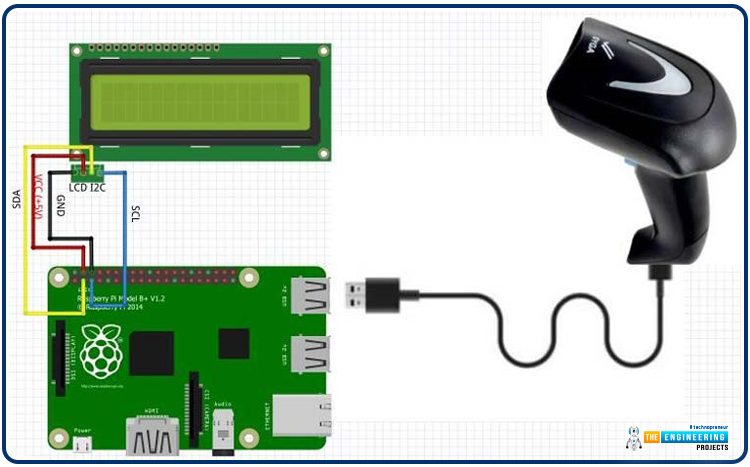
The Barcode scanner is connected via USB to Raspberry Pi 4, while the LCD is connected to the SPI pins of RPi4. The SPI pinout is as follows:
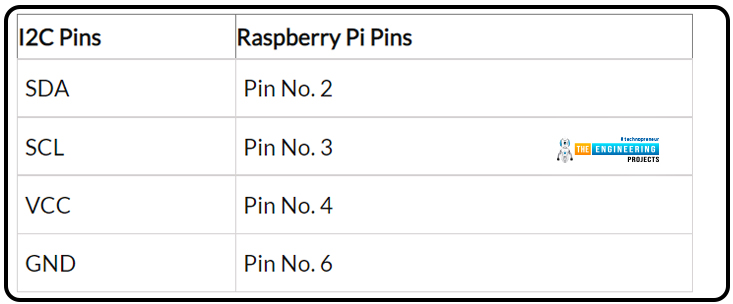
Here's the circuit diagram of the LCD 16x2 with RPi4:
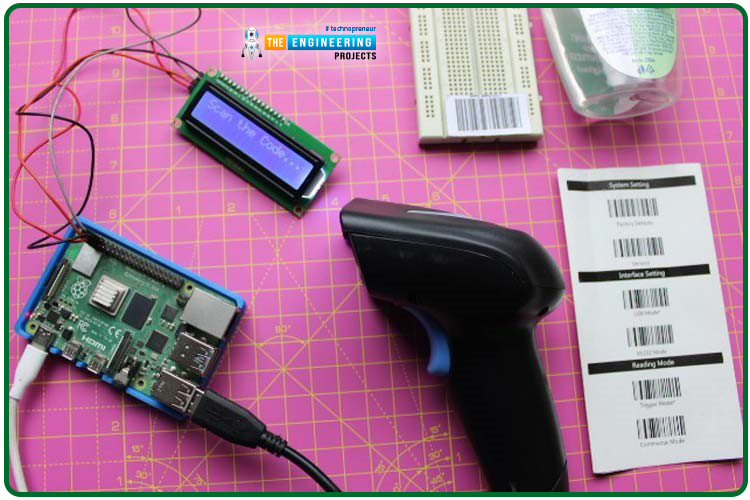
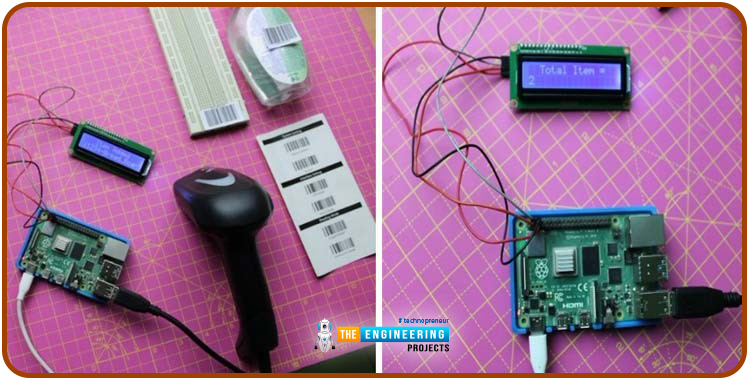
Here's our hardware setup and as you can see, we have interfaced both LCD and barcode scanner with the Raspberry Pi 4. We also have a sheet of barcodes to scan:
Configuring Raspberry Pi's I2C Interface
To begin, we need to turn on I2C on the Raspberry Pi. Here is the command to enter in the terminal:

sudo raspi-config
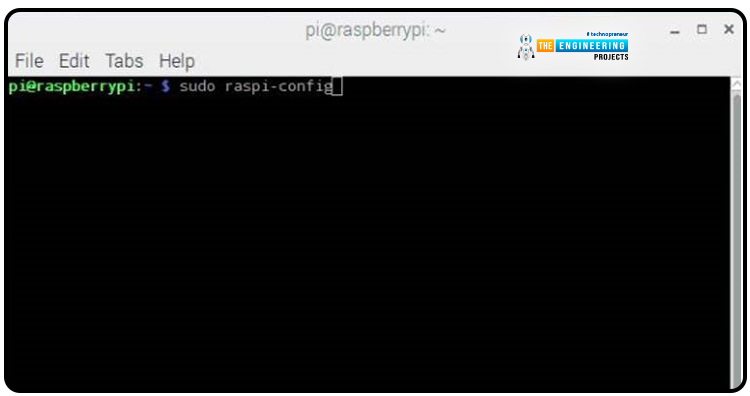
Now, use the down arrow key to access the Interfacing menu, and from there, select the P5 option, which is the I2C Enable/Disable menu item.

Once that's done, it'll inquire whether or not "you want the A.R.M. interface to be enabled." If you want to see "The ARM I2C adapter is enabled," select "Yes>." Select "ok" and then "Complete" to confirm your selections.
To begin working on the Liquid crystal display, you must first verify its I2C address in the Python console.

sudo i2cdetect -y 1
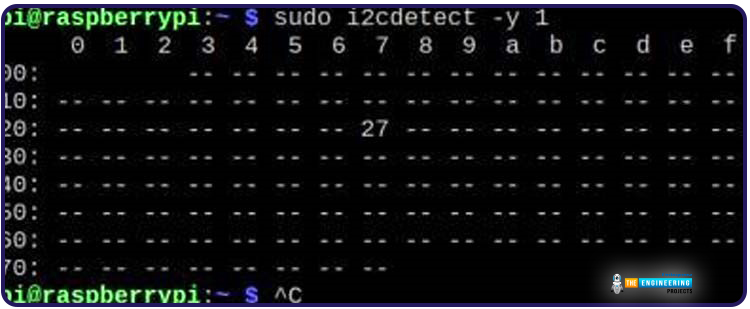
The attached I2C device has address 27, as shown above.
Barcode Scanner Configuration
This came together with my barcode scanner. This card will allow us to quickly and easily alter the device's default settings and change the Data rate, Trigger mode, and more.
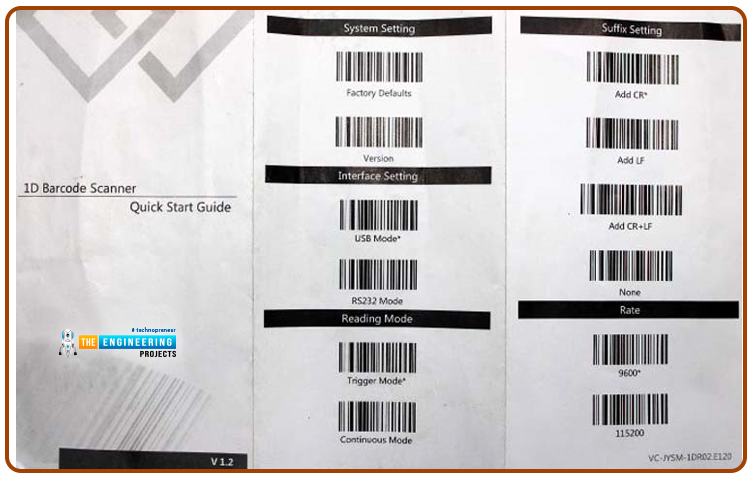
Make sure the method of data transmission is USB transmission before we begin programming. The reading mode should be set to Triggering, and the Suffix should be C.R.*. The end of a data set information is always signaled by an enter command when a carriage return is used.
Python Code for Barcode Scanner with Raspberry Pi 4
Now, access the Pi's command prompt and type pip install RPI LCD to get the software package downloaded and set up. My laptop and Raspberry Pi share the same wifi network; thus, I can control it from here using a V.N.C. viewer. In addition, I used THONNY and Python 3.7.3 to write the Code.
Since we'll be using Delay to show the material on the LCD, we're starting the Program by importing the Sleep object from time. Then, the RPI LCD object, used for integrating the 16 x 2 display, will be imported.

from time import sleep
from rpi_lcd import LCD
The number of objects scanned up until the loop's execution is kept in an item count variable. At first, it is set to 0 so that no invalid values are stored. For the same reason, the scanned Barcode will be saved in a variable called score, which will initially be empty.

item_count=0
scode=""
LCD.text("Scan the Code... ", 1)
As long as the while loop is active, scanning will continue indefinitely unless the controller is reset. Terminal input is required for this loop's input() function, and the resulting String will be saved in the variable scope. Then, we'll get it shown on an LCD screen:

While 1:
scode= str(input())
LCD.text("Scanned Barcode is", 1)
LCD.text(code,2)
sleep(2)
LCD.text(" Item Added", 1)
sleep(2)
item_count=item_count+1
IC=str(item_count)
LCD.text(" Total Item = ",1)
LCD.text(IC,2)
sleep(1)
The initial value of the item count was 0; however, it will be increased while the loop is executed. The item count is currently set to 1. We'll use typecasting to change the item count value from an integer to a string so that it can be shown on the LCD screen through the LCD.text() function.
Viewing the accompanying illustrations may help clarify matters. After two seconds, the LCD will show the total number of items scanned rather than the scanned Barcode itself (which will remain on the screen for two seconds).
Complete Code
from time import sleep
from rpi_lcd import LCD
LCD = LCD()
item_count=0
scode=""
LCD.text("Scan the Code... ", 1)
while 1:
scode= str(input())
LCD.text("Scanned Barcode is", 1)
LCD.text(code,2)
sleep(2) #Delay of 2 seconds
LCD.text(" Item Added", 1)
sleep(2)
item_count=item_count+1
IC=str(item_count)
LCD.text(" Total Item = ",1)
LCD.text(IC,2)
sleep(1)
Assembling a Shopping Cart with a Barcode Scanner
Electrical Schematic of a High-Tech Shopping Cart
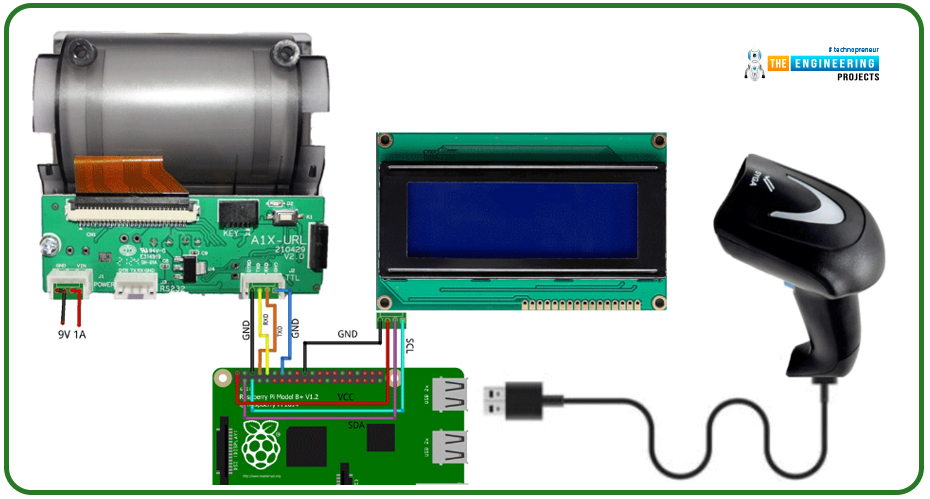
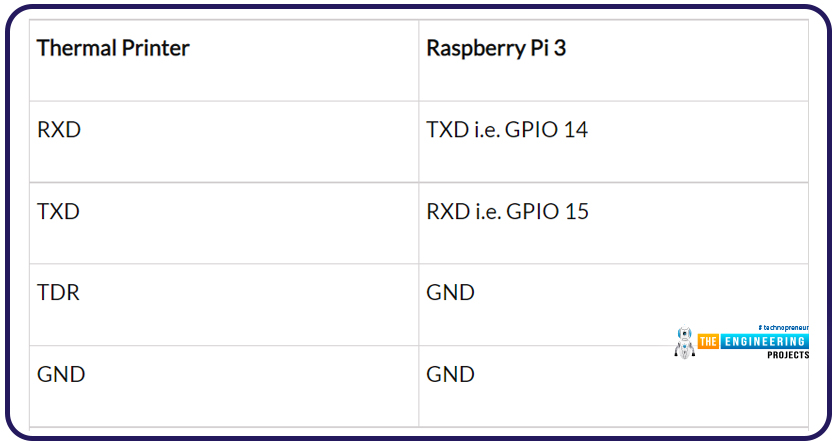
The following illustration depicts the wiring for connecting a barcode reader, thermal printers, and Liquid crystal display to a Raspberry Pi 4. The following table shows the relationships between these terms for your convenience.
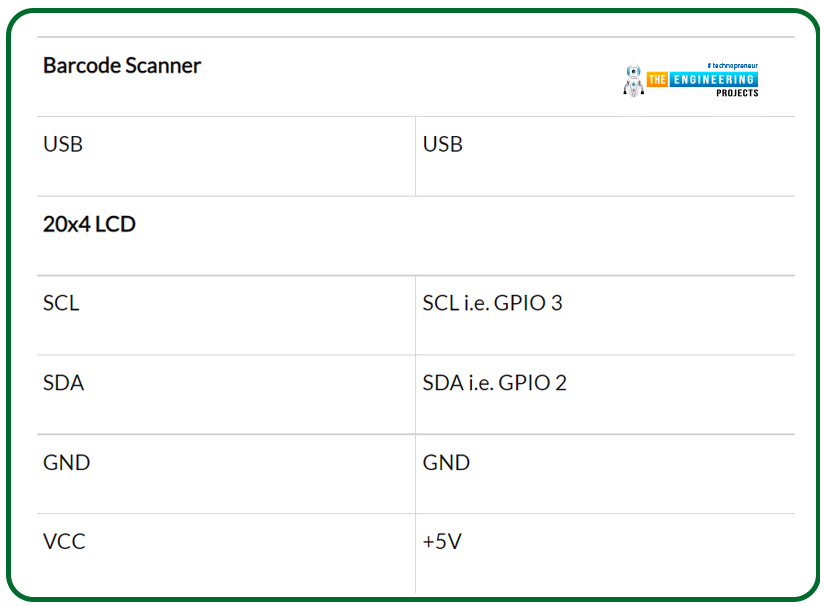
Smart Shopping Cart Programming
Now that we have all the parts hooked up, we can begin writing the Program for the intelligent cart. Before moving further, let's review the ideas we've covered in our prior assignments. I am compiling a summary of the essential takeaways from the preceding part.
- Turn on the I2C port to connect the 20x4 alphanumeric LCD to the computer and the serial port to connect the thermal printer.
- Adapt your USB barcode scanner to your specific needs.
- Make a Google doc and use it with your Google Apps account.
- Use as few commands as possible to test all of the peripherals.
- Putting in the Necessary Libraries:
- Python ESCPOS
- Python RPLCD
- Python Gspread
Complete Code
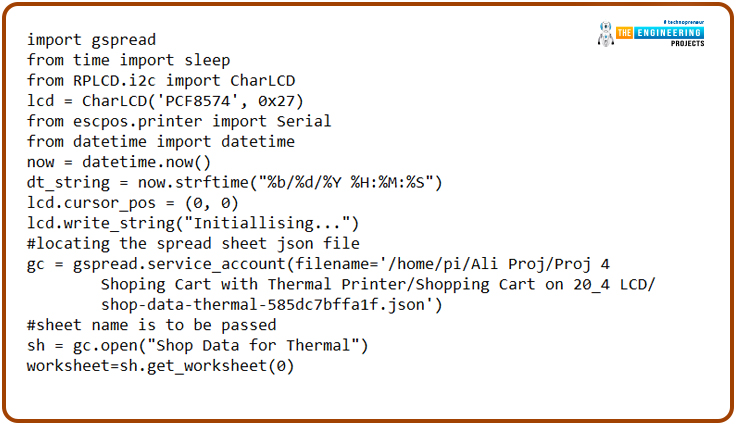
import spread
from time import sleep
from RPLCD.i2c import CharLCD
LCD = CharLCD('PCF8574', 0x27)
from escpos.printer import Serial
from DateTime import DateTime
now = DateTime.now()
dt_string = now.strftime("%b/%d/%Y %H:%M:%S")
lcd.cursor_pos = (0, 0)
LCD.write_string("Initialising...")
#locating the spreadsheet JSON file
GC = spread.service_account(filename='/home/pi/Ali Proj/Proj 4 Shopping Cart with Thermal Printer/Shopping Cart on 20_4 LCD/shop-data-thermal-585dc7bffa1f.json')
#sheet name is to be passed
sh = GC.open("Shop Data for Thermal")
worksheet=sh.get_worksheet(0)
The preceding Code includes imports for all required libraries, including spread for the Google Sheets Application programming interface, time for wait or rest functions, RPLCD for 20X4 Liquid crystal display, escapes for serially controlling the Heated Printer, and date and Time for retrieving the current date.
Using my Google account, I made a spreadsheet titled "Shop Data for Thermal." Please create your own and give it any name you wish. Please see the G spread docs for information on setting up your Google Spreadsheet and JSON for your Google service account.
Next, we'll launch Sheet1 by invoking get worksheet(0) and loading it into the sh editor.
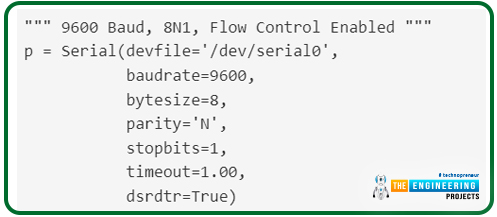
""" 9600 Baud, 8N1, Flow Control Enabled """
p = Serial(devfile='/dev/serial0',
baudrate=9600,
bytesize=8,
parity='N',
stopbits=1,
timeout=1.00,
dsrdtr=True)
This Code will be used to set up and initialize the serial port based on the parameters provided.
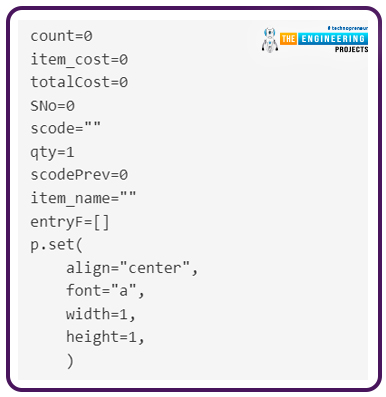
count=0
item_cost=0
totalCost=0
SNo=0
scode=""
qty=1
scodePrev=0
item_name=""
entryF=[]
p.set(
align="center",
font="a",
width=1,
height=1,
)
The necessary variables will now be initialized to " " or " 0 " to prevent any invalid data from being stored in them. In addition, the set() function will be used to establish the thermal printer's default printing settings.
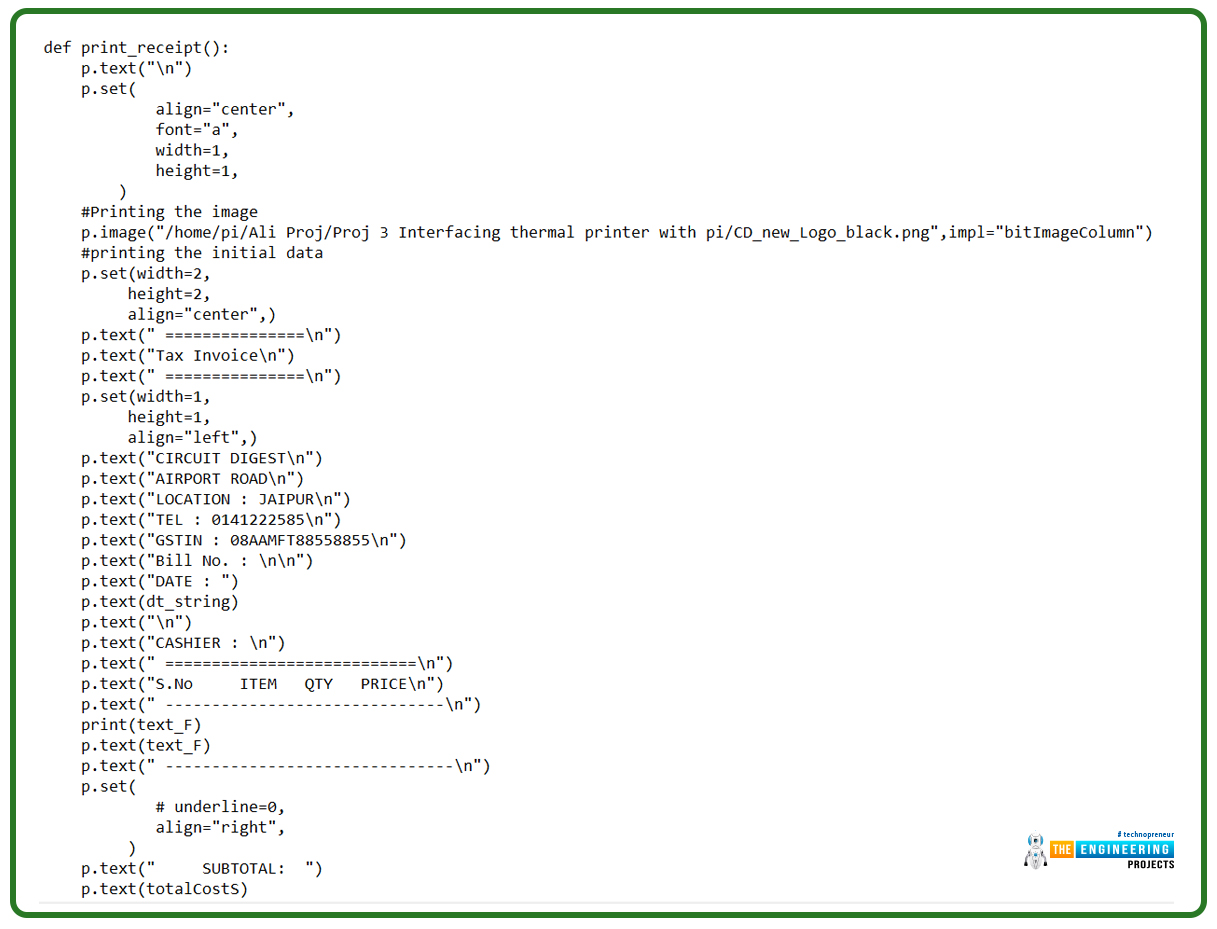
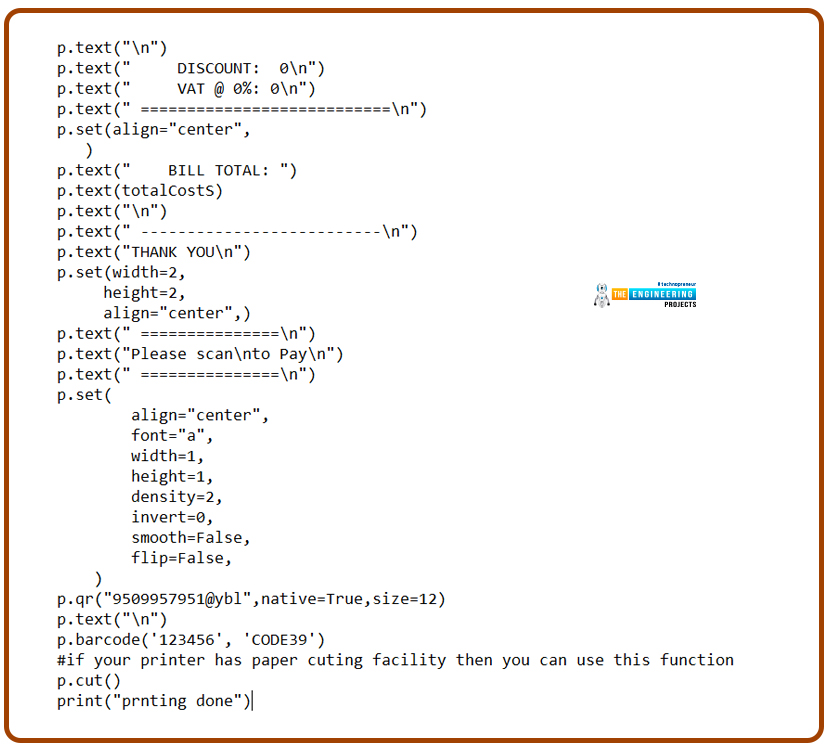
def print_receipt():
p.text("\n")
p.set(
align="center",
font="a",
width=1,
height=1,
)
#Printing the image
p.image("/home/pi/Ali Proj/Proj 3 Interfacing thermal printer with pi/CD_new_Logo_black.png",impl="bitImageColumn")
#printing the initial data
p.set(width=2,
height=2,
align="center",)
p.text(" ===============\n")
p.text("Tax Invoice\n")
p.text(" ===============\n")
p.set(width=1,
height=1,
align="left",)
p.text("CIRCUIT DIGEST\n")
p.text("AIRPORT ROAD\n")
p.text("LOCATION : JAIPUR\n")
p.text("TEL : 0141222585\n")
p.text("GSTIN : 08AAMFT88558855\n")
p.text("Bill No. : \n\n")
p.text("DATE : ")
p.text(dt_string)
p.text("\n")
p.text("CASHIER : \n")
p.text(" ===========================\n")
p.text("S.No ITEM QTY PRICE\n")
p.text(" ------------------------------\n")
print(text_F)
p.text(text_F)
p.text(" -------------------------------\n")
p.set(
# underline=0,
align="right",
)
p.text(" SUBTOTAL: ")
p.text(totalCostS)
p.text("\n")
p.text(" DISCOUNT: 0\n")
p.text(" VAT @ 0%: 0\n")
p.text(" ===========================\n")
p.set(align="center",
)
p.text(" BILL TOTAL: ")
p.text(totalCostS)
p.text("\n")
p.text(" --------------------------\n")
p.text("THANK YOU\n")
p.set(width=2,
height=2,
align="center",)
p.text(" ===============\n")
p.text("Please scan\nto Pay\n")
p.text(" ===============\n")
p.set(
align="center",
font="a",
width=1,
height=1,
density=2,
invert=0,
smooth=False,
flip=False,
)
p.qr("9509957951@ybl",native=True,size=12)
p.text("\n")
p.barcode('123456', 'CODE39')
#if your printer has paper cutting facility, then you can use this function
p.cut()
print("printing done")
With the Code above, we can quickly generate a method to output the total due. The invoice's format is also determined in the same procedure. A '123456' barcode can be printed using the p.barcode() method.
Suppose the detected Barcode does not match the database sheet. In that case, a message will be displayed on the terminal's Liquid crystal display and in the terminal's memory reading "Unknown Barcode" or "Item Not Registered," respectively, using the try/except logic. You can view this under the following line of Code.
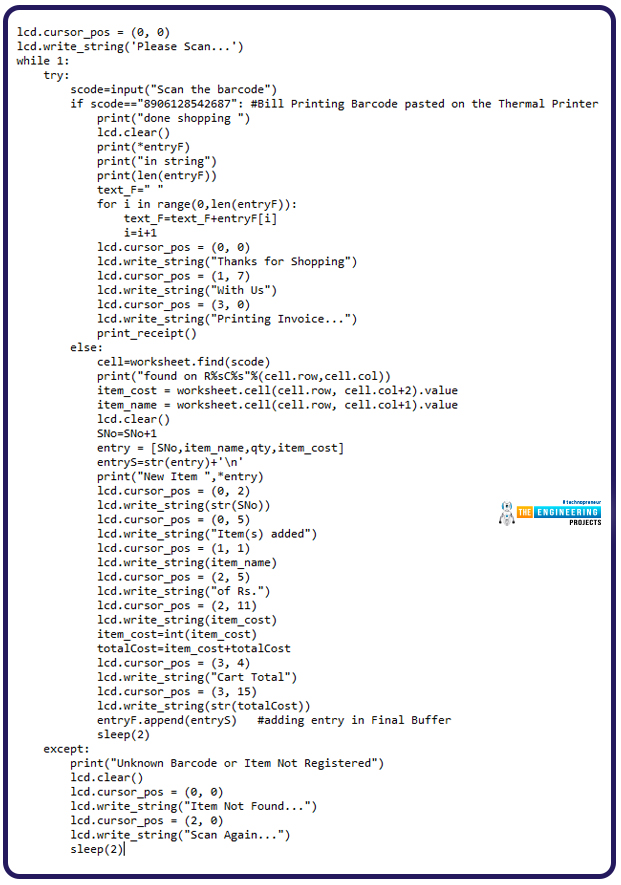
lcd.cursor_pos = (0, 0)
LCD.write_string('Please Scan...')
while 1:
try:
scode=input("Scan the barcode")
if scode=="8906128542687": #Bill Printing Barcode pasted on the Thermal Printer
print("done shopping ")
LCD.clear()
print(*entryF)
print("in string")
print(len(entryF))
text_F=" "
for i in range(0,len(entryF)):
text_F=text_F+entryF[i]
i=i+1
lcd.cursor_pos = (0, 0)
lcd.write_string("Thanks for Shopping")
lcd.cursor_pos = (1, 7)
lcd.write_string("With Us")
lcd.cursor_pos = (3, 0)
lcd.write_string("Printing Invoice...")
print_receipt()
else:
cell=worksheet.find(code)
print("found on R%sC%s"%(cell.row,cell.col))
item_cost = worksheet.cell(cell.row, cell.col+2).value
item_name = worksheet.cell(cell.row, cell.col+1).value
lcd.clear()
SNo=SNo+1
entry = [SNo,item_name,qty,item_cost]
entryS=str(entry)+'\n'
print("New Item ",*entry)
lcd.cursor_pos = (0, 2)
LCD.write_string(str(SNo))
lcd.cursor_pos = (0, 5)
LCD.write_string("Item(s) added")
lcd.cursor_pos = (1, 1)
LCD.write_string(item_name)
lcd.cursor_pos = (2, 5)
LCD.write_string("of Rs.")
lcd.cursor_pos = (2, 11)
LCD.write_string(item_cost)
item_cost=int(item_cost)
totalCost=item_cost+totalCost
lcd.cursor_pos = (3, 4)
LCD.write_string("Cart Total")
lcd.cursor_pos = (3, 15)
lcd.write_string(str(totalCost))
entryF.append(entryS) #adding entry in Final Buffer
sleep(2)
except:
print("Unknown Barcode or Item Not Registered")
LCD.clear()
lcd.cursor_pos = (0, 0)
LCD.write_string("Item Not Found...")
lcd.cursor_pos = (2, 0)
LCD.write_string("Scan Again...")
sleep(2)
Cart Usage Guide
First, you pick out the product you want and scan its Barcode.
Verify the accuracy of the LCD.
Scan something else and perform the same thing
Once you have everything you need, scan the Barcode affixed to the thermal printer to initiate the billing process.
Collect the bill and use the Q.R. code to pay using a U.P.I. account.

Real-life Applications of Barcode Scanners
Managing libraries is a specialty of library automation.
Each book is equipped with a barcode that the system uses to keep track of its current availability. The barcode scanner provides the librarian with up-to-date information on the books that have been checked out. Books can be checked automatically, allowing for less workforce.
Maintaining a stock-taking system.
Barcodes provide for more efficient product recognition and data deployment. Manually entering data at the front end raises the risk of human error, which can cause delays and financial losses. But the barcode scanner is highly accurate and rarely makes mistakes when processing product orders. Because the data is automatically recorded with each sale, this simplifies stock-taking by cutting down on time spent manually looking for items.
Reservations for travel
The billing procedure can be lengthy and frustrating at movie theaters, motels, and other establishments. Bills generated through electronic billing systems include a barcode or Q.R. code that can be easily decoded using a scanner kept by the relevant authorities.
Billing office
It lessens the likelihood of mistakes occurring during billing's manual data entry process. Barcode scanners have many applications in billing departments, including speedy data gathering and the ability to check pricing and promotions.
For Office Biometrics
A company's employees are obligated daily to record their attendance and clock in/out times. Scan the Barcode on their I.D. cards instead of having them manually enter their information.

For use in the production and logistics sectors
Using a barcode scanner, keeping tabs on company property is possible. A quick snapshot of the warehouse's inventory is provided. Raw materials utilized in production must also be sent to different markets. Consequently, there can be no mistakes in the labeling. As a result, it speeds up transactions and generates more money.
Reducing the likelihood of making mistakes and responding quickly to consumer requests are critical to growing the business. Time constraints can be met with more efficiency when both incoming and leaving shipments are monitored regularly. As industrial processes become increasingly mechanized, the cost of human labor declines.
On campus
The main features include tracking fixed assets like computers, lab equipment, machinery, etc. Teachers or employees responsible for the safety of their assets, such as the craft, can keep tabs on them with this feature. Barcode scanning keeps track of books and supplies that have gone missing in a library. A student's entrance and exit from the library can be quickly and accurately recorded using barcode scanners.
Industry of Health Care
Surgical supplies, patient specimens, pharmaceuticals, etc., must be tracked. Barcodes on patients' wrists allow doctors to quickly and readily verify that their care is being administered properly. These barcodes make it simple to record and monitor the previous distribution of prescriptions.
Governmental and Military Affairs
They take great care to ensure that sensitive information about the country does not leak. Problems with data recording or disclosure could lead to legal trouble. Official data can be kept safe with the use of barcodes.
Logistics
A worker working in logistics could be accountable for juggling multiple products at once, which increases the likelihood of making mistakes and sending out the wrong items. A barcode scanner can be used to automate this process with little room for error.
The Retail Industry
Including a barcode on each item will speed up the billing process by eliminating the need to enter each purchase manually. It will also make it simpler to view stock levels. Theft can be prevented by installing a barcode-based sensor on the exit door. In addition, this technology makes it easy to track the discounts applied to each item and ensure that they are still valid, reducing the need for human labor.
Conclusion
Barcode scanners prove essential for managing a wide variety of administrative processes. It appears that barcode scanning technology will continue to evolve in the future. We have seen how to construct our own "Smart Shopping Cart," complete with a barcode scanner to read the item's Barcode, retrieve the prices from the databases, show the information of the scanned object on an LCD for reference, and print the invoice using a thermal receipt printer. In the next tutorial, we will discuss How to design a Cryptocurrency Miner with Raspberry Pi 4. So, stay tuned. Have a good day.


 Raspberry Pi
 syedzainnasir
 0 Comments


