


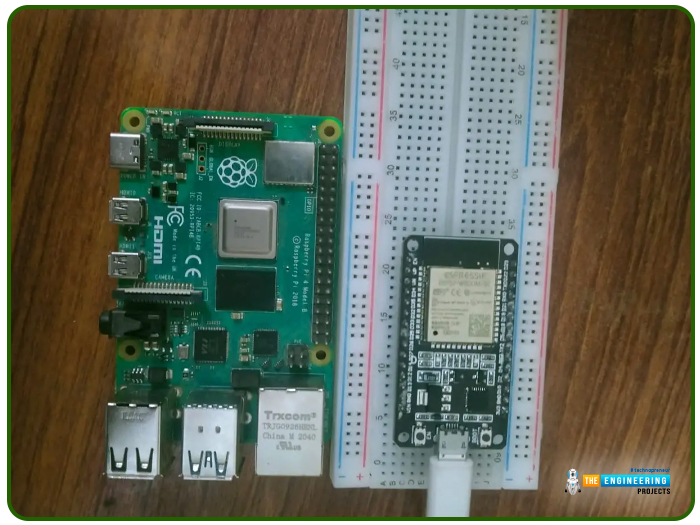
Communicate between Raspberry Pi 4 and Esp32 via Bluetooth


Welcome to the next tutorial of our raspberry pi 4 programming course. A previous article covered connecting a Remote Control Radio Frequency Module (433 MHz) to a Raspberry Pi 4. To turn things on and off wirelessly, we programmed a Raspberry Pi 4 to act as a radio-frequency (RF) remote control. However, this guide will study how to wirelessly pair a Raspberry Pi 4 and an ESP32. After reading this article, you'll get a good grounding in the fundamentals of Bluetooth module operation between two ESP32 and Pi 4 communication.
When it comes to sharing data over short distances using Ultra High-Frequency Radio Waves, Bluetooth is one of the most reliable and effective short-range wireless communication solutions. Since Bluetooth Technology was initially conceived as a cable substitution technology, its implementation in embedded devices is inevitable. While popular microcontrollers like the ESP32, Raspberry Pi, and Arduino Mega all come equipped with Bluetooth modules by default, others can be made Bluetooth-ready by adding modules like the HC 05 or JDY-30.
Required Components
You will require the following things:
Raspberry Pi
Arduino IDE
Two ESP32 Development Boards*
NRF Application
USB Cable for ESP32
What is the PyQt library?
PyQt is binding for the Qt C++ libraries & development tools that allow for the creation of GUIs independent of the underlying platform (GUIs). Other robust technologies accessed through Qt include networking, threading, regex, Database queries, SVG, OpenGL, and XML.
Since PyQt6 is the library's future, it will be used in this lesson. All references to PyQt from this point forward should be taken to mean PyQt6. Based on Qt v6, PyQt6 is an implementation of Qt. As such, it offers classes and utilities for working with graphical user interfaces, XML, networking, regex, threads, Database queries, and the web, among other technologies supported by Qt. Many of the Qt classes' bindings have been implemented in a set of Modules that make up the PyQt6 package at the Python level. If you're using Python 3.6.1 or later, you can install PyQt6.
In addition to Windows and Linux, PyQt6 works on mac, Android, and Android. This is appealing if you need a Graphical framework to create cross-platform apps that look and feel natural on all of them.
Platform-Specific Installation
There are PyQt6 binary packages available in the repositories of several Linux systems. If this describes your situation, the library can be installed through your distribution package manager. For instance, this is a command you can use on Ubuntu:

sudo apt install python3-pyqt6
This command will set up your system so you can utilize the PyQt6 library in any GUI applications you undertake. It's important to remember that you need root access to perform this; thus, the sudo command will be used.
Bluetooth Low Energy (BLE)
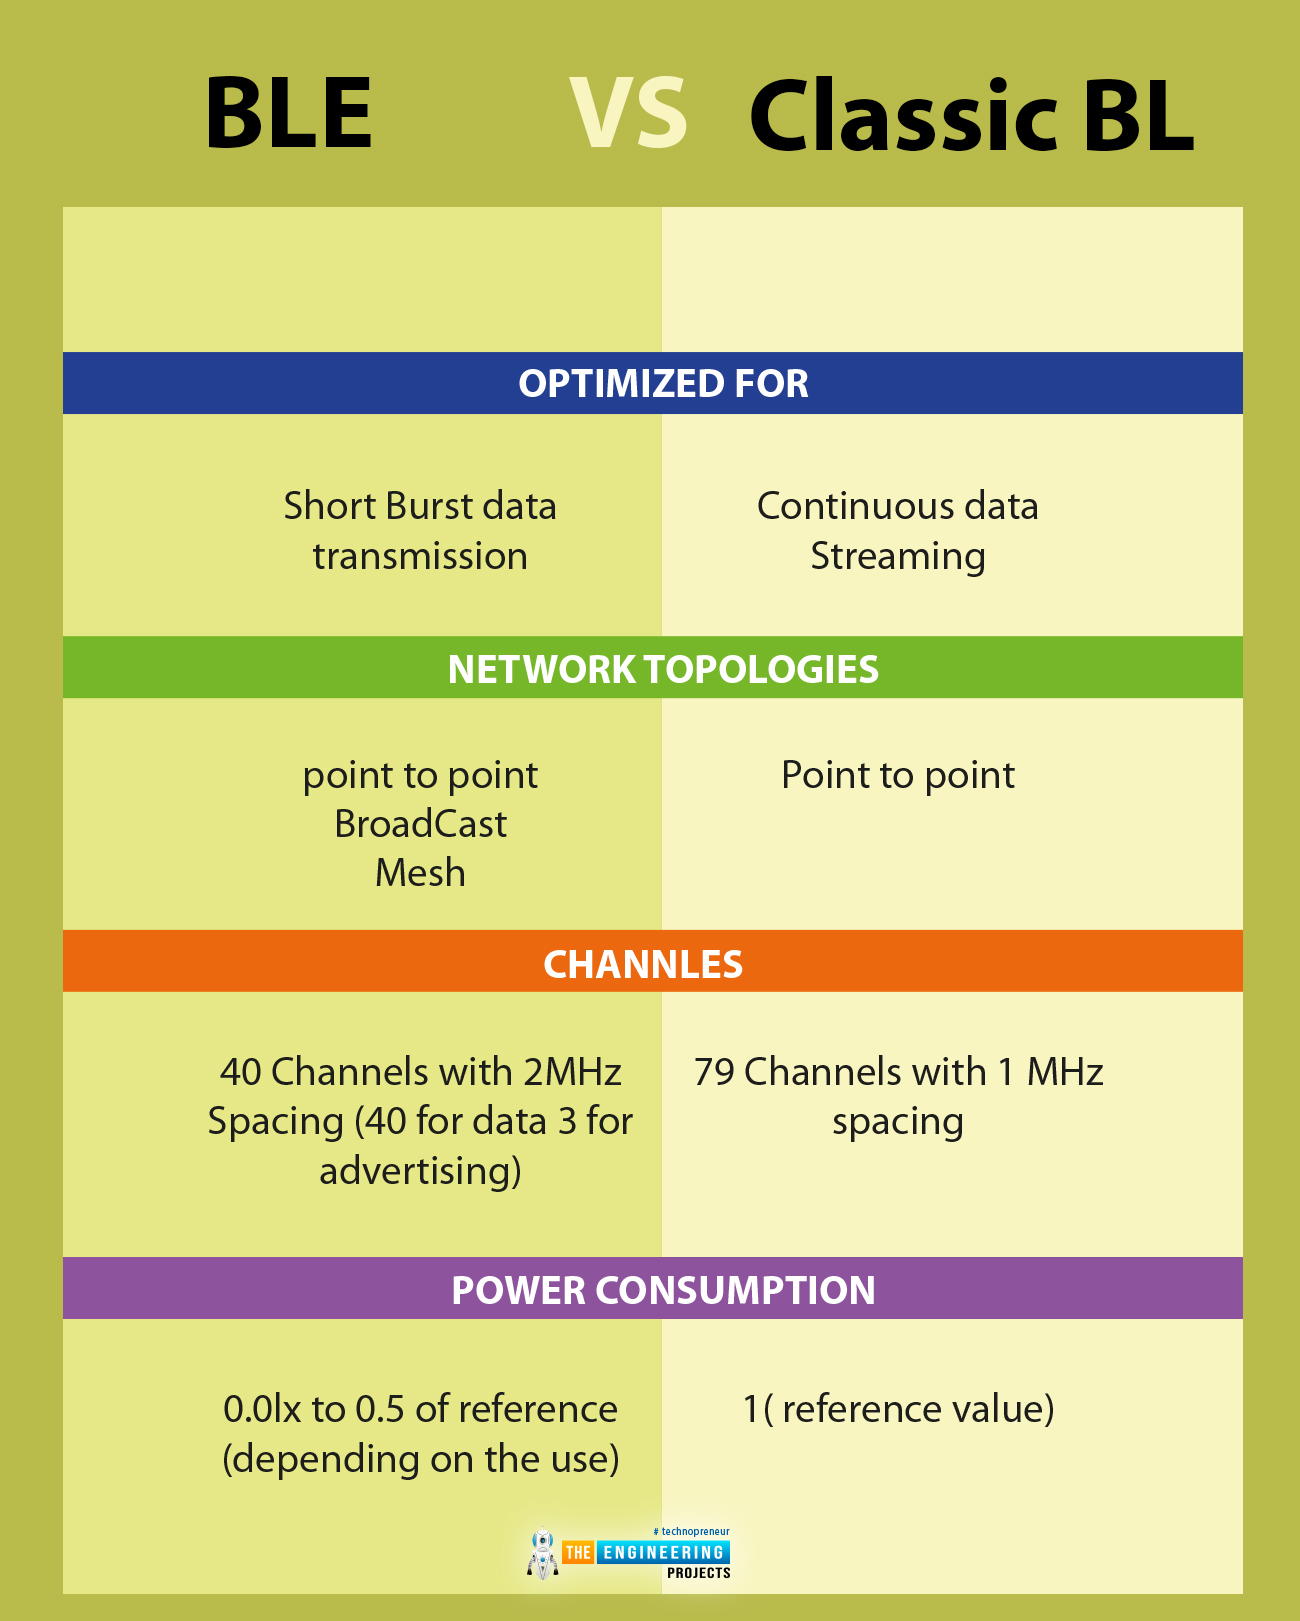
Raspberry Pi and ESP32 are the only microcontrollers that ship with Bluetooth Low-Energy Technology modules. While traditional Bluetooth is optimized for data transfers over long distances and wide bandwidths, BLE is optimized for short-range and low-power usage. As a result of its superior efficiency in conserving energy, it consumes less power than traditional Bluetooth by a factor of over one hundred, with just a negligible drop in performance. Unlike traditional Bluetooth, which stays on even when not in use, BLE goes into a sleep state whenever it is not actively involved in a connection or data transfer.
It can function in one of four ways:
A peripheral device publicizes data and facilitates communication with other, further-flung gadgets.
A broadcaster is a gadget explicitly designed to disseminate information.
Observer - Data-only monitoring hardware.
A central device serves a dual purpose: scan for and connect to other devices.
Before the introduction of BLE, the first two modes were used by detectors and other industrial machinery, while personal computers and mobile phones used the latter two modes. Most BLE, however, now supports all four transfer methods thanks to technological advances. These transfer methods are available on the ESP32 and the Raspberry Pi. In the table below, you can observe the vast distinction between the traditional and BLE.
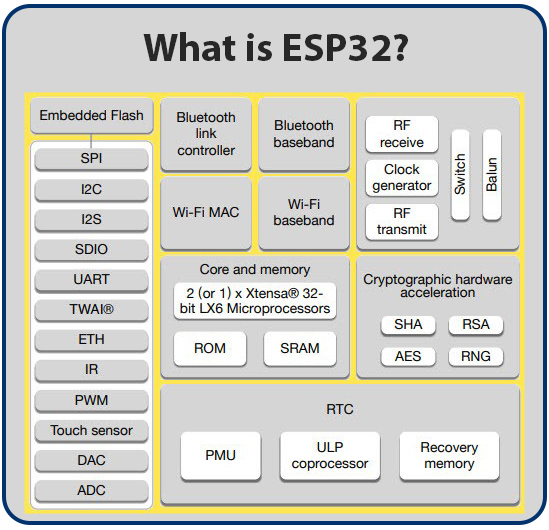
What is ESP32?
The ESP32 is a new System-on-a-Chip (SoC) microcontroller by Espressif Systems, the company responsible for the widely used ESP8266 SoC. For those looking for a 32-bit alternative to the ESP8266 SoC, Tensilica has you covered with their Xtensa LX6 Microprocessor, which comes in single-core and dual-core flavours and boasts built-in WiFi and Bluetooth.
A power amplifier, a low-noise reception amplifier, an antenna-selection switch, filters, and a balun for regulating the signal intensity are all included on the ESP32, just as they are on the ESP8266. Since the ESP32 requires so few external components, hardware development is streamlined.
The ESP32 is produced with TSMC's ultra-low-power 40 nm technology, another essential feature to keep in mind. As a result, employing ESP32 for the development of battery-operated applications like smartwatches, fitness trackers, baby monitors, and other similar devices should be a breeze.
Numerous ESP32 Coding Methods
If high-quality hardware like ESP32 can be programmed (coded) in multiple ways, it will be more accessible to a broader audience. As may be expected, the ESP32 is compatible with various development environments.
These are only a few examples of widely-used IDEs (integrated development environments):
Arduino IDE
PlatformIO IDE (VS Code)
LUA
MicroPython
Espressif IDF (IoT Development Framework)
JavaScript
Because of how comfortable it is, we'll be using the Arduino IDE to code the ESP32 we'll use in future projects. Other options are available to you as well.
Layout
Using the ESP32 DevKit Board as an example, we can examine its design to learn about the components that typically make up an ESP32 Development Board.
In the accompanying picture, you can see how the ESP32 Development Board I own is laid out.
Note: The market is flooded with ESP32 Boards that use the ESP-WROOM-32 Module. Different boards have different designs, pinouts, and sets of features.
The pin count on my board is 30. Some boards have 36 pins, while others have somewhat fewer. Therefore, before making any connections or turning on the board, you should verify that the pins are in the correct positions.
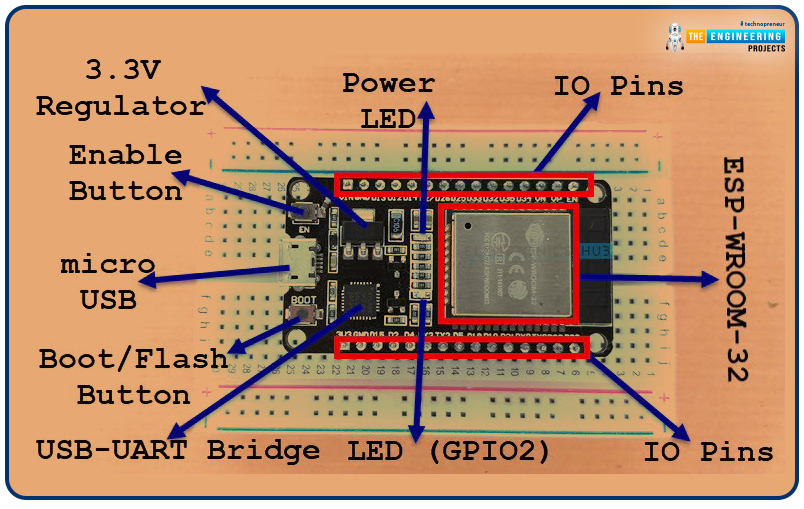
Depicted in the illustration are the components that make up the ESP32 Board:
ESP-WROOM-32 Module
Two rows of IO Pins (with 15 pins on each side)
CP2012 USB – UART Bridge IC
Micro–USB Connector (for power and programming)
AMS1117 3.3V Regulator IC
Enable Button (for Reset)
Boot Button (for flashing)
Power LED (Red)
User LED (Blue – connected to GPIO2)
Some passive components
The DTR and RTS pins on the USB-to-UART IC are utilized to automatically put the ESP32 into programming mode (when necessary) and to put the board to sleep after programming.
Pinout of ESP32 Board
A specialized ESP32 Pinout guide is something I intend to create. Meanwhile, check out the ESP32 Development Board's wiring diagram.
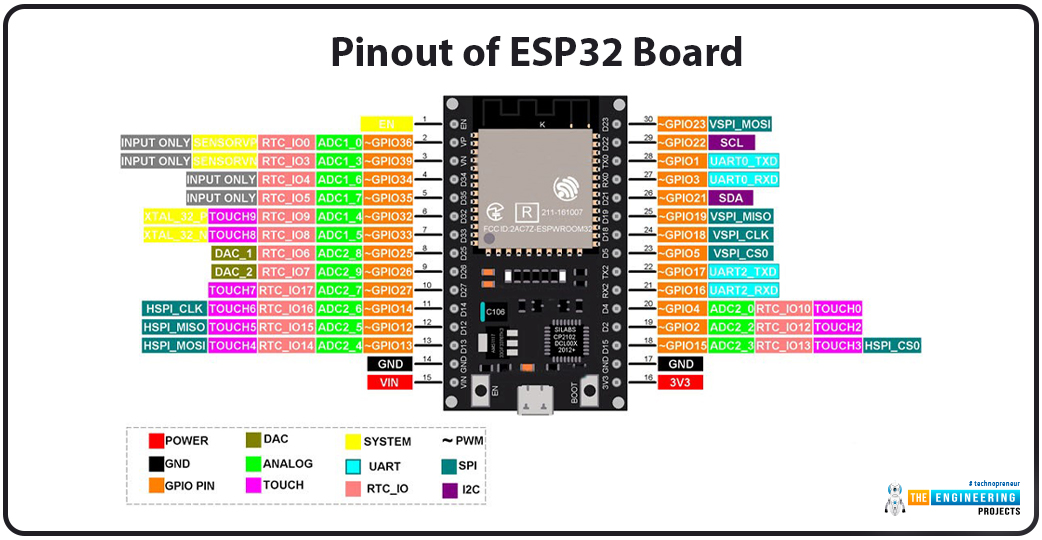
ESP Boards with 30 pins are supported with this pinout. Both the 30-pin and 36-pin versions of the ESP Board's pinout will be covered in this tutorial.
Now that you have a basic understanding of ESP32, it's time to see how it can be used. There is only so much more I can add to this chapter than what's already been said. The many sections of this guide should have stimulated some thought processes in your head. You probably already have an essential list of uses for ESP32 written out. Furthermore, most of your suggested services are doable.
Although ESP32 is a viable option for many uses, it is better suited for some. In this chapter, I'll explain the criteria you should use to decide whether or not to use ESP32 in a given application. This chapter is geared at production, so if you're thinking of hundreds or even thousands of devices, you're probably looking in the wrong place. If you only need to connect a few devices and ESP32 has what you need, utilize it without hesitation. You can confidently use ESP32 for prototyping and Proof of Concept (PoC).
ESP32's built-in support for wireless networking is a strong selling point. Thus, the ESP32 is the ideal microcontroller for a stationary application where reliable WiFi connectivity is not a primary concern, such as a lab-based environmental monitoring system. You won't need to buy a separate networking module because the WiFi stack is built right into the Module. If you plan on using the ESP32 in a mobile asset tracking application, however, you'll need a GSM or LTE module to maintain a constant connection to the server. As a result, ESP32 loses its cost advantage, and you may be better suited with a less expensive microcontroller that can still accomplish your goals.
Furthermore, ESP32's built-in hardware encryption accelerator makes it an excellent choice for any project that needs to communicate securely (HTTPS). Therefore, if you need to protect sensitive data from being intercepted, using an ESP32 microcontroller is preferable to using one of the many others that don't have this feature. The military industry is one possible use case for Industrial IoT.
Due to its dual-core architecture, the ESP32 is an excellent choice for data-intensive applications like those that require processing and transmission of data to occur on separate cores, as is the case with receiving information at a high baud rate. Industrial IoT is home to several such implementations. A microcontroller with less impressive specifications may be better suited for an actual application in which a secure connection isn't even necessary. So why bother with two cores if you can get by with only one?
The available GPIOs and peripherals are another consideration. There are three Universal Asynchronous Receiver/Transmitter (UART) channels on an ESP32. You may need to choose a different microcontroller if your application requires more than three UART channels. Similarly, the ESP32's 34 programmable GPIOs are plenty for most uses. However, if more general-purpose input/output (GPIO) pins are needed for your application, you may need to look at a different microcontroller.
With 1.5 MB of SPIFFS by default, the ESP32 offers more excellent onboard storage than competing microcontrollers. ESP32 eliminates the need for an additional Flash Chip or SD Card if your data storage needs are under 1.5 MB. As a bonus, the ESP32 handles wear-levelling within SPIFFS on its own. Nonetheless, the ESP32's competitive edge is nullified once more if it doesn't satisfy your data storage needs.
The 520 KiloByte of RAM on an ESP32 is likewise plenty of space for the vast majority of uses. This only becomes a stumbling block for resource-intensive tasks like image/video processing.
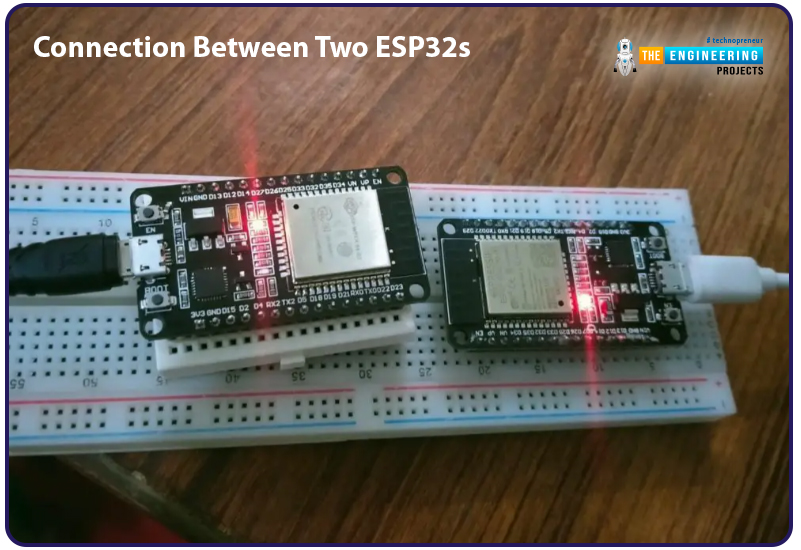
Connection Between Two ESP32s
Using the ESP32's built-in Bluetooth Low Energy (BLE) functionality, two microcontrollers may establish a highly efficient wireless link. With a Bluetooth connection between the two boards, one will take on the server role, while the other will take on the client role. For this project, one ESP32 will function as the server, broadcasting the data and establishing the connection, while the other ESP32 will take on the client's part, receiving the data broadcast by the server. Over the BLE connection, we will be exchanging strings between two esp32s.
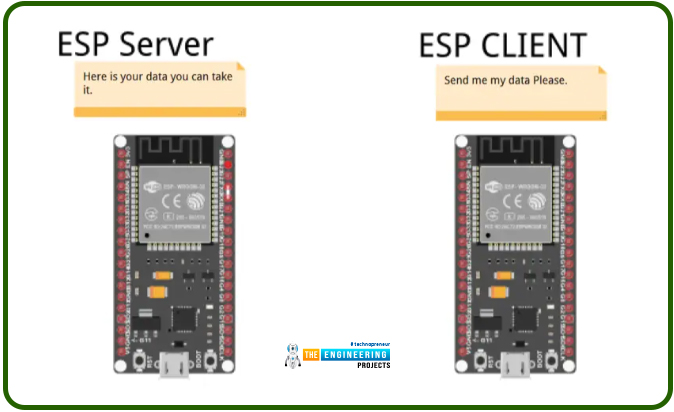
ESP32 as a Server
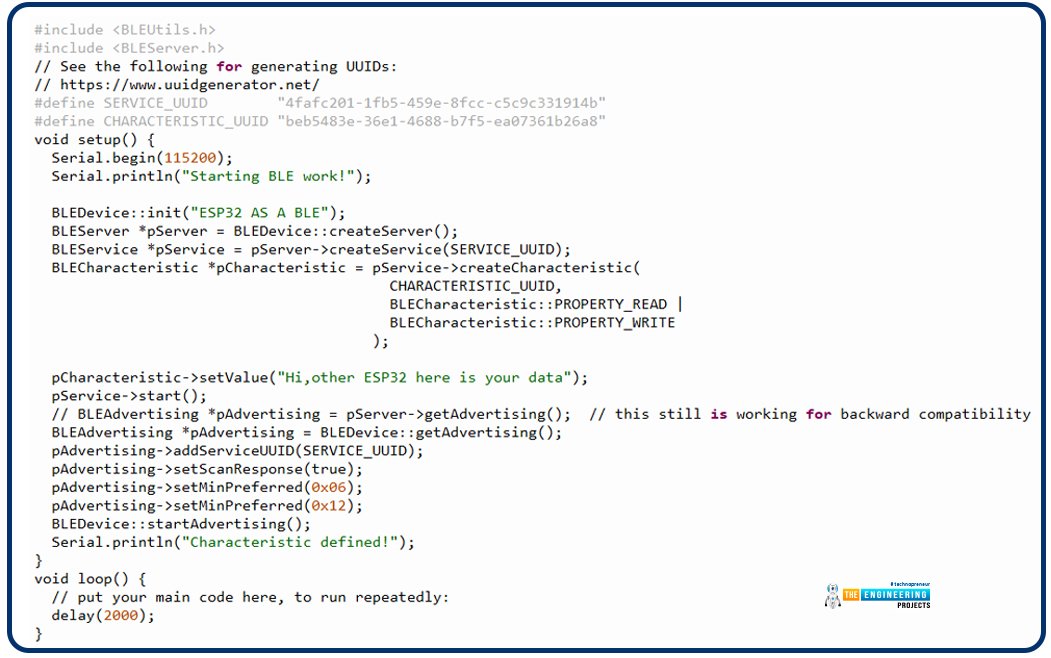
The first ESP32 we build will serve as a Bluetooth host. To the client, it will supply the link and the information. Here is its source code:
#include "bleutils.h"
#include "bleserver.h"
#define SERVICE_UUID "4fafc201-1fb5-459e-8fcc-c5c9c331914b"
#define CHARACTERISTIC_UUID "beb5483e-36e1-4688-b7f5-ea07361b26a8"
void setup() {
Serial.begin(115200);
Serial.println("Starting BLE work!");
BLEDevice::init("ESP32 AS A BLE");
BLEServer *pServer = BLEDevice::createServer();
BLEService *pService = pServer->createService(SERVICE_UUID);
BLECharacteristic *pCharacteristic = pService->createCharacteristic(
CHARACTERISTIC_UUID,
BLECharacteristic::PROPERTY_READ |
BLECharacteristic::PROPERTY_WRITE
);
pCharacteristic->setValue("Hi,other ESP32 here is your data");
pService->start();
// BLEAdvertising *pAdvertising = pServer->getAdvertising(); // this still is working for backward compatibility
BLEAdvertising *pAdvertising = BLEDevice::getAdvertising();
pAdvertising->addServiceUUID(SERVICE_UUID);
pAdvertising->setScanResponse(true);
pAdvertising->setMinPreferred(0x06);
pAdvertising->setMinPreferred(0x12);
BLEDevice::startAdvertising();
Serial.println("Characteristic defined!");
}
void loop() {
// put your main code here to run repeatedly:
delay(2000);
}
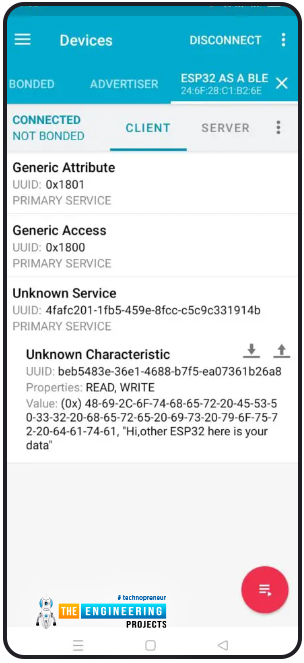
Code objects such as characteristics, BLE objects, and Advertising objects are all created using the BLE class. It begins with a Characteristic UUID and a Service UUID. The Universally Unique Identifier (UUID) is a string of bytes that can specify a Bluetooth device's features and capabilities. First, we initialized three objects of the BLEserver, BLE characteristic, and BLEService classes with the necessary data. Then, after setting up our Bluetooth server's UUID, attributes, and Services, we started it using the BLE device class's start advertising function. Any information, from sensor readings to business metrics, can be pre-set and advertised. Following the activation of this server, nRF Connect can be used to gain access to it from any mobile device.
Launch the scanner and link it to your Bluetooth device.

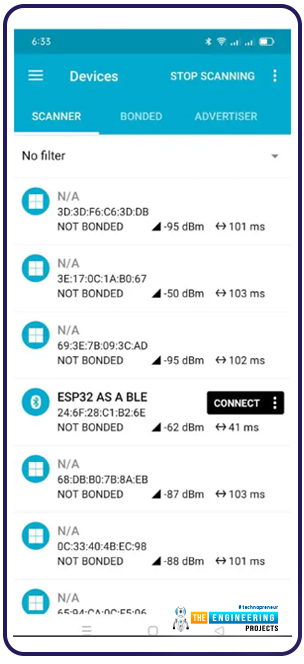
Once you've established a connection with your ESP32, inspect the feature and see your text displayed.

ESP32 as a Client
The second esp32 will function as a client, requesting information from the host device. The only information needed to establish a connection to the server esp32 and use its given services is the UUIDs of those services and the characteristics they identify.
Its program is as follows:
#include "BLEDevice.h"
//#include "BLEScan.h"
// The remote service we wish to connect to.
static BLEUUID serviceUUID("4fafc201-1fb5-459e-8fcc-c5c9c331914b");
// The Characteristic of the remote service we are interested in.
static BLEUUID charUUID("beb5483e-36e1-4688-b7f5-ea07361b26a8");
static boolean doConnect = false;
static boolean connected = false;
static boolean doScan = false;
static BLERemoteCharacteristic* pRemoteCharacteristic;
static BLEAdvertisedDevice* myDevice;
static void notifyCallback(
BLERemoteCharacteristic* pBLERemoteCharacteristic,
uint8_t* pData,
size_t length,
bool isNotify) {
Serial.print("Notify callback for characteristic ");
Serial.print(pBLERemoteCharacteristic->getUUID().toString().c_str());
Serial.print(" of data length ");
Serial.println(length);
Serial.print("data: ");
Serial.println((char*)pData);
}
class MyClientCallback : public BLEClientCallbacks {
void onConnect(BLEClient* pclient) {
}
void onDisconnect(BLEClient* pclient) {
connected = false;
Serial.println("onDisconnect");
}
};
bool connectToServer() {
Serial.print("Forming a connection to ");
Serial.println(myDevice->getAddress().toString().c_str());
BLEClient* pClient = BLEDevice::createClient();
Serial.println(" - Created client");
pClient->setClientCallbacks(new MyClientCallback());
// Connect to the remove BLE Server.
pClient->connect(myDevice); // if you pass BLEAdvertisedDevice instead of address, it will be recognized type of peer device address (public or private)
Serial.println(" - Connected to server");
// Obtain a reference to the service we are after in the remote BLE server.
BLERemoteService* pRemoteService = pClient->getService(serviceUUID);
if (pRemoteService == nullptr) {
Serial.print("Failed to find our service UUID: ");
Serial.println(serviceUUID.toString().c_str());
pClient->disconnect();
return false;
}
Serial.println(" - Found our service");
// Obtain a reference to the Characteristic in the service of the remote BLE server.
pRemoteCharacteristic = pRemoteService->getCharacteristic(charUUID);
if (pRemoteCharacteristic == nullptr) {
Serial.print("Failed to find our characteristic UUID: ");
Serial.println(charUUID.toString().c_str());
pClient->disconnect();
return false;
}
Serial.println(" - Found our characteristic");
// Read the value of the Characteristic.
if(pRemoteCharacteristic->canRead()) {
std::string value = pRemoteCharacteristic->readValue();
Serial.print("The characteristic value was: ");
Serial.println(value.c_str());
}
if(pRemoteCharacteristic->canNotify())
pRemoteCharacteristic->registerForNotify(notifyCallback);
connected = true;
return true;
}
/**
* Scan for BLE servers and find the first one that advertises the service we are looking for.
*/
class MyAdvertisedDeviceCallbacks: public BLEAdvertisedDeviceCallbacks {
/**
* Called for each advertising BLE server.
*/
void onResult(BLEAdvertisedDevice advertisedDevice) {
Serial.print("BLE Advertised Device found: ");
Serial.println(advertisedDevice.toString().c_str());
// We have found a device, let us now see if it contains the service we are looking for.
if (advertisedDevice.haveServiceUUID() && advertisedDevice.isAdvertisingService(serviceUUID)) {
BLEDevice::getScan()->stop();
myDevice = new BLEAdvertisedDevice(advertisedDevice);
doConnect = true;
doScan = true;
} // Found our server
} // onResult
}; // MyAdvertisedDeviceCallbacks
void setup() {
Serial.begin(115200);
Serial.println("Starting Arduino BLE Client application...");
BLEDevice::init("");
// Retrieve a Scanner and set the callback we want to use to be informed when we
// have detected a new device. Specify that we want active scanning and start the
// scan to run for 5 seconds.
BLEScan* pBLEScan = BLEDevice::getScan();
pBLEScan->setAdvertisedDeviceCallbacks(new MyAdvertisedDeviceCallbacks());
pBLEScan->setInterval(1349);
pBLEScan->setWindow(449);
pBLEScan->setActiveScan(true);
pBLEScan->start(5, false);
} //End of setup.
// This is the Arduino main loop function.
void loop() {
// If the flag "doConnect" is true then we have scanned for and found the desired
// BLE Server with which we wish to connect. Now we connect to it. Once we are
// connected, we set the connected flag to be true.
if (doConnect == true) {
if (connectToServer()) {
Serial.println("We are now connected to the BLE Server.");
} else {
Serial.println("We have failed to connect to the server; there is nothin more we will do.");
}
doConnect = false;
}
// If we are connected to a peer BLE Server, update the Characteristic each time we are reached
// with the current time since boot.
if (connected) {
String newValue = "Time since boot: " + String(millis()/1000);
Serial.println("Setting new characteristic value to \"" + newValue + "\"");
// Set the Characteristic's value to be the array of bytes that is a string.
pRemoteCharacteristic->writeValue(newValue.c_str(), newValue.length());
}else if(doScan){
BLEDevice::getScan()->start(0); // this is just an example of starting the scan after disconnect; most likely, there is a better way to do it in Arduino.
}
delay(1000); // Delay a second between loops.
} //End of loop
The functionality of this code depends on human input. At the outset of the code, we established the definitions of Characteristic and service UUID. Initially, BLERemoteCharacteristic and BLEAdvertisedDevice objects are created, and the connection to the server () function is used to establish a connection with the server (other esp32). In the End, it pulls in the server's data via the Characteristic and service variables. This is what these numbers will look like on the serial monitor:

Connection of ESP32 to Raspberry Pi
To link our ESP32 to Bluetooth, we will use a UART connection. Because of this, it will have bidirectional communication with the Pi 4.
As for the program, it goes like this:
#include "bledevice.h"
#include "bleserver.h"
#include "bleutils.h"
#include "ble2902.h"
BLEServer *pServer = NULL;
BLECharacteristic * pTxCharacteristic;
bool deviceConnected = false;
bool oldDeviceConnected = false;
uint8_t txValue = 0;
// See the following for generating UUIDs:
// https://www.uuidgenerator.net/
#define SERVICE_UUID "6E400001-B5A3-F393-E0A9-E50E24DCCA9E" // UART service UUID
#define CHARACTERISTIC_UUID_RX "6E400002-B5A3-F393-E0A9-E50E24DCCA9E"
#define CHARACTERISTIC_UUID_TX "6E400003-B5A3-F393-E0A9-E50E24DCCA9E"
class MyServerCallbacks: public BLEServerCallbacks {
void onConnect(BLEServer* pServer) {
deviceConnected = true;
};
void onDisconnect(BLEServer* pServer) {
deviceConnected = false;
}
};
class MyCallbacks: public BLECharacteristicCallbacks {
void onWrite(BLECharacteristic *pCharacteristic) {
std::string rxValue = pCharacteristic->getValue();
if (rxValue.length() > 0) {
Serial.println("*********");
Serial.print("Received Value: ");
for (int i = 0; i < rxValue.length(); i++)
Serial.print(rxValue[i]);
Serial.println();
Serial.println("*********");
}
}
};
void setup() {
Serial.begin(115200);
// Create the BLE Device
BLEDevice::init("UART Service For ESP32");
// Create the BLE Server
pServer = BLEDevice::createServer();
pServer->setCallbacks(new MyServerCallbacks());
// Create the BLE Service
BLEService *pService = pServer->createService(SERVICE_UUID);
// Create a BLE Characteristic
pTxCharacteristic = pService->createCharacteristic(
CHARACTERISTIC_UUID_TX,
BLECharacteristic::PROPERTY_NOTIFY
);
pTxCharacteristic->addDescriptor(new BLE2902());
BLECharacteristic * pRxCharacteristic = pService->createCharacteristic(
CHARACTERISTIC_UUID_RX,
BLECharacteristic::PROPERTY_WRITE
);
pRxCharacteristic->setCallbacks(new MyCallbacks());
// Start the service
pService->start();
// Start advertising
pServer->getAdvertising()->start();
Serial.println("Waiting a client connection to notify...");
}
void loop() {
if (deviceConnected) {
pTxCharacteristic->setValue(&txValue, 1);
pTxCharacteristic->notify();
txValue++;
delay(10); // Bluetooth stack will go into congestion, if too many packets are sent
}
// disconnecting
if (!deviceConnected && oldDeviceConnected) {
delay(500); // give the Bluetooth stack the chance to get things ready
pServer->startAdvertising(); // restart advertising
Serial.println("start advertising");
oldDeviceConnected = deviceConnected;
}
// connecting
if (deviceConnected && !oldDeviceConnected) {
// do stuff here on connecting
oldDeviceConnected = deviceConnected;
}
}
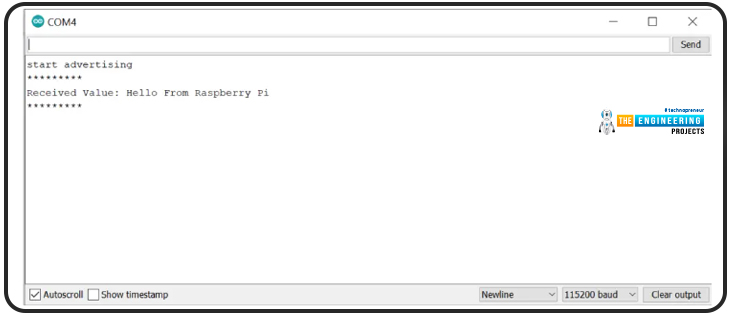
One part of the algorithm was responsible for broadcasting a loop of completely random data. One is transmitting information, while the other is receiving it. First, we settled on RX and TX as our two distinguishing features; afterwards, we gave each of them the precise definitions and values we'd come to expect. Since we're using UART, sending and receiving data simultaneously is not a problem. Use the NRF Application to check the functionality of a single end of a connection. Open the NRF Connector app and upload the code above.
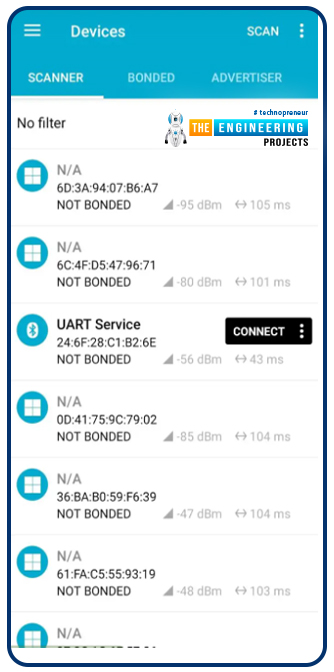
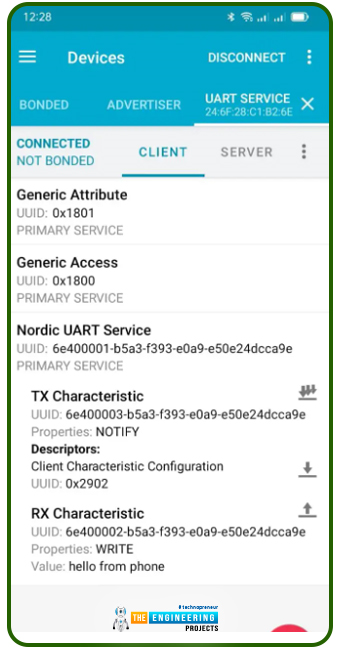
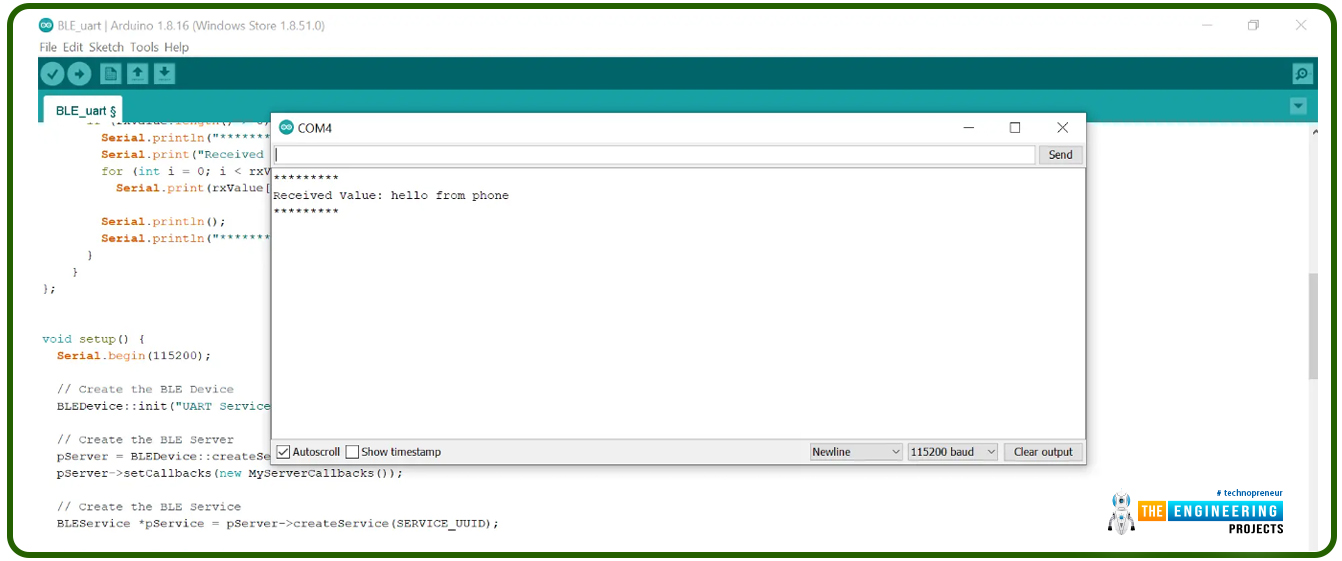
Enter the value you wish to transmit to the serial monitor after you have connected. The serial monitor will be updated with your input.
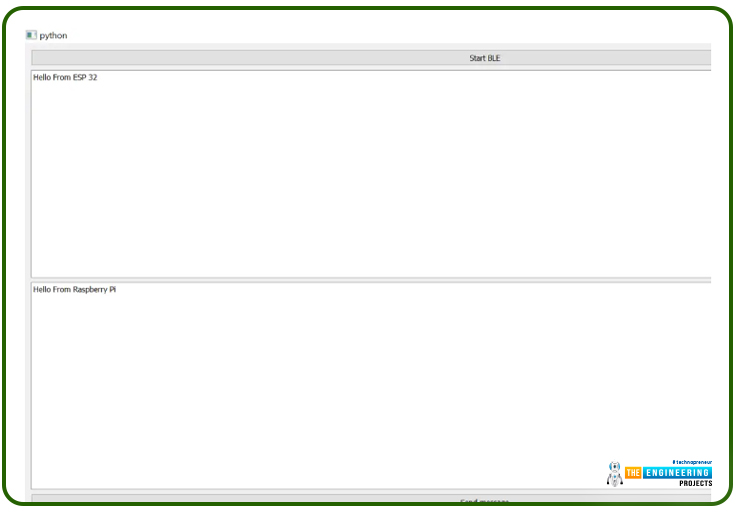
Raspberry Pi Connection
The Raspberry Pi is currently executing a Python script written in bluepy. This code creates a simple GUI for communicating with the esp. 32. The PYQT and bluepy packages need to be installed before continuing. You may run this code to see a graphical user interface as soon as everything is set up. After that, either input the information you wish to transmit to the ESP32 through BLE or view the information sent to the ESP32. It's a universal asynchronous receiver/transmitter (UART) link (universally asynchronous receiver-transmitter). Incoming info from esp32 will be displayed in the first message box, while outgoing data from Raspberry Pi can be written in the other text box.
As seen on the ESP32 serial connection display, we have the following:
import sys
import time
import requests
from PyQt5.QtCore import QObject, QRunnable, QThreadPool, QTimer, pyqtSignal, pyqtSlot
from PyQt5.QtWidgets import (
QApplication, QLabel, QMainWindow, QPlainTextEdit, QPushButton, QVBoxLayout, QWidget,
)
from bluepy import btle
class WorkerSignals(QObject):
signalMsg = pyqtSignal(str)
signalRes = pyqtSignal(str)
class MyDelegate(btle.DefaultDelegate):
def __init__(self, sgn):
btle.DefaultDelegate.__init__(self)
self.sgn = sgn
def handleNotification(self, cHandle, data):
try:
dataDecoded = data.decode()
self.sgn.signalRes.emit(dataDecoded)
except UnicodeError:
print("UnicodeError: ", data)
class WorkerBLE(QRunnable):
def __init__(self):
super().__init__()
self.signals = WorkerSignals()
self.rqsToSend = False
@pyqtSlot()
def run(self):
self.signals.signalMsg.emit("WorkerBLE start")
#---------------------------------------------
p = btle.Peripheral("3c:71:bf:0d:dd:6a")
p.setDelegate( MyDelegate(self.signals) )
svc = p.getServiceByUUID("6E400001-B5A3-F393-E0A9-E50E24DCCA9E")
self.ch_Tx = svc.getCharacteristics("6E400002-B5A3-F393-E0A9-E50E24DCCA9E")[0]
ch_Rx = svc.getCharacteristics("6E400003-B5A3-F393-E0A9-E50E24DCCA9E")[0]
setup_data = b"\x01\00"
p.writeCharacteristic(ch_Rx.valHandle+1, setup_data)
# BLE loop --------
while True:
"""
if p.waitForNotifications(1.0):
# handleNotification() was called
continue
print("Waiting...")
"""
p.waitForNotifications(1.0)
if self.rqsToSend:
self.rqsToSend = False
try:
self.ch_Tx.write(self.bytestosend, True)
except btle.BTLEException:
print("btle.BTLEException");
#---------------------------------------------hellohello
self.signals.signalMsg.emit("WorkerBLE end")
def toSendBLE(self, tosend):
self.bytestosend = bytes(tosend, 'utf-8')
self.rqsToSend = True
"""
try:
self.ch_Tx.write(bytestosend, True)
except BTLEException:
print("BTLEException");
"""
class MainWindow(QMainWindow):
def __init__(self):
super().__init__()
layout = QVBoxLayout()
buttonStartBLE = QPushButton("Start BLE")
buttonStartBLE.pressed.connect(self.startBLE)
self.console = QPlainTextEdit()
self.console.setReadOnly(True)
self.outconsole = QPlainTextEdit()
buttonSendBLE = QPushButton("Send message")
buttonSendBLE.pressed.connect(self.sendBLE)
layout.addWidget(buttonStartBLE)
layout.addWidget(self.console)
layout.addWidget(self.outconsole)
layout.addWidget(buttonSendBLE)
w = QWidget()
w.setLayout(layout)
self.setCentralWidget(w)
self.show()
self.threadpool = QThreadPool()
print(
"Multithreading with Maximum %d threads" % self.threadpool.maxThreadCount())
def startBLE(self):
self.workerBLE = WorkerBLE()
self.workerBLE.signals.signalMsg.connect(self.slotMsg)
self.workerBLE.signals.signalRes.connect(self.slotRes)
self.threadpool.start(self.workerBLE)
def sendBLE(self):
strToSend = self.outconsole.toPlainText()
self.workerBLE.toSendBLE(strToSend)
def slotMsg(self, msg):
print(msg)
def slotRes(self, res):
self.console.appendPlainText(res)
app = QApplication(sys.argv)
window = MainWindow()
app.exec()
Industrial applications
When there isn't enough electricity to go around, BLE comes in handy. Let's talk about some of the real-world uses for it:
Intelligent Farming Methods: Battery-powered microcontrollers with ble capabilities, like the ESP32 or Raspberry Pi, can be used for weeks to relay data from sensors from one ESP32 to another to optimize plant development.
In-Game Medical Staff: Using Bluetooth, a microcontroller can transmit data to a mobile phone or show the data locally on a screen, such as a user's heart rate, running speed, or any other data detected by sensors. All of these values can be tracked effectively and with no wire required.
Biomedical Condition Tracking: The BLE capabilities of a microcontroller enables the direct transfer of data from wristbands measuring vital signs like heart rate and blood pressure to a computer.
One of the many benefits of small microcontrollers is home automation. From lighting management to fingerprint door locks, the possibilities for using BLE devices are endless. It has several fascinating uses, including:
Alarms that go off at a predetermined time to remind you to turn off the stove, water pump, heater, or geyser
Safeguarding with mobile-operated surveillance cameras
Remotely operate garage doors using a mobile device
Measurements are taken from a variety of home sensors
Conclusion
Using the information shown here, we successfully established a Bluetooth connection between our Pi 4 and Esp32. We learned about esp32's internals and how to use the Raspberry Pi 4 to write programs for it. In conclusion, ESP32's specifications are adequate to support the vast majority of your proposed uses. If you're looking for an upgrade from the ESP8266, the ESP32 is the next generation and supports Bluetooth 4.2 and Bluetooth Low Energy. It includes additional CPU cores, faster WiFi, more GPIO, and these technologies. In addition to having a hall effect sensor and a temperature sensor already included, the ESP32 also features touch-sensing pins that can rouse the ESP32 from a deep sleep. When increasing output, it's vital to include good specifications but not anything too fancy. To rephrase, using a less expensive microcontroller may be more cost-effective if the intended result can be achieved with more basic specifications. The cost savings become noticeable when output increases by several orders of magnitude. While it may not be the best microcontroller for mass production, the ESP32 is perfect for proof-of-concept development and prototype prototyping. Next, we'll see how to connect a 4-by-4 keypad to a Raspberry Pi 4 for electronic door locks.


