


How to Interface MQ-2 gas sensor with Raspberry Pi 4


Hello friends, I hope you all are having fun. Today, I am going to share the 9th tutorial of Section-III in our Raspberry Pi 4 Programming Course. In the previous tutorial, we interfaced an air pressure sensor BMP180 with Raspberry Pi 4. In this tutorial, you'll learn how to interface an MQ-2 gas sensor with a Raspberry Pi 4.
Many apartments, residences, and workplaces rely heavily on these gas sensors to detect smoke or gas and alert the appropriate personnel in an emergency. In addition to gas and smoke, this sensor is sensitive to various odorous gases.
Project Description
Today, we will interface a gas sensor MQ-2 with Raspberry Pi 4 and will display the values on Raspberry Pi Console Window.
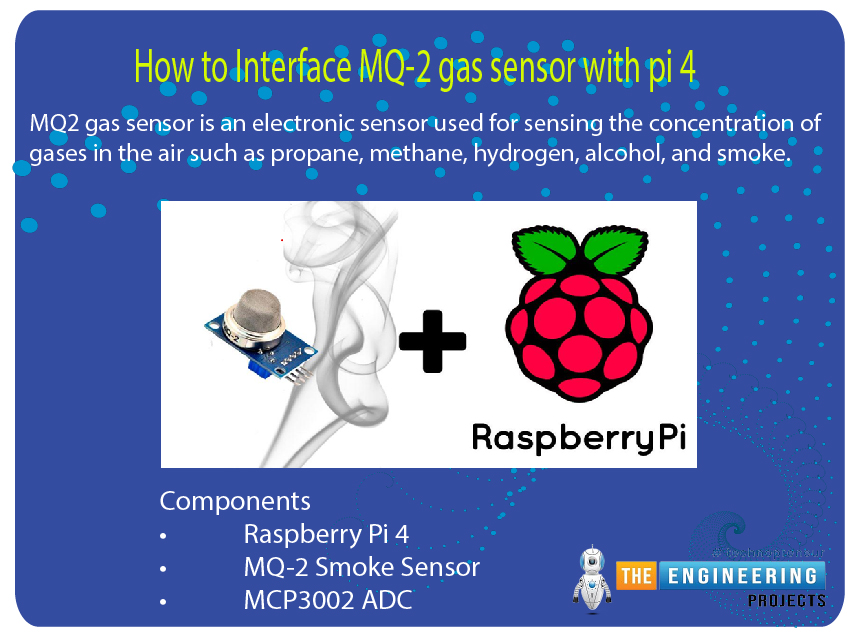
Components Required
These are the components used in today's project:
- Raspberry Pi 4
- MQ-2 Smoke Sensor
- MCP3002 ADC
MQ-2 Gas Sensor Pinout
- MQ-2 is a low-cost electronic sensor, used to sense the intensity of gases in the surrounding.
- MQ-x(MQ-1 to MQ-9) is a family of gas sensors used to detect different kinds of gases in the environment i.e. methane, propane, hydrogen etc.
- The MQ-2 gas sensor is used in security systems to detect potentially dangerous gases or flammable smoke.
- MQ-x sensors are inexpensive, simple-to-operate with an extended sensing range that may be narrowed to control the level of sensitivity.
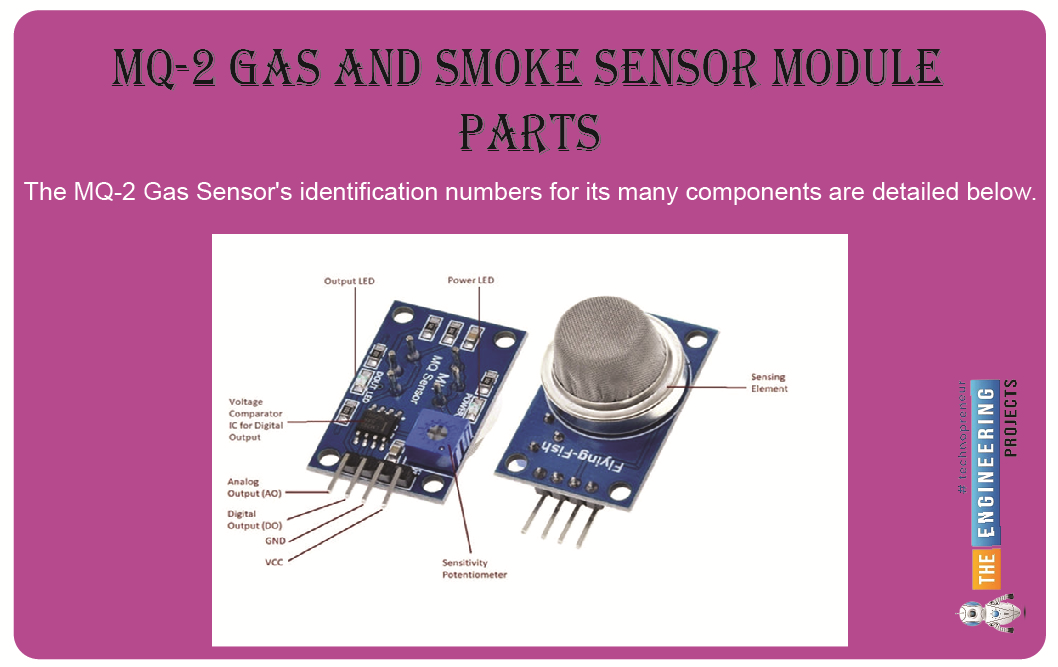
- The MQ-2 Gas sensor contains four inputs, two of which are reserved for Vcc and GND, and the remaining two can concurrently output digital and analog data.
- The image above reveals that the module incorporates two onboard LEDs. When power is provided to the board, the power LED lights up, while the Dout LED lights up when the potentiometer's trigger value is achieved.
- When an analog signal is received from the gas sensor, the board's integrated comparator OP-Amp converts it to a digital one.
- In addition, the device's sensitivity can also be fine-tuned using the included Trim-pot.
Now let's have a look at the Mq-2 Pinout:
MQ-2 Pinout
Here's the pinout diagram of MQ-2 sensor:
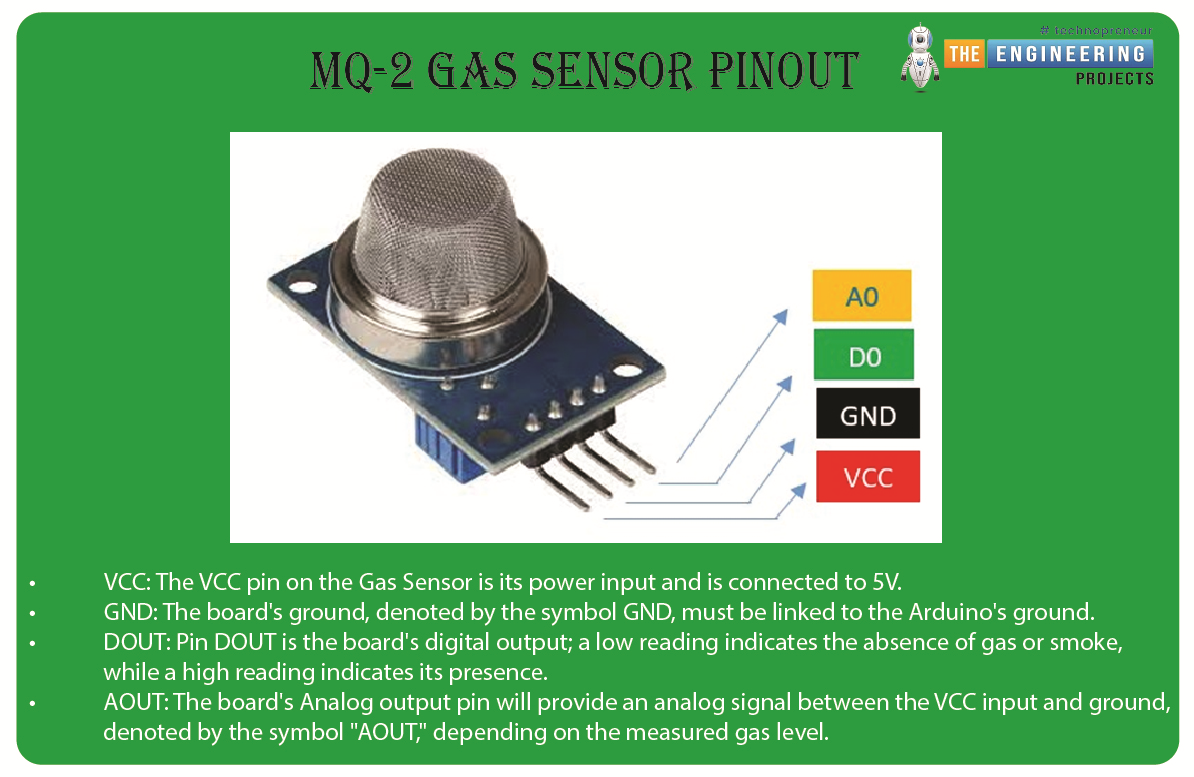
- Vcc: The VCC pin on the Gas Sensor is its power input and is connected to 5V.
- GND: The board's ground, denoted by the symbol GND, must be linked to the ground pin.
- Dout: Pin Dout is the board's digital output; a low reading indicates the absence of gas or smoke, while a high reading indicates its presence.
- Aout: The board's Analog output pin will provide an analog signal between the Vcc input and ground, denoted by the symbol "Aout", depending on the measured gas intensity.
How does the gas sensor function?
To correctly identify combustible glasses, the MQ-2 gas sensor employs a heating element; however, having such a component close to combustible gases would be catastrophic, so the sensor is built with anti-explosion protection consisting of two thin lines of stainless steel mesh, as can be seen in the image below. In this case, the stainless steel mesh houses the heating element.

Its mesh structure not only blocks out solids like dust and dirt but also keeps out particles in the air that are too big to be gaseous, such as oxygen and nitrogen. In this case, decapitating the sensor reveals that it consists of two main parts. The nichrome wire that does the heating is accompanied by a platinum wire that has been coated with tin dioxide for the sensing part. We have already removed the protective cap to prevent you from accidentally slicing your sensor, as shown in the figure below.
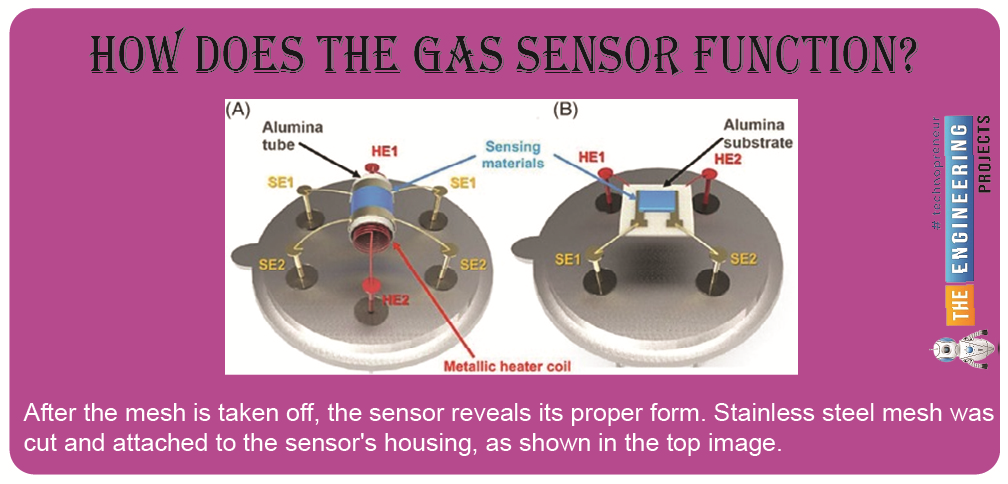
After the mesh is taken off, the sensor reveals its proper form. Stainless steel mesh was cut and attached to the sensor's housing, as shown in the top image. The sensory component that we have been discussing is now readily apparent. Since the actual detecting and heating element is attached to the sensor's six legs in a star configuration, the sensor's pins also take on that shape. Bakelite, used to increase the sensor's heat conductivity, is visible at the base of the device (black).
Module MQ-2 Gas Sensor Internal Design
Here is a pictorial representation of the circuitry inside the MQ-2 gas sensor module. This module's schematic is quite elementary, and its construction requires only a few essential parts. The following schematic could be helpful if you need to construct this circuit quickly:
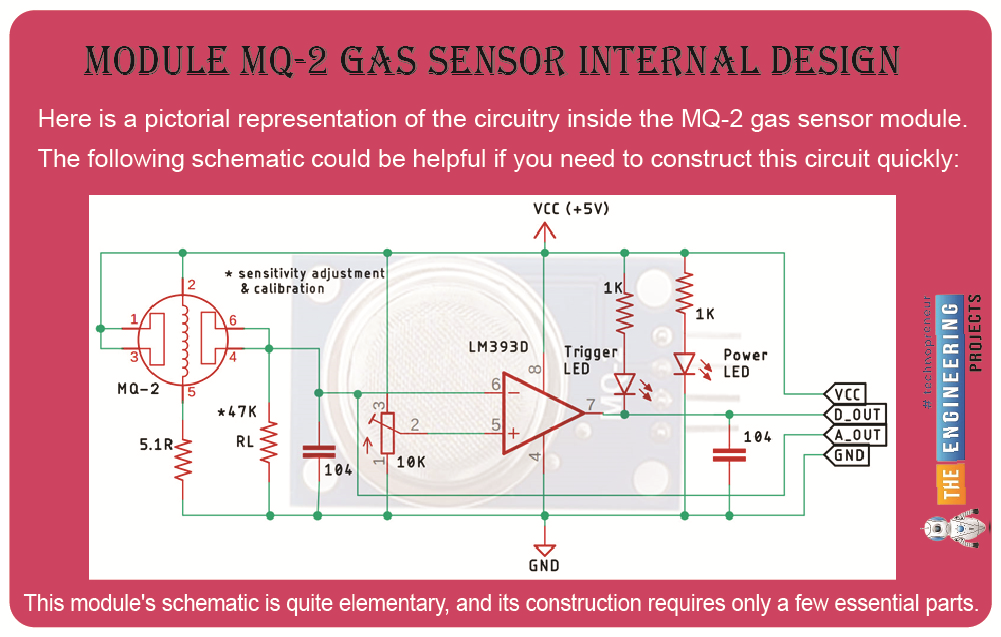
The LM393 op-amp is shown in the diagram; it is a +5V-powered, low-power op-amp with a small offset voltage. The MQ-2 sensor requires at least 5V, so 3.3V can't be used to power the circuit. This op-amp is primarily responsible for performing the digital-to-analog conversion of analog input signals. In addition, the MQ-2 Sensor module's sensitivity and triggering voltage can be fine-tuned via an onboard 10K potentiometer. In addition, there are two LED lights. As soon as power is supplied to the board, the power LED lights up, while the trigger LED lights up when a predetermined threshold is met. A pair of decoupling capacitors helps keep the board quiet.
MQ-2 gas sensor preheating time:
It would be best if you let the gas sensor stabilize after being preheated before you can use it. Moreover, a 24-hour preheat period is specified on the device's datasheet. Does this indicate that it must be on for 24hrs before being used?
The resounding "NO" is the clear response to this inquiry. This only denotes that a continuous 24-hour run is required to acquire the typical performance figures in the datasheet. And after 24 hours in their lab, they measured it. To stay within tolerance, you must adhere to the specified preheating time of 24 hours. Considering the small space, the sensor should reach temperature equilibrium in under 30 minutes. Nevertheless, you may get results within a few percentage points of the datasheets in minutes.
Suppose you need a precise reading of the gas concentration. In that case, you should preheat your sensor for 24 hours, ensure it is properly calibrated, and find a way to account for ambient variables such as temperature and humidity.
With the MQ-2 Gas sensor, you can do more than detect the presence of butane and hydrogen gas; you can also measure the concentration of these gases in parts per million. Detecting the gas and determining its concentration in parts per million are two very different processes. Detecting a gas's level and subsequent increase in concentration is the primary subject of this essay. In addition, we will briefly touch on precisely calculating the gas concentration in parts per million, for which a different method is required.
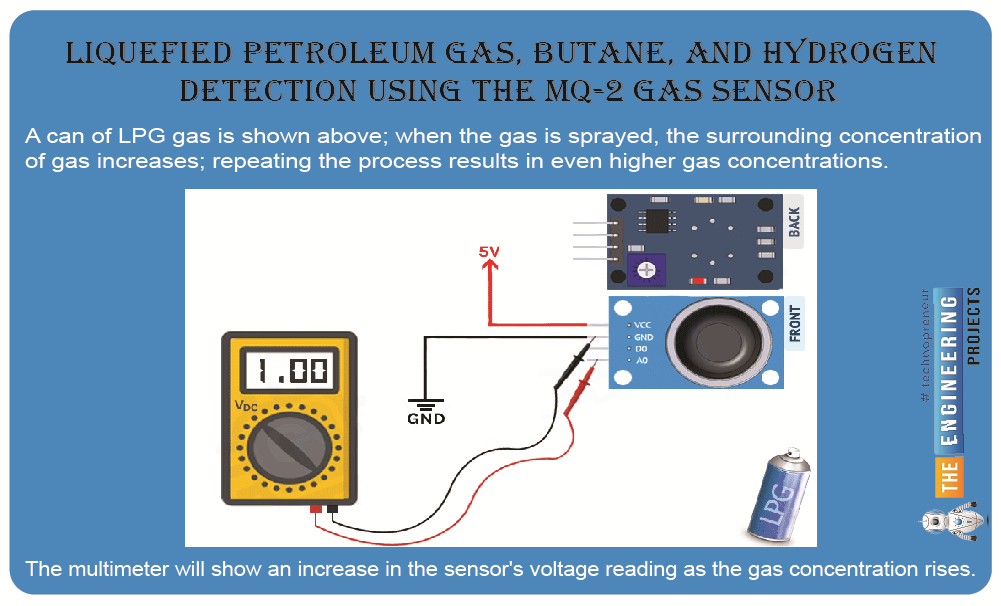
Liquefied Petroleum Gas, Butane, and Hydrogen Detection Using the MQ-2
A can of LPG gas is shown above; when the gas is sprayed, the surrounding concentration of gas increases; repeating the process results in even higher gas concentrations. The multimeter will show an increase in the sensor's voltage reading as the gas concentration rises. Also, the module's green LED will illuminate when it hits the user-defined threshold.
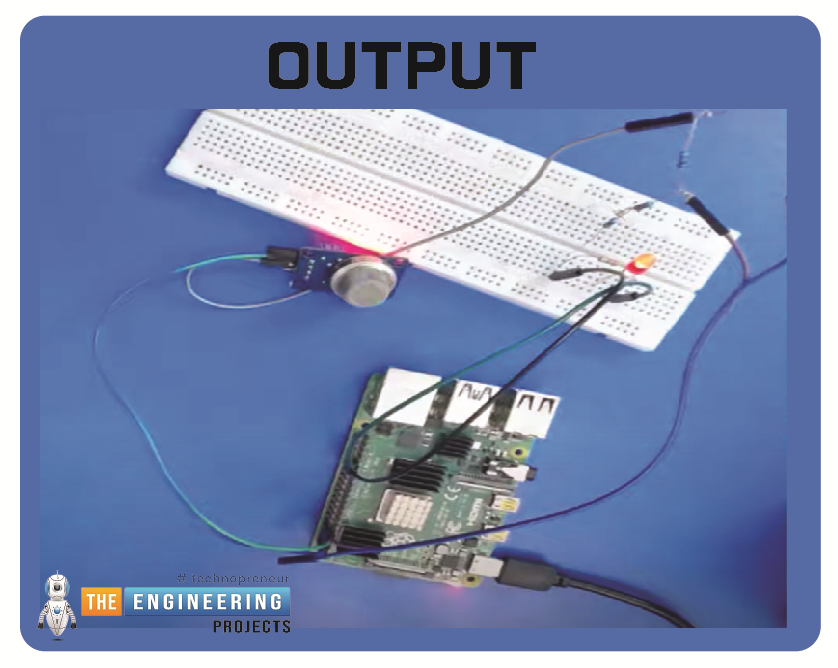
Raspberry Pi MQ-2 Detector Circuit Diagram
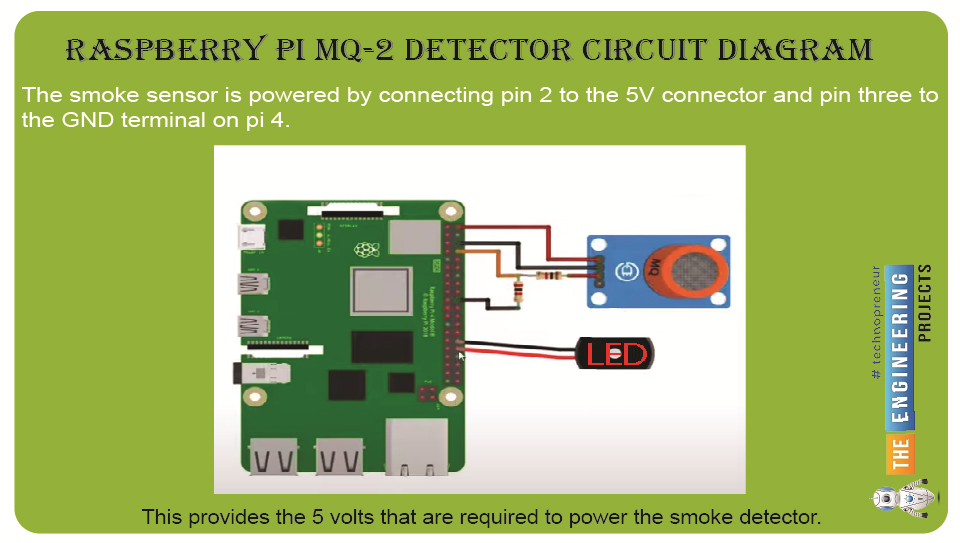
The smoke sensor is powered by connecting pin 2 to the 5V connector and pin three to the GND terminal on pi 4. This provides the 5 volts that are required to power the smoke detector.
Our application will be set up to turn on the light when the smoke detector's voltage rises above a user-defined threshold.
Now that we've established the physical links, all that's missing is the software we've been developing.
Complete code
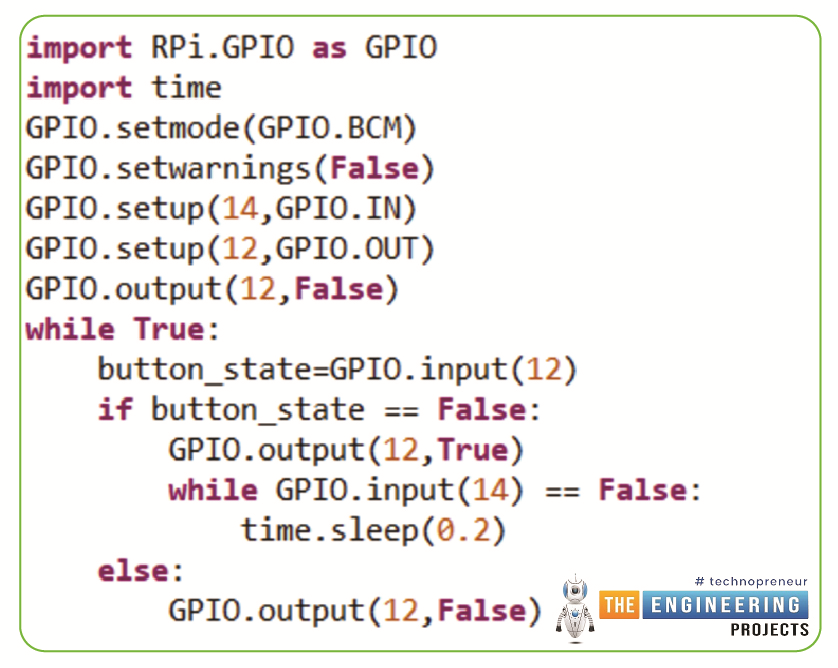
import RPi.GPIO as GPIO
import time
GPIO.setmode(GPIO.BCM)
GPIO.setwarnings(False)
GPIO.setup(14,GPIO.IN)
GPIO.setup(12,GPIO.OUT)
GPIO.output(12,False)
while True:
button_state=GPIO.input(12)
if button_state == False:
GPIO.output(12,True)
while GPIO.input(14) == False:
time.sleep(0.2)
else:
GPIO.output(12,False)
Output
Conclusion
Follow the steps in this tutorial. You should be able to connect the MQ-2 sensor to a breadboard and a Raspberry Pi, turn on the SPI interface, and then read sensor values using the most recent Circuit Python library. You can accomplish the same thing for additional MQ-x sensors by modifying the file depending on the sensor's design and then connecting each sensor to a separate MCP3008 channel to read its values simultaneously. The following tutorial will teach you how to use a Raspberry Pi 4 with BLE to manage your household gadgets.


