Greetings, and welcome to today's tutorial. In the last tutorial, we learned how to construct a system for tallying individuals using Raspberry Pi, astute subtraction, and blob tracking. We demonstrated the total number of building entrances and exits. Feature computation and HOG theory were also discussed. The tests proved that a device based on the raspberry pi could effectively function as a people counting station. One of the many benefits of the Pi 4 is its internet connectivity, which is especially useful for home automation projects due to its low price and ease of use. We're going to see if we can use a web page's buttons to manage our air conditioner today. With this Internet of Things (IoT) based home automation, you can command your home gadgets from the comfort of your couch. The user can access this web server from any gadget capable of loading HTML apps, such as a smartphone, tablet, computer, etc.
Components
The needs of this project can be broken down into two broad classes: hardware and software.
Hardware Requirement
Raspberry Pi 4
Memory card 8 or 16GB running Raspbian Jessie
5v Relays
2n222 transistors
Diodes
Jumper Wires
Connection Blocks
LEDs to test.
AC lamp to Test
Breadboard and jumper cables
220 or 100 ohms resistor
Software Requirement
We'll be using the WebIOPi framework, notepad++ on your PC, and FileZilla to transfer files (particularly web app files) from your computer to the raspberry pi and the Raspbian operating system.
The Raspberry Pi Setup Process
As a good habit, I constantly update the Raspberry Pi before using it for the first time. In this project phase, we will handle the web-to-raspberry-pi connection by upgrading the Pi and setting up the WebIOPi framework. The python Flask framework provides a potentially more straightforward alternative, but getting your hands dirty and looking at how things operate makes DIY appealing. When you get to that point, the fun of DIY begins. Use the updated commands below to upgrade your Raspberry Pi and restart the RPi.

sudo apt-get update
sudo apt-get upgrade
sudo reboot
After this is finished, we can set up the webIOPi framework. Using, verify that you are in your home directory.

cd ~
To download the files from the google page, type wget.

wget http://sourceforge.net/projects/webiopi/files/WebIOPi-0.7.1.tar.gz
Then, once the download is complete, unzip the file and enter the directory;

tar xvzf WebIOPi-0.7.1.tar.gz
cd WebIOPi-0.7.1/
Unfortunately, I could not locate a version of WebIOPi that is compatible with the Pi 4; thus, we have to download a patch before proceeding with the setup. Run the instructions below from within the WebIOPi directory to apply the patch.

wget https://raw.githubusercontent.com/doublebind/raspi/master/webiopi-pi2bplus.patch
patch -p1 -i webiopi-pi2bplus.patch
Once we have those things, we can begin the WebIOPi setup installation process by using the;

sudo ./setup.sh
Just click "Yes" when prompted to install more components during setup. Upon completion, restart your Pi.

sudo reboot
Verify the WebIOPi Setup
Before diving into the schematics and programs, we should power on the Raspberry Pi and ensure our WebIOPi installation is functioning as expected. Execute the command below;

sudo webiopi -d -c /etc/webiopi/config
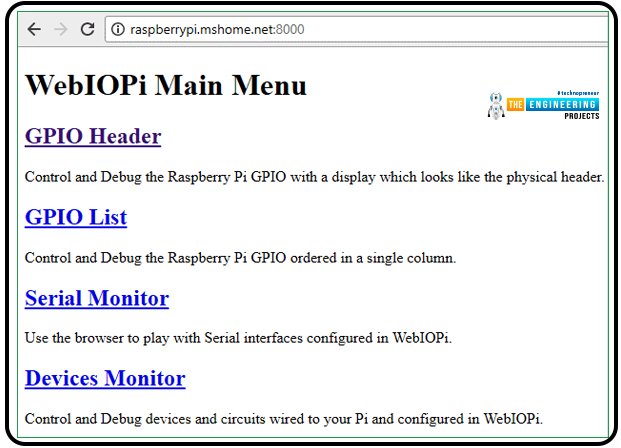
After running the above command on the pi, open a web browser and navigate to http://raspberrypi.mshome.net:8000 (or HTTP;//thepi'sIPaddress:8000) on the computer that is attached to the pi. When logging in, you'll be asked for a username and password.

Username is webiopi
Password is raspberry
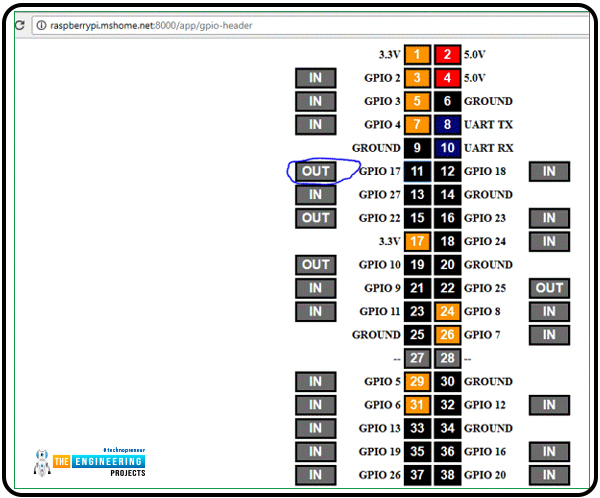
You may permanently disable this login if you no longer need it. Still, it's important to keep unauthorized users from taking control of your home's appliances and Internet of Things (IoT) components. After you've logged in, go to the GPIO header link.
Make GPIO 17 an output; we'll use it to power an LED in this Test.
Following this, attach the led to the Pi 4 as depicted in the schematics.
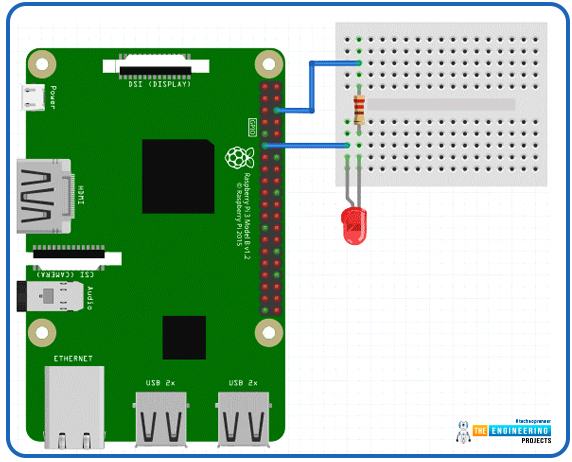
When you're ready to activate or deactivate the LED, return to the web page where you made the connection and select the pin 11 button. This allows us to use WebIOPi to manage the Raspberry Pi's GPIO pins. If the Test is successful, we can return to the console and exit the program by pressing CTRL + C. Please let me know in the comments if this arrangement has any problems. Once the pilot is finished, we can begin the actual project.
Developing a Web-Based Home-Control application for the Raspberry Pi
In this section, we will alter the WebIOPi service's standard setup and inject our code to be executed on demand. FileZilla or another FTP/SCP copy program will be the first tool we install on our computer. You'll agree that using the terminal to write code on the Pi is a stressful experience, so having access to Filezilla or another SCP program will be helpful. Let's make a project directory in which all our web scripts will be stored before we begin writing the HTML, CSS, and javascript programs for this Internet - of - things Home automated Web app and transferring them to the RPi.
First, make sure you're in your home directory using; next, create the folder; finally, open the newly constructed folder and make an HTML folder inside it.

cd ~
mkdir webapp
cd webapp
mkdir HTML
Make subfolders inside the HTML folder for scripts, CSS, and graphics.

mkdir html/css
mkdir html/img
mkdir html/scripts
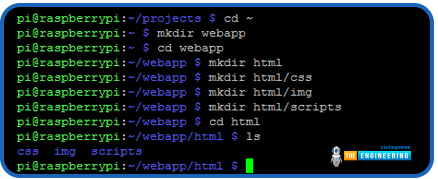
Now that we have our files prepared, we can start coding on the computer and transfer our work to the Pi using Filezilla.
The JavaScript Code
Writing the javascript will be our first order of business. An easy-to-use script for interacting with the WebIOPi server. Our four-button web app will only use two relays in the demonstration, and we only intend to control four GPIO pins for this project.
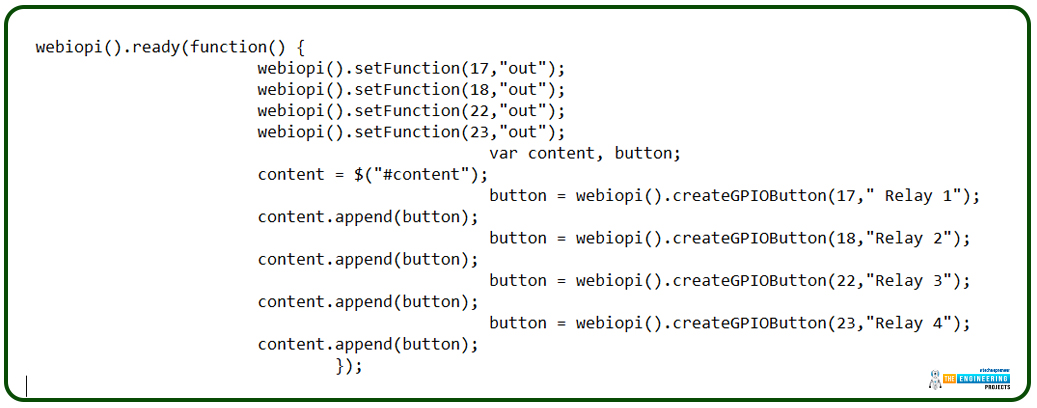
webiopi().ready(function() {
webiopi().setFunction(17,"out");
webiopi().setFunction(18,"out");
webiopi().setFunction(22,"out");
webiopi().setFunction(23,"out");
var content, button;
content = $("#content");
button = webiopi().createGPIOButton(17," Relay 1");
content.append(button);
button = webiopi().createGPIOButton(18,"Relay 2");
content.append(button);
button = webiopi().createGPIOButton(22,"Relay 3");
content.append(button);
button = webiopi().createGPIOButton(23,"Relay 4");
content.append(button);
});
Once the WebIOPi is ready, the preceding code is executed. To help you understand JavaScript, we've explained below:
webiopi().ready(function()
All this tells our system to make this function and call it once the webiopi is set.
webiopi().setFunction(23,"out")
We can instruct the WebIOPi program to use GPIO23 for output. Four buttons are now available, but you may add more if necessary.
var content, button
With this line, we're instructing the system to make a new variable called content into a button.
content = $("#content")
We will continue using the content variable in our HTML and CSS. As a result, the WebIOPi framework generates everything connected to #content when it is mentioned.
button = webiopi().createGPIOButton(17,"Relay 1")
WebIOPi can make several distinct types of push buttons. This code instructs the WebIOPi program to generate a GPIO key that operates on the GPIO pin identified as "Relay 1" above. The other ones are the same, too.
content.append(button)
Add this code to the button's existing HTML or external code. New buttons can be made that are identical to this one in every respect. This is especially helpful while coding or writing CSS.
If you made your JS files the same way I did, you can save them and then move them with Filezilla to webapp/HTML/scripts after you've finished making them. Now we can move on to developing the CSS.
The CSS Code:
With the aid of CSS, our Internet of Things (IoT) Rpi 4 home automation website now looks fantastic. So that the website will look like the one in the picture below, I built a custom style sheet called smarthome.css.
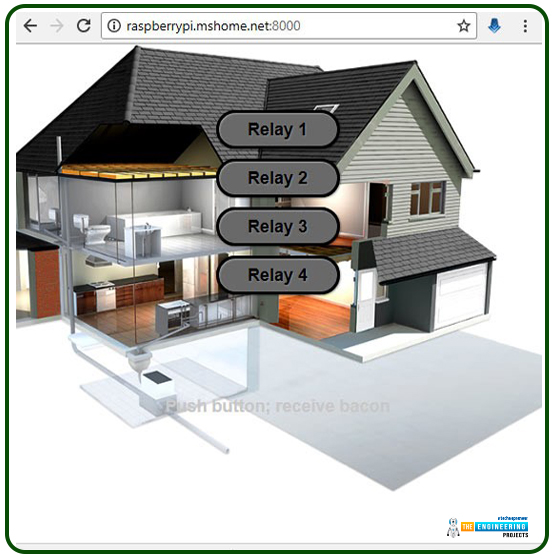
I don't want to paste the entire CSS script here, so I'll use a subset for the explanation. If you want to learn CSS, all you have to do is read the code. You can skip this and use our CSS code if you want to.
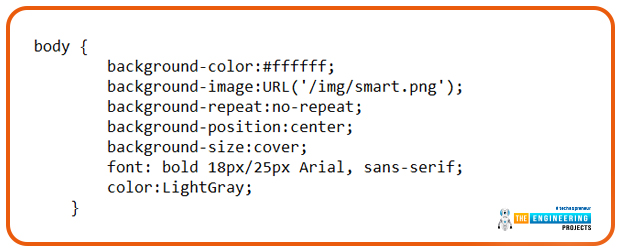
The first section of the script, displayed below, represents the web application's main stylesheet.
body {
background-color:#ffffff;
background-image:URL('/img/smart.png');
background-repeat:no-repeat;
background-position:center;
background-size:cover;
font: bold 18px/25px Arial, sans-serif;
color:LightGray;
}
The above code, which I hope needs no explanation, begins by setting the background colour to white (#ffffff), adds a background image to the document from the specified folder (remember the one we created earlier? ), makes sure the picture doesn't duplicate by setting the background-repeat to no-repeat, and finally tells the CSS to center the background. Next, we adjust the background's text size, font, and colour.
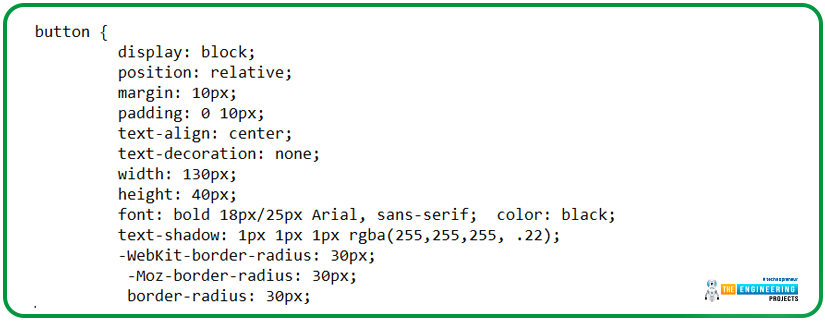
After finishing the main content, we styled the buttons with CSS.
button {
display: block;
position: relative;
margin: 10px;
padding: 0 10px;
text-align: center;
text-decoration: none;
width: 130px;
height: 40px;
font: bold 18px/25px Arial, sans-serif; color: black;
text-shadow: 1px 1px 1px rgba(255,255,255, .22);
-WebKit-border-radius: 30px;
-Moz-border-radius: 30px;
border-radius: 30px;
}
Everything else in the script is similarly optimized for readability and brevity. You can play with them and see what happens; this kind of learning is known as "learning by doing," I believe. However, CSS's strengths lie in its simplicity, and its rules are written in plain English. The button's text shadow and button shadow are two of the few supplementary features found in the block's other section. To top it all off, pressing the button triggers a subtle transition effect, making it look polished and lifelike. To guarantee optimal page performance on all browsers, these are defined independently for WebKit, firefox, opera, etc.
The following code snippet notifies the WebIOPi service that it is receiving data as input.

input[type="range"] {
display: block;
width: 160px;
height: 45px;
}
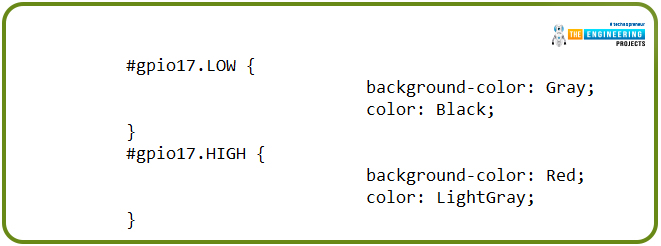
Providing feedback on when a button is pressed will be the last element we want to implement. As a result, the screen's colour scheme and button hues provide a quick indicator of progress. To accomplish this, the following line of code is added to each button's HTML.
#gpio17.LOW {
background-color: Gray;
color: Black;
}
#gpio17.HIGH {
background-color: Red;
color: LightGray;
}
The code snippets up top alter the button's color depending on the user's selection. The button's background is gray when it is inactive (at LOW) and red when it is active (at HIGH). Now that we have our CSS under control let's save it as smarthome.css, upload it to our raspberry pi's styles folder using FileZilla (or another SCP client of your choosing), and fix the remaining HTML code.
HTML Code
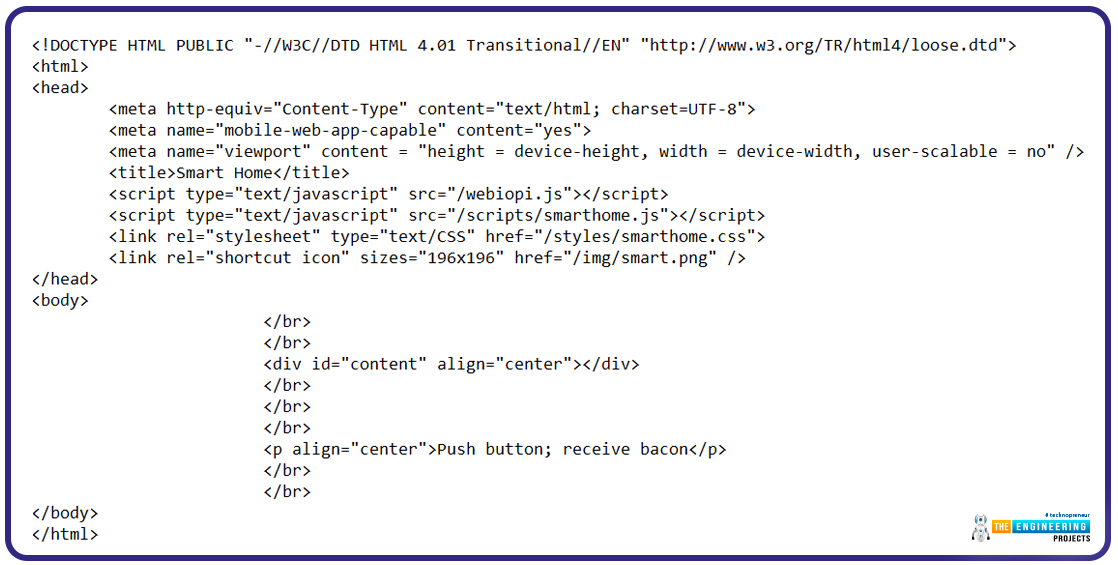
The HTML code unifies the style sheets and java scripts.
<!DOCTYPE HTML PUBLIC "-//W3C//DTD HTML 4.01 Transitional//EN" "http://www.w3.org/TR/html4/loose.dtd">
<html>
<head>
<meta http-equiv="Content-Type" content="text/html; charset=UTF-8">
<meta name="mobile-web-app-capable" content="yes">
<meta name="viewport" content = "height = device-height, width = device-width, user-scalable = no" />
<title>Smart Home</title>
<script type="text/javascript" src="/webiopi.js"></script>
<script type="text/javascript" src="/scripts/smarthome.js"></script>
<link rel="stylesheet" type="text/CSS" href="/styles/smarthome.css">
<link rel="shortcut icon" sizes="196x196" href="/img/smart.png" />
</head>
<body>
</br>
</br>
<div id="content" align="center"></div>
</br>
</br>
</br>
<p align="center">Push button; receive bacon</p>
</br>
</br>
</body>
</html>
The head tag contains several crucial elements.

<meta name="mobile-web-app-capable" content="yes">
The code line above makes it possible to add the web app to the mobile device's home screen when using Chrome or Safari. You can access this function using the Chrome menu. This makes it so the app may be quickly launched on any mobile device or desktop computer.
The following line of code provides a measure of responsiveness for the web app. Because of this, it can take up the entire display of any gadget on which it is run.

<meta name="viewport" content = "height = device-height, width = device-width, user-scalable = no" />
The web page's title is defined in the following line of code.

<title>Smart Home</title>
The following four lines of code all connect the Html file to multiple resources it requires to function as intended.

<script type="text/javascript" src="/webiopi.js"></script>
<script type="text/javascript" src="/scripts/smarthome.js"></script>
<link rel="stylesheet" type="text/CSS" href="/styles/smarthome.css">
<link rel="shortcut icon" sizes="196x196" href="/img/smart.png" />
The first line above directly connects to the WebIOPi framework JavaScript, which is stored in the server's root directory. This method must be invoked whenever WebIOPi is used.
The second line tells the HTML document where to find our jQuery script, and the third tells where to get our style sheet. The last line prepares an icon for the mobile desktop, which can be useful if we use the website as an app or a favicon.
To ensure that our HTML code displays whatever is contained in the JavaScript file, we include break tags in the body portion of the code. The definition of our button's content was made previously in the JavaScript code, and its id="content" should bring that to mind.

<div id="content" align="center"></div>
Everybody is familiar with the routine of saving an Html file as index.html and then transferring it to the Pi's HTML folder via Filezilla.
Modifications to the WebIOPi Server for Use in Automated Household Tasks
Before we can begin sketching out circuit diagrams and running tests on our web app, we need to make a few adjustments to the webiopi service's configuration file, instructing it to look for configuration information in our HTML folder rather than the default location.
Edit the configuration by executing the following commands as root:

sudo nano /etc/webiopi/config
Find the section of the configuration file labelled "HTTP" and look for the line that begins with "#" Modify the directory where HTML and resources are stored by default with doc-root.
Remove the # comments from anything below it, and if your folder is organized like mine, set the doc-root to the location of your project file.

doc-root = /home/pi/webapp/html
Lastly, save your work and exit. If you already have another server installed on the Pi utilizing port 8000, you may easily change it. If not, let's stop saving and call it a day.
It's worth noting that the WebIOPi service password can be changed using the command;

sudo webiopi-passwd
A new login name and password will be required. Getting rid of this entirely is possible, but safety comes first.
Finally, issue the following command to start the WebIOPi service.

sudo /etc/init.d/webiopi start
If you want to see how the server is doing, you can do so by;

sudo /etc/init.d/webiopi status
That's why there's a way to halt its execution:

sudo /etc/init.d/webiopi stop
Setup WebIOPi to start automatically with;

sudo update-RC.d webiopi defaults
To do the opposite and prevent it from starting up automatically, use the following;

sudo update-RC.d webiopi remove
Schematic and Explanation of a Circuit
Now that we have everything set up, we can begin developing the schematics for our Web-controlled home appliance.
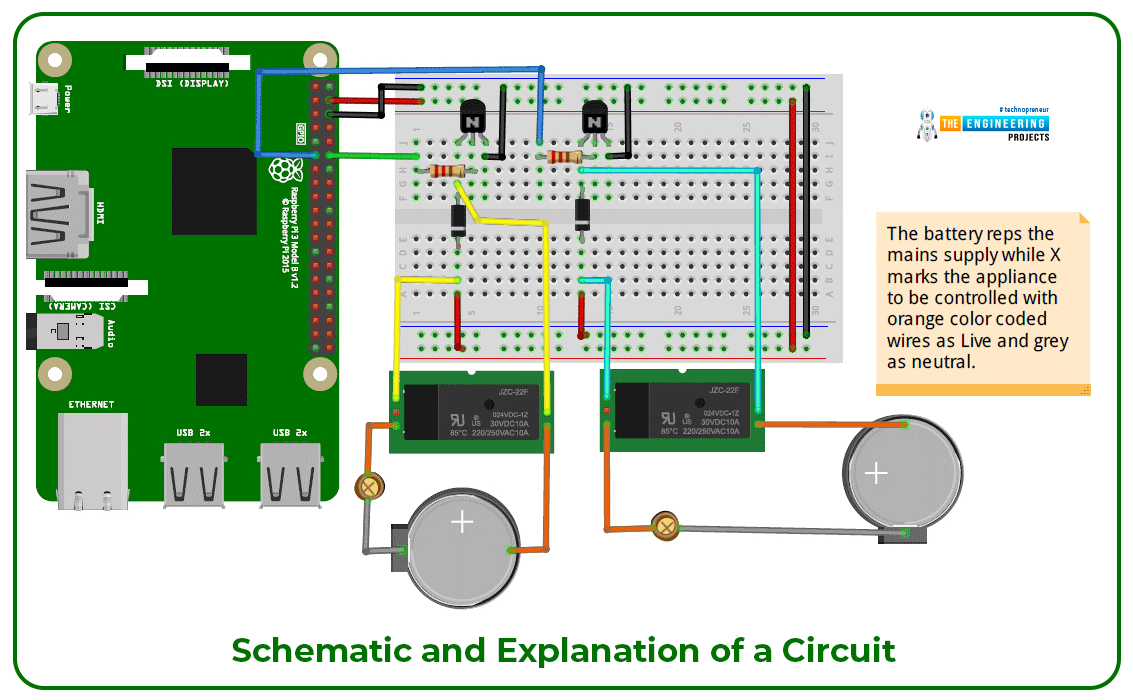
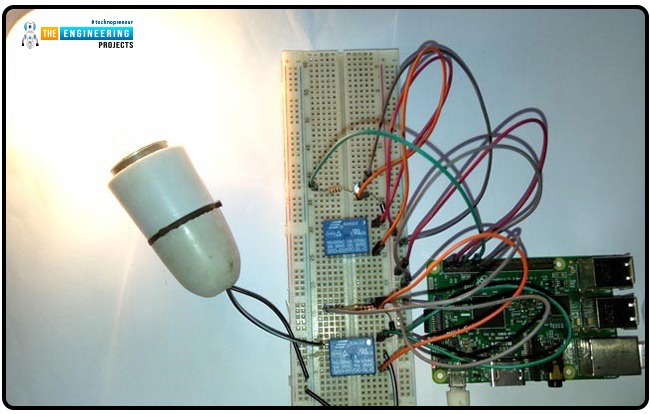
Whereas I could not procure relay modules, which in my experience, make electronics projects simpler for do-it-yourselfers. So, I'm going to draw some diagrams for regular, single-relay, 5V-powered standalone devices.
Join the components as seen in the fritzing diagram. It's important to remember that your Relay's COM, NO (usually open), and NC (typically Close) contacts could be on opposite sides. Please verify this with a millimetre.
Relays Underlying Operating Principles
Relays can be found anywhere that electricity is being switched, from a simple traffic light controller to a high-voltage switchyard. Relays, in the broadest sense, are equivalent to any other switch. They can connect or disconnect a circuit and are frequently employed to activate or deactivate an electrical load. However, this is a comprehensive statement; there are many other relays, and each Relay behaves slightly differently depending on the task at hand; as the electromechanical Relay is one of the most widely used relays, we will devote more space to discussing it here. In spite of variations in design, all relays work according to the same fundamental concept, so let's dive into the nuts and bolts of relays and talk about how they function.
So, what exactly is Relay?
A relay is called an electromechanical switch that may either establish or rupture an electrical connection. A relay is like a mechanical switch, except that it is activated and deactivated by an electronic signal rather than by physically flipping a switch. It comprises a flexible movable mechanical portion controlled electrically through an electromagnet. Once again, this Relay operating concept is suitable exclusively for electromechanical relays.
A common and widely used relay consists of electromagnets typically employed as a switch. However, there are many kinds of relays, each with its purpose. When a signal is received on one side of the device, it controls the switching activity on the other, much like the dictionary definition of Relay. That's right, a relay is an electromechanical switch that can open and close circuits. This device's primary function is to establish or sever contact with the aid of a signal to turn it ON or OFF automatically and without human intervention. Its primary use is to allow a low-power signal to exert control over a circuit with a high power consumption. Typically, the high-voltage circuit is controlled by a direct current (DC) signal.
How the Relay is Built and Functions
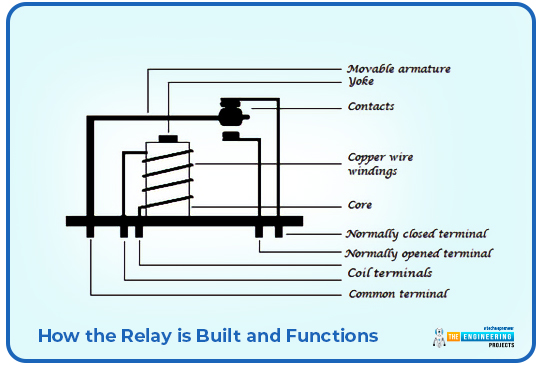
The following diagram depicts the internal structure and design of a Relay.
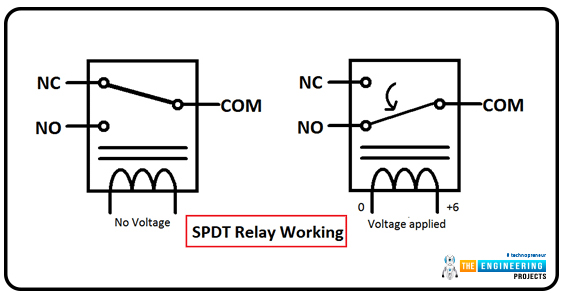
A coil of copper wire is wound around a core, which is then placed inside a housing. When the coil is electrified, it attracts the movable armature, which is supported by a spring or stand and has a metal contact attached to one end. This assembly is positioned over the core. In most cases, the movable armature is a shared connection point for the motor's internal components and the other wiring harness. The usually closed (NC) pin is linked to the common terminal, while the ordinarily opened (NO) pin is not used in operation. By connecting the armature to the usually open contact whenever the coil is activated, current can flow uninterruptedly through the armature. When the power is turned off, it returns to its starting position.
The picture below shows a schematic of the Relay's circuit in its most basic form.
Relay Teardown: An Inside Look
In the images below, you can see the main components of an electromechanical relay—an electromagnet, a flexible armature, contacts, a yoke, and a spring/frame/stand. They have been thoughtfully placed into a relay.
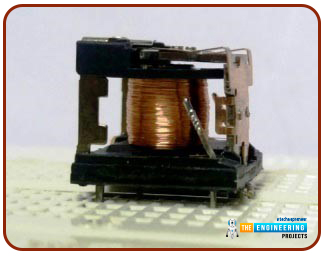
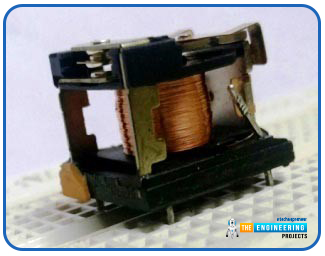
The workings of a Relay's mechanical components have been outlined below.
Electromagnet
An electromagnet is crucial to the operation of a relay. This metal lacks magnetic properties but can be transformed into a magnet when exposed to an electrical current. It is healthy knowledge that a conductor takes on the magnetic characteristics of the current flowing through it. Thus, a metal can operate as a magnet and attract magnetic objects within its range when wound with a conductive material and powered by an adequate power source.
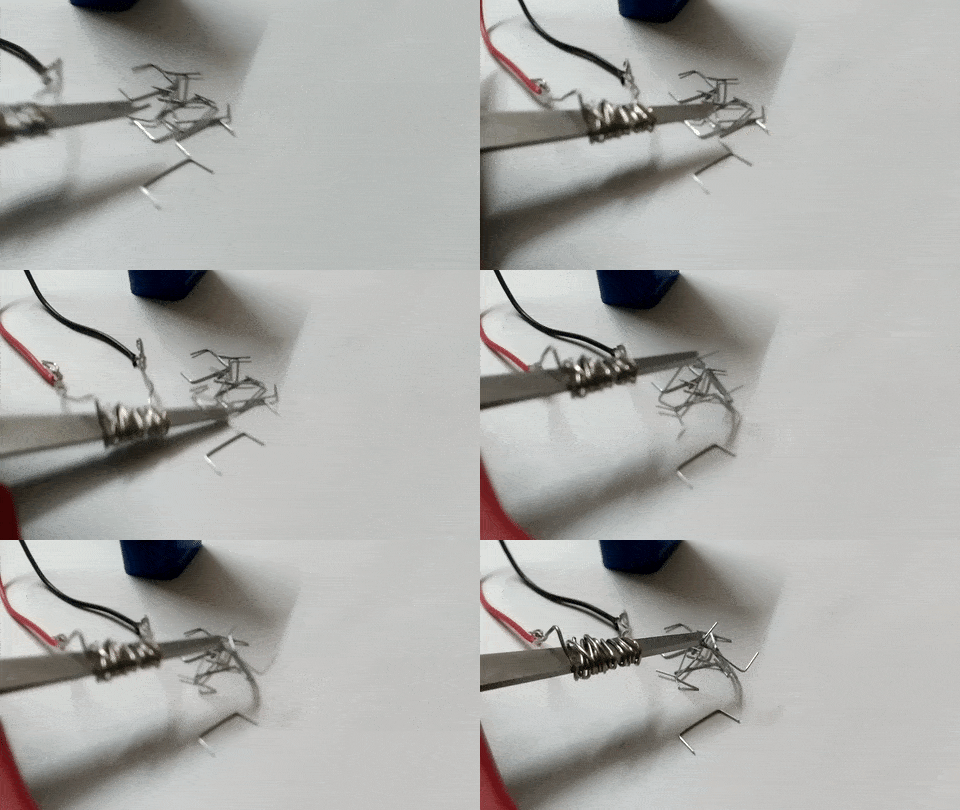
Movable Armature
A moveable armature is just one piece of metal that can rotate or stand on its own. It facilitates connection-making and -breaking with the contacts attached to it.
Contacts
Internal conductors are the wires that run through a device and hook up to its terminals.
Yoke
It's a tiny metal piece attached to a core that attracts and retains the armature whenever the coil is activated.
Spring (optional)
While some relays can function without a spring, those that do have one attach it to the armature at one end to prevent any snagging or binding. One can use a metal "stand" in place of a spring.
Mechanism of Action of a Relay
Let's examine the differences between a relay's normally closed and normally open states.
Relay's NORMALLY CLOSED state
If no current flows through the core, there will be no magnetic field, and the device will not be a magnet. As a result, it is unable to draw in the flexible framework. So, the ordinarily closed position of the armature is the starting point (NC).
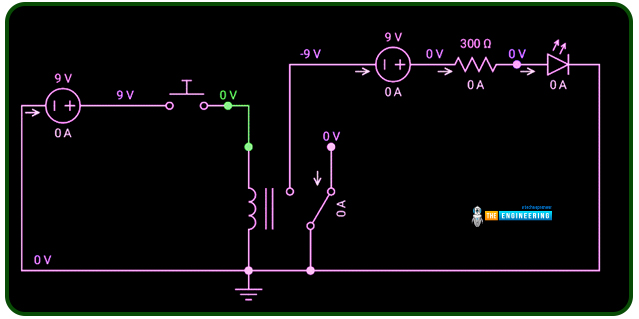
Relay in NORMALLY OPENED state
When a high enough voltage is supplied to the core, it begins to have a strong magnetic field around itself, allowing it to function as a magnet. The magnetic field produced by the core attracts the movable armature whenever it comes within its field of influence, changing the armature's location. As it has been wired to a normally open relay pin, any external circuits attached to it will no longer operate in the same way.
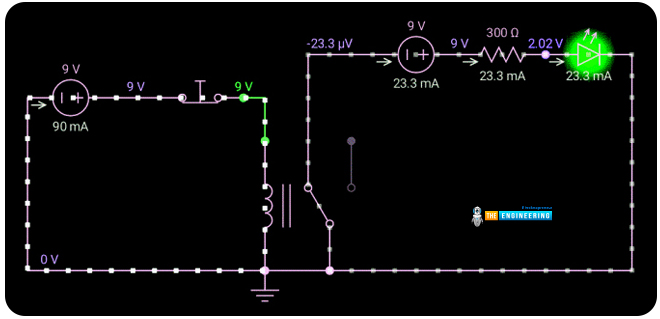
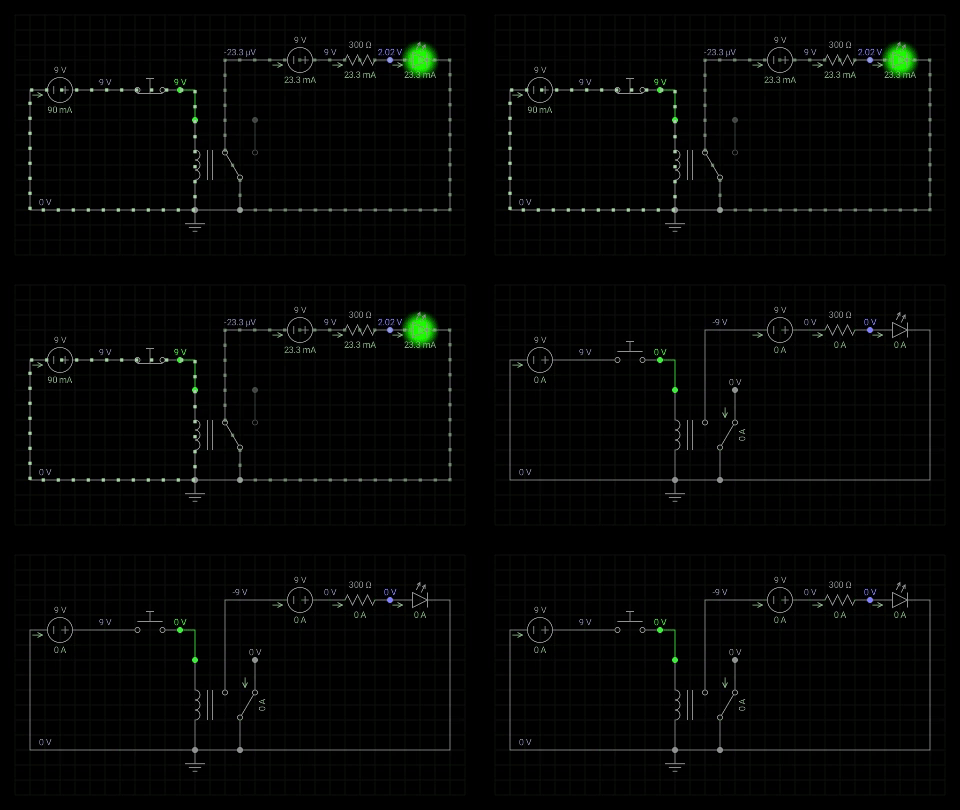
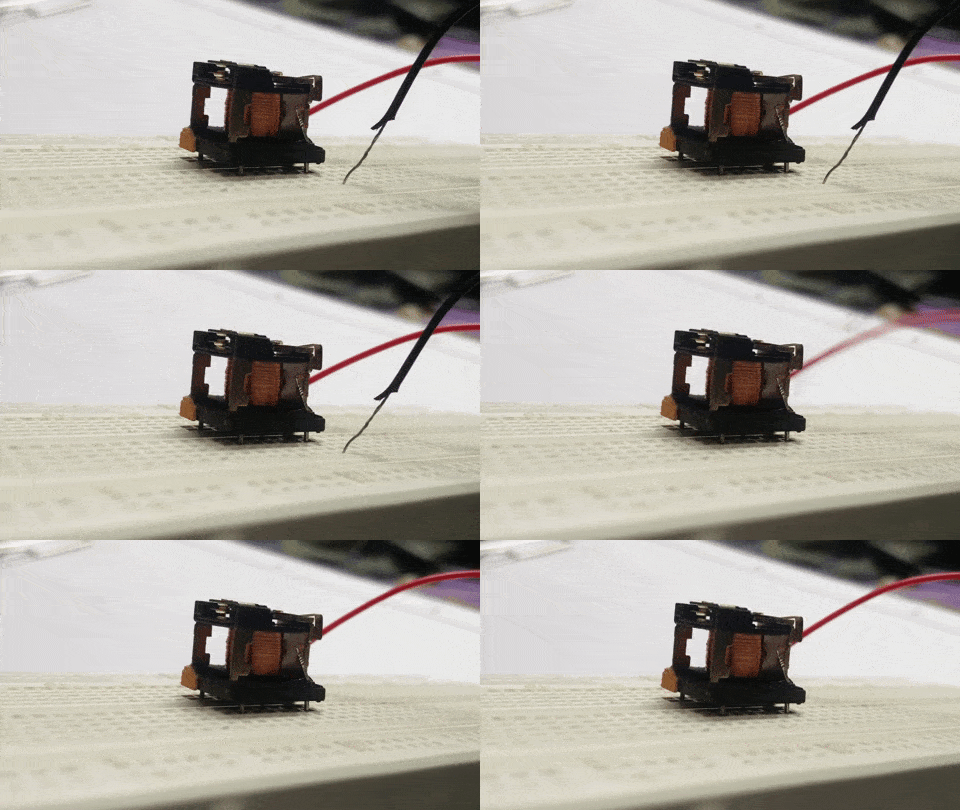
It is important to connect the relay pins correctly so that the external circuit can do its job. When a coil is powered, the armature is drawn toward it, revealing the switching action; when the power is cut, the coil loses its magnetic property, and the armature returns to its original location. The animation provided below shows the Relay in action.
Transistor functions in the circuit
There is nothing complicated about a transistor, yet there is a lot going on inside it. Okay, so first, we'll tackle the easy stuff. An electronic transistor is a small component that can switch between two functions. It's a switch that can also act as an amplifier.
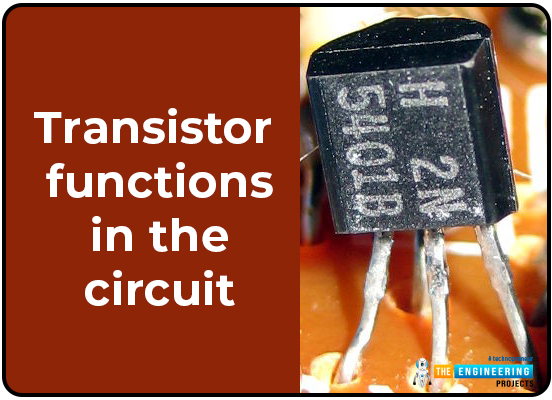
An amplifier is a device that takes in a little electric current and outputs a significantly larger electric current (called an output current). It can be thought of as a current booster. One of the earliest applications for transistors, this is particularly helpful in devices like hearing aids. A hearing aid contains a microscopic microphone that converts ambient sound into electrical signals. These are then amplified by a transistor and used to power a miniature loudspeaker, which reproduces the ambient noise at a much higher volume.
It is possible to use a transistor as a switch. A transistor is a device that allows for the passage of one electrical current to induce a much larger current to flow through the next part of the device. What this means is that a relatively small current can activate a much larger one. All computer chips function in this general way. As an illustration, a memory chip may have as many as a billion individually controllable transistors. Due to the fact that each transistor can exist in either of two states, it is capable of storing either a zero or a one. A chip's ability to hold billions of zeroes and ones, as well as almost as many regular numbers and letters, is made possible by its billions of transistors.
Diode functions in the circuit
Diodes can range in size from what's shown in the image up top. They feature a cylindrical body that is usually black with a stripe at one end and certain leads that protrude so that we may plug it into a circuit. The opposite terminal is called the cathode and is opposite the anode.
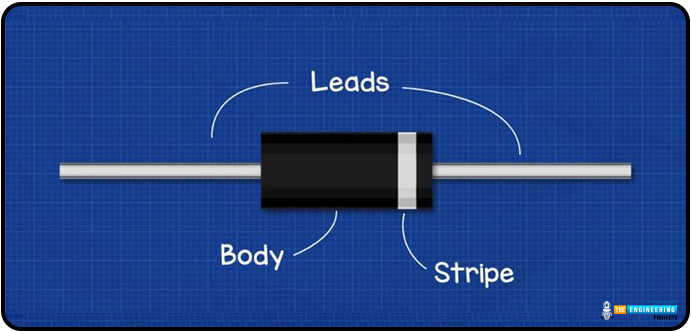
A diode is an electrical component that restricts current flow in one direction.
To illustrate, picture a swing valve fitted in a water line. The water pressure inside the pipe will force open the swing gate, allowing the water to flow uninterrupted. In contrast, the gate will be forced shut, and water flow will stop if the river alters its course. As a result, there is only one direction for water to flow.
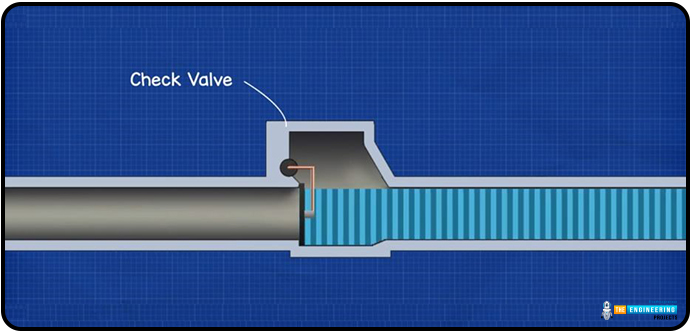
Very much like a diode, which we also employ to alter the current flow through a circuit, it allows us to switch it on and off at will.
We have now animated this process using electron flow, in which electrons move from negative to positive. However, traditional flow, positive to negative, is the norm in electronics engineering. It's usually best to start with the conventional current because it's more familiar to most people, but feel free to use either one; we'll assume you're aware of the difference.
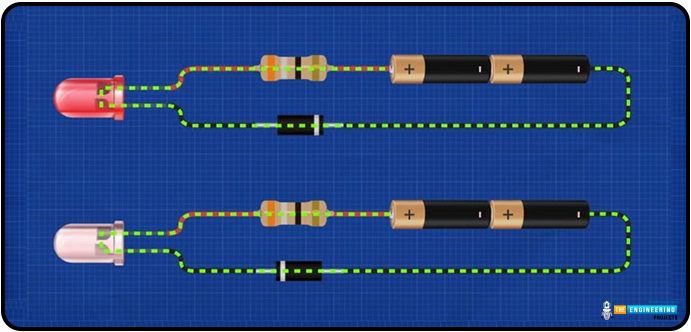
It's important to remember that the light-emitted diode will only light up properly if the diode is connected to the circuit in the correct orientation when adding it to a simple Light emitted diode circuit like the one shown above. Only one direction of current can travel through it. Accordingly, its conductive or insulating properties are determined by the orientation in which it is mounted.
So that it can conduct electricity, you must join the black end to the neutral and the striped end to the positive. The forward bias is the condition in which current can flow. If we invert the diode, it will become an insulator and stop the passage of electricity. The term for this is "the reverse bias."
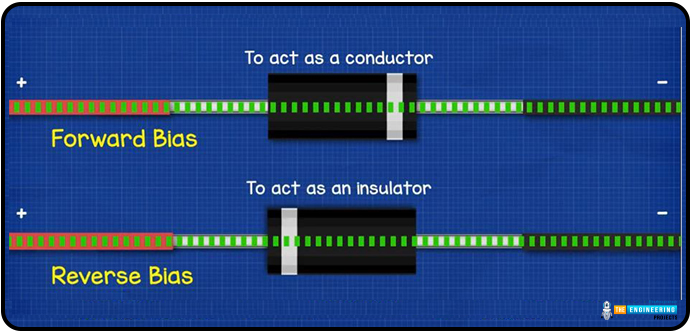
Exactly how would a diode function?
You probably know that electricity is the transfer of electrons between atoms that are not bound. Because of its high number of unpaired electrons, copper is widely used for electrical wiring. Since rubber is an insulator—its electrons are kept very securely, so they cannot flow between atoms—it is used to wrap around the copper wires for our protection.
In a simplified form of a metal conducting atom, the nucleus is at the center, and the electrons are housed in a series of shells around it. It takes a specific amount of energy for an electron to be absorbed into each shell, and each shell has a max number of electrons it can hold. Those electrons that are furthest from the nucleus are the most energetic. Conductors have between one and three electrons in their outermost "valence" shell.

The nucleus acts as a magnet, keeping the electrons in place. However, there is yet another layer, the conduction band. If an electron gets here, it can leave its atom and travel to another. Because the valence shell and conduction band of a metal atom overlap, the electron can move quickly and easily between the two.
The insulator has a tightly packed outer layer. No free space for electrons to occupy. Because of the strong attraction between the nucleus and the electrons and the great distance between the nucleus and the conduction band, the electrons are trapped inside the nucleus and cannot leave. Because of this, electricity is unable to travel through it.
Of course, a semiconductor is also a different type of material. A semiconductor might be silicon, for instance. This material behaves as an insulator because it has one more electron than is necessary in its outermost shell to be a conductor. However, with enough external energy, a few valence electrons can generate enough momentum to hop across to the conduction band, where they can finally break free. Consequently, this substance can perform the roles of both an insulator and a conductor.
Due to the lack of free electrons in pure silicon, engineers must add a small number of materials (called "doping") to the silicon to alter its electrical properties.

This process gives rise to P-type and N-type doping, respectively. The diode itself is a combination of these doped materials.
Two leads connect the anode and cathode to various thin plates inside the diode. P-Type doped silicon is on the anode side of these plates, and the cathode side is N-Type doped silicon—an insulating and protective resin that coats the entire structure.
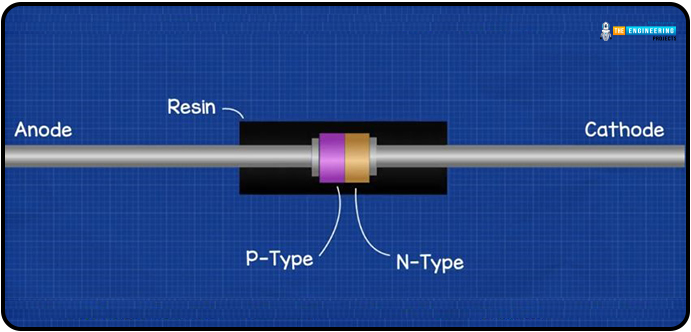
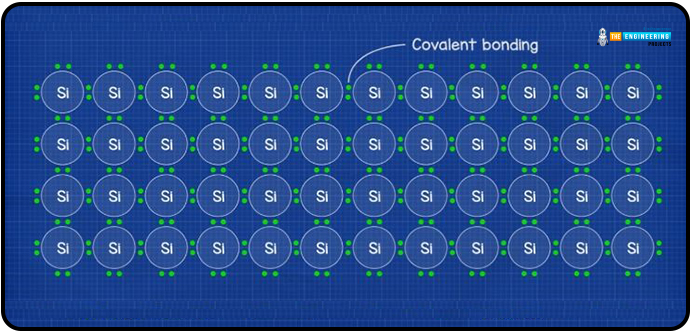
Consider the material to be pure silicon before it has been doped. There are four silicon atoms surrounding each one. Because silicon atoms need eight electrons to fill their valence shells but only have four available, they share one with their neighbours. Covalent bonding describes this type of interaction.
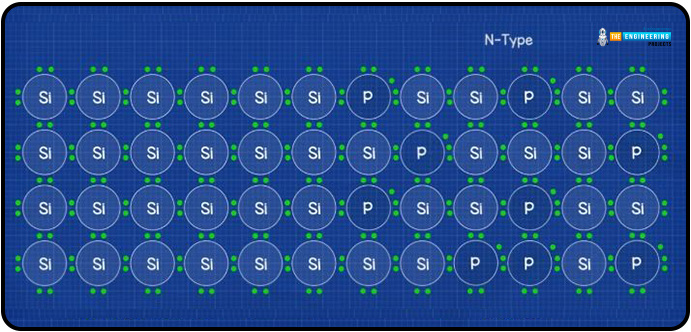
Phosphorus, an N-type element, can be substituted for a number of silicon atoms in a compound semiconductor. Phosphorus has a 5-electron valence shell because of this. This extra electron isn't needed because particles are sharing them to reach the magic number of 8. This means there's an extra electrons in the material, and it's free to go wherever it wants.
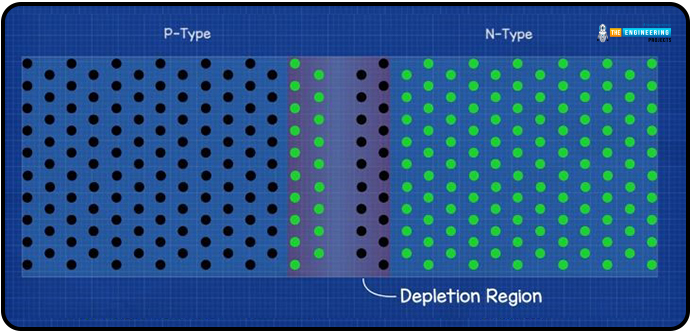
In P-type doping, a substance like aluminum is introduced. Due to its limited valence electron pool of 3, this atom is unable to share an electron with any of its four neighbours. An electron-sized void is therefore made available.
We now have silicon with either too many or too few electrons, depending on the doping method.
Upon joining, the two substances forge a p-n junction. This is a depletion region, and it forms at the intersection. Here, some of the surplus electrons on the N-type side migrate over to fill the vacancies on the P-type side. By moving in this direction, electrons and holes will accumulate on either side of a barrier. Holes are thought to be positively charged since they are the opposite of electrons, which are negatively charged. The resulting accumulation produces two distinct regions, one slightly negatively charged and the other slightly positively charged. This forms an electric field that blocks the path of any more electrons. In regular diodes, the voltage drop over this area is only 0.7V.
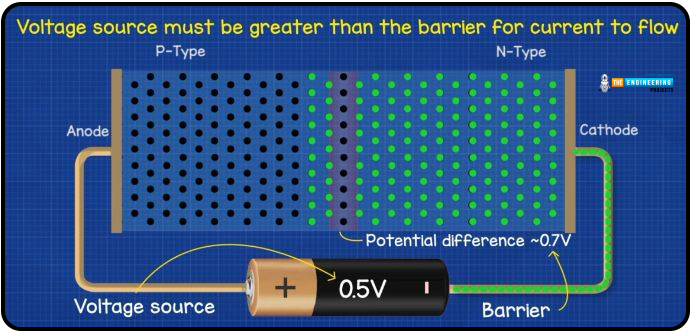
By applying a voltage across the diode with the P-Type anode linked to the positive and the N-Type cathode attached to the negative, a forward bias is established, and current can flow. The electrons can't get over the 0.7V barrier unless the voltage source is higher.
We can achieve this by connecting the positive terminal of the power supply to the cathode of an N-type device and the negative terminal to the anode of a P-type device. The diode functions as a conductor to block current because the barrier expands as holes are drawn toward the negative and electrons are drawn toward the positive.
Resistor functions in the circuit
A resistor is a two-terminal, non-active electrical component that reduces the amount of current in electric and electronic circuits. A certain amount can lower the current by strategically placing a resistor in a circuit. From the outside, most resistors will appear identical. But if you crack it open, you'll find a ceramic rod used for insulation within, with copper wire covering the rest of the structure. Those copper twists are crucial to the resistance. When copper is sliced thinner, resistance rises because electrons have more difficulty penetrating the material. We now know that electrons can move more freely through some conductors than insulators.
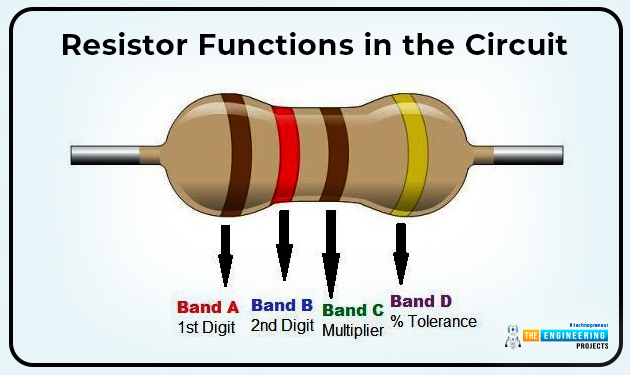
George Ohm investigated the correlation between resistor size and material thickness. His proof showed that an object's resistance (R) grows in proportion to its length. Because of this, the resistance offered by the lengthier and thin wires is greater. However, wire thickness has a negative effect on resistance.
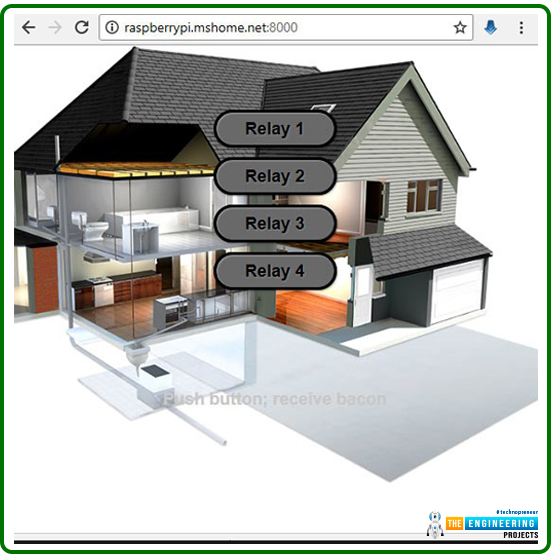
Once everything is hooked up, you can start your server by browsing to the IP address of your RPi and entering the port you chose earlier (as mentioned in the previous section), entering your password and username and seeing a page that looks like the one below.
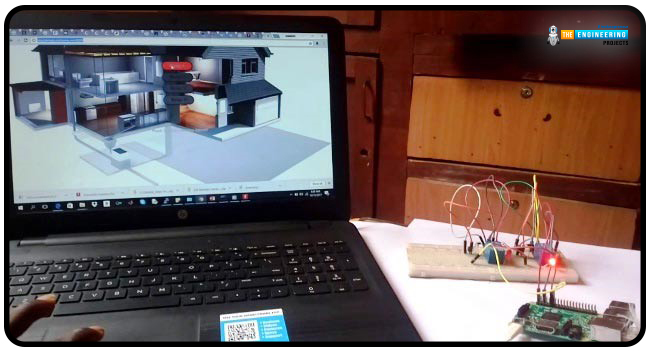
All it takes is a few clicks of your mouse to operate four AC home appliances from afar. This can be controlled from a mobile device (phone, tablet, etc.) and expanded with additional switches and relays. Thank you all for reading to the end.
Conclusion
This guide showed us how to set up a web-based control system for our home automation system based on the Raspberry Pi 4. We have learned how to utilize the WebIOPi API to manage, debug, and use raspberry Pi's GPIO, sensors, and adapters from an internet browser or any application. We have also implemented JavaScript, CSS, and HTML code for the web application. For those who thrive on difficulty, feel free to build upon this base and add whatever demanding module you can think of to the project. The following tutorial will teach you how to use a Raspberry Pi 4 to create a Line Follower robot that can navigate obstacles and drive itself.


 Raspberry Pi
 syedzainnasir
 0 Comments


 2.3k
2.3k
 953
953
 921
921
 2.1K
2.1K

