Greetings, and welcome to today's tutorial. In the last tutorial, we learned how to construct a system for tallying individuals using Raspberry Pi, astute subtraction, and blob tracking. We demonstrated the total number of building entrances and exits. Feature computation and HOG theory were also discussed. The tests proved that a device based on the raspberry pi could effectively function as a people counting station. One of the many benefits of the Pi 4 is its internet connectivity, which is especially useful for home automation projects due to its low price and ease of use. We're going to see if we can use a web page's buttons to manage our air conditioner today. With this Internet of Things (IoT) based home automation, you can command your home gadgets from the comfort of your couch. T ...
Welcome to the next tutorial of our Raspberry Pi programming course. Our previous tutorial taught us to how to tweet from Raspberry pi. We also discussed some methods used by the tweepy library to perform some API calls in our project. We will learn how to print from a Raspberry pi in this lesson.
Let us get started
There are several benefits of having a print server. Print servers may link numerous computers to one or multiple printers, either physically or wirelessly, allowing you to access the printer with various devices and send print instructions from all the other connected computers.
It is not easy to print from an Android smartphone to a cabled printer; however, a printer server makes it simple. A print server is useful in small workpl ...
Hello readers, I hope you all are doing great. In our previous tutorials on raspberry pi Pico, we discussed the basic features, architecture, download and installation of development environments for raspberry Pi Pico programming. In this tutorial, we will learn how to access and control Raspberry Pi Pico and its GPIO pins to implement LED blinking using MicroPython.
Introduction
Raspberry Pi development boards are quite popular and frequently used among students and hobbyists. But the drawback of Raspberry Pi is their cost i.e., around $35-$45. So when cost of the development board is of prime importance the users prefer to use ESP8266, ESP32, Arduino, PIC etc. over Raspberry Pi. To overcome this drawback, Raspberry Pi foundations designed a new board i.e., Raspberry Pi Pico which is a ...
Hello friends, I hope you all are doing great. In today's tutorial, we are gonna have a look at LED Blinking using Raspberry Pi 3. It's our first embedded project on Pi 3 and its quite simple. In our previous tutorials on Raspberry Pi 3, we have seen How to install Rasbian on SD Card for Pi 3 and then we have also setup HDMI LCD with Pi 3. So, now our raspberry Pi 3 is ready to program.
In today's tutorial, we will interface a single LED with digital Pin of Raspberry Pi and then we will design a simple code in Python which will turn this LE ON and OFF. It will be quite simple and I will guide you step by step, but if you got into any trouble then ask in comments and I will help you out. So, let's get starteed with LEd Blinking using Raspberry Pi 3 ...
Thank you for being here for today's tutorial of our in-depth Raspberry Pi programming tutorial. The previous tutorial demonstrated the proper wiring of the photoresistor sensor to the GPIO pins. Finally, we learned how it might be included in a Python script for data collection and analysis needs. We also looked at the functions of each component in the circuit. However, I'll walk you through installing a Pi 4 Print Server in this guide. While installing the program is straightforward, setting it up so that a Windows network can locate the print server requires a little more effort. Rather than spending hundreds of dollars upgrading to a laser printer, you may easily upgrade your current USB printer to laser quality by installing a print server.
Because of this software, you no longer ha ...
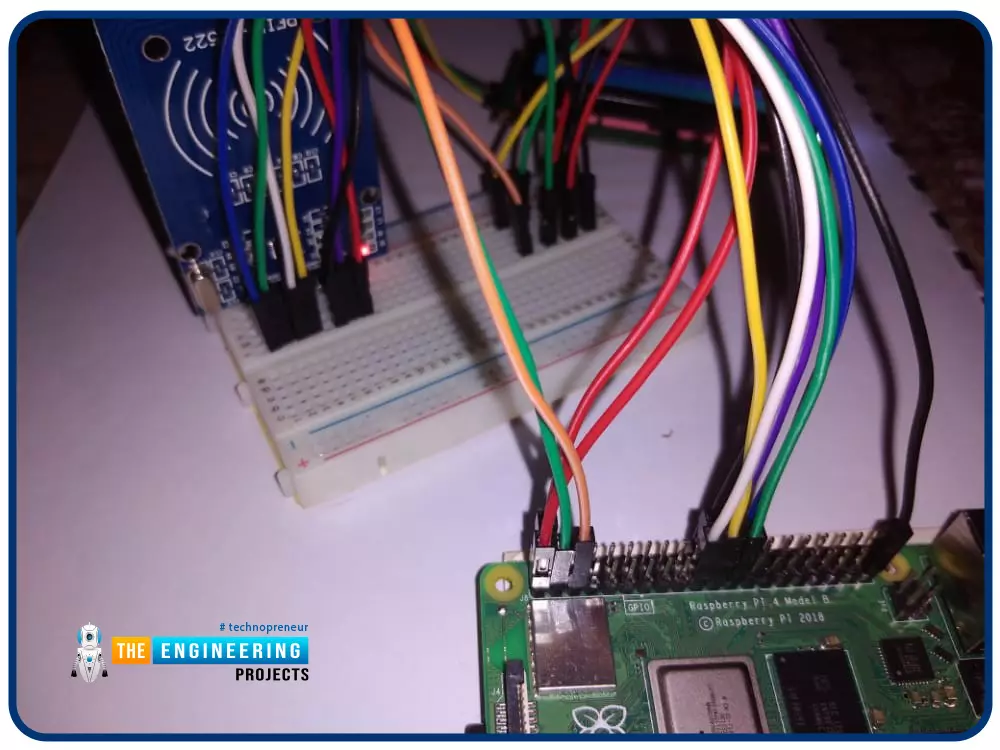
Greetings! This is the complete project of our Raspberry Pi 4 tutorials. In our previous tutorial, we learned to set up our raspberry pi as a virtual private network server. In this tutorial, we will design a smart attendance system using an RFID card reader, which we will use to sign in students in attendance in a class.
First, we will design a database for our website, then we will design the RFID circuit for scanning the student cards and displaying present students on the webpage, and finally, we will design the website that we will use to display the attendees of a class.
Components
RFID card kit
Breadboard
Jumper wires
Raspberry pi 4
I2C LCD screen
Design a database in MySQL server
Additionally, the Database server offers a DBMS ...
Thank you for joining us for yet another session of this series on Raspberry Pi programming. In the preceding tutorial, we created a pi-hole ad blocker for our home network using raspberry pi 4. We also learned how to install pi-hole on raspberry pi four and how to access it in any way with other devices. This tutorial will implement a speech recognition system using raspberry pi and use it in our project. First, we will learn the fundamentals of speech recognition, and then we will build a game that uses the user's voice to play it and discover how it all works with a speech recognition package.
Here, you'll learn:
The basics of voice recognition
On PyPI, what packages may be found?
Utilize the SpeechRecognition package with a wide range ...
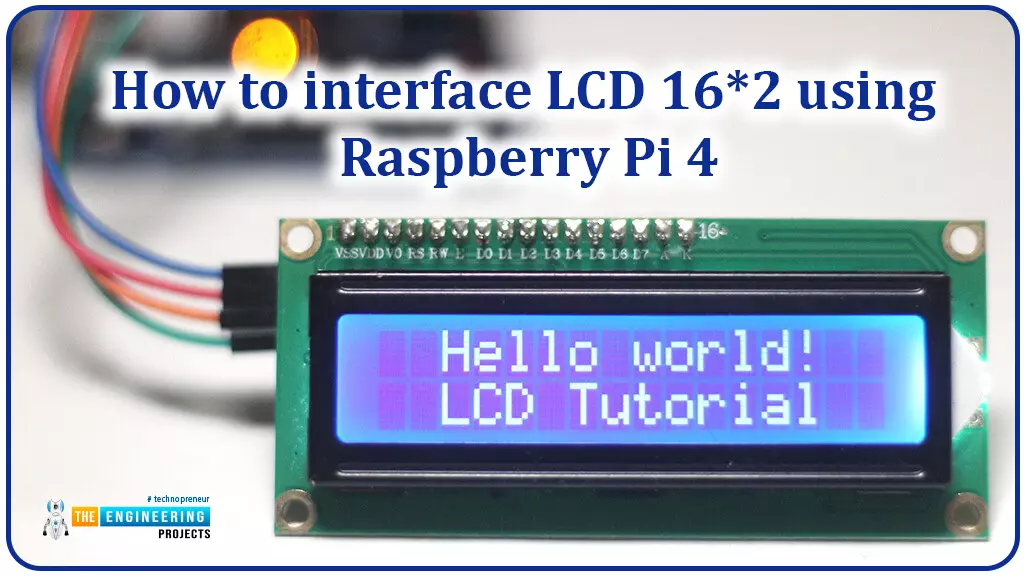
Hello friends, I hope you all are doing great. Today, I am going to share the 6th lecture in the Raspberry Pi 4 Programming series. We're glad you could join us for another lesson in our comprehensive Raspberry Pi programming guide. In today's guide, I'll show you how to interface a 16x2 LCD screen with Raspberry Pi 4.
So, let's get started:Interface LCD 16x2 with Raspberry Pi 4Today, we are going to interface a 16x2 LCD screen with Raspberry Pi 4. At first, we will print the "Hello World" text on the LCD, and in the last section, we will implement the scrolling and blinking of text on the LCD.Here's the video tutorial on LCD interfacing with Raspberry Pi 4:Components RequiredWe will need the following components for today's project:Raspberry Pi 4.M ...
Welcome to the next tutorial of our Raspberry Pi programming course. Our previous tutorial taught us to make a button-controlled "music box" that plays different sounds depending on which buttons are pressed. In this lesson, we will configure our raspberry pi for voice control.
What will you learn?
Like the Amazon Echo, voice-activated gadgets are becoming increasingly popular, but you can also construct your own with a Raspberry, a cheap USB mic, and some appropriate software. Simply speaking to your Raspberry Pi will allow you to search YouTube, view websites, activate applications, and even answer inquiries.
What will you need?
Because the Raspberry Pi lacks a soundcard or audio port, this project requires a USB microphone or a camera with a ...
to our new beginner’s course on Raspberry Pi. This course is appropriate for anyone using either a traditional Raspberry Pi board or the new Raspberry Pi 400 board that includes an integrated keyboard and display. Learning how to code, building robots, and doing plenty of other strange and exciting things are all possible with this low-cost computer setup. The Raspberry Pi can do everything a computer can do, from surfing the web to viewing movies and music, and playing video games.
Raspberry Pi is much more than a modern computer. It`s created to educate young people on how to program in languages such as Scratch and Python, and it comes with all of the major programming languages pre-installed. The world is in desperate need of programmers now ...