Update: We have created a new version of this library, which you can check here: Sound Detector Library for Proteus V2.0.
Hello friends, I hope you all are doing great. In today's tutorial, I am going to share a new Sound Sensor Library for Proteus. We are presenting this library for the first time and I would give the credit to our team, without their support it won't be possible. Proteus doesn't have this module in its library and it is used in a lot of Engineering Projects these days.
This sound sensor is used to detect the sound in the surroundings and is normally known as the Sound Detector sensor. It won't recognize the sound. As we can't produce the sound in Proteus, that's why we have placed a TestPin. When this TestPin is HIGH, that m ...
Hello everyone! I hope you all will be absolutely fine and having fun. Today, I am going to give you an elaboration about Introduction to Pixy Camera. It is basically is an electronic device or sensor having fast vision. It is also known as fast vision sensor most of the time. Using this device we can teach to find objects in a very less time duration. It is an image sensor having a very powerful processor. Pixy is easy to interface with the micro-controllers e.g. Arduino. We can make different programs only to send the desired data from the device to micro-controller. In this way micro-controller can not overwhelm.
Pixy camera is able to communicate with the micro-controller in several different ways e.g. serial communication, I2C protocol, dig ...
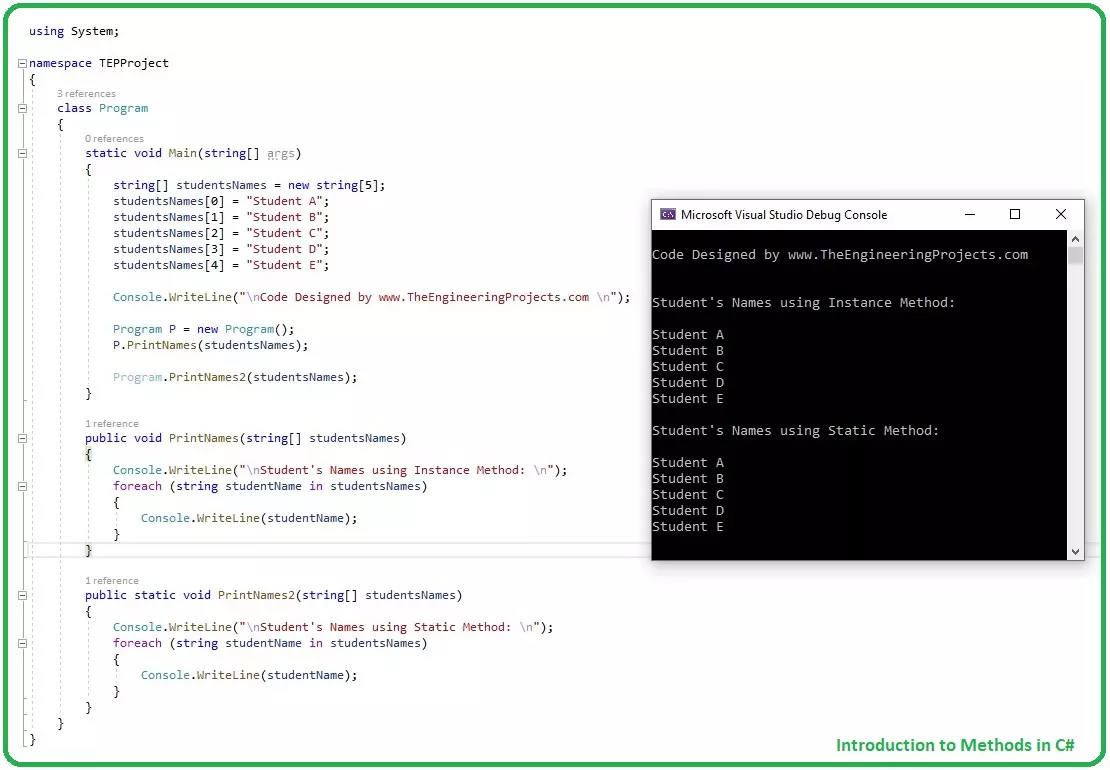
Hello friends, I hope you all are doing great. In today tutorial, I am going to give you a detailed Introduction to Methods in C#. It's our 12th tutorial in C# series. So far, we have covered all the basic concepts in C# and now it's time to move forward and have a look at some complex concepts.
Methods have an important role in C# programming and if you want to be an efficient programmer then you must set your method controls correctly. Some methods have secret codes in them, which you don't want to give access to your developers, then you can set it private. We will cover such things in detail later, let's first have a look at Introduction to Methods in C#:
Introduction to Methods in C#
Methods in C#, also called Functions, are extremely usef ...
Hello friends, I hope you all are doing great. In today's tutorial, I am going to explain How to Create PWM in Raspberry Pi 3. In our previous tutorial, we have seen How to Create GUI in Raspberry Pi 3, & we have also controlled an LED from the GUI Buttons. So, I am gonna take that project and will add PWM code in it.
So, I would recommend you to first have a look at LED Blinking with Raspberry Pi 3 in which we have designed this simple project and then check How to Create GUI in Raspberry Pi 3, where we have controlled that LED digitally with GUI. But today, we are gonna control the intensity of this LED by creating a PWM Pulse in Raspberry Pi 3. Along with that, we are also gonna have a look at How to use Scale in Raspberry Pi 3. I will add ...
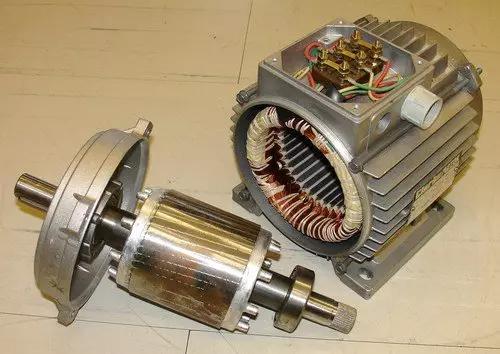
Hi fellows! Hoping everyone is fine and doing great. Today, I am going to give you an Introduction to Induction Motors, the term which is very common and familiar but still many of us do not know it’s working and difference from other motors. Induction Motor is an AC electric motor, having a stator and a rotor just like other motors, but the working principle is a little different which would be discussed further. There are two types of Induction Motors, one is named as Single Phase Induction Motor, while the second one is named as 3 Phase Induction Motor.
An Induction motor is also called asynchronous motor, because the speed of rotation of its rotor is less than stator. In other words, it does not run at its synchronous speed. Before going into ...
Hello guys, in the last post I have explained the Basics of Inverters along with its types and also the inverters topology in other words working of inverters, then we discussed the Major Components of Inverters. Now in this post I am gonna explain the pure sine wave inverter and how to create it. I have used AVR microcontroller int his project. The reason I am using random microcontrollers is that so you guys get a taste of each one. Before starting on sine wave inverter read this article again and again as I have also mentioned the problem i got while making it. You should also read the Modified Sine Wave Design with Code.
I have divided this tutorial into four parts which are shown below. This is a step by step guide to design and build an in ...
The eCommerce industry, which has already experienced year-over-growth for the past five years, gained a monumental boost after the pandemic made online shopping mainstream. Today, there are more than 20 million eCommerce businesses operating worldwide, and new companies open shops every day.
The majority of these companies need skilled developers and engineers to build safe and robust eCommerce sites to house their businesses. If you are interested in specializing in eCommerce development, you would be remiss to ignore the advantages and disadvantages of each payment gateway option.
Payment gateways allow online customers to purchase products seamlessly and securely. However, they are not all created equal. As an engineer or site developer, you s ...
Hello friends, I hope you all are doing great. Today, I am going to share Circuit Designing of LCD with Arduino in Proteus ISIS. In my previous tutorial, I have posted a tutorial on How to use Arduino Library in Proteus. Using that library, we can easily test Arduino code in Proteus to check whether its working or not. If you haven't read that post then before starting it, first read it, as without adding the arduino library we can't use Arduino in Proteus.
Coming to today's post, as we have done adding the Arduino Library in Proteus, so I thought to do some projects on it and the first one I chose is quite simple one i.e. Circuit Designing of LCD with Arduino in Proteus ISIS. So we will have a look on how to show some characters on LCD using Ardu ...
Hello friends, I hope you all are fine and enjoying life. Today i am going to share a new project tutorial which is How to create a GUI in MATLAB ? First of all, lets have a little introduction that what is meant by GUI? How it is created and what are the uses and applications of GUI? GUI stands for Graphical User Interface. We all know the basics of MATLAB that it is used for creating complex algorithms and to create Simulink simulation, but we don't know that it aalso has another feature which is to create GUIs. The algorithms developed in MATLAB works on the background and do their tasks while MATLAB also emphasis on the user interaction that's why it has also provided us with GUI so that we can create a user friendly front end interface for ou ...
Introduction
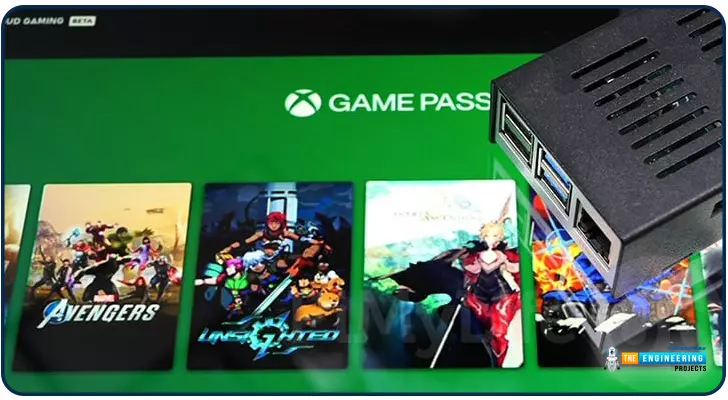
Greetings, and welcome to the next section of our Raspberry Pi 4 tutorials. In the last section, we discovered how to set up and run our self-host bitwarden on our Raspberry Pi. We learned how to set up admin panels and perform a wide range of actions, such as limiting the creation of new accounts and users for security purposes. However, in this guide, we will discover how to configure a PS3 or PS4 joystick with our raspberry pi and set up and run Xbox cloud gaming on our Pi 4.
Components
Raspberry pi 4
SD card
Power supply
Ethernet cable or wifi
Xbox controller
Xbox game pass ultimate subscription
USB keyboard
USB mouse
HDMI cable
Through a service called Xbox Cloud Gaming, users may play a wide variety of games witho ...