Hello everyone! I hope you all will be absolutely and having fun. Today, I am going to give a detailed discussion on Introduction to LM117. Lm 117 is basically a voltage regulator. It is most commonly known as positive (+ve) voltage regulator used to regulate the voltage up to the desired positive level. Lm-117 can regulate the voltage ranging from 12.5V to 37V and provides the current around 1.5A. LM 117 has three (3) pins and is quite easy to use.
To obtain the desired output voltage we need to connect the two external resistors. There are three types of regulations in LM-117 i.e. line regulation, fixed regulation and load regulation. The line regulation & load regulation both are far better than fixed regulation. LM 117 provides overload ...
The majority of schools around the world rely on the traditional methods of teaching and learning. Students have to attend lectures in the classrooms, read paper textbooks and memorize lots of irrelevant facts and figures from them to prepare for different tests, they do handwriting assignments and complete different types of essays such as a five-paragraph essay or compare and contrast essay on Picasso painting. All these methods are boring, inefficient and outdated. But there are schools that use innovative teaching methods, strategies, and learning techniques and where the learning process is really fun.
The innovation in education can be presented in different ways, for example, integrating new teaching methods, cutting-edge technologies, rejec ...
The technology of manufacturing color-coated (or pre-painted) steel was patented by the UK-based company British Steel in the late 60s. Since then, galvanized steel with color coating has been used in the construction industry as a material with an optimal cost/durability ratio. In addition to the decorative function, color coating provides additional protection for galvanized steel from the influence of adverse environmental factors.
What is color coating?
Color coating is a film that consists of zinc, aluminum, or various alloys with a thickness range of 30-250 micrometers. This film protects steel materials from damage and corrosion, greatly improving their properties. The maximum adhesion of high-molecular compounds to the surface of a steel ro ...
Hello friends, hope you all are fine and having fun with your lives. In today's post, I am gonna design a Convolution Calculator in MATLAB. We all know about convolution but if you don't know then here's the wiki page for convolution which has a detailed description of Convolution. In simple words, convolution is a mathematical operation, which applies on two values say f and g and gives a third value as an output say v. In convolution, we do point to point multiplication of input functions and gets our output function.
Convolution is an important technique and is used in many simulating projects. It has a vital importance in image processing. So, today we are gonna do convolution in MATLAB and will check the output. You should also check Image Zo ...
Hello friends, I hope you all are fine and enjoying yourself. Today I am going to share a new project titled Interfacing of temperature sensor LM35 with Arduino UNO in Proteus ISIS. So far, I have only worked on temperature sensor DS18B20 for temperature measurements and I have also uploaded a tutorial on Interfacing of Temperature Sensor 18B20 with Arduino.
Recently I got a chance to work on a project regarding temperature sensing but the condition of this project was that to use only LM35 for temperature detection. Then, I get to know much about LM35, its operating conditions and features. So I thought I should also upload its tutorial as it will also be advantageous for engineering students. Because learning new things is always a charm.
An exc ...
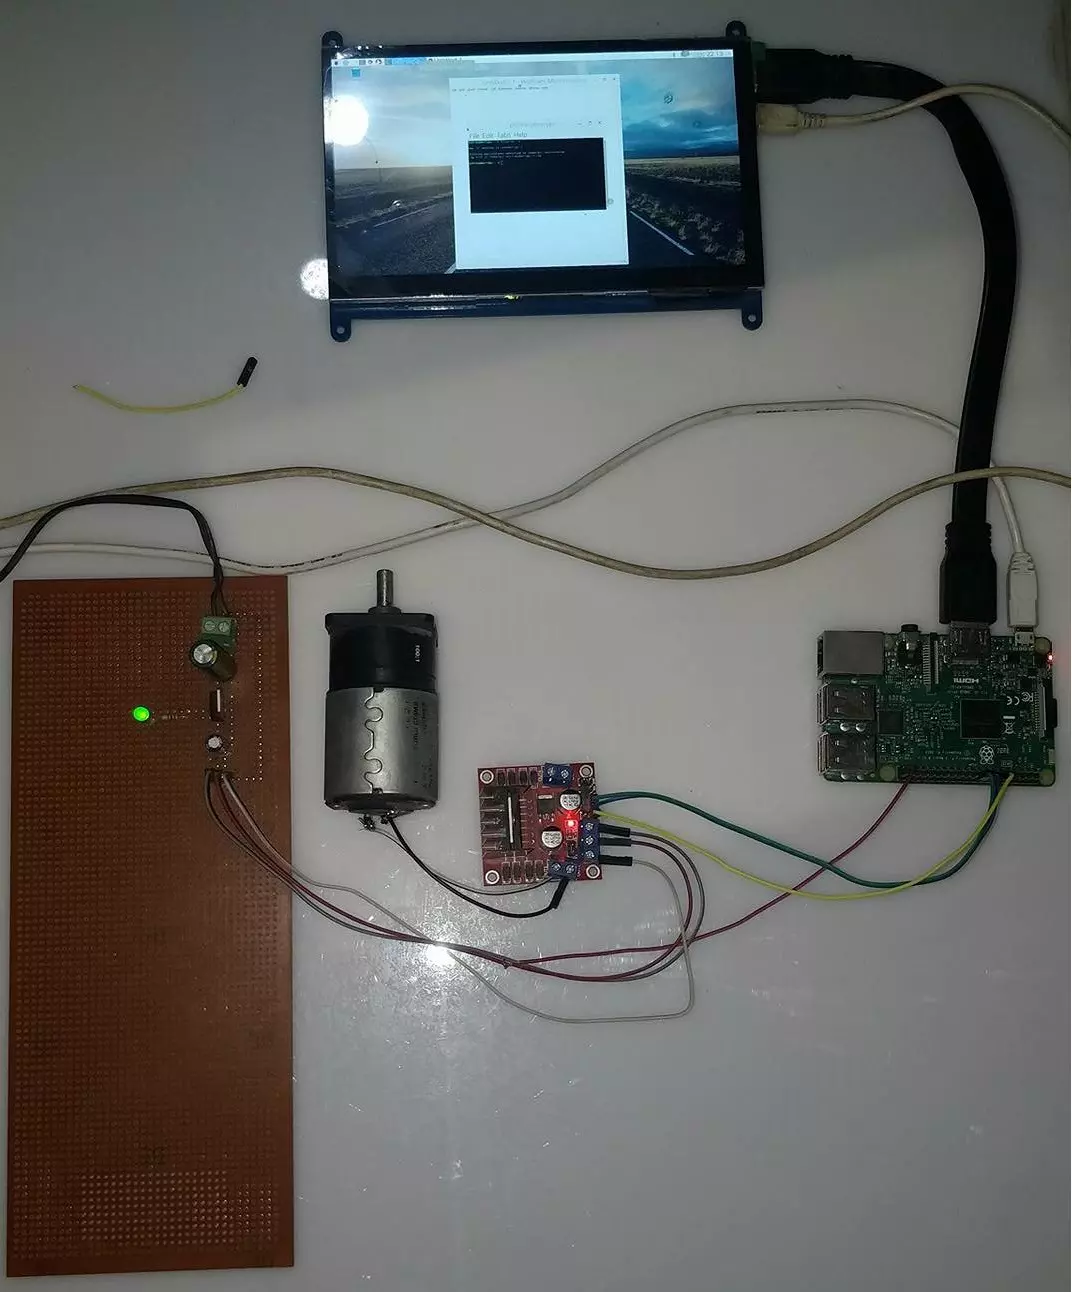
Hello friends, I hope you all are doing great. In today's tutorial, I am going to show you How to Control DC Motor with Raspberry Pi 3. We will control both the speed and direction of DC Motor. I hope you have read the previous tutorial on How to Create a GUI in Raspberry Pi 3 as we are gonna create a small GUI in this tutorial as well and then we are gonna control our DC Motor with Buttons on GUI.
In order to control the DC Motor, we have to use some drivers in between our Microcontroller and DC Motor. This driver's functionality is to control a 12V DC Motor with a 5V signal from a microcontroller. In today's tutorial, we are gonna use L298 Motor Driver. So, let's get started with How to Control DC Motor with Raspberry Pi 3:
How to Control DC Mot ...
Buy This Project
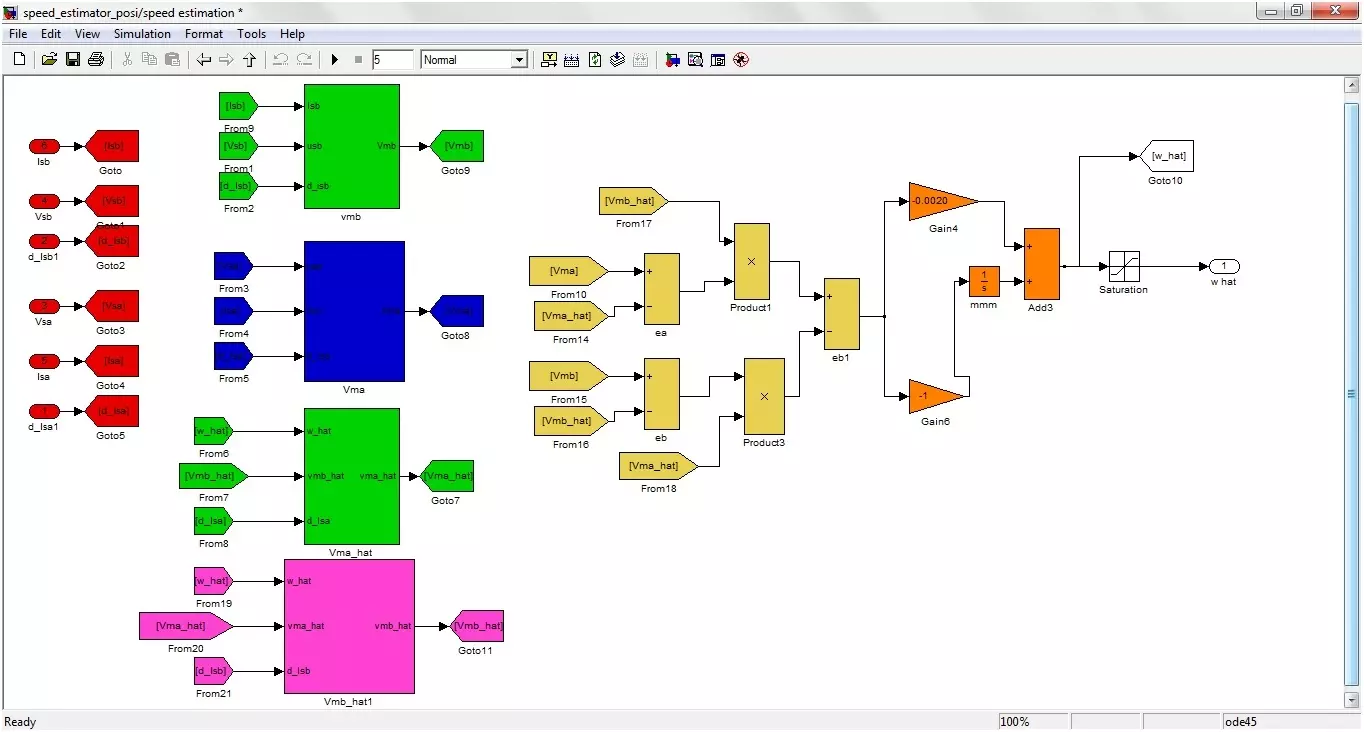
Today I am going to show you Sensorless Speed Estimation of Induction Motor in MATLAB. In order to control and estimate the speed of Induction motor, there are many methods proposed by different scientists. The method I have selected in my project is Adaptive method. Using this method, I have controlled the speed of Induction motor using MATLAB software. Matlab software is used for simulation design. The simulation is designed in simulink and the MATLAB version used for designing this project is MATLAB 2010. It is also tested on MATLAB 2012 and 2013. All the details of this project are mentioned below.
If someone wants to buy this project then click on the button shown on right side. Its quite difficult to implement and is designe ...
Hello friends, I hope you all are fine and having fun with your lives. In today's tutorial, I am going to show you the Interfacing of XBee with Computer. In the previous part of this tutorial, I have given the Introduction to XBee Module. Hope you guys have read it and if not then go visit it so that you may have some idea about XBee module.
Now come to the second part about how to interface xbee with computer because its important as if you cant interface the xbee with computer then you cant interface it with any microcontroller and later I will tell you its interfacing with microcontroller. You should also check this XBee Library for Proteus which will help you to simulate XBee module in Proteus.
We will cover arduino with more detail as its ...
Hello everyone, I hope you all are doing great. In today's tutorial, I am going to give you a detailed Introduction to Arduino YUN, and we will also have a look at its basic functionalities. Arduino YUN is a latest microcontroller board, manufactured by Arduino. It's the most advanced and highly stylish arduino board. The beauty of Arduino YUN lies in having two on board processors, which I haven't seen yet in any other Microcontroller board. One of them is simple Arduino processor which is similar to that of Arduino Leonardo while the second processor is Atheros AR9331. Atheros supports Linux server, which is the new thing in Arduino YUN. Because of these two processors, one now can do anything in the world of automation as well as web servers. ...
Introduction
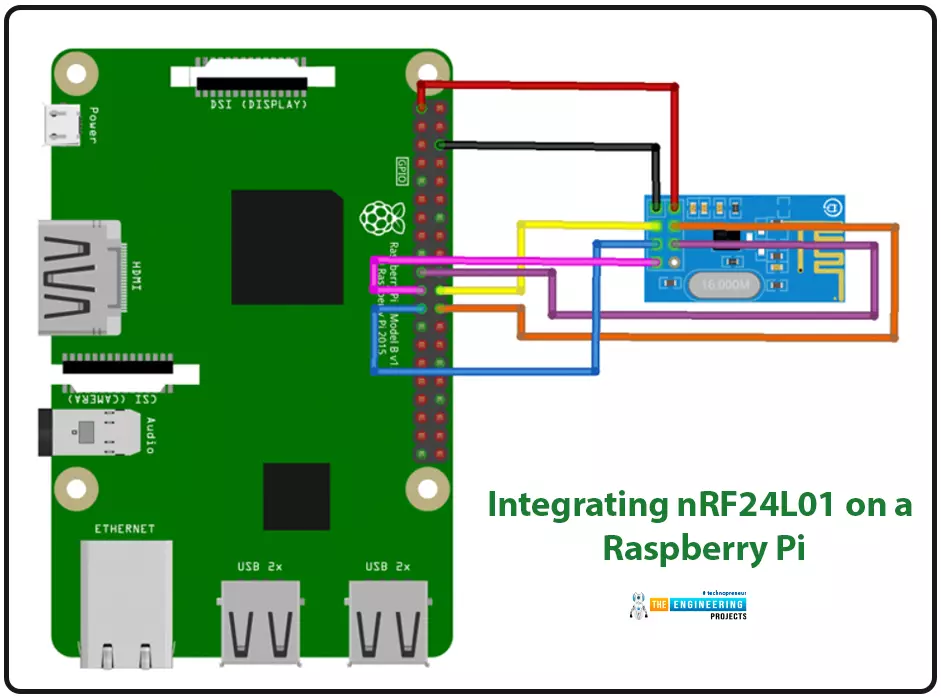
We're glad you could join us for another lesson in our series on programming for the Raspberry Pi 4. The previous chapter covered how to interface the USB barcode scanner with raspberry pi 4. We looked at different types of barcodes and what each stripe represents as well as the different types of barcode scanners available today. We also built a python program for the intelligent shopping cart and now our familiarity with barcodes and scanners and how they function has significantly increased. The benefits and drawbacks of its use were also discussed, but what we're interested in for this article is the transmission of radio frequency signals using the nrf24l01 Module in a raspberry pi 4.
Components
nRF24L01 RF module
Raspberry pi 4
Arduino Uno
Jumper wires
Power suppl ...