Hello friends! Today, we will install a C compiler for MPLAB and make sure that a PIC project actually uses it. In the previous lesson, we covered installing the MPLAB development environment . The next step is to connect that environment to the language tools that translate our C source. The original article used MPLAB C18 and shows its historical Windows installer. Those screenshots remain useful for maintaining an older PIC18 project. For a new compatible 8-bit PIC project, MPLAB XC8 is the relevant Microchip compiler family to investigate. We will keep the two workflows distinct. By the end, you should know which compiler your project requires, how to install and select it, and how to separate an installation problem from a source-code or linker problem. We will use PIC18F452 as the ex ...
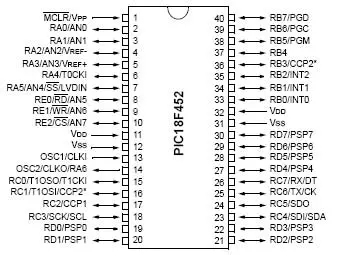
Hello friends! In the previous lesson, we discussed microcontroller basics . Today, we will apply those ideas to a PIC18F452 and identify everything needed to make a simple program run on real hardware. We will use the 40-pin PDIP version of the PIC18F452, matching the original circuit in this tutorial. Our first output is an LED on RD0. Before writing the application, we will work through power, reset, the external clock, programming connections and the distinction between the IDE and compiler. The original lesson used older MPLAB tools and a socket-style programming workflow. Those are useful historical references, but a supported in-circuit programmer can program the PIC while it remains in the target circuit. The exact combination of device, programmer and software must be checked befo ...