


Project Files of IoT Smart Energy Meter with ESP32 - Proteus Simulation
 Libraries
 Code
 Projects
 Simulation
esp32-smart-energy-meter-tep-v1-0-575ed9fe3ce8450ebe74b6ace965cb23.zip

IoT Smart Energy Meter with ESP32 - Proteus Simulation V1.0
IoT Smart Energy Meter with ESP32 - Proteus Simulation V1.0 comes as a ZIP archive of 24 files (4.4 MB, 10.0 MB unpacked) holding Proteus library files, simulation model DLLs, a Proteus simulation, an Arduino sketch and compiled HEX firmware.
- LIBProteus library
- DLLProteus model
- DSNProteus simulation
- INOArduino sketch
- HEXHEX firmware
Description
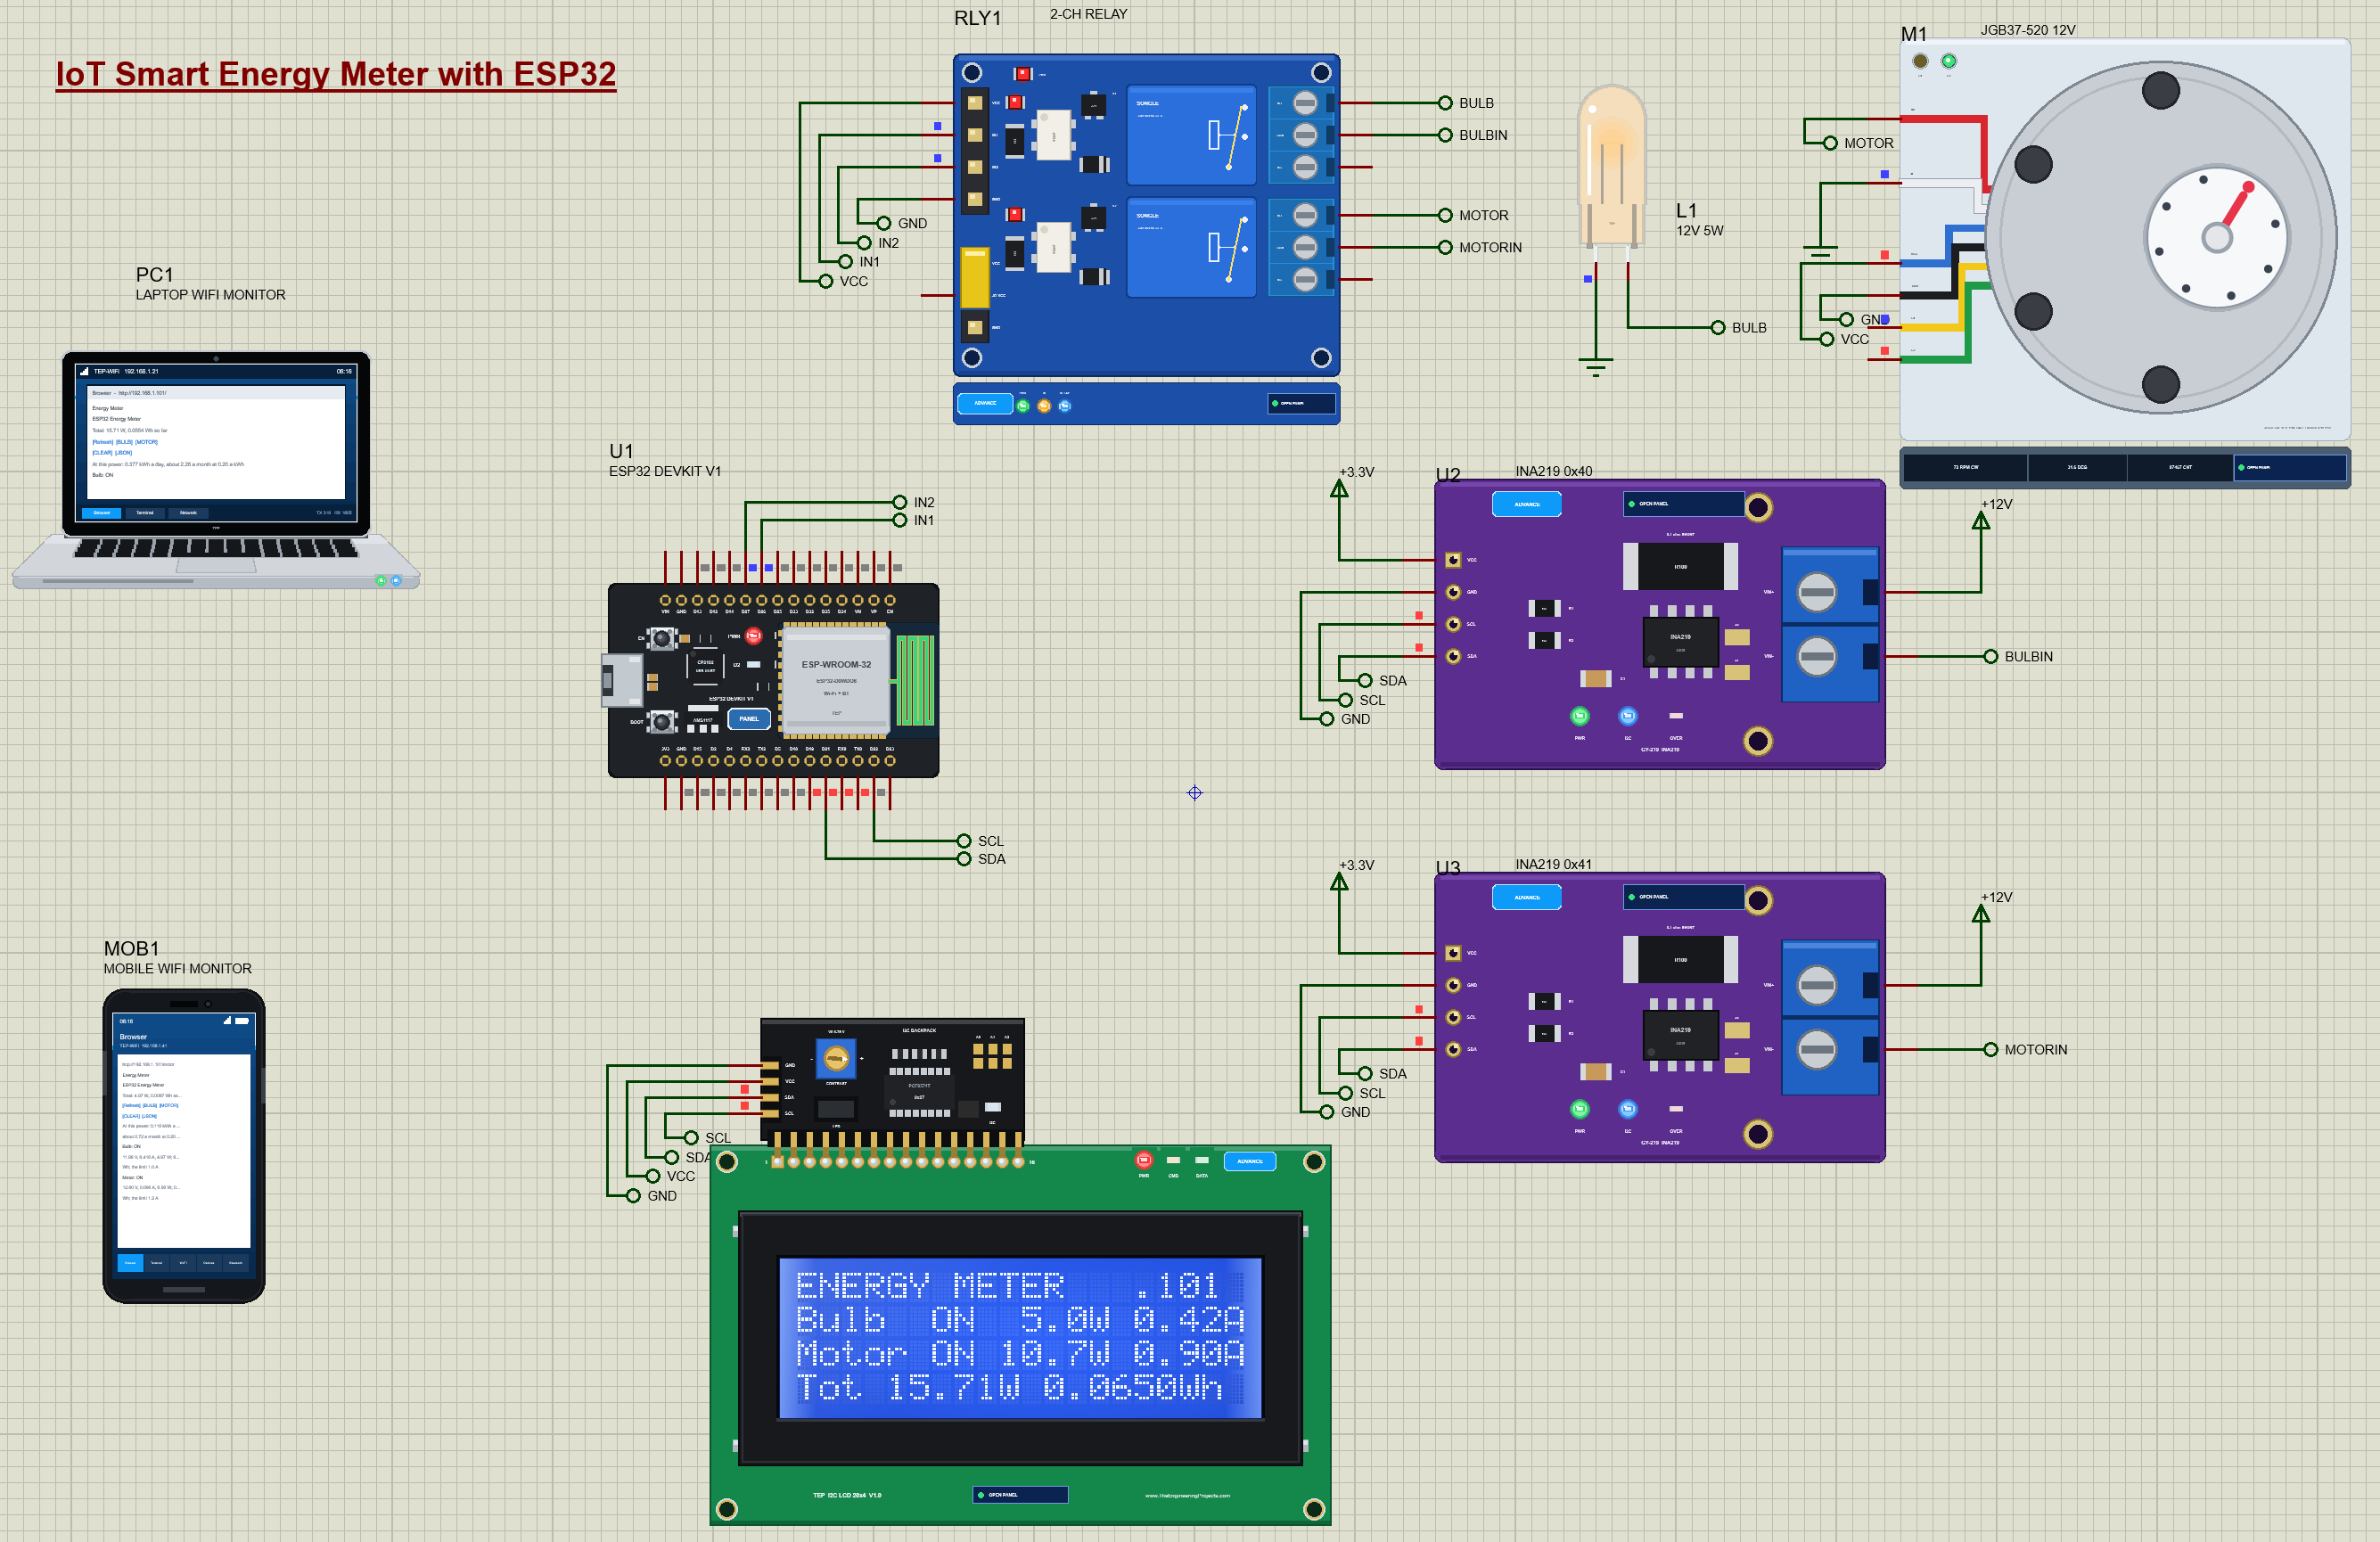
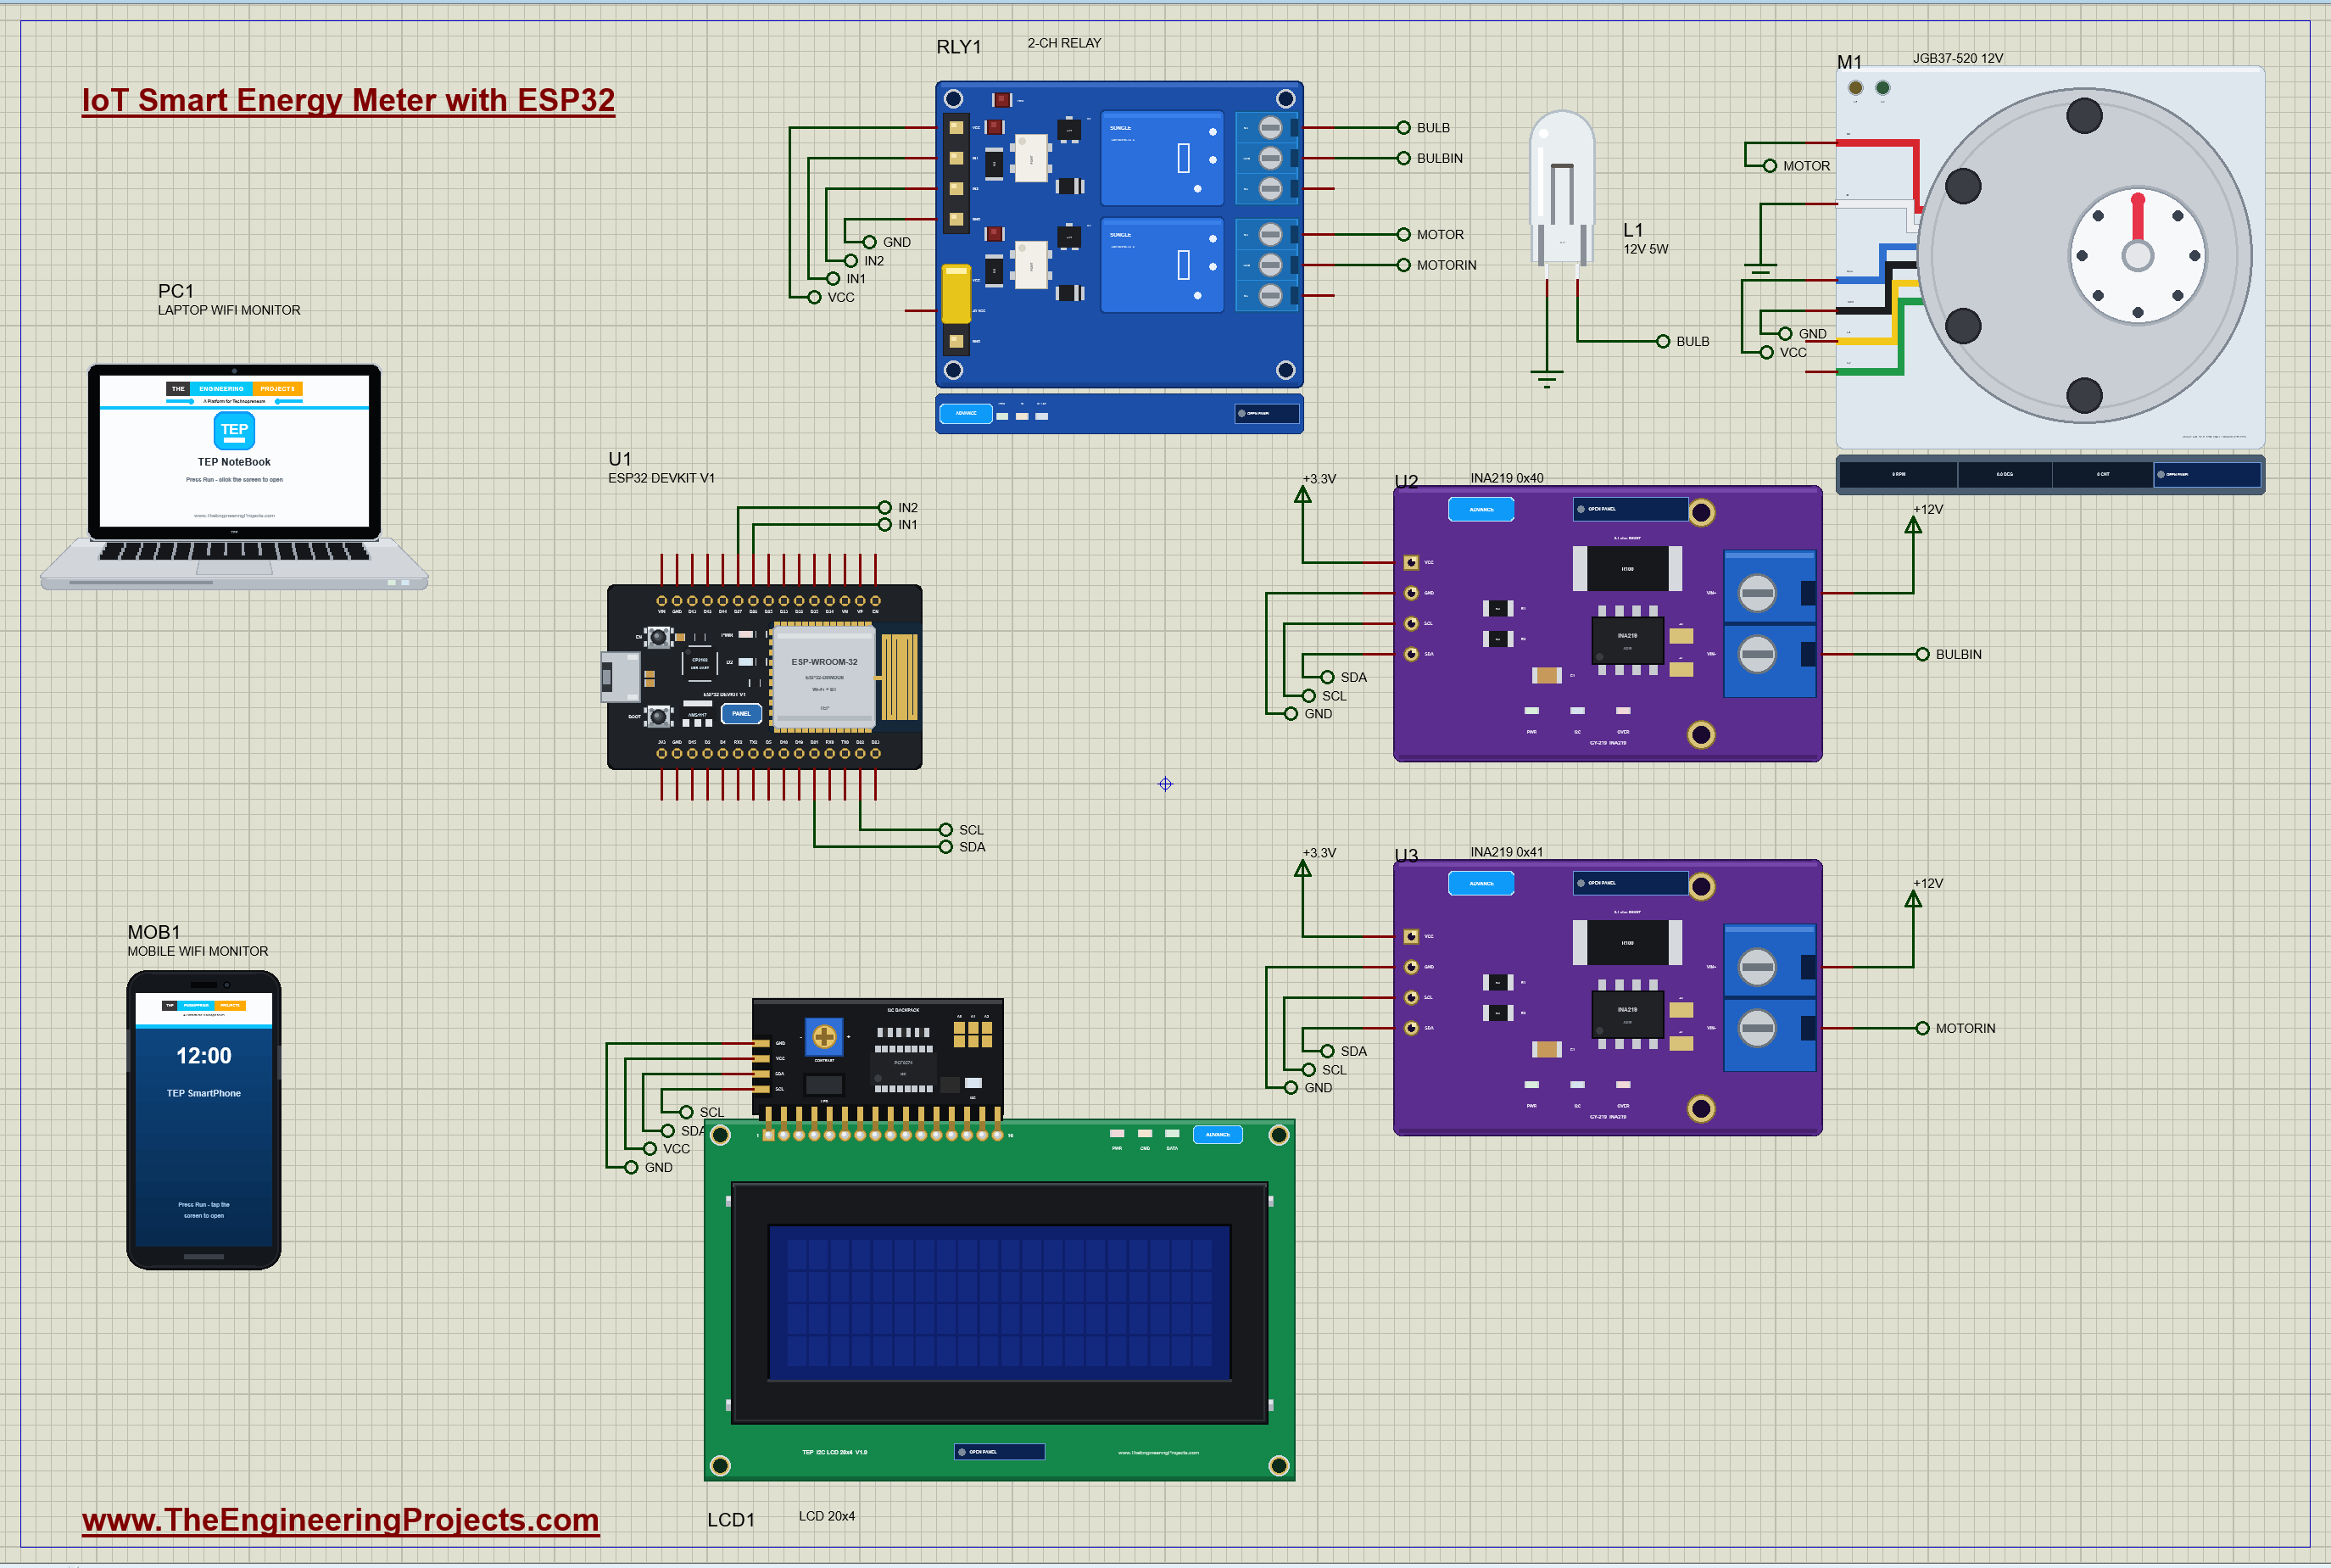
IoT-Smart-Energy-Meter-ESP32-Proteus-Simulation-v1.0.zip: the complete Proteus simulation project (ESP32 DevKit V1, two INA219 current sensors, a 2-channel relay module, a 12 V bulb, a JGB37-520 gear motor, an I2C LCD 20x4, the Laptop and Mobile WiFi Monitors), the ESP32 sketch and its HEX file, every LIB and DLL the simulation needs, and a README.

File Structure
 File Structure
8.7 KB17.7 KB36.6 KB205.4 KB62.6 KB17.1 KB39.5 KB13.1 KB490.4 KB291 KB319.5 KB283 KB409 KB2.9 MB330 KB35.1 KB83.6 KB291 KB319.5 KB283 KB409 KB2.9 MB330 KB12.7 KBGallery12 images from the tutorialOpen the tutorial
 Gallery12 images from the tutorial
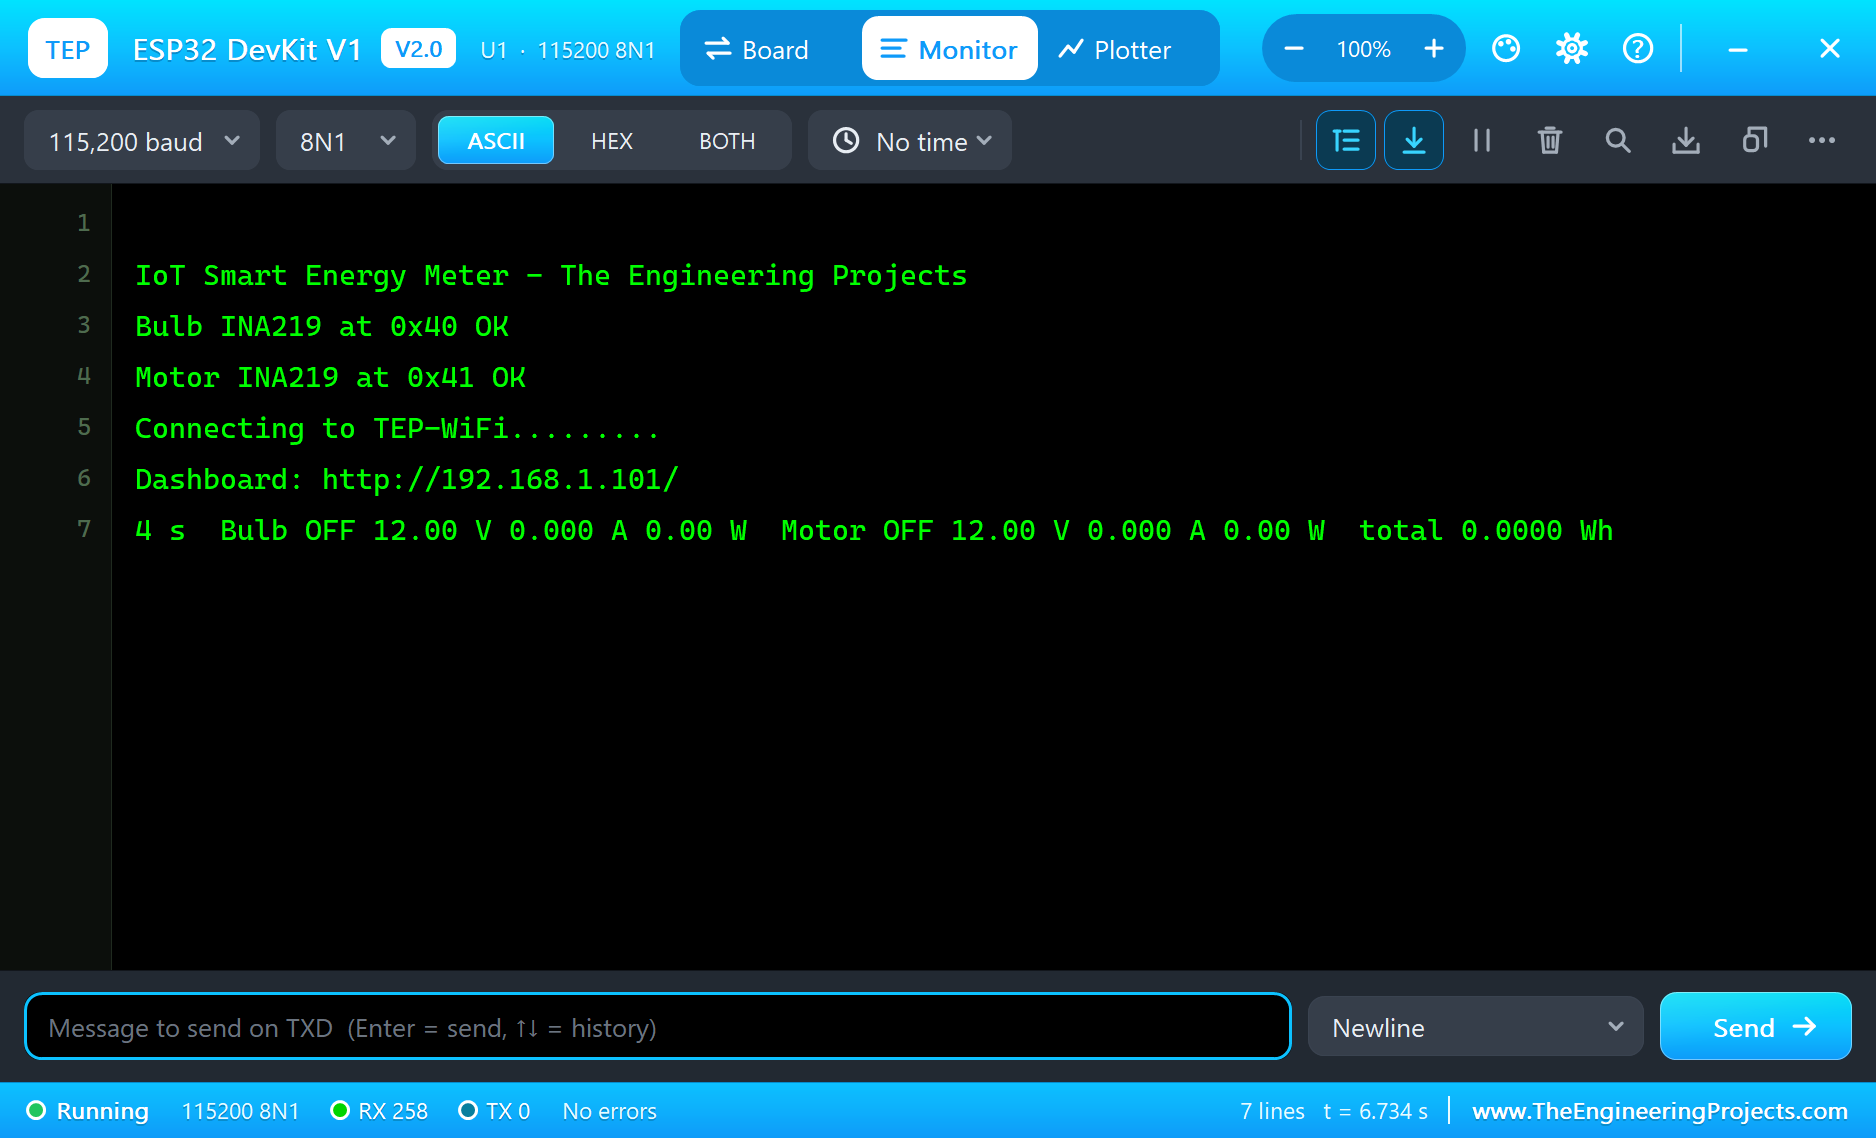
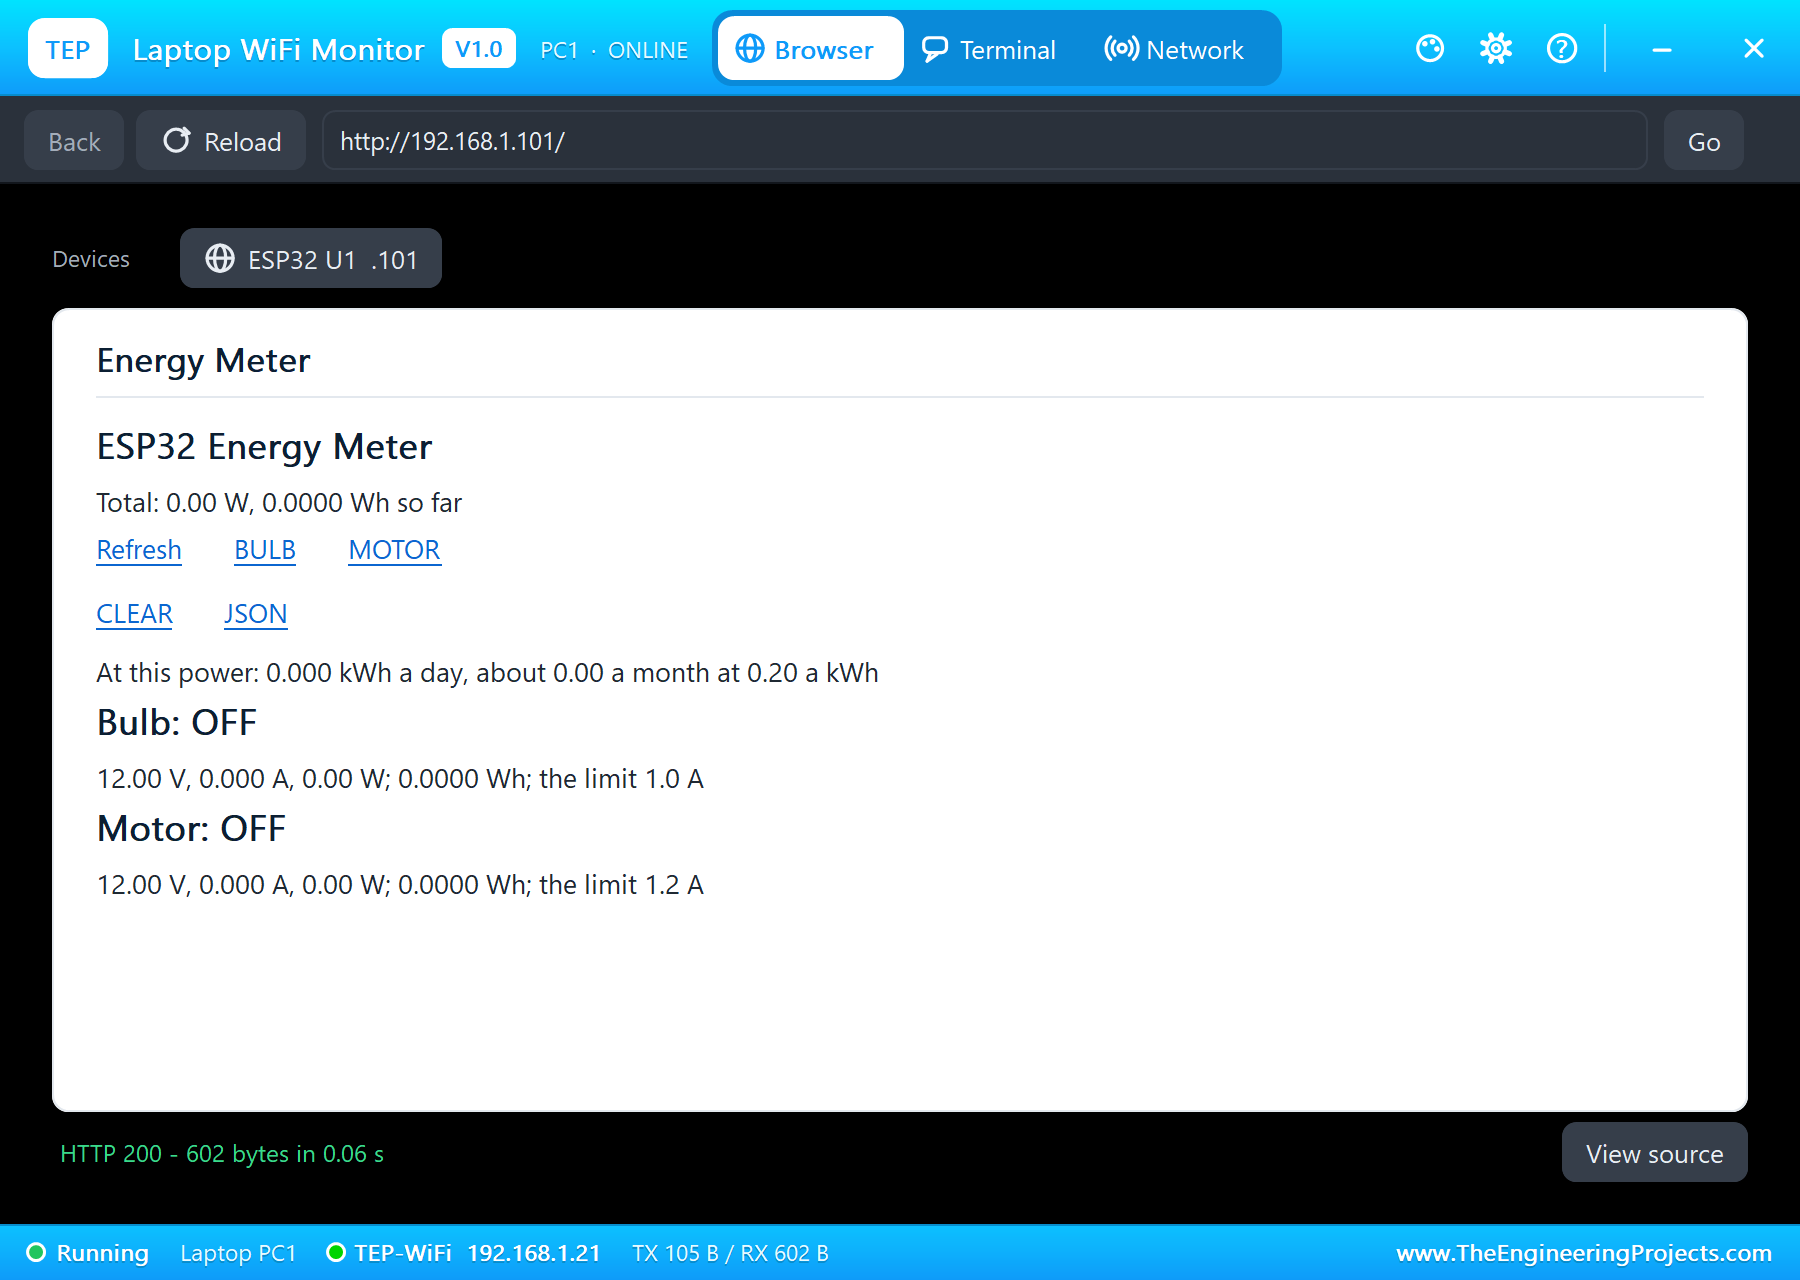
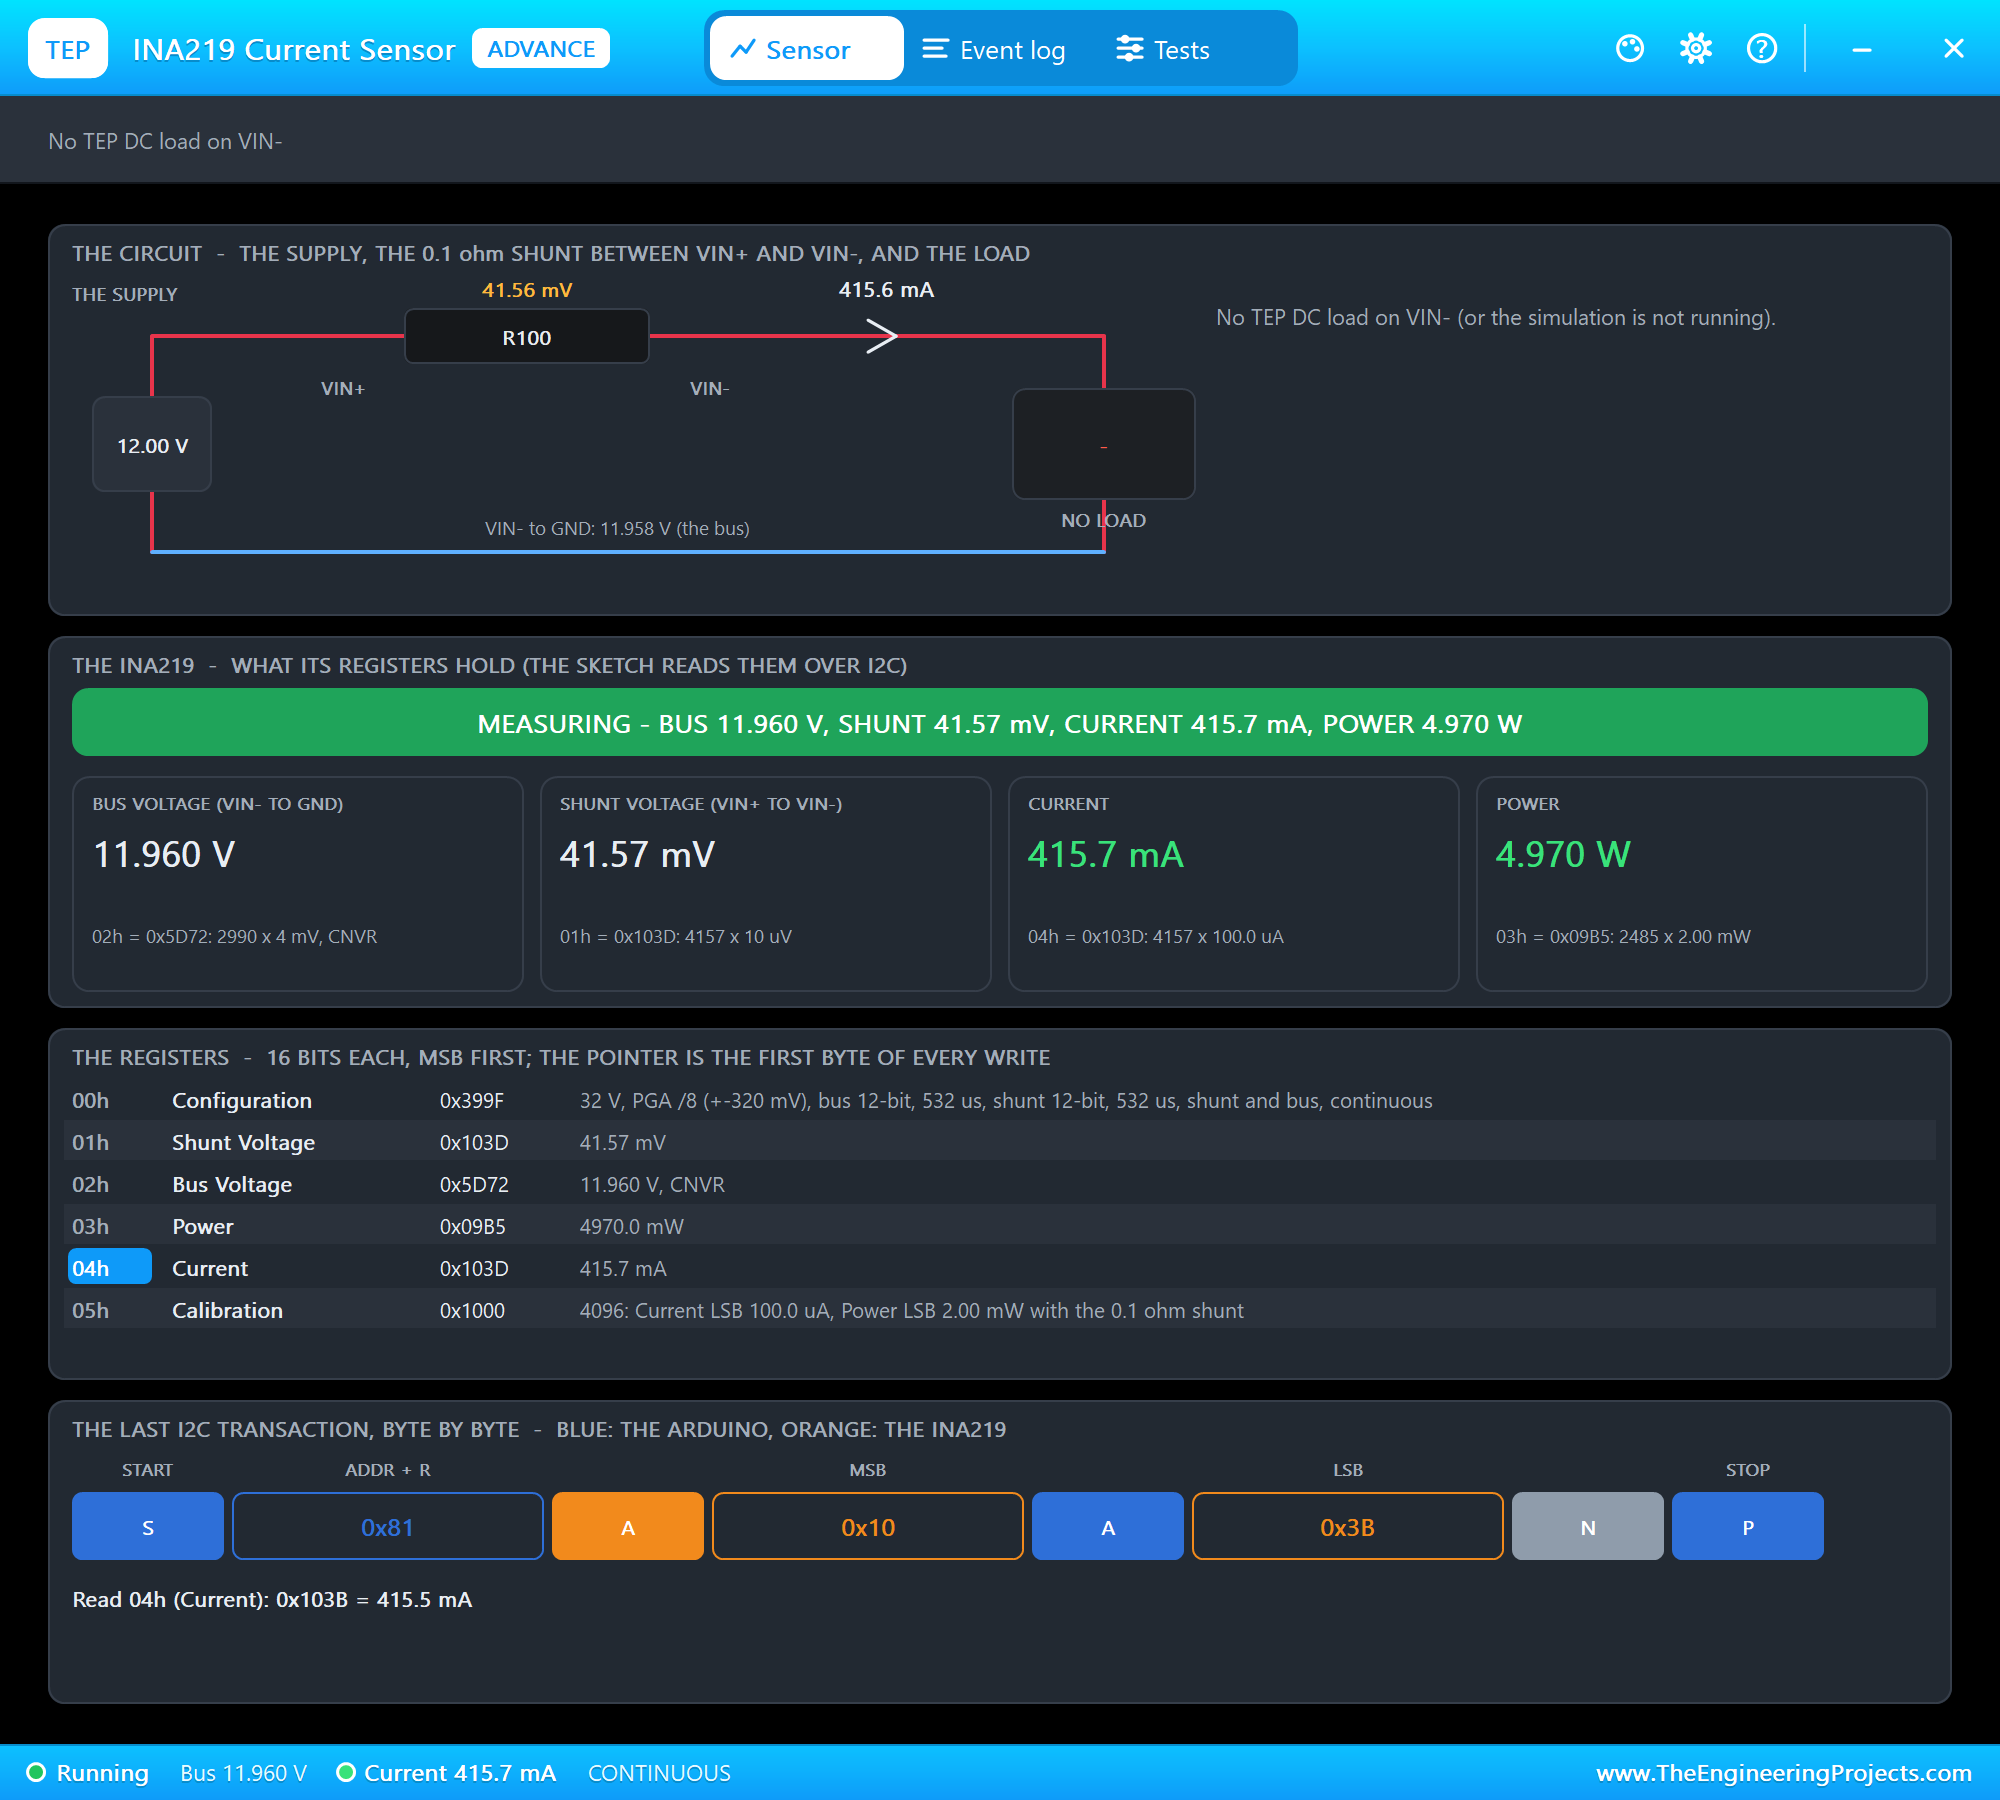
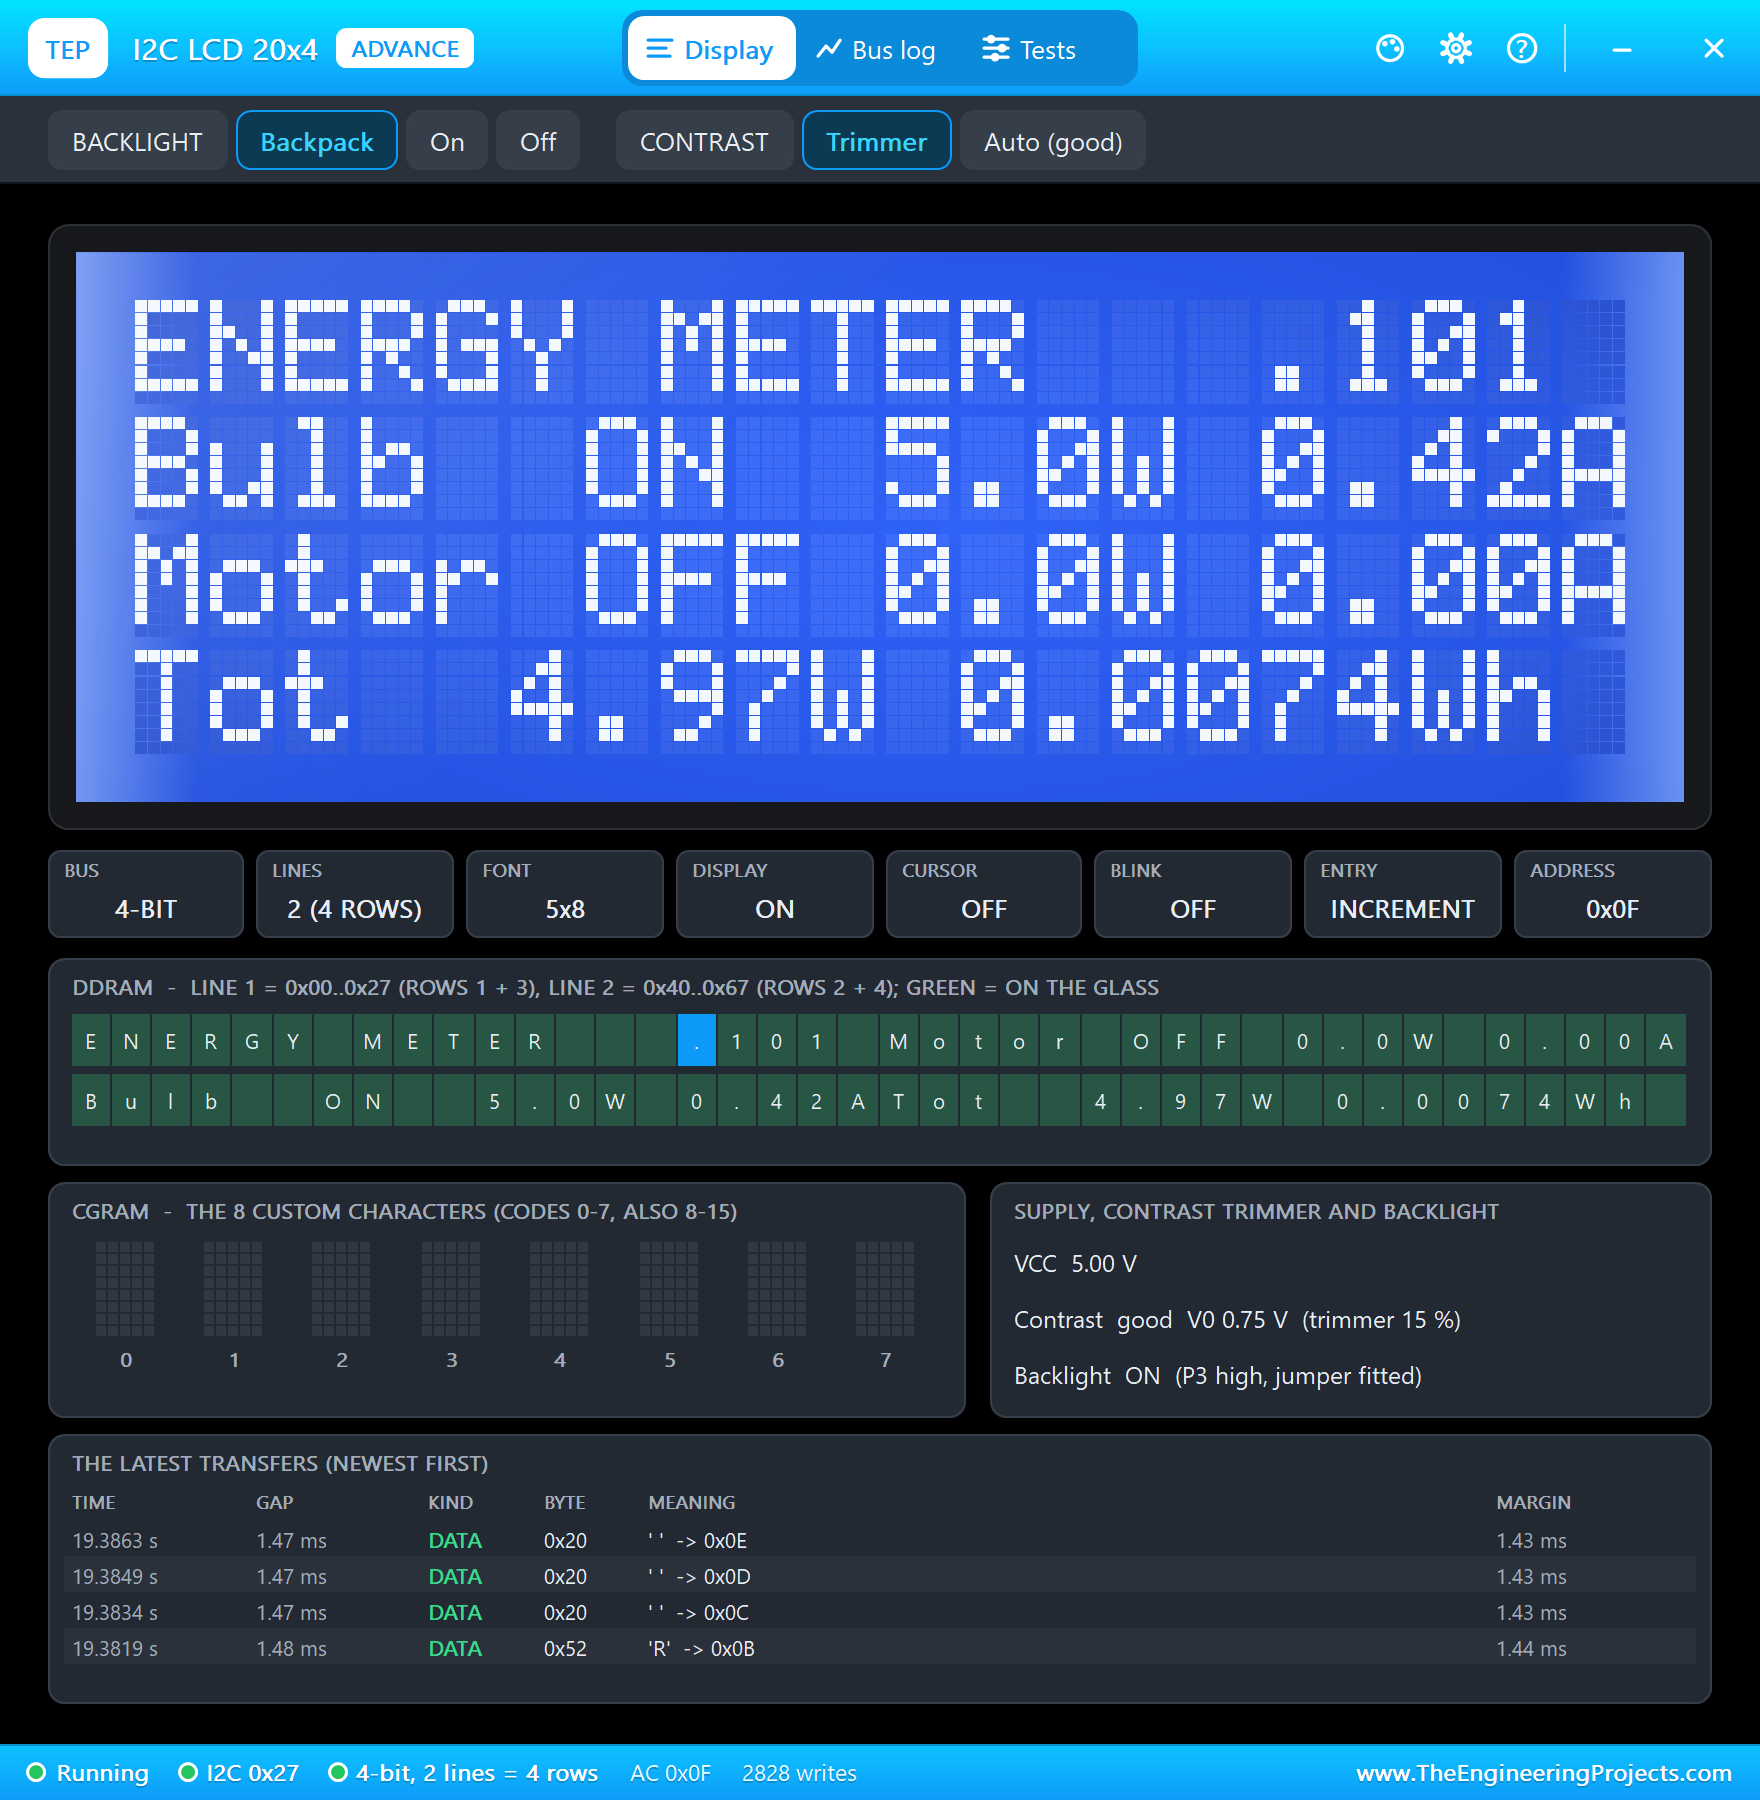
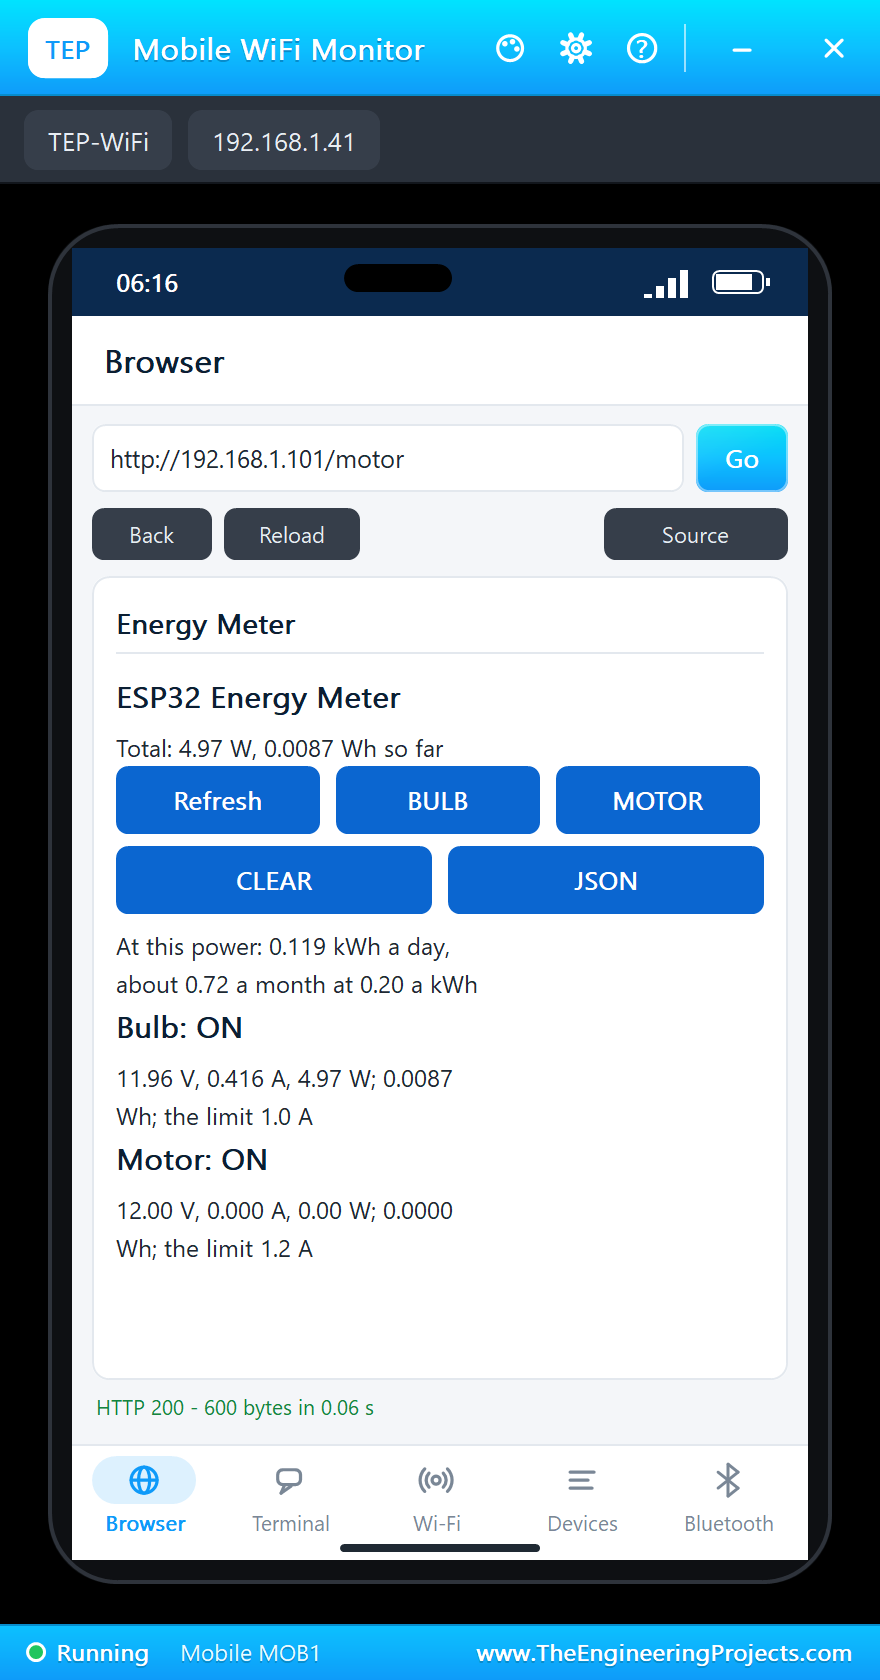
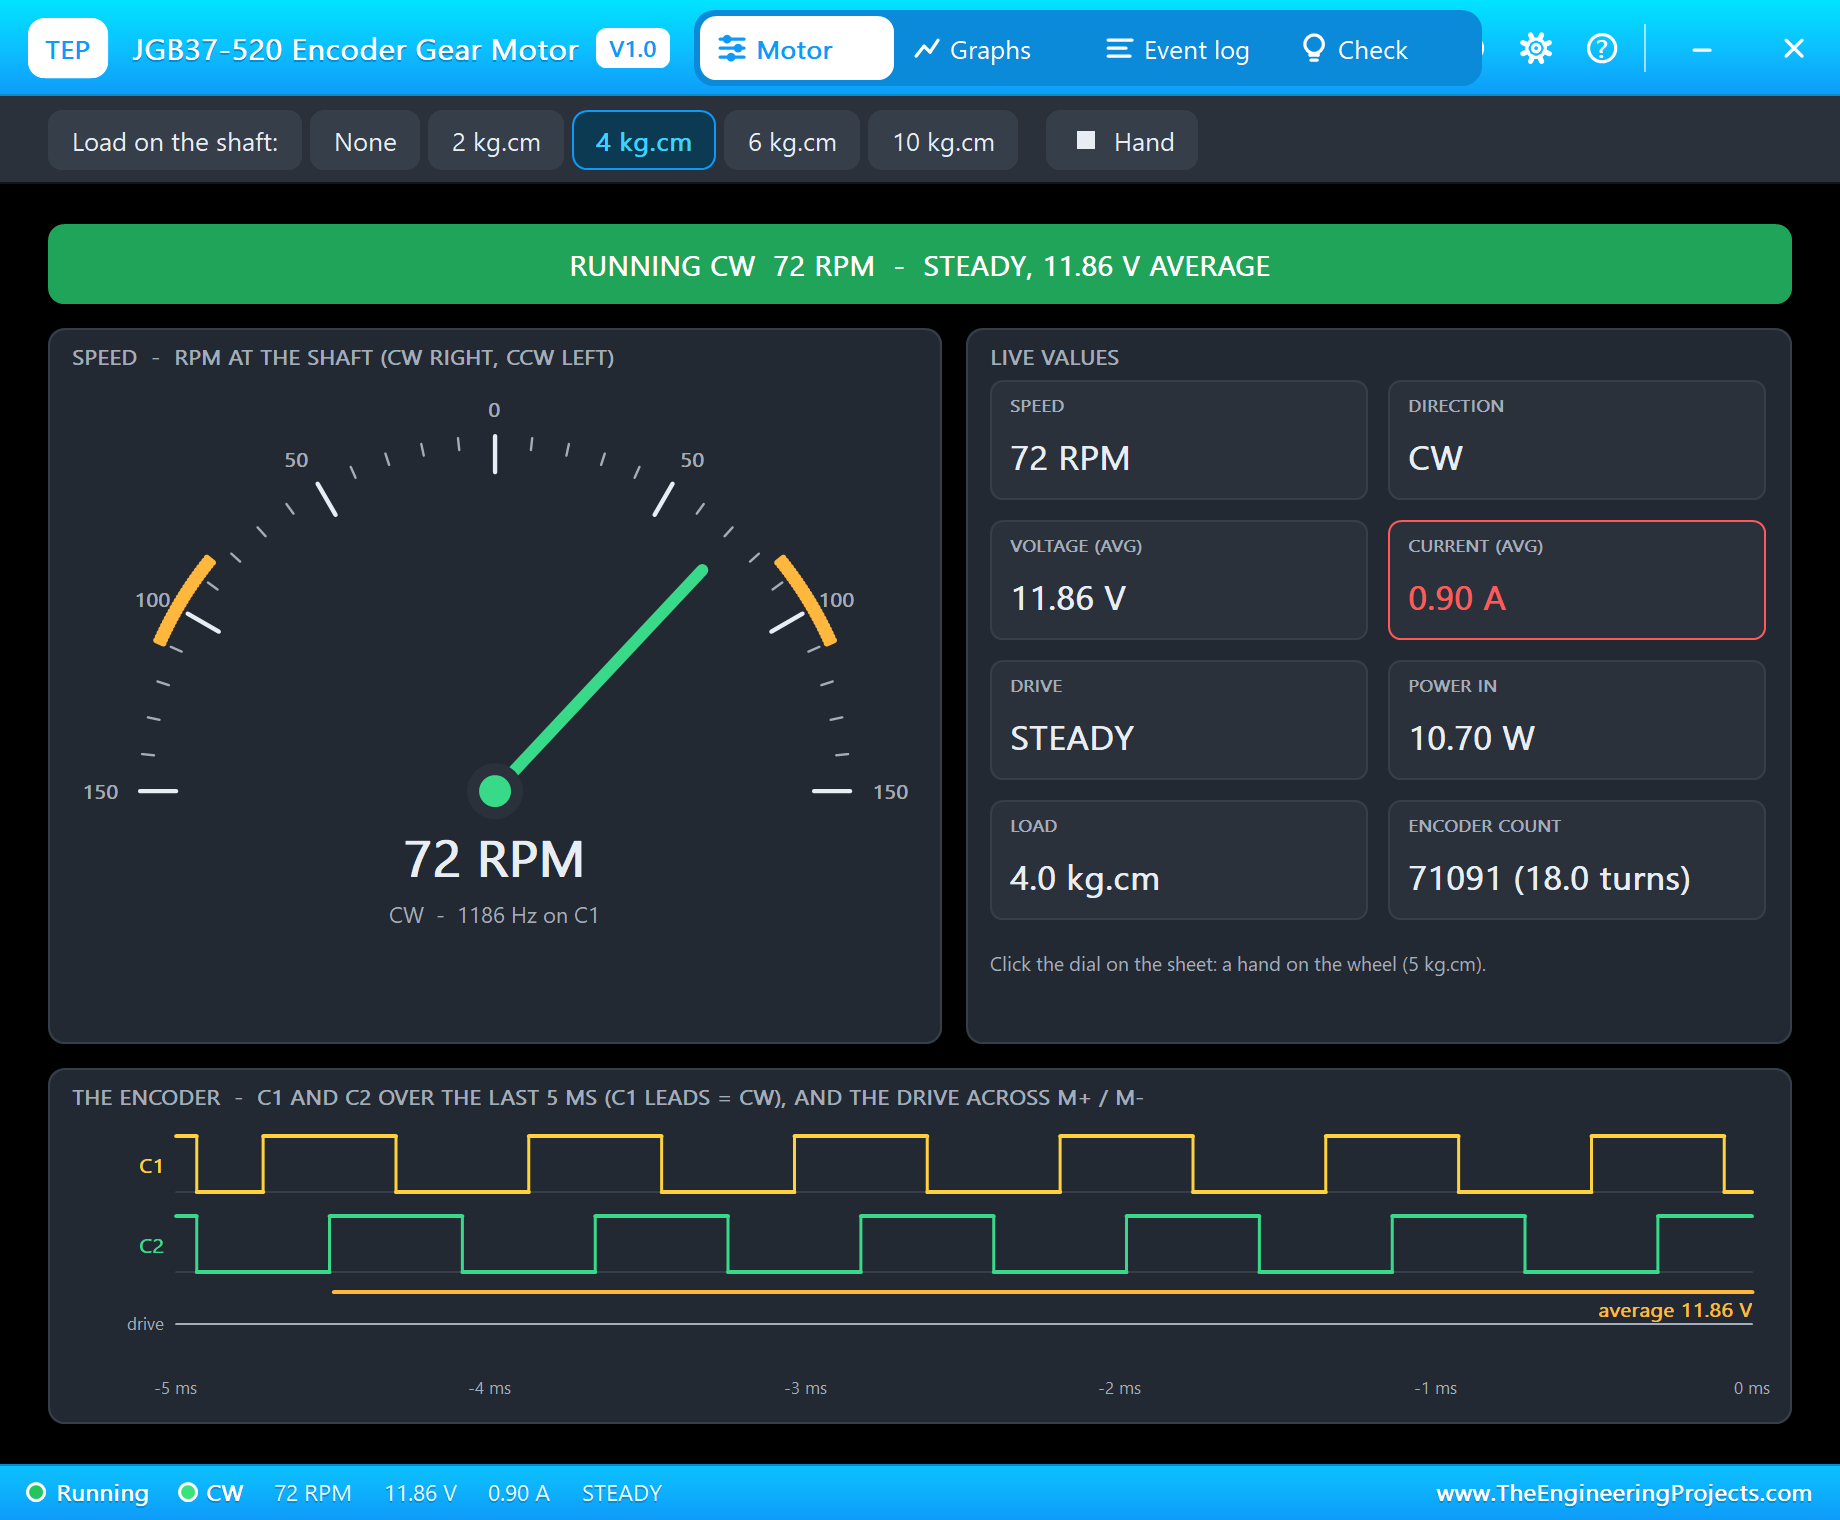
The circuit, the board and the results as they appear in IoT Smart Energy Meter with ESP32 - Proteus Simulation. Open an image for its full size.
README
 README
===============================================================================================================
  IoT Smart Energy Meter with ESP32 - Proteus Simulation Project V1.0
  The Engineering Projects - www.TheEngineeringProjects.com
===============================================================================================================

IMPORTANT LINKS
  The project tutorial (circuit, code, simulation results):
    https://www.theengineeringprojects.com/2026/11/iot-smart-energy-meter-esp32-proteus-simulation.html
  The libraries this project is built from (each post has its own full download and tutorial):
    ESP32 DevKit V1 board:
      https://www.theengineeringprojects.com/2026/10/esp32-devkit-v1-library-for-proteus-v2-0.html
    INA219 current sensor:
      https://www.theengineeringprojects.com/2026/10/ina219-current-sensor-library-for-proteus-v1-0.html
    Relay module (2-channel):
      https://www.theengineeringprojects.com/2026/10/relay-module-library-for-proteus-v1-0.html
    Filament bulb (W5W 12 V 5 W):
      https://www.theengineeringprojects.com/2026/11/filament-bulb-library-for-proteus.html
    JGB37-520 gear motor:
      https://www.theengineeringprojects.com/2026/10/jgb37-520-encoder-gear-motor-library-for-proteus-v1-0.html
    I2C LCD 20x4:
      https://www.theengineeringprojects.com/2026/10/i2c-lcd-20x4-library-for-proteus-v1-0.html
    Laptop WiFi Monitor:
      https://www.theengineeringprojects.com/2026/10/laptop-wifi-monitor-library-for-proteus.html
    Mobile WiFi Monitor:
      https://www.theengineeringprojects.com/2026/10/mobile-wifi-monitor-library-for-proteus.html
  Support our free work: https://www.theengineeringprojects.com/donate

FILE STRUCTURE
ESP32-Smart-Energy-Meter-TEP-v1.0/
|-- Proteus Library Files/
|   |-- TEPBULB.LIB                                    17.7 KB   a part of the project -> LIBRARY folder
|   |-- TEPESP32V1.LIB                                 36.6 KB   a part of the project -> LIBRARY folder
|   |-- TEPI2CLCD20X4.LIB                             205.4 KB   a part of the project -> LIBRARY folder
|   |-- TEPINA219.LIB                                  62.6 KB   a part of the project -> LIBRARY folder
|   |-- TEPJGB37.LIB                                   17.1 KB   a part of the project -> LIBRARY folder
|   |-- TEPLAPTOP.LIB                                  39.5 KB   a part of the project -> LIBRARY folder
|   |-- TEPMOBILE.LIB                                  13.1 KB   a part of the project -> LIBRARY folder
|   |-- TEPRELAY.LIB                                  490.4 KB   a part of the project -> LIBRARY folder
|-- Proteus Model Files/
|   |-- TEPBULB.DLL                                   291.0 KB   a model -> MODELS folder
|   |-- TEPINA219.DLL                                 319.5 KB   a model -> MODELS folder
|   |-- TEPJGB37.DLL                                  283.0 KB   a model -> MODELS folder
|   |-- TEPLCD.DLL                                    409.0 KB   a model -> MODELS folder
|   |-- TEPNET.DLL                                     2.89 MB   a model -> MODELS folder
|   |-- TEPRELAY.DLL                                  330.0 KB   a model -> MODELS folder
|-- Proteus Simulation/
|   |-- ESP32_Energy_Meter.hex                         83.6 KB   the firmware
|   |-- ESP32-Smart-Energy-Meter.pdsprj                35.1 KB   the project simulation
|   |-- TEPBULB.DLL                                   291.0 KB   copy of the model
|   |-- TEPINA219.DLL                                 319.5 KB   copy of the model
|   |-- TEPJGB37.DLL                                  283.0 KB   copy of the model
|   |-- TEPLCD.DLL                                    409.0 KB   copy of the model
|   |-- TEPNET.DLL                                     2.89 MB   copy of the model
|   |-- TEPRELAY.DLL                                  330.0 KB   copy of the model
|-- Arduino Code/
|   |-- ESP32_Energy_Meter/ESP32_Energy_Meter.ino       8.7 KB   the sketch (source of the .hex)
|-- README.txt                                        ~12.6 KB   this file
Total: 9.97 MB (unzipped). The C++ source code of the models is not included.

WHAT IS IT?
  A complete IoT energy meter you can run in Proteus: an ESP32 DevKit V1 measures two 12 V loads, switches them, and
  shows the power, the energy and the cost on an LCD and on a laptop or a phone, all inside one Proteus simulation.
    * Two INA219 current sensors (INA219ADVTEP) on the high side of the loads: U2 at 0x40 (the bulb), U3 at 0x41
      (the motor; the A0 jumper, property ADDRESS). Each has a 0.1 ohm shunt and measures the voltage and the current.
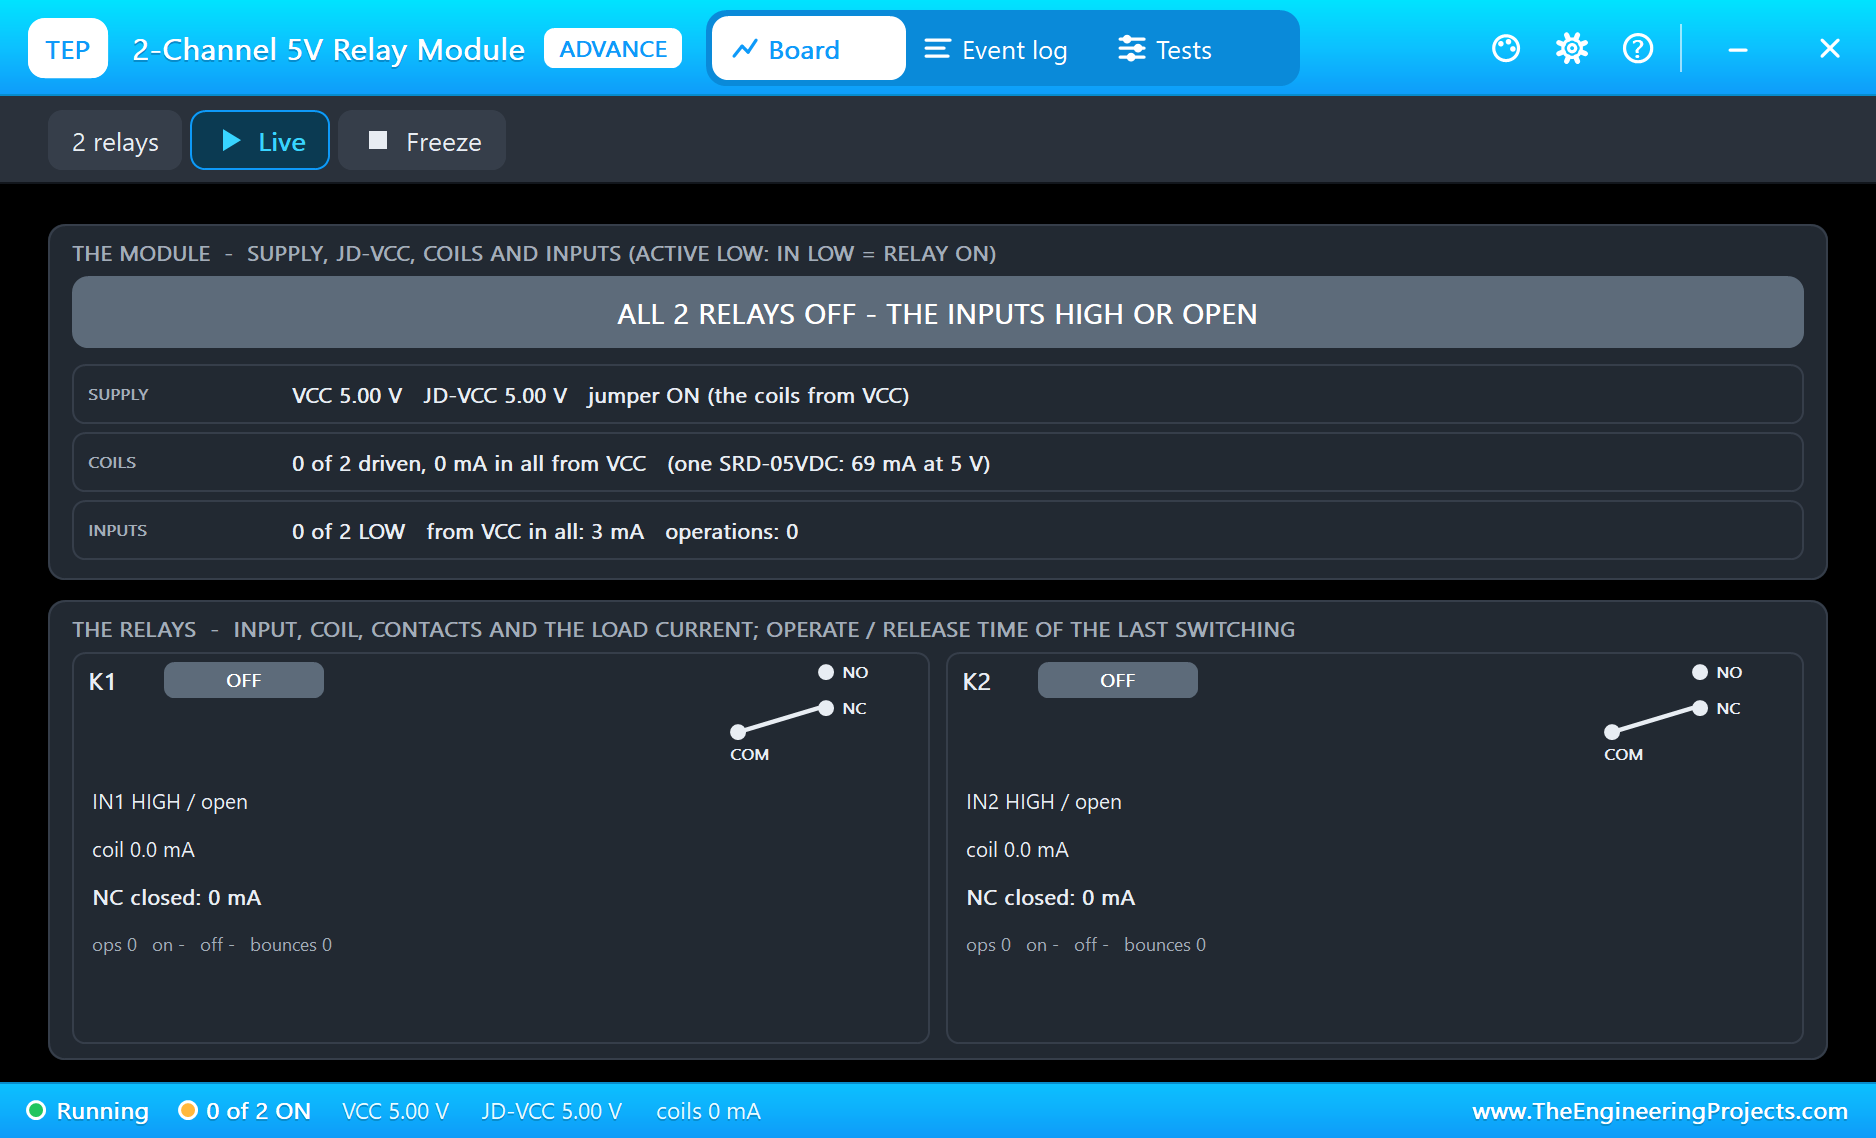
    * A 2-channel 5 V relay module (RELAY2ADVTEP, RLY1): IN1 on D26, IN2 on D27, active LOW. +12V goes into each
      INA219's VIN+, its VIN- to the relay's COM, the relay's NO to the load.
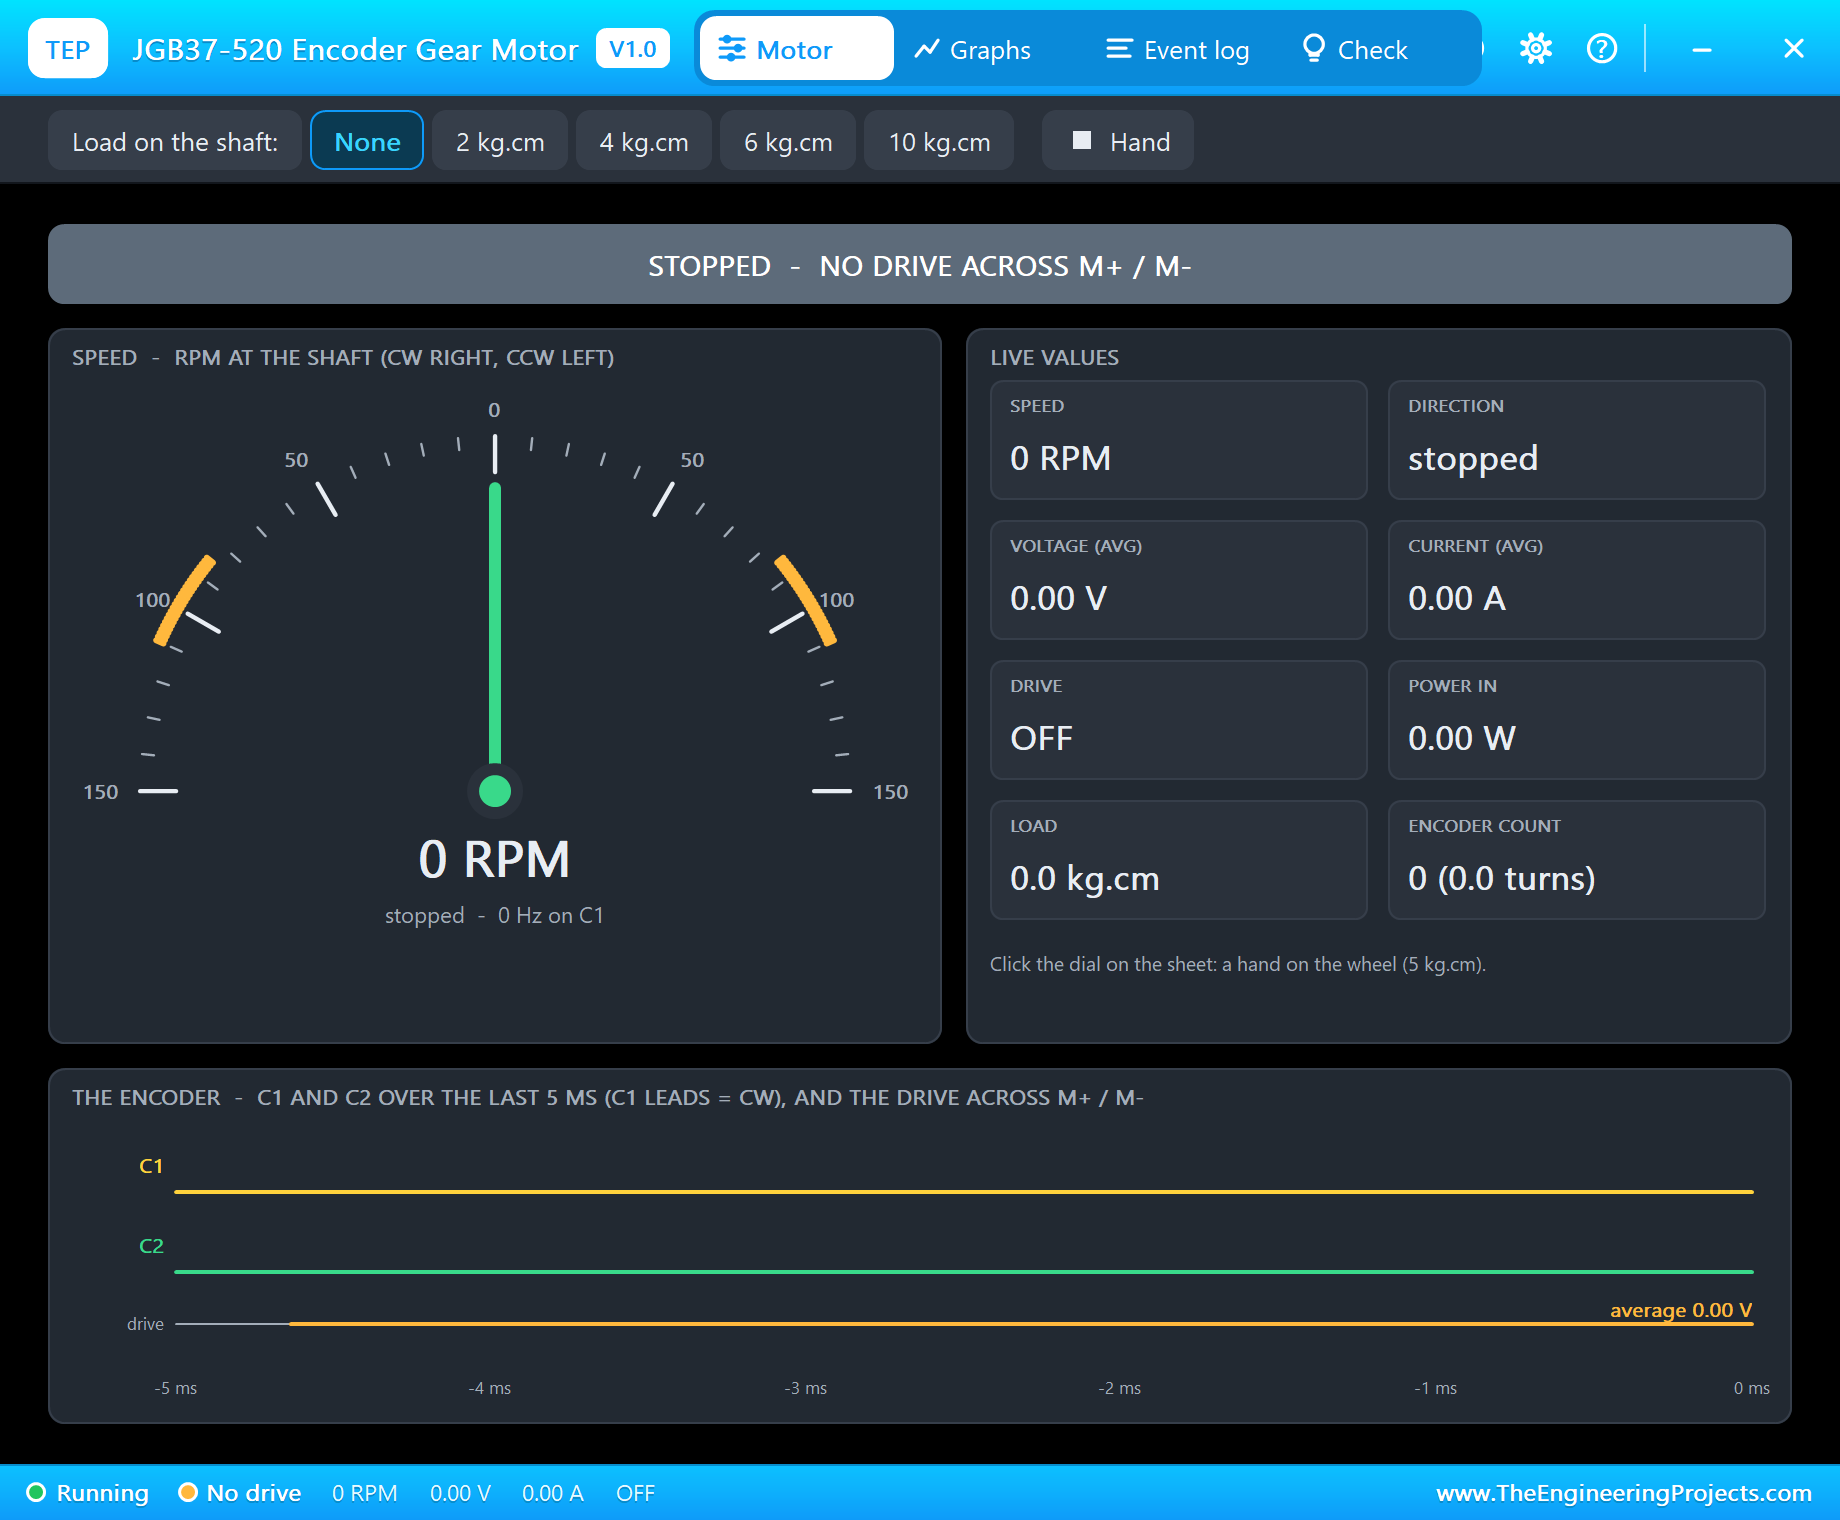
    * Load 1: a W5W 12 V 5 W bulb (BULBW5WTEP, L1). Load 2: a JGB37-520 12 V gear motor (JGB37MOTORTEP, M1); its load
      torque is set in its pop-up.
    * I2C LCD 20x4 (I2CLCD20X4BLUEADVTEP, LCD1) at 0x27 on 5 V. The LCD and both INA219s share one I2C bus: SDA on
      D21, SCL on D22. The INA219s run on 3.3 V.
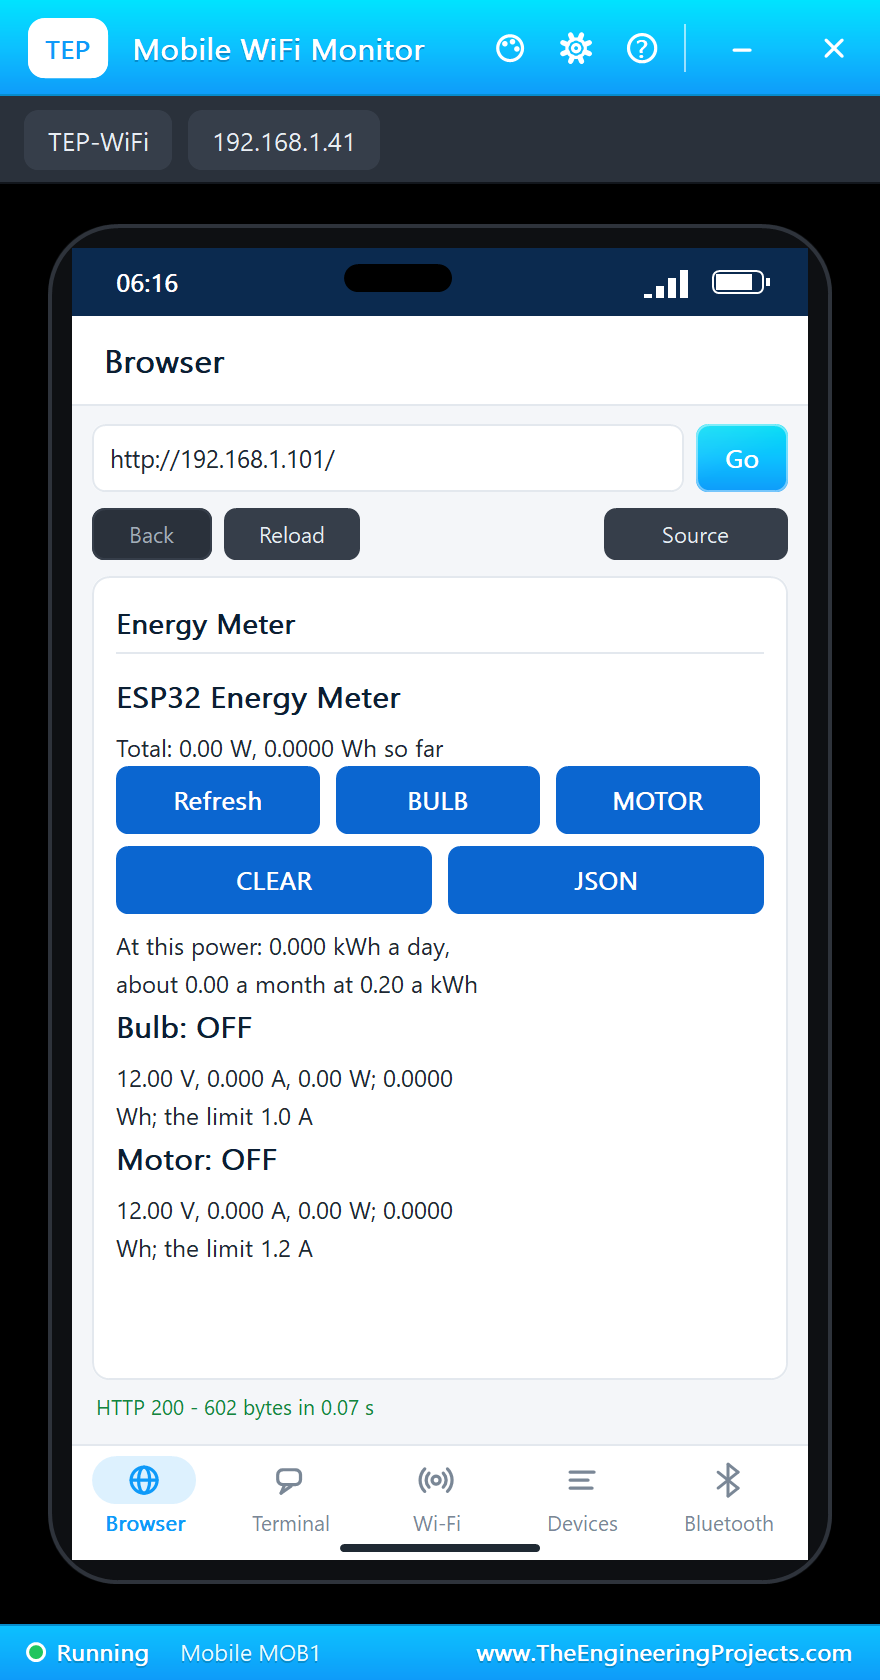
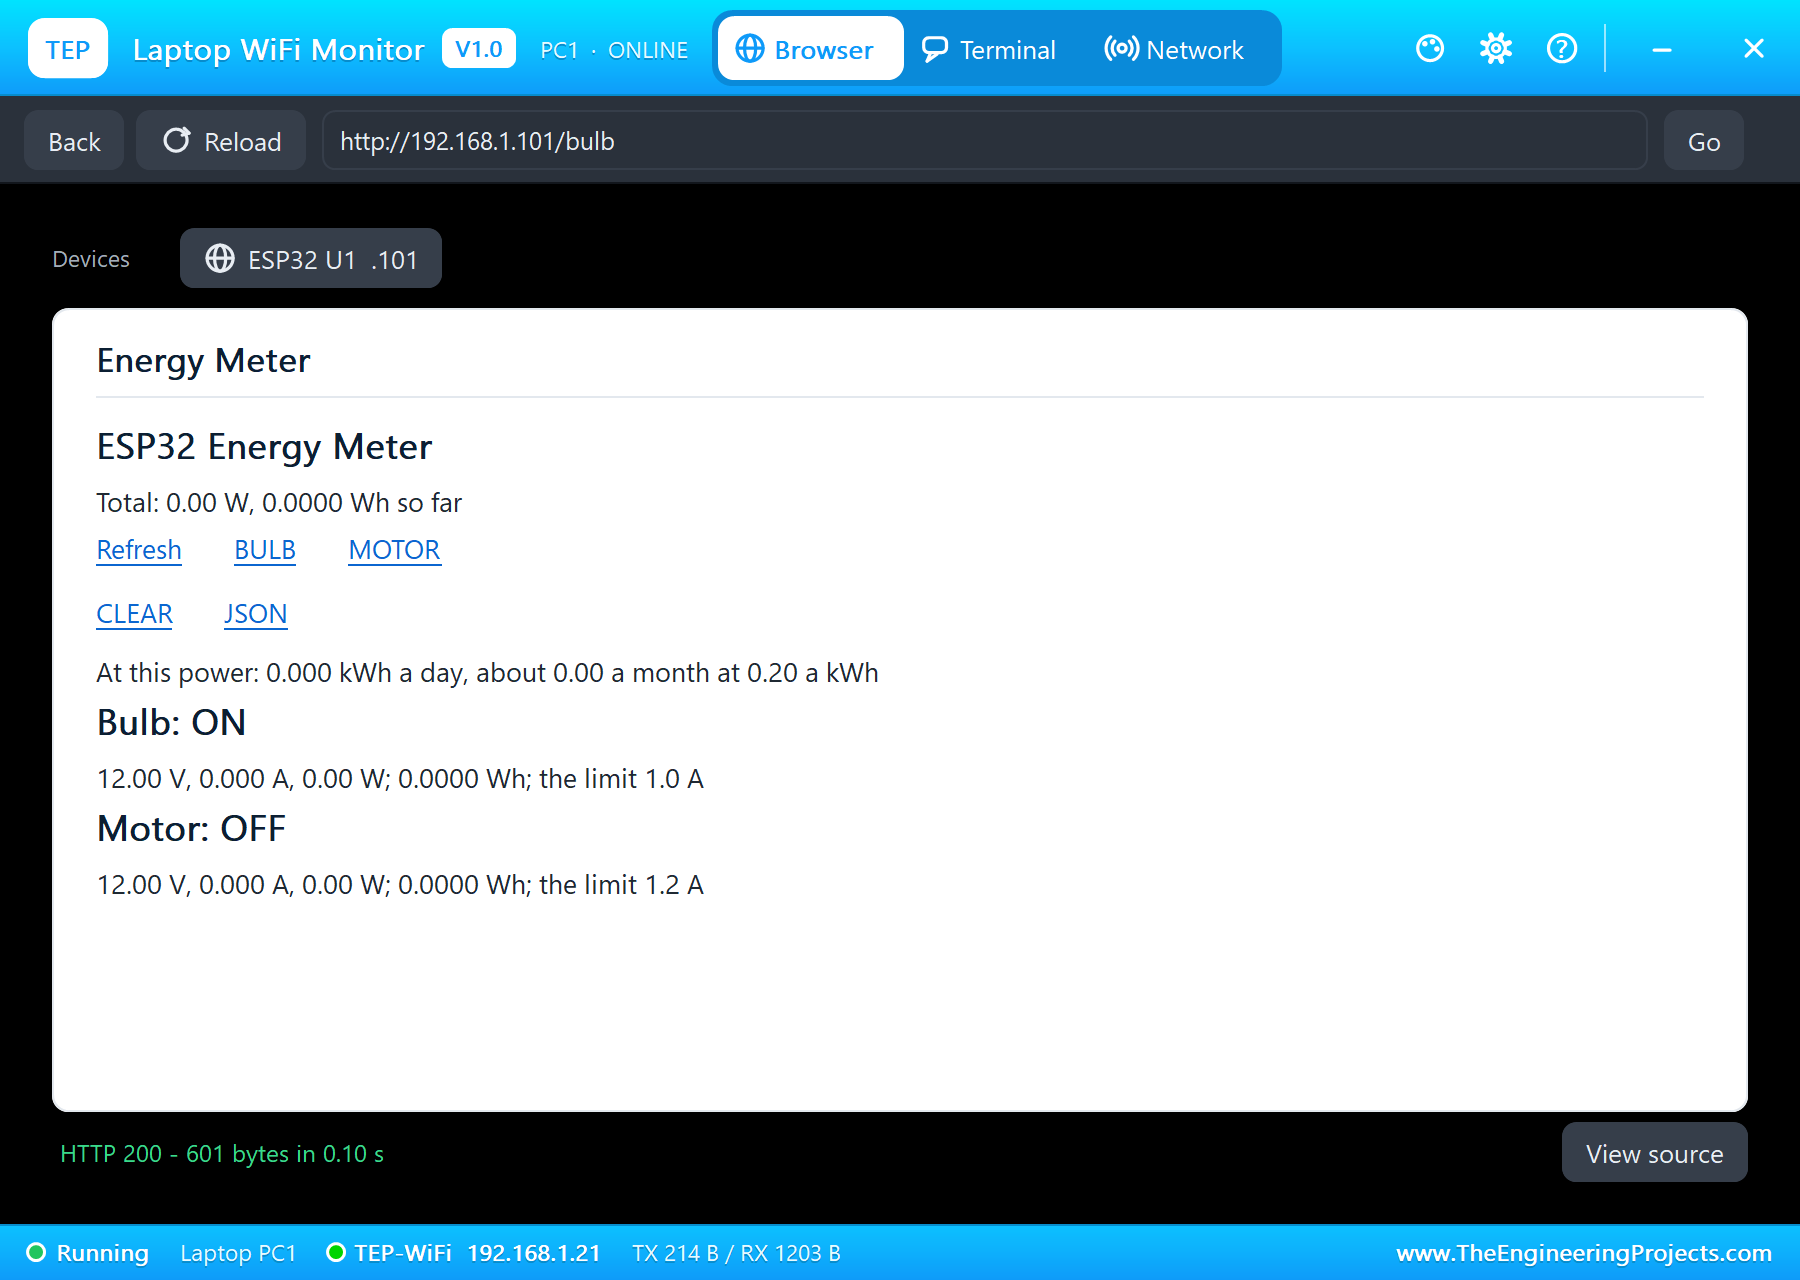
    * Laptop WiFi Monitor (PC1) and Mobile WiFi Monitor (MOB1) open the dashboard at http://192.168.1.101/.
  The sketch reads both sensors ten times a second, works out the power (V x I) and adds up the energy (Wh), shows
  the cost a day and a month at the power of the moment (PRICE_KWH = 0.20), and trips a load that draws more than its
  limit for 1 s (the bulb 1.0 A, the motor 1.2 A); a bulb's switch-on surge is much shorter, so it never trips.
  Switching a tripped load on again resets it, like a circuit breaker. Its pages:
    /            the dashboard: the total power, the energy, the cost, each load's V, A, W, Wh and state
    /bulb        switch the bulb on / off
    /motor       switch the motor on / off
    /clear       clear the energy counters
    /data        everything as JSON

TEST STATUS
  Tested in Proteus 8 Professional on Windows 11, the run that made the tutorial's screenshots:
    * Bulb INA219 at 0x40 OK, Motor INA219 at 0x41 OK; TEP-WiFi joined, the dashboard at http://192.168.1.101/. Both
      loads OFF: 12.00 V on both sensors, 0 A.
    * BULB from the laptop at 14.0 s: 11.96 V, 0.416 A, 4.97 W.
    * MOTOR from the phone at 19.9 s: the next reading caught its starting surge, 2.06 A (24.3 W) - far shorter than
      1 s, so no trip; then 0.152 A, 1.83 W with no load.
    * 4 kg.cm on the motor's shaft (its pop-up): 0.902 A, 10.74 W, within the 1.2 A limit. Total 15.71 W: "0.377 kWh
      a day, about 2.26 a month at 0.20 a kWh".
    * 10 kg.cm: "Motor TRIPPED - 2.03 A for 1 s, the limit is 1.2 A" at 37.3 s; the relay off, the LCD "Motor TRP".
    * The load off (None) and MOTOR from the phone at 43.3 s: the trip reset, 0.154 A again. 0.1029 Wh used in all
      by 52 s.
  52 s of simulation took about 11 minutes on our PC with all the captures.

INSTALLATION
  1. Close Proteus. Extract the WHOLE zip file, for example to your Desktop.
  2. Copy the files from "Proteus Library Files" into the LIBRARY folder of Proteus, for example
     C:\Program Files (x86)\Labcenter Electronics\Proteus 8 Professional\LIBRARY
  3. Copy the files from "Proteus Model Files" into the MODELS folder (next to LIBRARY).
  4. Start Proteus. Press P in the schematic and search for ESP32 DEVKIT V1, INA219ADVTEP or RELAY2ADVTEP to check
     that the parts are there.

RUN THE SIMULATION
  1. Open "Proteus Simulation\ESP32-Smart-Energy-Meter.pdsprj". Keep the .hex and .DLL files beside it.
  2. Press Play. The LCD shows both loads OFF; after about 2 s of simulation the serial monitor prints the address.
  3. Open the Laptop WiFi Monitor (PC1) or the Mobile WiFi Monitor (MOB1) and press Go.
  4. Press BULB and MOTOR on the page to switch the loads; press Refresh to update the page.
  5. In the motor's pop-up, put a load on its shaft (2 to 10 kg.cm): the current and the power rise; enough load and
     the overload trip switches the motor off. Take the load off and press MOTOR to switch it on again.
  Your own sketch: the source is in "Arduino Code". Install the TEP Boards for Proteus add-on from the ESP32 DevKit V1
  post, and the Adafruit INA219, Adafruit BusIO and LiquidCrystal I2C libraries from the Arduino Library Manager;
  choose Tools > Board > ESP32 DevKit V1 (TEP Proteus), export the compiled binary and set the board's PROGRAM
  property to the new .hex file. The same sketch runs on a real ESP32 Dev Module.

PROPERTIES USED IN THIS PROJECT
  U1 ESP32 DEVKIT V1   PROGRAM=ESP32_Energy_Meter.hex
  U2 INA219ADVTEP      ADDRESS=0x40 (the bulb)
  U3 INA219ADVTEP      ADDRESS=0x41 (the motor)
  RLY1 RELAY2ADVTEP    JUMPER=ON (JD-VCC from VCC)
  M1 JGB37MOTORTEP     LOAD=0 (kg.cm; the pop-up sets it)
  LCD1                 ADDRESS=0x27
  PC1, MOB1            HOMEPAGE=http://192.168.1.101/

TROUBLESHOOTING
  * "INA219 at 0x41 missing" on the serial monitor: the two sensors have the same ADDRESS, or SDA / SCL are swapped.
  * A load's current reads negative or 0 while it runs: VIN+ and VIN- are swapped (VIN+ goes to the +12V supply).
  * A relay does not click: its VCC is not 5 V, or IN is not LOW (the inputs are active LOW).
  * The motor trips as soon as it starts with a heavy load: that is the overload trip doing its job; take the load
    off, then press MOTOR.
  * "Connecting to TEP-WiFi......" never ends: the .hex file is missing beside the project, or TEPNET.DLL is not in
    MODELS. Copy the files again and restart Proteus.

LICENCES
  * The project, the sketch, the parts (LIB files) and the models (DLL files) are made by The Engineering Projects
    and are free for learning and for your own projects. The models use only standard Windows libraries.
    The C++ source code of the models is not included; the source code is not included for any model.
  * The .hex file is built from the sketch with TEP Boards for Proteus, the Arduino add-on in the ESP32 DevKit V1
    download (its licences are listed in that download), and contains the libraries below.
  * Proteus is a product of Labcenter Electronics and is not included. ESP32 and INA219 are names of their owners;
    this project is not made or endorsed by them.

THIRD-PARTY LICENCES (compiled into ESP32_Energy_Meter.hex; the libraries' sources are not included)
  Adafruit INA219 Library 1.2.3 - Copyright (c) 2012, Adafruit Industries - BSD licence: Redistribution and use in
  source and binary forms, with or without modification, are permitted provided that the following conditions are
  met: 1. Redistributions of source code must retain the above copyright notice, this list of conditions and the
  following disclaimer. 2. Redistributions in binary form must reproduce the above copyright notice, this list of
  conditions and the following disclaimer in the documentation and/or other materials provided with the
  distribution. 3. Neither the name of the copyright holders nor the names of its contributors may be used to
  endorse or promote products derived from this software without specific prior written permission. THIS SOFTWARE
  IS PROVIDED BY THE COPYRIGHT HOLDERS AND CONTRIBUTORS "AS IS" AND ANY EXPRESS OR IMPLIED WARRANTIES, INCLUDING, BUT
  NOT LIMITED TO, THE IMPLIED WARRANTIES OF MERCHANTABILITY AND FITNESS FOR A PARTICULAR PURPOSE ARE DISCLAIMED. IN
  NO EVENT SHALL THE COPYRIGHT HOLDER OR CONTRIBUTORS BE LIABLE FOR ANY DIRECT, INDIRECT, INCIDENTAL, SPECIAL,
  EXEMPLARY, OR CONSEQUENTIAL DAMAGES HOWEVER CAUSED AND ON ANY THEORY OF LIABILITY, WHETHER IN CONTRACT, STRICT
  LIABILITY, OR TORT (INCLUDING NEGLIGENCE OR OTHERWISE) ARISING IN ANY WAY OUT OF THE USE OF THIS SOFTWARE, EVEN IF
  ADVISED OF THE POSSIBILITY OF SUCH DAMAGE.
  Adafruit BusIO 1.17.4 - Copyright (c) 2017 Adafruit Industries - MIT licence: Permission is hereby granted, free
  of charge, to any person obtaining a copy of this software and associated documentation files (the "Software"), to
  deal in the Software without restriction, including without limitation the rights to use, copy, modify, merge,
  publish, distribute, sublicense, and/or sell copies of the Software, and to permit persons to whom the Software is
  furnished to do so, subject to the following conditions: The above copyright notice and this permission notice
  shall be included in all copies or substantial portions of the Software. THE SOFTWARE IS PROVIDED "AS IS", WITHOUT
  WARRANTY OF ANY KIND, EXPRESS OR IMPLIED.
  LiquidCrystal I2C 1.1.2 - by Frank de Brabander, maintained by Marco Schwartz
  (https://github.com/marcoschwartz/LiquidCrystal_I2C).

VERSION
  V1.0 - the first release of the project.
===============================================================================================================Development1 release
 Development1 release
-
V1.0IoT Smart Energy Meter with ESP32 - Proteus Simulation V1.0this page
V1.0 is the only release in the Download Center so far. When a newer version is published, it appears above with its own download page.
Installation8 steps
 Installation8 steps
From the download to a working project, in order. The steps follow what the package contains.
You will need
- Proteus Design SuiteProteus 8 or newer (Labcenter), on Windows
- Arduino IDE1.8 or 2.x, with the board of the tutorial chosen under Tools → Board
- Any archive toolWindows, macOS and Linux extract ZIP files on their own
Steps
- 1
Extract the archive
Right-click esp32-smart-energy-meter-tep-v1-0-575ed9fe3ce8450ebe74b6ace965cb23.zip and choose Extract All (or open it with 7-Zip or WinRAR) into a folder you can find again. Keep its folder structure (ESP32-Smart-Energy-Meter-TEP-v1.0) as it is.
- 2
Copy the library files into Proteus
Move TEPBULB.LIB, TEPESP32V1.LIB and TEPI2CLCD20X4.LIB and 5 more and the files into the LIBRARY folder of your Proteus installation: C:\Program Files (x86)\Labcenter Electronics\Proteus 8 Professional\LIBRARY for Proteus 8, or the matching Proteus 7 folder. Older versions keep it under ProgramData\Labcenter Electronics. If Proteus is open, close it first.
- 3
Add the simulation model
Copy TEPBULB.DLL, TEPINA219.DLL and TEPJGB37.DLL and 3 more into the MODELS folder next to LIBRARY, so the component can run, not only be drawn.
- 4
Restart Proteus and place the component
Start Proteus, open a schematic, press P (Pick Devices) and search for the component by the name used in the tutorial. It appears with its pins ready to wire.
- 5
Open the sketch in the Arduino IDE
Open ESP32_Energy_Meter.ino, select your board and port under Tools, then Verify. Sketch → Export Compiled Binary writes the HEX file a simulation needs.
- 6
Load the HEX file
In Proteus double-click the microcontroller, set Program File to ESP32_Energy_Meter.hex and run the simulation. For real hardware, flash the same file with your programmer.
- 7
Open the example simulation
Open ESP32-Smart-Energy-Meter.pdsprj in Proteus to see the wiring exactly as in the tutorial. Check the controller's Program File path, then press Play.
- 8
Follow the tutorial
IoT Smart Energy Meter with ESP32 - Proteus Simulation explains every connection and setting in order; keep it open beside the files while you build.
FAQs9 questionsContact TEP
 FAQs9 questions
How do I download IoT Smart Energy Meter with ESP32 - Proteus Simulation V1.0?
Wait for the 30-second guest countdown on this page, then press the download button; the file comes straight from our storage. Members who are logged in skip the wait. If the browser opens the file instead of saving it, use its Save as option. The download link is made for you when the countdown ends and works for 15 minutes; a saved or shared link stops working, so share this page instead.
What is inside the archive?
IoT Smart Energy Meter with ESP32 - Proteus Simulation V1.0 comes as a ZIP archive of 24 files (4.4 MB, 10.0 MB unpacked) holding Proteus library files, simulation model DLLs, a Proteus simulation, an Arduino sketch and compiled HEX firmware. Open the File Structure tab for the full list of 24 files.
What should I do if the download does not start?
Check the browser's download list first; an ad blocker or a company firewall can also hold it back, so try another browser or network. If the file arrives incomplete, download it again. For an installation problem, read the Install tab or tell us in the comments with your software version and the exact error message.
Is this file free?
Yes. Every file in the TEP Download Center is free for learning, personal and student projects. If you share it, link back to this page or the tutorial so others find the latest version.
How do I check that the file arrived complete?
Compare its SHA-256 with the one on this page, 0235ed2a4017cb5b9d89c4eb60279941931490fe8ed3c894280adda3356272b5. In PowerShell run Get-FileHash "esp32-smart-energy-meter-tep-v1-0-575ed9fe3ce8450ebe74b6ace965cb23.zip"; on macOS or Linux run shasum -a 256 "esp32-smart-energy-meter-tep-v1-0-575ed9fe3ce8450ebe74b6ace965cb23.zip". The same value means the file is exactly the one in our storage; a different one means the download broke off, so download it again.
Do I need WinRAR to open the ZIP file?
No. Windows, macOS and Linux open ZIP archives on their own (Extract All, or double-click). WinRAR and 7-Zip work too. Extract the whole archive before using the files.
Where do I put the LIB and IDX files?
Both files go into the LIBRARY folder of your Proteus installation (Proteus 8: C:\Program Files (x86)\Labcenter Electronics\Proteus 8 Professional\LIBRARY; Proteus 7 has the same folder under its own name). Restart Proteus afterwards and search for the component with P.
Which Proteus version does the library need?
The tutorial names the Proteus version the library was made and tested with. Most TEP libraries work in Proteus 7 and Proteus 8; if the component does not appear after a restart, check that both the LIB and the IDX file were copied and that Proteus was fully closed while copying.
How do I get the HEX file into the simulation?
Compile the sketch in the Arduino IDE (Sketch → Export Compiled Binary gives you the HEX next to the sketch), then in Proteus double-click the board, set Program File to that HEX and run.
Members skip the wait. Log in or join TEP.

- 1Total downloads
- 4%Popularity
- ProteusCategory
- 0Comments
- ssyedzainnasirUploaded by
- 11 Nov 2026Uploaded at


 SHA-256
0235ed2a4017cb5b9d89c4eb60279941931490fe8ed3c894280adda3356272b5


 Need help with this file?
 Tags
Related Proteus
All Proteus tutorials


More ESP32 project files
All ESP32 tutorials

Comments
0