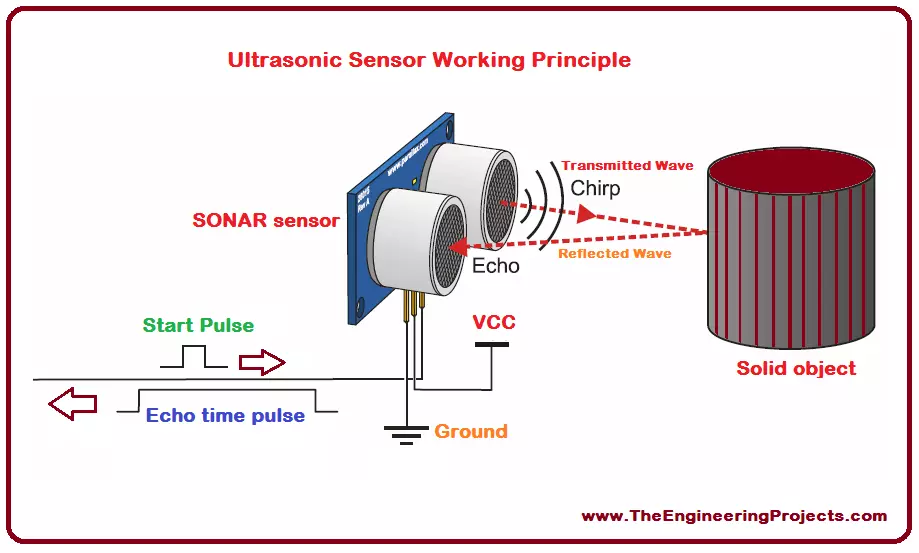
Hello everyone! I hope you all will be absolutely fine and having fun. Today, I will give you a detailed discussion on myRIO Ultrasonic Sensor Interfacing. In this tutorial, you will learn about NI myRIO ultrasonic sensor interfacing. We will go into the details of the ultrasonic sensor and then will move forward towards its interfacing with myRIO. I have already shared many articles on ultrasonic sensors and will share their link in this article as well.
The ultrasonic sensor is also known as SONAR (Sound Navigation and Ranging). As it is clear from its name, it transmits sound waves and these waves are received back to it after getting reflected from any object. It measures the total time elapsed during the entire transmission as well as during the reception of the reflected waves. The ...
Hello guys, in the last post I have explained the Basics of Inverters along with its types and also the inverters topology in other words working of inverters, then we discussed the Major Components of Inverters. Now in this post I am gonna explain the pure sine wave inverter and how to create it. I have used AVR microcontroller int his project. The reason I am using random microcontrollers is that so you guys get a taste of each one. Before starting on sine wave inverter read this article again and again as I have also mentioned the problem i got while making it. You should also read the Modified Sine Wave Design with Code.
I have divided this tutorial into four parts which are shown below. This is a step by step guide to design and build an in ...
Hello friends, hope you all are fine and enjoying good health. Today I am posting the next part of Proteus tutorial which is Interfacing of LCD with PIC Microcontroller. . In the previous post of this tutorial, we have seen the basics of Proteus and discussed various functions of Proteus ISIS. If you are new to Proteus then I would recommend that before starting this tutorial, you should first read the first part so that you get the better idea of Proteus as I wont go in detail in today's post. Today, we will first design a circuit of LCD with PIC on Proteus ISIS which includes PIC Microcontroller and then we will see how to burn the microcontroller in Proteus and at the end we will run our circuit and will display some text on the LCD. It will ...
Hey Guys! Hope you all are doing great and having fun. Today, I am going to discuss the details on the Introduction to Buck Converter. It is a power converter which is mainly used to stepping down the voltage from its input to the output load. It mainly consists of two semiconductors and one energy storing components which can be either capacitor or inductor. It works best in the circuits where electrical isolation is not required.
Introduction to Buck Converter
Buck converters are power converters which are mainly used for converting high voltage to the low voltage. These converters are highly efficient, showing almost 90% of efficiency.
They are useful for performing a special task like converting the huge supply voltage of 12 V in the co ...
Hello friends, hope you all are fine and having fun with your lives. In today's post we are gonna have a look at How to use Temperature Sensor 18B20 in Proteus ISIS. I will use Arduino board as a microcontroller and will connect the temperature sensor with it and then will display the code on LCD. I have already posted the same tutorial in which I have done Interfacing of Temperature Sensor 18B20 with Arduino but in that project I have used the real components and designed the hardware. But today, I will just show you the simulation so that you could test the simulation first and then design it in hardware.
Temperature Sensor 18B20 is the most commonly used temperature sensor. Its a one wire sensor means it sends data through a single wire and we ...
Hello Learner! I hope you are doing great. Welcome to another tutorial at The Engineering Projects. This blog is the part of series we have stated about the Digital Logic Circuits. Previous to this, we learned Implementation of SK Flip Flops in Proteus. at the present day, we'll seek the knowledge about the following points:
What are Flip Flops?
What are JK Flip Flops?
How can we record the Truth Table of JK Flip Flops?
What is the Procedure to Construct the circuit of JK Flip Flop through Logic Gates and IC circuit?
Moreover, we'll also have some useful bits of Information in Did you know Sections. Let' see the explanation of the concepts given above.
Flip Flops
The Flip Flops are the building blocks of many of the Electronic Circuits. ...
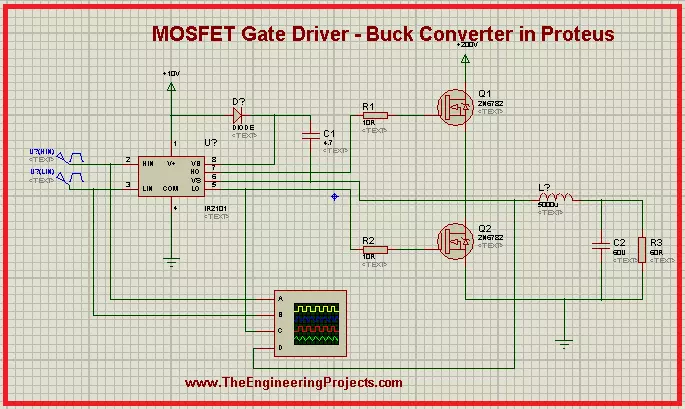
Hey Geeks! Welcome to The Engineering Projects. We hope you are doing great. MOSFET is a predominant component widely used in electronics due to its performance. We are working on the Projects of MOSFET and today's experiment is really interesting. We are working on the MOSFET Gate Driver and we will work on the following concepts:
Introduction to MOSFET Gate Driver.
Circuit of MOSFET Gate Driver.
Working of MOSFET Gate Driver.
Simulation of MOSFET Gate Driver in Proteus.
Applications of MOSFET Gate Driver.
You will find important information about the topic in DID YOU KNOW sections.
Introduction to MOSFET Gate Driver
We all know MOSFET is a type of transistor and is used in a wide range of circuits. It has many interesting features and ...
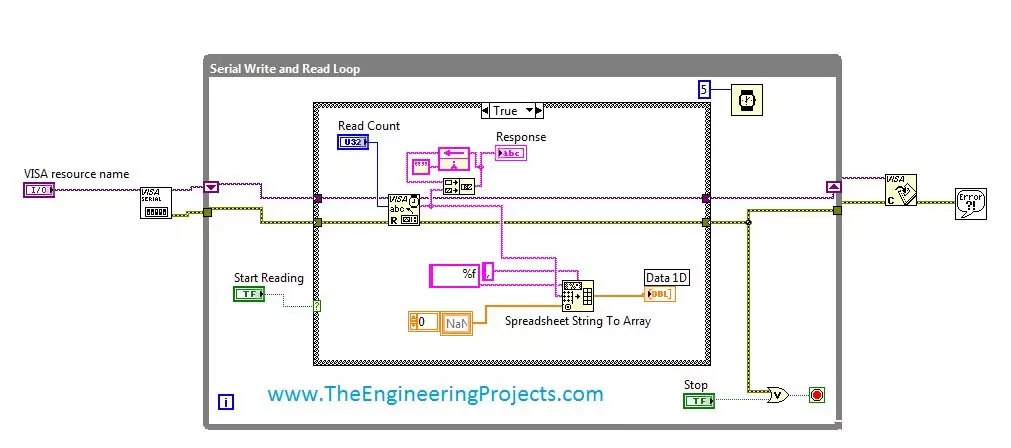
Hello friends, hope you all are fine and enjoying good health. Today's post is my first post on LabView Software. I have worked on LabView quite a lot in past but these days I am continuously working on LabvView so I thought to write some tutorials on it. In today's tutorial, I will explain in detail How to get continuous data from COM Port in LabView software. LabView is a very handy tool for the engineers. One can easily plot graphs and can work on different hardware modules with it. One of the best feature of LabView is its extensive help desk. There are many examples present in it which are ready to run and can help a lot, moreover their online is also very extensive. I got into many problems while working on it and I never get stuck, I just s ...
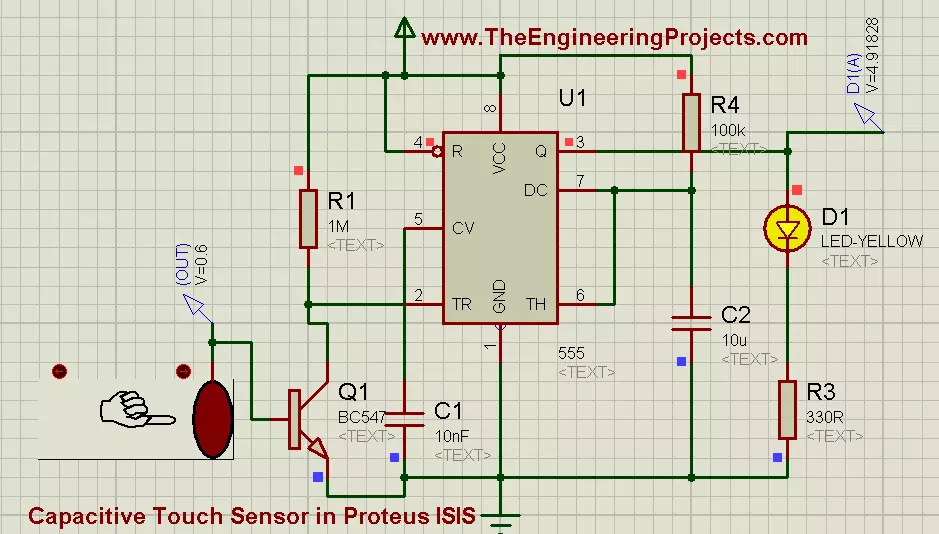
Hello friends, I hope you all are fine and enjoying. Today i am going to share my new project's tutorial which is How to use Capacitive Touch Sensor in Proteus ISIS. It is a very interesting project, and we will be using a 555 Timer while designing this project. If you recall our previous project tutorial which was Angle Control of Servo Motor using 555 Timer in Proteus ISIS, in which 555 timer was generating PWM and was controlling the rotating angle of servo motor.
Now in this project, we have a little different context and now we will be using a 555 Timer in collaboration with Capacitive Touch Sensor. First of all, lets have a little introduction of Capacitive Touch Sensor. Well, if we talk broadly then, in Electrical Engineering Capacitive Tou ...
Hello friends, I hope you all are doing great. In today's tutorial, we will have a look at How to use Voltmeter & Ammeter in Proteus ISIS. It's our 4th tutorial in Proteus series. While designing an electronics project, voltage & current measurements are essential debugging features, as they help in understanding circuit behavior.
Proteus has builtin instruments for voltage & current measurement. We have have their probes and today we will discuss them in detail. First have a look at Voltmeter in Proteus ISIS:
How to use Voltmeter in Proteus ISIS
DC Voltmeter is used to measure the voltage difference across any DC component.
In order to use DC Voltmeter, we need to click on Virtual Instrum ...