Hello Friends! I hope you all are doing great welcoming 2022. With the start of the New Year, we would like to bring to you a new tutorial series. This tutorial series is on a programming language, plotting software, a data processing tool, a simulation software, a very advanced calculator and much more, all wrapped into one package called MATLAB.
We would welcome all the scientists, engineers, hobbyists and students to this tutorial series. MATLAB is a great tool used by scientists and engineers for scientific computing and numerical simulations all over the world. It is also an academic software used by PhDs, Masters students and even advanced researchers.
MATLAB (or "MATrix LABoratory") is a programming language and numerical computing environm ...
Hello friends, hope you all are having fun and enjoying life. In today's post we are gonna see how to send data to serial port in MATLAB. Its a requested tutorial, asked by a follower and after giving him the code, I thought to share it on our blog so that others could also get benefit from it. We have discussed serial port many times and have seen how to communicate with it using different software but we haven't yet discussed how to send data to serial port in MATLAB. So, in today's post I am gonna share the complete code for sending data to serial port in MATLAB.
Serial port is most common way of communication, we can send or receive data using serial port. Normally, in engineering projects there's a need to send or receive data from microcontr ...
Hello Friends, hope you all are fine and having fun. In today tutorial i am going to elaborate How to Automatically Connect with Wifi SSID using Arduino YUN. If you recall one of my previous tutorials named Getting started with Arduino YUN , in which i gave a brief introduction about Arduino YUN, its working and features. In that tutorial, I have explained How to connect Arduino YUN with Wifi manually. A little problem encounters while connecting Arduino manually to available wifi networks that if wifi connection drops then, then Arduino will also disconnect automatically and if wifi connection is energized again, it will still remain disconnected unless you reconnect it by yourself. This thing has very serious drawbacks in industrial projects, wh ...
Hello friends, hope you all are fine and having fun with your lives. Today's post is about How to increase Workspace in Proteus. It's our 3rd tutorial in Proteus series. Its quite a simple tutorial and along with this trick, I will also share few commonly used features or Proteus. Once, I was working on a simulation project in which I have to design a complete load management system in Proteus and it was quite messy as I have to include a lot of components and the area of Proteus got quite small for that and then I encountered this problem i.e. where to place the components.
You have seen in Proteus software that there's a blue rectangle which is considered as the workspace in Proteus. This area is constant and doesn't increase or decrease on its ...
Hello friends, hope you all are fine and having fun with your lives. In today's post we are gonna have a look at How to use Temperature Sensor 18B20 in Proteus ISIS. I will use Arduino board as a microcontroller and will connect the temperature sensor with it and then will display the code on LCD. I have already posted the same tutorial in which I have done Interfacing of Temperature Sensor 18B20 with Arduino but in that project I have used the real components and designed the hardware. But today, I will just show you the simulation so that you could test the simulation first and then design it in hardware.
Temperature Sensor 18B20 is the most commonly used temperature sensor. Its a one wire sensor means it sends data through a single wire and we ...
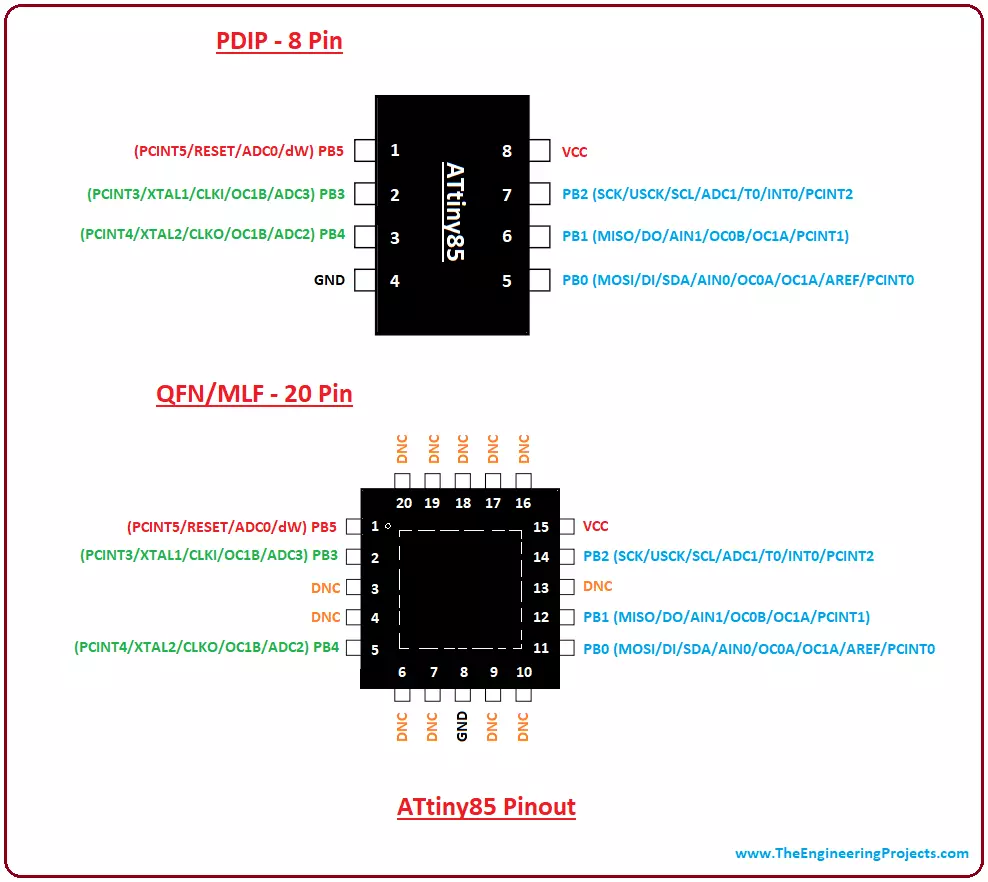
Hey Guys! Hope you are doing well. I am back to give you a daily dose of valuable information. Today, I'll discuss the details on the Introduction to ATtiny85. It is an 8-bit AVR microcontroller, introduced by Microchip, and is based on RISC CPU. It comes with 8-pin interface (PDIP) and falls under the category of low power controllers. Programmable watchdog timer and 10-bit ADC converter are added in the device that makes it suitable for sensor interfacing and resetting the device in case it gets stuck in an infinite loop.
Microchip never fails to satisfy the requirements of any individual by providing flawless microcontroller modules that are directly or remotely connected with automation and embedded systems. With the invention of these tiny o ...
Hi Friends! Hope you are doing well. We always strive to give you valuable information as per your needs and requirements so you keep coming back for what we have to offer. Today, I'll uncover the details on the Introduction to ATmega168. It is an 8-bit AVR microcontroller that comes with 32-pin interface and is mainly based on RISC CMOS technology. The Program memory is 16K, based on Flash, and incorporates read-write capabilities.
The module comes with a wide temperature range from -40 to 85 ºC while operating voltage ranges from 1.8 to 5.5 V. If you are working on project that is related to automation and embedded systems, you can not write off the importance of this module that comes with an ability of performing a number of functions at once ...
Hey pals! I wish you are doing great. Welcome to a new lesson about the Digital Logic Circuits in The Engineering Projects. In the past tutorials, we Designed the Basic JK Flip Flop. Today, we'll talk about the following Points:
What are JK Flip Flops?
What are the Master Slave Flip Flops?
How does the Circuit of Master Slave Flip Flop looks?
How types of JK Flip Flop different from each other?
How does the simulation of Master JK Flip Flip take place in Proteus ISIS?
Moreover, we'll also learn some key concepts in DID YOU KNOW portions. Yet Let's recall some points about the topic. Flip Flops are the building block of a huge number of electronic systems and devices. A Flip Flop is a Digital circuit that can take the bits as input, wor ...
Hello fiends, hope you all are fine and having fun with your lives. In today's tutorial, I am going to share a new project designed in MATLAB and named as Hexapod Simulation in MATLAB. We all know about the Hexapod, its a special kind of robot which has six legs. Hexa is used for six so its quite obvious that hexapod has six legs on it.
I have designed this project on a client's request and today I thought to share it with you guys. Because this Hexapod simulation in MATLAB is designed after a lot of efforts by our TEP team that's why this simulation is not free to download but we have placed a small price on it so that engineering students can buy it easily. So, let's get started with Hexapod Simulation in MATLAB.
Hexapod Simulation in MATLAB
...
Hello everyone! I hope you all will be absolutely fine and having fun. Today, I am going to share my knowledge about Multi Color Detection in MATLAB. Color Detection scheme plays a vital role at some places. Like in Image processing technique the detection of specific color among the different colors is necessary to perform some action on it. For example there are three cars of the colors red, blue and green and we want to wash the red car. You should also have a look at Color Detection in Images using MATLAB because I am gonna use the same code and will add some improvements in it. Moreover, if you are working on Live Videos instead of Images then you should have a look at Color Detection in Live Video using MATLAB.
For this purpose we need to ...