I hope you all are doing great. In today's tutorial, we are gonna have a look at detailed Introduction to ESP-01. ESP-01 is an inexpensive, small-sized WiFi module, which consists of TCP/IP stack along with a built-in microcontroller. So, we can directly program this small chip and can bring WiFi capability in our Embedded projects. When first time this ship came into the market in August 2014, it got a lot of attention by users. The main reason for it to seek attention is that this module allows the microcontroller to connect with a WiFi available (and programmed to connect) and it follows Hayes Style Commands and develops a TCP/IP network.
ESP-01 chip integrates an antenna, RF balun, power amplifier, filters, and power arrangement module. ESP-01 is used in industry and many projects a ...
Hello friends, hope you all are fine and enjoying. Yesterday I got a mail from a friend, and he requested me to explain a tutorial about Seven Segment Display. So today, I am going to share my new project tutorial which is Seven Segment Display using 555 Timer in Proteus ISIS. It is a very simple project to understand Modern Digital Electronics.
As you all know, now a days all the Digital Display’s uses Seven Segment Display. So first of all let’s have a little introduction about Seven Segment Display. How they are fabricated and how their LED’s glow in such a beautiful manner? Seven Segment Display (SSD) is the form of electronic device, used to display decimal numbers. Seven Segment Displays are commonly designed in Hexagonal shape but according ...
Hello friends, i hope you all are fine and enjoying in life. On a friends request, today i am going to share a new tutorial which is 'Getting Started with Arduino Software'. Previously i have uploaded a large no of project tutorials made on 555 timers and some MATLAB based Simulations. Now we are going to touch the next level and from now on we will work on mostly projects containing Arduino microcontroller.
To get started with Arduino microcontroller, we first need to learn the operating software of Arduino microcontroller. This tutorial is very informative and i will be using Arduino software 1.0.5. It is a very basic level software and very easy to learn. IF you have already worked on Arduino software then you don't need to go through it. This ...
Hello geeks, welcome to our new project. In this project, we are going to make a very interesting project which is an Up-Down counter. Most of us who have an electronics background or studied digital electronics must know the counter. Counter is a simple device which counts numbers. As per the digital electronics, there are two types of counter, the Up counter which counts in increasing order and another is Down counter which counts in decreasing order. And every counter has a reset limit, on which the counter resets to its initial value and starts the counting again. The limit of every counter depends on the bits of counter. For example, we have a 8 bit Up counter which means it will count upto 255 and afterwards it will reset and will start agai ...
Hello friends,I hope you all are fine and having fun with your lives. In today's tutorial, I am going to share a new Proteus Library named as Flex Sensor Library for Proteus. I am quite excited while sharing this one because we are the first one to design this library and share it online. Although, I wanna add one thing here that most of the flex sensors are analog sensors and their resistance changes over bending and believe me I have tried my best to design an analog sensor but despite the efforts we couldn't so I am sharing a digital version of Flex Sensor. So, its not gonna detect how much its bent but it will detect whether its up or bent. So, I thought to share it with you guys. It's better to have something than nothing. You should also have ...
Hello everyone I hope you all will be absolutely fine and having fun. Today, I am going to share my knowledge on Introduction to TL494. It supports all of the functions that are necessary for the Pulse Width Modulation (PWM) control circuits. Power supply control is the basic purpose of the TL494 device. It has an output control circuit, a flipflop, dead time comparator, two different error amplifiers, 5V reference voltage, oscillator and a PWM comparator. TL 494 operates properly between the frequency of 1kHz to 300kHz.
The Dead Time Comparator (DTC) provides around 5% of dead time. Both of the error amplifiers display a common-mode voltage from -0.3V to (Vcc-2)V. If we provide a sawtooth wave at the CT terminal and terminate RT to the referenc ...
Hello friends, hope you all are having fun and enjoying life. Today's post is quite a simple one and is about designing of circuit diagram of buzzer in Proteus ISIS. Buzzer is quite a common electrical component which is used in almost every Embedded Systems project. For example, you have seen a simple UPS, it gives a beep each time the light goes off or it has depleted its battery. Buzzer is normally used for given some indication and normally this indication is kind of a warning.
Proteus has a builtin component for buzzer and its an animated component means it gives a sound (beep) when its turned ON. So, I am gonna use that one and will give you an actual beep on it. So, it won't be much difficult and quite a simple procedure. In this post, I am ...
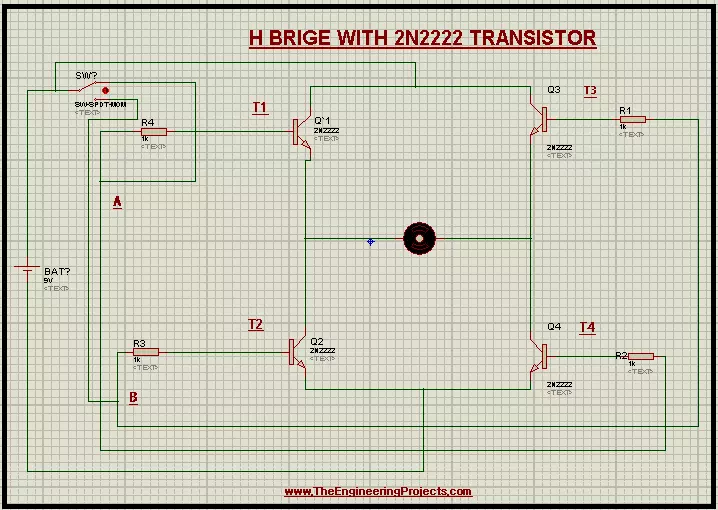
Hey Learners! Welcome to The Engineering Projects. We hope you are doing great. Our team is working on transistors and today, we'll design a circuit for using the 2N2222 Transistor. In this chapter you will learn:
What is H Bridge with 2N2222 Transistor?
How do the 2N2222 Transistor works?
What is the working of H Bridge?
How can we run the circuit of H Bridge in Proteus using 2N2222 Transistor?
By the same token, you will also learn important information about the topic in DID YOU KNOW Sections.
Introduction to H-Bridge
In electronic circuits, the direction of quantities like the flow of current, EMF, Electric field lines matter a lot. The H Bridge is used to control such motors through its specialized circuitry. The H Bridge is defined ...
Hi Guys! Hope you’re well today. I welcome you on board. Happy to see you around. In this post today, I’ll detail the Introduction to TL081.TL081 is a high-speed general-purpose JFET input single operational amplifier that comes with high noise immunity and better offset characteristics. It carries high input impedance and low offset current. The offset voltage of this device makes it an ideal match for amplifier applications. It incorporates well-matched bipolar transistors and high-voltage JFET in a compact IC.
Read this post till the end as I’ll detail the complete Introduction to TL081 covering datasheet, pinout, features, and applications. Let’s jump right in.
Introduction to TL081
TL081 is a high-speed JFET input single operational amplifier that comes with high slew rates, ...
Hello Everyone! I always love to keep your stomach filled with useful information so you can excel and grow in your relevant field. Today, I am going to reveal the details on the Introduction to 1n914. It is a small signal diode that allows the current to flow in one direction and blocks the current in other direction. It features operating junction temperature of 175 ºC and forward surge current of 4A. It is widely used for industrial and power management applications. I'll give you a brief details about this diode, so you don't have to go anywhere else for finding the information regarding this small signal diode. Let's get started.
Introduction to 1n914
1n914 is a small signal diode that is widely used in portable devices.
It exhibits zero ...