Hello everyone! I hope you all will be absolutely fine and having fun. Today, I am going to give a detailed discussion on Introduction to LF411. LF-411 is a Junction Field Effect Transistor (JFET) input Operational Amplifier (Op-amp). It is the most common module available in the market these days due to its cost efficiency. LF 411 has low input offset voltage. Input offset voltage drift is guaranteed for LF-411. A very low supply current is needed for this device. It provides higher slew rates as well as high gain bandwidth product.
Moreover, LF411 also provides lower input bias current as well as lower input offset currents. It is an 8 pin operational amplifier. The details about its pins will be discussed later. Due to its low cost and high ...
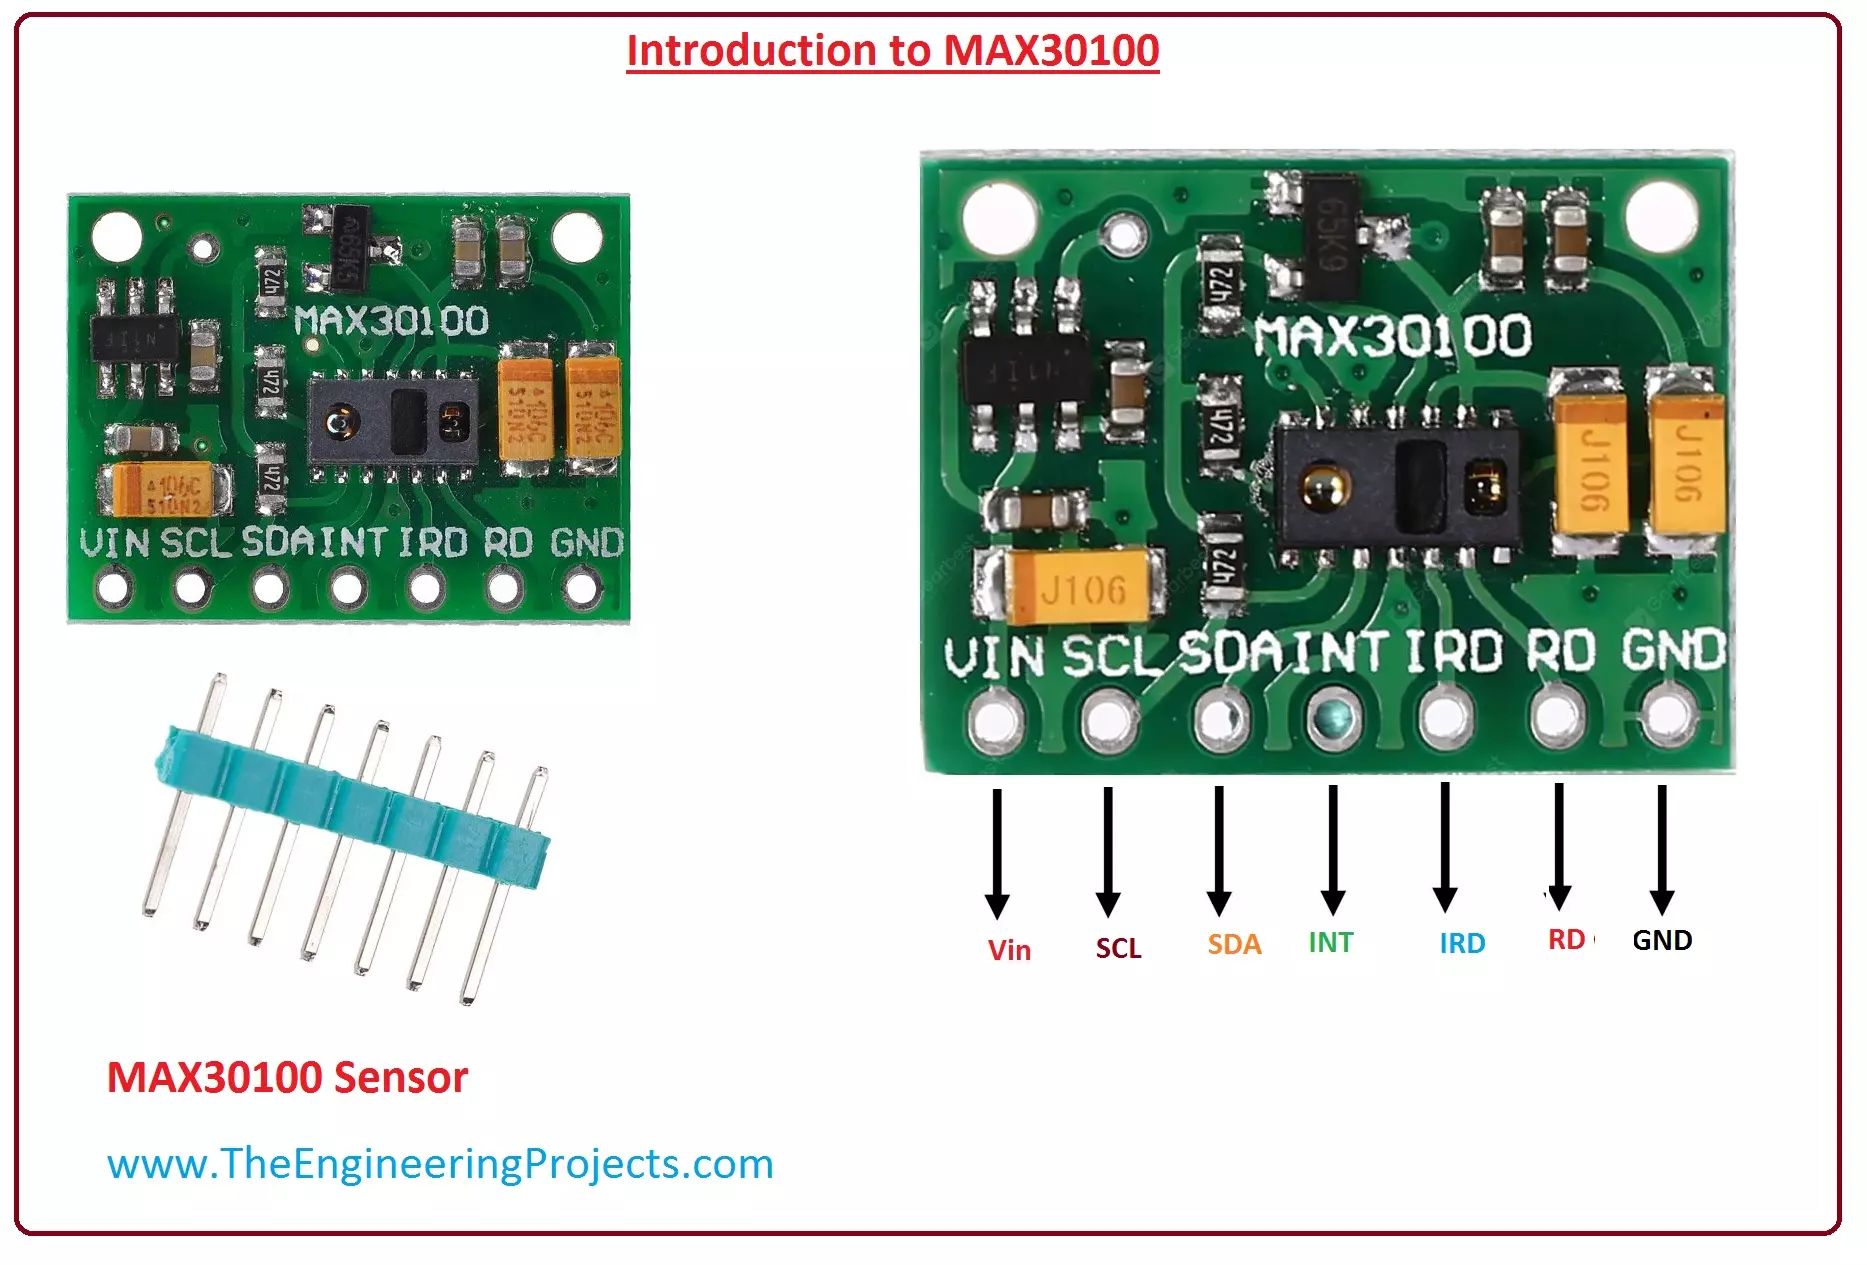
Hello friends, I hope you all are doing great. In today's tutorial, we are gonna have a look at a detailed Introduction to MAX30100. MAX30100 is a heart pulse rate monitor sensor. This sensor consists of two Light Emitting Diodes (LEDs), (one emits infrared light and the other emits red light) modifiable optics, low noise signal processor that detects heart pulse rate signal. Its operating voltage is from 1.8v to 3.3v.
The MAX30100 is used in different industrial and medical equipment such as fitness measurement devices, medical devices, and different wearable instruments. In today's post, we will have a look at its working, pinout, protocol, features, etc. I will also share some links where I have interfaced it with other microcontrollers. If you have any questions about it please ask ...
Hi Friends! I welcome you on board. Happy to see you around. In this post today, I’ll walk you through the Introduction to Arduino Pico.
Arduino Pico is the world’s smallest Arduino compatible board, as said by Arduino Official Page. Because of its small size & low weight, it is normally used in autonomous projects i.e. drones, robots, quadcopters etc. where size is the real issue.
Arduino boards are introduced in modern electronics, to make projects economical and easy to design. A common man with no prior knowledge about programming can get hands-on experience with them. This smallest Pico version is readily available to turn your innovative thoughts into reality.
I suggest you read this post all the way through as I’ll detail the complete I ...
Hi guys, I hope you are good and doing well in your life. In this article, I am going to tell you about a new pH Sensor Library for Proteus. I hope you all will enjoy it and find it useful. We are all well aware of pH Sensors which are used for the detection of pH of different fluids. By knowing the pH of a liquid we can tell whether the liquid is acidic or basic. You can’t find a pH sensor in Proteus software, so we designed a pH sensor for simulation purposes. You can interface this pH Sensor with any Microcontroller, for example: Arduino, PIC Microcontroller, 8051 Microcontroller etc.
In this pH Sensor Library, I have added four different pH Sensors, which are used for the detection of the pH of any fluid. Since we can’t place real liquid and m ...
Hi Guys! Hope you’re well today. I welcome you on board. In this post today, I’ll detail the complete Introduction to BD138.
BD138 is a PNP transistor that is incorporated in audio amplification and switching applications. It is composed of silicon material and comes in the TO-126 package. It contains three terminals, where small input current across one terminal is used to produce large output current across the remaining two terminals. The collector-base and collector-emitter voltages are 60V with emitter-base voltage 5V that illustrates the amount of voltage it requires to bias the transistor.
In this post I’ll walk you through the Introduction to BD138 detailing pinout, working, physical dimensions, applications, power ratings, and alternati ...
Hello friends! I hope you are doing great. Today, we are discussing the latest version of the Arduino Mega 1280 library for Proteus. This can be used in both versions (Proteus 7 and Proteus. We have shared the previous versions, which are the Arduino Mega 1280 library for Proteus and the Arduino Mega 1280 library for Proteus V2.0 with you. With the advancement in the version, these microcontrollers have a better structure and the design is closer to the real microcontrollers.
In this article, I will discuss the introduction of the Arduino Mega 1280 in detail. Here, you will learn the features and functions of this microcontroller. Then, we’ll see how to download and install this library in Proteus. In the end, we’ll see a mini project using the Arduino Mega 1280 V3.0. Let’s move towards ...
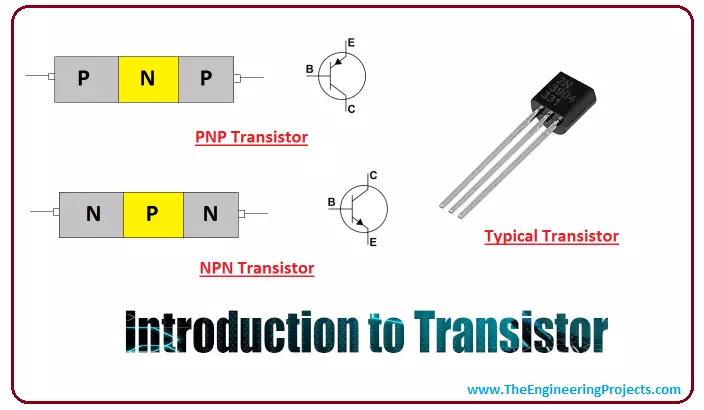
Hi Guys! Hope you are doing fine. Today, I am going to give you a detailed Introduction to Transistor. A transistor is a semiconductor device that comes with three terminals, where a small current at one terminal is used to control current at the other terminals. Transistors are mainly used for the amplification of electronic signals. Transistors were first invented by American Physicists John Bardeen in 1947.
Before the inception of transistors, vacuum tubes were used to control the electronic signals. These vacuum tubes come with anode & cathode arrangement and the potential difference across these ends produces the electric current. In the later versions, a filament is added which is used to provide heat to the cathode that directs the electrons towards the anode side. Their complex ...
Hello Guys! Hope you’re well today. I welcome you on board. In this post today, I’ll walk you through the Introduction to BD136.
BD136 is a medium power general-purpose transistor mainly used for switching and audio amplification purposes. It belongs to the PNP transistor family and comes with collector current 1.5A, indicating it can drive loads under 1.5A. The amplification factor ranges from 40 to 250, which means it can amplify the input signal up to 250 times. Both collector-emitter and collector-base voltages are 45V while the emitter-base voltage is 5V, indicating only 5V is required to bias this transistor.
I suggest you read this entire post, as I’ll be detailing complete introduction to BD140 covering pinout, working principle, power r ...
Hello Friends! Hope you’re well today. I welcome you on board. In this post today, I’ll be discussing the Introduction to 1n5408.
The 1n5408 is a component where current flows in one direction only. It comes with two pins named anode and cathode. The Anode side is positive from where the current enters the diode and the cathode is negative from where the current leaves the diode. The colored band side is the indication that the side is the cathode and the other side without the colored band is the anode of the diode.
Just stay with me for a little while as I’ll walk you through the 1n5408 power diode pinout, datasheet, features, equivalents, and applications.
Let’s get started.
Introduction to 1N5408
The 1n5408 is a power diode where current ...
Hello Friends! Hope you are doing great. We always come up with useful information that helps you solve your problems and keeps you updated with the knowledge that resonates with your needs and demands.
Today, I am going to unlock the details on the Introduction to 2n6491. It is an NPN power transistor mainly used for general purpose amplification and switching purpose.
It exhibits high DC current gain and comes with TO-220 package. I'll break down all information related to this transistor in easy steps, so you can grab the main concept easily. Let's dive in and explore what is this about and its main applications.
Introduction to 2n6491
2n6491 is an NPN (negative-positive-negative) bipolar junction transistor mainly used for general purpose ...