Hello friends, I hope you all are doing great. In today's tutorial, I am going to share a new Solar Panel Library for Proteus. I hope you guys are gonna enjoy this Proteus Library as it's not available in Proteus and we are presenting it for the first time. :) I am quite proud of my team. B|
We all know about Solar Panels which is an excellent renewable energy source. It is widely adopted by the inhabitants of this green planet as its totally free and converts solar energy into electricity. Solar panels are also used a lot in Engineering Projects especially related to renewable energy sources. Proteus doesn't have solar panels in its database that's why our team has designed this library. Using this Solar Panel Library for Proteus, now you can eas ...
Hello friends, hope you all are fine and having fun with your lives. In today's post, I am going to share a new DS1307 Library for Proteus. Recently, I have shared the GSM Library for Proteus, which was really appreciated by the readers so I got quite excited and have designed another new Proteus Library. Currently I am working on many Proteus Libraries. In future, I am gonna design almost all the sensors in Proteus. So stay tuned with us.
Anyways coming to today's post, today we are gonna have a look at DS1307 Library for Proteus. Using this library, now you can quite easily simulate DS1307 module in Proteus in a quite stylish way. ;) I have designed it in red color because its available in red color in market. DS1307 module is already available ...
Hello everyone! I hope you all will be absolutely fine and fun. Today, I am going to tell you that how to make a simple algorithm for Stepper Motor Speed Control using Arduino. I have already discussed with you about DC Motor Direction Control using Arduino, Matlab and NI LabVIEW. Moreover, I have also discussed the DC Motor Speed Control using Arduino,Matlab and LabView. If you are working on Stepper Motor, then you must have a look at Stepper Motor Direction Control using Arduino, Stepper Motor Direction Control using Matlab and Stepper Motor Direction Control using NI LabVIEW. Now, in this tutorial I will explain you about the program which will helpful for Stepper Motor Speed Control using Arduino. Before going into the details of this tutori ...
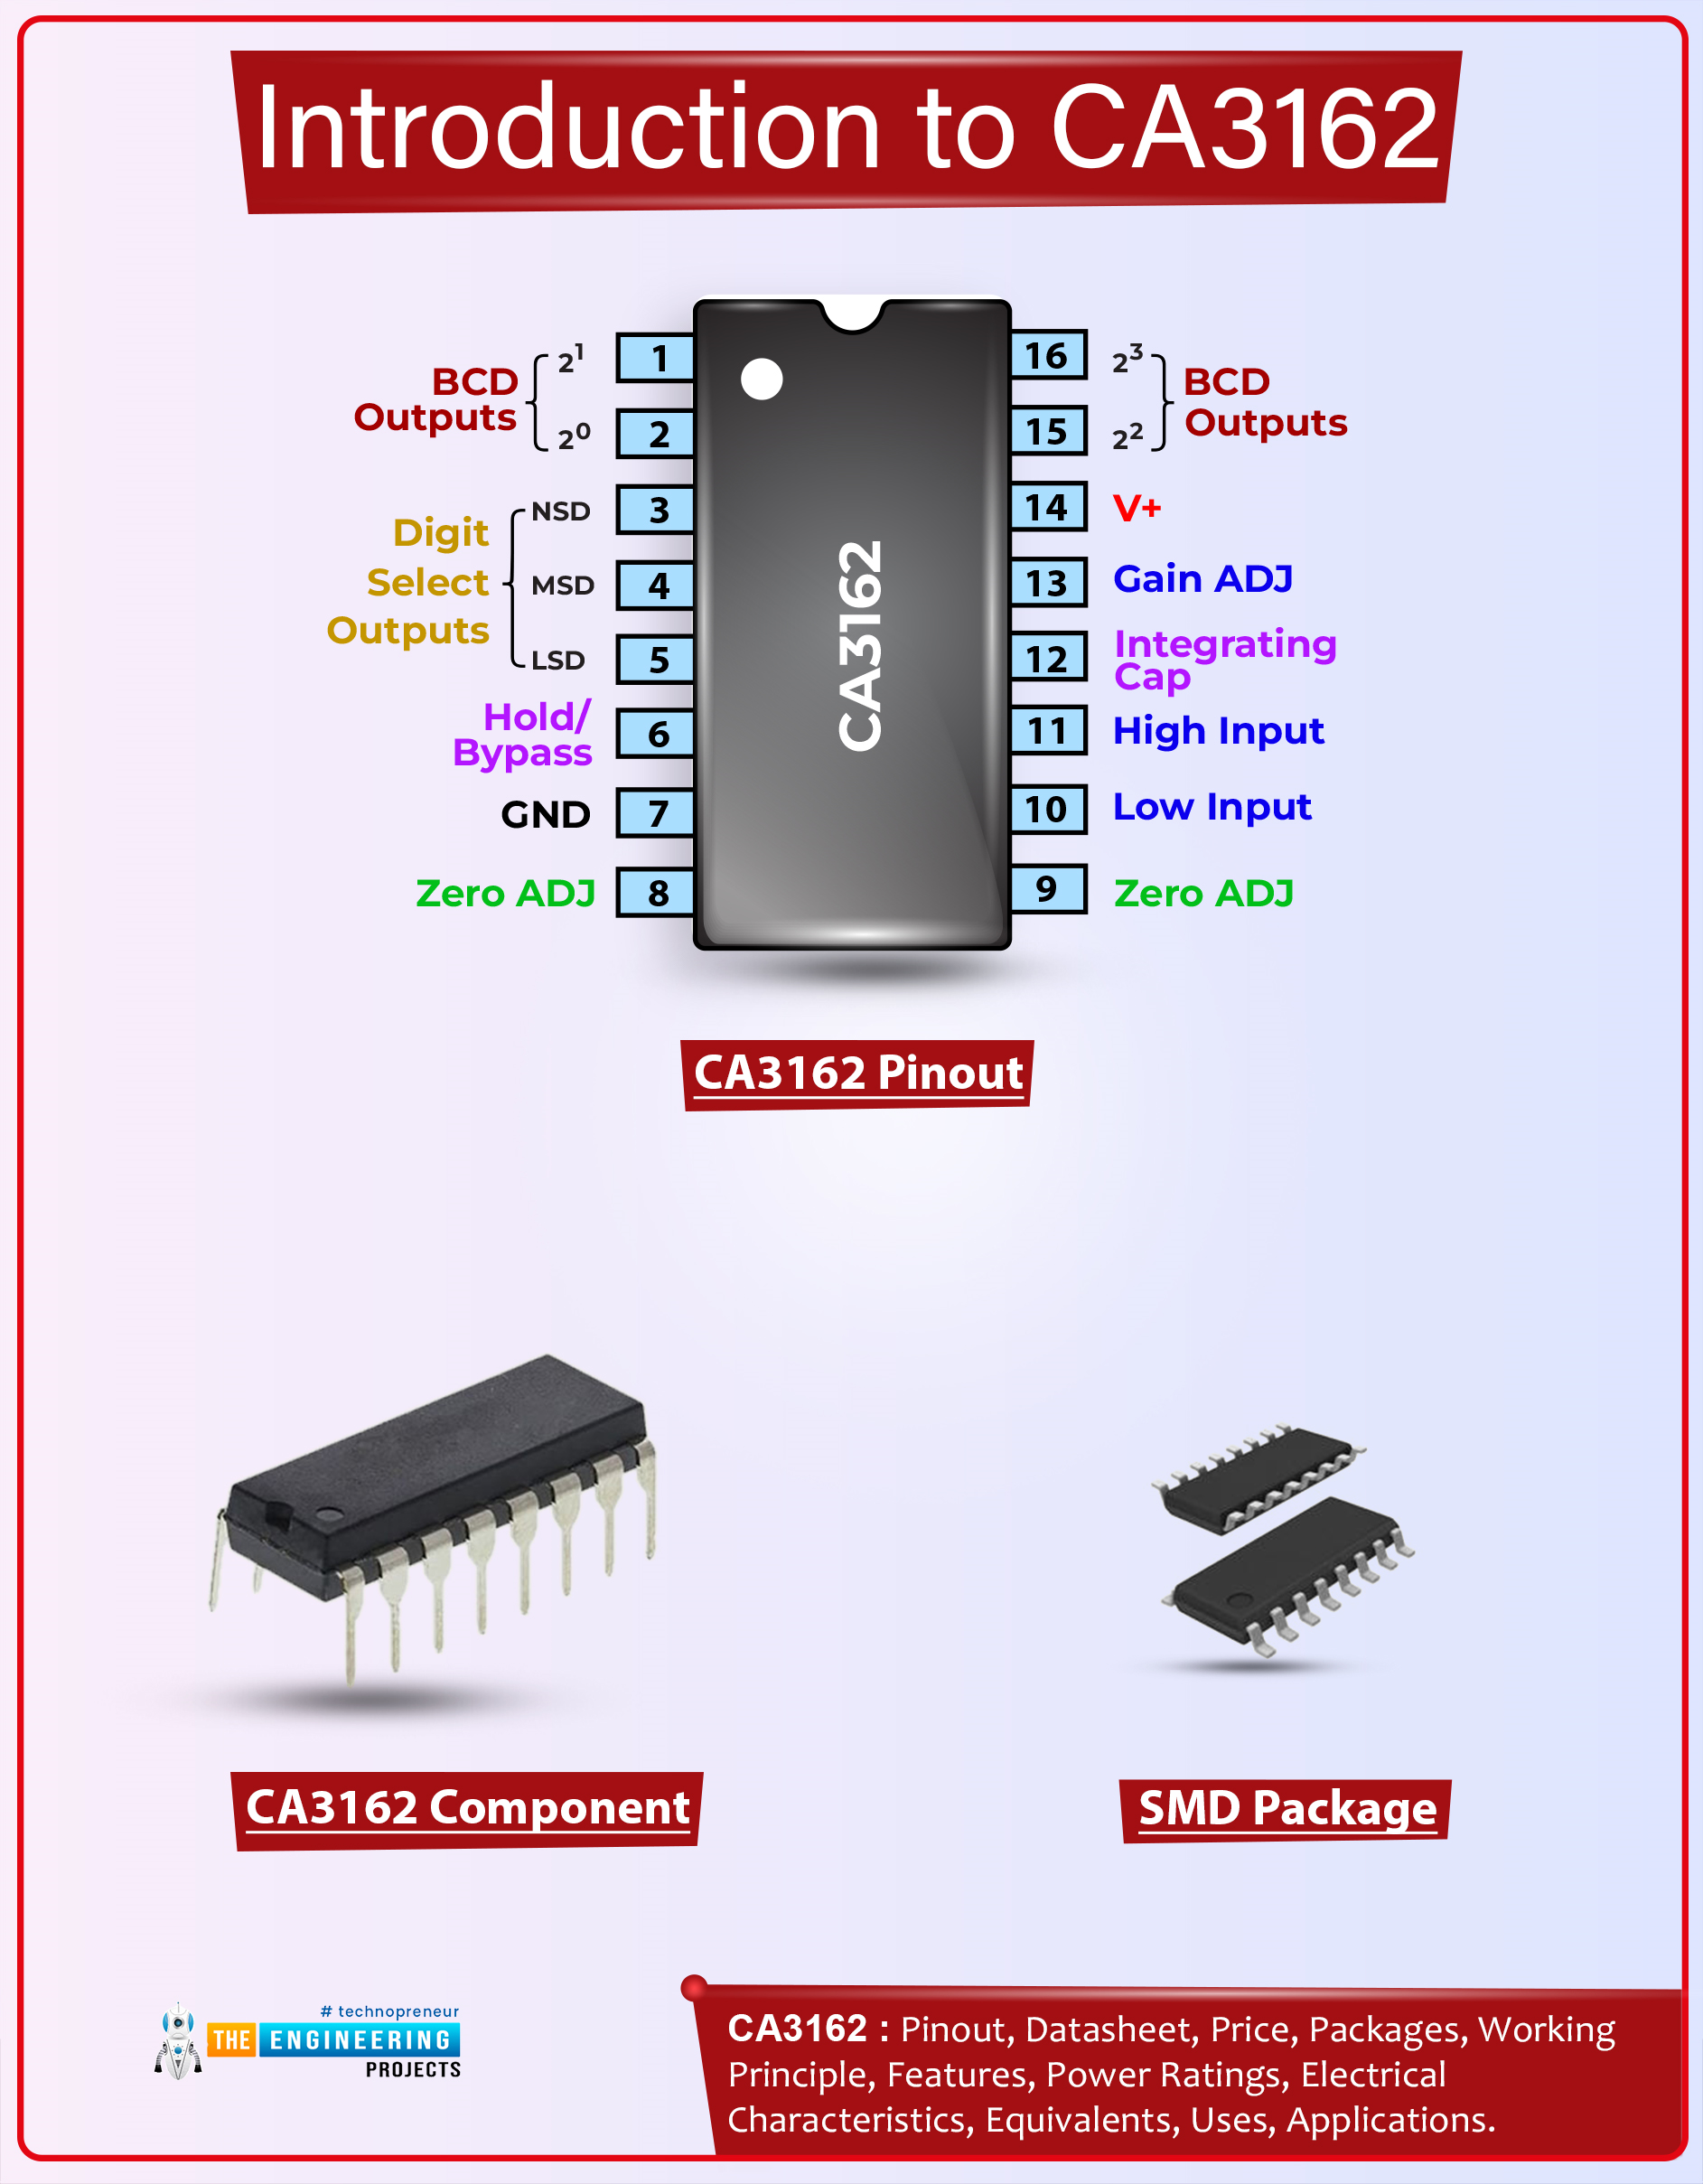
Hi Friends! I welcome you on board. Happy to see you around. In this post today, I’ll detail the Introduction to CA3162.The CA3162 is a monolithic A/D converter, offering a 3-digit multiplexed BCD output. It comes with an ultra-stable internal band-gap voltage reference. With differential input, this device provides a choice of low-speed (4Hz) or high-speed (96Hz) conversion rate. It is a 16-pin device that provides dual slope A/D conversion.
I suggest you buckle up as I’ll walk you through the complete Introduction to CA3162 covering datasheet, pinout, features, and applications. Without further ado, let’s get started.
Introduction to CA3162
The CA3162 is a monolithic A/D converter that offers a 3-digit multiplexed BCD output. It is available with ultra-stable internal bandgap vo ...
Hello everyone, I hope you all are fine and having fun. Today's tutorial is the next episode in the series of basic Arduino tutorial for Beginners. In today's tutorial, we are gonna have a look at How to use digitalRead in Arduino. In the previous tutorial, we have seen How to use pinMode Arduino Command, which sets the Arduino Pin either as Input or Output. So, if you are using this pin as input then you have to read its status and that's where you need to use this digitalRead Arduino Command.
Other than Serial Pins in Arduino UNO, we also have 12 digital Pins. Serial Pins are also digital Pins so in total we have 14 digital Pins in Arduino UNO starting from 0 to 13. I am gonna explain them in detail in today's tutorial and we will also have a lo ...
Hi Guys! Hope you’re well today. I welcome you on board. In this post today, I’ll detail the complete Introduction to BD138.
BD138 is a PNP transistor that is incorporated in audio amplification and switching applications. It is composed of silicon material and comes in the TO-126 package. It contains three terminals, where small input current across one terminal is used to produce large output current across the remaining two terminals. The collector-base and collector-emitter voltages are 60V with emitter-base voltage 5V that illustrates the amount of voltage it requires to bias the transistor.
In this post I’ll walk you through the Introduction to BD138 detailing pinout, working, physical dimensions, applications, power ratings, and alternati ...
Hello friends, I hope you all are fine. In today's tutorial, I am going to share the Raspberry Pi Pico Library for Proteus. It's a dummy library, we have just designed the display. We can't add the Python Code to it, but we can make it work with Arduino code. A mixture of Arduino and Raspberry Pi, I have given it an unofficial name "Arduino Pi". It's better to have something than nothing. You can design circuit diagrams using this library and can also demonstrate your project in presentations by designing simulations.So, let's have a look at How to simulate Raspberry Pi Pico by adding this Proteus Library:
Raspberry Pi Pico Library for Proteus
First of all, we need to download the zip file of Proteus Library for Raspberry Pi Pico, by clicking the below button:Raspberry Pi Pico Library ...
Hello friends, I hope you all are doing well. In today's tutorial, I am going to share a new Proteus Library of Single Cell Battery. These single-cell batteries are not present in Proteus, so we have designed them, I hope you guys will find them helpful.
This Proteus library has 5 Single Cell Batteries in it, we have designed the most common ones. Four of these batteries provide 3.7V, while one provides 12V. First, let's have a look at
What is a Single Cell Battery???
Single Cell Batteries are available in different voltage ranges and normally provide 3.7 volts.
Single Cell Battery is used in small electronic projects i.e. toys, clocks, alarms, calculators etc.
Few Single Cell Batteries are shown in the below figure, which we have simulated ...
Hi Fellas! I hope you’re well today. Happy to see you around. In this post today, I’ll walk you through the Introduction to IRF840.The IRF840 is an n-channel power MOSFET. It is a fast switching and high voltage device that is available with low on-state resistance. As this is an n-channel MOSFET here conduction process is exercised by the movements of the electrons. In other words, though conduction is carried out by both the movement of holes and electrons, electrons are major carriers in this case.
I suggest you read this entire post till the end as I’ll discuss the complete Introduction to IRF840 covering datasheet, pinout, features, equivalent, and applications. Let’s jump right in.
Introduction to IRF840
The IRF840 is an n-channel power MOSFET that supports loads up to 8A an ...
Hello friends, hope you all are fine and having fun with your lives. Today, I am going to share on How to measure Frequency using Arduino board. Its quite a simple tutorial but is an essential one especially when you are working on some power related project. Because in Power projects, you have to measure the frequency of AC voltages. I was working on a project in which I have to do dimming of AC Lamp so in that project I have to measure the frequency of AC signal.
I have designed this project using Arduino UNO and have simulated in the Proteus software, which you all know is my favorite simulating software. :) The code is also quite simple which I have given below for download. The simulation is also included in download package but again I sugge ...