Hi Guys! Hope you’re well today. I welcome you on board. Happy to see you around. In this post today, I’ll detail the Introduction to Arduino Sensor Shield.
Arduino Sensor Shield is a board compatible with the Arduino Boards and comes with the standard header layout. It is used to connect sensors, servos, LCD with the Arduino board without soldering. This board is connected with the Arduino Board using the jumper wires.
I suggest you read this post all the way through as I’ll be discussing the complete Introduction to Arduino Sensor Shield.
Let’s get started.
Introduction to Arduino Sensor Shield
Arduino Sensor Shield is a board used to connect sensors, servos, LCD with the Arduino Board without the requirement of soldering.
Using Arduino ...
Hello friends, I hope you all are fine and having fun with your lives. In today's post we are gonna see Interfacing of EasyVR with Arduino UNO. In the previous post, we have seen Getting Started with EasyVR Commander. It was quite simple and if you follow the steps carefully you wont stuck anywhere but still if you into some trouble i am here.
Now this tutorial is quite a quick and important one as it contains the real code using which we will control our robot. After adding the voice commands, now close the EasyVR Commander and open the Arduino Software. Connect the arduino board with computer and double check that your jumper J12 in on position SW. You should also read Training Error: Recognition Failed in EasyVR, if you got such error while ...
Hello friends, I hope you all are doing great. In today's tutorial, we are gonna have a look at detailed Introduction to TIP32. The TIP32 is a silicon Epitaxial base PNP transistor it exists in a TO-220 malleable casing. It is proposed for use in less power consuming rectilinear and swapping submissions. Its quality is that it exists in three different collector and emitter ratings. Its corresponding NPN transistor is TIP31.
This is a communal transistor it used in diverse engineering projects. It created for minimum time consuming swapping submissions. In today’s post, we will have a look at its fortification, smashup, dissimilarity, claims, etc. I will also share some links where I have connected it with other microcontrollers. You can also get ...
Update: I have updated the code and removed the bug. Thanks for informing. Now this code will work perfectly.
Buy This Project
Hello friends, hope you all are fine and having good health. Today, as the name suggests, I am gonna post on how to Receive SMS with AT Commands using Sim900 and Arduino. I have already posted a tutorial on How to Send SMS with Arduino UNO and Sim900, so now we are gonna check the opposite. Sending SMS is quite easy, you just need to write some AT commands and write the message you wanna send and hit the Cntrl + Z and it will be sent. But receiving a text message on your SIM900 shield is a bit difficult because now you need to place a check when user will send a message. So, ideally whenever anyone send a message to yo ...
Hello readers, I hope you all are doing well. Welcome to the Section 2 (ESP32 Features) of the ESP32 Programming Series. ESP32 is equipped with numerous built-in features and in each chapter of this Section 2, we will explore one of these ESP32 features in detail.
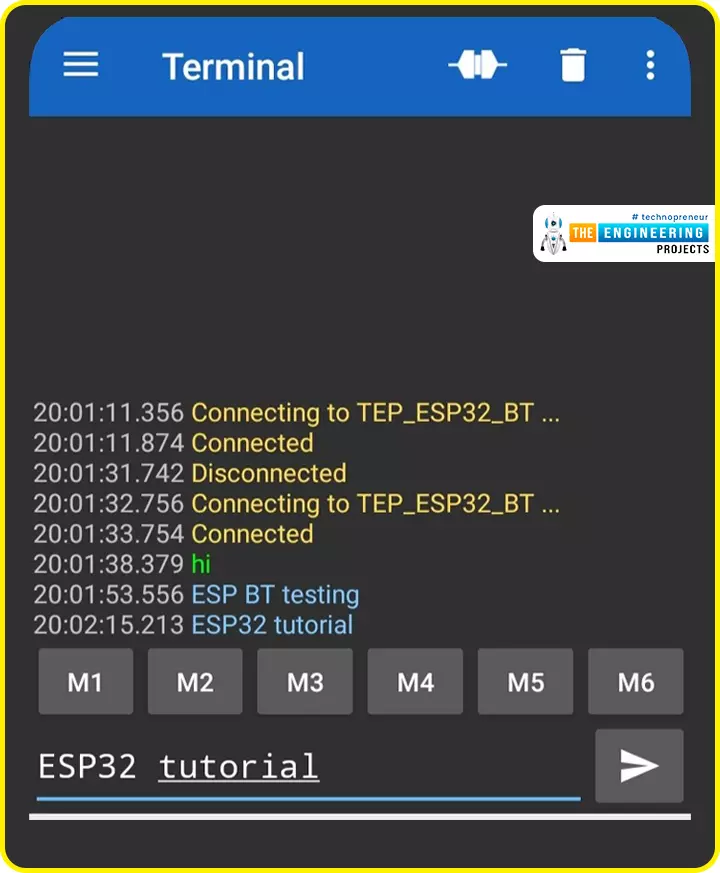
In the previous Section(Section 1: ESP32 IDEs), we installed different software IDEs to program ESP32 boards. Among these IDEs, we are going to use Arduino IDE for programming ESP32. So, I hope all of your tools are configured properly and you are ready to explore the built-in features of ESP32.Today's the 1st Chapter of Section 2, and here we will discuss How to communicate with ESP32 Bluetooth Classic from a smartphone using Arduino IDE.
Here's the video tutorial for ESP32 Bluetooth Classic:
ESP32 Wireless Features ...
Thank you for being here for today's tutorial of our in-depth Raspberry Pi programming tutorial. The previous tutorial taught us how to install a PIR sensor on a Raspberry Pi 4 to create a motion detector. However, this tutorial will teach you how to connect a single seven-segment display to a Raspberry Pi 4. In the following sections, we will show you how to connect a Raspberry Pi to a 4-digit Seven-Segment Display Module so that the time can be shown on it.
Seven-segment displays are a simple type of Display that use eight light-emitting diodes to show off decimal numbers. It's common to find it in gadgets like digital clocks, calculators, and electronic meters that show numbers. Raspberry Pi, built around an ARM chip, is widely acknowledged as ...
Hey Everyone! We welcome you on board. We feel happy when you keep visiting us for useful information pertaining to your needs and expectations. Today, I am going to discuss the details on the Introduction to BC107. It is a low power NPN bipolar junction transistor which is mainly used for general purpose switching and amplification purpose. I'll discuss each and everything related to this transistor so you can get clear idea what is this about and what are its main applications? Let's dive in and explore its properties one by one.
Introduction to BC107
BC107 is an NPN bipolar planner low power transistor which is mainly designed for general purpose switching and amplification purpose.
It is mainly composed of three terminals named as an em ...
Hello friends, I hope you all are doing great. In today's tutorial, we are gonna have a look at detailed Introduction to HC-06. HC-06 is a class 2 slave Bluetooth module designed for serial communication. Once it is paired to a master Bluetooth device such as PC, smartphones, and tablet, its operations become easier to the user. It sends and receives data in a bidirectional manner.
HC-06 is used in different devices which works on Bluetooth for sending and receiving data. In today's post, we will have look at its pinout, working, circuit diagram, protocol, etc. I will also share some links of projects where I have interfaced it with Arduino and some other microcontroller. Friends if you have any questions please ask in comments I will try my bes ...
Hello friends, I hope you all are doing great. In today's tutorial, I am going to show you How to use Arduino PWM Pins. It's the next tutorial in our new Arduino Tutorial for Beginners series. We will design a small code in which we will be controlling a dc motor's speed using the Arduino PWM Pins but before going into the details, let me first give you an introduction to Arduino PWM Pins because without understanding the PWM, which is the abbreviation of Pulse Width Modulation, you won't be able to understand How to use Arduino PWM Pins. In our previous tutorial, we have seen How to use analogWrite in Arduino and I have told you in that tutorial that we use this command for PWM as well. So, today we will have a look at How to do that.
PWM is an a ...
Hello everyone! I hope you all will be absolutely fine and having fun. Today, I am going to share my knowledge about Introduction to LM339. LM339 belongs to the family of devices having 4 independent voltage comparators. Each comparator is designed in such a way that it is capable of operating from a single power source over a wide range of power supplies. It can also operate for split power supplies. There is a unique characteristic of comparators, Input Common-Mode Voltage Range (ICMR) includes a ground even when it is operating from a single power supply voltage.
Basically, LM339 is a comparator IC having four built-in comparators. The basic purpose of a comparator is to rotate the signal between analog and digital domains. At its input termina ...