Instagram has become one of the most popular social media platforms, with over a billion active users worldwide. This popularity has led to businesses and individuals using Instagram as a marketing tool to reach their target audience. However, gaining a substantial following on Instagram can take time and effort, especially for newcomers or those looking for rapid growth.
Many people turn to buying Instagram followers to speed up the process of gaining followers. To meet this demand, numerous platforms offer the option to buy Instagram followers. But with so many options available, it can take time to determine which platform is trustworthy and reliable. Here we will explore the top four platforms you can trust to buy Instagram followers, providing you with the essential information you ...
Would you like to know how to host a hybrid networking event from A to Z? Buckle up because you are in for a sweet treat! Today, we will reveal everything, from greasing technical nuts and bolts to achieve better profit margins.
The idea of this article is to give you a bird's-eye view of the whole process. Of course, you will have to pick and choose some extra steps. But by the end of this brief guide, you will feel confident and able to plan your hybrid event.
Before explaining the practical steps, let's define the term hybrid networking event.
What Is A Hybrid Networking Event?
A hybrid networking event is a networking event that integrates multimedia tools for reaching another audience.
Unlike traditional networking events, a hybrid one enter ...
Hello friends, I hope you all are doing great. In today's tutorial, I am going to share a new Solar Panel Library for Proteus. I hope you guys are gonna enjoy this Proteus Library as it's not available in Proteus and we are presenting it for the first time. :) I am quite proud of my team. B|
We all know about Solar Panels which is an excellent renewable energy source. It is widely adopted by the inhabitants of this green planet as its totally free and converts solar energy into electricity. Solar panels are also used a lot in Engineering Projects especially related to renewable energy sources. Proteus doesn't have solar panels in its database that's why our team has designed this library. Using this Solar Panel Library for Proteus, now you can eas ...
Hello friends, I hope you all are fine and having fun with your lives. Today, I am going to share a very basic and introductory tutorial named How to use Arduino Serial Read. I am sharing this tutorial because I am getting a lot of emails in which users normally ask about basic Arduino tutorials as they are very new to them. So, I thought of sharing this very basic Arduino tutorial in which we are going to have a look at how we can use the Arduino Serial Read command.
I selected this tutorial as my first tutorial in this list of Arduino basic tutorials because learning to use Serial port is very necessary as it's one of the best troubleshooting tools for your code. I have also given a Proteus Simulation in which I have received the incoming data f ...
Hello friends, today we are gonna have a look on how to interface Seven Segment with Arduino in Proteus. In my last post, I have posted an Arduino Library for Seven Segment Display, which is designed by our team and is quite basic in functionality. So, if you haven't checked that post then first of all check that one and download the Arduino Library for Seven Segment Display as I am gonna use that library in today's post. Moreover, in order to run this library you are also gonna need to download Arduino Library for Proteus, using this library you will be able to use Arduino board in Proteus so also read that post and download this library and install it in your Proteus.
Again I am mentioning that its the first library designed by our team so its i ...
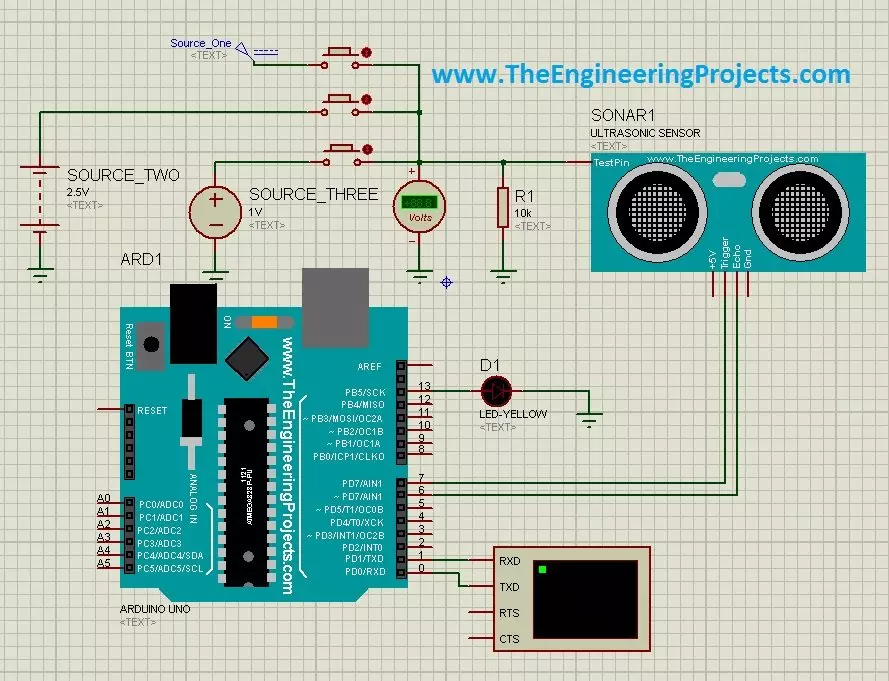
Hello friends, a few days ago I posted an Ultrasonic Sensor Library for Proteus, using which one can easily simulate ultrasonic sensor in Proteus. The post was highly praised by the reader and I have received quite good feedback from the followers. So, I thought of sharing some more examples related to it so that users can get a complete understanding of how to use Ultrasonic sensors in Proteus. Today, we are gonna have a look on different Ultrasonic Sensor Simulation in Proteus. If you haven't read the previous post then first have a look at it because without the installation of Ultrasonic Sensor Library in Proteus, you won't be able to use these examples. Ultrasonic Sensor is used widely in Embedded Systems.Today, I am gonna share three examples of Ultrasonic Sensor Simulation in Proteu ...
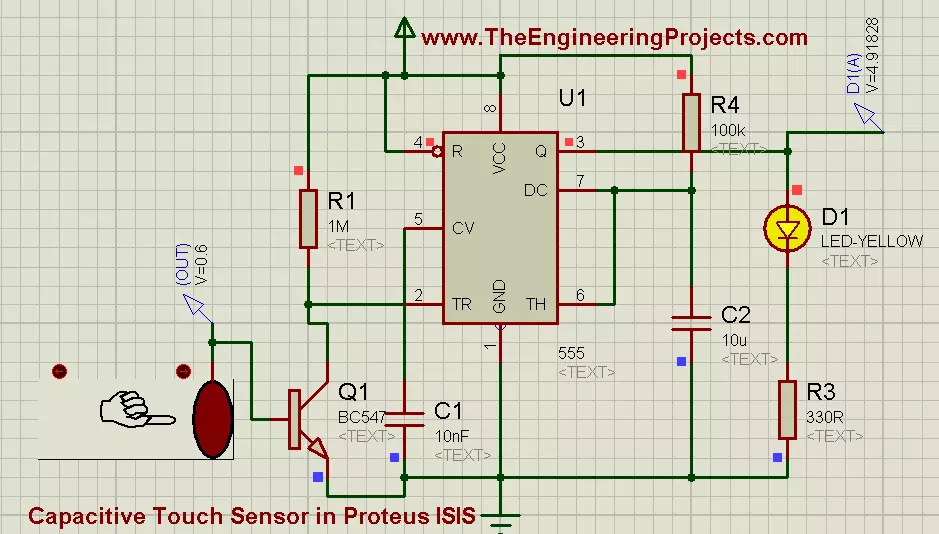
Hello friends, I hope you all are fine and enjoying. Today i am going to share my new project's tutorial which is How to use Capacitive Touch Sensor in Proteus ISIS. It is a very interesting project, and we will be using a 555 Timer while designing this project. If you recall our previous project tutorial which was Angle Control of Servo Motor using 555 Timer in Proteus ISIS, in which 555 timer was generating PWM and was controlling the rotating angle of servo motor.
Now in this project, we have a little different context and now we will be using a 555 Timer in collaboration with Capacitive Touch Sensor. First of all, lets have a little introduction of Capacitive Touch Sensor. Well, if we talk broadly then, in Electrical Engineering Capacitive Tou ...
Hello friends, I hope you all are doing great. In today's tutorial, I am going to do an Arduino 74HC165 Interfacing and we will have a look at How to increase Input Pins of Arduino. 74HC165 is a shift register and works on the principal of Parallel In Serial Out. In my previous tutorial Arduino 74HC595 Interfacing: Increase Output Pins, we have seen How to increase the output pins of Arduino and today we are gonna do exact the opposite and we will increase the input pins.
74HC165 will take 8 parallel inputs from different sensors or buttons etc and will send them to serial OUT Pin, which will be connected to Arduino. So, if you are working on a project where you want to get data of 15 or 20 digital sensors then you can use this shift register and ...
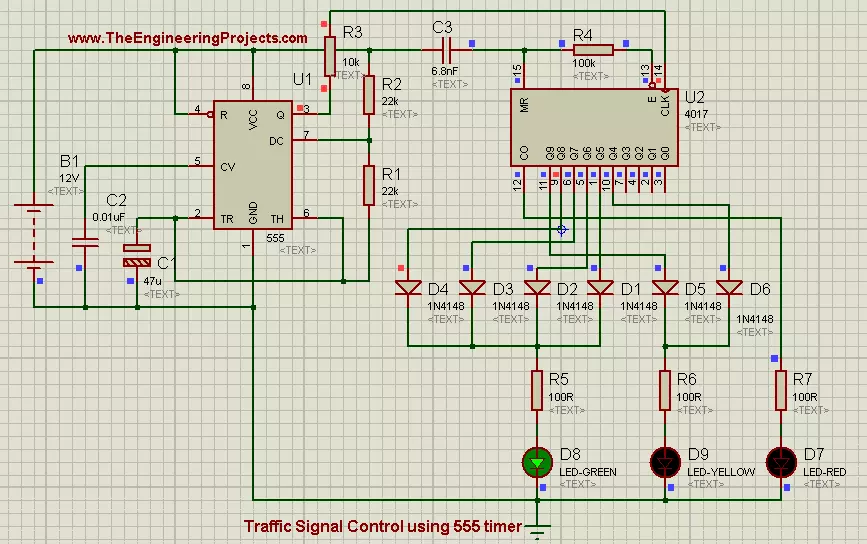
Hello Friends, i hope you all are fine and enjoying. Now i am going to share my new project tutorial which is Traffic Signal Control using 555 Timer. Up till now i have uploaded a no. of projects using 555 timer and i have got much appreciation from my friends, for some 555 timer based projects like How to use Capacitive Touch Sensor in Proteus ISIS, Sequential LED Blinking using 555 Timer and many more.
Now i am going to share another application of 555 Timer and here we will be using a shift register (4017) next to 555 timer to implement Traffic Signal Control circuit. 4017 is a SERIAL IN PARALLEL OUT shift register. Data enters in a serial manner into register and it leaves the register in parallel manner. 4017 is a 10-bit shift register and it ...
Hello friends, I hope you all are fine and having fun with your lives. Today, I am going to share a complete Arduino Tutorial for Beginners because I was having a lot of requests about it. Reader were asking the same question that they are new to Arduino and how should they start so if you are beginner to Arduino and you don't have any idea How to learn it then you should read the below tutorials.
I have posted all the basic Arduino Tutorial for Beginners already so in today's tutorial I am just gonna arrange them and must ask you to read them one by one from top to bottom and at then end you will really be able to design any kind of project on Arduino. So, let's get started with Arduino Tutorial for Beginners:
Arduino Tutorial for Beginners
Befor ...